height ISUZU TROOPER 1995 Owner's Guide
[x] Cancel search | Manufacturer: ISUZU, Model Year: 1995, Model line: TROOPER, Model: ISUZU TROOPER 1995Pages: 1928
Page 1181 of 1928
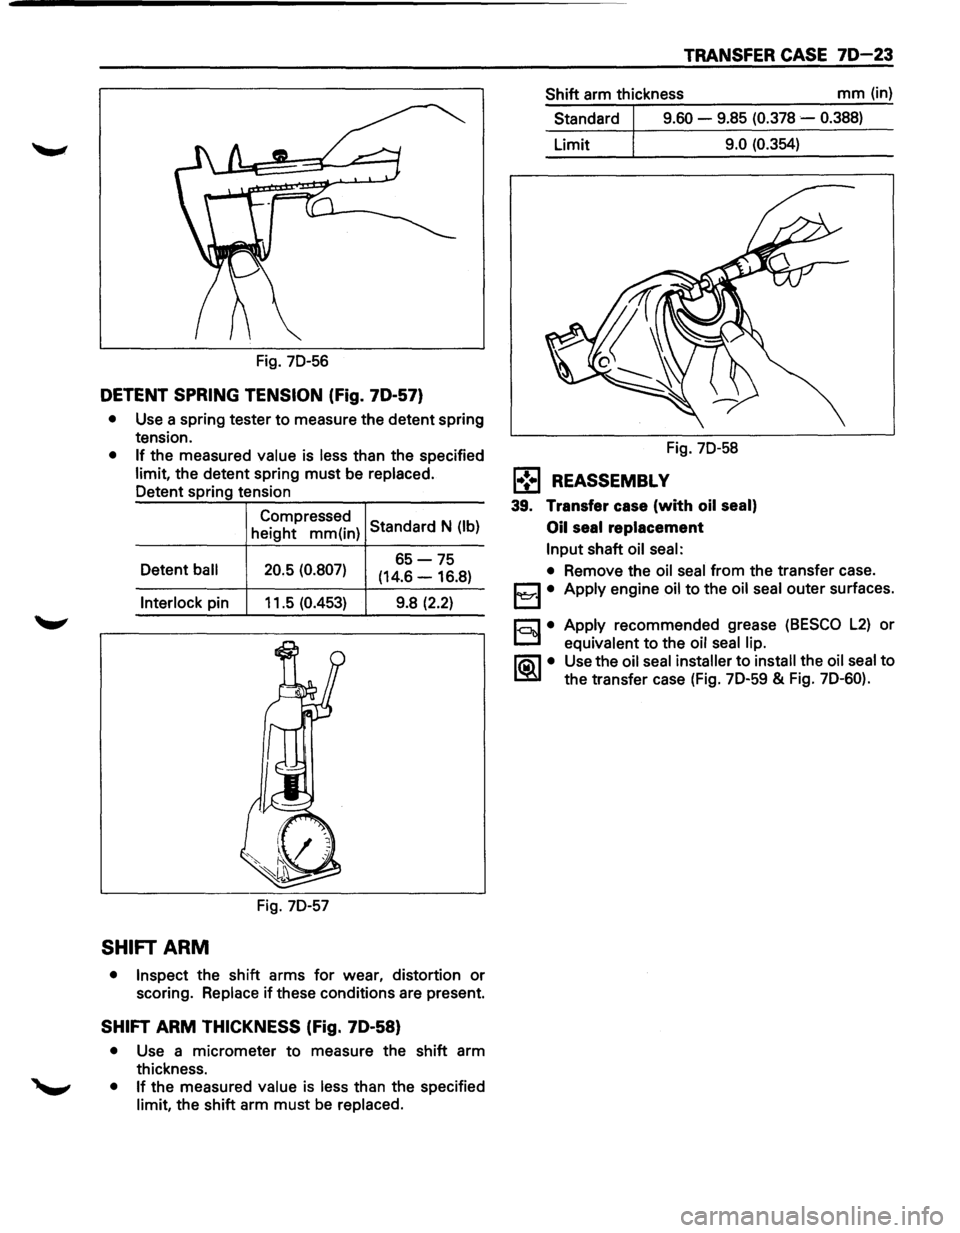
Fig. 7D-56
DETENT SPRING TENSION (Fig. 70-57)
• Use a spring tester to measure the detent spring
tension.
• If the measured value is less than the specified
limit, the detent spring must be replaced.
Detent spring tension
Compressed Standard N (lb)
height mm(in)
Detent
ball 20.5 (0.807) 65-75
(14.6 -16.8)
Interlock pin 11.5 (0.453) 9.8 (2.2)
Fig. 7D-57
SHIFT ARM
•
Inspect the shift arms for wear, distortion or
scoring. Replace
if these conditions are present.
SHIFT ARM THICKNESS (Fig. 70-58)
• Use a micrometer to measure the shift arm
thickness.
• If the measured value is less than the specified
limit, the shift arm must be replaced.
TRANSFER CASE 70-23
Shift arm thickness mm (in)
Standard
9.60 - 9.85 (0.378 -0.388)
Limit 9.0 (0.354)
Fig. 7D-58
l•!•l REASSEMBL V
39. Transfer case (with oil seal)
Oil
seal replacement
Input shaft oil seal:
• Remove the oil seal from the transfer case.
j3 • Apply engine oil to the oil seal outer surfaces.
r.:;::'l • Apply recommended grease (BESCO L2) or
D equivalent to the oil seal lip.
li:\1 • Use the oil seal installer to install the oil seal to
~ the transfer case (Fig. 7D-59 & Fig. 7D-60).
Page 1637 of 1928
Supplemental Restraint System 9J-13
ON-VEHICLE SERVICE
SERVICE PRECAUTIONS
WARNING: WHEN PERFORMING SERVICE ON OR
AROUND SRS COMPONENTS OR SRS WIRING,
FOLLOW
THE PROCEDURES LISTED BELOW TO
TEMPORARILY DISABLE THE SRS. FAILURE TO
FOLLOW PROCEDURES COULD RESULT IN
POSSIBLE AIR
BAG DEPLOYMENT, PERSONAL
INJURY OR OTHERWISE
UNNEEDED SRS
REPAIRS.
The DERM in Driver-Passenger SRS can maintain
sufficient voltage to cause a deployment for up to 2
minutes after the ignition switch is turned
"OFF," the
battery is disconnected, or the fuse powering the DERM
is removed.
Many of the service procedures require removal of the
"AIR BAG" fuse, and disconnection of the inflator
modules from the deployment loop to avoid an accidental
deployment.
If the inflator module is disconnected from
the deployment loop as noted in the "Disabling the
SRS"
procedure that follows, service can begin immediately
without waiting for the 2-minute time period to expire.
DISABLING THE SRS
REMOVAL
Turn the ignition switch to "OFF"
1. Remove SRS fuse C-21, C-22, C-23 and C-24 from
left dash side lower fuse block.
2. Disconnect yellow 3-way connector at the base of
steering column.
3. Remove 1/P compartment door assembly, Refer to
"Passenger inflator module replacement" in section
9J-132.
4. Disconnect yellow 4-way connector behind the 1/P
compartment door assembly.
IMPORTANT
• With the "AIR BAG" fuse removed and ignition switch
"ON," if Fuse 21 left. the "AIR BAG" warning lamp will
be "ON." This is normal operation and does not
indicate an
SRS malfunction.
ENABLING THE SRS
INSTALLATION
Turn ignition switch to "LOCK" and remove key.
1. Connect yellow 4-way connector for passenger
inflator module.
2. 1/P compartment door assembly, Refer to
"Passenger inflator module replacemenf' in section
9J-3.
3. Connect yellow 2-way connector at the base of the
steering column.
4. Install "AIR BAG" fuse C-21, C-22, C-23 and C-24 to
left dash side lower fuse block.
Turn ignition switch to
"RUN" and verify that the "AIR
BAG"
warning lamp flashes seven times and then turns
"OFP' If it does not operate as described, perform the
"SRS Diagnostic System Check" in section 9J-2.
HANDLING/INSTALLATION/DIAGNOSIS
1. Inflator modules should not be subjected to
temperatures above
65°C{150°F).
2. Discriminating sensors, inflator modules, arming
sensors, or DERMs should not be used if they have
been dropped from a height
of 91.4 centimeters
{3feet).
3. When a discriminating sensor or arming sensor is
replaced, it must be oriented with the arrow on the
sensor pointing toward the front of the vehicle.
It is
very important for the discriminating sensors and
arming sensor to be located flat on the mounting
surface, parallel to the vehicle datum line.
It is
important that the sensor mounting surface is free of
any dirt or other foreign material.
4. Do not apply power to the SRS unless all
components are connected or a diagnostic chart
requests it, as this
will set a diagnostic trouble code.
5. The "SRS Diagnostic System Check" must be the
starting point of any
SRS diagnostics. The "SRS
Diagnostic System Check" will verify proper "AIR
BAG"
warning lamp operation and will lead you to the
correct chart to diagnose any
SRS malfunctions.
Bypassing these procedures may result
in extended
diagnostic time, incorrect diagnosis, and incorrect
parts replacements.
Page 1741 of 1928
Supplemental Restraint System 9J-117
SERVICE PRECAUTIONS
CAUTION: WHEN PERFORMING SERVICE ON OR
AROUND SRS COMPONENTS OR SRS WIRING,
FOLLOW
THE PROCEDURES LISTED BELOW TO
TEMPORARILY
DISABLE THE SRS. FAILURE TO
FOLLOW PROCEDURES COULD RESULT IN
POSSIBLE AIR BAG DEPLOYMENT, PERSONAL
INJURY OR OTHERWISE UNNEEDED SRS
REPAIRS.
The DERM in Driver-Passenger SRS can maintain
sufficient voltage to cause a deployment for up to 2
minutes after the ignition switch is turned to
"OFF," the
battery is disconnected, or the fuse powering the DERM
is removed.
Many of the service procedures require removal of the
"AIR BAG" fuse, and disconnection of the inflator
modules from the deployment loop to avoid an accidental
deployment.
If the inflator module is disconnected from
the deployment loop as noted in the "Disabling the
SRS"
procedure that follows, service can begin immediately
without waiting for the 2 minute time period to expire.
DISABLING THE SRS
REMOVAL
• Turn the steering wheel so that the vehicle's wheels
are pointing straight ahead.
• Turn the ignition switch to "OFF"
1. Remove SRS fuse C-21, C-22, C-23 and C-24 from
left dash side lower fuse block.
2. Disconnect yellow
3-way connector at the base of
the steering column.
3. Remove
liP compartment door assembly, Refer to
"Passenger inflator module replacemenf' in section
9J-135.
4. Disconnect yellow 4-way connector behind the liP
compartment door assembly.
NOTE
• With the" AIR BAG" fuse removed and ignition switch
"ON," the "AiR BAG" warning lamp will be "ON." This
is normal operation and does not indicate
an SRS
malfunction.
ENABLING THE SRS
INSTALLATION
Turn ignition switch to "LOCK" and remove key.
1. Connect yellow 4-way connector of passenger
inflator module.
2. Install liP compartment door assembly, Refer to
"Passenger inflator module replacement" in section
9J-3.
3. Connect yellow 3-way connector at the base of the
steering column.
4. Install" AIR BAG" fuse C-21, C-22, C-23 and C-24 to
left dash side lower fuse block.
Tum ignition switch to
"RUN" and verify that the "AIR
BAG"
warning lamp flashes seven times and then turns
"OFF" If it does not operate as described, perform the
"SRS Diagnostic System Check" in section 9J-32.
HANDLING/INSTALLATION/DIAGNOSIS
1. Inflator modules should not be subjected to
temperatures above 65°C(150°F).
2. Discriminating s~nsors, inflator modules, arming
sensors, or DERMs should not be used if they have
been dropped from a height of 1
00 centimeters (3.28
feet) or more.
3. When a discriminating sensor or arming sensor is
replaced, it MUST be oriented with the arrow
on the
sensor pointing toward the front of the vehicle.
It is
very important for the discriminating sensors and
arming sensor to be located flat on the mounting
surface, parallel to the vehicle datum line.
It is
important that the sensor mounting surface is free of
any dirt or other foreign material.
4. Do not apply power to the SRS unless all
components are connected or a diagnostic chart
requests it, as this
will set a diagnostic trouble code.
5. The
"SRS Diagnostic System Check'' must be the
starting point of any SRS diagnostics. The
"SRS
Diagnostic System Check" will verify proper "AIR
BAG" warning lamp operation and will lead you to the
correct chart to diagnose any SRS malfunctions.
Bypassing these procedures may result in extended
diagnostic time, incorrect diagnosis, and incorrect
parts replacements.
INSPECTIONS REQUIRED AFTER ACCI
DENT
CAUTION: CERTAIN SRS COMPONENTS MUST BE
REPLACED AFTER A FRONTAL
CRASH INVOLVING
AIR
BAG DEPLOYMENT.
In all types of accident regardless of "Air Bag"
deployment, visually inspect all the following
components and their points and replace as required:
- Passenger
Inflator Module
- Steering wheel
- SRS coil assembly
- Steering column
- Knee bolster and
Instrument panel mounting
Page 1846 of 1928
10-88 BODY
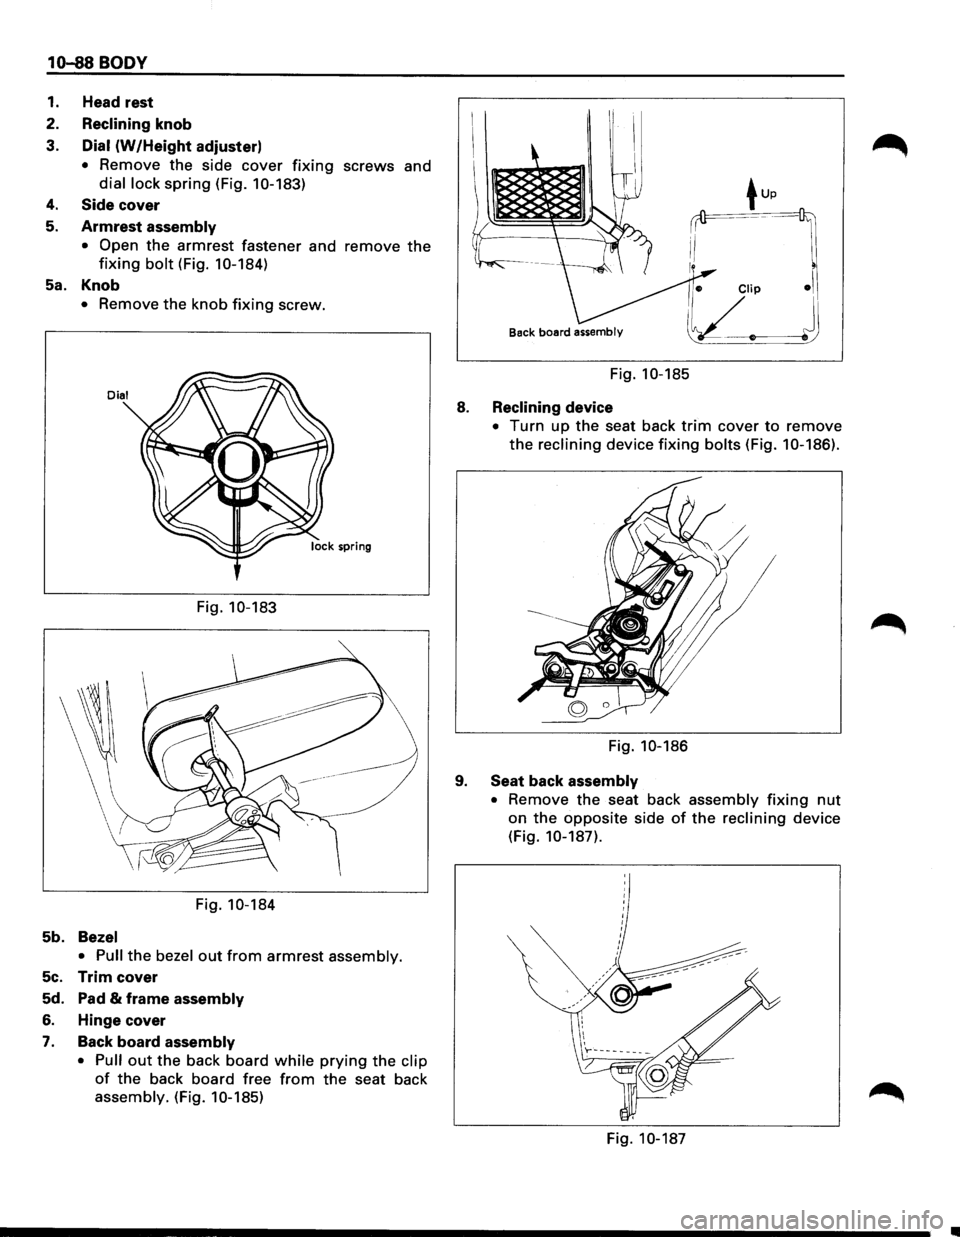
1. Head rest
2.
Reclining knob
3.
Dial (W/Height adjuster)
• Remove the side cover fixing screws and
dial lock spring (Fig. 10-183)
4. Side cover
5. Armrest assembly
• Open
the armrest fastener and remove the
fixing bolt (Fig. 10-184)
Sa. Knob
• Remove the knob fixing screw.
Dial
Fig. 10-183
Fig. 10-184
5b. Bezel
• Pull
the bezel out from armrest assembly.
5c. Trim cover
Sd. Pad & frame assembly
6. Hinge cover
7. Back board assembly
• Pull
out the back board while prying the clip
of the back board free from the seat back
assembly. (Fig. 10-185)
Back board assembly
Fig. 10-185
8. Reclining device
9.
• Turn up the seat back trim cover to remove
the reclining device fixing bolts (Fig. 10-186).
I I
Fig. 10-186
Seat back assembly
•
Remove the seat back assembly fixing nut
on the opposite side of the reclining device
(Fig.
10-187).
Fig. 10-187
Page 1847 of 1928
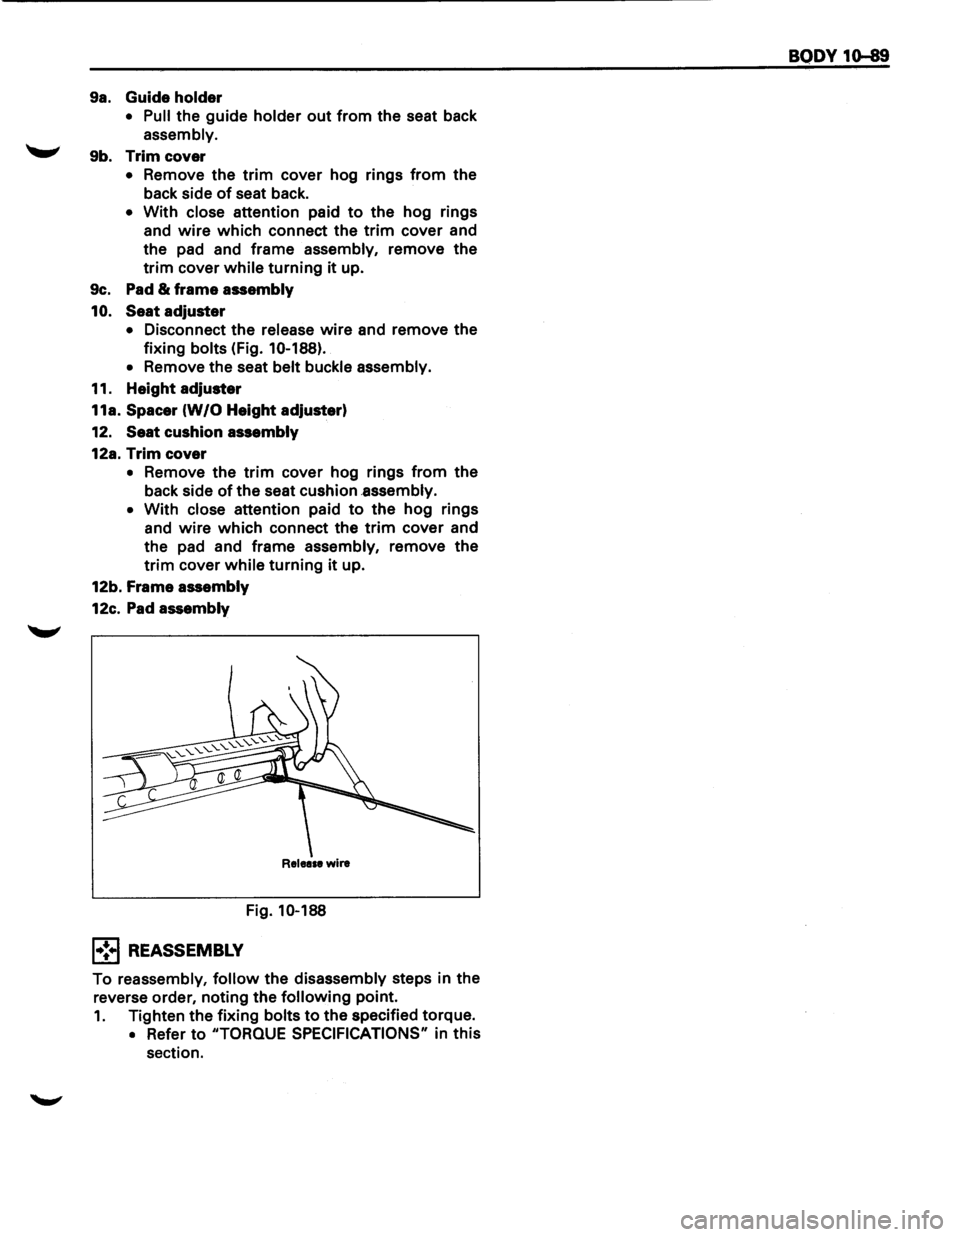
9a. Guide holder
• Pull the guide holder out from the seat back
assembly.
"-"' 9b. Trim cover
• Remove the trim cover hog rings from the
back side
of seat back.
• With close attention paid to the hog rings
and
wire which connect the trim cover and
the pad and frame assembly, remove the
trim cover while turning it up.
9c. Pad
& frame assembly
10. Seat adjuster
• Disconnect the release wire and remove the
fixing
bolts (Fig. 10-188).
•
Remove the seat belt buckle assembly.
11. Height adjuster
11a.
Spacer (W/0 Height adjuster)
12. Seat cushion assembly
12a.
Trim cover
• Remove the trim cover hog rings from the
back side
of the seat cushion .assembly.
• With close attention paid to the hog rings
and
wire which connect the trim cover and
the pad and frame assembly, remove the
trim cover while turning it up.
12b. Frame assembly
12c. Pad assembly
Release wire
Fig. 10-188
1•:.1 REASSEMBLY
To reassembly, follow the disassembly steps in the
reverse order, noting the
following point.
1. Tighten the fixing bolts to the specified torque.
• Refer to "TORQUE SPECIFICATIONS" in this
section.
BODY 1o-89
Page 1848 of 1928
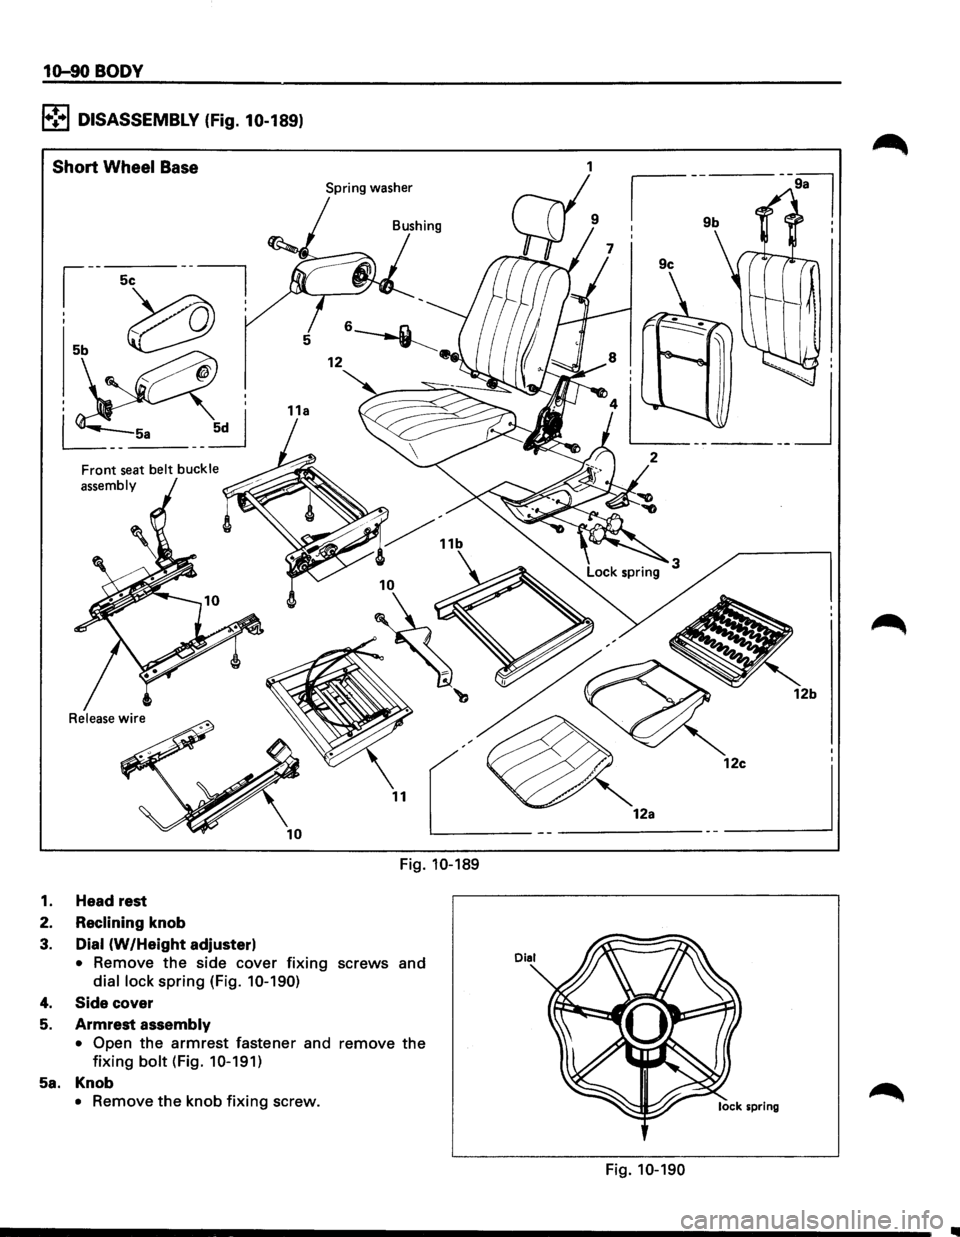
1o-90 BODY
l•!•l DISASSEMBLY (Fig. 10-189)
Short Wheel Base
Spring washer
Front seat belt buckle
assembly
Release
wire
Fig. 10-189
1. Head rest
2.
Reclining knob
3. Dial (W /Height adjuster)
• Remove the side cover fixing screws and
dial lock spring (Fig. 10-190)
4. Side cover
5. Armrest assembly
• Open the armrest fastener and remove the
fixing bolt (Fig. 10-191)
5a. Knob
• Remove the knob fixing screw.
I
________ 1_2a-------~
Fig. 10-190
Page 1850 of 1928
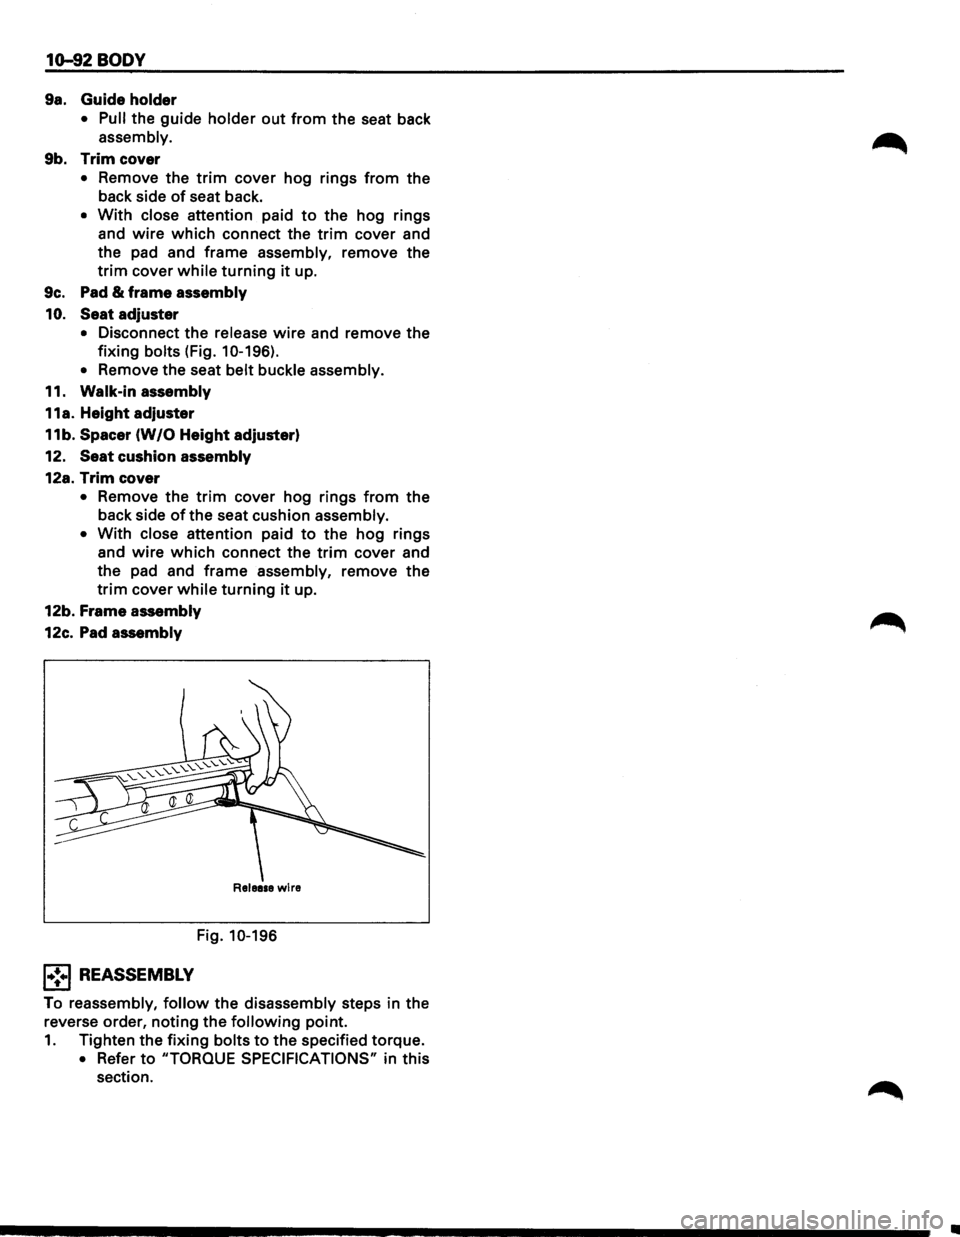
10-92 BODY
9a. Guide holder
• Pull the guide holder out from the seat back
assembly.
9b. Trim cover
• Remove the trim cover hog rings from the
back side
of seat back.
• With close attention paid to the hog rings
and
wire which connect the trim cover and
the pad and
frame assembly, remove the
trim cover while turning it up.
9c. Pad
& frame assembly
10.
Seat adjuster
• Disconnect the release wire and remove the
fixing bolts (Fig. 10-196).
•
Remove the seat belt buckle assembly.
11. Walk-in assembly
11a. Height adjuster
11 b. Spacer (W /0 Height adjuster)
12. Seat cushion
assembly
12a. Trim cover
• Remove the trim cover hog rings from the
back side
of the seat cushion assembly.
•
With close attention paid to the hog rings
and
wire which connect the trim cover and
the pad and
frame assembly, remove the
trim cover while turning it up.
12b. Frame
assembly
12c. Pad assembly
Release wire
Fig. 10-196
1•!+1 REASSEMBLY
To reassembly, follow the disassembly steps in the
reverse order,
noting the following point.
1. Tighten the fixing bolts to the specified torque.
• Refer to "TORQUE SPECIFICATIONS" in this
section.
•