stop start ISUZU TROOPER 1995 Owner's Guide
[x] Cancel search | Manufacturer: ISUZU, Model Year: 1995, Model line: TROOPER, Model: ISUZU TROOPER 1995Pages: 1928
Page 709 of 1928
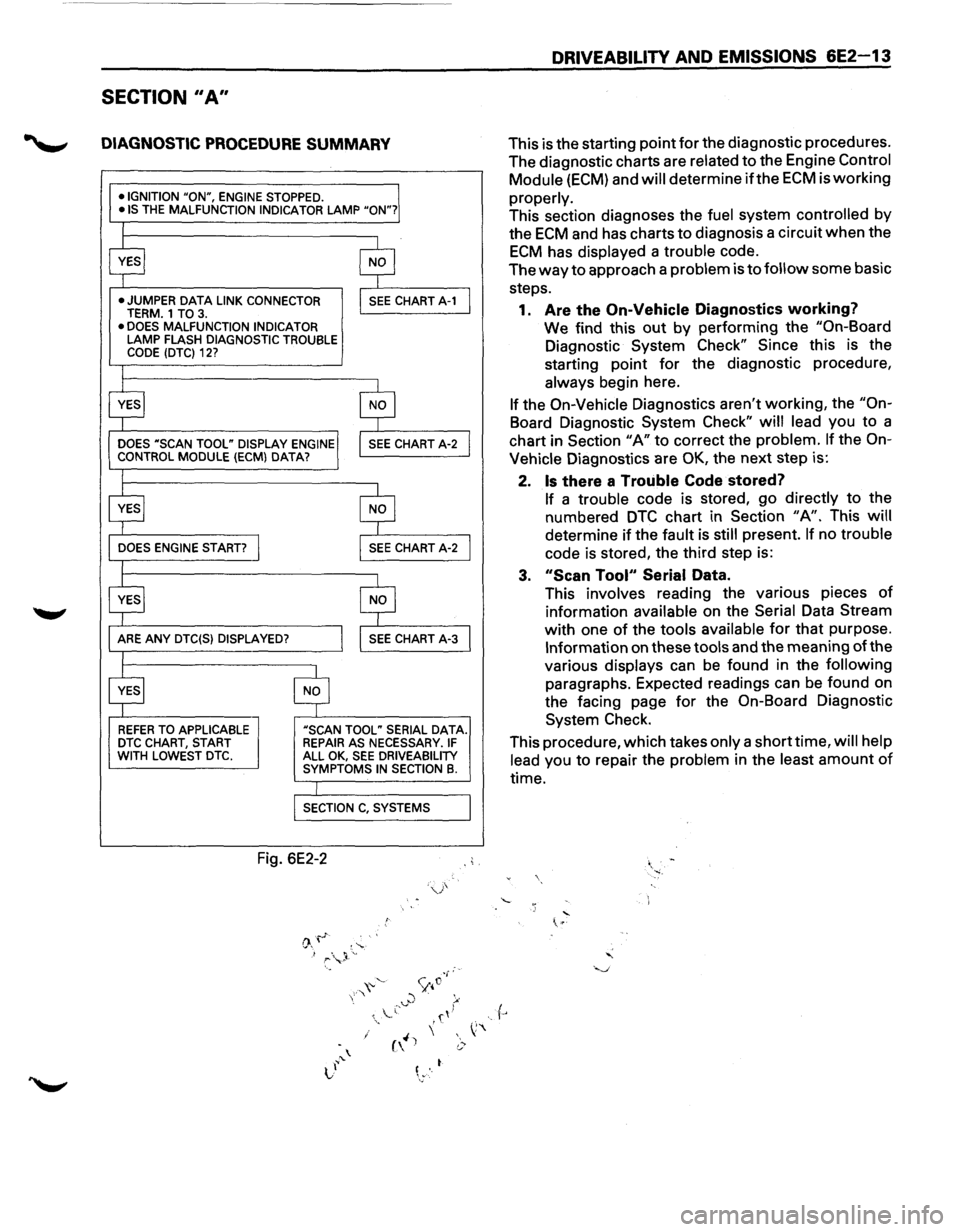
SECTION II A"
DIAGNOSTIC PROCEDURE SUMMARY
•IGNITION "ON", ENGINE STOPPED. •IS THE MALFUNCTION INDICATOR LAMP "ON"?
•
JUMPER DATA LINK CONNECTOR TERM. 1 TO 3. • DOES MALFUNCTION INDICATOR LAMP FLASH DIAGNOSTIC TROUBLE CODE (DTC) 12?
REFER TO APPLICABLE DTC CHART, START WITH LOWEST DTC.
"SCAN TOOL" SERIAL DATA. REPAIR AS NECESSARY. IF ALL OK, SEE DRIVEABILITY SYMPTOMS IN SECTION B.
Fig. 6E2-2
r
DRIVEABILITY AND EMISSIONS 6E2-13
This is the starting point for the diagnostic procedures.
The diagnostic charts are
related to the Engine Control
Module
(ECM) and will determine if the ECM is working
properly.
This section diagnoses the fuel system controlled by
the
ECM and has charts to diagnosis a circuit when the
ECM has displayed a trouble code.
The
way to approach a problem is to follow some basic
steps.
1.
Are the On-Vehicle Diagnostics working?
We find this out by performing the "On-Board
Diagnostic System Check" Since this is the
starting point
for the diagnostic procedure,
always
begin here.
If the On-Vehicle Diagnostics aren't working, the "On
Board Diagnostic System Check" will lead you to a
chart in Section
"A" to correct the problem. If the On
Vehicle
Diagnostics are OK, the next step is:
2.
Is there a Trouble Code stored?
If a trouble code is stored, go directly to the
numbered
DTC chart in Section "A". This will
determine if the fault is still present. If no trouble
code is stored, the third step is:
3. "Scan Tool" Serial Data.
This
involves reading the various pieces of
information available on the Serial Data Stream
with one of the tools available for that purpose.
Information on these tools and the meaning of the
various
displays can be found in the following
paragraphs. Expected readings can be found on
the facing page
for the On-Board Diagnostic
System Check.
This procedure, which takes
only a short time, will help
lead
you to repair the problem in the least amount of
time.
Page 711 of 1928
THROTTLE ANGLE
Displays in percent the amount the throttle is
open.
HEATED OXYGEN SENSOR (H02S)
The reading will be read out in millivolts (mv) with
a range from 1 to 999 mv. If the reading is
consistently
below 350 (350 mv), the fuel system
is running
lean as seen by the Engine Control
Module
(ECM) and if the reading is consistently
above
550 (550 mv), the system is running rich.
VEHICLE SPEED SENSOR (VSS)
Displays vehicle speed, useful in checking
speedometer accuracy.
PROGRAMMABLE READ ONLY MEMORY
(PROM)
ID
In this position the last4 digits of the Mem-Cal part
number will be displayed.
REVOLUTION PER MINUTE (RPM)
Displays engine speed. Often useful if extra
reference pulses are suspected. A sudden high
revolution per minute indication while at a steady
throttle
would indicate electrical interference
(EMI) in the reference circuit. This interference is
usually caused by ECM wires too close to ignition
secondary wires
or an open electronic ignition
ground circuit.
MILE PER HOUR (MPH)
Displays vehicle speed. Useful in checking
speedometer accuracy.
ENGINE COOLANT TEMPERATURE (ECT)
Displays engine temperature in degress centi
grade.
After engine is started the temperature
should rise steadily to about
85-95·c, then
stabilize
when the thermostat opens.
INTAKE AIR TEMPERATURE (IAT)
SENSOR
Displays temperature of the intake manifold air.
Should read close to ambient air temperature
when the engine is cold, and rise
as underhood
and engine temperature increases.
DRIVEABILITY AND EMISSIONS 6E2-15
MANIFOLD ABSOLUTE PRESSURE (MAP)
The Manifold Absolute Pressure (MAP) Sensor
produces a low signal voltage when MAP is low
(high vacuum) and a high voltage when the
pressure is high (low vacuum).
With the ignition on and the engine stopped, the
manifold absolute pressure is equal
to
atmospheric pressure and the signal voltage will
be high. This information is used by the ECM as an
indication of vehicle altitude and is referred to as
barometric pressure. Comparison of this
barometric pressure reading
with a known good
vehicle
with the same sensor is a good way to
check accuracy
of a "suspect" sensor. Readings
should be the same
±0.4 Volt.
MAP
Sensors have a colored plastic insert visible
in the connector cavity.
Sensors with the same
insert color are identical in calibration. The
harness electrical connector color should also be
the same
as the sensor insert color.
BAROMETRIC PRESSURE (BARO)
Displays the MAP reading before the engine was
started. This value
will vary depending on
Barometric Pressure and altitude.
EXHAUST GAS RECIRCULATION (EGR)
(ON/OFF)
The exhaust gas recirculation system uses a valve
controlled by vacuum to feed a small amount of
exhaust gas back into the intake manifold to
control formation
of NOx. Like all ECM outputs the
"Scan tool" only indicates that the ECM has
commanded the function and does
not indicate
that the function has
really happened.
SHORT TERM (S.T.) FUEL TRIM AND LONG
TERM (L.T.) FUEL TRIM
On Fuel Injected Engines, normal readings for
these positions are around 128. If higher, it
indicates that the ECM is adding fuel to the base
fuel calculation because the system is lean.
If the
numbers are below 128, the
ECM is taking out fuel
from the base calculation because the system is
rich. The
S.T. Fuel Trim is short term corrective
action while the
L.T. Fuel Trim portion (which is a
long term correction)
will only change if the
intergrator has seen a condition which lasts
for a
calibrated period
of time.
Page 712 of 1928
6E2-16 DRIVEABILITV AND EMISSIONS
LONG TERM (LT.) FUEL TRIM
There are from zero to seventeen different cells
which the Engine Control Module (ECM) learns at
depending on revolution per minute (rpm) and
manifold absolute pressure. This parameter
will
display what cell the ECM is using for the fuel
calculation at the time.
IDLE AIR CONTROL (lAC) COUNTS
This system is used to control engine idle speed to
the desired rpm, for different operating
conditions.
In this diagnostic test mode, the
numbers
will indicate what position the ECM
thinks the valve is in. The ECM moves the idle air
control in counts and these counts are displayed
on a
"Scan tool".
DESIRED REVOLUTION PER MINUTE
Indicates the rpm to which the ECM is trying to
control the idle.
AIR CONDITIONING (A/C) REQUEST
Displays the state of the Air Conditioning (A/C)
signal line to the ECM. Should read "YES"
whenever the A/C is requested.
AIR CONDITIONING {A/C) CLUTCH
Displays "ON" when the ECM has commanded
the
A/C Clutch "ON".
POWER STEERING PRESSURE (PSP)
SWITCH
Displays the state of switch. This reading may
vary
with the tool used and the type of switch
installed on the vehicle. The important thing is
that the reading changes state (switches) when
the steering is moved against the stops.
BA TTERV POSITIVE VOLTAGE
Displays the battery positive voltage detected at
the
ECM ignition input.
SPARK ADVANCE
This is a amount of total spark advance including
the base electronic ignition timing.
START UP ENGINE COOLANT
This parameter is the engine coolant temperature
at the
time the engine was started.
ENGINE SPEED (RPM)
RPM calculated during a crank mode, helpful in
diagnosing a NON-start condition.
FUEL TRIM ENABLE
This value is an indication when the Fuel Trim
Enable values are being updated within the ECM
program.
AIR/FUEL RATIO
This is the air to fuel ratio that is being
commanded to the injectors.
INDUCTION AIR CONTROL
The "Scan tool" will display the command being
given to the induction air control
plate system
solenoid.
SECTION B-DRIVEABILITY SYMPTOMS
Always start with Section "A" "On-Board Diagnostic
System Check" before proceeding to the driveability
symptoms.
Section "A" checks the ECM which may
cause the driveability problem. A definition
of each
symptom is included. This will then lead to the most
probable causes of the driveability problem.
SECTION C-COMPONENTS SYSTEMS
There are many component systems that are used to
control fuel and emissions. Section "C" introduces
each component system or control
with a general
description, diagnosis, and on-vehicle service.
Each
of the Section "C" diagnosis sections will contain
information on
how the "Scan tool" can be used for
diagnosing a particular component when a trouble
code has
not been set. (example: Section "C1" under
diagnosis
will explain how the "Scan tool" can be used
for diagnosis as well as what the normal readings
would be for the ECM Sensors.
•
Page 747 of 1928
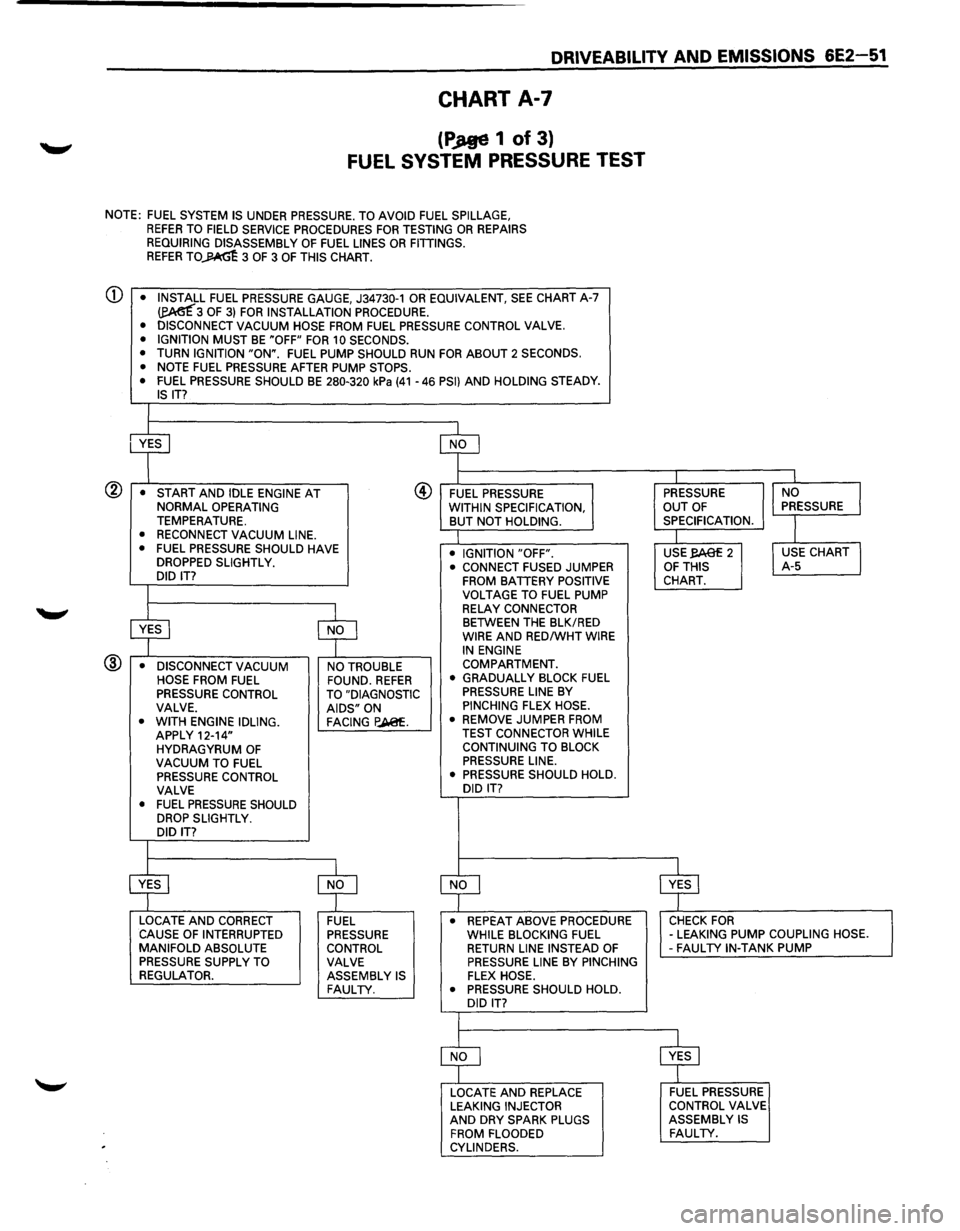
DRIVEABILITV AND EMISSIONS 6E2-51
CHART A-7
(PJtge 1 of 3}
FUEL SYSTEM PRESSURE TEST
NOTE: FUEL SYSTEM IS UNDER PRESSURE. TO AVOID FUEL SPILLAGE, REFER TO FIELD SERVICE PROCEDURES FOR TESTING OR REPAIRS
REQUIRING DISASSEMBLY OF FUEL LINES OR FITTINGS. REFER TO~ 3 OF 3 OF THIS CHART.
CD • INSTALL FUEL PRESSURE GAUGE, J34730-1 OR EQUIVALENT, SEE CHART A-7 ~3 OF 3) FOR INSTALLATION PROCEDURE.
• DISCONNECT VACUUM HOSE FROM FUEL PRESSURE CONTROL VALVE.
• IGNITION MUST BE "OFF" FOR 10 SECONDS.
• TURN IGNITION "ON". FUEL PUMP SHOULD RUN FOR ABOUT 2 SECONDS.
• NOTE FUEL PRESSURE AFTER PUMP STOPS.
• FUEL PRESSURE SHOULD BE 280-320 kPa (41-46 PSI) AND HOLDING STEADY. IS IT?
I
• START AND IDLE ENGINE AT NORMAL OPERATING TEMPERATURE. • RECONNECT VACUUM LINE.
• FUEL PRESSURE SHOULD HAVE
DROPPED SLIGHTLY.
DID IT?
I
@ FUEL PRESSURE
WITHIN SPECIFICATION,
BUT NOT HOLDING.
• IGNITION "OFF".
.---'---$YES
-$r---'--NO -
@ • DISCONNECT VACUUM NO TROUBLE •
CONNECT FUSED
JUMPER FROM BATTERY POSITIVE
VOLTAGE TO FUEL PUMP
RELAY CONNECTOR BETWEEN THE BLK/RED WIRE AND RED/WHT WIRE IN ENGINE
COMPARTMENT.
HOSE FROM
FUEL FOUND. REFER PRESSURE CONTROL TO "DIAGNOSTIC
VALVE. AIDS" ON
• WITH ENGINE IDLING. FACING P.A@f. APPLY 12-14"
HYDRAGYRUM OF VACUUM TO FUEL PRESSURE CONTROL
VALVE
•
FUEL PRESSURE SHOULD DROP SLIGHTLY.
DID IT?
I
• GRADUALLY BLOCK FUEL PRESSURE LINE BY PINCHING FLEX HOSE.
• REMOVE JUMPER FROM
TEST CONNECTOR WHILE
CONTINUING TO BLOCK
PRESSURE LINE.
• PRESSURE SHOULD HOLD.
DID
IT?
I PRESSURE
OUT OF SPECIFICATION.
I USE,.eAef 2 OF THIS CHART.
I
INO I PRESSURE
I
I USE CHART I A-5
~~NLO------------------~ $~YELS---------------------, LOCATE AND CORRECT
CAUSE OF INTERRUPTED
MANIFOLD ABSOLUTE
PRESSURE SUPPLY TO
REGULATOR. FUEL PRESSURE
CONTROL VALVE ASSEMBLY
IS FAULTY.
• REPEAT ABOVE PROCEDURE CHECK FOR WHILE BLOCKING FUEL -LEAKING PUMP COUPLING HOSE. RETURN LINE INSTEAD OF -FAUL TV IN-TANK PUMP PRESSURE LINE BY PINCHING FLEX HOSE.
• PRESSURE SHOULD HOLD.
DID
IT?
LOCATE AND REPLACE LEAKING INJECTOR AND DRY SPARK PLUGS
FROM FLOODED
CYLINDERS.
FUEL PRESSURE
CONTROL VALVE
ASSEMBLY
IS FAULTY.
Page 748 of 1928
6E2-52 DRIVEABILITV AND EMISSIONS
CHART A-7
(Page 2 of 3)
FUEL SYSTEM PRESSURE TEST
Circuit Description:
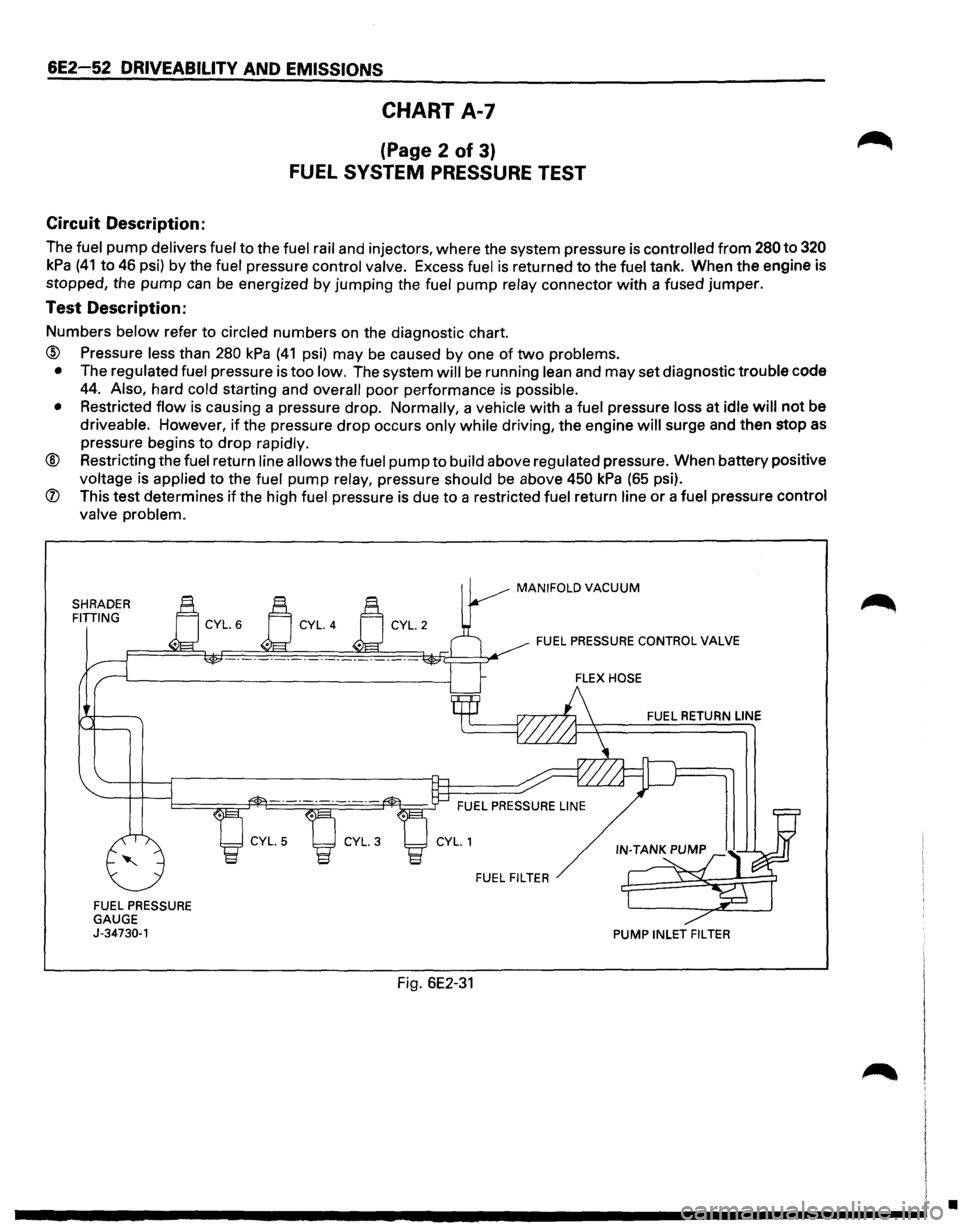
The fuel pump delivers fuel to the fuel rail and injectors, where the system pressure is controlled from 280 to 320
kPa (41 to 46 psi) by the fuel pressure control valve. Excess fuel is returned to the fuel tank. When the engine is
stopped, the
pump can be energized by jumping the fuel pump relay connector with a fused jumper.
Test Description:
Numbers below refer to circled numbers on the diagnostic chart.
® Pressure less than 280 kPa (41 psi) may be caused by one of two problems.
• The regulated fuel pressure is too low. The system will be running lean and may set diagnostic trouble code
44. Also, hard cold starting and overall poor performance is possible.
• Restricted flow is causing a pressure drop. Normally, a vehicle with a fuel pressure loss at idle will not be
driveable. However,
if the pressure drop occurs only while driving, the engine will surge and then stop as
pressure begins to drop rapidly.
® Restricting the fuel return line allows the fuel pump to build above regulated pressure. When battery positive
voltage is applied to the fuel pump relay, pressure should
be above 450 kPa (65 psi).
® This test determines if the high fuel pressure is due to a restricted fuel return line or a fuel pressure control
valve problem.
SHRADER FITIING
FUEL PRESSURE GAUGE J-34730-1
Fig. 6E2-31
MANIFOLD VACUUM
FUEL PRESSURE CONTROL VALVE
FUEL RETURN
LINE
FUEL FILTER
PUMP INLET FILTER
•
Page 787 of 1928
FUEL SYSTEM
• CHECK:
• CHECK:
• CHECK:
• CHECK:
• CHECK:
• CHECK:
Fuel pump relay operation-pump should
turn "ON" for 2 seconds when ignition is
turned
"ON". Use CHART A-5.
Fuel injectors are correct for the vehicle.
Fuel
pressure, use CHART A-7.
Contaminated
fuel.
Engine fuse (visual inspect).
A
faulty in-tank fuel pump check valve will
allow
the fuel in the lines to drain back to
the tank after engine is stopped. To check
for this condition, perform fuel system
diagnosis CHART A-7.
IGNITION SYSTEM
• CHECK: For proper ignition voltage output with
spark tester J26792 or equivalent (ST-
125).
DRIVEABILITY AND EMISSIONS 6E2-91
• CHECK: Spark plugs. Remove spark plugs, check
for wet plugs, cracks, wear, improper
gap, burned electrodes, or heavy
deposits. Repair
or replace as necessary.
• CHECK: Bare or shorted wires.
• CHECK: Loose ignition coil ground.
ADDITIONAL CHECKS
• CHECK: Idle air control operation-use CHART C-
2C.
• CHECK: Basic engine problem. Refer to ENGINE
MECHANICAL DIAGNOSIS (SECTION
6A).
• CHECK: Service Bulletins for calibration updates.
SURGES AND/OR CHUGGLES
Definition: Engine power variation under steady
throttle or cruise. Feels like the car speeds
up and
slows down with no change in the
acceleration pedal.
PRELIMINARY CHECKS
• Perform the careful visual checks as described at
start
of "Symptoms," Section "6E2-B."
•
Be sure driver understands transmission
operation, and air conditioning compressor
operation
as explained in the owner's manual.
SENSORS
• CHECK: Heated oxygen sensor (H02S). The
H02S should respond quickly to different
throttle position, if it does not, check the
H02S for silicon or other contaminations
from fuel, or use of improper RTV sealant.
The sensor may have a white, powdery
coating and result in a high but false
signal voltage
(rich heated H02S signal
indication). The engine control module
will
then reduce the amount of fuel
delivered
to the engine, causing a severe
driveability problem. Also, watch for
green glycol contamination or cracking.
FUEL SYSTEM
• NOTICE: To determine ifthe condition is caused by
a rich
or lean system, the car should be
driven at the speed of the complaint.
Monitoring block learn will help identify a
problem.
Lean -Block learn above 142. Refer to
"Diagnostic Aids" on facing page of
diagnostic trouble code 44.
Rich -L.T. Fuel Trim above 118. Refer to
"Diagnostic Aids" on facing page of
diagnostic trouble code 45.
• CHECK: Fuel pressure while condition exists. Use
CHART A-7.
• CHECK: In-line fuel filter. Replace if dirty or
plugged.
IGNITION SYSTEM
• CHECK: For proper ignition voltage output using
spark tester (ST-125) J26792
or
equivalent .
• CHECK: Spark plugs. Remove spark plugs, check
for wet plugs, cracks, wear, improper
gap, burned electrodes, or heavy
deposits. Repair
or replace as necessary.
Also, check condition of electronic
ignition and spark plug wires.
• CHECK: Ignition timing. Using "Scan tool".
ADDITIONAL CHECKS
• CHECK: Engine control module grounds for being
clean, tight and in their proper location.
• CHECK: Vacuum lines for kinks or leaks.
• CHECK: Exhaust gas recirculation -There should
be no exhaust gas recirculation at idle.
Refer to CHART C-7.
• CHECK: Generator output voltage. Repair if less
than 9 or more than 16 volts.
Page 789 of 1928
IGNITION SYSTEM
• CHECK: Spark plugs for proper heat cause. Refer
to Owner's Manual.
• CHECK: Ignition timing, using a "Scan tool".
ENGINE MECHANICAL
• CHECK: For excessive oil in the combustion
chamber. -
Valve oil seals for leaking.
• CHECK: Combustion chambers for excessive
carbon
build up. Remove carbon with top
engine cleaner and follow instructions on
can.
DRIVEABILITY AND EMISSIONS 6E2-93
• CHECK: Combustion chamber pressure by
performing a compression test.
See
ENGINE MECHANICAL DIAGNOSIS
(SECTION 6A).
• CHECK: For incorrect basic engine parts such as
cam, heads, pistons, etc.
HESITATION, SAG, STUMBLE
Definition: Momentary lack of response as the
accelerator is pushed down. Can occur at
all car speeds. Usually most severe when
first trying
to make the car move, as from a
stop sign. May cause engine to
stall if
severe enough.
PRELIMINARY CHECKS
• Perform the careful visual/physical checks as
described at start of "Symptoms," Section "6E2-
B."
SENSORS
• CHECK: Throttle position sensor for binding or
sticking. Voltage should increase at a
steady
rate as throttle is moved toward
Wide Open Throttle.
• CHECK: Manifold absolute pressure sensor-use
CHART C-10.
FUEL SYSTEM
• CHECK: Fuel pressure, use CHART A-7.
• CHECK: Fuel injectors are correct for vehicle.
• CHECK: Contaminated fuel.
• CHECK: Evaporative emission canister purge
system
for proper operation. Refer to
"Evaporative Emission Control System,"
Section "6E2-C3."
IGNITION SYSTEM
• CHECK: Spark plugs for being fouled, or for faulty
secondary wiring.
• CHECK: Ignition timing, using a "Scan tool".
• CHECK: Ignition system ground.
ADDITIONAL CHECKS
• CHECK: Exhaust gas recirculation operation, use
CHART
C-7.
• CHECK: Engine thermostat functioning correctly
and proper heat range.
• CHECK: Generator output voltage. Repair if less
than 9 or more than 16 volts.
CUTS OUT, MISSES
Definition: Steady pulsation or jerking that follows
engine speed, usually more pronounced
as engine load increases, not normally felt
above 1500 revolution per minute or 48
kph
(30 mile per hour). The exhaust has a
steady spitting sound at
idle or low speed.
PRELIMINARY CHECKS
• Perform the careful visual/physical checks as
described at start of "Symptoms," Section "6E2-
B."
IGNITION SYSTEM
• Check for cylinder miss by:
1. Start engine, allow engine to stabilize then
disconnect
idle air control motor. Remove
one spark
plug wire at a time, using insulated
pliers.
CAUTION: Do not perform this test for
more than 2 minutes,
as this test may
cause damage to the three
way
catalytic converter.
2. If there is a revolution per minute drop on all
cylinders (equal
to within 50 revolution per
minute), go
to "Rough, Unstable, or Incorrect
Idle, Stalling"
symptom. Reconnect idle air
control valve.
Page 816 of 1928
6E2 120 DRIVEABILITY AND EMISSIONS
THROTTLE BODY (TB) ASSEMBLY
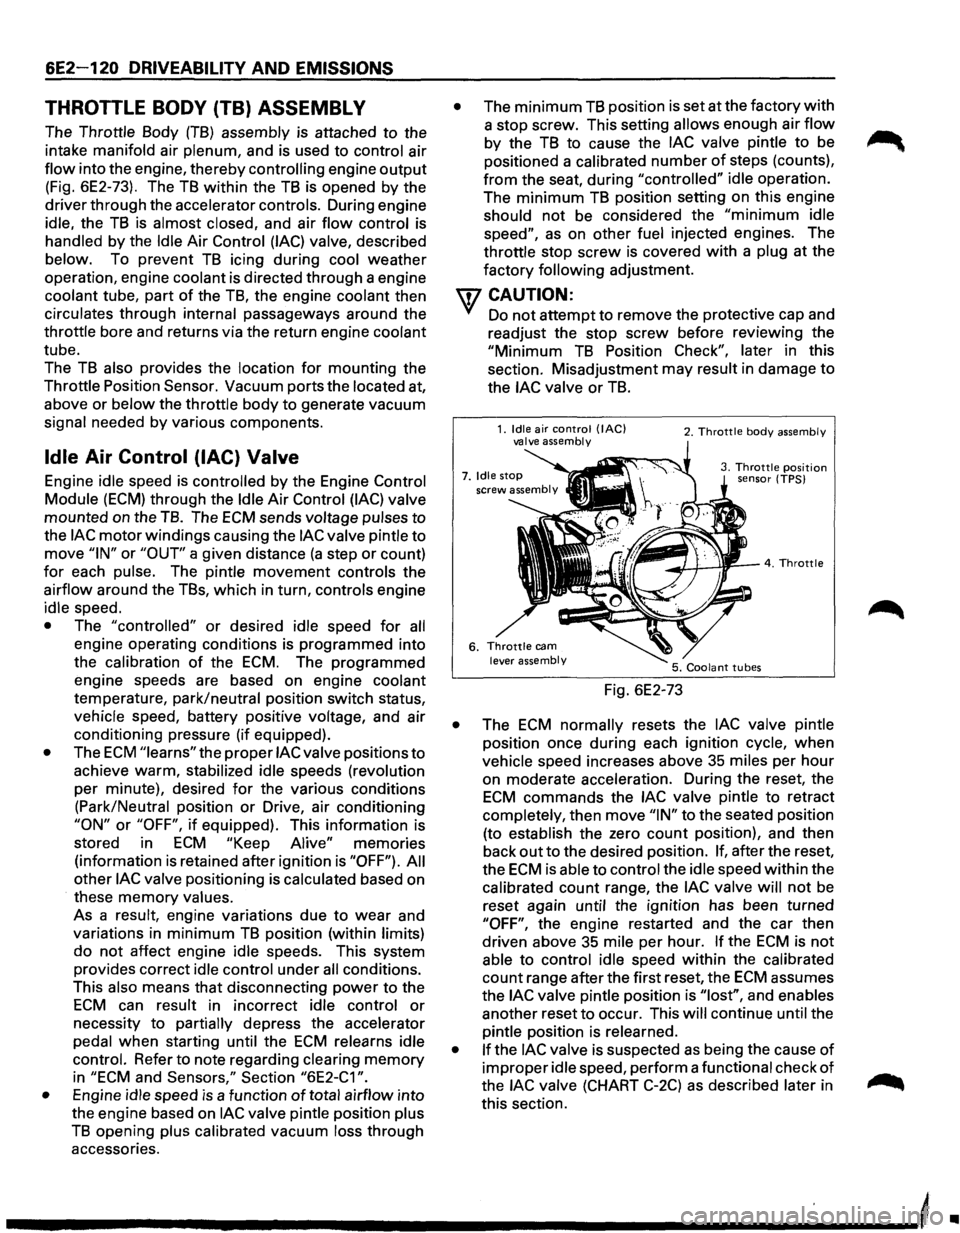
The Throttle Body (TB) assembly is attached to the
intake manifold air
plenum, and is used to control air
flow into the engine, thereby controlling engine output
(Fig. 6E2-73). The TB within the TB is opened by the
driver through the accelerator controls. During engine
idle, the
TB is almost closed, and air flow control is
handled by the Idle Air Control (lAC) valve, described
below. To prevent
TB icing during cool weather
operation, engine
coolant is directed through a engine
coolant tube, part
of the TB, the engine coolant then
circulates through internal passageways around the
throttle bore and returns via the return engine coolant
tube.
The
TB also provides the location for mounting the
Throttle Position
Sensor. Vacuum ports the located at,
above or
below the throttle body to generate vacuum
signal needed
by various components.
Idle Air Control (lAC) Valve
Engine idle speed is controlled by the Engine Control
Module (ECM) through the Idle Air Control (lAC) valve
mounted on the
TB. The ECM sends voltage pulses to
the lAC motor windings causing the lAC valve pintle to
move "IN" or "OUT" a given distance (a step or count)
for each pulse. The pintle movement controls the
airflow around the TBs, which in turn, controls engine
idle speed.
• The "controlled" or desired idle speed for all
engine operating conditions is programmed into
the
calibration of the ECM. The programmed
engine speeds are based on engine coolant
temperature, park/neutral position switch status,
vehicle speed, battery positive voltage, and air
conditioning pressure (if equipped).
• The ECM "learns" the proper lAC valve positions to
achieve warm, stabilized idle speeds (revolution
per minute), desired
for the various conditions
(Park/Neutral position
or Drive, air conditioning
"ON" or "OFF", if equipped). This information is
stored in
ECM "Keep Alive" memories
(information
is retained after ignition is "OFF"). All
other lAC valve positioning is calculated based on
these
memory values.
As a
result, engine variations due to wear and
variations in
minimum TB position (within limits)
do not affect engine idle speeds. This system
provides correct idle control under
all conditions.
This also means
that disconnecting power to the
ECM can result in incorrect idle control or
necessity to partially depress the accelerator
pedal
when starting until the ECM relearns idle
control. Refer to note regarding clearing
memory
in "ECM and Sensors," Section "6E2-C1 ".
•
Engine idle speed is a function of total airflow into
the engine based on
lAC valve pintle position plus
TB opening plus calibrated vacuum loss through
accessories.
• The minimum TB position is set at the factory with
a stop screw. This setting allows enough air flow
by the TB to cause the lAC valve pintle to be
positioned a calibrated
number of steps (counts),
from the seat, during "controlled" idle operation.
The
minimum TB position setting on this engine
should not be considered the
"minimum idle
speed", as on other fuel injected engines. The
throttle stop
screw is covered with a plug at the
factory
following adjustment.
U7 CAUTION:
VI Do not attempt to remove the protective cap and
readjust the stop screw before
reviewi~g t~e
"Minimum TB Position Check", later m th1s
section. Misadjustment may result in damage to
the lAC valve or TB.
Fig. 6E2-73
2. Throttle body assembly
3. Throttle position sensor (TPS)
• The ECM normally resets the lAC valve pintle
position once during each ignition cycle,
when
vehicle speed increases above 35 miles per hour
on moderate acceleration. During the reset, the
ECM commands the lAC valve pintle to retract
completely, then move
"IN" to the seated position
(to establish the zero
count position), and then
back
out to the desired position. If, after the reset,
the
ECM is able to control the idle speed within the
calibrated count range, the
lAC valve will not be
reset again until the ignition has been turned
"OFF", the engine restarted and the car then
driven above 35 mile per hour.
If the ECM is not
able to control idle speed within the calibrated
count range after the first reset, the
ECM assumes
the
lAC valve pintle position is "lost", and enables
another reset
to occur. This will continue until the
pintle position is relearned.
• If the lAC valve is suspected as being the cause of
improper idle speed, perform a functional check of
the lAC valve (CHART C-2C) as described later in
this section.
-----------------------------'
•
Page 823 of 1928
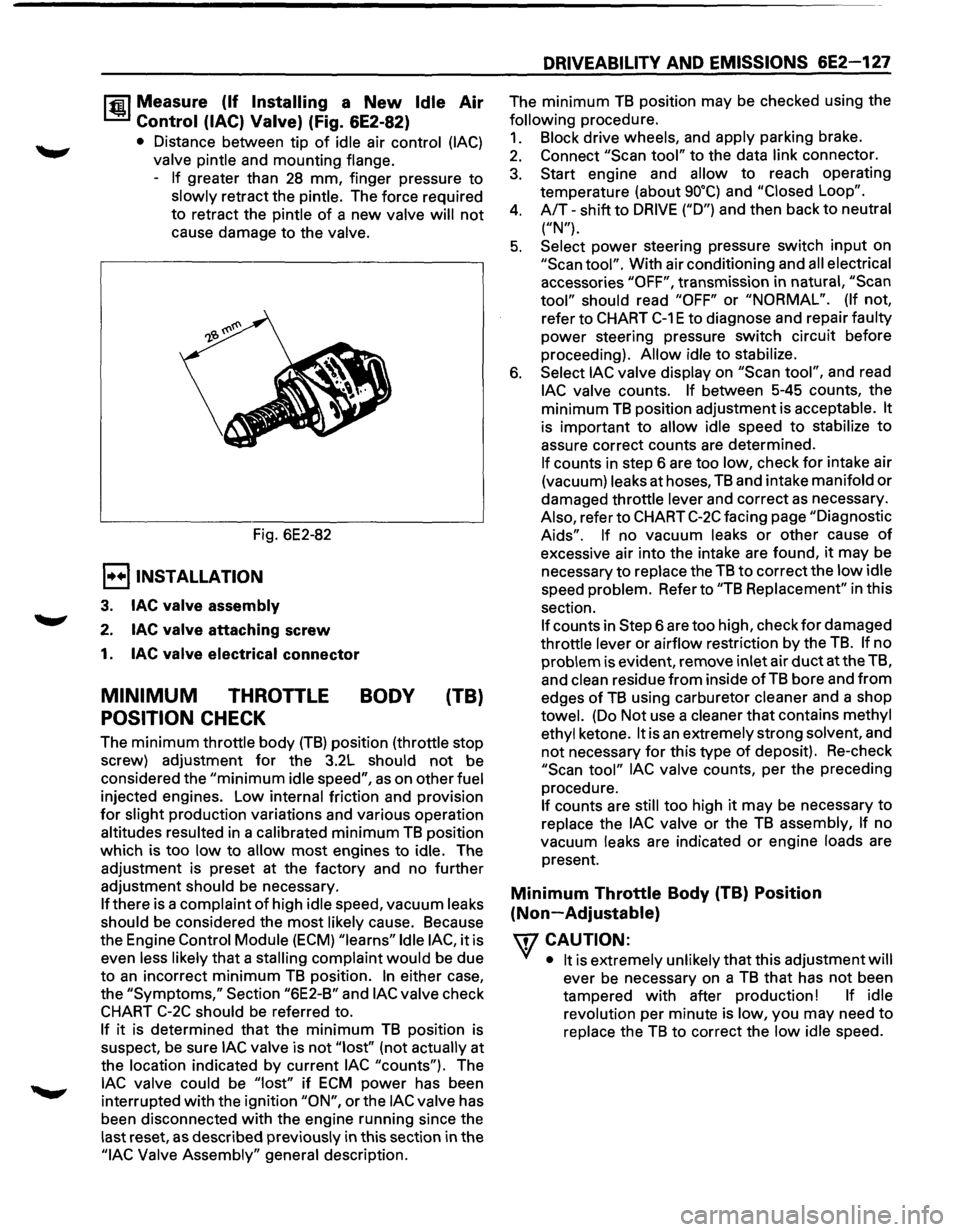
1~1 Measure (If Installing a New Idle Air
Control (lAC) Valve) (Fig. 6E2-82)
• Distance between tip of idle air control (lAC)
valve pintle and mounting flange.
-
If greater than 28 mm, finger pressure to
slowly retract the pintle. The force required
to retract the pintle
of a new valve will not
cause damage to the valve.
Fig. 6E2-82
E) INSTALLATION
3. lAC valve assembly
2. lAC valve attaching screw
1. lAC valve electrical connector
MINIMUM THROTTLE BODY (TB)
POSITION CHECK
The minimum throttle body (TB) position (throttle stop
screw) adjustment
for the 3.2L should not be
considered the
"minimum idle speed", as on other fuel
injected engines. Low internal friction and provision
for slight production variations and various operation
altitudes resulted in a calibrated
minimum TB position
which is too
low to allow most engines to idle. The
adjustment is preset at the factory and no further
adjustment should be necessary.
If there is a complaint of high idle speed, vacuum leaks
should be considered the
most likely cause. Because
the Engine
Control Module (ECM) "learns" Idle lAC, it is
even less likely
that a stalling complaint would be due
to
an incorrect minimum TB position. In either case,
the
"Symptoms," Section "6E2-B" and lAC valve check
CHART C-2C should be referred to.
If it is determined that the minimum TB position is
suspect,
be sure lAC valve is not "lost'' (not actually at
the location indicated by current
lAC "counts"). The
lAC valve could be "lost" if ECM power has been
interrupted
with the ignition "ON", or the lAC valve has
been disconnected
with the engine running since the
last reset,
as described previously in this section in the
"lAC Valve Assembly" general description.
DRIVEABILITY AND EMISSIONS 6E2-127
The minimum TB position may be checked using the
following procedure.
1. Block drive wheels, and apply parking brake.
2. Connect "Scan tool" to the data link connector.
3. Start engine and allow to reach operating
temperature (about
go•q and "Closed Loop".
4. A/T-shift to DRIVE ("D") and then back to neutral
("N").
5. Select power steering pressure switch input on
"Scan tool". With air conditioning and all electrical
accessories
"OFF", transmission in natural, "Scan
tool" should read "OFF" or "NORMAL". (If not,
refer to
CHART C-1 E to diagnose and repair faulty
power steering pressure switch circuit before
proceeding).
Allow idle to stabilize.
6. Select lAC valve display on "Scan tool", and read
lAC valve counts. If between 5-45 counts, the
minimum
TB position adjustment is acceptable. It
is important to allow idle speed to stabilize to
assure correct counts are determined.
If counts in step 6 are too low, check for intake air
(vacuum) leaks at hoses,
TB and intake manifold or
damaged throttle lever and correct as necessary.
Also, refer to
CHART C-2C facing page "Diagnostic
Aids". If no vacuum leaks or other cause of
excessive air into the intake are found, it may be
necessary
to replace the TB to correct the low idle
speed problem. Refer to
"TB Replacement" in this
section.
If counts in Step 6 are too high, check for damaged
throttle lever or airflow restriction by the
TB. If no
problem is evident, remove inlet air
duct at the TB,
and
clean residue from inside of TB bore and from
edges of TB using carburetor cleaner and a shop
towel. (Do Not use a cleaner that contains methyl
ethyl ketone.
It is an extremely strong solvent, and
not necessary for this type of deposit). Re-check
"Scan tool" lAC valve counts, per the preceding
procedure.
If counts are still too high it may be necessary to
replace the
lAC valve or the TB assembly, If no
vacuum leaks are indicated
or engine loads are
present.
Minimum Throttle Body (TB) Position
(Non-Adjustable)
\fl CAUTION:
VI • It is extremely unlikely that this adjustment will
ever be necessary on a TB that has not been
tampered
with after production! If idle
revolution per minute is low, you may need
to
replace the TB to correct the low idle speed.
Page 826 of 1928
6E2-130 DRIVEABILITY AND EMISSIONS
CHART C-2C
IDLE AIR CONTROL (lAC) SYSTEM CHECK
Circuit Description:
The engine control module (ECM) controls engine idle speed with idler air control (lAC) valve. To increase idle
speed, the ECM retracts the lAC valve pintle away from its seat, allowing more air to bypass the throttle bore. To
decrease
idle speed, it extends the lAC valve pintle towards its seat, reducing bypass air flow. A "Scan tool" will
read the ECM commands to the lAC valve in counts. Higher counts indicate more air bypass (higher idle). Lower
counts indicate
less air is allowed to bypass (lower idle).
Test Description:
Number below re{er to circled numbers on the diagnostic chart.
1. The lAC tester is used to extend and retract the lAC valve. Valve movement is verified by an engine speed
change.
If no change in engine speed occurs, the valve can be retested when removed from the throttle body.
2. This step checks the quality of the lAC movement in step 1. Between 700 revolution per minute (rpm) and
about
1500 rpm, the engine speed should change smoothly with each flash of the tester light in both extend
and retract.
If the lAC valve is retracted beyond the control range (about 1500 rpm), it may take many flashes
in the extend position before engine speed will begin to drop. This is normal on certain engines, fully
extending lAC may cause engine stall. This may be normal.
3. Steps 1 and 2 verified proper lAC valve operation. This step checks the lAC circuits. Each lamp on the node
light should flash red and green while the lAC valve is cycled. While the sequence of color is not important if
either light "OFF" or does not flash red and green, check the circuits for faults, beginning with poor terminal
contacts.
Diagnostic Aids:
A slow, unstable, or fast idle may be caused by a non-lAC system problem that cannot overcome by the lAC valve.
Out
of control range lAC "Scan tool" counts will be above 60 if idle is too low, and zero counts if idle is too high. The ..-...
following checks should be made to repair a non-lAC system problem. _......._
• Vacuum Leak (High Idle)
If idle
is too high, stop the engine. Fully extend (low) lAC with tester.
Start engine.
If idle speed is above 800 rpm, locate and correct vacuum leak including PCV system. Also check
for binding of throttle blade or linkage.
•
Lean heated oxygen sensor signal (High Air/Fuel Ratio)
The
idle speed may be too high or too low. Engine speed may vary up and down and disconnecting the lAC
valve
does not help. Diagnostic trouble code 44 may be set. "Scan tool" oxygen (02) voltage will be less than
100 mV (.1 volt). Check for low regulated fuel pressure, water in fuel, or a restricted injector.
• Rich heated oxygen sensor signal (Low Air/Fuel Ratio)
The
idle speed will be too low. "Scan tool" lAC counts will usually be above 80. System is obviously rich and
may exhibit
black smoke in exhaust.
"Scan tool" 02 voltage will be fixed about 750 mV (.75 volt).
Check
for high fuel pressure, leaking or sticking injector. Silicon contaminated heated oxygen sensor will
"Scan
tool" an 02 voltage slow to respond.
• Throttle Body
Remove
lAC valve and inspect bore for foreign material.
• lAC Valve
Electrical Connections
lAC valve
connections should be carefully checked for proper contact.
• PCV Valve
An incorrect or faulty PCV valve may result in an incorrect idle speed.
• Refer to "Rough, Unstable, Incorrect Idle or Stalling" in "Symptoms," Section "6E2-B".
• If
intermittent poor driveability or idle symptoms are resolved by disconnecting the lAC, carefully recheck
connections,
valve terminal resistance, or replace lAC.