clock ISUZU TROOPER 1995 Service Manual
[x] Cancel search | Manufacturer: ISUZU, Model Year: 1995, Model line: TROOPER, Model: ISUZU TROOPER 1995Pages: 1928
Page 1326 of 1928
8 -136 CHASSIS ELECTRICAL
MAP LIGHT SWITCH/BULB
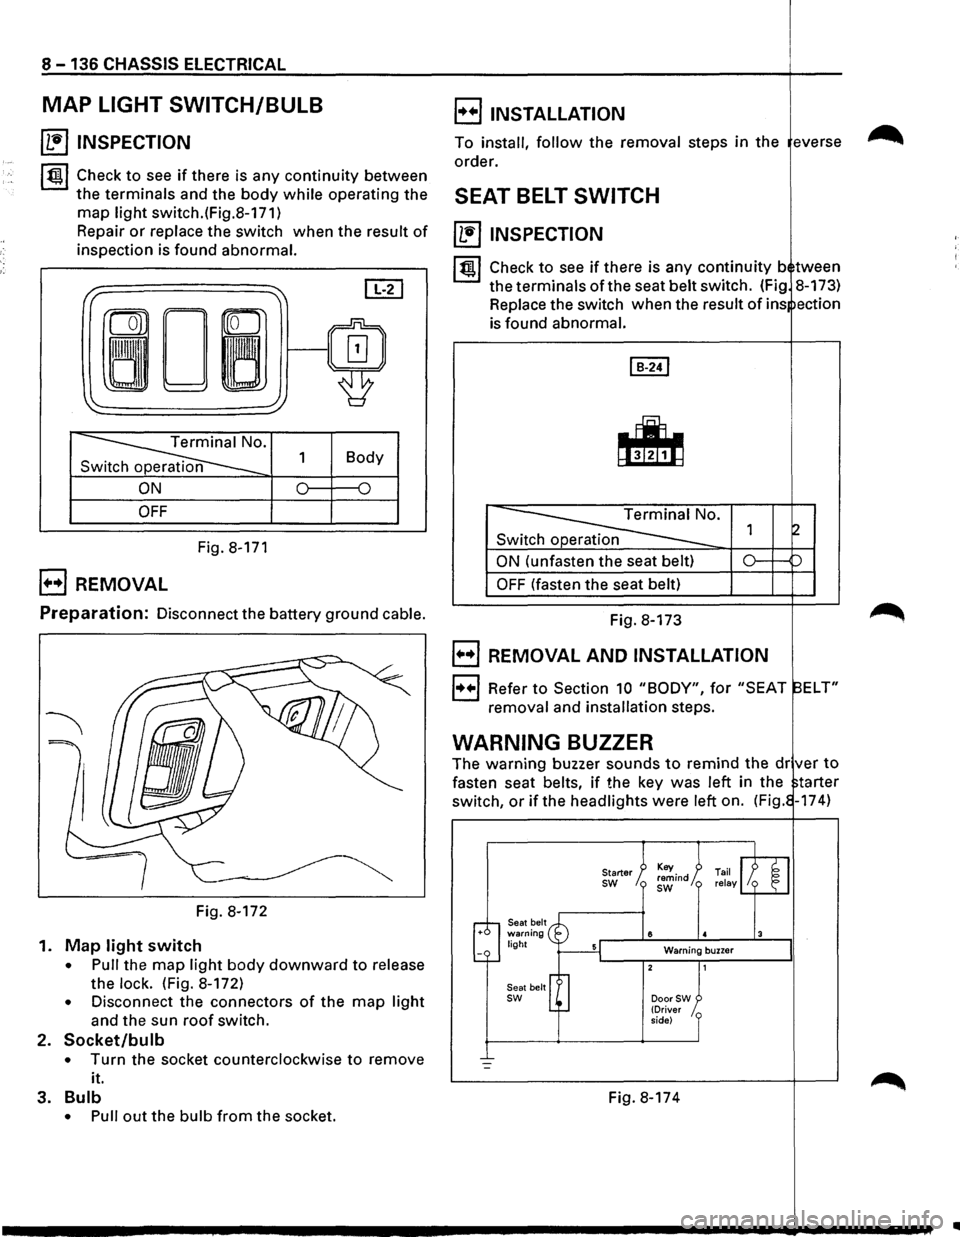
~ INSPECTION
~~~ Check to see if there is any continuity between
the terminals and the body while operating the
map light switch.(Fig.8-171)
Repair
or replace the switch when the result of
inspection is found abnormal.
I" ~ [IT]
ron
0~/~ ~
'
~· 1 Body
n
ON 0 {)
OFF
Fig. 8-171
B REMOVAL
E) INSTALLATION
To install, follow the removal steps in the everse
order.
SEAT BELT SWITCH
~ INSPECTION
I~ l Check to see if there is any continuity b tween
the terminals of the seat belt switch. (Fig 8-173)
Replace the switch when the
result of ins ection
is found abnormal.
Switch operation
ON (unfasten the seat belt)
OFF (fasten the seat belt)
Preparation: Disconnect the battery ground cable. Fig. 8-173
Fig. 8-172
1.
Map light switch
• Pull the map light body downward to release
the
lock. (Fig. 8-172)
• Disconnect the connectors of the map light
and the sun roof switch.
2. Socket/bulb
• Turn the socket counterclockwise to remove
it.
3.
Bulb
• Pull out the bulb from the socket.
B REMOVAL AND INSTALLATION
1++1 Refer to Section 10 "BODY", for "SEAT ELT"
removal and installation steps.
WARNING BUZZER
The warning buzzer sounds to remind the dr ver to
fasten seat belts, if the key was left in the tarter
switch,
or if the headlights were left on. (Fig. -174)
Seat belt warning light
Seat belt
sw
Starter sw
8
Warning buzzer
DoorSW (Driver
side)
Fig. 8-174
..
Page 1436 of 1928
8-246 CHASSIS ELECTRICAL
AUDIO, AUTO ANTENNA, CIGARETTE LIGHTER AND DIGITAL CLOCK
GENERAL DESCRIPTION
The audio circuit is designed for the current to flow through the receiver circuit when the radio switch is turned
on
with the starter switch in" ACC" or "ON". Current runs through the memory circuit of the audio regardless
of the position of the starter switch.
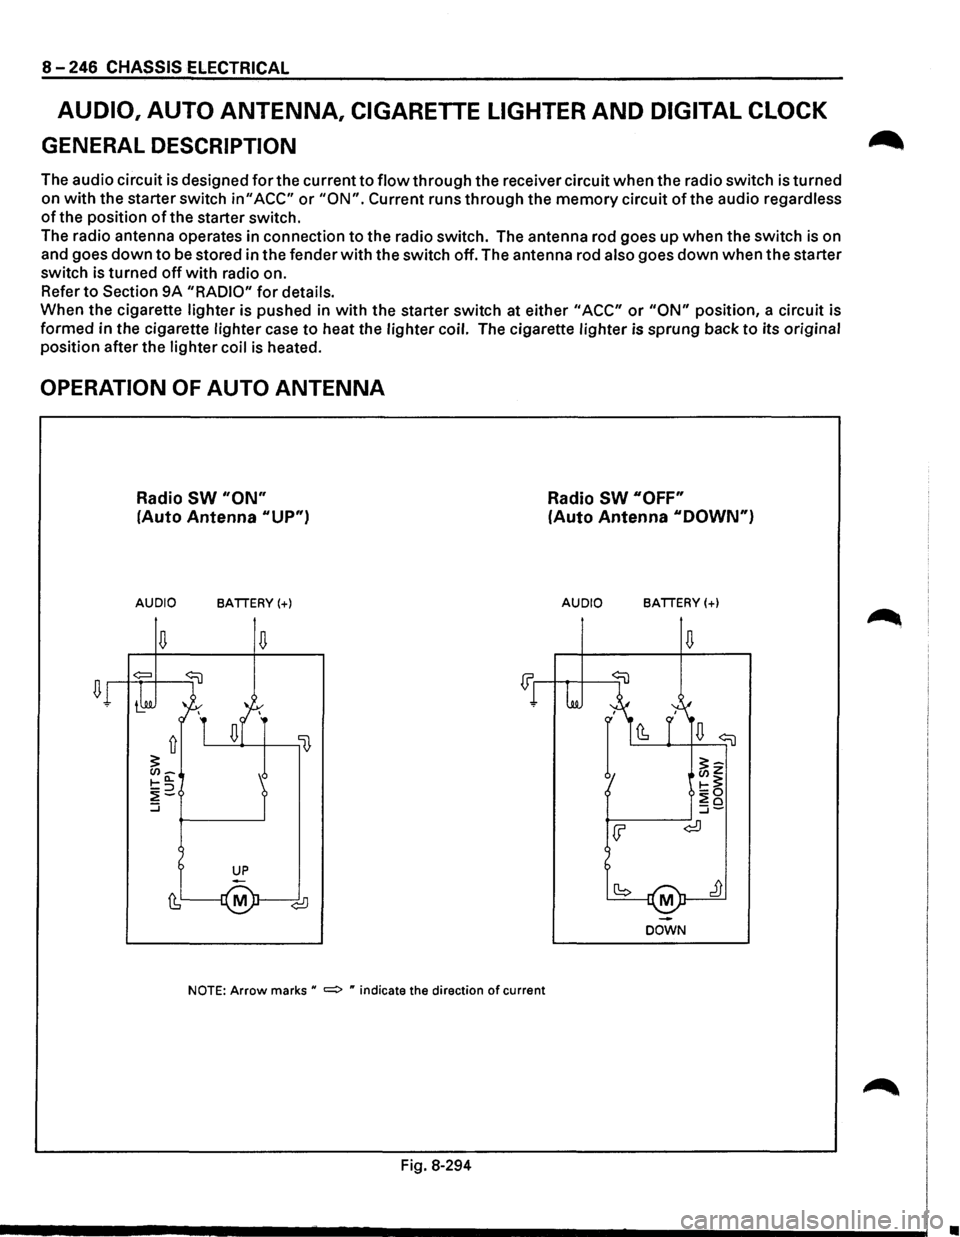
The radio antenna operates in connection
to the radio switch. The antenna rod goes up when the switch is on
and goes
down to be stored in the fender with the switch off. The antenna rod also goes down when the starter
switch is turned
off with radio on.
Refer
to Section 9A "RADIO" for details.
When the cigarette lighter is pushed in
with the starter switch at either "ACC" or "ON" position, a circuit is
formed in the cigarette lighter case
to heat the lighter coil. The cigarette lighter is sprung back to its original
position after the lighter coil
is heated.
OPERATION OF AUTO ANTENNA
Radio SW "ON"
(Auto Antenna "UP")
AUDIO BATTERY(+)
NOTE: Arrow marks u =:> " indicate the direction of current
Fig. 8-294
Radio SW "OFF"
(Auto Antenna "DOWN")
AUDIO BATTERY(+)
M
DOWN
•
Page 1441 of 1928
AUDIO
AUTO ANTENNA
Refer to Section 9A "RADIO" for details.
CIGARETTE LIGHTER
~ INSPECTION
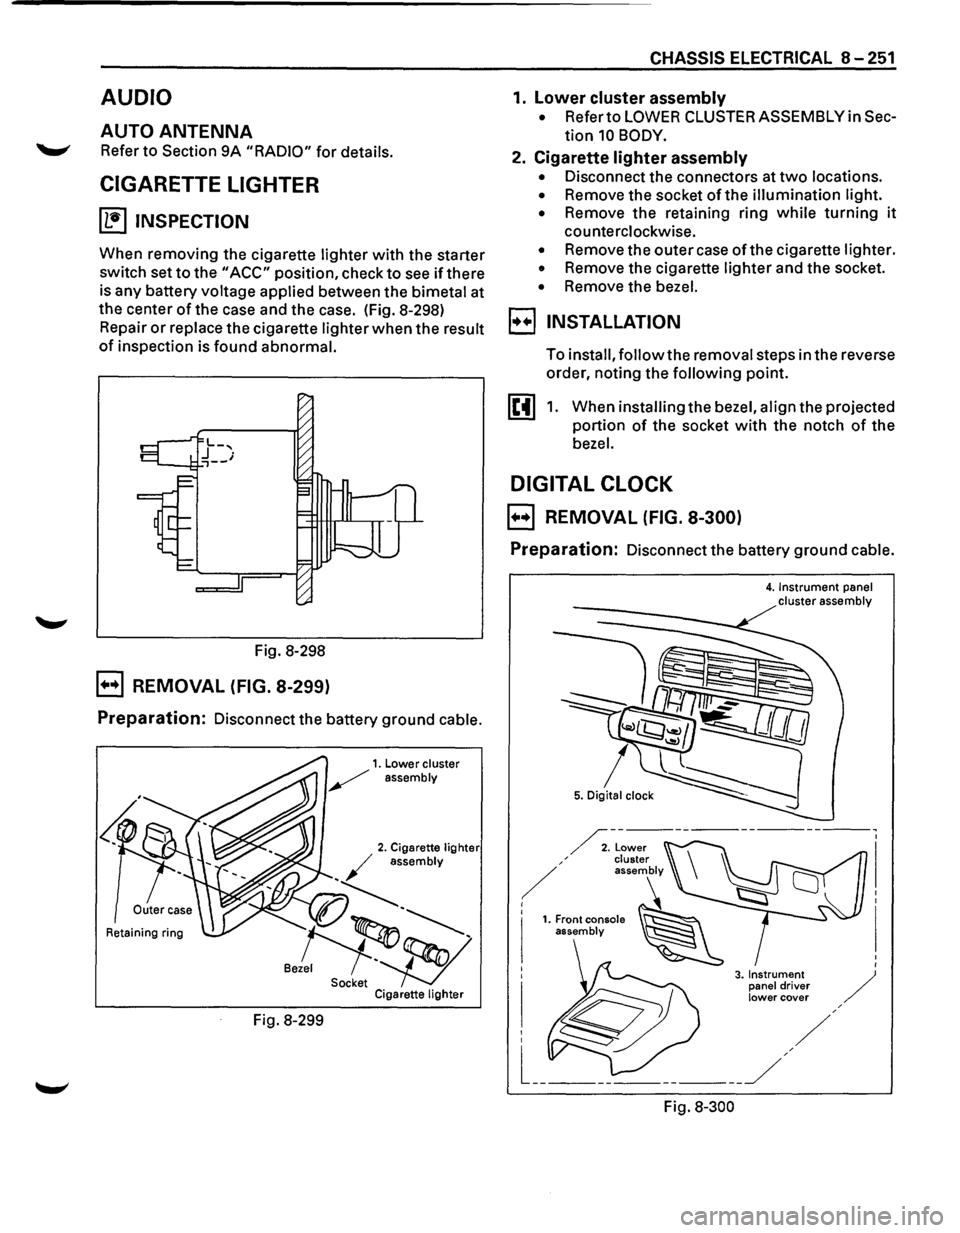
When removing the cigarette lighter with the starter
switch set
to the "ACC" position, check to see if there
is any battery voltage applied between the bimetal at
the center
of the case and the case. (Fig. 8-298)
Repair
or replace the cigarette lighter when the result
of inspection is found abnormal.
Fig. 8-298
B REMOVAL (FIG. 8-299)
Preparation: Disconnect the battery ground cable.
Retaining ring
Fig. 8-299
CHASSIS ELECTRICAL 8-251
1. lower cluster assembly
• Refer to LOWER CLUSTER ASSEMBLY in Sec
tion 10 BODY.
2. Cigarette lighter assembly
• Disconnect the connectors at two locations.
• Remove the socket of the illumination light.
•
Remove the retaining ring while turning it
counterclockwise.
• Remove the outer case of the cigarette lighter.
• Remove the cigarette lighter and the socket.
• Remove the bezel.
I••! INSTALLATION
To install, follow the removal steps in the reverse
order, noting the
following point.
1. When installing the bezel, align the projected
portion
of the socket with the notch of the
bezel.
DIGITAL CLOCK
B REMOVAL (FIG. 8-300)
Preparation: Disconnect the battery ground cable.
Fig.
8-300
4. Instrument panel cluster assembly
Page 1442 of 1928
8-252 CHASSIS ELECTRICAL
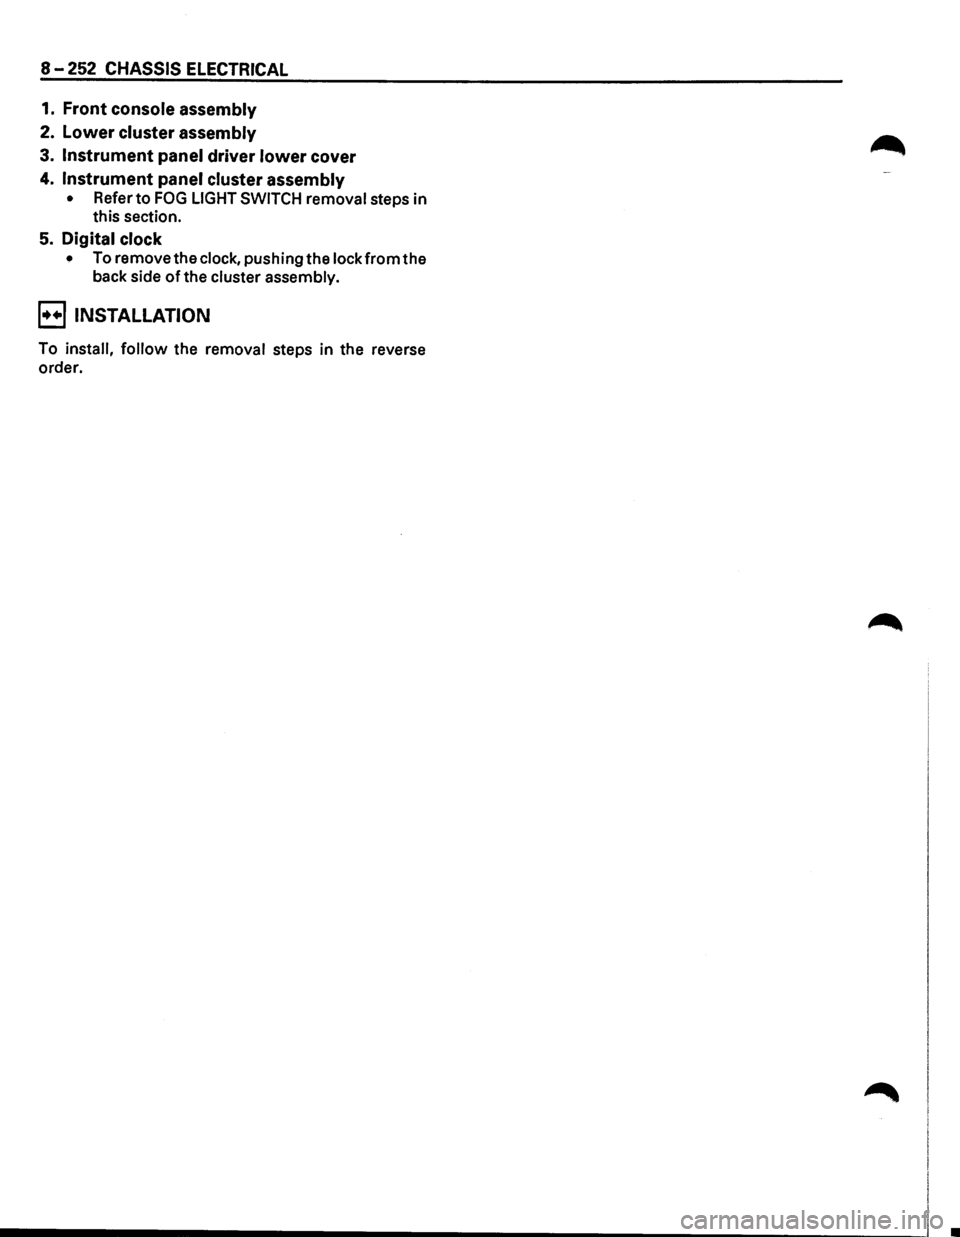
1. Front console assembly
2. Lower cluster assembly
3. Instrument panel driver lower cover
4. Instrument panel cluster assembly
• Refer to FOG LIGHT SWITCH removal steps in
this section.
5. Digital clock
• To remove the clock, pushing the lock from the
back side
of the cluster assembly.
E) INSTALLATION
To install, follow the removal steps in the reverse
order.
Page 1518 of 1928
8-328 CHASSIS ELECTRICAL
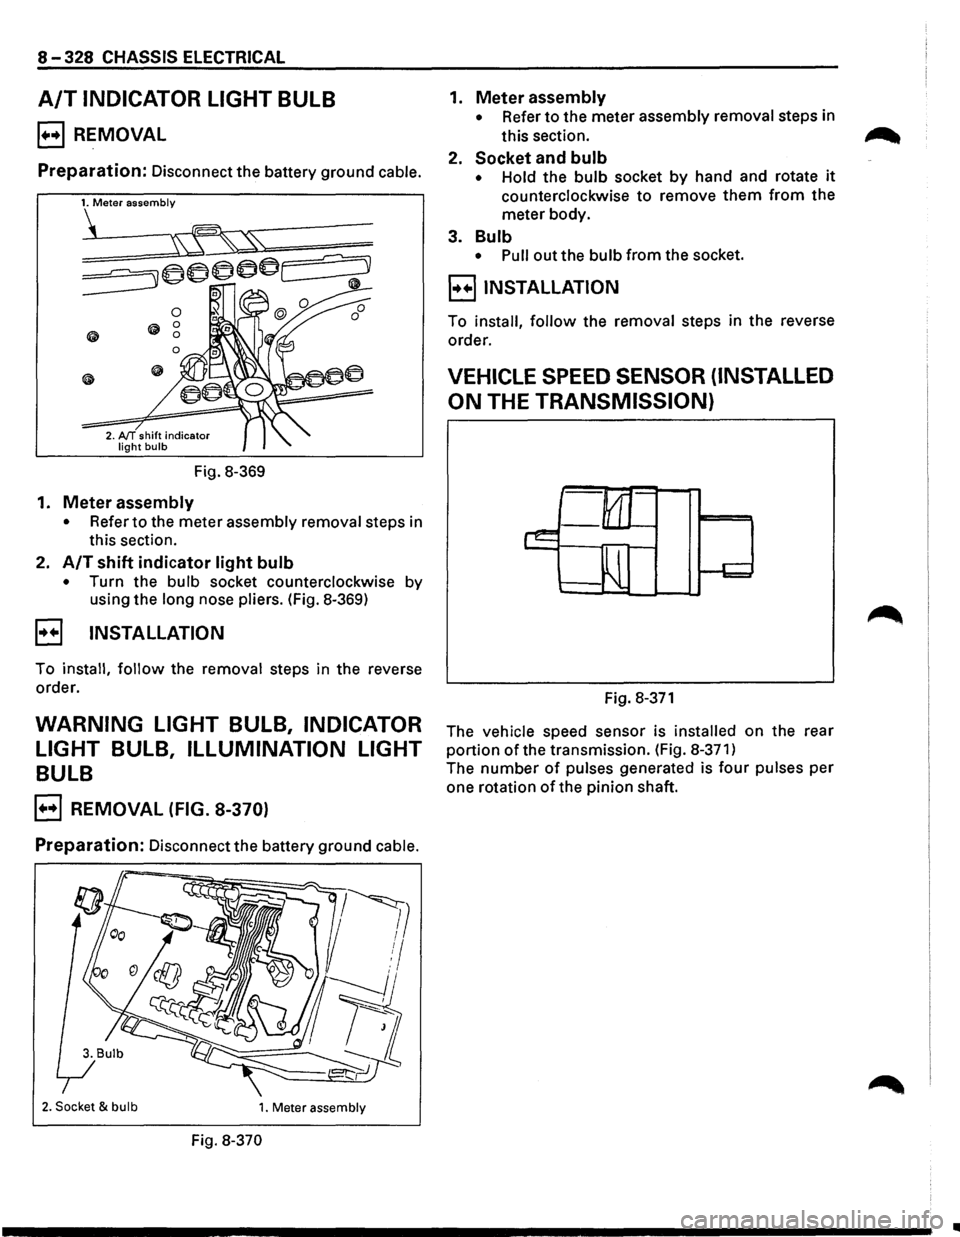
A/T INDICATOR LIGHT BULB
B REMOVAL
Preparation: Disconnect the battery ground cable.
Fig.
8-369
1. Meter assembly
• Refer to the meter assembly removal steps in
this section.
2.
A/T shift indicator light bulb
• Turn the bulb socket counterclockwise by
using the
long nose pliers. (Fig. 8-369)
B INSTALLATION
To install, follow the removal steps in the reverse
order.
WARNING LIGHT BULB, INDICATOR
LIGHT
BULB, ILLUMINATION LIGHT
BULB
B REMOVAL (FIG. 8-370)
Preparation: Disconnect the battery ground cable.
2. Socket & bulb 1. Meter assembly
Fig. 8-370
1. Meter assembly
• Refer to the meter assembly removal steps in
this section.
2.
Socket and bulb
• Hold the bulb socket by hand and rotate it
counterclockwise to remove them from the
meter body.
3.
Bulb
• Pull out the bulb from the socket.
B INSTALLATION
To install, follow the removal steps in the reverse
order.
VEHICLE SPEED SENSOR (INSTALLED
ON
THE TRANSMISSION)
Fig. 8-371
The vehicle speed sensor is installed on the rear
portion of the transmission. (Fig. 8-371)
The number of pulses generated is four pulses per
one rotation
of the pinion shaft.
..
Page 1581 of 1928
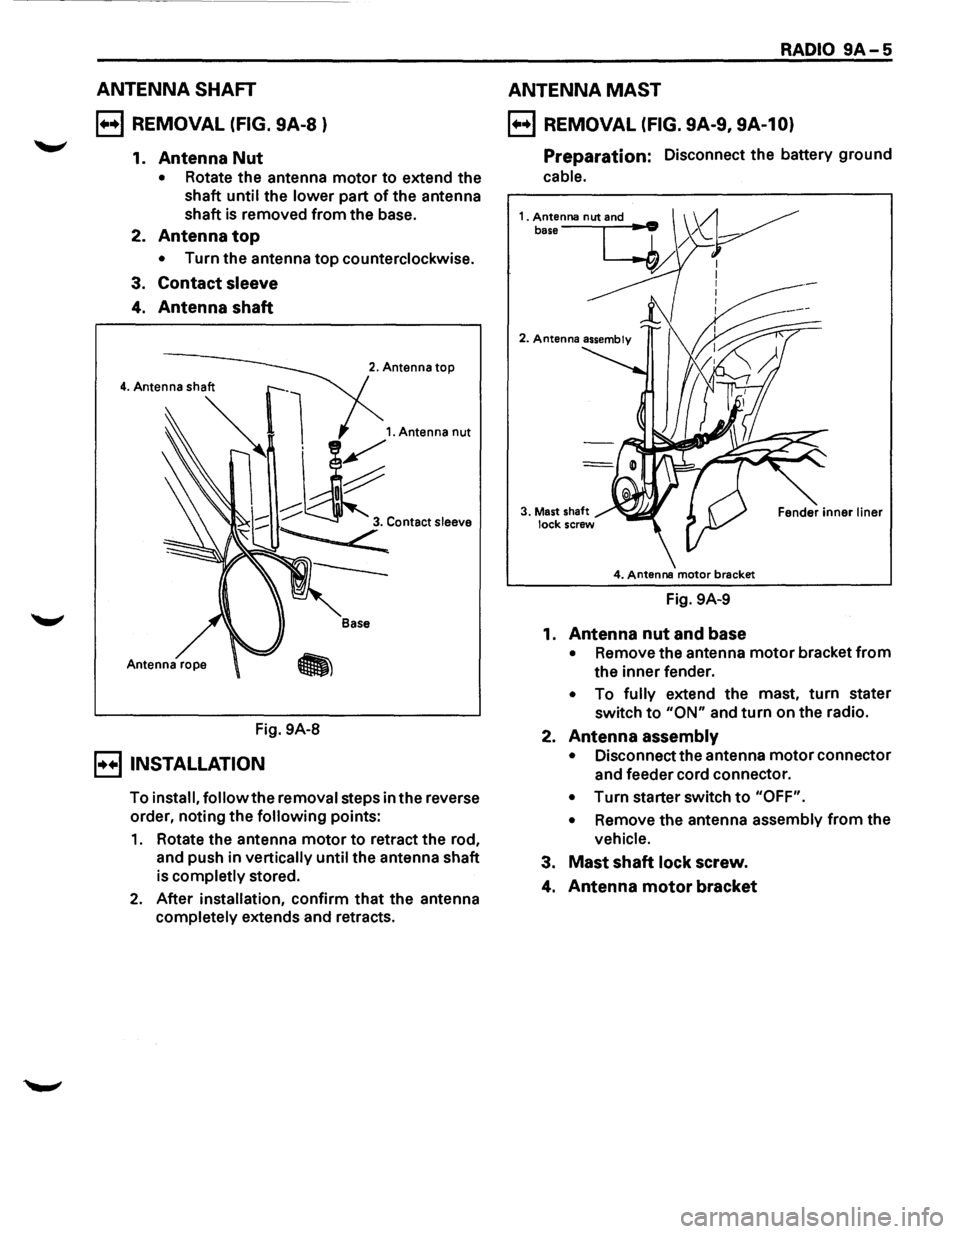
ANTENNA SHAFT
B REMOVAL (FIG. 9A-8 )
1. Antenna Nut
• Rotate the antenna motor to extend the
shaft
until the lower part of the antenna
shaft is removed from the base.
2.
Antenna top
• Turn the antenna top counterclockwise.
3.
Contact sleeve
4. Antenna shaft
Fig. 9A-8
B INSTALLATION
2. Antenna top
Base
To install, follow the removal steps in the reverse
order, noting the
following points:
1. Rotate the antenna motor to retract the rod,
and push in
vertically until the antenna shaft
is
completly stored.
2. After installation, confirm that the antenna
completely extends and retracts.
RADIO 9A-5
ANTENNA MAST
B REMOVAL (FIG. 9A-9, 9A-10)
Preparation: Disconnect the battery ground
cable.
4. Antenna motor brecket
Fig. 9A-9
1.
Antenna nut and base
• Remove the antenna motor bracket from
the inner fender.
• To fully extend the mast, turn stater
switch
to "ON" and turn on the radio.
2.
Antenna assembly
• Disconnect the antenna motor connector
and feeder cord connector.
• Turn starter switch to "OFF".
•
Remove the antenna assembly from the
vehicle.
3. Mast shaft lock screw.
4. Antenna motor bracket
Page 1582 of 1928
9A-6 RADIO
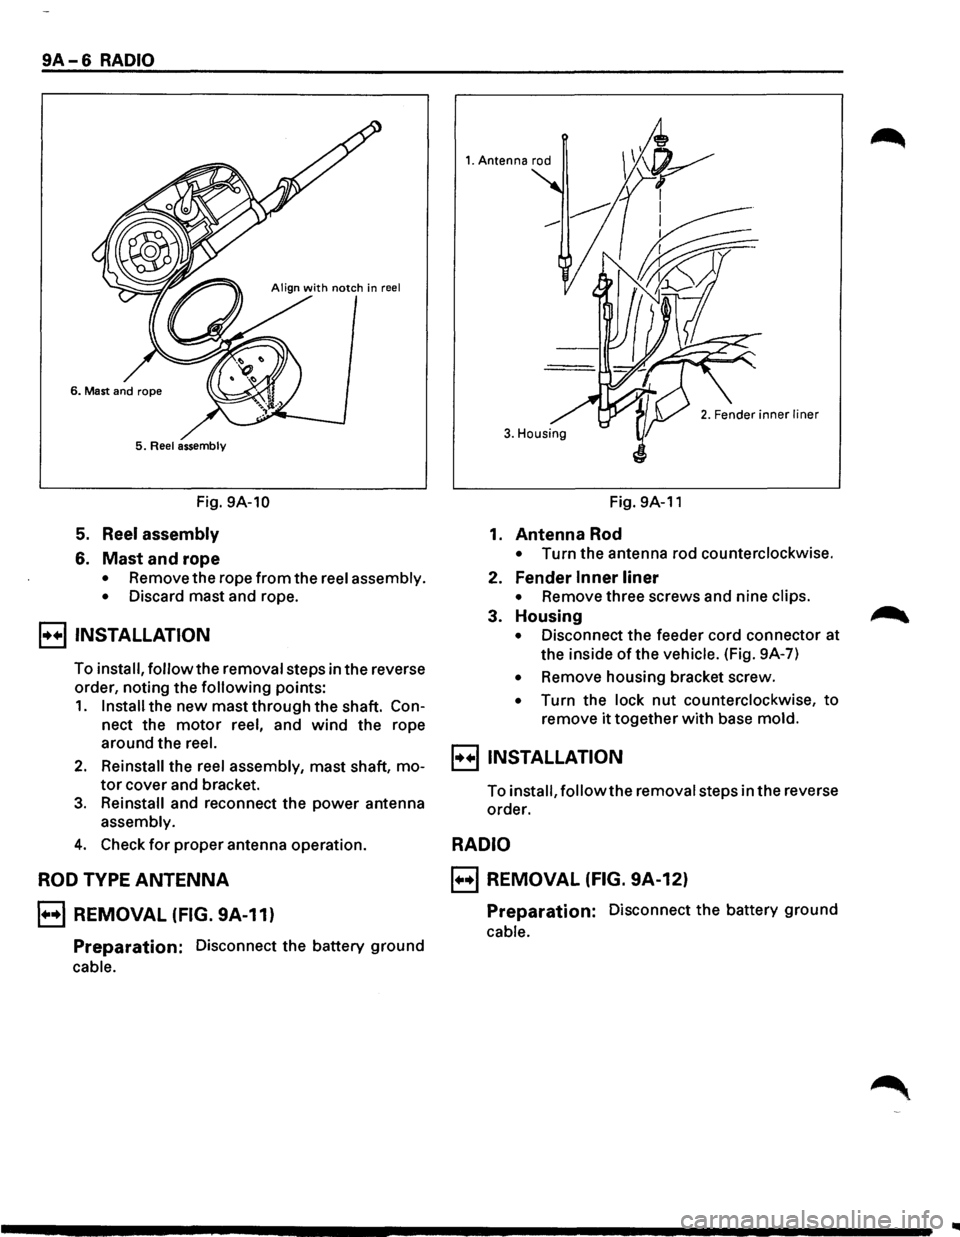
5. Reel assembly
Fig. 9A-10
5. Reel assembly
6. Mast and rope
• Remove the rope from the reel assembly.
•
Discard mast and rope.
B INSTALLATION
To install, follow the removal steps in the reverse
order, noting the
following points:
1. Install the new mast through the shaft. Con
nect the motor reel, and wind the rope
around the
reel.
2. Reinstall the reel assembly, mast shaft, mo
tor cover and bracket.
3. Reinstall and reconnect the power antenna
assembly.
4. Check for proper antenna operation.
ROD TYPE ANTENNA
B REMOVAL (FIG. 9A-11)
Preparation: Disconnect the battery ground
cable.
1. Antenna rod
3. Housing
Fig. 9A-11
1. Antenna Rod
• Turn the antenna rod counterclockwise.
2. Fender Inner liner
• Remove three screws and nine clips.
3. Housing
• Disconnect the feeder cord connector at
the inside
of the vehicle. (Fig. 9A-7)
• Remove housing bracket screw.
• Turn the lock nut counterclockwise, to
remove it together with base mold.
B INSTALLATION
To install, follow the removal steps in the reverse
order.
RADIO
B REMOVAL (FIG. 9A-12)
Preparation: Disconnect the battery ground
cable.
Page 1612 of 1928
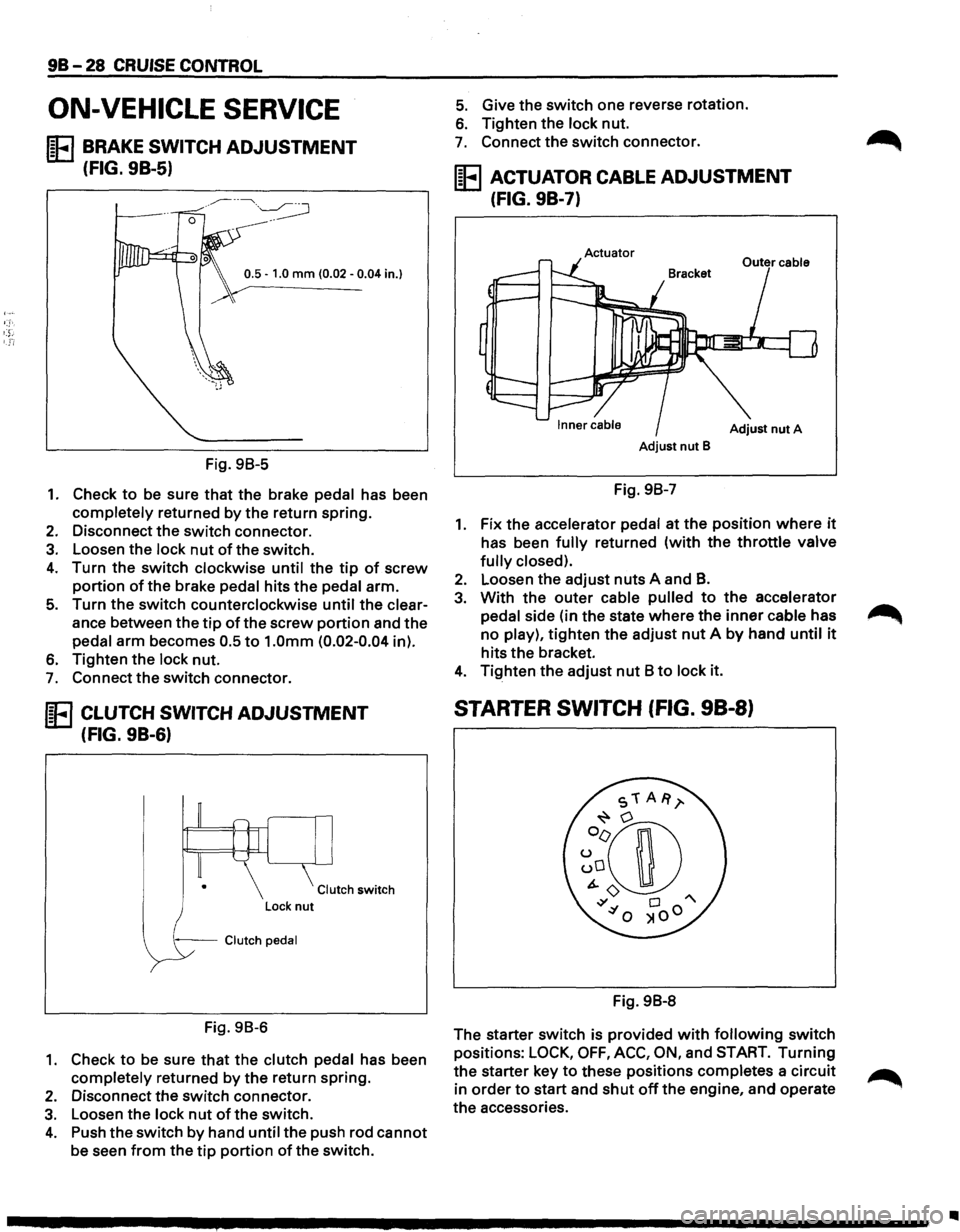
98-28 CRUISE CONTROL
ON-VEHICLE SERVICE
IE BRAKE SWITCH ADJUSTMENT
(FIG. 9B-5)
0.5 -1.0 mm (0.02 -0.04 in.}
Fig. 98-5
1. Check to be sure that the brake pedal has been
completely returned by the return spring.
2. Disconnect the switch connector.
3. Loosen the lock nut of the switch.
4. Turn the switch clockwise until the tip of screw
portion of the brake pedal hits the pedal arm.
5. Turn the switch counterclockwise until the clear
ance between the
tip of the screw portion and the
pedal arm becomes 0.5
to 1.0mm (0.02-0.04 in).
6. Tighten the lock nut.
7. Connect the switch connector.
IE CLUTCH SWITCH ADJUSTMENT
(FIG. 9B-6)
Clutch switch
--Clutch pedal
Fig. 98-6
1. Check to be sure that the clutch pedal has been
completely returned by
the return spring.
2. Disconnect the switch connector.
3. Loosen the lock nut of the switch.
4. Push the switch by hand until the push rod cannot
be seen from the tip portion of the switch.
5. Give the switch one reverse rotation.
6. Tighten the lock nut.
7. Connect the switch connector.
IE ACTUATOR CABLE ADJUSTMENT
(FIG. 9B-7)
Actuator
Adjust nut A
Adjust nut B
Fig. 98-7
1. Fix the accelerator pedal at the position where it
has been fully returned (with the throttle valve
fully closed).
2. Loosen the adjust nuts A and B.
3. With the outer cable pulled to the accelerator
pedal side (in the state
where the inner cable has
no play),
tighten the adjust nut A by hand until it
hits the bracket.
4. Tighten the adjust nut 8 to lock it.
STARTER SWITCH (FIG. 98-8)
Fig. 98-8
The starter switch is provided
with following switch
positions:
LOCK, OFF, ACC, ON, and START. Turning
the starter key to these positions completes a circuit
in
order to start and shut off the engine, and operate
the accessories.
Page 1752 of 1928
9J-128 Supplemental Restraint System
12. Remove steering column cover.
13. Disconnect the wiring harness connectors ~
located base of steering column.
14. Remove the combination switch assembly with
SRScoil.
NOTE: SRS
coil is a part of combination switch
assembly, which
cannot be replaced individually.
Therefore, be sure not to remove the
SRS coil from the
combination switch assembly.
INSTALLATION
1. Install the combination switch assembly with
SRScoil.
2. Connect the wiring harness connector located In
base of steering column.
3. Turn the SRS coil clockwise to full, return about
3 turns and align the neutral mark.
CAUTION: WHEN TURNING THE SRS COIL
CLOCKWISE TO FULL, STOP TURNING IF
RESISTANCE IS FELT. FORCED FURTHER
TURNING MAY CAUSE DAMAGE TO THE CABLE IN
THE SRS COIL.
4. Install steering column cover.
CAUTION: WHEN INSTALLING THE STEERING
COLUMN COVER, BE SURE TO WIRE (THROUGH ~
EACH HARNESS) AS ILLUSTRATED SO THAT THE
HARNESSES OF STARTER SWITCH,COMBINATION
SWITCH
AND SRS COIL MAY NOT CATCH WIRING.
5. Install the steering wheel and align the setting
marks.
6. Tighten the steering fixing nut to the specified
torque.
Torque : 34N·m(25 lb·ft.).
7. Connect horn lead connector.
8. Connect inflator module to 2-way yellow wiring
harness connector.
9. Install inflator module into steering wheel and
torque fasteners.
NOTE: Always replace inflator module {Air Bag)
fasteners with new fasteners. Never reuse old fasteners.
Torque: 8N·m(69 lb·ln.)
10. Install the steering lower cover and engine hood
opening lever.
11. Install front console assembly and connect the
wiring harness connector.
12. Install the transmission knob{for M/T) and
transfer control knob. ~
13. Enable the SRS (Refer to "Enabling the SRS" in
this section.).
•
Page 1755 of 1928
1 o. Connect the wiring harness connector located
base of steering column.
11. Turn the SRS coil clockwise to full, return about
3 turns and align the neutral mark.
CAUTION: WHEN TURNING THE SRS COIL
CLOCKWISE TO FULL, STOP TURNING IF
RESISTANCE IS FELT. FORCED FURTHER
TURNING MAY CAUSE DAMAGE TO THE CABLE IN
THE SRS COIL.
12. Install steering column cover.
CAUTION: WHEN INSTALLING THE STEERING
COLUMN COVER,
BE SURE TO WIRE {THROUGH
EACH HARNESS) AS ILLUSTRATED SO THAT THE
HARNESSES OF STARTER SWITCH,COMBINATION
SWITCH
AND SRS COIL MAY NOT CATCH WIRING.
13. Install the steering wheel and align the setting
marks.
14. Tighten the steering fixing nut to the specified
torque.
Torque: 34N·m(25 lb·ft.).
15. Connect horn lead connecor.
16. Connect inflator module to
2-way yellow wiring
harness connector.
17.
Install inflator module into steering wheel and
torque fasteners.
Torque: 8N·m(69 lb-in.)
18. Install the steering lower cover and engine hood
opening lever.
19.
Install front console assembly and connect the
wiring harness connector.
20.
Install the transmission knob(for M/T) and
transfer control knob.
21. Enable the
SRS (Refer to "Enabling the SRS" in
this section.).
Supplemental Restraint System 9J-131