engine ISUZU TROOPER 1995 Workshop Manual
[x] Cancel search | Manufacturer: ISUZU, Model Year: 1995, Model line: TROOPER, Model: ISUZU TROOPER 1995Pages: 1928
Page 1036 of 1928
7A-164 AUTOMATIC TRANSMISSION (4L30-E)
20. Third crossmember
~~~ Torque N·m(lb.ft) 50 (37)
19. Rear mount nut
~~~ Torque N·mOb·ft) 41 (30)
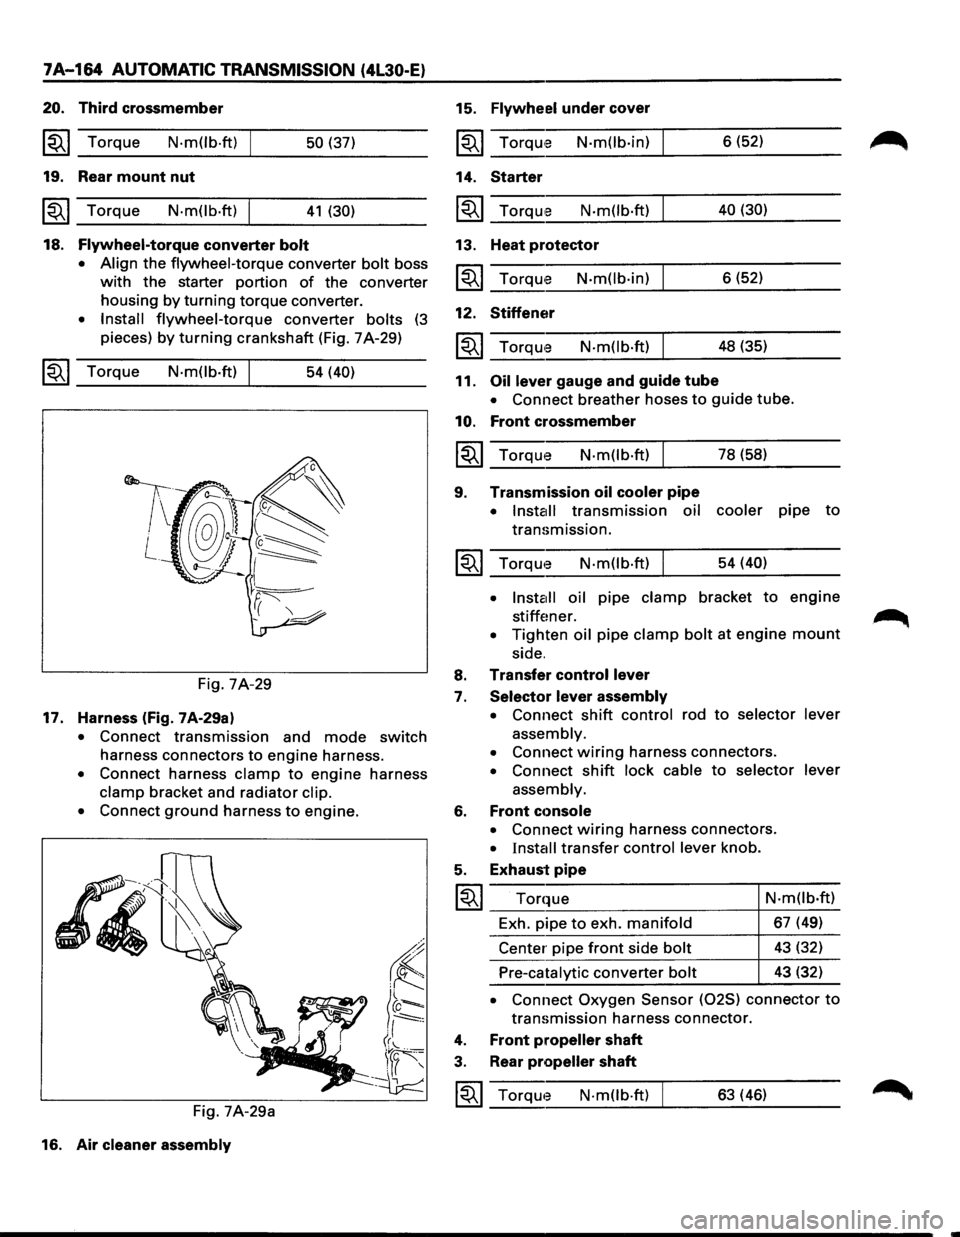
18. Flywheel-torque converter bolt
• Align
the flywheel-torque converter bolt boss
with the starter portion of the converter
housing
by turning torque converter.
• Install flywheel-torque converter bolts (3
pieces) by turning crankshaft (Fig. 7 A-29)
~~~ Torque N·mOb·ft) 54 (40)
Fig. 7A-29
17. Harness (fig. 7A-29a)
• Connect transmission and mode switch
harness connectors to engine harness.
• Connect harness clamp to engine harness
clamp bracket and radiator clip.
•
Connect ground harness to engine.
Fig. 7A-29a
16. Air
cleaner assembly
15. Flywheel under cover
~~~ TorqUte N·mOb·in)
14. Starter
~~~ Torqu,e N·m(lb·ft)
13. Heat protector
~~~ Torqu'e N·m(lb·in)
12. Stiffener
N·m(lb·ft)
11. Oil lever gauge and guide tube 6
(52)
40 (30)
6 (52)
48 (35)
• Connect breather hoses to guide tube.
10. Front crossmember
~~~ Torque N·m(lb·ft) I 78 (58)
9. Transmission oil cooler pipe
• Install transmission oil cooler pipe to
transmission.
~~~ Torqwe N·m(lb·ft) I 54 (40)
•
lnsta1ll oil pipe clamp bracket to engine
stiffener. .~
• Tighten oil pipe clamp bolt at engine mount
side.
8. Transfer control lever
7. Selector lever assembly
•
Connect shift control rod to selector lever
assembly.
•
Connect wiring harness connectors.
• Connect shift lock cable to selector lever
assembly.
6. Front cc>nsole
• Connect wiring harness connectors.
• Install transfer control lever knob.
5. Exhaust pipe
I~I ___ T_o_r_q~_ue __________________ 4-N_·_m_(l_b_·ft __ )
Exh. pipe
to exh. manifold 67 (49)
Center pipe
front side bolt 43 (32)
Pre-catalytic converter bolt 43 (32)
• Connect Oxygen Sensor (025) connector to
transmission harness connector.
4. Front propeller shaft
3. Rear propeller shaft
~~~ Torqwe N·mOb·ft) 63 (46)
Page 1037 of 1928
2. Exhaust and transfer protectors
~~~ Torque N-m(lb.ft) 37 (27)
1. Skid plate
• Connect negative (-) battery cable.
• Install
engine hood.
• Adjust shift lock cable.
Refer to "Selector lever" in this section.
SOLENOID VALVE
(MAIN CASE VALVE BODY)
l••l REMOVAL
Preparation:
• Disconnect negative {-) battery cable.
•
Remove exhaust protector and exhaust pipe.
1. Main case oil pan
• Remove sixteen 10 mm screws, main case
oil pan, magnet, and gasket.
• Drain fluid.
Refer to "CHANGING TRANSMISSION
FLUID".
2. Oil filter
• Remove three 13 mm screws, oil filter.
3. Wiring harness
• Disconnect wiring harness from band control
solenoid,
shift solenoids and main case 4 pin
connector.
Pull only on connectors, not on
wiring harness.
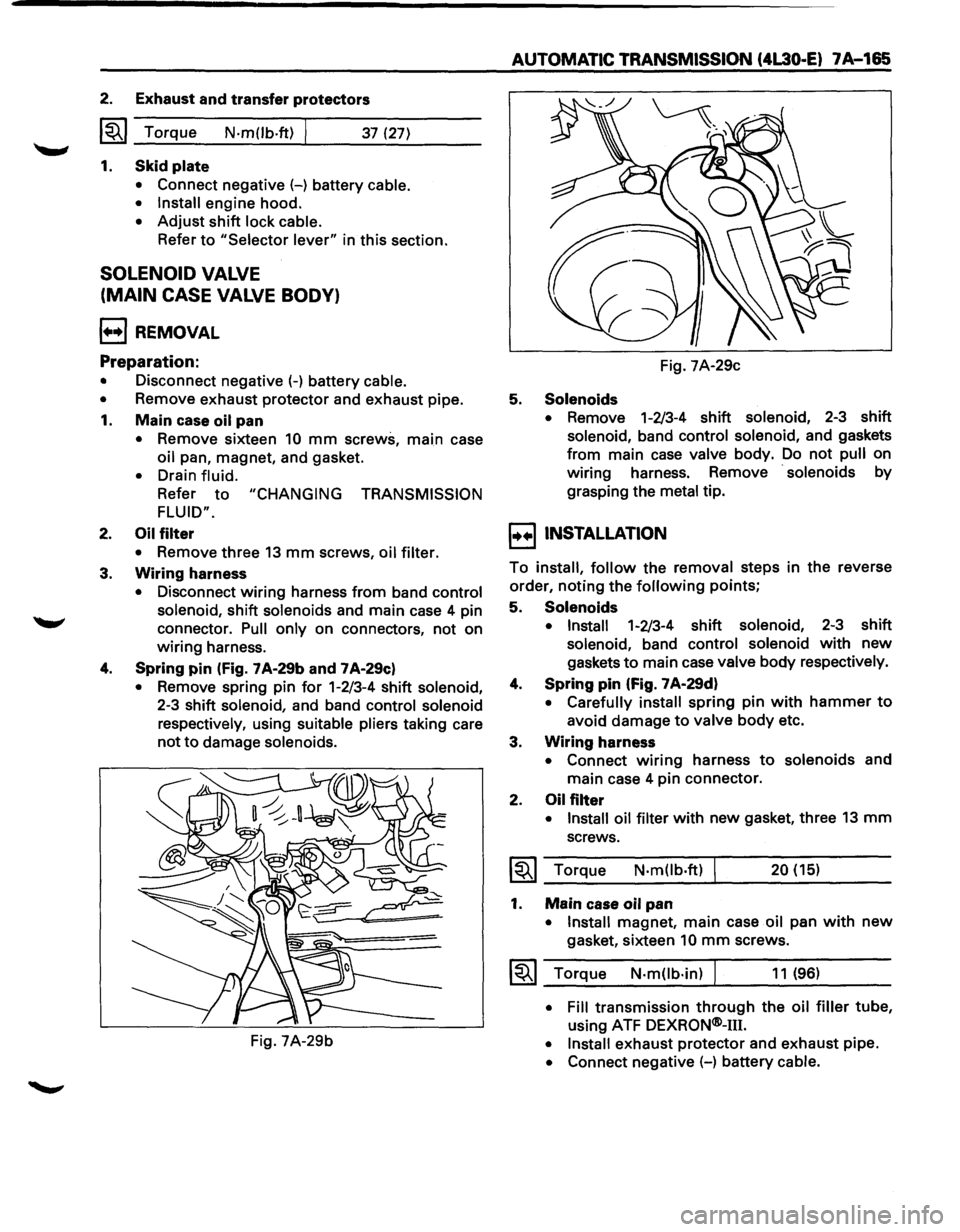
4. Spring pin (Fig. 7 A-29b and 7 A-29c)
• Remove spring pin for 1-2/3-4 shift solenoid,
2-3 shift solenoid, and band control solenoid
respectively,
using suitable pliers taking care
not to damage solenoids.
Fig. 7A-29b
AUTOMATIC TRANSMISSION (4L30 .. E) 7A-165
Fig. 7A-29c
5. Solenoids
• Remove 1-2/3-4 shift solenoid, 2-3 shift
solenoid, band control solenoid, and gaskets
from main case valve body. Do not pull on
wiring harness. Remove
· solenoids by
grasping the
metal tip.
I••! INSTALLATION
To install, follow the removal steps in the reverse
order,
noting the following points;
5. Solenoids
• Install 1-2/3-4 shift solenoid, 2-3 shift
solenoid, band control solenoid with new
gaskets to main case valve body respectively.
4. Spring pin (Fig. 7 A·29d)
• Carefully install spring pin with hammer to
avoid damage to valve body etc.
3. Wiring harness
• Connect wiring harness to solenoids and
main case 4 pin connector.
2. Oil filter
• Install oil filter with new gasket, three 13 mm
screws.
~~~ Torque N·m(lb.ft) 20 (15)
1. Main case oil pan
•
Install magnet, main case oil pan with new
gasket, sixteen 10 mm screws.
1~1 Torque N·m(lb·in) J 11 (96)
• Fill transmission through the oil filler tube,
using ATF DEXRQN®-m.
• Install exhaust protector and exhaust pipe.
• Connect negative (-) battery cable.
Page 1042 of 1928
7 A-170 AUTOMATIC TRANSMISSION (4L30-E)
TRANSMISSION OIL TEMPERATURE
SENSOR (ADAPTER CASE)
1•+1 REMOVAL
Preparation:
• Disconnect negative (-) battery cable.
•
Remove exhaust protector and exhaust pipe.
• Drain fluid.
•
Refer to "CHANGING TRANSMISSION FLUID".
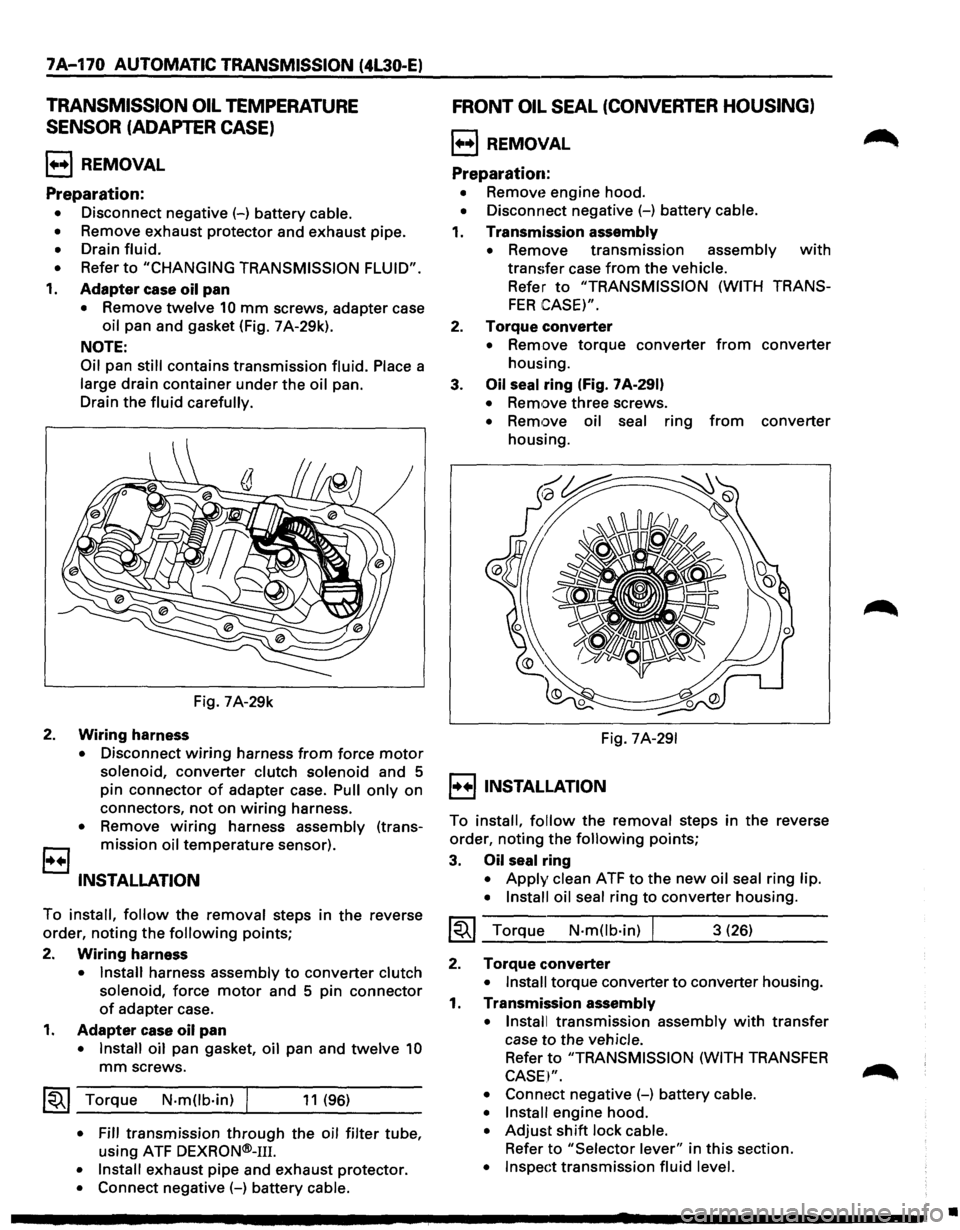
1. Adapter case oil pan
• Remove twelve 10 mm screws, adapter case
oil pan and gasket (Fig. 7 A-29k).
NOTE:
Oil
pan still contains transmission fluid. Place a
large drain container under the oil pan.
Drain the
fluid carefully.
Fig. 7A-29k
2. Wiring harness
• Disconnect wiring harness from force motor
solenoid, converter clutch solenoid and 5
pin connector
of adapter case. Pull only on
connectors,
not on wiring harness.
• Remove wiring harness assembly (trans
B mission oil temperature sensor).
INSTALLATION
To install, follow the removal steps in the reverse
order, noting the
following points;
2.
Wiring harness
• Install harness assembly to converter clutch
solenoid,
force motor and 5 pin connector
of adapter case.
1. Adapter case oil pan
• Install oil pan gasket, oil pan and twelve 10
mm screws.
~~~ Torque N·mOb·in) I 11 (96)
• Fill transmission through the oil filter tube,
using ATF
DEXRON®-111.
• Install exhaust pipe and exhaust protector.
• Connect negative (-) battery cable.
FRONT OIL SEAL (CONVERTER HOUSING)
l++l REMOVAL
Preparation:
• Removt~ engine hood.
• Disconnect negative (-) battery cable.
1. Transmission assembly
•
Remove transmission assembly with
transfer case from the vehicle.
Refer to "TRANSMISSION (WITH TRANS
FER CASE)".
2. Torque converter
• Remove torque converter from converter
housing.
3.
Oil seal ring (Fig. 7 A-291)
• Remove three screws.
• Remove oil seal ring from converter
housing.
Fig.
7A-291
I++IINSTALLATION
To install, follow the removal steps in the reverse
order, noting the
following points;
3. Oil seal ring
• Apply clean ATF to the new oil seal ring lip.
• Install oil seal
ring to converter housing.
~~~ Torque N·mOb·in) I 3 (26)
2. Torque converter
• Install torque converter to converter housing.
1. Transmission assembly
• Install
transmission assembly with transfer
case
to the vehicle.
Refer to "TRANSMISSION (WITH TRANSFER
CASE I".
• Connoct negative (-) battery cable.
• Install
engine hood.
• Adjust shift lock cable.
Refer to "Selector lever" in this section.
• Inspect transmission fluid level.
•
Page 1060 of 1928
7A-188 AUTOMATIC TRANSMISSION (4L30-E)
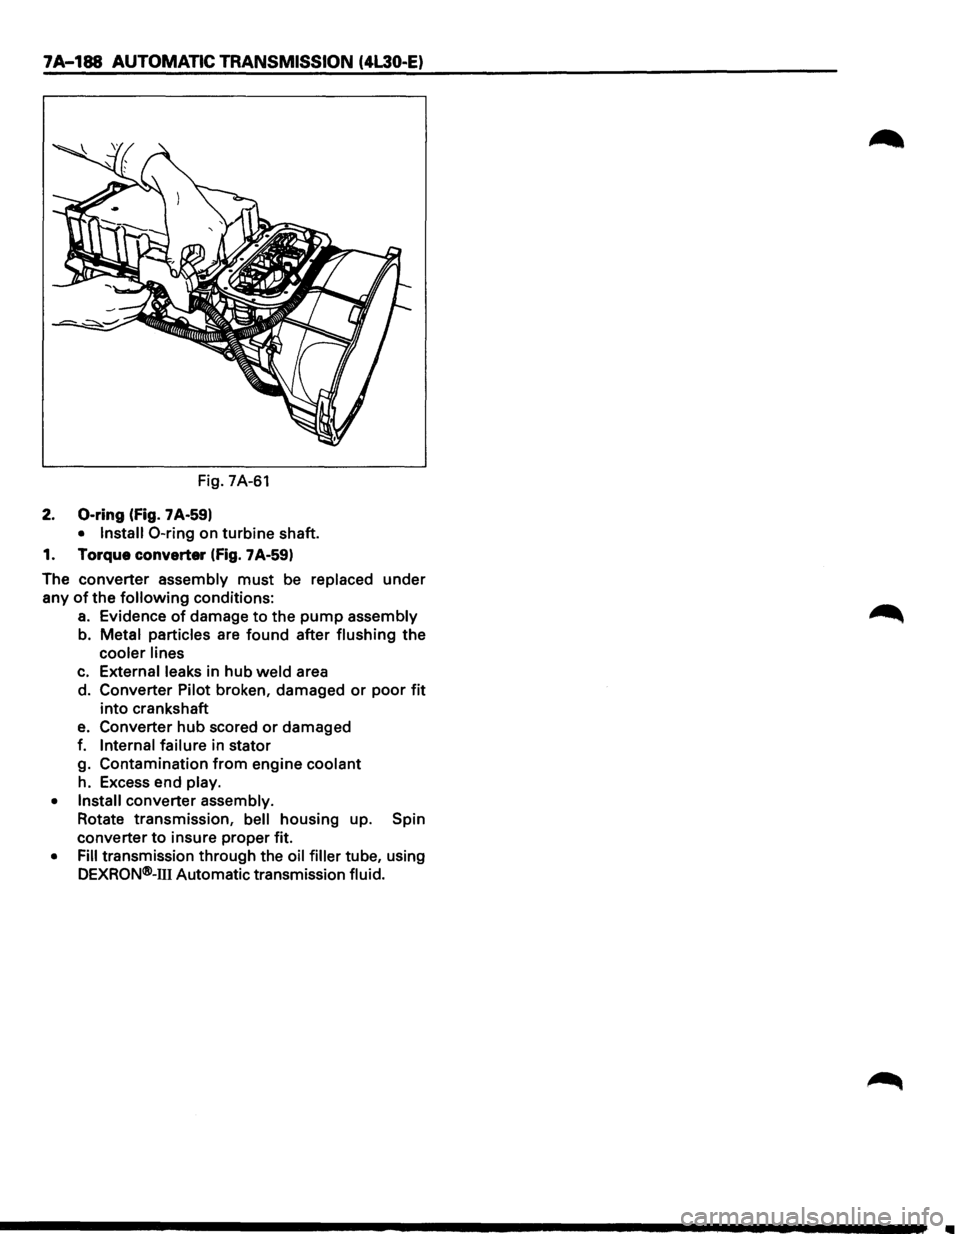
Fig. 7A-61
2. 0-ring (fig. 7 A-59)
• Install 0-ring on turbine shaft.
1. Torque converter
(fig. 7A-59)
The converter assembly
must be replaced under
any
of the following conditions:
a. Evidence of damage to the pump assembly
b. Metal particles are found after flushing
the
cooler lines
c. External leaks in hub weld area
d. Converter Pilot broken, damaged
or poor fit
into crankshaft
e. Converter hub scored or damaged
f.
Internal failure in stator
g. Contamination
from engine coolant
h. Excess end play.
• Install converter assembly.
Rotate transmission,
bell housing up. Spin
converter
to insure proper fit.
• Fill transmission through the oil filler tube, using
DEXRQN®-111 Automatic transmission fluid.
Page 1079 of 1928
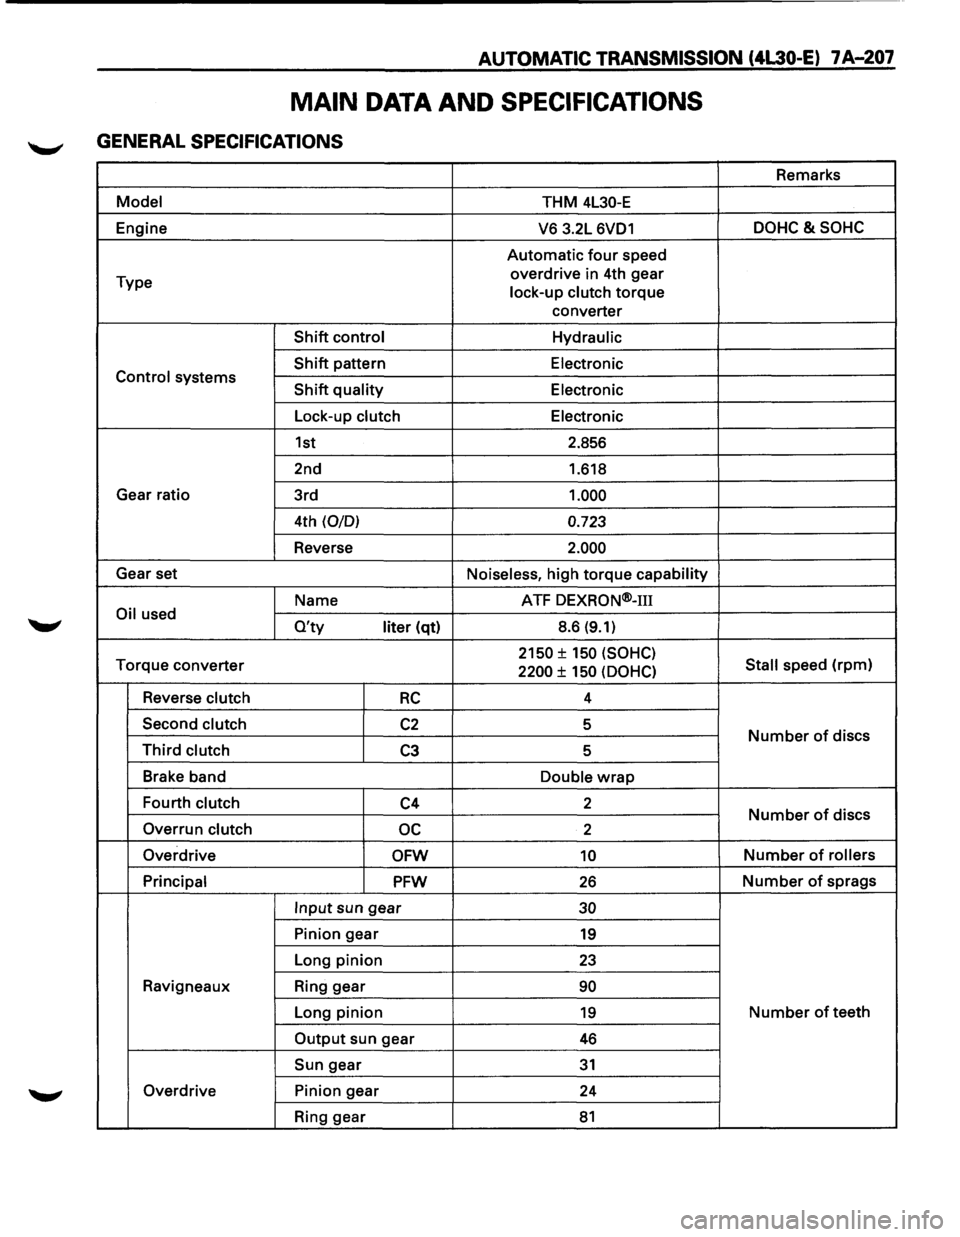
AUTOMATIC TRANSMISSION (4L30-E) 7 A-207
MAIN DATA AND SPECIFICATIONS
GENERAL SPECIFICATIONS
Remarks
Model THM 4L30-E
Engine
V6 3.2L 6VD1 DOHC&SOHC
Automatic four speed
Type overdrive
in 4th gear
lock-up clutch
torque
converter
Shift control Hydraulic
Shift pattern
Electronic Control systems Shift quality Electronic
Lock-up clutch Electronic
1st 2.856
2nd 1.618
Gear ratio
3rd
1.000
4th (0/0) 0.723
Reverse 2.000
Gear set
Noiseless, high torque capability
Name ATF
DEXRON®-m
Oil used O'ty liter (qt) 8.6 (9.1)
Torque
converter 2150 ± 150 (SOHC)
Stall speed (rpm) 2200 ± 150 (OOHC)
Reverse clutch RC 4
Second clutch
C2 5 Number of discs Third clutch C3 5
Brake band
Double
wrap
Fourth clutch C4 2 Number of discs
Overrun clutch oc 2
Overdrive
OFW 10 Number of rollers
Principal
PFW 26 Number of sprags
Input sun gear 30
Pinion gear 19
Long pinion 23
Ravigneaux Ring gear 90
Long pinion 19 Number of teeth
Output sun gear 46
Sun gear 31
Overdrive Pinion gear
24
Ring gear
81
Page 1094 of 1928
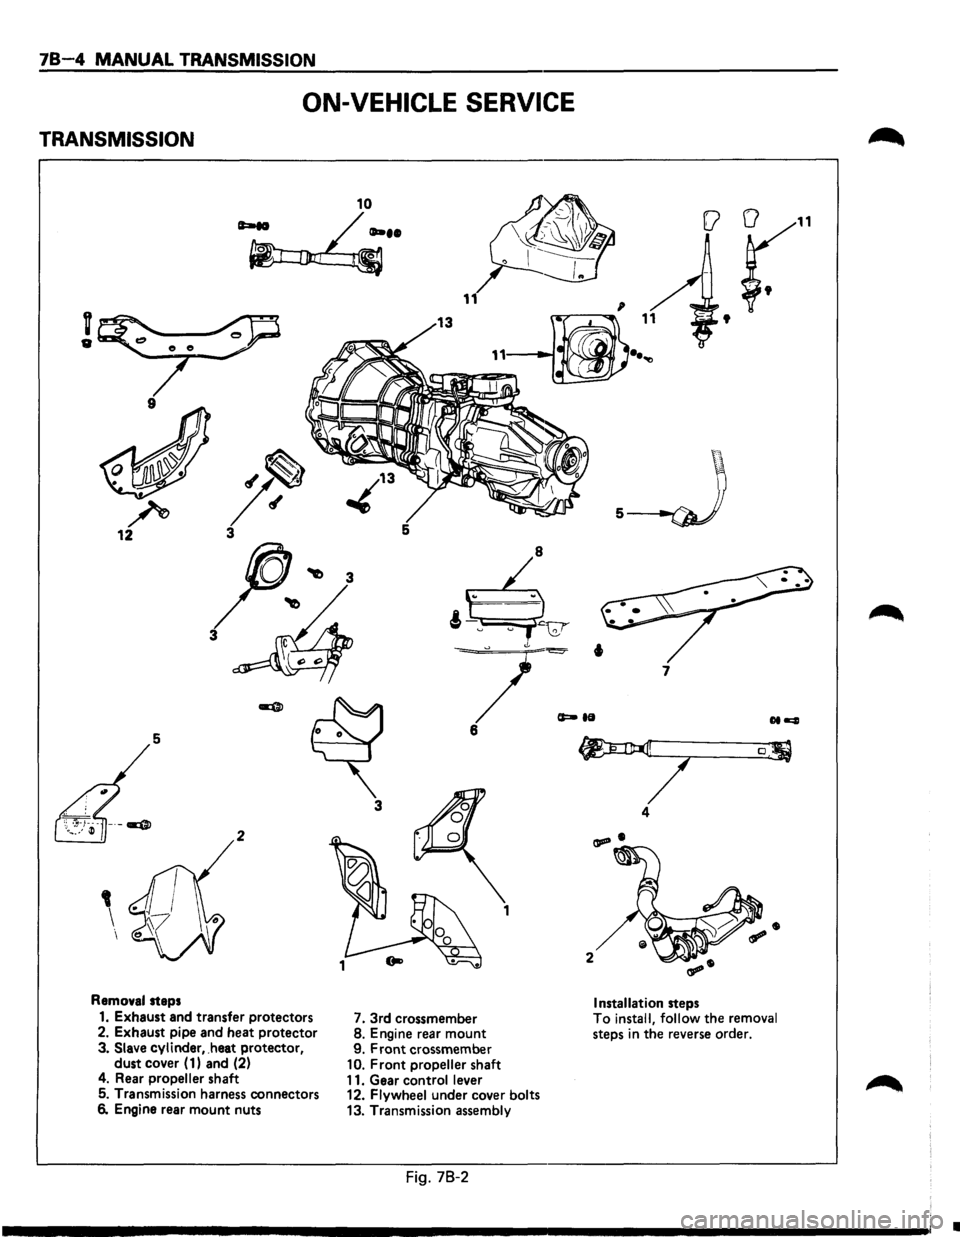
78-4 MANUAL TRANSMISSION
ON-VEHICLE SERVICE
TRANSMISSION
10
~··
v
"
9
r 12 5
3
5
3
2
1
Removal steps
1. Exhaust and transfer protectors
7. 3rd crossmember
2. Exhaust pipe and heat protector 8. Engine rear mount 3. Slave cylinder, .heat protector,
9. Front crossmember dust cover ( 1) and (2) 10. Front propeller shaft
4. Rear propeller shaft
11. Gear control lever 5. Transmission harness connectors
12. Flywheel under cover bolts 6. Engine rear mount nuts
13. Transmission assembly
Fig. 78-2
(a
11
t
.__J
7
[J
4
Installation steps To install,
follow the removal steps in the reverse order.
•
Page 1095 of 1928
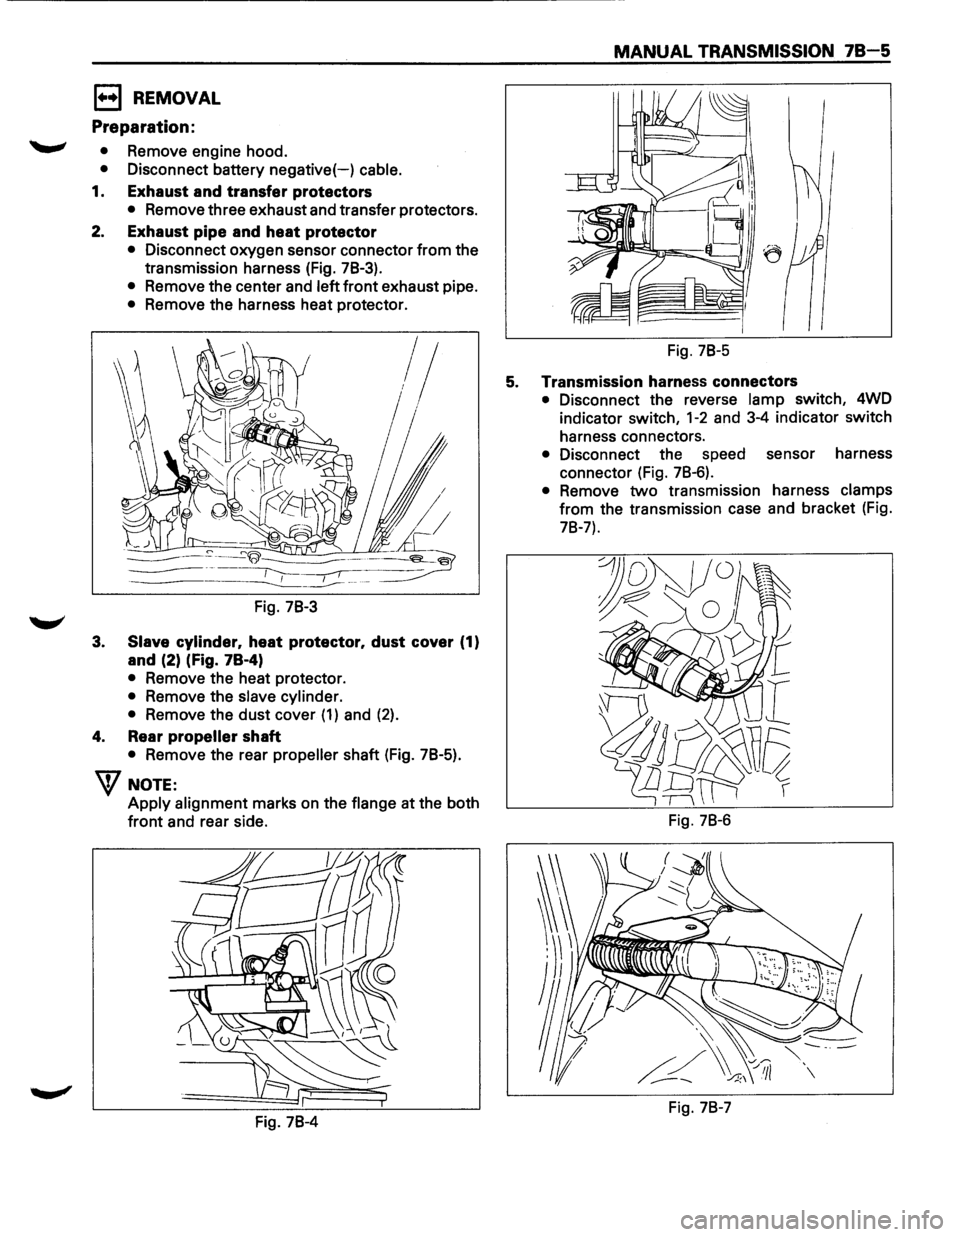
EJ REMOVAL
Preparation:
'--"' • Remove engine hood.
• Disconnect battery negative(-) cable.
1. Exhaust and transfer protectors
• Remove three exhaust and transfer protectors.
2. Exhaust pipe and heat protector
3.
• Disconnect oxygen sensor connector from the
transmission harness (Fig. 78-3).
• Remove the center and left front exhaust pipe.
• Remove the harness heat protector.
lj
Fig. 78-3
Slave cylinder, heat protector, dust cover (1)
and (2) (Fig. 78-4)
• Remove the heat protector.
• Remove the slave cylinder.
•
Remove the dust cover (1) and (2).
4. Rear propeller shaft
• Remove the rear propeller shaft (Fig. 78-5).
W NOTE:
Apply alignment marks on the flange at the both
front and rear side.
Fig. 78-4
MANUAL TRANSMISSION 78-5
Fig. 78-5
5. Transmission harness connectors
• Disconnect the reverse lamp switch, 4WD
indicator switch,
1-2 and 3-4 indicator switch
harness connectors.
• Disconnect the speed sensor harness
connector (Fig. 78-6).
• Remove two transmission harness clamps
from the transmission case and bracket (Fig.
78-7).
Fig. 78-6
Fig. 78-7
Page 1096 of 1928
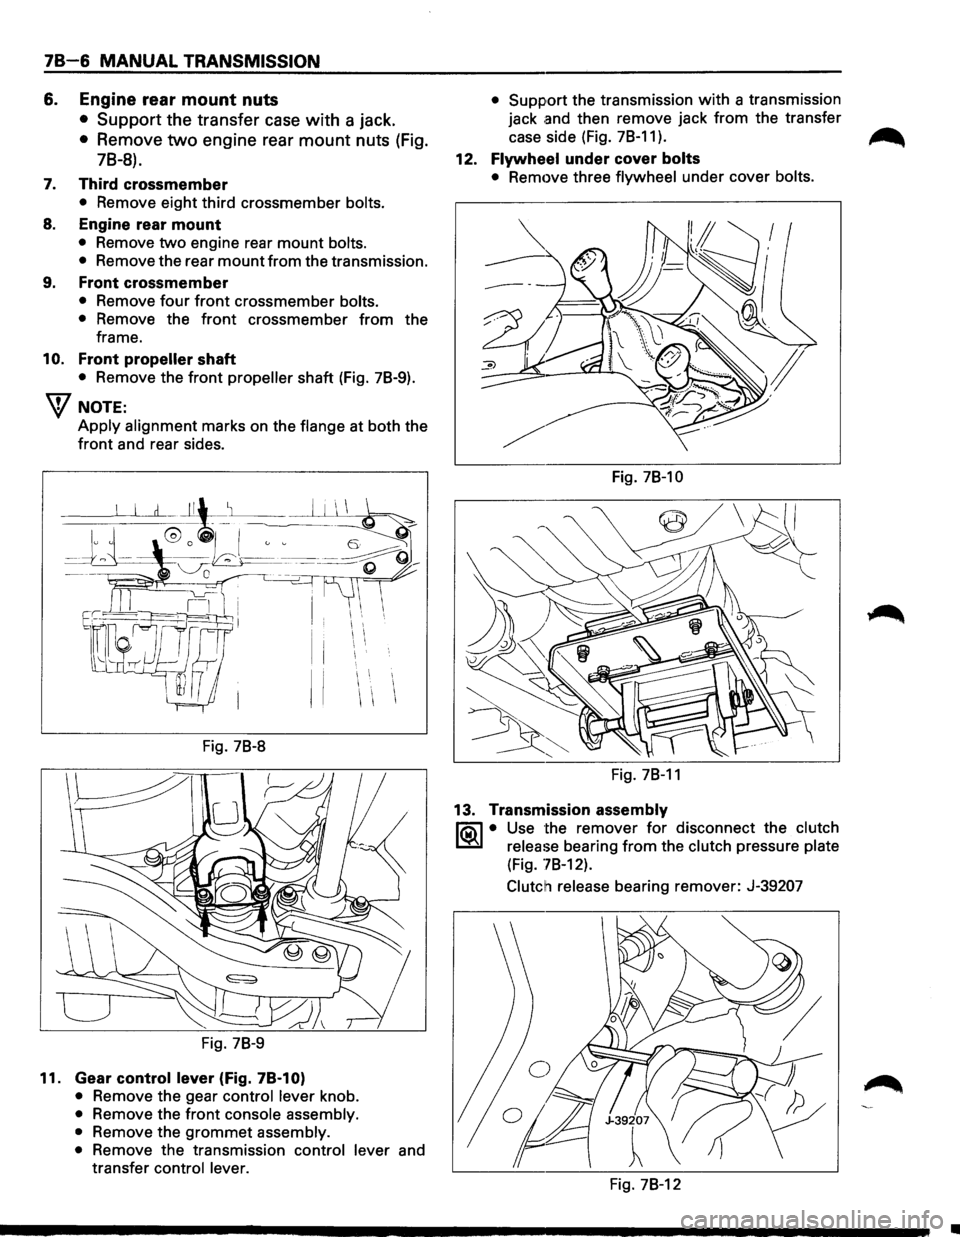
78-6 MANUAL TRANSMISSION
6. Engine rear mount nuts
• Support the transfer case with a jack.
• Remove two engine rear mount nuts (Fig.
78-8).
7. Third crossmember
• Remove eight third crossmember bolts.
8. Engine rear mount
• Remove two engine rear mount bolts.
•
Remove the rear mount from the transmission.
9. Front crossmember
• Remove four front crossmember bolts.
•
Remove the front crossmember from the
frame.
10. Front propeller shaft
• Remove the front propeller shaft (Fig. 78-9).
W NOTE:
Apply alignment marks on the flange at both the
front and rear sides.
I I I
II
Fig. 78-8
Fig. 78-9
11. Gear control lever (Fig. 78-1 0)
• Remove the gear control lever knob.
• Remove the front console assembly.
•
Remove the grommet assembly.
•
Remove the transmission control lever and
transfer
control lever. •
Support
the transmission with a transmission
jack
.and then remove jack from the transfer
case side (Fig. 78-11).
~
12. Flywheel under cover bolts
• Remove three flywheel under cover bolts.
Fig. 78-10
Fig. 78-11
13. Transmission assembly
li5\l • Use the remover for disconnect the clutch
~ release bearing from the clutch pressure plate
(Fig. '78-12).
Clutch release
bearing remover: J-39207
Fig. 78-12
•
Page 1097 of 1928
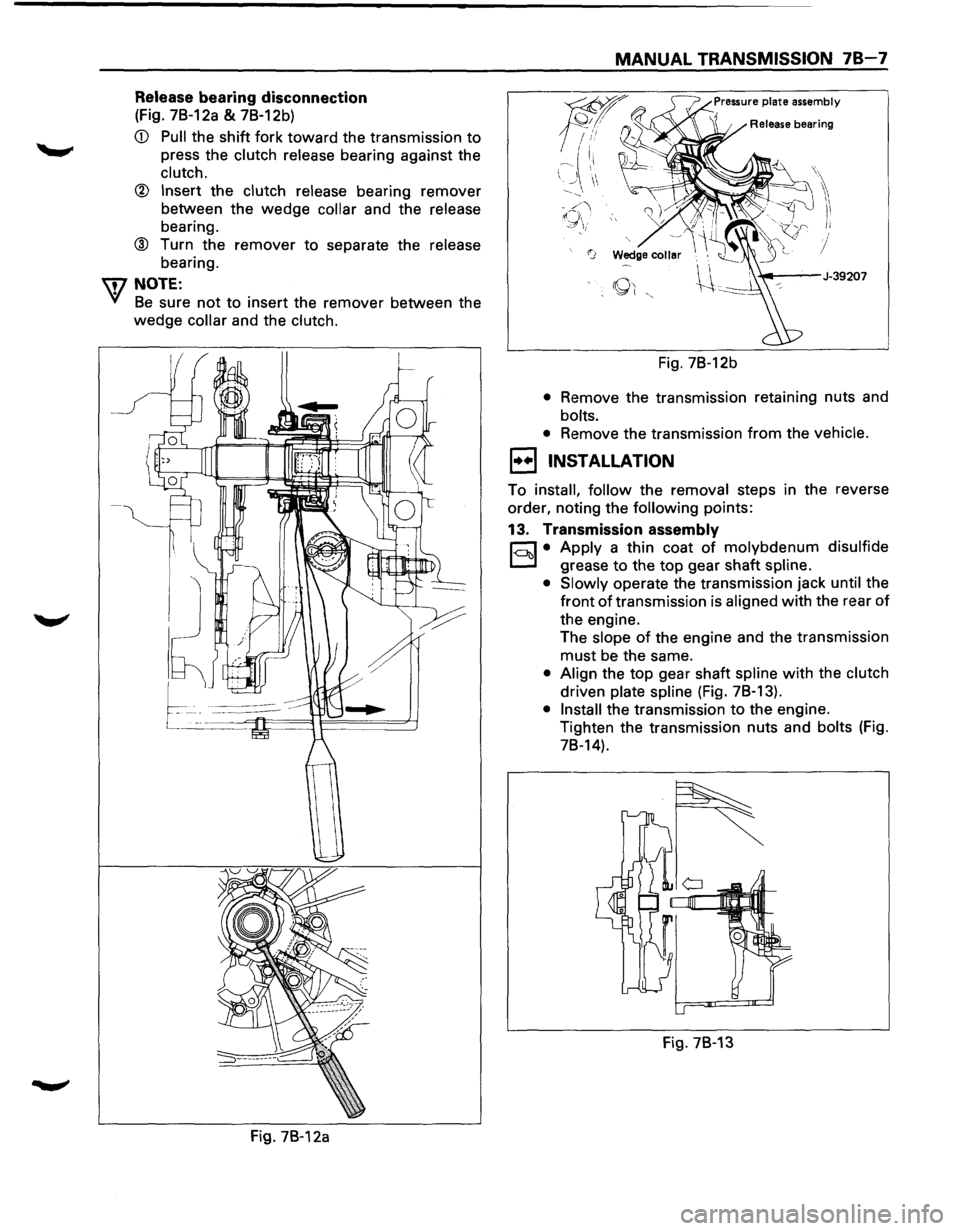
Release bearing disconnection
(Fig. 7B-12a & 7B-12b)
CD Pull the shift fork toward the transmission to
press the clutch release bearing against the
clutch.
® Insert the clutch release bearing remover
between the
wedge collar and the release
bearing.
® Turn the remover to separate the release
bearing.
IDNOTE:
Yl Be sure not to insert the remover between the
wedge collar and the clutch.
Fig. 7B-12a
MANUAL TRANSMISSION 78-7
Fig. 7B-12b
• Remove the transmission retaining nuts and
bolts.
•
Remove the transmission from the vehicle.
1••1 INSTALLATION
To install, follow the removal steps in the reverse
order, noting the
following points:
13. Transmission assembly
r;:::;J • Apply a thin coat of molybdenum disulfide
D grease to the top gear shaft spline.
• Slowly
operate the transmission jack until the
front
of transmission is aligned with the rear of
the engine.
The
slope of the engine and the transmission
must be the same.
• Align the top gear shaft spline with the clutch
driven plate spline (Fig. 78-13).
• Install the transmission to the engine.
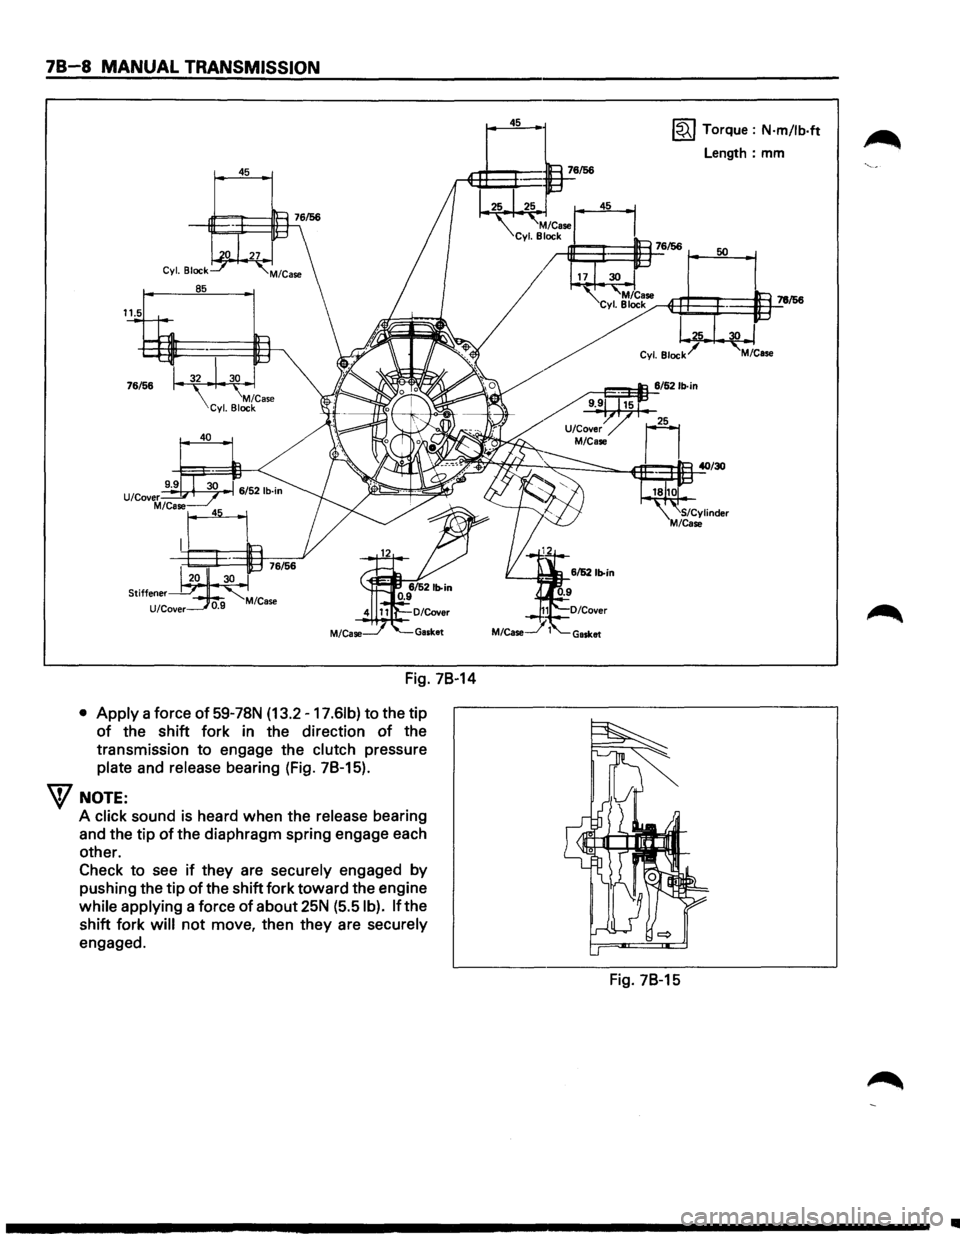
Tighten the transmission nuts and
bolts (Fig.
78-14).
Fig. 78-13
Page 1098 of 1928
78-8 MANUAL TRANSMISSION
45
Fig. 78-14
• Apply a force of 59-78N (13.2 -17.61b) to the tip
of the shift fork in the direction of the
transmission
to engage the clutch pressure
plate and release bearing (Fig. 78-15).
W NOTE:
A click sound is heard when the release bearing
and the tip
of the diaphragm spring engage each
other.
Check
to see if they are securely engaged by
pushing the tip of the shift fork toward the engine
while applying a force
of about 25N (5.5 I b). If the
shift fork
will not move, then they are securely
engaged.
45 ~ Torque : N·m/lb·ft
Length: mm
Fig. 78-15
..