ISUZU TROOPER 1995 Manual Online
Manufacturer: ISUZU, Model Year: 1995, Model line: TROOPER, Model: ISUZU TROOPER 1995Pages: 1928
Page 81 of 1928
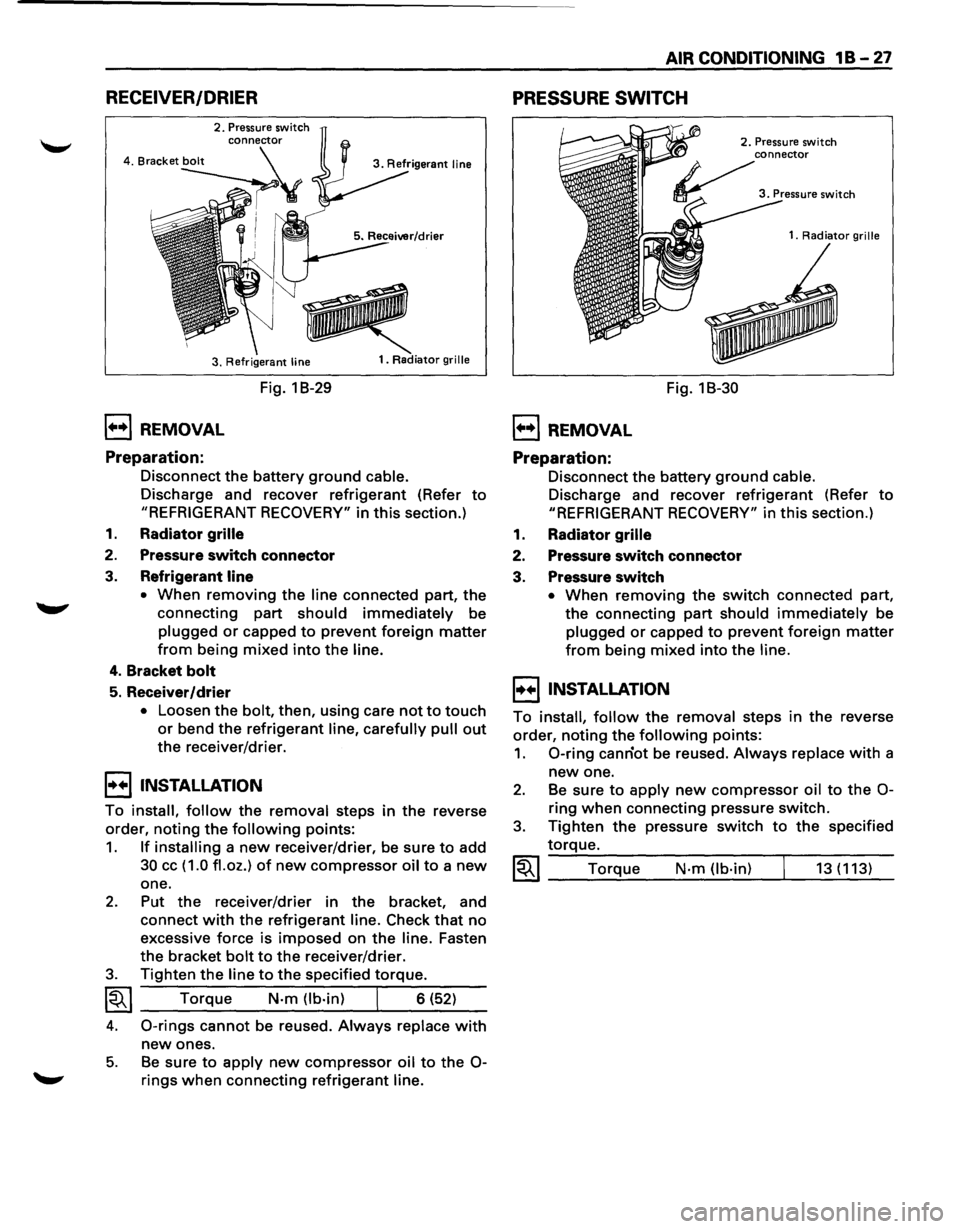
RECEIVER/DRIER
2. Pressure switch
3. Refrigerant
line
1••1 REMOVAL
Preparation:
Fig. 1 B-29
1. Radiator grille
Disconnect the battery ground cable.
Discharge and recover refrigerant (Refer to
"REFRIGERANT RECOVERY" in this section.)
1. Radiator grille
2. Pressure switch connector
3. Refrigerant line
•
When removing the line connected part, the
connecting part
should immediately be
plugged or capped to prevent foreign matter
from being mixed into the line.
4. Bracket bolt
5. Receiver/drier
• Loosen the bolt, then, using care not to touch
or bend the refrigerant line, carefully pull out
the receiver/drier.
I••I•NSTALLATION
To install, follow the removal steps in the reverse
order,
noting the following points:
1. If installing a new receiver/drier, be sure to add
30 cc ( 1.0 fl. oz.) of new compressor oil to a new
one.
2. Put the receiver/drier in the bracket, and
connect
with the refrigerant line. Check that no
excessive force is imposed on the line. Fasten
the bracket
bolt to the receiver/drier.
3. Tighten the line to the specified torque.
~~~ Torque N-m (lb-in) I 6 (52)
4. 0-rings cannot be reused. Always replace with
new ones.
5. Be sure to apply new compressor oil to the 0-
rings when connecting refrigerant line.
AIR CONDITIONING 1 B -27
PRESSURE SWITCH
1••1 REMOVAL
Preparation:
Fig. 18-30
2. Pressure switch
1.
Radiator grille
Disconnect the battery ground cable.
Discharge and recover refrigerant (Refer to
"REFRIGERANT RECOVERY" in this section.)
1. Radiator grille
2. Pressure switch connector
3. Pressure switch
• When removing the switch connected part,
the connecting
part should immediately be
plugged or capped to prevent foreign matter
from being mixed into the line.
I••IINSTALLATION
To install, follow the removal steps in the reverse
order,
noting the following points:
1. 0-ring canriot be reused. Always replace with a
new one.
2. Be sure to apply new compressor oil to the 0-
ring when connecting pressure switch.
3. Tighten the pressure switch to the specified
torque.
~~~ Torque N·m (lb-in) 13 (113)
Page 82 of 1928
1 B-28 AIR CONDITIONING
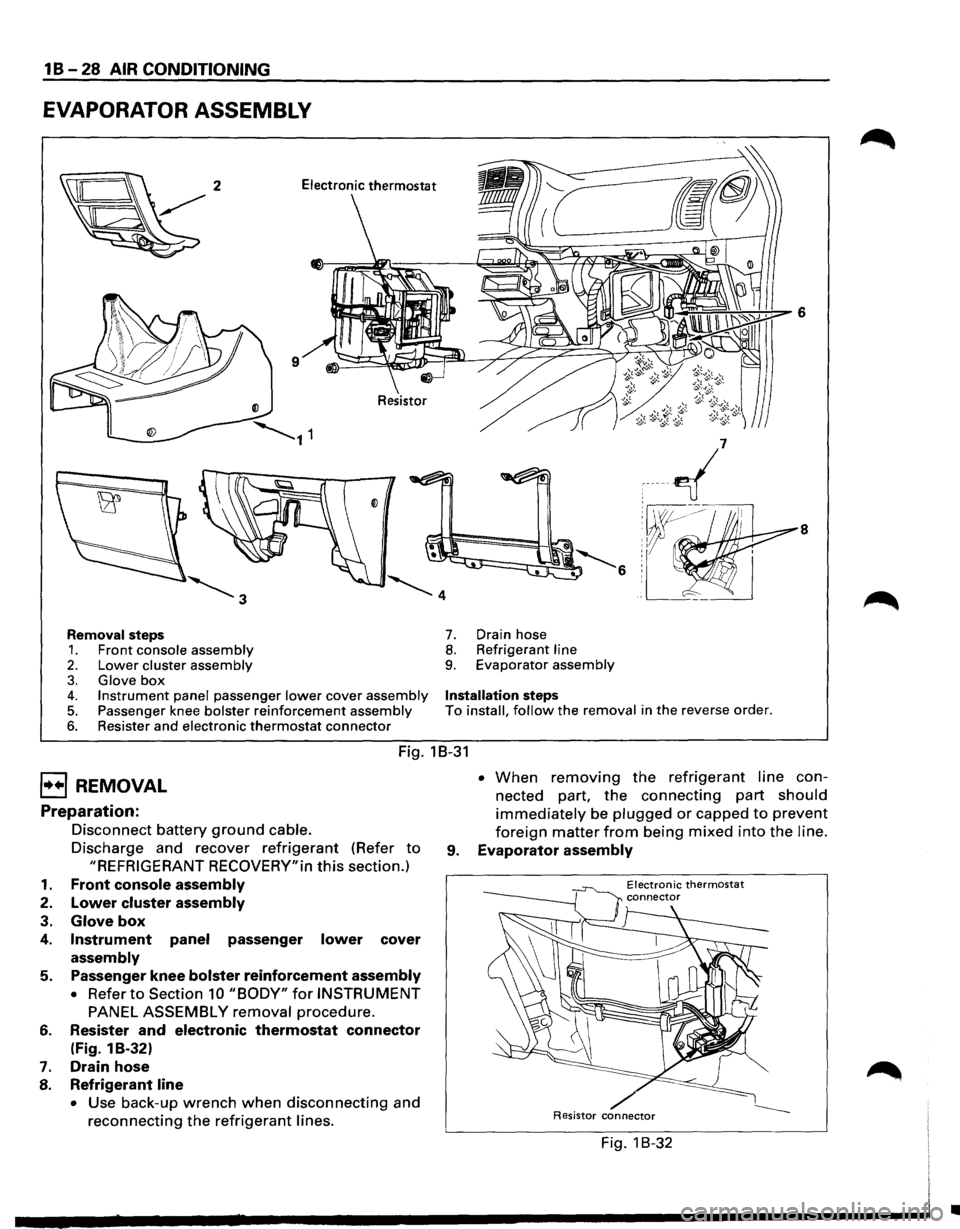
EVAPORATOR ASSEMBLY
8
Removal steps 7. Drain hose
1. Front console assembly 8. Refrigerant line
2. Lower cluster assembly 9. Evaporator assembly
3. Glove box 4. Instrument panel passenger lower cover assembly Installation steps
5. Passenger knee bolster reinforcement assembly To install, follow the removal in the reverse order.
6. Resister and electronic thermostat connector
Fig. 18-31
EJ REMOVAL
Preparation:
1.
2.
3.
4.
5.
6.
7.
8.
Disconnect battery ground cable.
Discharge and recover refrigerant (Refer to
"REFRIGERANT RECOVERY"in this section.)
Front console assembly
Lower cluster assembly
Glove box
Instrument panel passenger lower cover
assembly
Passenger knee bolster reinforcement assembly
• Refer to Section 10 "BODY" for INSTRUMENT
PANEL ASSEMBLY removal procedure.
Resister
and electronic thermostat connector
(Fig. 1 B-32)
Drain hose
Refrigerant line
• Use back-up wrench when disconnecting and
reconnecting the refrigerant lines. •
When removing the refrigerant line con
nected part,
the connecting part should
immediately be plugged or capped to prevent
foreign matter from being mixed into the line.
9. Evaporator assembly
Electronic thermostat
/ Resistor connector
Fig. 1 B-32
•
Page 83 of 1928
I••IINSTALLATION
To install, follow the removal steps in the reverse
order,
noting the following points:
1. To install a new evaporator assembly, add 50cc
(1.7 fl.oz.) of new compressor oil to a new core.
2. Tighten the refrigerant outlet line to the
specified torque.
~~~ Torque N·m (lb.ft) 25 (18)
AIR CONDITIONING 1 B-29
3. Tighten the refrigerant inlet line to the specified
torque.
~~~ Torque N·m (lb·ft) 15 (11)
4. 0-rings cannot be reused. Always replace with
new ones.
5. Be sure to apply new compressor oil to the 0-
rings when connecting lines.
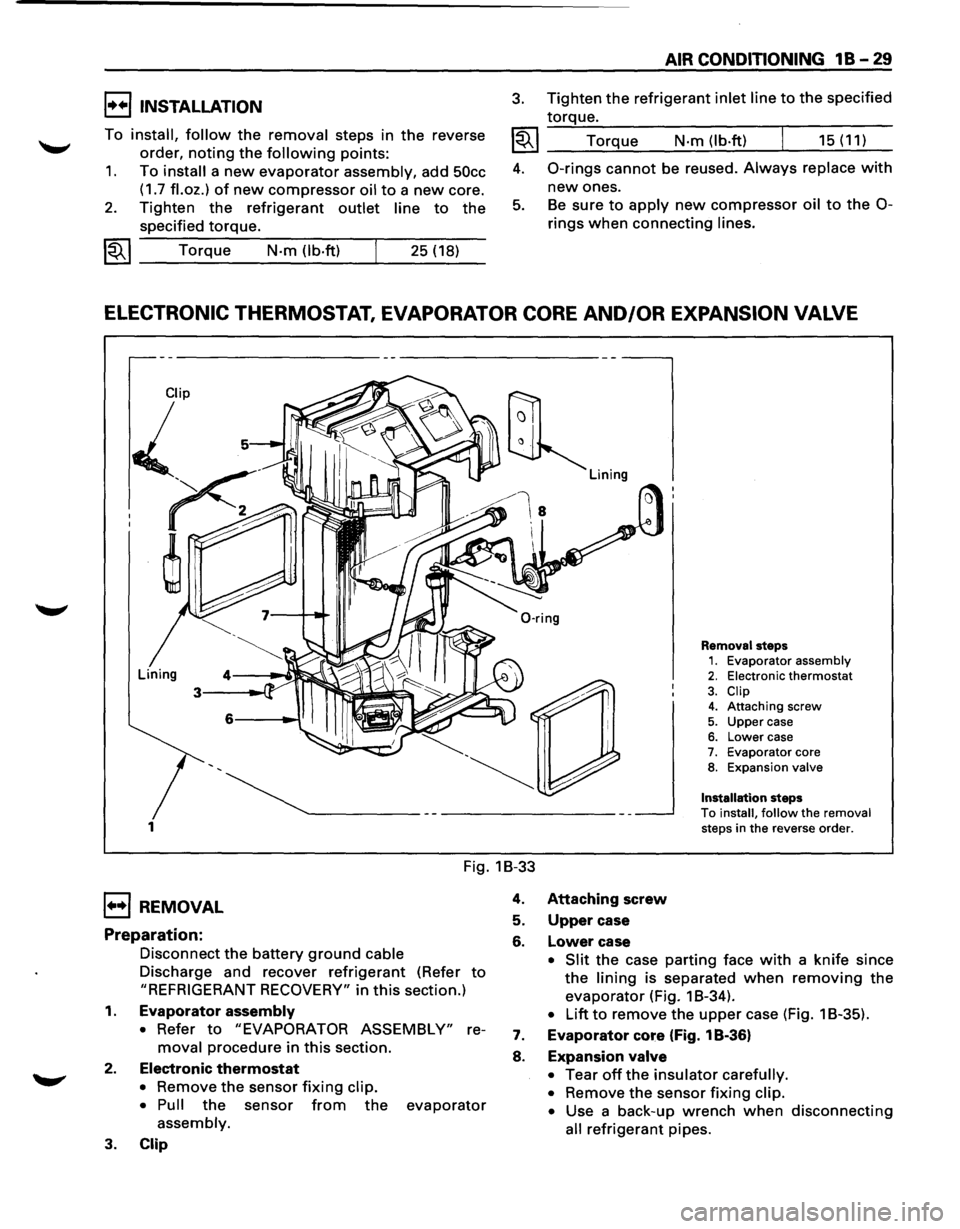
ELECTRONIC THERMOSTAT, EVAPORATOR CORE AND/OR EXPANSION VALVE
1
Removal steps 1. Evaporator assembly 2. Electronic thermostat
3. Clip 4. Attaching screw
5. Upper case 6. Lower case 7. Evaporator core 8. Expansion valve
Installation
steps
To install, follow the removal steps in the reverse order.
Fig. 1B-33
1••1 REMOVAL
Preparation:
Disconnect the battery ground cable
Discharge and recover refrigerant (Refer to
"REFRIGERANT RECOVERY" in this section.)
1. Evaporator assembly
• Refer to "EVAPORATOR ASSEMBLY" re
moval procedure in this section.
2. Electronic thermostat
• Remove the sensor fixing clip.
• Pull
the sensor from the evaporator
assembly.
3. Clip
4. Attaching screw
5. Upper case
6. Lower case
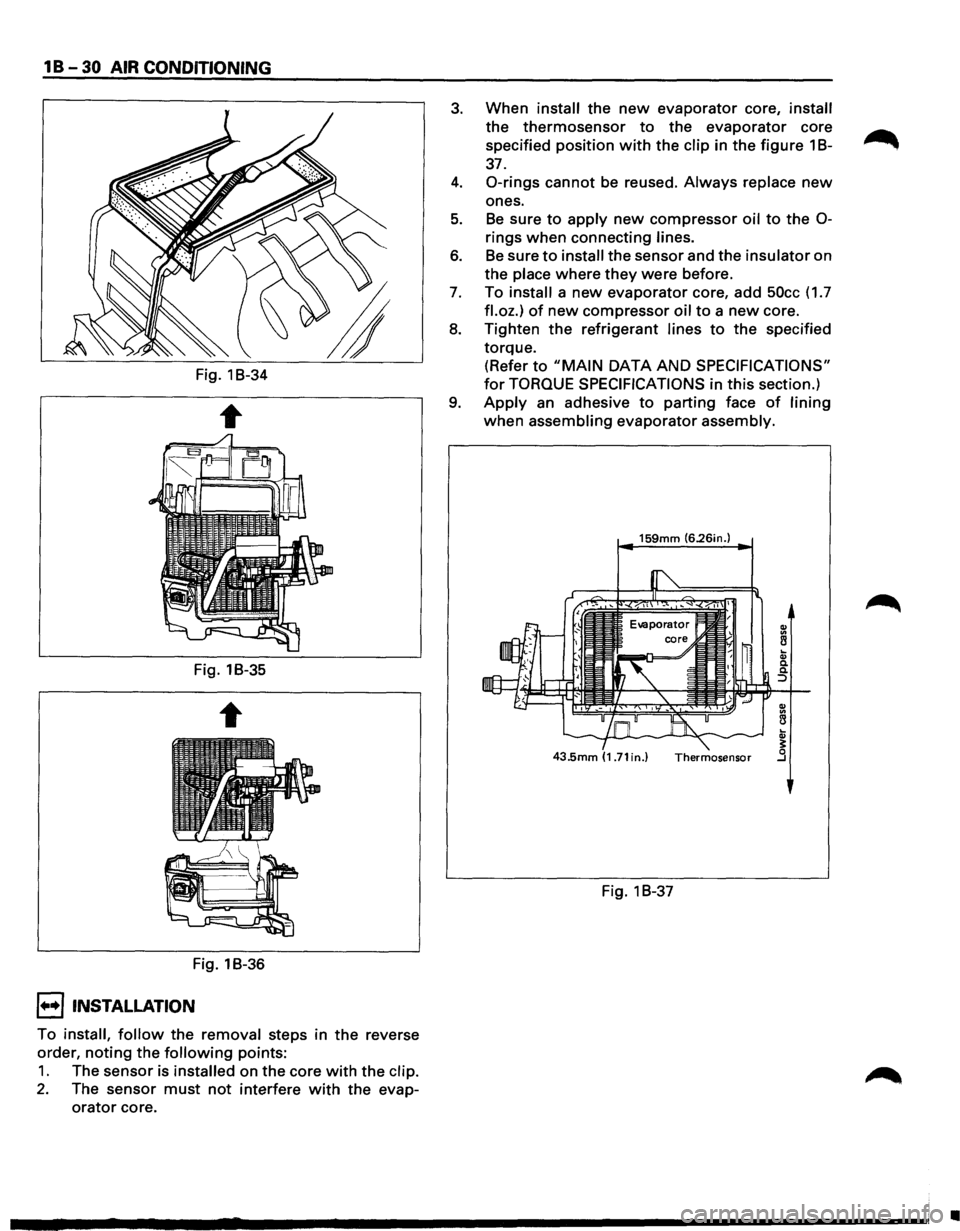
• Slit the case parting face with a knife since
the lining is separated when removing the
evaporator (Fig. 1 B-34).
• Lift to remove the upper case (Fig. 1 B-35).
7. Evaporator core (Fig. 1 B-36)
8. Expansion valve
•
Tear off the insulator carefully.
•
Remove the sensor fixing clip.
•
Use a back-up wrench when disconnecting
all refrigerant pipes.
Page 84 of 1928
1 B -30 AIR CONDITIONING
Fig. 1B-34
Fig. 1B-35
Fig. 1B-36
I••! INSTALLATION
To install, follow the removal steps in the reverse
order,
noting the following points:
1. The sensor is installed on the core with the clip.
2. The sensor must not interfere with the evap
orator core.
3. When install the new evaporator core, install
the thermosensor to the evaporator core
specified position
with the clip in the figure 1 B-~
37.
4. 0-rings cannot be reused. Always replace new
ones.
5. Be sure to apply new compressor oil to the 0-
rings when connecting lines.
6. Be sure to install the sensor and the insulator on
the place where
they were before.
7. To install a new evaporator core, add 50cc (1.7
fl.oz.) of new compressor oil to a new core.
8. Tighten the refrigerant lines to the specified
torque. (Refer
to "MAIN DATA AND SPECIFICATIONS"
for TORQUE SPECIFICATIONS in this section.)
9. Apply an adhesive to parting face of lining
when assembling evaporator assembly.
159mm (6.26in.)
Fig. 1 B-37
•
Page 85 of 1928
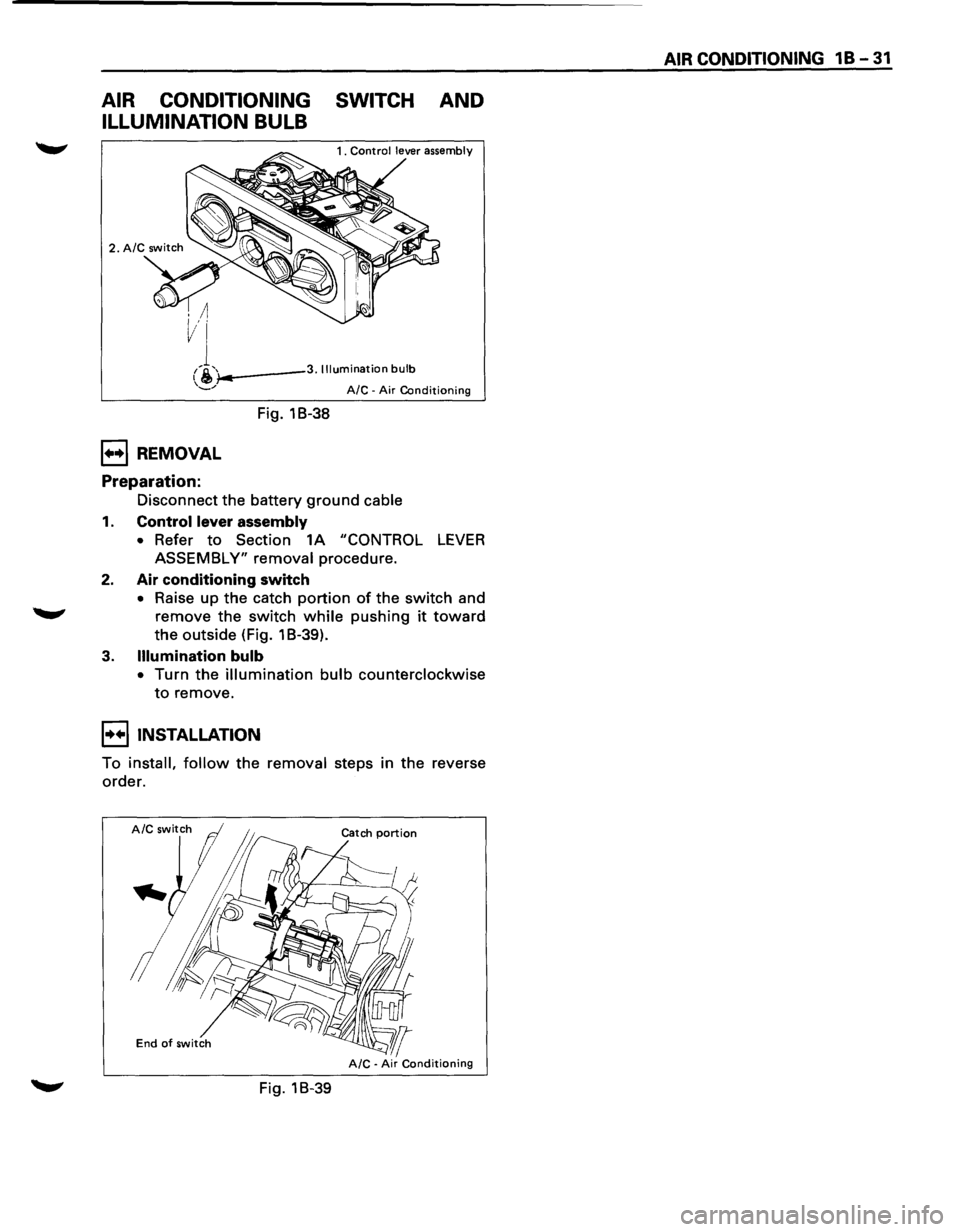
AIR CONDITIONING SWITCH AND
ILLUMINATION BULB
i-..---3. Illumination bulb
1++1 REMOVAL
Preparation:
Fig. 18-38
A/C -Air Conditioning
Disconnect the battery ground cable
1. Control lever assembly
• Refer to Section 1A "CONTROL LEVER
ASSEMBLY" removal procedure.
2. Air conditioning switch
• Raise up the catch portion of the switch and
remove the switch while pushing it toward
the outside (Fig. 1 B-39).
3. Illumination bulb
• Turn the illumination bulb counterclockwise
to remove.
I••IINSTALLATION
To install, follow the removal steps in the reverse
order.
End of switch
Fig. 18-39
AIR CONDITIONING 1 B -31
Page 86 of 1928
1 B -32 AIR CONDITIONING
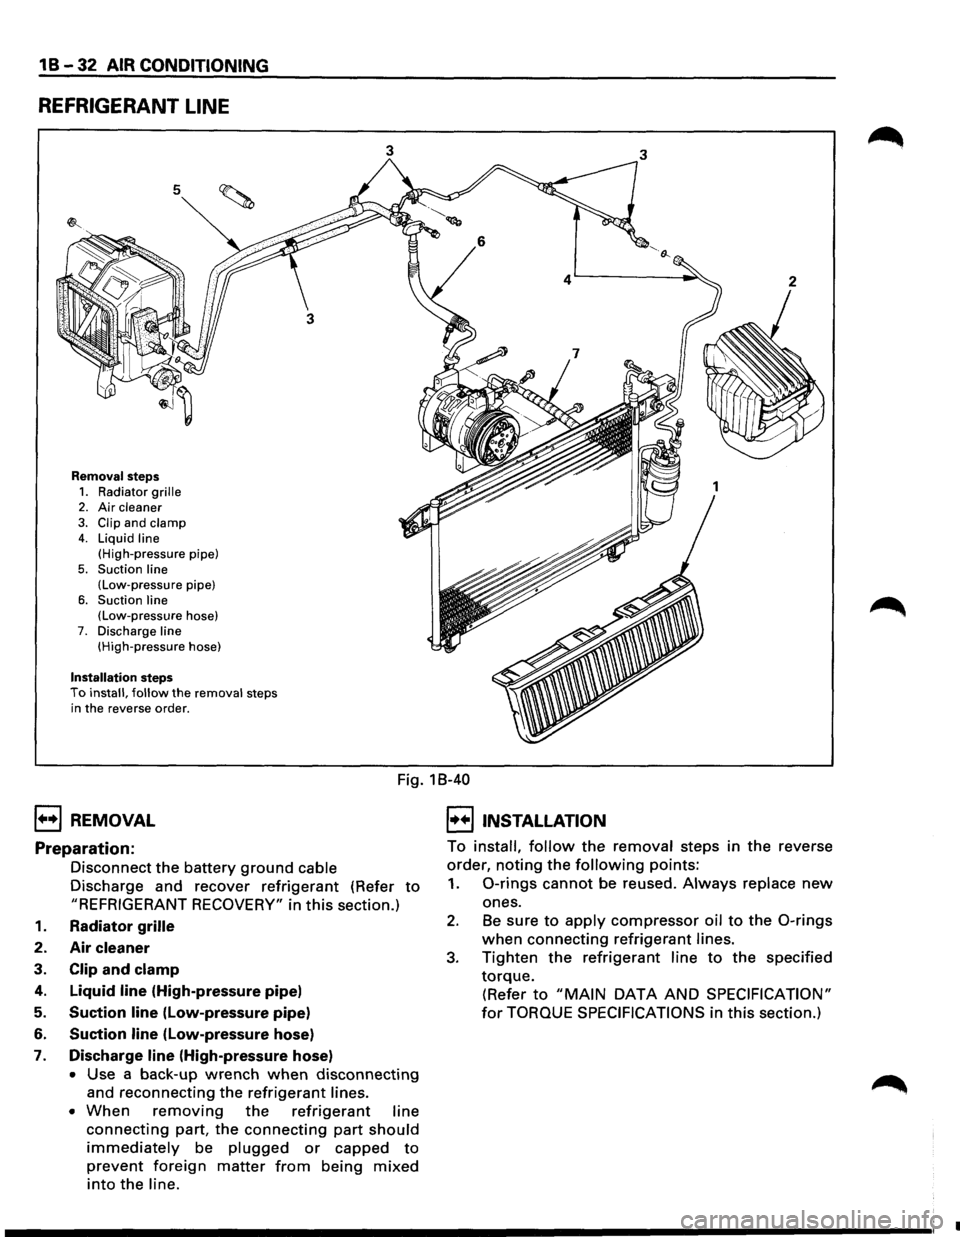
REFRIGERANT LINE
5
Removal steps
1. Radiator grille 2. Air cleaner
3. Clip and clamp 4. Liquid line
(High-pressure pipe)
5. Suction line (Low-pressure pipe)
6. Suction line (Low-pressure hose) 7. Discharge line (High-pressure hose)
Installation steps To install, follow the removal steps
in the reverse order.
3 3
1++1 REMOVAL
Fig. 18-40
I••IINSTALLATION
Preparation:
Disconnect the battery ground cable
Discharge and recover
refrigerant (Refer to
"REFRIGERANT RECOVERY" in this section.)
1. Radiator grille
2. Air cleaner
3. Clip and clamp
4. Liquid line (High-pressure pipe)
5. Suction line (Low-pressure pipe)
6. Suction line (low-pressure hose)
7. Discharge line (High-pressure hose)
• Use a back-up wrench when disconnecting
and reconnecting the refrigerant lines.
• When removing the refrigerant line
connecting part, the connecting part should
immediately be plugged or capped to
prevent foreign matter from being mixed
into the line. To
install,
follow the removal steps in the reverse
order,
noting the following points:
1. 0-rings cannot be reused. Always replace new
ones.
2. Be sure to apply compressor oil to the 0-rings
when connecting refrigerant lines.
3. Tighten the refrigerant line to the specified
torque.
(Refer to "MAIN DATA AND SPECIFICATION"
for TORQUE SPECIFICATIONS in this section.)
•
Page 87 of 1928
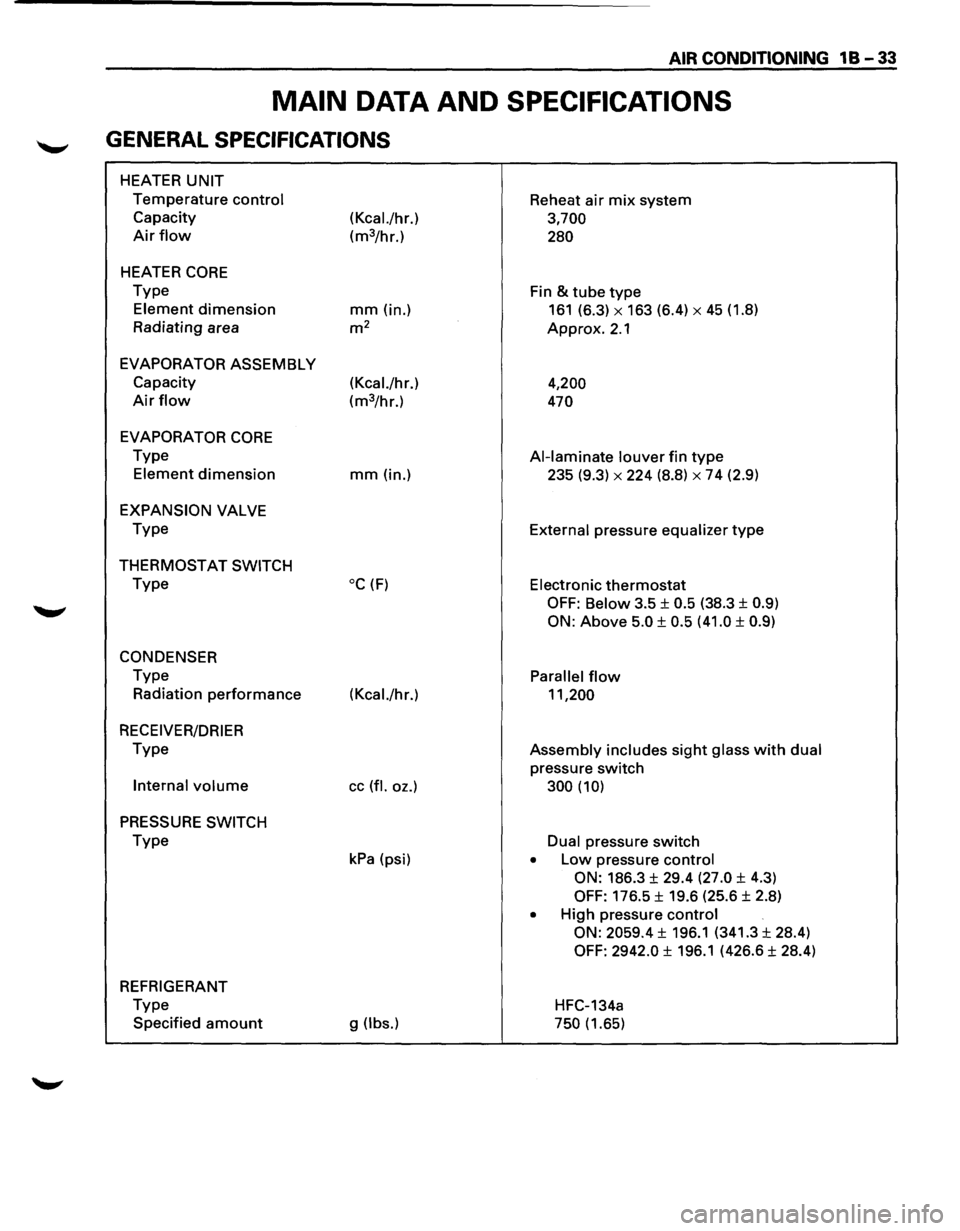
AIR CONDITIONING 1 B -33
MAIN DATA AND SPECIFICATIONS
GENERAL SPECIFICATIONS
HEATER UNIT
Temperature control Reheat air mix system
Capacity
(Kcal./hr.) 3,700
Air flow (m3/hr.) 280
HEATER CORE
Type
Fin & tube type
Element dimension mm (in.) 161 (6.3) X 163 (6.4) X 45 (1.8)
Radiating area
m2 Approx. 2.1
EVAPORATOR ASSEMBLY
Capacity (Kcal./hr.)
4,200
Air flow (m3/hr.) 470
EVAPORATOR
CORE
Type Al-laminate louver fin type
Element dimension mm(in.) 235 (9.3) X 224 (8.8) X 7 4 (2.9)
EXPANSION VALVE
Type
External pressure equalizer type
THERMOSTAT SWITCH
Type oc (F) Electronic thermostat
OFF: Below 3.5 ± 0.5 (38.3 ± 0.9)
ON:
Above 5.0 ± 0.5 (41.0 ± 0.9)
CONDENSER
Type Parallel flow
Radiation performance (Kcal./hr.) 11,200
RECEIVER/DRIER
Type Assembly includes sight glass with dual
pressure switch
Internal volume cc (fl. oz.) 300 (10)
PRESSURE SWITCH
Type Dual pressure switch
kPa (psi) • Low pressure control
ON:
186.3 ± 29.4 (27.0 ± 4.3)
OFF: 176.5 ± 19.6 (25.6 ± 2.8)
• High pressure control
ON: 2059.4
± 196.1 (341.3 ± 28.4)
OFF: 2942.0 ± 196.1 (426.6 ± 28.4)
REFRIGERANT
Type
HFC-134a
Specified
amount g (lbs.) 750 (1.65)
Page 88 of 1928
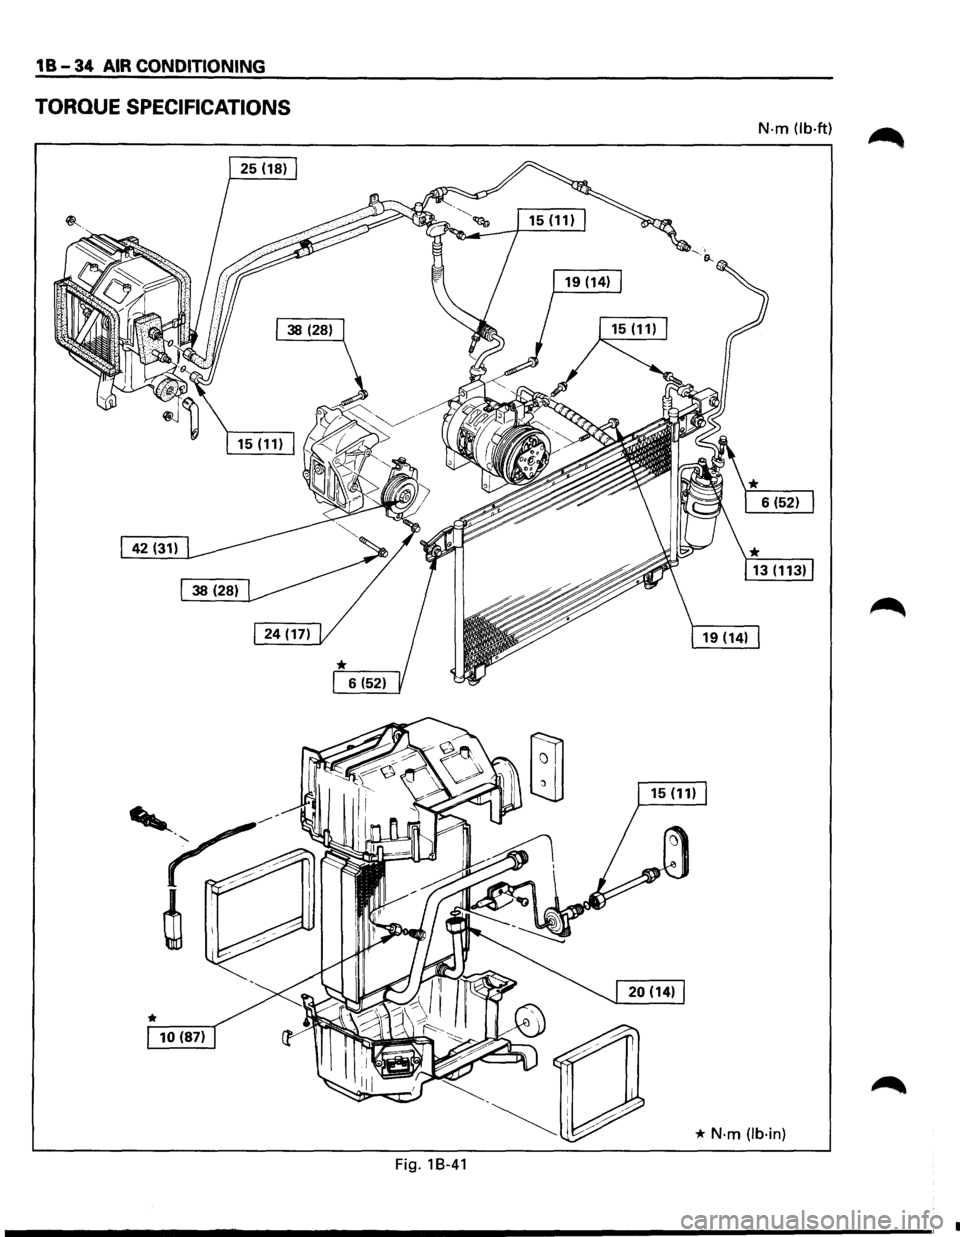
1 B-34 AIR CONDITIONING
TORQUE SPECIFICATIONS
N-m (lb·ft)
* N·m (lb·in)
Fig. 18-41
_____________ ,.
Page 89 of 1928
COMPRESSOR OVERHAUL 1 D - 1
SECTION 10
COMPRESSOR OVERHAUL
CONTENTS
General Description . . . . . . . . . . . . . . . . . . . . . 1 D-1
Diagnosis . . . . . . . . . . . . . . . . . . . . . . . . . . . . . 1
D-2
General Information . . . . . . . . . . . . . . . . . . . . 1 D-3
Compressor Oil . . . . . . . . . . . . . . . . . . . . . . 1 D-3
Service Procedures . . . . . . . . . . . . . . . . . . . . . 1D-5
Magnetic Clutch Assembly . . . . . . . . . . . . . 1 D-5
Main Data and Specifications . . . . . . . . . . . . . 1 D-8
General Specifications . . . . . . . . . . . . . . . . . 1 D-8
Torque Specifications . . . . . . . . . . . . . . . . . 1 D-8
Special Tools . . . . . . . . . . . . . . . . . . . . . . . . . . 1D-9
GENERAL DESCRIPTION
When servicing the compressor, keep dirt or foreign
material from getting on or into the compressor
parts and system. Clean tools and a clean work area
are
important for proper service. The compressor
connections and the outside of the compressor
should be cleaned before any "On-Vehicle" repair,
or before removal of the compressor. The parts must
be kept clean at all times and any parts to be
reassembled
should be cleaned with Trichloro
ethane, naphtha, kerosene, or equivalent solvent,
and
dried with dry air. Use only lint free cloths to
wipe parts.
The
operations described below are based on bench
overhaul
with compressor removed from the
vehicle, except as noted. They have been prepared
in
order of accessibility of the components. When
the compressor is removed from the vehicle for
servicing, the oil remaining in the compressor
should be discarded and new compressor oil added
to the compressor.
Magnetic clutch assembly repair procedures require
that the system be discharged of refrigerant. (Refer
to Section 1 B for "REFRIGERANT RECOVERY".)
Compressor malfunction will appear in one of four
ways: noise, seizure, leakage or low discharge
pressure. Resonant
compressor noises are not
cause for alarm; however, irregular noise or rattles
may indicate broken parts or excessive clearances
due to wear. To check seizure, de-energize the
magnetic clutch and check to see if the drive plate
can be rotated.
If rotation is impossible, the com
pressor is seized. Low discharge pressure may be
due to a faulty internal seal of the compressor, or a
restriction in the compressor.
Low discharge pres
sure
may also be due to an insufficient refrigerant
charge
or a restriction elsewhere in the system.
These possibilities
should be checked prior to
servicing the compressor. If the compressor is
inoperative,
but is not seized, check to see if current
is being supplied to the magnetic clutch coil
terminals.
This vehicle is equipped with five-vane rotary com
pressor.
The
compressor has vanes built into a rotor which is
mounted on a shaft.
When the shaft rotates, the vanes built into the
cylinder block assembly are opened by centrifugal
force.
This changes the volume of the space formed by the
rotor and cylinder, resulting in the intake and
compression of the refrigerant gas. The discharge
valve and the
valve stopper, which protects the
discharge valve, are
built into the cylinder block
assembly. There is no suction valve but a shaft seal
is
installed between the shaft and head; a trigger
valve, which applies back pressure to the vanes, is
installed in the cylinder block and a refrigerant gas
temperature sensor is installed in the front head.
The specified
quantity of compressor oil is contained
in
the compressor to lubricate the various parts
using
the refrigerant gas discharge pressure.
The thermo sensor is installed to the front head of
the compressor to protect it by stopping its
operation when the refrigerant gas is insufficient or
when the temperature get abnormally high.
•OFF ..... 160 ±soc (320.0 ± 9.0°F)
•ON ..... 135 ±soc (275.0 ± 9.0°F)
The oil used in the HFC-134a system compressor
differs from that used in R-12 systems.
Also, compressor
oil to be used varies according to
the compressor model. Be sure to avoid mixing two
or more different types of oil.
If the wrong oil is used, lubrication will be poor and
the compressor will seize or malfunction.
The specified
amount of the compressor oil is
150cc (5.0 fl.oz.).
Page 90 of 1928
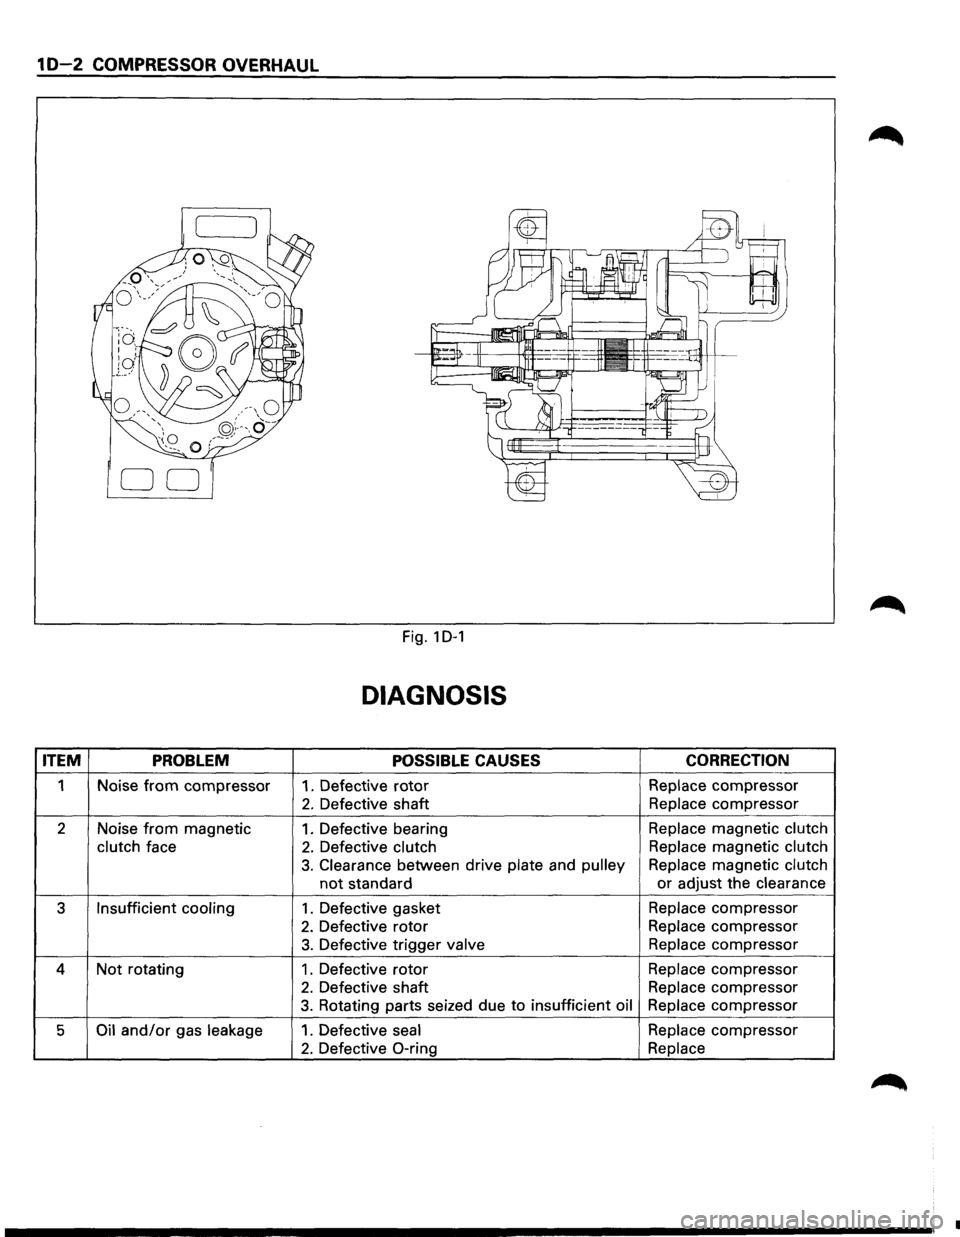
1 D-2 COMPRESSOR OVERHAUL
Fig. 1 D-1
DIAGNOSIS
ITEM PROBLEM POSSIBLE CAUSES CORRECTION
1
Noise from compressor 1. Defective rotor Replace compressor
2. Defective shaft Replace compressor
2 Noise
from magnetic 1. Defective bearing Replace magnetic clutch
clutch
face 2. Defective clutch Replace magnetic clutch
3. Clearance
between drive plate and pulley Replace magnetic clutch
not standard or adjust
the clearance
3
Insufficient cooling 1. Defective gasket Replace
compressor
2. Defective rotor Replace compressor
3. Defective trigger valve Replace compressor
4 Not rotating 1. Defective rotor Replace compressor
2. Defective shaft Replace compressor
3. Rotating parts seized due to insufficient oil Replace compressor
5 Oil and/or gas leakage 1. Defective seal Replace compressor
2. Defective 0-ring Replace
•