reservoir JAGUAR X308 1998 2.G Owner's Guide
[x] Cancel search | Manufacturer: JAGUAR, Model Year: 1998, Model line: X308, Model: JAGUAR X308 1998 2.GPages: 2490, PDF Size: 69.81 MB
Page 385 of 2490

I
nstallation
7.
Cl
ean all mating surfaces and re
move brake dust. See Warning
above.
8. Repeat above procedure to remo ve opposite side brake pads.
1. CAUTI
ON: Retracting the caliper piston may cause the
fluid reservoir to over-flow. Remove brake fluid spillage
immediately from paint work, with clean water.
Slowly retract piston into caliper housing.
2. NOTE
: Clean caliper piston to pad mating surface.
Install brake pads to caliper housing.
Remove paper backing from pads to reveal
adhesive shim.
Install brake pads, in sert clip located on back of inner pad
into caliper piston.
3. Inst
all caliper housing to caliper carrier.
1. Align housing to carrier.
2. Install and tighten gu ide pins to 25-30 Nm.
3. Install dust covers.
4. Install anti-rattle spring.
4. Repeat above procedure to install opposite side brake pads.
5. Fit wheels. Refer to Section 204-04.
Page 387 of 2490

Rear Dis
c Brake - Brake PadsVehicl
es With: High Performance Brakes
Re
moval and Installation
Remov
al
1.
W
ARNING: BRAKE DUST, IF INHALED CAN DAMAGE
YOUR HEALTH. ALWAYS REMOVE BRAKE DUST USING A VACUUM
BRUSH. DO NOT USE A COMPRE SSED-AIR LINE TO DISPERSE
BRAKE DUST INTO THE ATMOSPHERE. Failure to follow this
instruction may result in personal injury.
• CAUTIONS:
Brake pads must always be replaced in axle sets.
Replacement of nuts and bolts: Various thread-locking
devices are used on nuts and bolts throughout the vehicle. These
devices restrict the number of ti mes a nut or bolt can be used.
For additional information, refer to: General Service Information
(10
0-00 General Information,
Description and Operation).
The High performance brake caliper is aligned to the brake
disc when it is first installed to the vehicle, therefore, care must
be taken not to disturb this alignment. When removing the
caliper; remove the bolts that se cure the anchor bracket to the
vertical link only. DO NOT loosen any other caliper bolts.
Open engine compartment and fit paint work protection covers
to fenders.
2. R
aise rear of vehicle an
d support on stands.
For additional information, refer to: Using the Workshop Jack
(10
0-02 Jacking and Lifting, General Procedures).
3. Remove rear wheels.
For additional information, refer to: Wheel and Tire
(20
4-04
Wheels and Tires, Remo val and Installation).
4. CAUTI
ON: Remove brake flui
d spillage immediately from
paint work, with clean water.
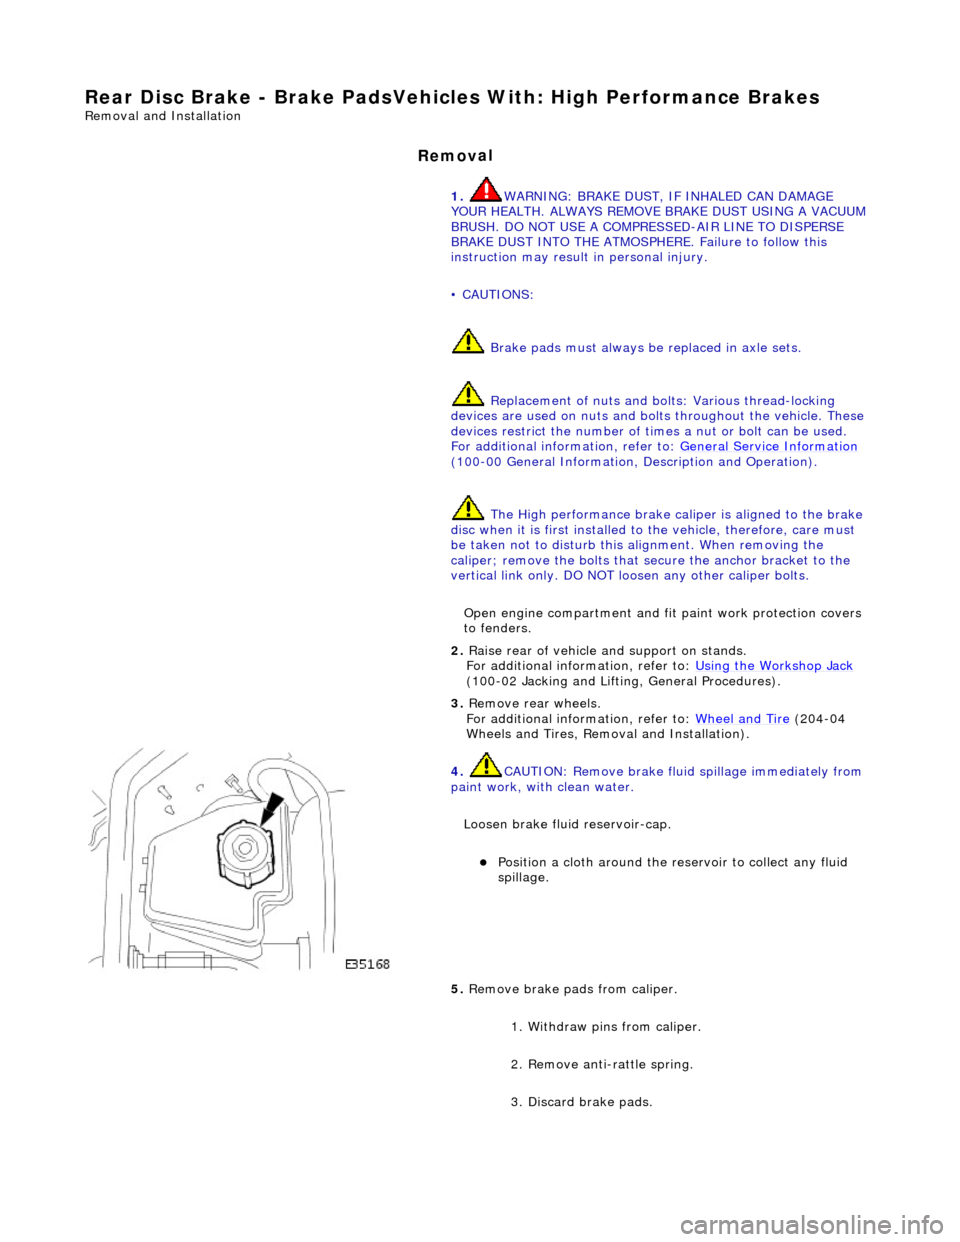
Loosen brake fluid reservoir-cap.
Position a cloth around the
reservoir to collect any fluid
spillage.
5. Remove brake
pads from caliper.
1. Withdraw pins from caliper.
2. Remove anti-rattle spring.
3. Discard brake pads.
Page 388 of 2490

In
stallation
6.
Clean all mating surfaces and remove brake du
st, see
WARNING above.
7. Repeat above procedure to remo ve opposite side brake pads.
1. CAUTIO
N: Make sure grease does not contact brake-pad
friction surface or brake disc.
To prevent brake squeal apply grease to the shoulders of the
brake-pad backplate.
For additional information, refer to: Specifications
(206-0
4 Rear
Disc Brake, Specifications).
Apply a un iform
layer of grea
se to backplate shoulders,
making sure the whole sh oulder is covered.
2. CAUTIO
N: Make sure the brake pads are fitted with the
direction arrow following the direction of wheel rotation.
Make sure the brake pads are fi tted with the direction arrow
following the direction of wheel rotation.
3. CAUTI O
NS:
Retracting the caliper piston may cause the fluid reservoir
to over-flow. Remove brake flui d spillage immediately from paint
work with clean water.
Make sure the brake pads are installed to the correct
orientation.
Make sure the brake pads ar e fitted with the direction
arrow following the direction of wheel rotation.
Note the condition of pins and replace if necessary.
• NOTE: Slowly retract caliper pistons.
Page 406 of 2490

Hydraulic Br
ake Actuation -
Hydraulic Brake Actuation
Description and Operation
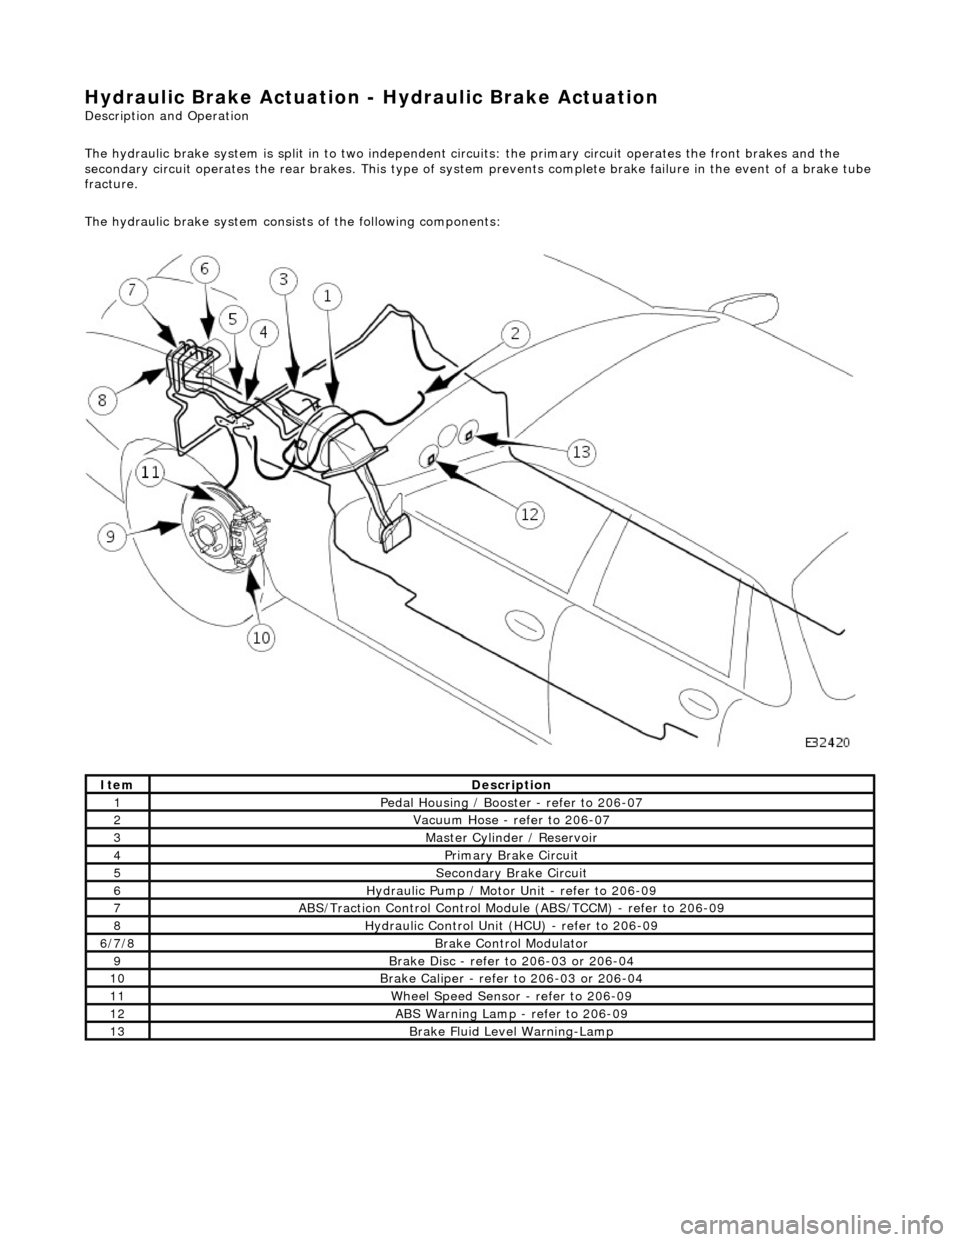
The hydraulic brake system is split in to two independent circuits: the primary ci rcuit operates the front brakes and the
secondary circuit operates the re ar brakes. This type of system prevents comple te brake failure in the event of a brake tube
fracture.
The hydraulic brake system consists of the following components:
Ite
m
Descr
iption
1Pedal Housi
ng / Booster - refer to 206-07
2Vacu
um Hose - refer to 206-07
3Mast
er Cyl
inder / Reservoir
4Primary Brake Circu
i
t
5Secon
dary Brake Circuit
6Hydrauli c
Pump / Motor Unit - refer to 206-09
7ABS/Traction
Control Control Modu
le (ABS/TCCM) - refer to 206-09
8Hydraulic Cont
rol Unit (HCU) - refer to 206-09
6/
7/
8
Br
ak
e Control Modulator
9Brake
Di
sc - refer to 206-03 or 206-04
10Brake
Cali
per - refer to 206-03 or 206-04
11W
h
eel Speed Sensor - refer to 206-09
12ABS Warning Lamp -
refer to 206
-09
13Brake F
l
uid Level Warning-Lamp
Page 407 of 2490

The t
andem master cylinder contains two in
dependent pistons, fluid pressure to each brake circuit is controlled by its own
individual piston. Brake fluid is supplied to the master cylinder by the reservoir, which is divided into two sections to preve nt
total fluid loss should one of the circuits fail. A port situated at the bottom of each section of the reservoir supplies the f luid
to each piston.
The fluid reservoir has a fluid-le vel indicator switch installed, which operates when the fluid level is low, causing the brake
fluid level warning-lamp to illuminate.
Bra
ke Caliper
The brake
calipers are of the single piston
type. The caliper carrier, which is secured to the vertical link by two bolts, carr ies
the single-piston caliper housing. The cali per housing is secured to the caliper carrier by two guide-pins and an anti-rattle
spring. When the brakes are applied, the caliper-housing piston pushes the brake pad in front of it, to wards the brake disc.
This movement forces the calipe r housing to move along the guid e-pins, in the opposite direction of the piston, to apply the
second brake pad.
Br
embo Brake Caliper
The four
cylinder brake caliper is rigidly attached to the vert
ical link via an anchor bracket. The caliper is a split assembly
with each side of the caliper, housing two pistons. The two-pairs of opposed pistons act direct ly on the brake pads mounted
one each side of the disc.
Mast
er Cylinder and Reservoir
Page 408 of 2490

Hydraulic Br
ake Actuation
- Brake Fluid Reservoir
Remo
val and Installation
Remov
a
l
• C
A
UTIONS:
Replacement of nuts and bolts: Various thread-locking de vices are used on nuts and bolts throughout the vehicle.
These devices restrict the number of times a nut or bolt can be used. See section 100-00 for information.
Remove brake fluid spilla ge immediately from paint work, with clean water.
1. Position vehicl
e on a four-post lift.
2. Open engine compartment and fit paint work protection covers
to fenders.
3. Disconnect battery ground cable (IMPORTANT, see operation
86.15.19 for further information).
4. Remove engine compartment rear cover. Refer to operation
76.11.35.
5. Remove pedal housing, brake booster and master cylinder
assembly. Refer to operation 70.35.39.
6. Remove reservoir filler cap and empty residual brake fluid into
a container. Refit cap.
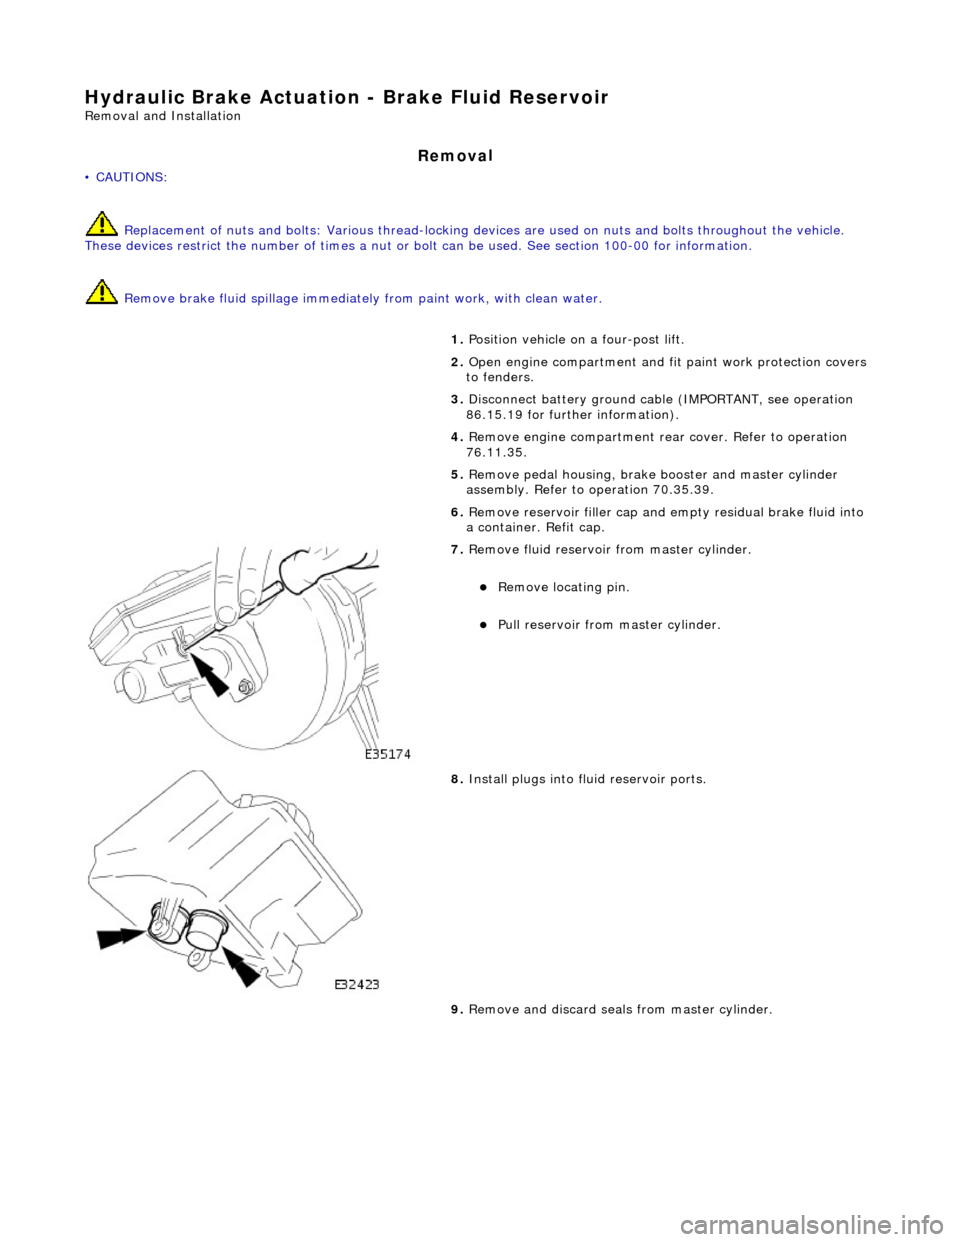
7. Re
move fluid reservoir from master cylinder.
R
e
move locating pin.
Pull reservoir
from master cylinder.
8. Install plugs into f
luid reservoir ports.
9. Remove and discard seal s from master cylinder.
Page 409 of 2490

I
nstallation
10
.
Install plugs into master cylinder ports.
11. Clean components and mating surfaces.
1. Inst
all seals into master cylinder.
Re
move plugs.
Lubricate seals with
cl
ean brake fluid.
Inst
all seals.
2. Install
reservoir to master cylinder.
Re
move plugs.
Install
reservoir, making sure
reservoir is fully seated.
Inst
all locating pin.
3. Install pedal housing, brake booster and master cylinder
assembly. Refer to operation 70.35.39.
4. Install engine compartment rear cover. Refer to operation
76.11.35.
5. Reconnect battery ground cable (IMPORTANT, see operation
Page 411 of 2490

Hydraulic B
rake Actuation
- Brake Master Cylinder
Re
moval and Installation
Remov
al
• C
AUTIONS:
Replacement of nuts and bolts: Various thread-locking de vices are used on nuts and bolts throughout the vehicle.
These devices restrict the number of times a nut or bolt can be used. See section 100-00 for information.
Remove brake fluid spilla ge immediately from paint work, with clean water.
1. Position vehi
cle on a four-post lift.
2. Open engine compartment and fit paint work protection covers
to fenders.
3. Disconnect battery ground cable (IMPORTANT, refer to
operation 86.15.19 for fu rther information).
4. Remove engine compartment rear cover. Refer to operation
76.11.35.
5. Remove pedal housing, brake booster and master cylinder
assembly. Refer to operation 70.35.39.
6. Place assembly on a work bench.
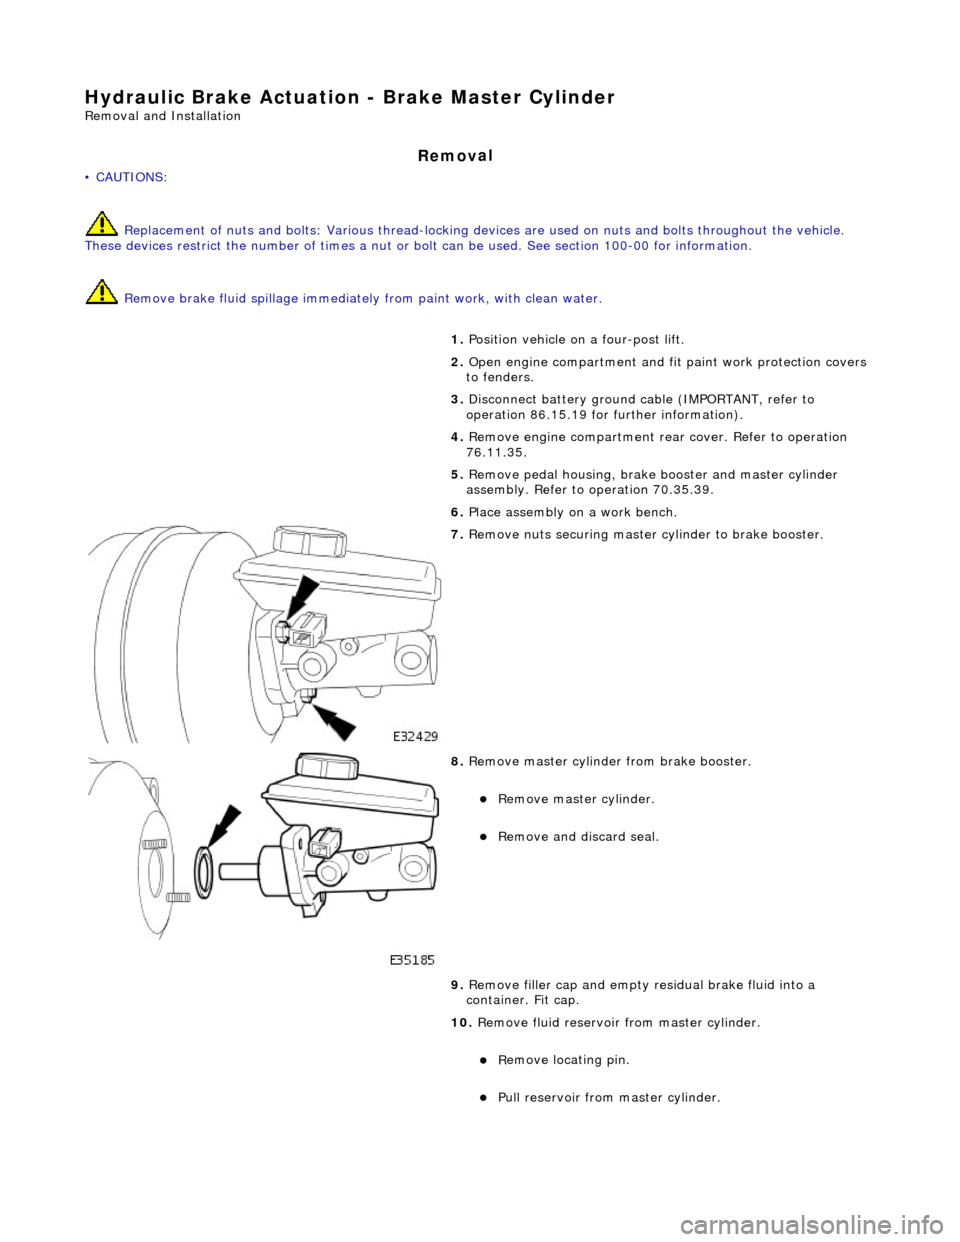
7. R
emove nuts securing master cylinder to brake booster.
8. R
emove master cylinder from brake booster.
Re
move master cylinder.
Remove an
d discard seal.
9. Remove filler cap and empty residual brake fluid into a
container. Fit cap.
10. Remove fluid reservoir from master cylinder.
R
emove locating pin.
Pull
reservoir from master cylinder.
Page 412 of 2490

In
stallation
11
. Install
plugs into fluid reservoir ports.
12 . Remove an
d discard seal
s from master cylinder.
13 . Inst
all plugs into master cylinder ports.
14. Clean components and mating surfaces.
1. Install seals into master cylinder.
Remo
ve plugs.
Page 413 of 2490

Lubricate seals with cl
ean brake fluid.
Inst
all seals.
2. Install
fluid reservoir to master cylinder.
R
emove plugs from reservoir
Install
reservoir, making sure
reservoir is fully seated.
Inst
all locating pin.
3. Inst
all master cylinder to brake booster.
Inst
all seal.
Inst
all master cylinder, make sure master cylinder rod
locates brake booster rod.
4. Inst
all and tighten nuts to 21-29 Nm.
5. Install pedal housing, brake booster and master cylinder
assembly. Refer to operation 70.35.39.
6. Install engine compartment rear cover. Refer to operation
76.11.35.
7. Connect battery ground cable (IMPORTANT, see operation
86.15.15 for further information).
8. Bleed brake system. Refer to operation 70.25.03.
9. Remove paint-work protection covers and close engine
com
partment.