JAGUAR X308 1998 2.G Workshop Manual
Manufacturer: JAGUAR, Model Year: 1998, Model line: X308, Model: JAGUAR X308 1998 2.GPages: 2490, PDF Size: 69.81 MB
Page 611 of 2490
E
ngine - Cylinder Head LH
In-ve
hicle Repair
Remova
l
CAU
TION: If a replacement cylinder head is to be installed to a
vehicle with variable camshaft timing (VCT) the cylinder head m ust have the
oil gallery blind rivet removed before installation.
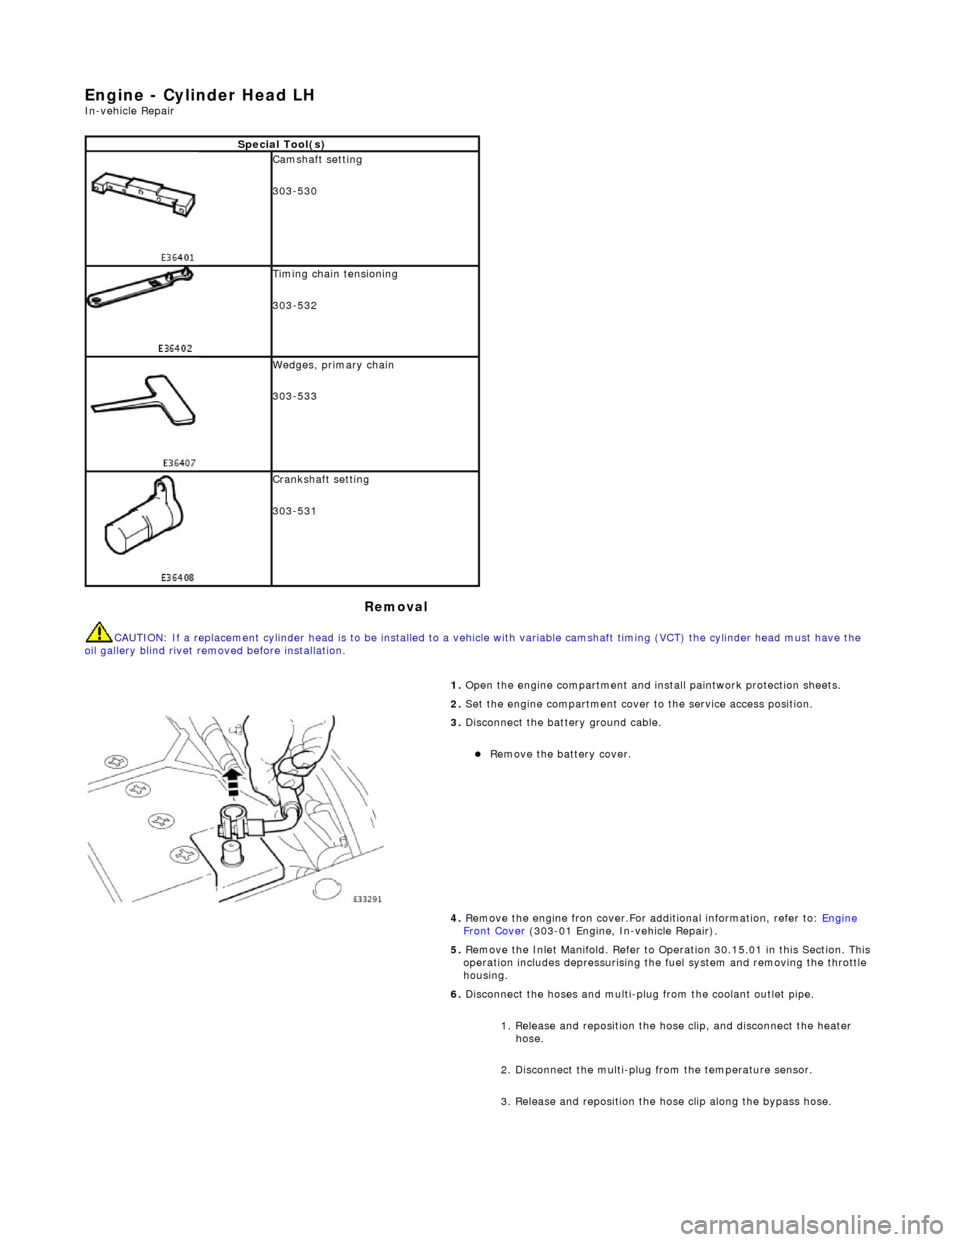
Spe
cial Tool(s)
Cams
haft setting
303-530
Ti
ming chain tensioning
303-532
Wedges, prim
ary chain
303-533
Cr
ankshaft setting
303-531
1.
Open the engine compartment and install paintwork protection sheets.
2. Set the engine compartment cover to the service access position.
3.
Disconnect the battery ground cable.
Re
move the battery cover.
4. Remove the engine fron cover.For additional information, refer to: Engine
Front Cover (303-01 Engi
ne, In-vehicle Repair).
5. Remove the Inlet Manifold. Refer to Operation 30.15.01 in this Section. This operation includes depressurising the fuel system and removing the throttle
housing.
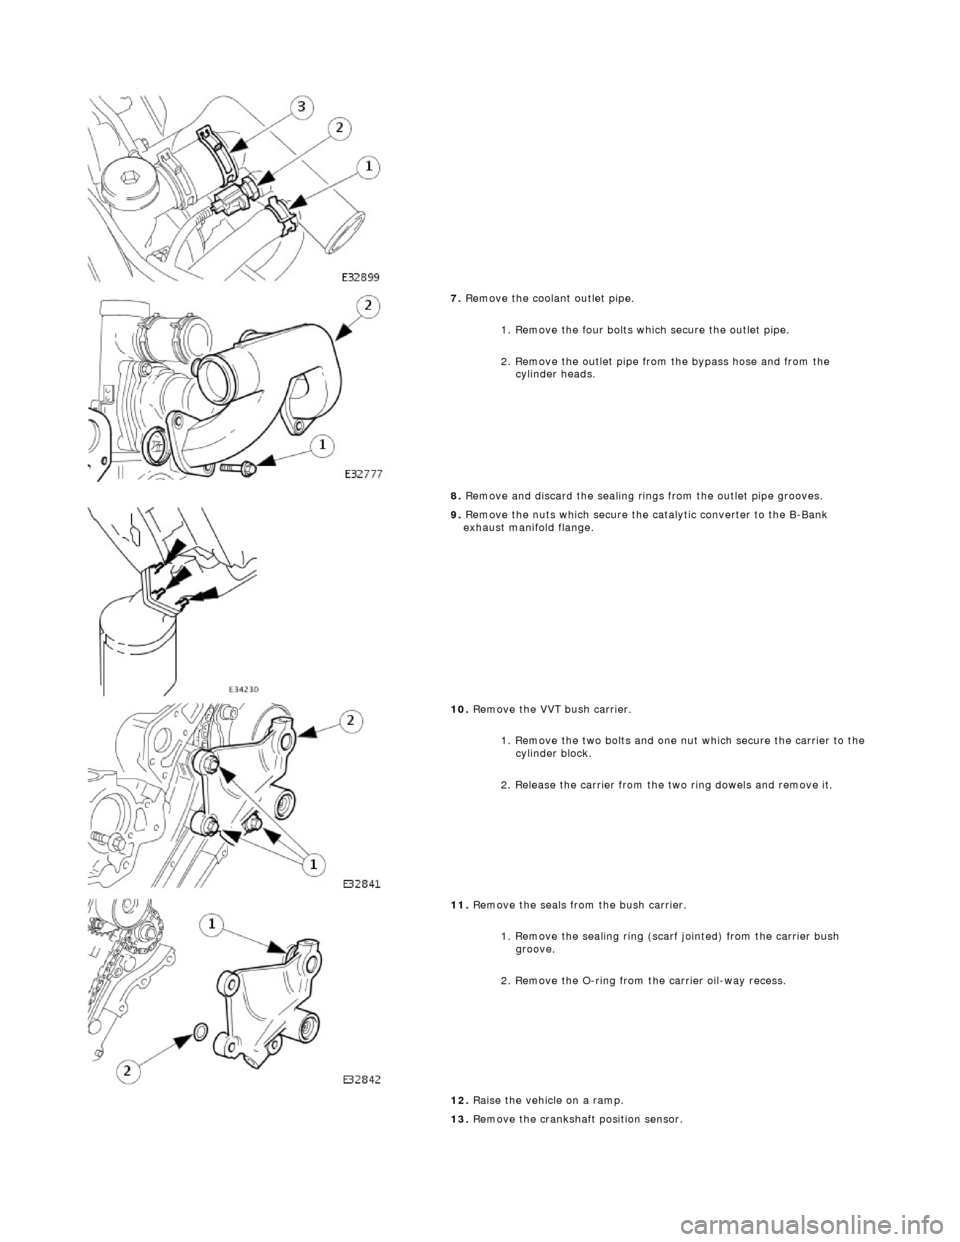
6. Disconnect the hoses and multi-plug from the coolant outlet pipe.
1. Release and reposition the hose clip, and disconnect the heater hose.
2. Disconnect the multi-plug from the temperature sensor.
3. Release and reposition the hose clip along the bypass hose.
Page 612 of 2490
7.
Remove the coolant outlet pipe.
1. Remove the four bolts which secure the outlet pipe.
2. Remove the outlet pipe from the bypass hose and from the cylinder heads.
8. Remove and discard the sealing ring s from the outlet pipe grooves.
9.
Remove the nuts which secure the catalytic converter to the B-Bank
exhaust manifold flange.
10 . Re
move the VVT bush carrier.
1. Remove the two bolts and one nut which secure the carrier to the cylinder block.
2. Release the carrier from the two ring dowels and remove it.
11. R
emove the seals from the bush carrier.
1. Remove the sealing ring (scarf jointed) from the carrier bush groove.
2. Remove the O-ring from the carrier oil-way recess.
12. Raise the vehicle on a ramp.
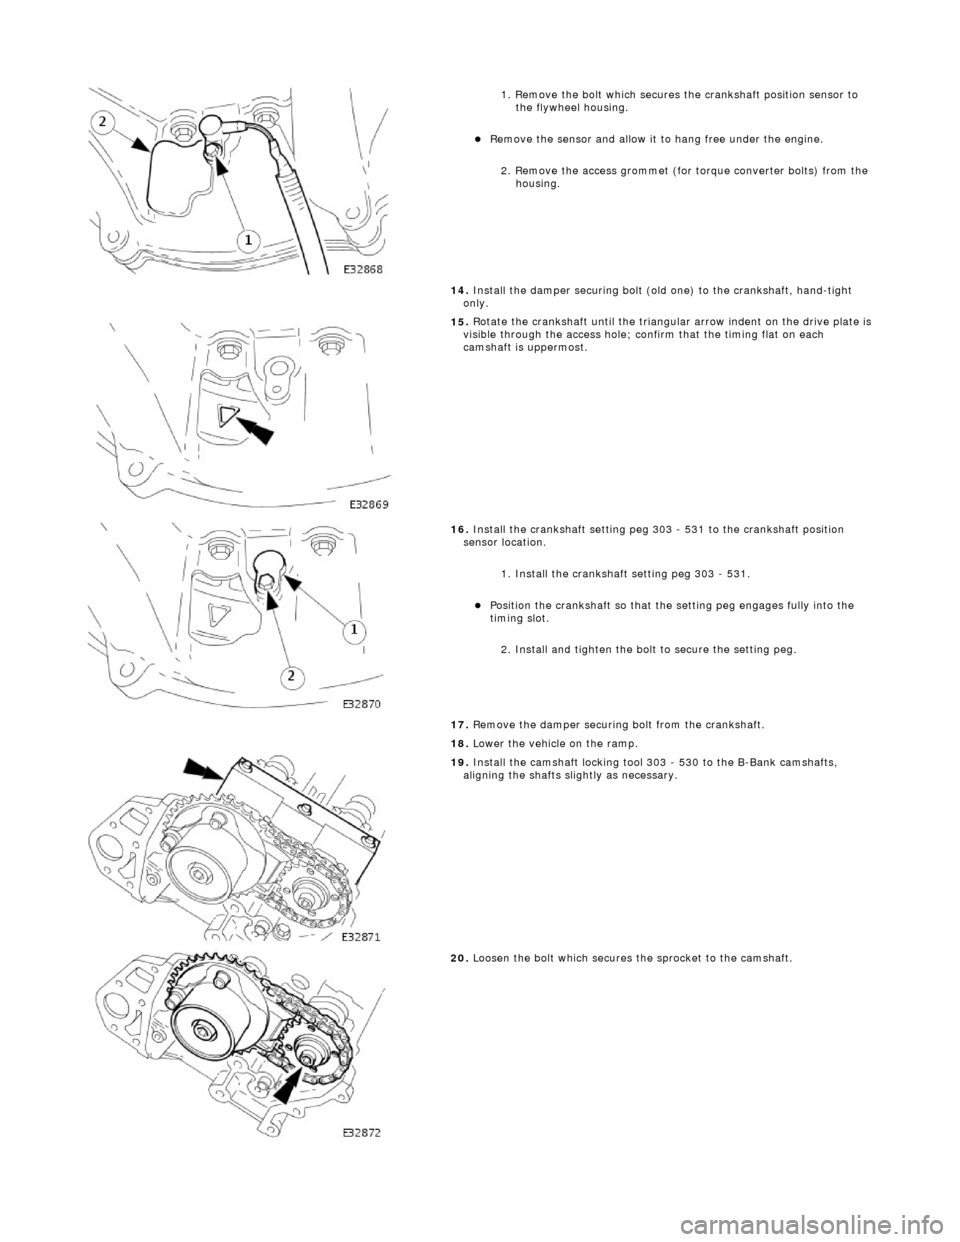
13. Remove the crankshaft position sensor.
Page 613 of 2490
1
. Remove the bolt which secures the crankshaft position sensor to
the flywheel housing.
R
emove the sensor and allow it to hang free under the engine.
2. Remove the access grommet (for torque converter bolts) from the housing.
14. Install the damper securing bolt (old one) to the crankshaft, hand-tight
only.
15
.
Rotate the crankshaft until the triangular arrow indent on the drive plate is
visible through the access hole; confirm that the timing flat on each
camshaft is uppermost.
16
.
Install the crankshaft setting peg 3 03 - 531 to the crankshaft position
sensor location.
1. Install the crankshaft setting peg 303 - 531.
Position
the crankshaft so that the setting peg engages fully into the
timing slot.
2. Install and tighten the bolt to secure the setting peg.
17. Remove the damper securing bolt from the crankshaft.
18. Lower the vehicle on the ramp.
19
.
Install the camshaft locking tool 303 - 530 to the B-Bank camshafts,
aligning the shafts slightly as necessary.
20
.
Loosen the bolt which secures the sprocket to the camshaft.
Page 614 of 2490

21. L
oosen the bolt which secures the VVT unit to the camshaft.
22. Remove the camshaft locking tool 303 - 530 (installed for previous
operation).
23 . R
emove the primary chain tensioner bolts.
24 . R
emove the tensioner assembly.
1. Remove the tensioner.
2. Remove the tens ioner back-plate.
25 . R
emove the primary chain tensioner blade.
1. Remove the pivot bolt which secures the tensioner blade.
2. Remove the tensioner blade.
26. Reposition the VVT unit along the cam journal to allow the chain to clear
the head casting.
Di s
connect the primary chain from the VVT unit and secure it to the
bypass hose retaining clip, using a Ty-strap.
27. Remove the VVT unit and exhaust camshaft sprocket.
1. Remove the securing bolt from both the VVT unit and the exhaust cam sprocket.
2. Remove the VVT unit, exhaust sprocket and secondary chain as an assembly (release the chain from the tensioner which is still
secured to the cylinder head).
Re
move the secondary chain from
the VVT unit and the sprocket.
Page 615 of 2490
28
.
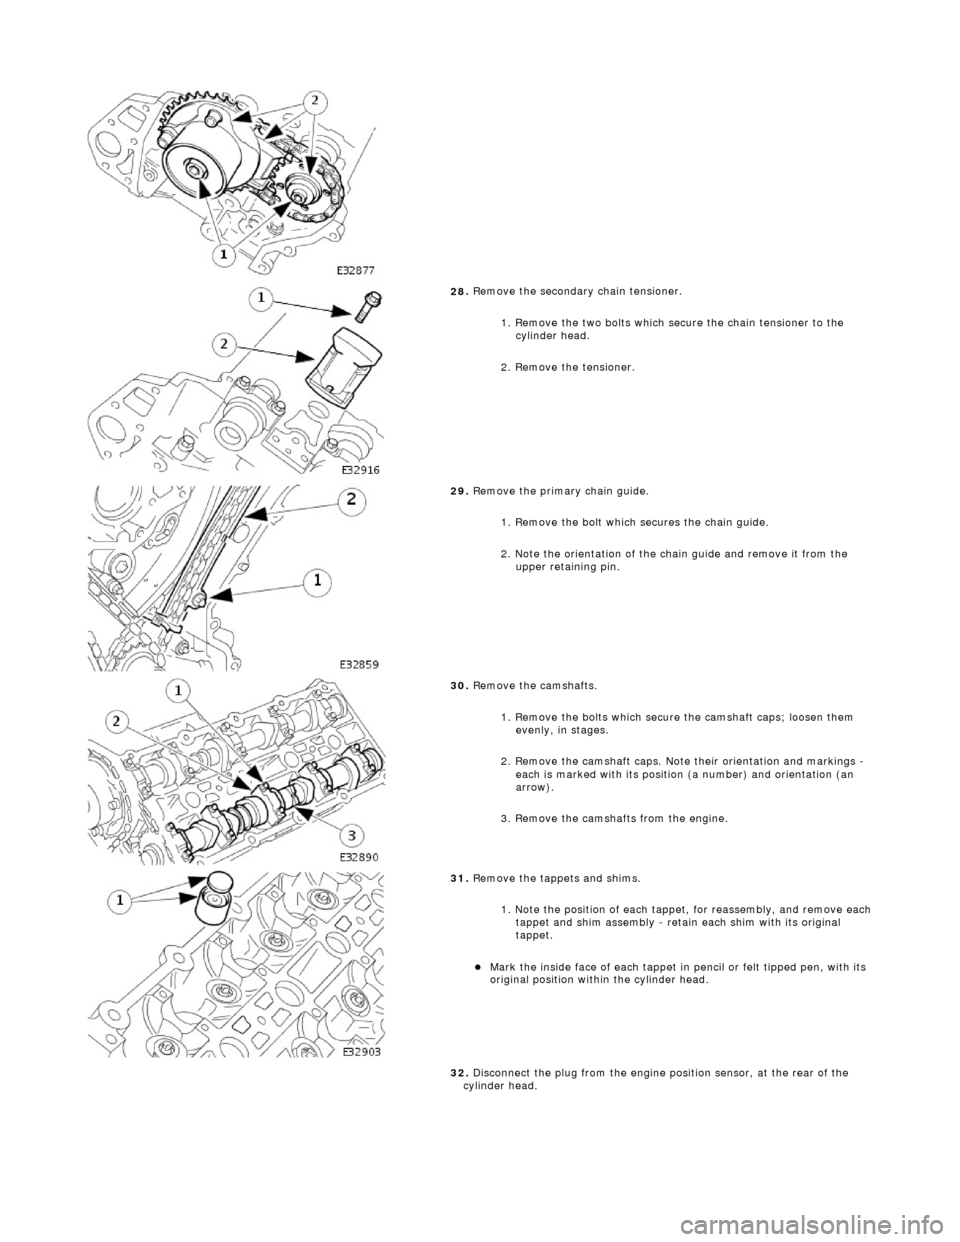
Remove the secondary chain tensioner.
1. Remove the two bolts which secure the chain tensioner to the cylinder head.
2. Remove the tensioner.
29
.
Remove the primary chain guide.
1. Remove the bolt which secures the chain guide.
2. Note the orientation of the chain guide and remove it from the upper retaining pin.
30
.
Remove the camshafts.
1. Remove the bolts which secure the camshaft caps; loosen them evenly, in stages.
2. Remove the camshaft caps. Note their orientation and markings -
each is marked with its position (a number) and orientation (an
arrow).
3. Remove the camshafts from the engine.
31
.
Remove the tappets and shims.
1. Note the position of each tappet, for reassembly, and remove each
tappet and shim assembly - retain each shim with its original
tappet.
Mark
the inside face of each tappet in pencil or felt tipped pen, with its
original position within the cylinder head.
32. Disconnect the plug from the engine position sensor, at the rear of the
cylinder head.
Page 616 of 2490
33. R
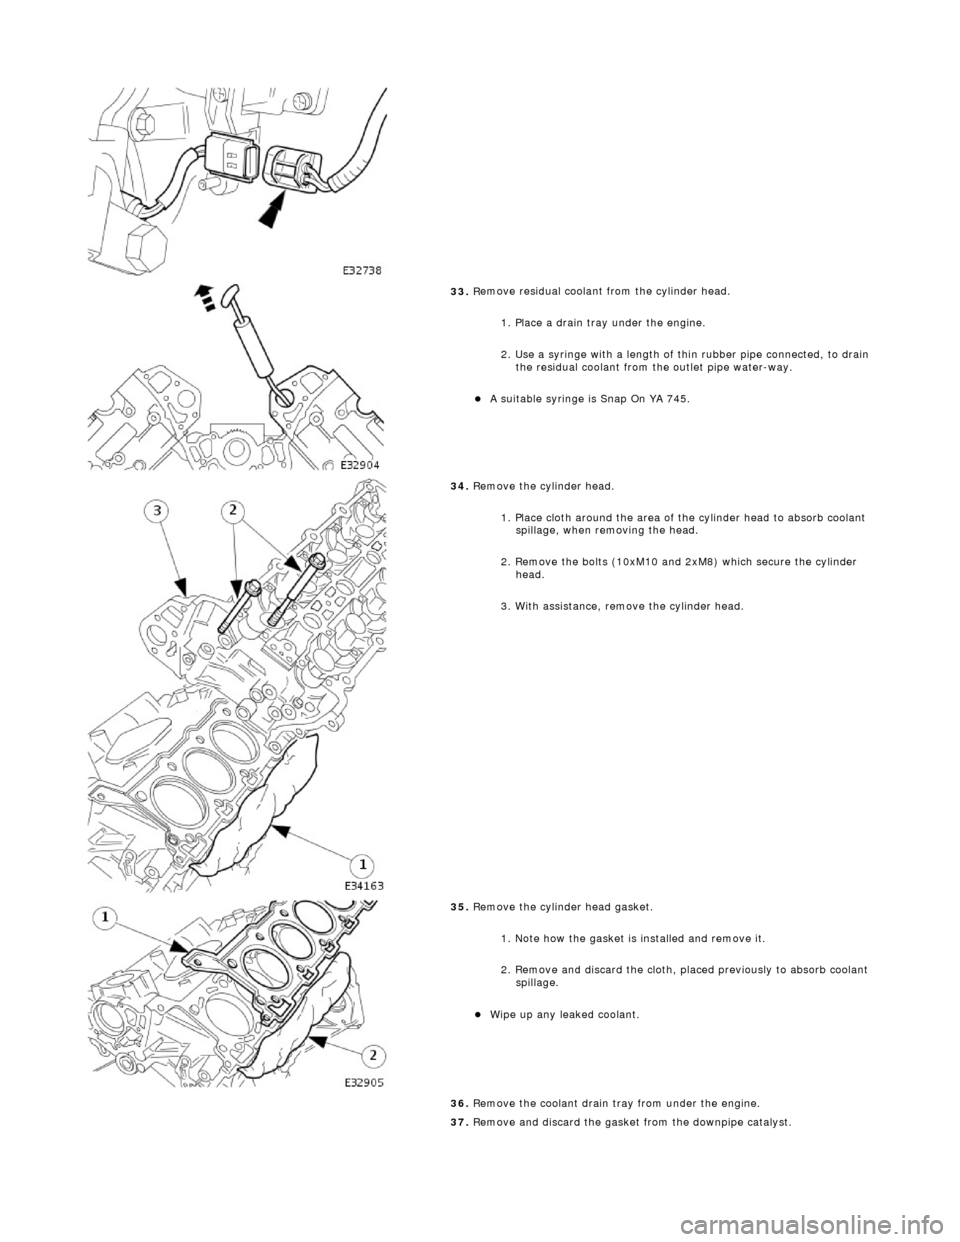
emove residual coolant from the cylinder head.
1. Place a drain tray under the engine.
2. Use a syringe with a length of thin rubber pipe connected, to drain the residual coolant from the outlet pipe water-way.
A s u
itable syringe is Snap On YA 745.
34 . R
emove the cylinder head.
1. Place cloth around the area of th e cylinder head to absorb coolant
spillage, when removing the head.
2. Remove the bolts (10xM10 and 2xM8) which secure the cylinder head.
3. With assistance, remove the cylinder head.
35 . R
emove the cylinder head gasket.
1. Note how the gasket is installed and remove it.
2. Remove and discard the cloth, placed previously to absorb coolant spillage.
Wipe up any l e
aked coolant.
36. Remove the coolant drain tray from under the engine.
37. Remove and discard the gasket from the downpipe catalyst.
Page 617 of 2490
Inst
allation
Cl
ean the gasket faces of the catalyst and the exhaust manifold.
38. Clean cylinder head and cylinder block gasket faces.
E
nsure that all threaded holes in the cylinder block face are clean and
free from oil.
Cl
ean and inspect the cylinder head bolts. They may be re-used on two
occasions. When re- used, each bolt head should be marked with one
dot from an automatic centre punch.
39. Clean and inspect all relevant components and mating faces.
1.
CAUTIONS:
If a replacement cylinder head is to be installed to a vehicle with VCT
the cylinder head must have the oil gallery blind rivet removed before
installation.
Make sure that all debris is removed from the cylinder head and cylinder
head oil gallery.
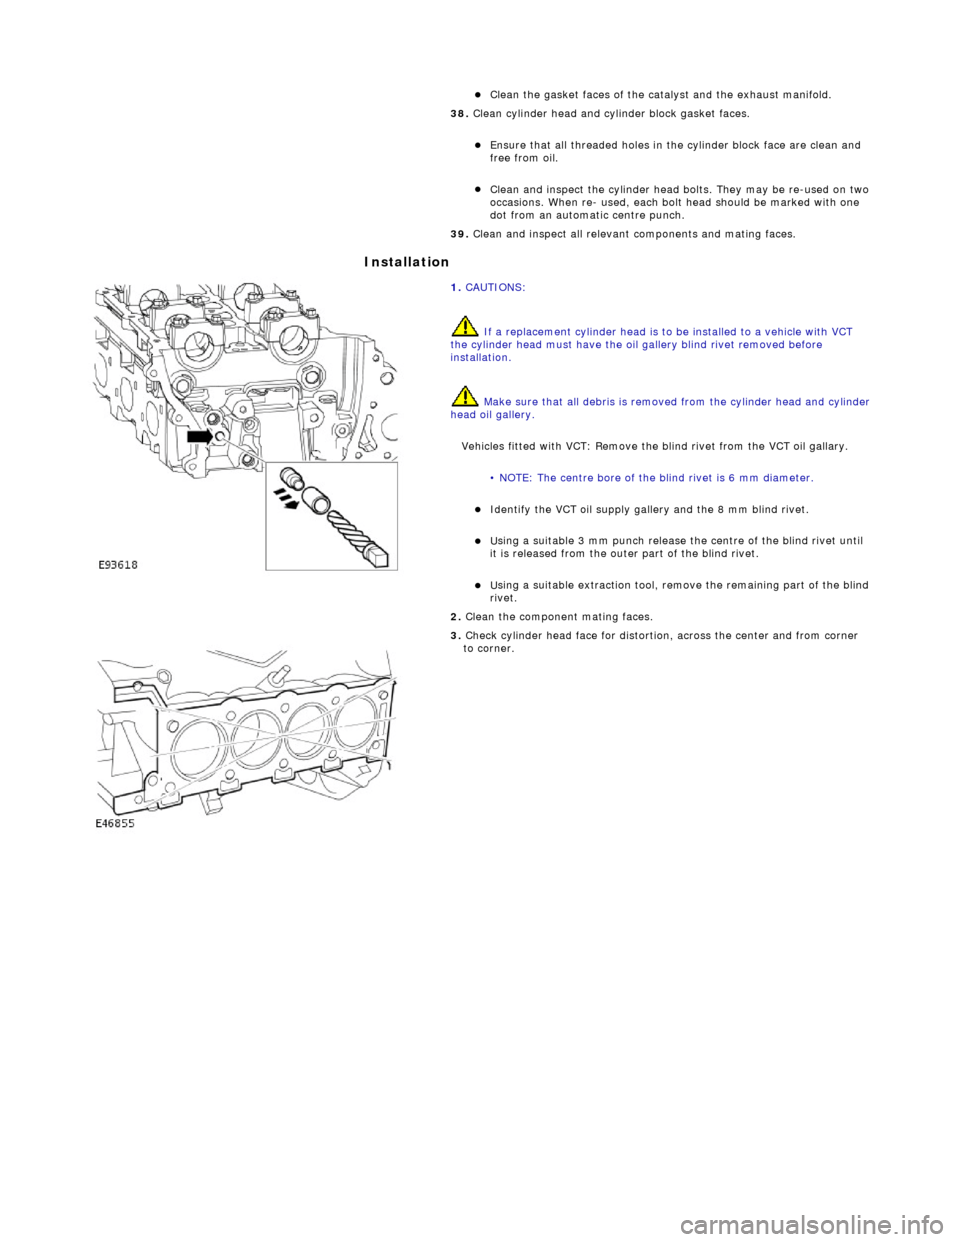
Vehicles fitted with VCT: Remove the blind rivet from the VCT oil gallary.
• NOTE: The centre bore of the blind rivet is 6 mm diameter.
I
dentify the VCT oil supply gallery and the 8 mm blind rivet.
U
sing a suitable 3 mm punch release the centre of the blind rivet until
it is released from the outer part of the blind rivet.
U
sing a suitable extraction tool, remo
ve the remaining part of the blind
rivet.
2.
Clean the component mating faces.
3.
Check cylinder head face for distortio
n, across the center and from corner
to corner.
Page 618 of 2490
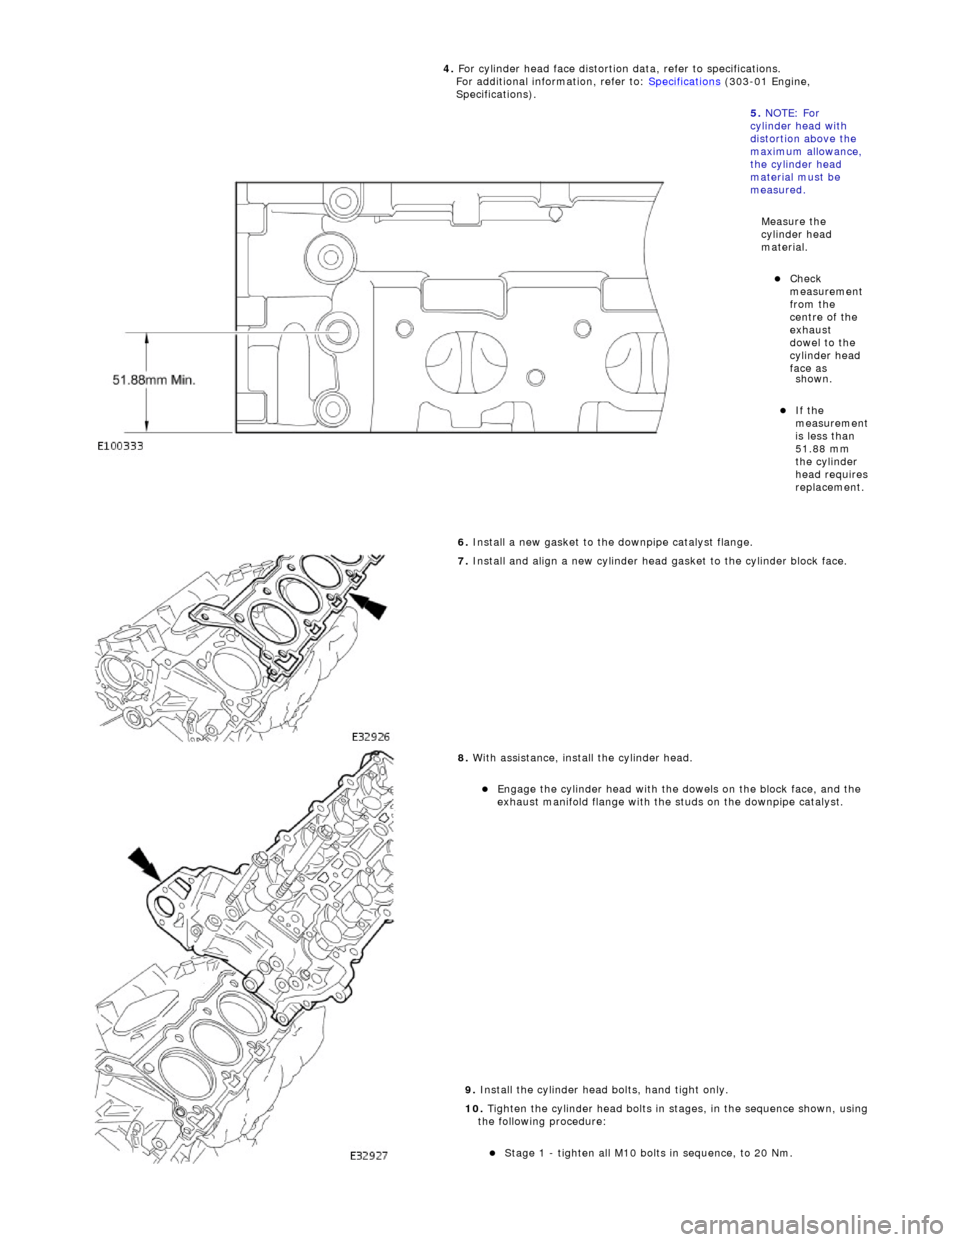
shown
.
If the
m
easurement
is less than
51.88 mm
the cylinder
head requires
replacement.
6.
Install a new gasket to the downpipe catalyst flange.
7.
Install and align a new cylinder head gasket to the cylinder block face.
8.
With assistance, install the cylinder head.
E
ngage t
he cylinder head with the dowels on the block face, and the
exhaust manifold flange with the studs on the downpipe catalyst.
9. Install the cylinder head bolts, hand tight only.
10. Tighten the cylinder head bolts in stages, in the sequence shown, using
the following procedure:
Stage 1 - ti
ghten all M10 bolt
s in sequence, to 20 Nm.
4.
For cylinder head face distortion
data, refer to specifications.
For additional information, refer to: Specifications
(303-01 Engi
ne,
Specifications).
5. NOTE: For
cylinder head with
distortion above the
maximum allowance,
the cylinder head
material must be
measured.
Measure the
cylinder head
material.
Che c
k
measurement
from the
centre of the
exhaust
dowel to the
cylinder head
face as
Page 619 of 2490
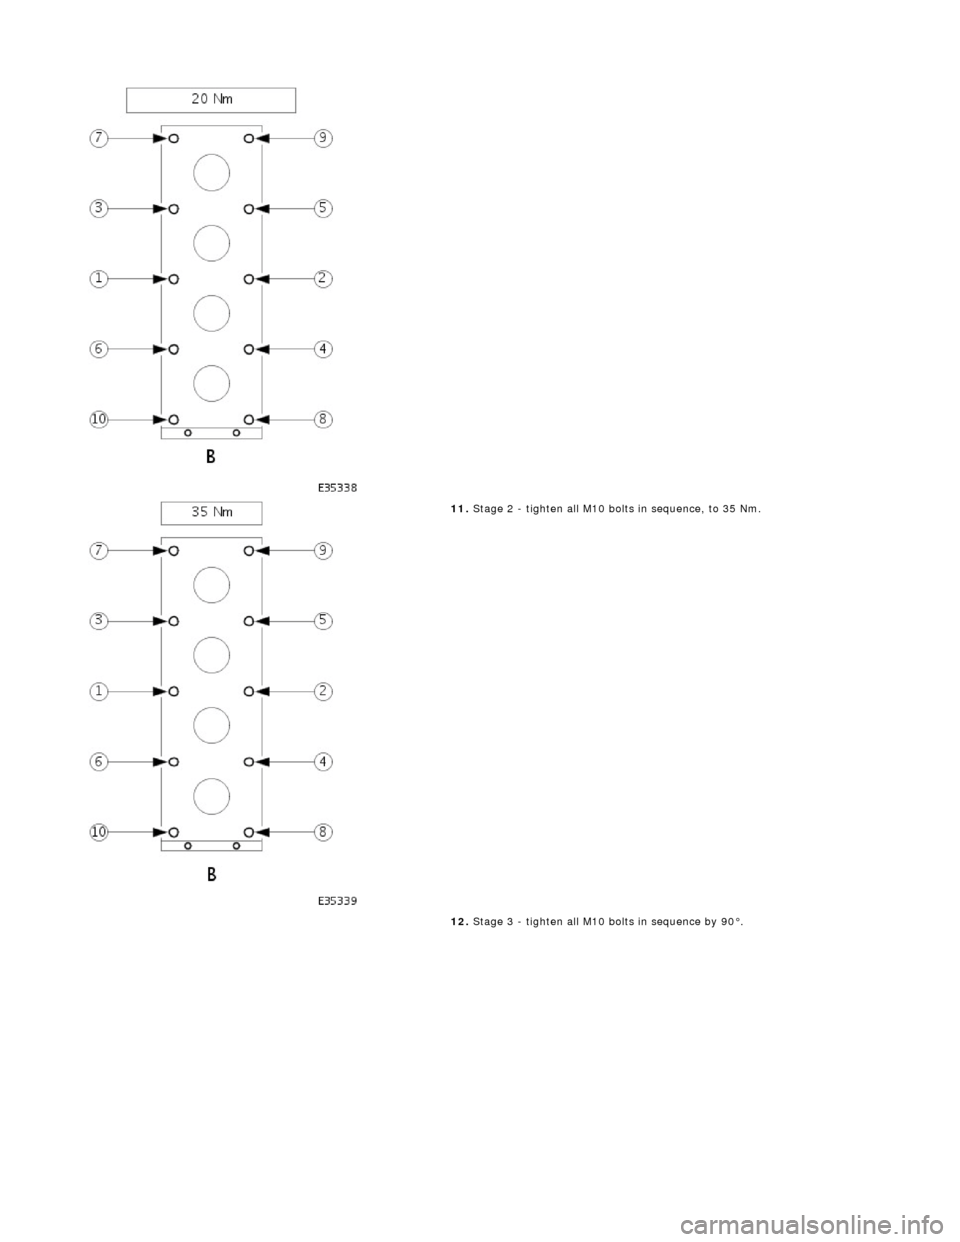
11
.
Stage 2 - tighten all M10 bolt s in sequence, to 35 Nm.
12. Stage 3 - tighten all M10 bolts in sequence by 90°.
Page 620 of 2490
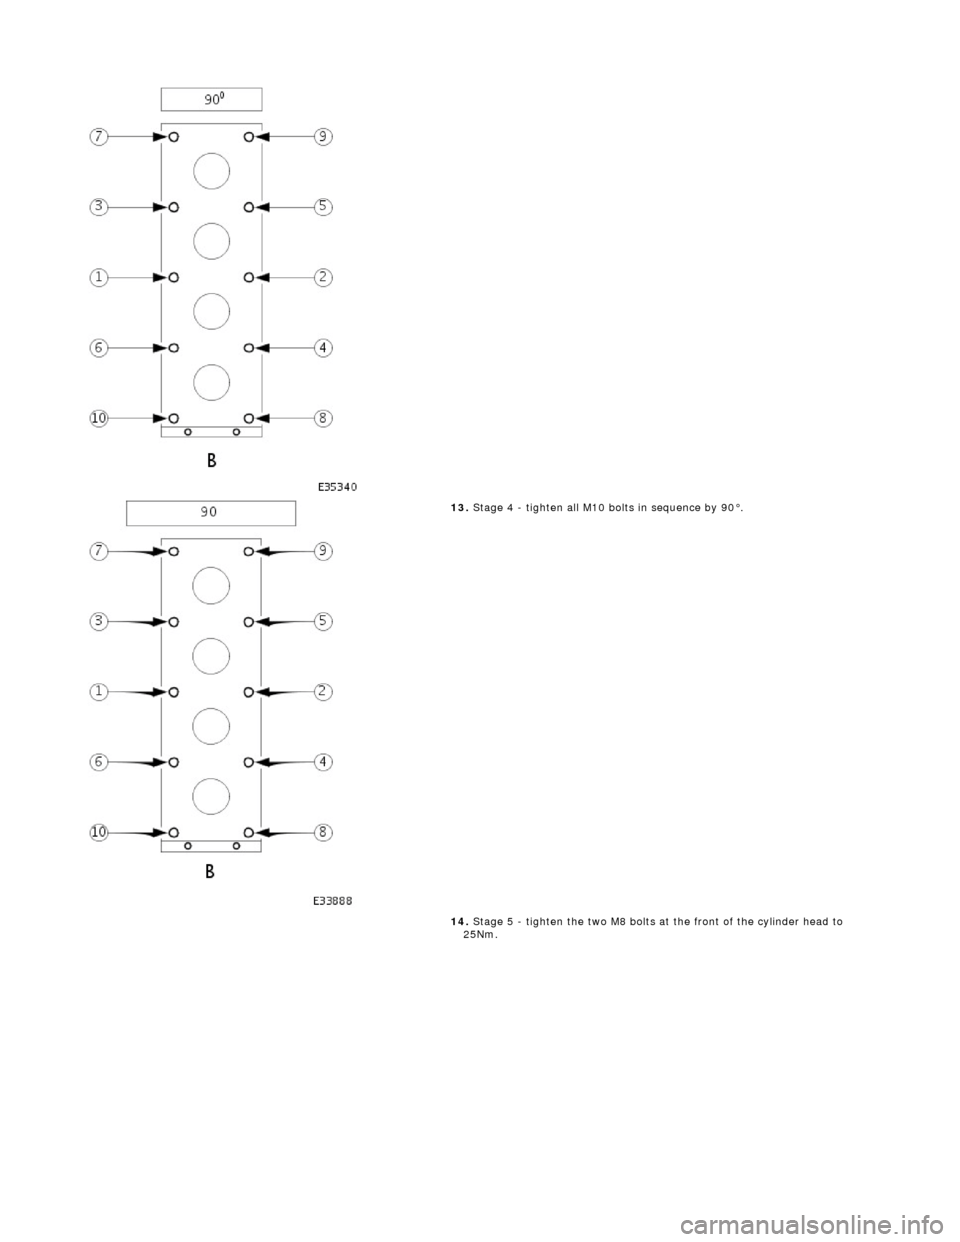
13. S
tage 4 - tighten all M10 bolts in sequence by 90°.
14. Stage 5 - tighten the two M8 bolts at the front of the cylinder head to
25Nm.