JEEP RENEGADE 2018 Owner handbook (in English)
Manufacturer: JEEP, Model Year: 2018, Model line: RENEGADE, Model: JEEP RENEGADE 2018Pages: 356, PDF Size: 6.11 MB
Page 21 of 356
5)Never extract the mechanical key while
the vehicle is moving. The steering wheel
will automatically lock as soon as it is
turned. This holds true for cars being
towed as well.
6)Before leaving the vehicle, ALWAYS
engage the handbrake. On versions
equipped with automatic transmission,
move the gear lever to STOP (Park) and
press the ignition device to set it to STOP.
When leaving the vehicle, always lock all
the doors by pressing the button on the
handle.
7)For versions equipped with the Keyless
Enter-N-Go system, do not leave the
electronic key inside or near the car or in
a place accessible to children. Do not
leave the vehicle with the ignition device
in MAR position. A child could activate
the electric window winders, other
controls or even start the vehicle.SENTRY KEY®
TheSentry Key®system, prevents
unauthorised use of the vehicle,
disabling engine starting.
The system does not need to be
enabled/activated: operation is
automatic, regardless of the fact that the
vehicle's doors are locked or unlocked.
When the ignition device is taken to
MAR, theSentry Key®system identifies
the code transmitted by the key. If the
code is recognised as valid, theSentry
Key®system enables engine starting.
When the ignition device is brought back
to STOP, theSentry Key®system
deactivates the control unit controlling
the engine, thus preventing its starting.
For the correct engine starting
procedures, see the instructions in the
"Starting the engine" paragraph, "Starting
and driving" chapter.
IRREGULAR OPERATION
If, during starting, the key code is not
correctly recognised, the
icon is
displayed on the instrument panel (see
the instructions in the "Warning lights
and messages" paragraph, "Knowing the
instrument panel" chapter). This
condition leads to the engine switching
off after 2 seconds. In this case, bringthe ignition device to STOP and then to
MAR; if it is still blocked, try with the
other keys provided. If it is still not
possible to start the engine, contact a
Jeep Dealership.
If the
icon is displayed while driving,
this means that the system is running a
self-diagnosis (e.g. due to a voltage
drop). If the displaying is still on, contact
a Jeep Dealership.
19
Page 22 of 356
ALARM
Activation of the alarm triggers the
acoustic warning and the direction
indicators.
IMPORTANT The alarm is adapted to
meet requirements in various
countries.
SWITCHING ON THE ALARM
With the doors, bonnet and tailgate
closed and the ignition device turned to
STOP, point the key with remote control
(or electronic key) towards the vehicle
and press and release button
.
Except for specific markets, the system
emits a visual and acoustic signal and
enables door locking.
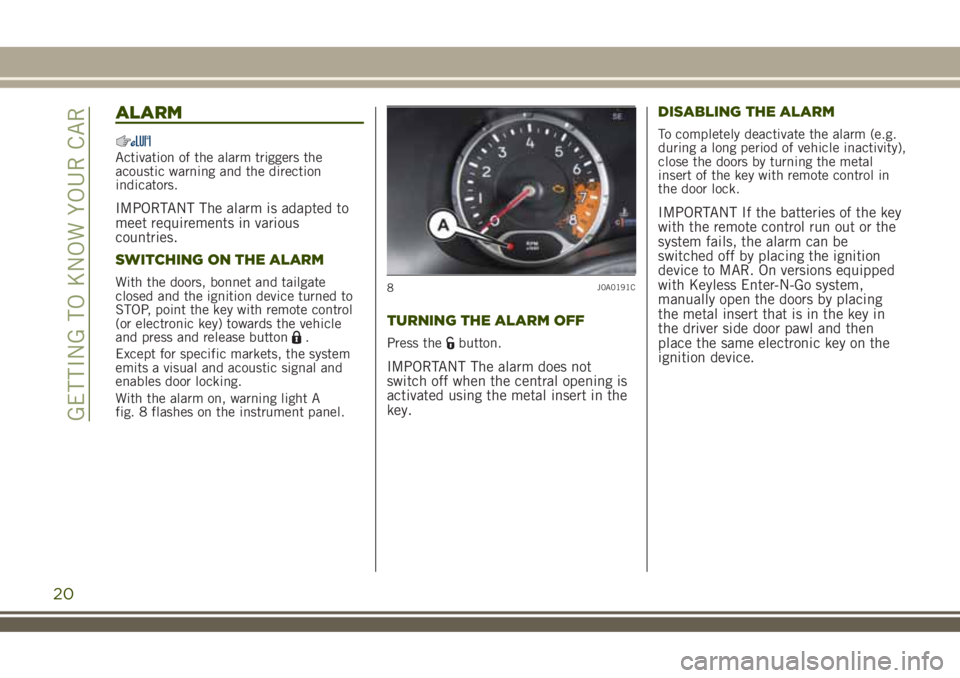
With the alarm on, warning light A
fig. 8 flashes on the instrument panel.
TURNING THE ALARM OFF
Press thebutton.
IMPORTANT The alarm does not
switch off when the central opening is
activated using the metal insert in the
key.DISABLING THE ALARM
To completely deactivate the alarm (e.g.
during a long period of vehicle inactivity),
close the doors by turning the metal
insert of the key with remote control in
the door lock.
IMPORTANT If the batteries of the key
with the remote control run out or the
system fails, the alarm can be
switched off by placing the ignition
device to MAR. On versions equipped
with Keyless Enter-N-Go system,
manually open the doors by placing
the metal insert that is in the key in
the driver side door pawl and then
place the same electronic key on the
ignition device.
8J0A0191C
20
GETTING TO KNOW YOUR CAR
Page 23 of 356
DOORS
LOCKING/UNLOCKING DOORS
FROM THE INSIDE
8)
If all doors are closed properly, they will
automatically be locked once the vehicle
has exceeded 20 km/h ("Autoclose"
function).
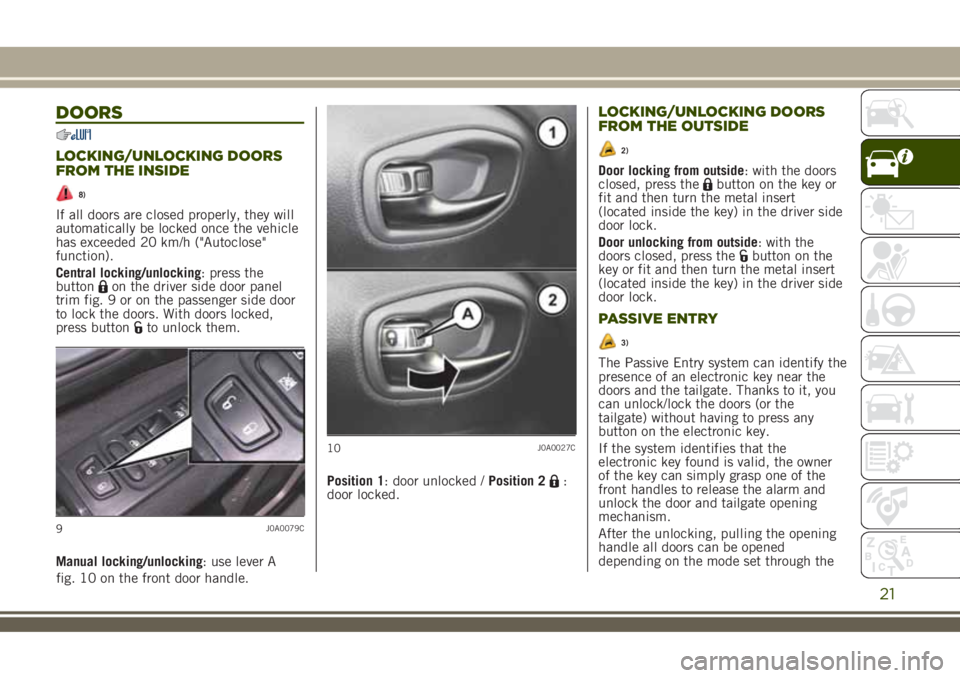
Central locking/unlocking: press the
button
on the driver side door panel
trim fig. 9 or on the passenger side door
to lock the doors. With doors locked,
press button
to unlock them.
Manual locking/unlocking: use lever A
fig. 10 on the front door handle.Position 1: door unlocked /Position 2
:
door locked.
LOCKING/UNLOCKING DOORS
FROM THE OUTSIDE
2)
Door locking from outside: with the doors
closed, press thebutton on the key or
fit and then turn the metal insert
(located inside the key) in the driver side
door lock.
Door unlocking from outside: with the
doors closed, press the
button on the
key or fit and then turn the metal insert
(located inside the key) in the driver side
door lock.
PASSIVE ENTRY
3)
The Passive Entry system can identify the
presence of an electronic key near the
doors and the tailgate. Thanks to it, you
can unlock/lock the doors (or the
tailgate) without having to press any
button on the electronic key.
If the system identifies that the
electronic key found is valid, the owner
of the key can simply grasp one of the
front handles to release the alarm and
unlock the door and tailgate opening
mechanism.
After the unlocking, pulling the opening
handle all doors can be opened
depending on the mode set through the
9J0A0079C
10J0A0027C
21
Page 24 of 356
display menu or theUconnect™system.
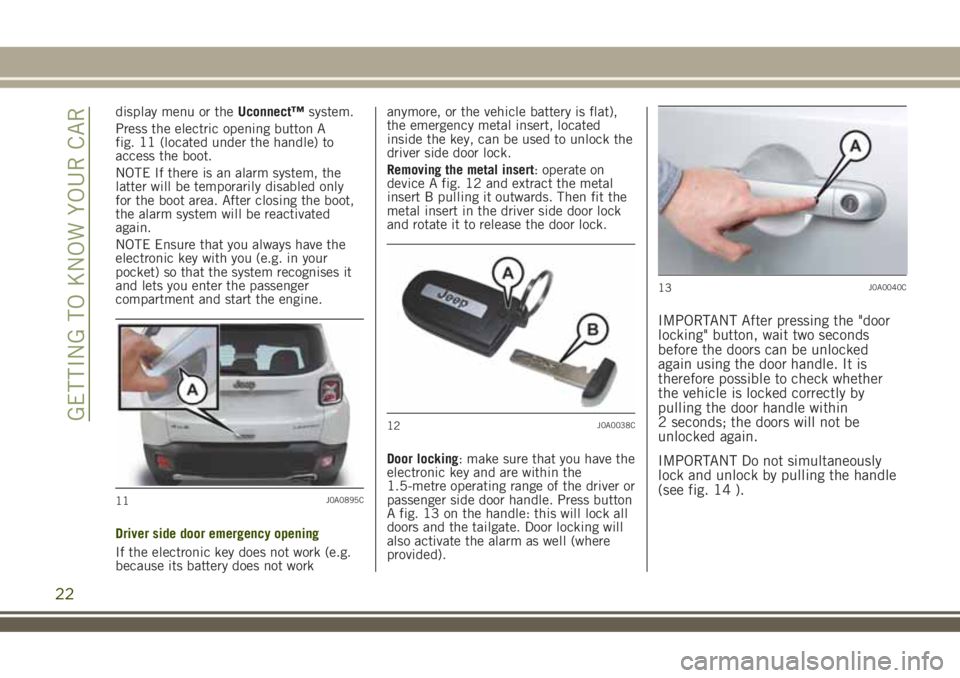
Press the electric opening button A
fig. 11 (located under the handle) to
access the boot.
NOTE If there is an alarm system, the
latter will be temporarily disabled only
for the boot area. After closing the boot,
the alarm system will be reactivated
again.
NOTE Ensure that you always have the
electronic key with you (e.g. in your
pocket) so that the system recognises it
and lets you enter the passenger
compartment and start the engine.
Driver side door emergency opening
If the electronic key does not work (e.g.
because its battery does not workanymore, or the vehicle battery is flat),
the emergency metal insert, located
inside the key, can be used to unlock the
driver side door lock.
Removing the metal insert: operate on
device A fig. 12 and extract the metal
insert B pulling it outwards. Then fit the
metal insert in the driver side door lock
and rotate it to release the door lock.
Door locking: make sure that you have the
electronic key and are within the
1.5-metre operating range of the driver or
passenger side door handle. Press button
A fig. 13 on the handle: this will lock all
doors and the tailgate. Door locking will
also activate the alarm as well (where
provided).
IMPORTANT After pressing the "door
locking" button, wait two seconds
before the doors can be unlocked
again using the door handle. It is
therefore possible to check whether
the vehicle is locked correctly by
pulling the door handle within
2 seconds; the doors will not be
unlocked again.
IMPORTANT Do not simultaneously
lock and unlock by pulling the handle
(see fig. 14 ).
11J0A0895C
12J0A0038C
13J0A0040C
22
GETTING TO KNOW YOUR CAR
Page 25 of 356
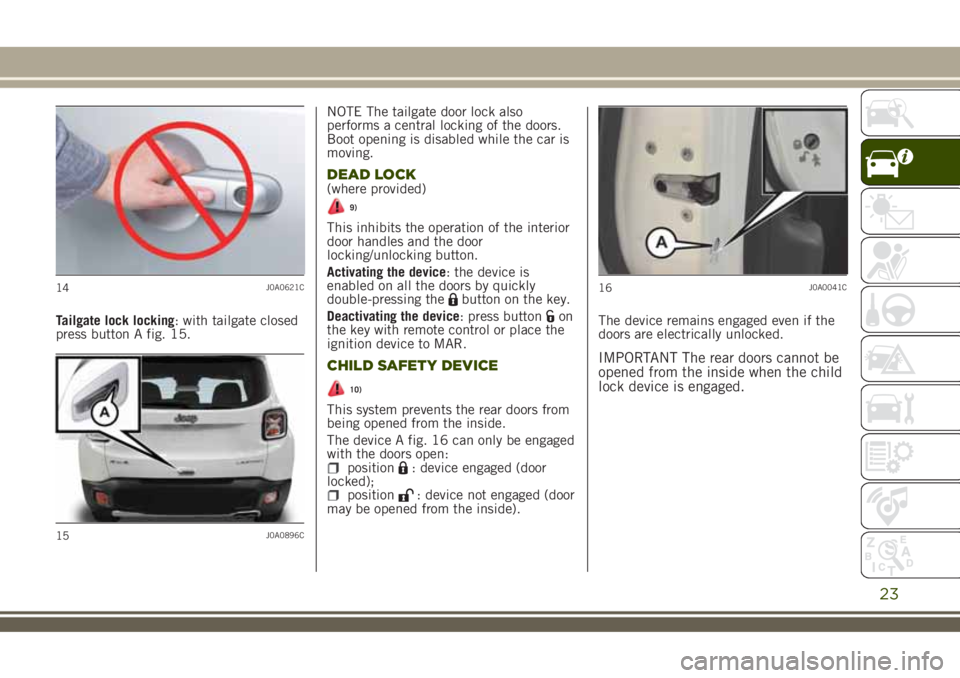
Tailgate lock locking: with tailgate closed
press button A fig. 15.NOTE The tailgate door lock also
performs a central locking of the doors.
Boot opening is disabled while the car is
moving.
DEAD LOCK(where provided)
9)
This inhibits the operation of the interior
door handles and the door
locking/unlocking button.
Activating the device: the device is
enabled on all the doors by quickly
double-pressing the
button on the key.
Deactivating the device: press button
on
the key with remote control or place the
ignition device to MAR.
CHILD SAFETY DEVICE
10)
This system prevents the rear doors from
being opened from the inside.
The device A fig. 16 can only be engaged
with the doors open:
position: device engaged (door
locked);
position: device not engaged (door
may be opened from the inside).The device remains engaged even if the
doors are electrically unlocked.
IMPORTANT The rear doors cannot be
opened from the inside when the child
lock device is engaged.
14J0A0621C
15J0A0896C
16J0A0041C
23
Page 26 of 356
WARNING
8)NEVER leave children unattended
inside the car, let alone leave the car with
the doors unlocked in a place that
children can access easily. Children may
seriously, or even fatally, injure
themselves. Also ensure that children do
not inadvertently operate the electric
parking brake, the brake pedal or the
automatic transmission lever.
9)Always use this device when carrying
children. After engaging the child lock on
both rear doors, check for effective
engagement by trying to open a door with
the internal handle.
10)Once the Dead Lock system is
engaged, it is impossible to open the
doors from inside the vehicle. Before
getting out of the car, please therefore
check that there is no-one left inside.
IMPORTANT
2)Make sure to take the key with you once
a door or the tailgate is locked, to prevent
locking the same key inside the vehicle. If
the key has been locked in, it can only be
recovered using the second provided key.
3)The operation of the recognition system
depends on various factors, such as, for
example, any electromagnetic wave
interference from external sources (e.g.
mobile phones), the charge of the battery
in the electronic key and the presence of
metal objects near the key or the car. In
these cases it is still possible to unlock the
doors by using the metal insert in the
electronic key (see description on the
following pages).
SEATS
FRONT SEATS WITH MANUAL
ADJUSTMENT
11)4)
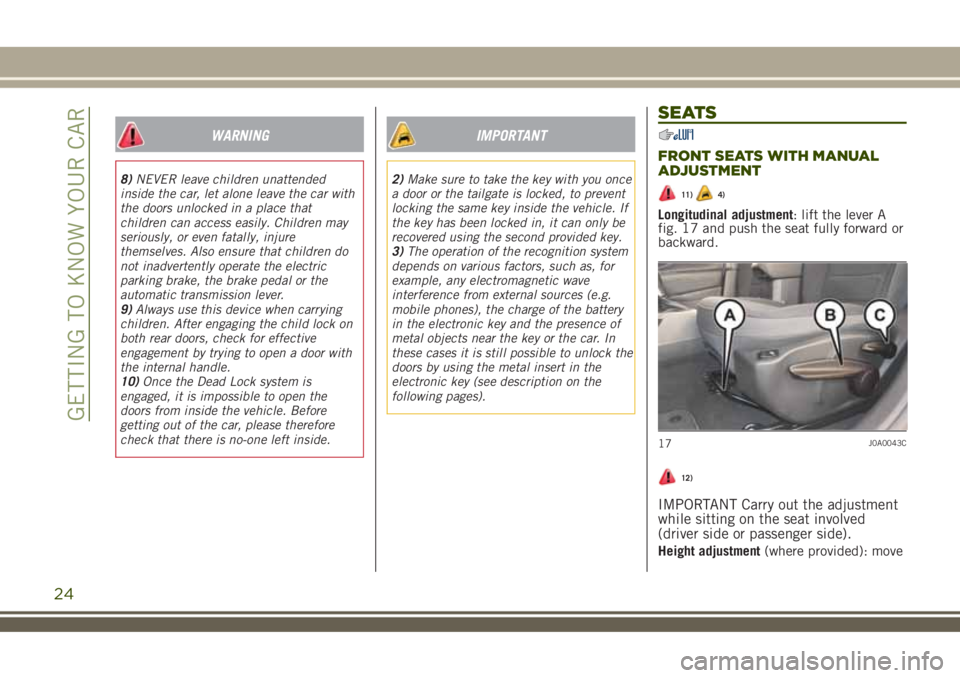
Longitudinal adjustment: lift the lever A
fig. 17 and push the seat fully forward or
backward.
12)
IMPORTANT Carry out the adjustment
while sitting on the seat involved
(driver side or passenger side).
Height adjustment(where provided): move
17J0A0043C
24
GETTING TO KNOW YOUR CAR
Page 27 of 356
lever B upwards or downwards to achieve
the required height.
Backrest angle adjustment: move lever C
to adjust the backrest angle,
accompanying it with the movement of
the chest (operate the lever until the
desired position is reached, then release
it).
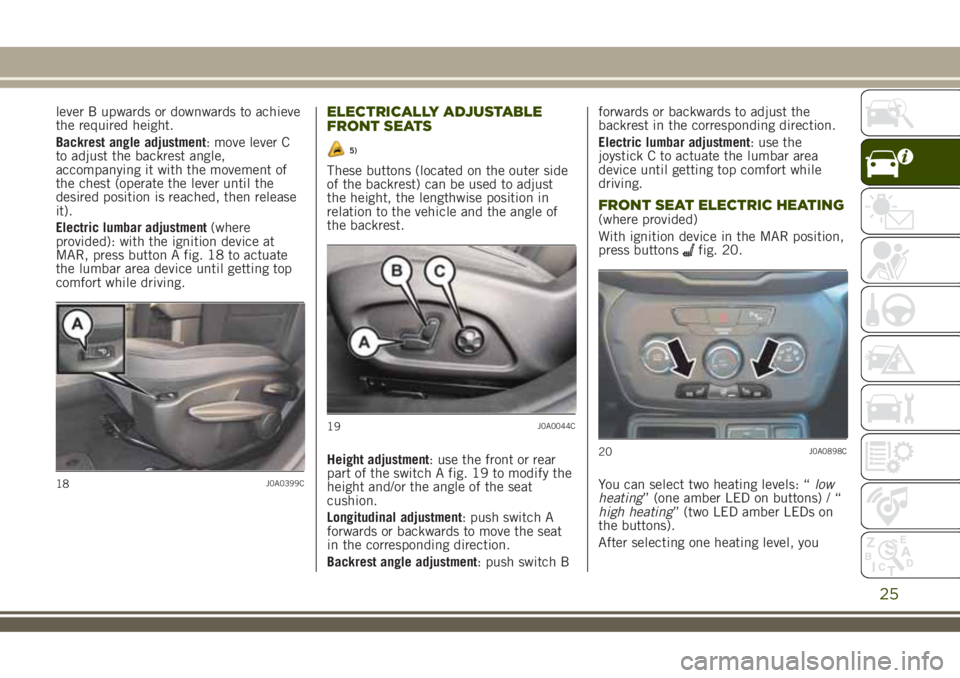
Electric lumbar adjustment(where
provided): with the ignition device at
MAR, press button A fig. 18 to actuate
the lumbar area device until getting top
comfort while driving.ELECTRICALLY ADJUSTABLE
FRONT SEATS
5)
These buttons (located on the outer side
of the backrest) can be used to adjust
the height, the lengthwise position in
relation to the vehicle and the angle of
the backrest.
Height adjustment: use the front or rear
part of the switch A fig. 19 to modify the
height and/or the angle of the seat
cushion.
Longitudinal adjustment: push switch A
forwards or backwards to move the seat
in the corresponding direction.
Backrest angle adjustment: push switch Bforwards or backwards to adjust the
backrest in the corresponding direction.
Electric lumbar adjustment: use the
joystick C to actuate the lumbar area
device until getting top comfort while
driving.
FRONT SEAT ELECTRIC HEATING(where provided)
With ignition device in the MAR position,
press buttons
fig. 20.
You can select two heating levels: “low
heating” (one amber LED on buttons) / “
high heating” (two LED amber LEDs on
the buttons).
After selecting one heating level, you
18J0A0399C
19J0A0044C
20J0A0898C
25
Page 28 of 356
need to wait for a few minutes until warm
air flows into the compartment.
IMPORTANT To preserve the battery
charge, this function cannot be
activated when the engine is off.
Auto On Comfort (where provided)
The electric heated driver seat is
switched on automatically to "maximum
heating" whenever the engine is started
and the outside temperature is lower
than 4.4°C. This functionality can be
enabled or disabled from theUconnect™
system Menu.
REAR SEATS
Partial extension of the luggage
compartment (1/3 or 2/3)
6)
Proceed as follows:remove the parcel shelf, if present;completely lower the rear seat head
restraints;
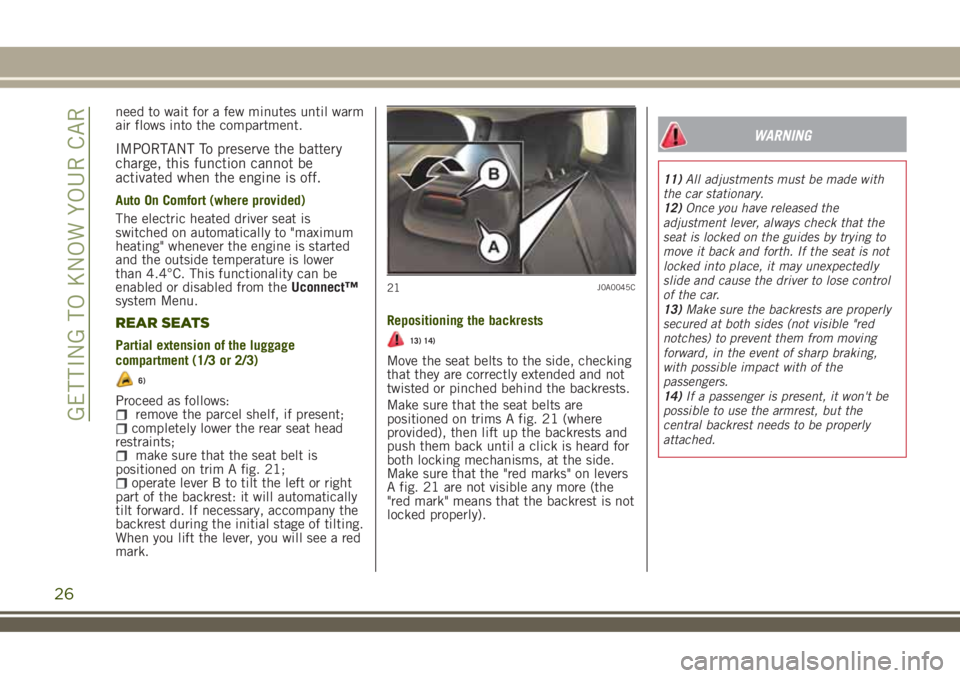
make sure that the seat belt is
positioned on trim A fig. 21;
operate lever B to tilt the left or right
part of the backrest: it will automatically
tilt forward. If necessary, accompany the
backrest during the initial stage of tilting.
When you lift the lever, you will see a red
mark.Repositioning the backrests
13) 14)
Move the seat belts to the side, checking
that they are correctly extended and not
twisted or pinched behind the backrests.
Make sure that the seat belts are
positioned on trims A fig. 21 (where
provided), then lift up the backrests and
push them back until a click is heard for
both locking mechanisms, at the side.
Make sure that the "red marks" on levers
A fig. 21 are not visible any more (the
"red mark" means that the backrest is not
locked properly).
WARNING
11)All adjustments must be made with
the car stationary.
12)Once you have released the
adjustment lever, always check that the
seat is locked on the guides by trying to
move it back and forth. If the seat is not
locked into place, it may unexpectedly
slide and cause the driver to lose control
of the car.
13)Make sure the backrests are properly
secured at both sides (not visible "red
notches) to prevent them from moving
forward, in the event of sharp braking,
with possible impact with of the
passengers.
14)If a passenger is present, it won't be
possible to use the armrest, but the
central backrest needs to be properly
attached.
21J0A0045C
26
GETTING TO KNOW YOUR CAR
Page 29 of 356
IMPORTANT
4)The fabric upholstery of the seats has
been designed to withstand long-term wear
deriving from normal use of the car. Some
precautions are however required. Avoid
prolonged and/or excessive rubbing against
clothing accessories such as metal buckles
and Velcro strips which, by applying a high
pressure on the fabric in a small area,
could cause it to break, thereby damaging
the upholstery.
5)Do not arrange objects beneath the
electrically adjustable seat and do not
impede its movement, since the controls
may be damaged. They may also restrict
the seat travel.
6)Before tilting the backrest, remove any
objects on the seat cushion.
HEAD RESTRAINTS
ADJUSTMENTS
15)
Upwards adjustment: raise the head
restraint until it clicks into place.
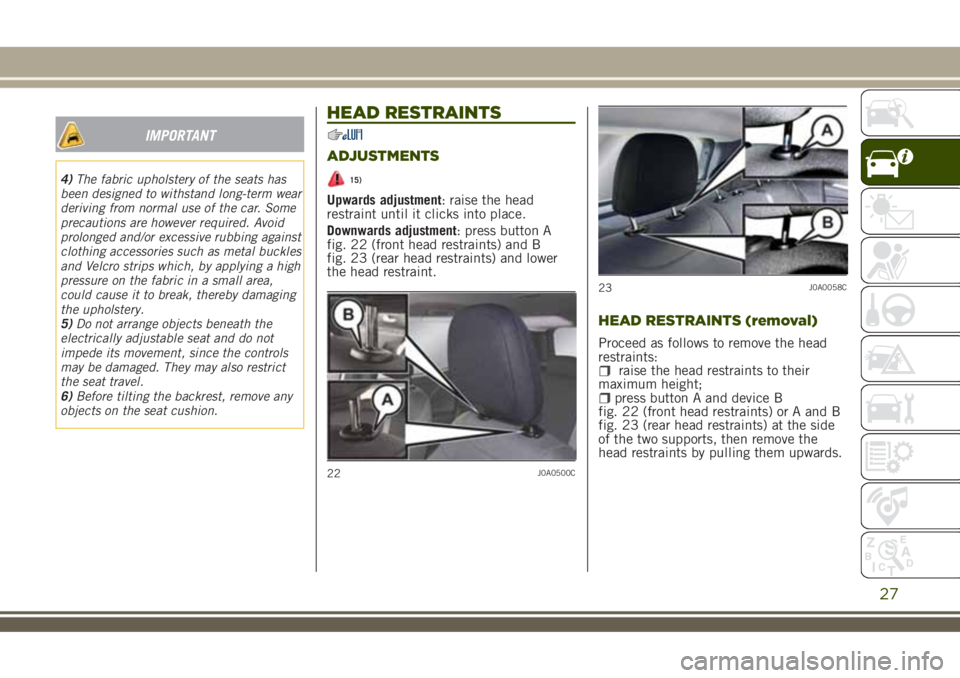
Downwards adjustment: press button A
fig. 22 (front head restraints) and B
fig. 23 (rear head restraints) and lower
the head restraint.
HEAD RESTRAINTS (removal)
Proceed as follows to remove the head
restraints:
raise the head restraints to their
maximum height;
press button A and device B
fig. 22 (front head restraints) or A and B
fig. 23 (rear head restraints) at the side
of the two supports, then remove the
head restraints by pulling them upwards.
22J0A0500C
23J0A0058C
27
Page 30 of 356
WARNING
15)Head restraints must be adjusted so
that the head, rather than the neck, rests
on them. Only in this case they can
protect your head correctly.
STEERING WHEEL
16) 17)
ADJUSTMENTS
The steering wheel can be adjusted both
in height and in depth.
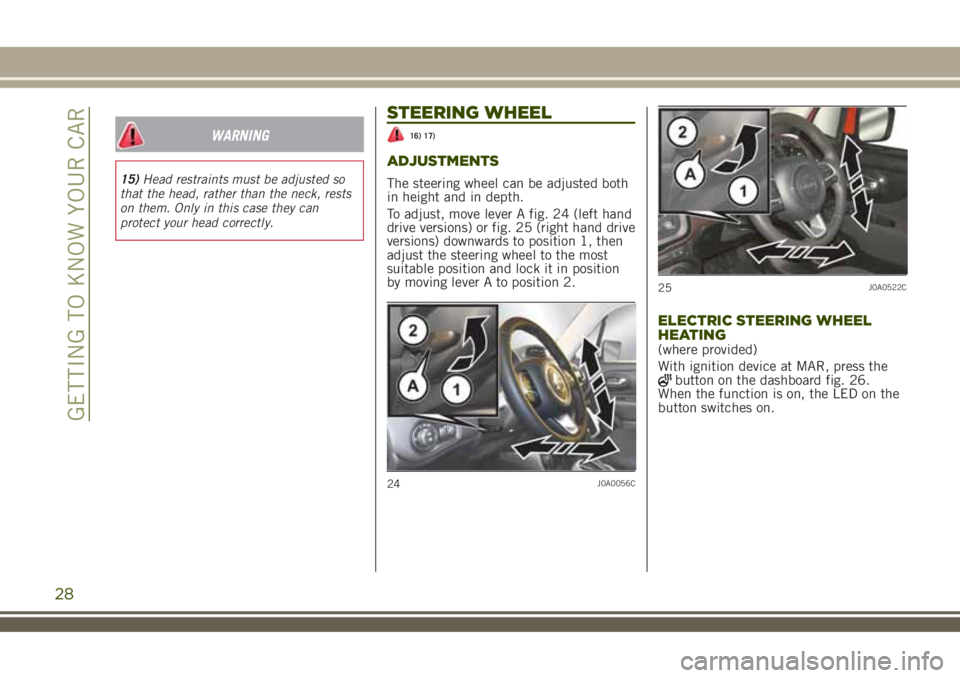
To adjust, move lever A fig. 24 (left hand
drive versions) or fig. 25 (right hand drive
versions) downwards to position 1, then
adjust the steering wheel to the most
suitable position and lock it in position
by moving lever A to position 2.
ELECTRIC STEERING WHEEL
HEATING
(where provided)
With ignition device at MAR, press the
button on the dashboard fig. 26.
When the function is on, the LED on the
button switches on.
24J0A0056C
25J0A0522C
28
GETTING TO KNOW YOUR CAR