Lancia Delta 2011 Owner handbook (in English)
Manufacturer: LANCIA, Model Year: 2011, Model line: Delta, Model: Lancia Delta 2011Pages: 290, PDF Size: 8.36 MB
Page 41 of 290
40KNOWING YOUR CAR
KEYS
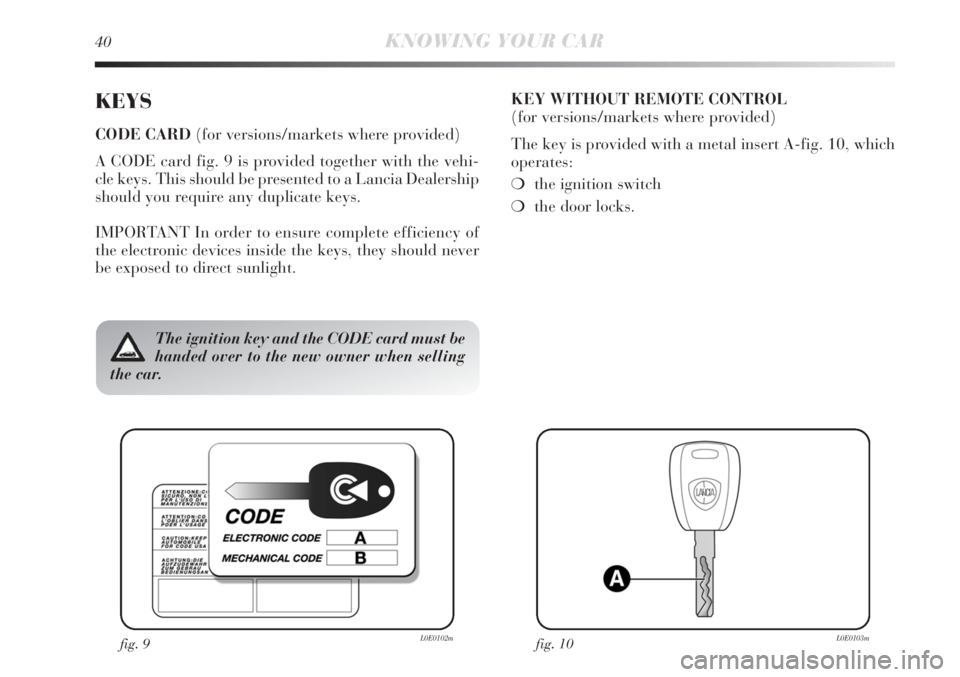
CODE CARD (for versions/markets where provided)
A CODE card fig. 9 is provided together with the vehi-
cle keys. This should be presented to a Lancia Dealership
should you require any duplicate keys.
IMPORTANT In order to ensure complete efficiency of
the electronic devices inside the keys, they should never
be exposed to direct sunlight.KEY WITHOUT REMOTE CONTROL
(for versions/markets where provided)
The key is provided with a metal insert A-fig. 10, which
operates:
❍the ignition switch
❍the door locks.
fig. 9L0E0102mfig. 10L0E0103m
The ignition key and the CODE card must be
handed over to the new owner when selling
the car.
Page 42 of 290
1
KNOWING YOUR CAR41
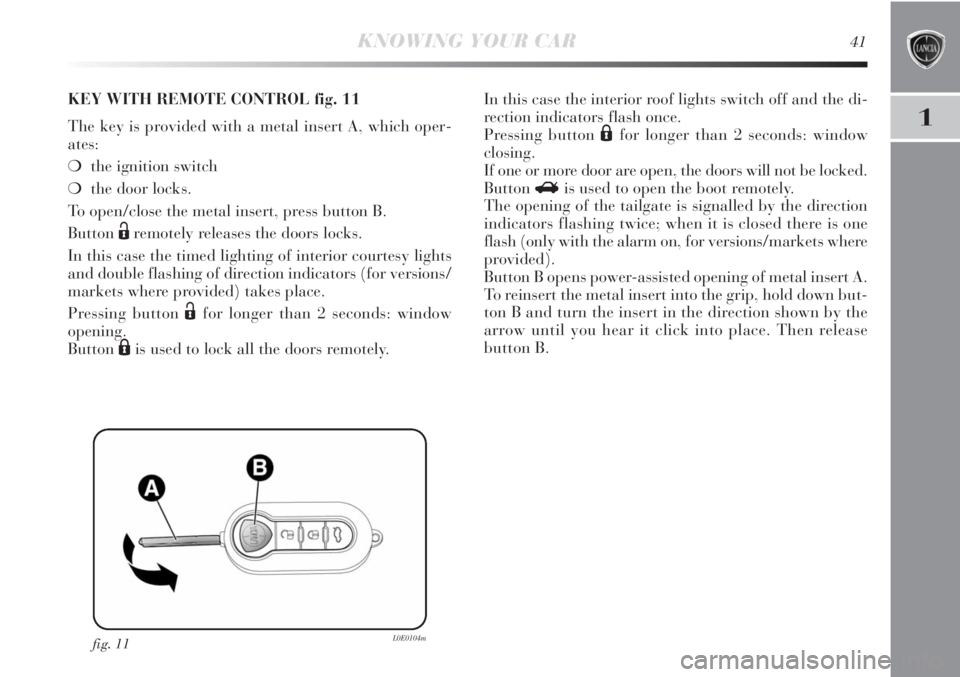
fig. 11L0E0104m
KEY WITH REMOTE CONTROL fig. 11
The key is provided with a metal insert A, which oper-
ates:
❍the ignition switch
❍the door locks.
To open/close the metal insert, press button B.
Button
Ëremotely releases the doors locks.
In this case the timed lighting of interior courtesy lights
and double flashing of direction indicators (for versions/
markets where provided) takes place.
Pressing button
Ëfor longer than 2 seconds: window
opening.
Button
Áis used to lock all the doors remotely.In this case the interior roof lights switch off and the di-
rection indicators flash once.
Pressing button
Áfor longer than 2 seconds: window
closing.
If one or more door are open, the doors will not be locked.
Button
Ris used to open the boot remotely.
The opening of the tailgate is signalled by the direction
indicators flashing twice; when it is closed there is one
flash (only with the alarm on, for versions/markets where
provided).
Button B opens power-assisted opening of metal insert A.
To reinsert the metal insert into the grip, hold down but-
ton B and turn the insert in the direction shown by the
arrow until you hear it click into place. Then release
button B.
Page 43 of 290
42KNOWING YOUR CAR
Only press button B-fig. 11 when the key is
away from the body, particularly from your
eyes and other objects that may be damaged
(e.g. clothing). Never leave the key unattended to
make sure it is not touched by others, especially
children, who may inadvertently press the button.
Request for additional remote controls
The system can recognise up to 8 keys with incorporated
remote control. Should a new remote control be neces-
sary, contact a Lancia Dealership and be ready to present
the CODE card, a personal identity document and the
car’s ownership documents.
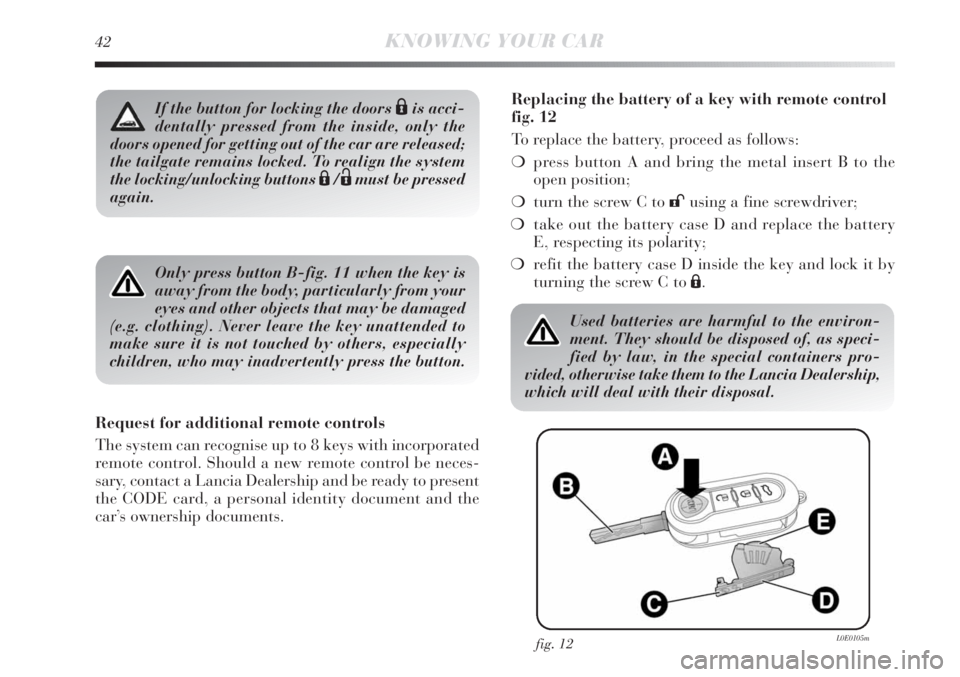
fig. 12L0E0105m
Used batteries are harmful to the environ-
ment. They should be disposed of, as speci-
fied by law, in the special containers pro-
vided, otherwise take them to the Lancia Dealership,
which will deal with their disposal.
Replacing the battery of a key with remote control
fig. 12
To replace the battery, proceed as follows:
❍press button A and bring the metal insert B to the
open position;
❍turn the screw C to :using a fine screwdriver;
❍take out the battery case D and replace the battery
E, respecting its polarity;
❍refit the battery case D inside the key and lock it by
turning the screw C to Á.If the button for locking the doors Áis acci-
dentally pressed from the inside, only the
doors opened for getting out of the car are released;
the tailgate remains locked. To realign the system
the locking/unlocking buttons
Á/Ëmust be pressed
again.
Page 44 of 290
1
KNOWING YOUR CAR43
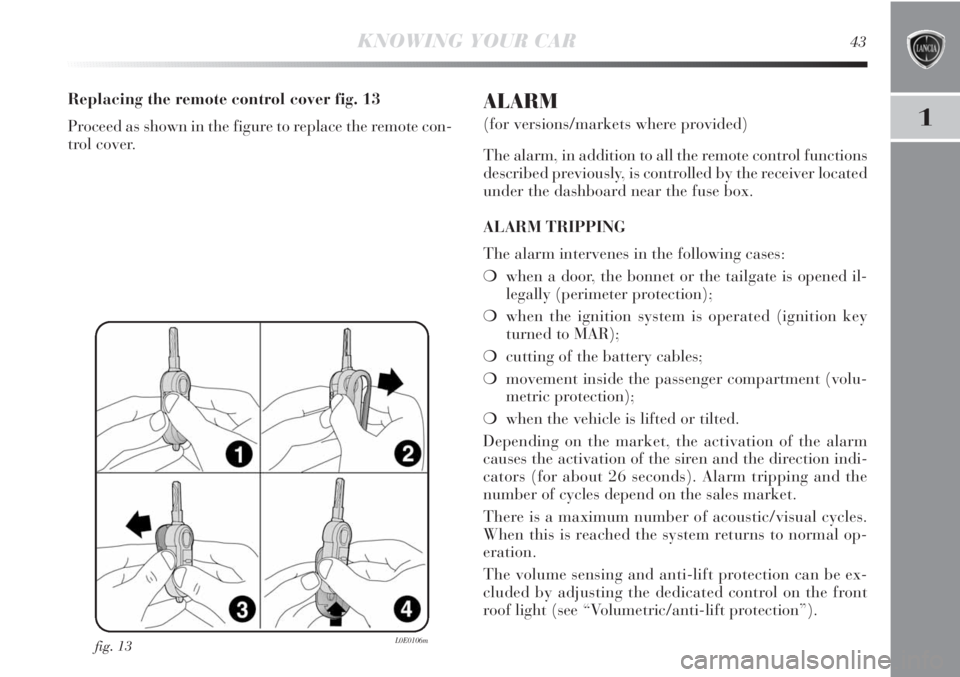
fig. 13L0E0106m
Replacing the remote control cover fig. 13
Proceed as shown in the figure to replace the remote con-
trol cover.ALARM
(for versions/markets where provided)
The alarm, in addition to all the remote control functions
described previously, is controlled by the receiver located
under the dashboard near the fuse box.
ALARM TRIPPING
The alarm intervenes in the following cases:
❍when a door, the bonnet or the tailgate is opened il-
legally (perimeter protection);
❍when the ignition system is operated (ignition key
turned to MAR);
❍cutting of the battery cables;
❍movement inside the passenger compartment (volu-
metric protection);
❍when the vehicle is lifted or tilted.
Depending on the market, the activation of the alarm
causes the activation of the siren and the direction indi-
cators (for about 26 seconds). Alarm tripping and the
number of cycles depend on the sales market.
There is a maximum number of acoustic/visual cycles.
When this is reached the system returns to normal op-
eration.
The volume sensing and anti-lift protection can be ex-
cluded by adjusting the dedicated control on the front
roof light (see “Volumetric/anti-lift protection”).
Page 45 of 290
44KNOWING YOUR CAR
IMPORTANT The engine immobilizer function is guar-
anteed by the Lancia CODE, which is automatically ac-
tivated when the ignition key is extracted from the starter
device.
TURNING THE ALARM ON
With the doors and bonnet closed and the ignition key
either turned to STOP or removed, point the key with the
remote control towards the vehicle and press and release
button
Á.
Excluding some markets, the system produces an acoustic
warning (beep) and enables door locking.
The switching on of the alarm is preceded by a self-di-
agnosis stage: if a fault is detected, the system emits a new
acoustic signal together with the display of a message (see
“Panel warning lights” chapter).
In this case switch off the alarm by pressing
Ë, check that
all the doors, bonnet and tailgate are closed correctly;
then switch the alarm back on by pressing
Á.
If a door or the bonnet is not properly shut, it will be ex-
cluded from the testing by the alarm system.
If the alarm emits an acoustic signal even when the doors,
bonnet and tailgate are correctly closed, a failure has oc-
curred in system operation. Contact a Lancia Dealership.IMPORTANT Centrally locking the doors using the metal
insert on the key does not activate the alarm.
IMPORTANT The alarm is adapted to meet requirements
in various countries.
TURNING THE ALARM OFF
Press button
Ëon the key with the remote control.
The following operations are performed (excluding some
markets):
❍the direction indicators flash briefly twice;
❍two brief acoustic signals are emitted (“BEEP”);
❍the doors are unlocked.
IMPORTANT Activating the central opening using the
key’s metal insert does not turn the alarm off.
Page 46 of 290
1
KNOWING YOUR CAR45
VOLUMETRIC/ANTI-LIFT PROTECTION
To guarantee the correct operation of the protection sys-
tem it is advisable to shut all the side windows and the
sun roof (for versions/markets where provided).
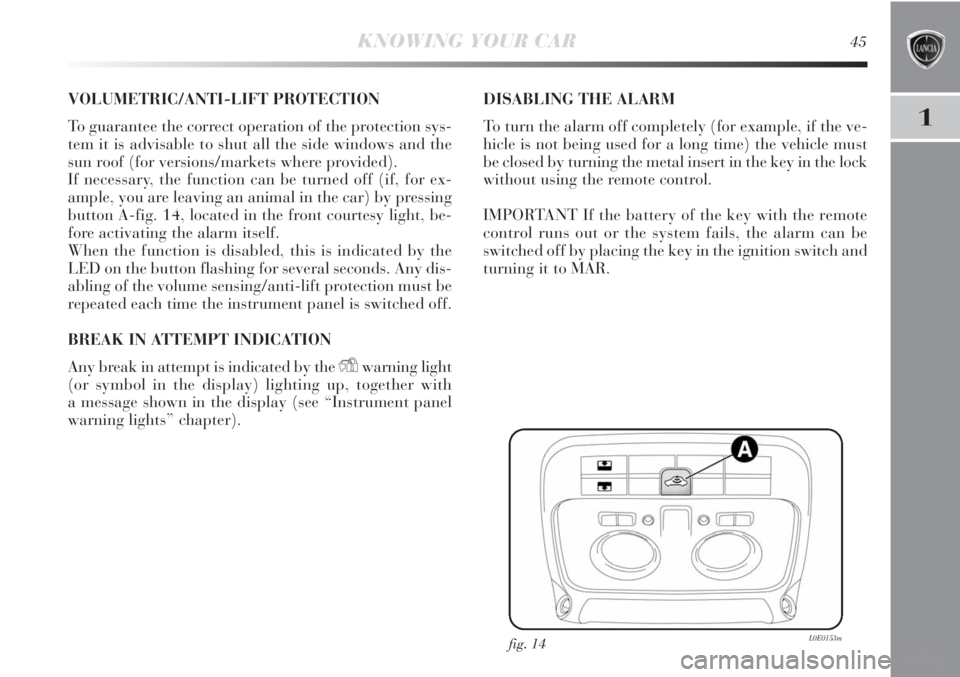
If necessary, the function can be turned off (if, for ex-
ample, you are leaving an animal in the car) by pressing
button A-fig. 14, located in the front courtesy light, be-
fore activating the alarm itself.
When the function is disabled, this is indicated by the
LED on the button flashing for several seconds. Any dis-
abling of the volume sensing/anti-lift protection must be
repeated each time the instrument panel is switched off.
BREAK IN ATTEMPT INDICATION
Any break in attempt is indicated by the
Ywarning light
(or symbol in the display) lighting up, together with
a message shown in the display (see “Instrument panel
warning lights” chapter).DISABLING THE ALARM
To turn the alarm off completely (for example, if the ve-
hicle is not being used for a long time) the vehicle must
be closed by turning the metal insert in the key in the lock
without using the remote control.
IMPORTANT If the battery of the key with the remote
control runs out or the system fails, the alarm can be
switched off by placing the key in the ignition switch and
turning it to MAR.
fig. 14L0E0153m
Page 47 of 290
46KNOWING YOUR CAR
IGNITION DEVICE
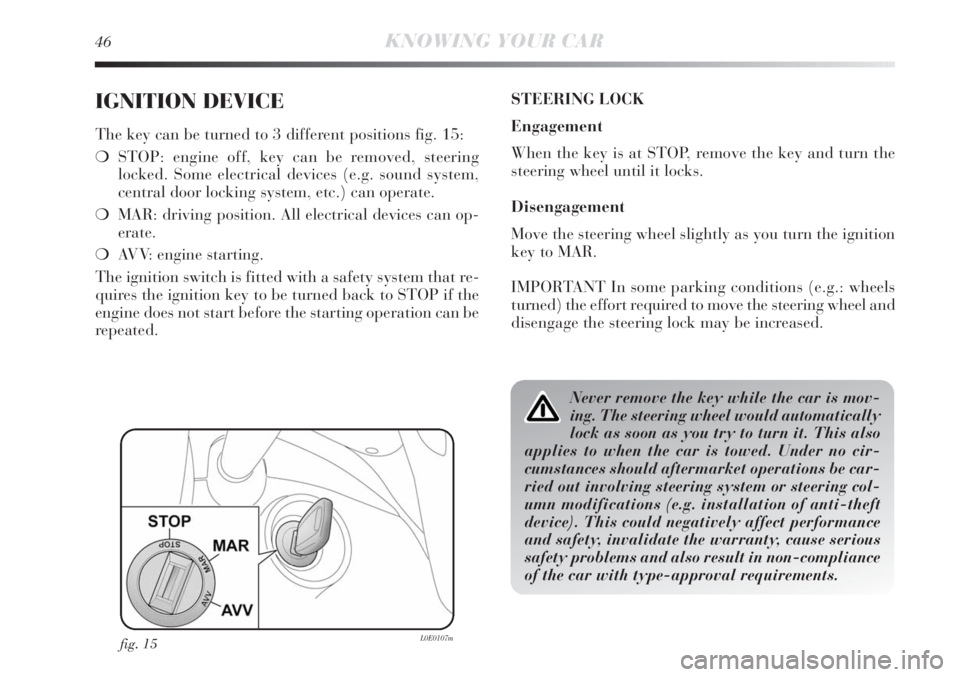
The key can be turned to 3 different positions fig. 15:
❍STOP: engine off, key can be removed, steering
locked. Some electrical devices (e.g. sound system,
central door locking system, etc.) can operate.
❍MAR: driving position. All electrical devices can op-
erate.
❍AVV: engine starting.
The ignition switch is fitted with a safety system that re-
quires the ignition key to be turned back to STOP if the
engine does not start before the starting operation can be
repeated.STEERING LOCK
Engagement
When the key is at STOP, remove the key and turn the
steering wheel until it locks.
Disengagement
Move the steering wheel slightly as you turn the ignition
key to MAR.
IMPORTANT In some parking conditions (e.g.: wheels
turned) the effort required to move the steering wheel and
disengage the steering lock may be increased.
fig. 15L0E0107m
Never remove the key while the car is mov-
ing. The steering wheel would automatically
lock as soon as you try to turn it. This also
applies to when the car is towed. Under no cir-
cumstances should aftermarket operations be car-
ried out involving steering system or steering col-
umn modifications (e.g. installation of anti-theft
device). This could negatively affect performance
and safety, invalidate the warranty, cause serious
safety problems and also result in non-compliance
of the car with type-approval requirements.
Page 48 of 290
1
KNOWING YOUR CAR47
SEATS
FRONT SEATS
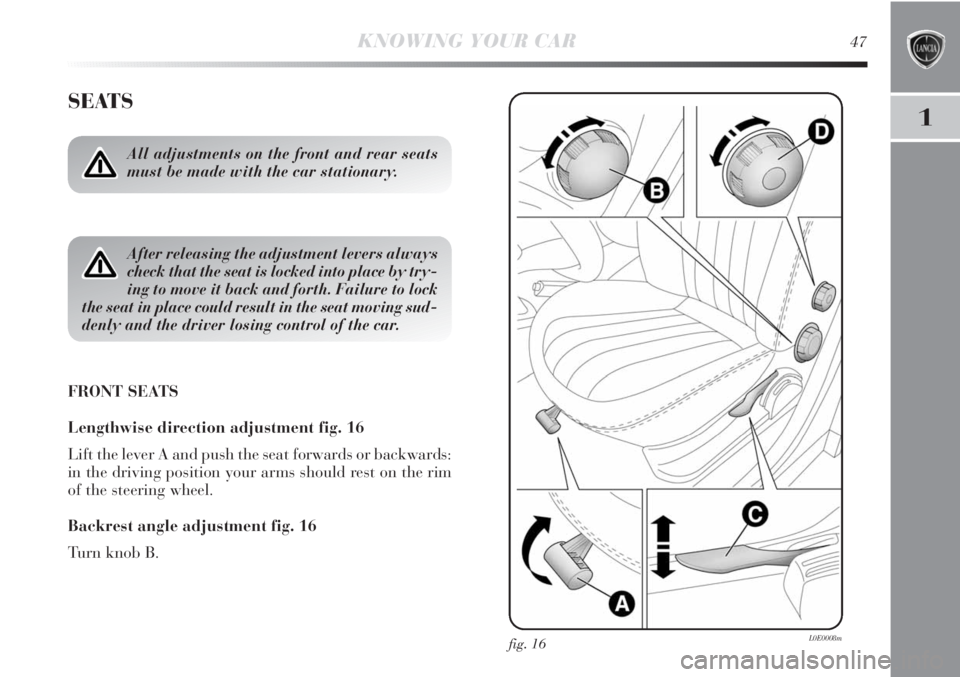
Lengthwise direction adjustment fig. 16
Lift the lever A and push the seat forwards or backwards:
in the driving position your arms should rest on the rim
of the steering wheel.
Backrest angle adjustment fig. 16
Turn knob B.
All adjustments on the front and rear seats
must be made with the car stationary.
After releasing the adjustment levers always
check that the seat is locked into place by try-
ing to move it back and forth. Failure to lock
the seat in place could result in the seat moving sud-
denly and the driver losing control of the car.
fig. 16L0E0008m
Page 49 of 290
48KNOWING YOUR CAR
Height adjustment fig. 16
Operate lever C to raise or lower the rear part of the seat
cushion to improve comfort.
Lumbar adjustment (driver’s seat) fig. 16
The position of the back against the seat backrest is ad-
justed by turning knob D.
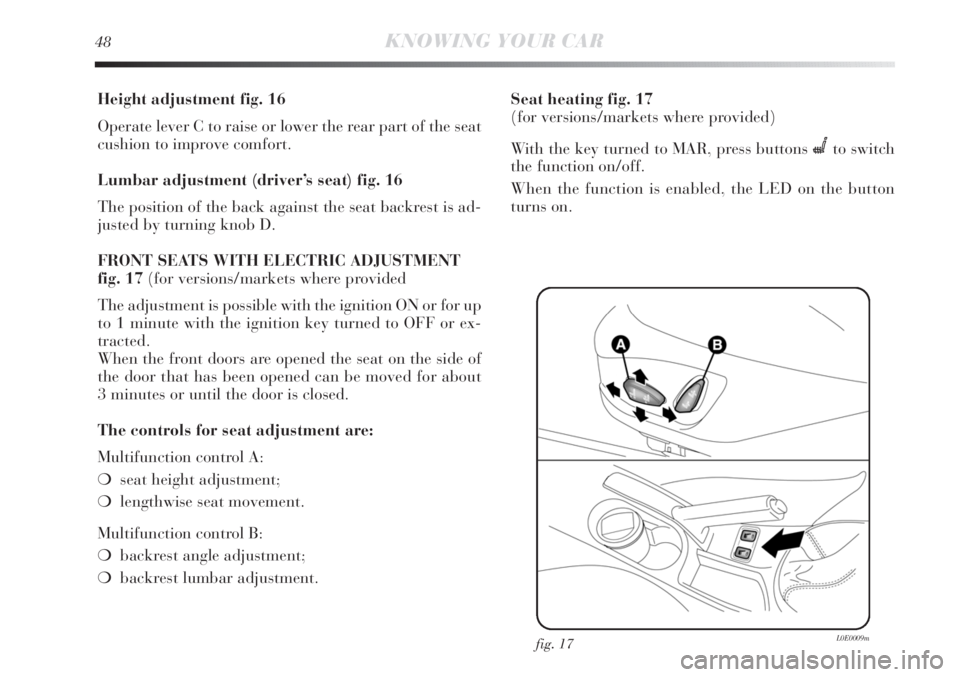
FRONT SEATS WITH ELECTRIC ADJUSTMENT
fig. 17(for versions/markets where provided
The adjustment is possible with the ignition ON or for up
to 1 minute with the ignition key turned to OFF or ex-
tracted.
When the front doors are opened the seat on the side of
the door that has been opened can be moved for about
3 minutes or until the door is closed.
The controls for seat adjustment are:
Multifunction control A:
❍seat height adjustment;
❍lengthwise seat movement.
Multifunction control B:
❍backrest angle adjustment;
❍backrest lumbar adjustment.Seat heating fig. 17
(for versions/markets where provided)
With the key turned to MAR, press buttons
Cto switch
the function on/off.
When the function is enabled, the LED on the button
turns on.
fig. 17L0E0009m
Page 50 of 290
1
KNOWING YOUR CAR49
REAR SEATS
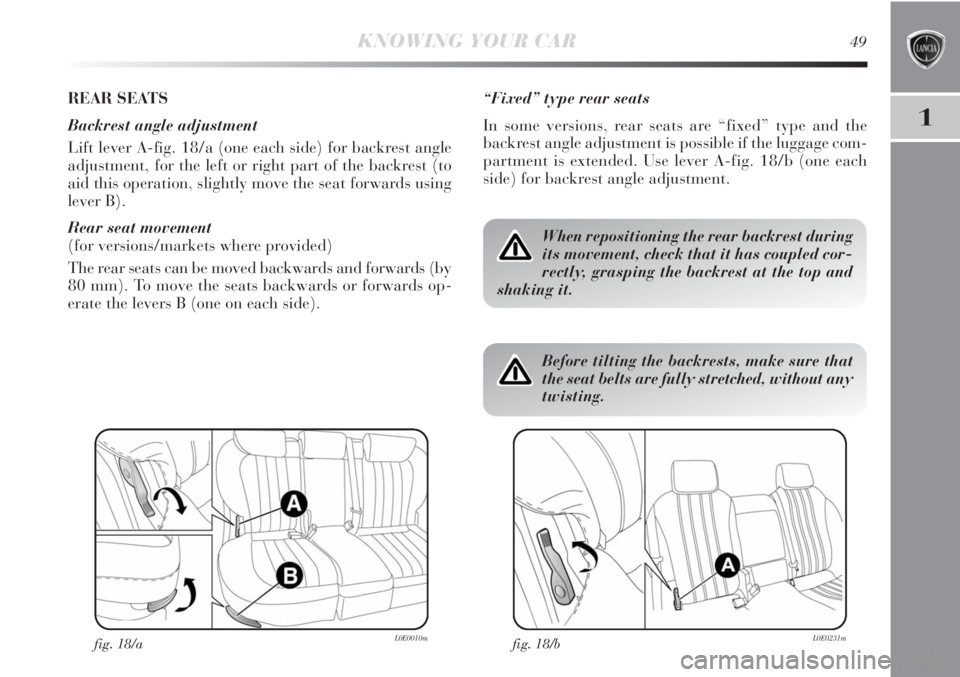
Backrest angle adjustment
Lift lever A-fig. 18/a (one each side) for backrest angle
adjustment, for the left or right part of the backrest (to
aid this operation, slightly move the seat forwards using
lever B).
Rear seat movement
(for versions/markets where provided)
The rear seats can be moved backwards and forwards (by
80 mm). To move the seats backwards or forwards op-
erate the levers B (one on each side).
fig. 18/aL0E0010m
“Fixed” type rear seats
In some versions, rear seats are “fixed” type and the
backrest angle adjustment is possible if the luggage com-
partment is extended. Use lever A-fig. 18/b (one each
side) for backrest angle adjustment.
When repositioning the rear backrest during
its movement, check that it has coupled cor-
rectly, grasping the backrest at the top and
shaking it.
fig. 18/bL0E0231m
Before tilting the backrests, make sure that
the seat belts are fully stretched, without any
twisting.