check engine LAND ROVER DISCOVERY 2002 Repair Manual
[x] Cancel search | Manufacturer: LAND ROVER, Model Year: 2002, Model line: DISCOVERY, Model: LAND ROVER DISCOVERY 2002Pages: 1672, PDF Size: 46.1 MB
Page 309 of 1672
ENGINE - V8
12-2-66 OVERHAUL
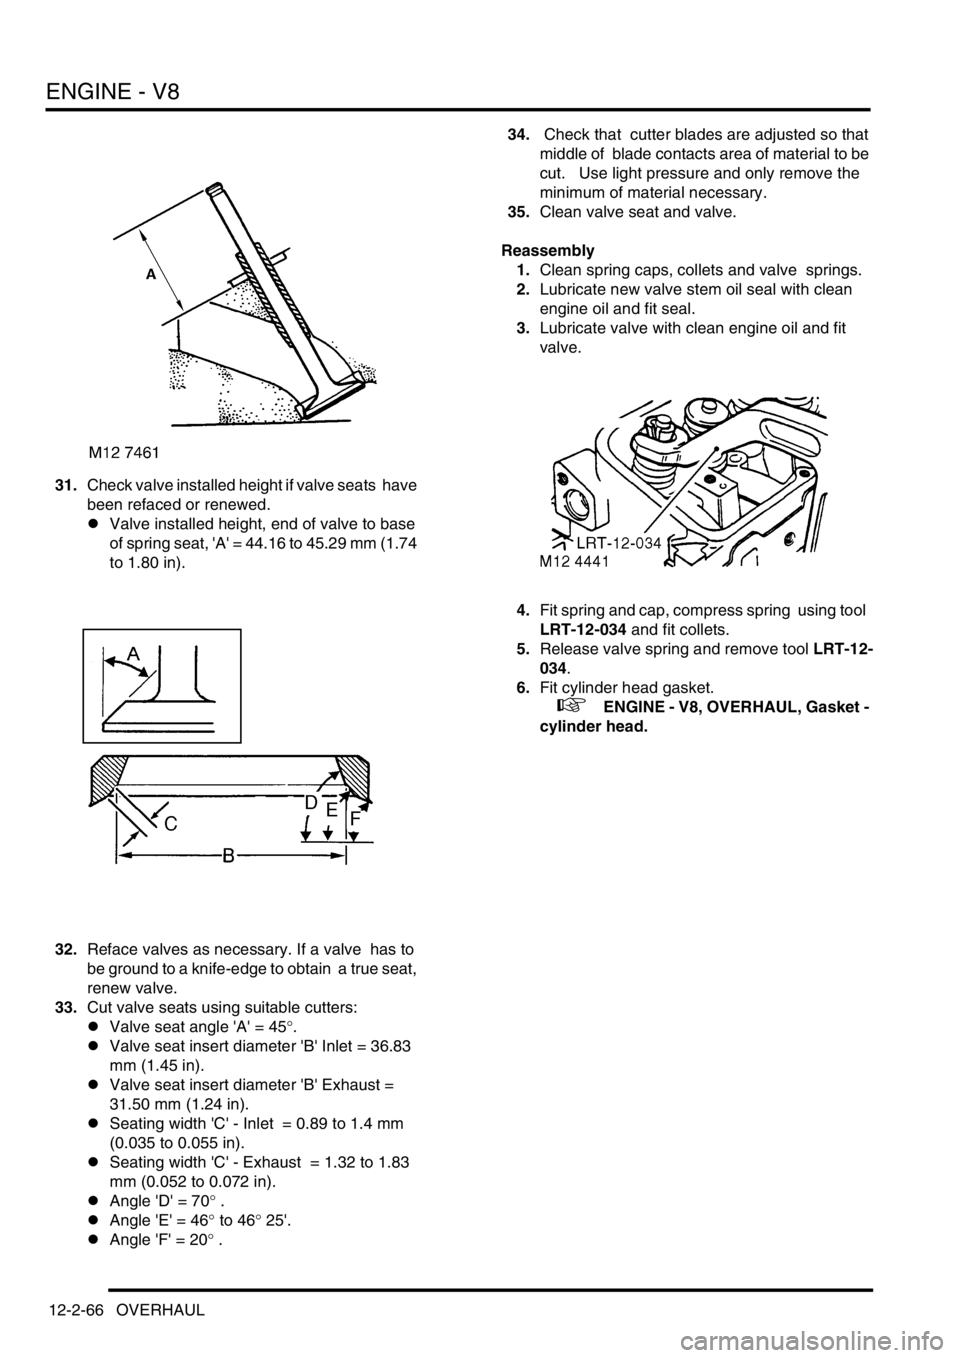
31.Check valve installed height if valve seats have
been refaced or renewed.
lValve installed height, end of valve to base
of spring seat, 'A' = 44.16 to 45.29 mm (1.74
to 1.80 in).
32.Reface valves as necessary. If a valve has to
be ground to a knife-edge to obtain a true seat,
renew valve.
33.Cut valve seats using suitable cutters:
lValve seat angle 'A' = 45
°.
lValve seat insert diameter 'B' Inlet = 36.83
mm (1.45 in).
lValve seat insert diameter 'B' Exhaust =
31.50 mm (1.24 in).
lSeating width 'C' - Inlet = 0.89 to 1.4 mm
(0.035 to 0.055 in).
lSeating width 'C' - Exhaust = 1.32 to 1.83
mm (0.052 to 0.072 in).
lAngle 'D' = 70
° .
lAngle 'E' = 46
° to 46° 25'.
lAngle 'F' = 20
° .34. Check that cutter blades are adjusted so that
middle of blade contacts area of material to be
cut. Use light pressure and only remove the
minimum of material necessary.
35.Clean valve seat and valve.
Reassembly
1.Clean spring caps, collets and valve springs.
2.Lubricate new valve stem oil seal with clean
engine oil and fit seal.
3.Lubricate valve with clean engine oil and fit
valve.
4.Fit spring and cap, compress spring using tool
LRT-12-034 and fit collets.
5.Release valve spring and remove tool LRT-12-
034.
6.Fit cylinder head gasket.
+ ENGINE - V8, OVERHAUL, Gasket -
cylinder head.
Page 311 of 1672
ENGINE - V8
12-2-68 OVERHAUL
Inspect
1.Clean carbon from piston. Inspect piston for
distortion, cracks and burning.
2.Remove piston rings from piston.
3.Measure and record piston diameter at 90
° to
gudgeon pin axis and 10 mm (0.4 in) from
bottom of the skirt. The piston must be 0.02 to
0.045 mm (0.001 to 0.002 in) smaller than the
cylinder bore.
4.Check gudgeon pin bore in piston for signs of
wear and overheating.
5.Pistons fitted on production are graded 'A' or
'B', the grade letter is stamped on the piston
crown.
lPiston diameter: Grade 'A' = 93.970 to
93.985 mm (3.6996 to 3.7002 in).
lPiston diameter: Grade 'B' = 93.986 to 94.00
mm (3.7002 to 3.7007 in).
6.Worn cylinders fitted with grade 'A' pistons may
be honed to accept the grade 'B' piston
provided that specified cylinder bore and
ovality limits are maintained. Grade 'B'
pistons are supplied as service
replacements. Do not attempt to de-glaze
cylinder bores.
7.Check gudgeon pins for signs of wear and
overheating.
8.Check clearance of gudgeon pin in piston.
l Gudgeon pin to piston clearance = 0.006 to
0.015 mm (0.0002 to 0.0006 in).
9.Check overall dimensions of gudgeon pin.
Gudgeon pins are only supplied as an
assembly with replacement pistons.
lGudgeon pin length = 60.00 to 60.50 mm
(2.362 to 2.382 in).
lGudgeon pin diameter = 23.995 to 24.00
mm (0.9446 to 0.9448 in)10.Measure cylinder bore wear and ovality in two
axis 40 to 50 mm (1.6 to 2 in) from top of bore.
The temperature of piston and cylinder
block must be the same to ensure accurate
measurement. Do not attempt to de-glaze
cylinder bores.
lGrade 'A' pistons: Cylinder bore = 94.00 to
94.015 mm (3.7007 to 3.7013 in).
lGrade 'B' pistons: Cylinder bore = 94.016 to
94.030 mm (3.7014 to 3.7019 in).
lMaximum ovality = 0.013 mm (0.0005 in).
11.Check alignment of connecting rods.
Reassembly
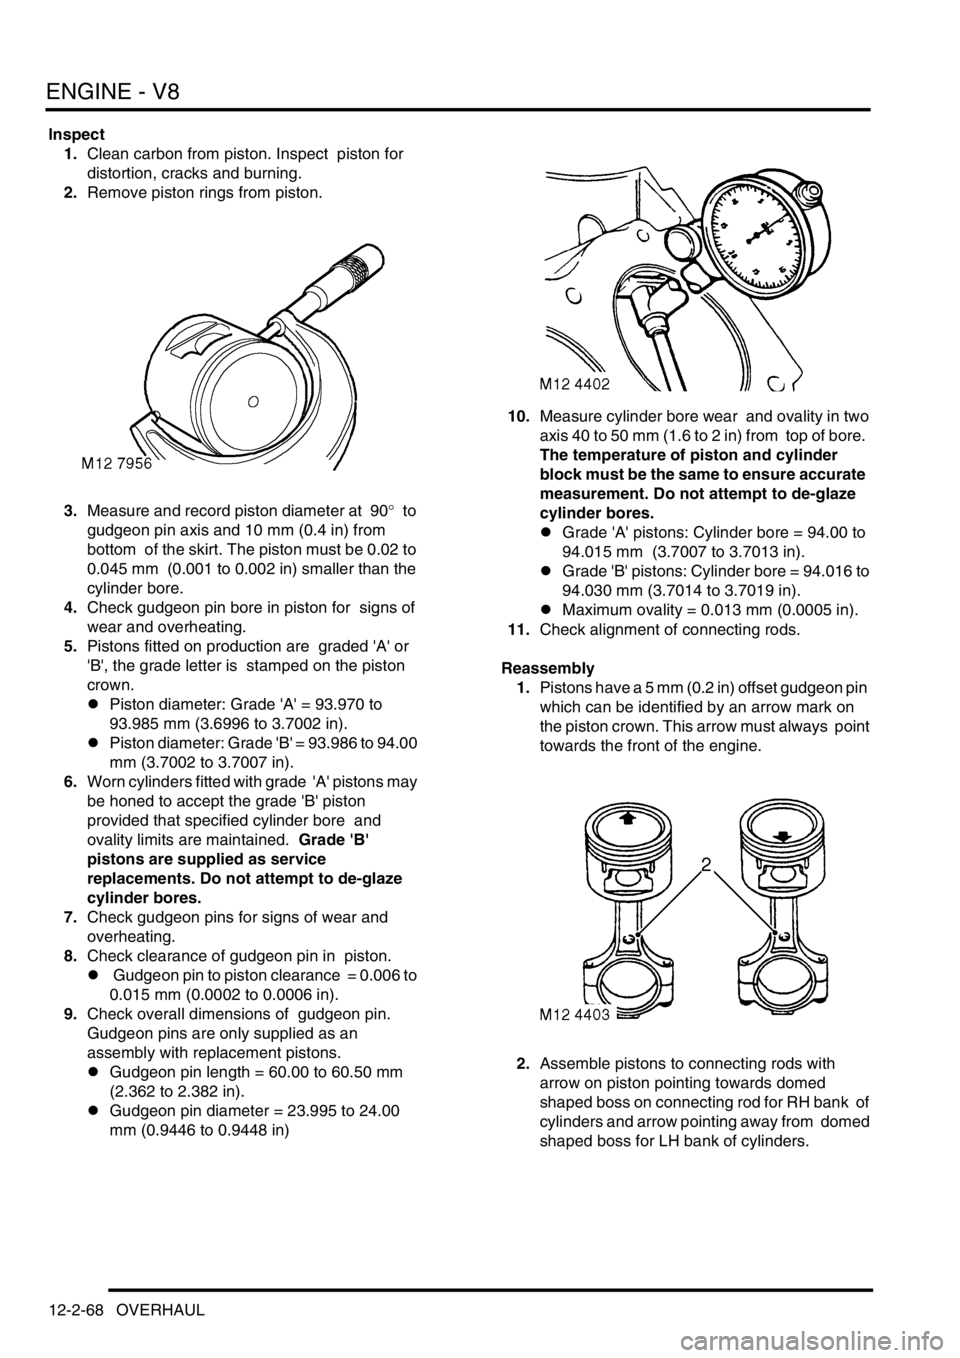
1.Pistons have a 5 mm (0.2 in) offset gudgeon pin
which can be identified by an arrow mark on
the piston crown. This arrow must always point
towards the front of the engine.
2.Assemble pistons to connecting rods with
arrow on piston pointing towards domed
shaped boss on connecting rod for RH bank of
cylinders and arrow pointing away from domed
shaped boss for LH bank of cylinders.
Page 312 of 1672
ENGINE - V8
OVERHAUL 12-2-69
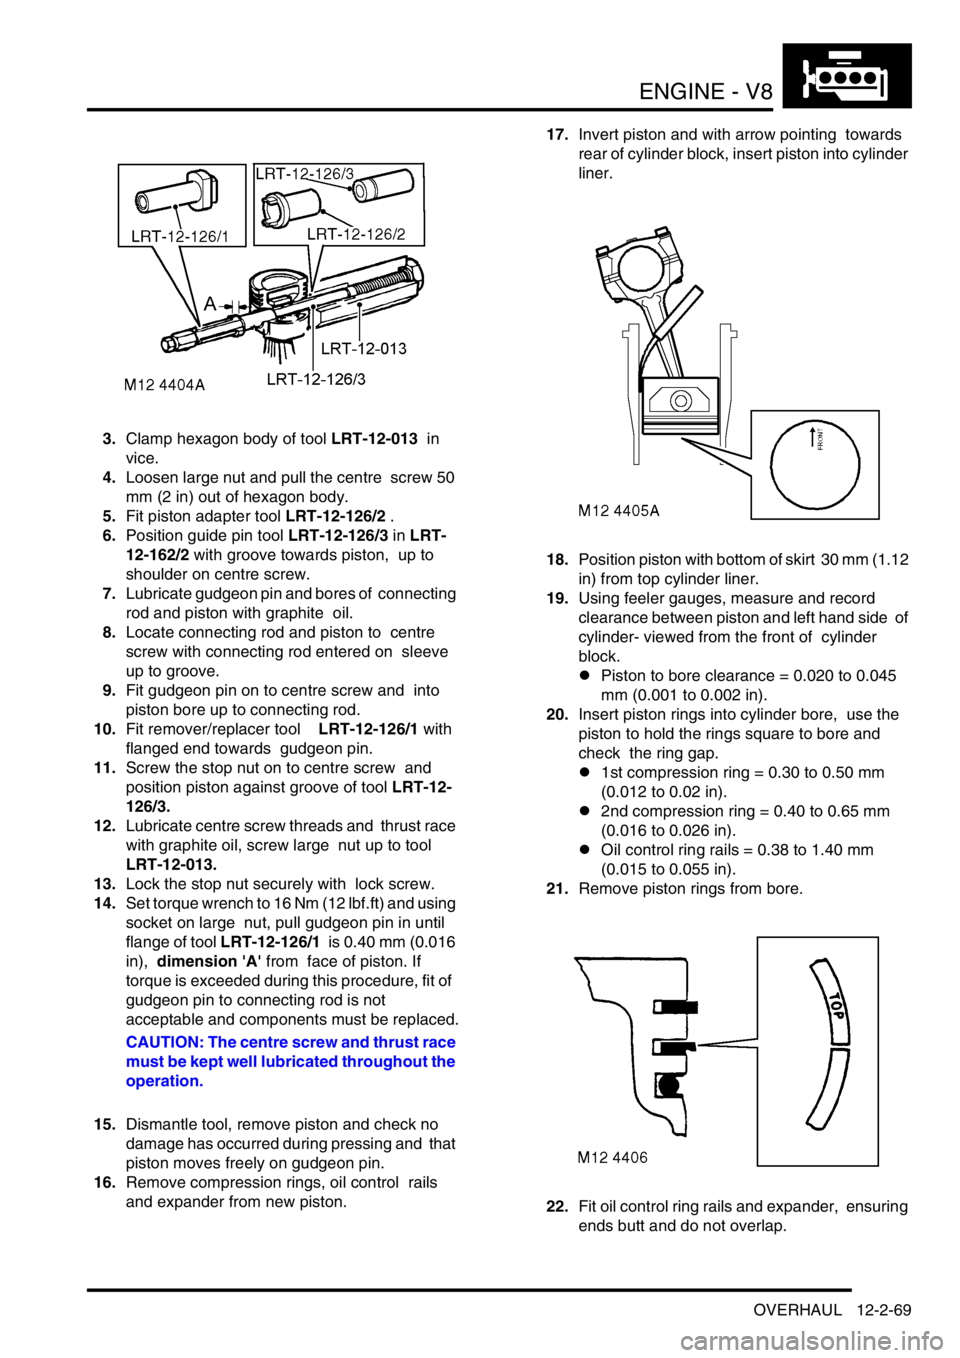
3.Clamp hexagon body of tool LRT-12-013 in
vice.
4.Loosen large nut and pull the centre screw 50
mm (2 in) out of hexagon body.
5.Fit piston adapter tool LRT-12-126/2 .
6.Position guide pin tool LRT-12-126/3 in LRT-
12-162/2 with groove towards piston, up to
shoulder on centre screw.
7.Lubricate gudgeon pin and bores of connecting
rod and piston with graphite oil.
8.Locate connecting rod and piston to centre
screw with connecting rod entered on sleeve
up to groove.
9.Fit gudgeon pin on to centre screw and into
piston bore up to connecting rod.
10.Fit remover/replacer tool LRT-12-126/1 with
flanged end towards gudgeon pin.
11.Screw the stop nut on to centre screw and
position piston against groove of tool LRT-12-
126/3.
12.Lubricate centre screw threads and thrust race
with graphite oil, screw large nut up to tool
LRT-12-013.
13.Lock the stop nut securely with lock screw.
14.Set torque wrench to 16 Nm (12 lbf.ft) and using
socket on large nut, pull gudgeon pin in until
flange of tool LRT-12-126/1 is 0.40 mm (0.016
in), dimension 'A' from face of piston. If
torque is exceeded during this procedure, fit of
gudgeon pin to connecting rod is not
acceptable and components must be replaced.
CAUTION: The centre screw and thrust race
must be kept well lubricated throughout the
operation.
15.Dismantle tool, remove piston and check no
damage has occurred during pressing and that
piston moves freely on gudgeon pin.
16.Remove compression rings, oil control rails
and expander from new piston. 17.Invert piston and with arrow pointing towards
rear of cylinder block, insert piston into cylinder
liner.
18.Position piston with bottom of skirt 30 mm (1.12
in) from top cylinder liner.
19.Using feeler gauges, measure and record
clearance between piston and left hand side of
cylinder- viewed from the front of cylinder
block.
lPiston to bore clearance = 0.020 to 0.045
mm (0.001 to 0.002 in).
20.Insert piston rings into cylinder bore, use the
piston to hold the rings square to bore and
check the ring gap.
l1st compression ring = 0.30 to 0.50 mm
(0.012 to 0.02 in).
l2nd compression ring = 0.40 to 0.65 mm
(0.016 to 0.026 in).
lOil control ring rails = 0.38 to 1.40 mm
(0.015 to 0.055 in).
21.Remove piston rings from bore.
22.Fit oil control ring rails and expander, ensuring
ends butt and do not overlap.
Page 313 of 1672
ENGINE - V8
12-2-70 OVERHAUL
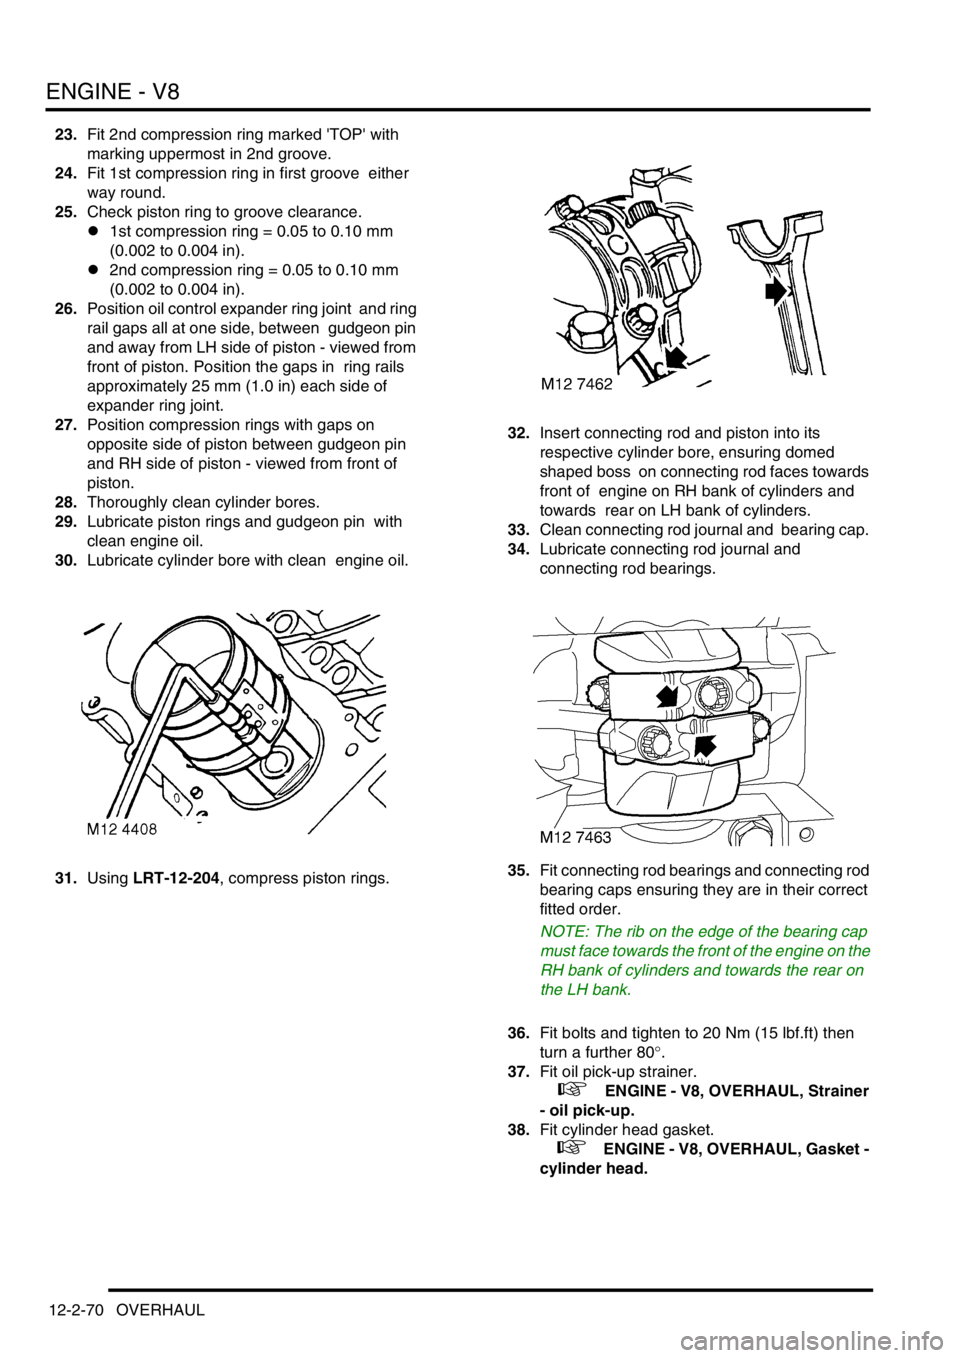
23.Fit 2nd compression ring marked 'TOP' with
marking uppermost in 2nd groove.
24.Fit 1st compression ring in first groove either
way round.
25.Check piston ring to groove clearance.
l1st compression ring = 0.05 to 0.10 mm
(0.002 to 0.004 in).
l2nd compression ring = 0.05 to 0.10 mm
(0.002 to 0.004 in).
26.Position oil control expander ring joint and ring
rail gaps all at one side, between gudgeon pin
and away from LH side of piston - viewed from
front of piston. Position the gaps in ring rails
approximately 25 mm (1.0 in) each side of
expander ring joint.
27.Position compression rings with gaps on
opposite side of piston between gudgeon pin
and RH side of piston - viewed from front of
piston.
28.Thoroughly clean cylinder bores.
29.Lubricate piston rings and gudgeon pin with
clean engine oil.
30.Lubricate cylinder bore with clean engine oil.
31.Using LRT-12-204, compress piston rings. 32.Insert connecting rod and piston into its
respective cylinder bore, ensuring domed
shaped boss on connecting rod faces towards
front of engine on RH bank of cylinders and
towards rear on LH bank of cylinders.
33.Clean connecting rod journal and bearing cap.
34.Lubricate connecting rod journal and
connecting rod bearings.
35.Fit connecting rod bearings and connecting rod
bearing caps ensuring they are in their correct
fitted order.
NOTE: The rib on the edge of the bearing cap
must face towards the front of the engine on the
RH bank of cylinders and towards the rear on
the LH bank.
36.Fit bolts and tighten to 20 Nm (15 lbf.ft) then
turn a further 80
°.
37.Fit oil pick-up strainer.
+ ENGINE - V8, OVERHAUL, Strainer
- oil pick-up.
38.Fit cylinder head gasket.
+ ENGINE - V8, OVERHAUL, Gasket -
cylinder head.
Page 314 of 1672
ENGINE - V8
OVERHAUL 12-2-71
Bearings - connecting rods
$% 12.17.16.01
Disassembly
1.Remove oil pick up strainer.
+ ENGINE - V8, OVERHAUL, Strainer
- oil pick-up.
2.Suitably mark cylinder reference number on
each connecting rod bearing cap.
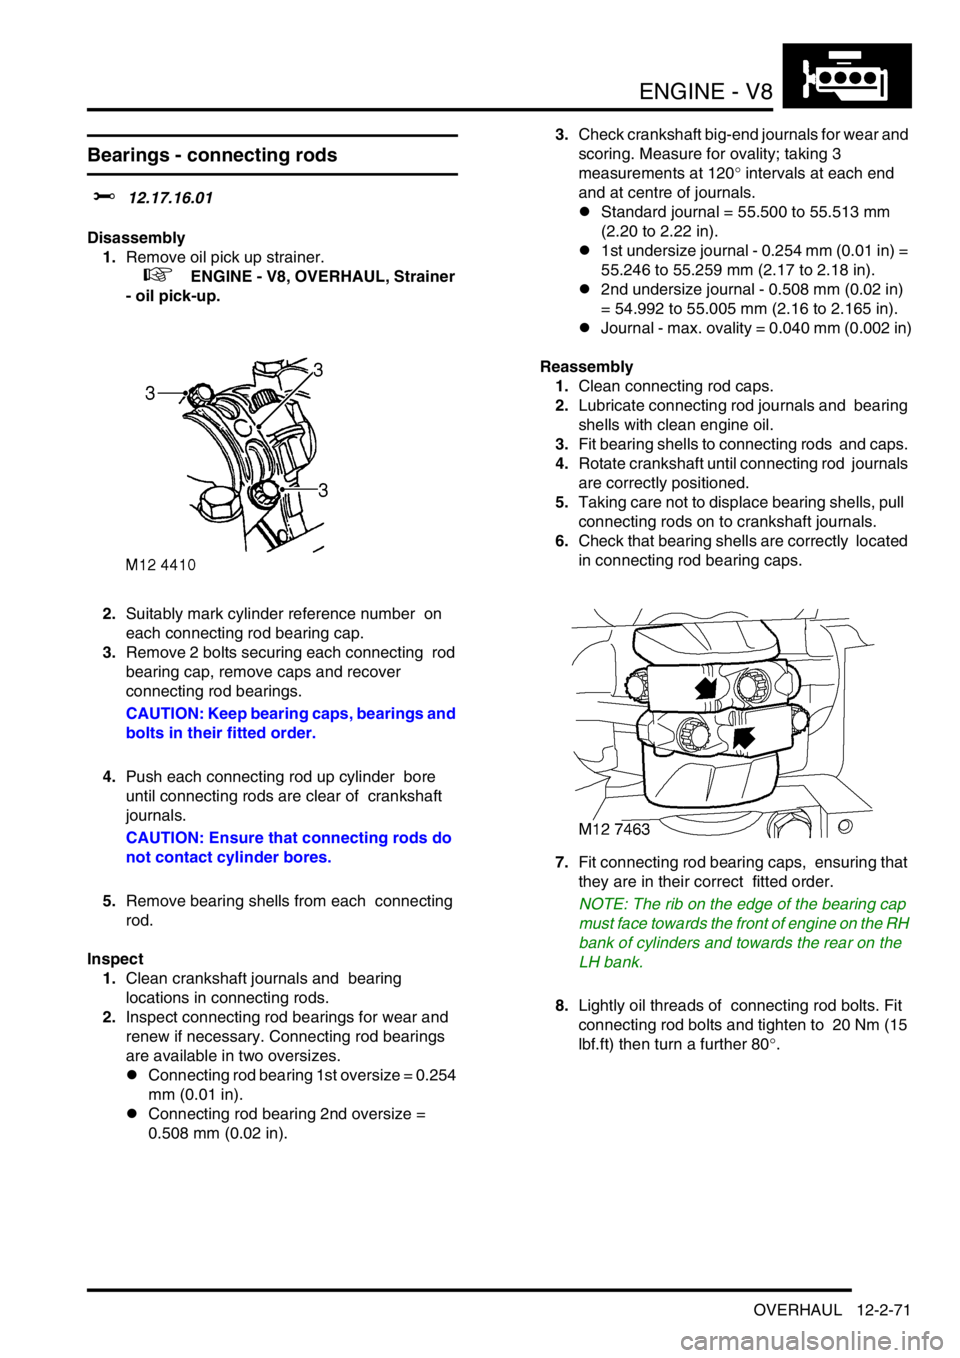
3.Remove 2 bolts securing each connecting rod
bearing cap, remove caps and recover
connecting rod bearings.
CAUTION: Keep bearing caps, bearings and
bolts in their fitted order.
4.Push each connecting rod up cylinder bore
until connecting rods are clear of crankshaft
journals.
CAUTION: Ensure that connecting rods do
not contact cylinder bores.
5.Remove bearing shells from each connecting
rod.
Inspect
1.Clean crankshaft journals and bearing
locations in connecting rods.
2.Inspect connecting rod bearings for wear and
renew if necessary. Connecting rod bearings
are available in two oversizes.
lConnecting rod bearing 1st oversize = 0.254
mm (0.01 in).
lConnecting rod bearing 2nd oversize =
0.508 mm (0.02 in).3.Check crankshaft big-end journals for wear and
scoring. Measure for ovality; taking 3
measurements at 120
° intervals at each end
and at centre of journals.
lStandard journal = 55.500 to 55.513 mm
(2.20 to 2.22 in).
l1st undersize journal - 0.254 mm (0.01 in) =
55.246 to 55.259 mm (2.17 to 2.18 in).
l2nd undersize journal - 0.508 mm (0.02 in)
= 54.992 to 55.005 mm (2.16 to 2.165 in).
lJournal - max. ovality = 0.040 mm (0.002 in)
Reassembly
1.Clean connecting rod caps.
2.Lubricate connecting rod journals and bearing
shells with clean engine oil.
3.Fit bearing shells to connecting rods and caps.
4.Rotate crankshaft until connecting rod journals
are correctly positioned.
5.Taking care not to displace bearing shells, pull
connecting rods on to crankshaft journals.
6.Check that bearing shells are correctly located
in connecting rod bearing caps.
7.Fit connecting rod bearing caps, ensuring that
they are in their correct fitted order.
NOTE: The rib on the edge of the bearing cap
must face towards the front of engine on the RH
bank of cylinders and towards the rear on the
LH bank.
8.Lightly oil threads of connecting rod bolts. Fit
connecting rod bolts and tighten to 20 Nm (15
lbf.ft) then turn a further 80
°.
Page 315 of 1672
ENGINE - V8
12-2-72 OVERHAUL
9.Check clearance between connecting rods on
each crankshaft journal.
l Connecting rod clearance = 0.15 to 0.36
mm (0.006 to 0.014 in).
10.Fit oil pick up strainer.
+ ENGINE - V8, OVERHAUL, Strainer
- oil pick-up.
Crankshaft and main bearings
$% 12.21.33.01
Disassembly
1.Remove crankshaft rear oil seal.
+ ENGINE - V8, OVERHAUL, Seal -
crankshaft - rear - automatic models.
2.Remove timing gear cover gasket.
+ ENGINE - V8, OVERHAUL, Gasket -
timing gear cover.
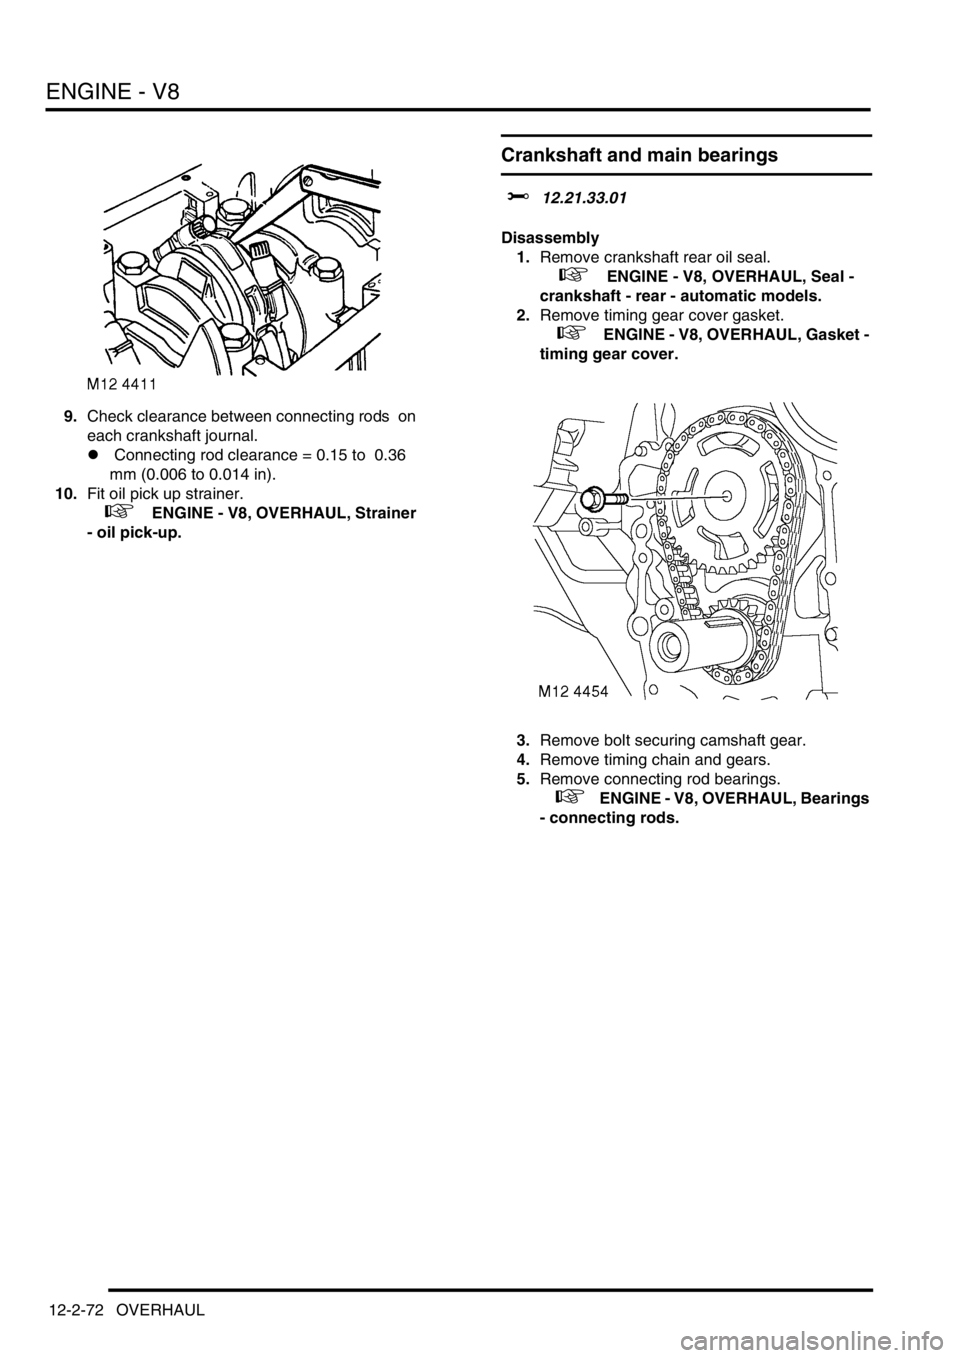
3.Remove bolt securing camshaft gear.
4.Remove timing chain and gears.
5.Remove connecting rod bearings.
+ ENGINE - V8, OVERHAUL, Bearings
- connecting rods.
Page 316 of 1672
ENGINE - V8
OVERHAUL 12-2-73
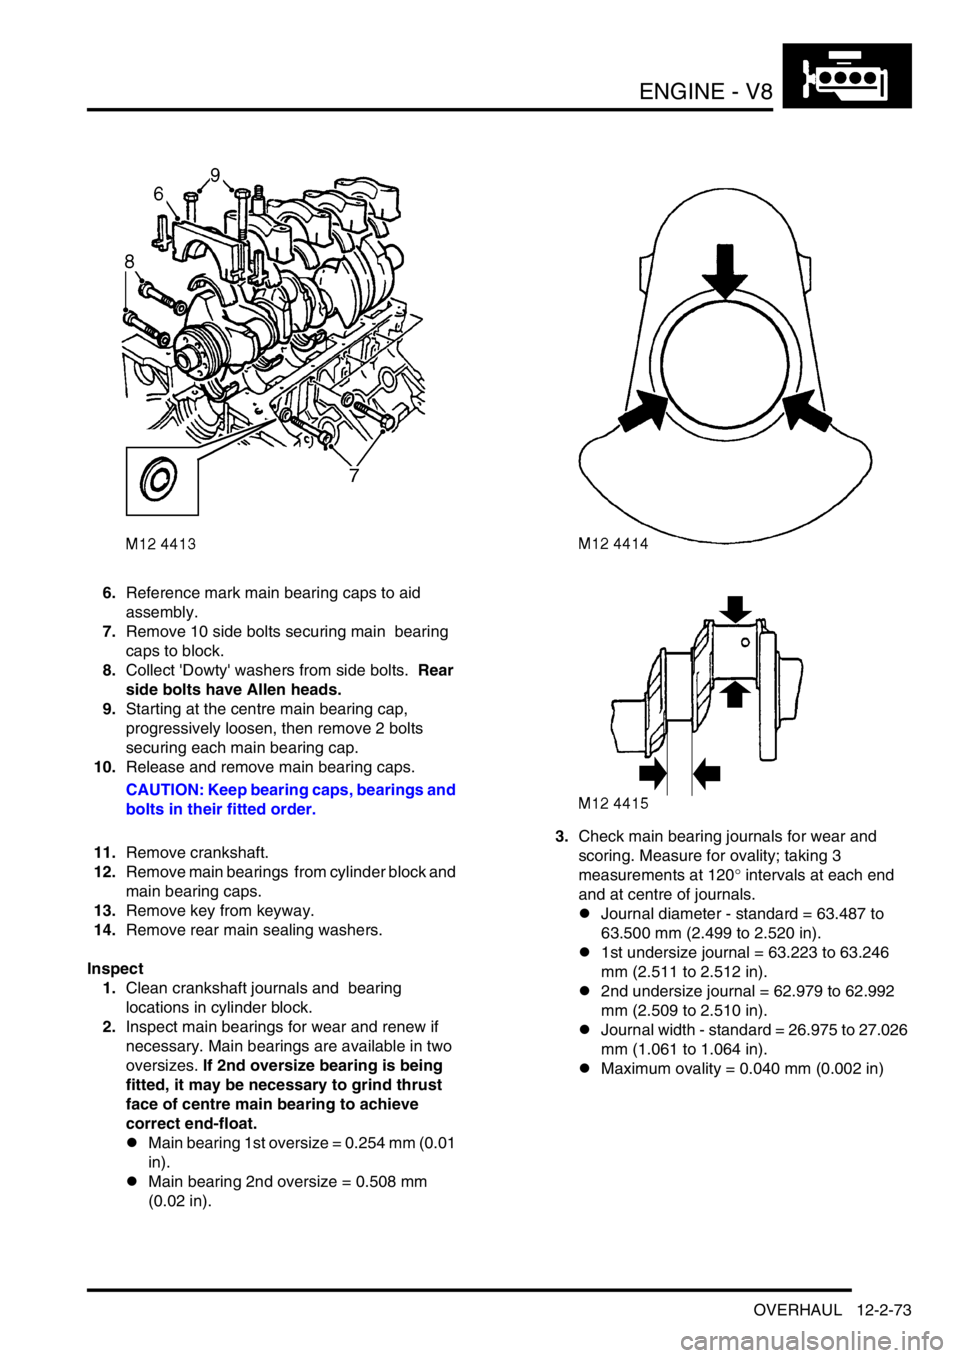
6.Reference mark main bearing caps to aid
assembly.
7.Remove 10 side bolts securing main bearing
caps to block.
8.Collect 'Dowty' washers from side bolts. Rear
side bolts have Allen heads.
9.Starting at the centre main bearing cap,
progressively loosen, then remove 2 bolts
securing each main bearing cap.
10.Release and remove main bearing caps.
CAUTION: Keep bearing caps, bearings and
bolts in their fitted order.
11.Remove crankshaft.
12.Remove main bearings from cylinder block and
main bearing caps.
13.Remove key from keyway.
14.Remove rear main sealing washers.
Inspect
1.Clean crankshaft journals and bearing
locations in cylinder block.
2.Inspect main bearings for wear and renew if
necessary. Main bearings are available in two
oversizes. If 2nd oversize bearing is being
fitted, it may be necessary to grind thrust
face of centre main bearing to achieve
correct end-float.
lMain bearing 1st oversize = 0.254 mm (0.01
in).
lMain bearing 2nd oversize = 0.508 mm
(0.02 in).3.Check main bearing journals for wear and
scoring. Measure for ovality; taking 3
measurements at 120
° intervals at each end
and at centre of journals.
lJournal diameter - standard = 63.487 to
63.500 mm (2.499 to 2.520 in).
l1st undersize journal = 63.223 to 63.246
mm (2.511 to 2.512 in).
l2nd undersize journal = 62.979 to 62.992
mm (2.509 to 2.510 in).
lJournal width - standard = 26.975 to 27.026
mm (1.061 to 1.064 in).
lMaximum ovality = 0.040 mm (0.002 in)
Page 317 of 1672
ENGINE - V8
12-2-74 OVERHAUL
Reassembly
1.Clean main bearing locations in cylinder block
and bearing caps.
2.Clean sealant from rear main bearing cap and
mating faces.
3.Fit key to keyway.
4.Check threads of main bearing cap bolts for
damage, renew bolts in pairs.
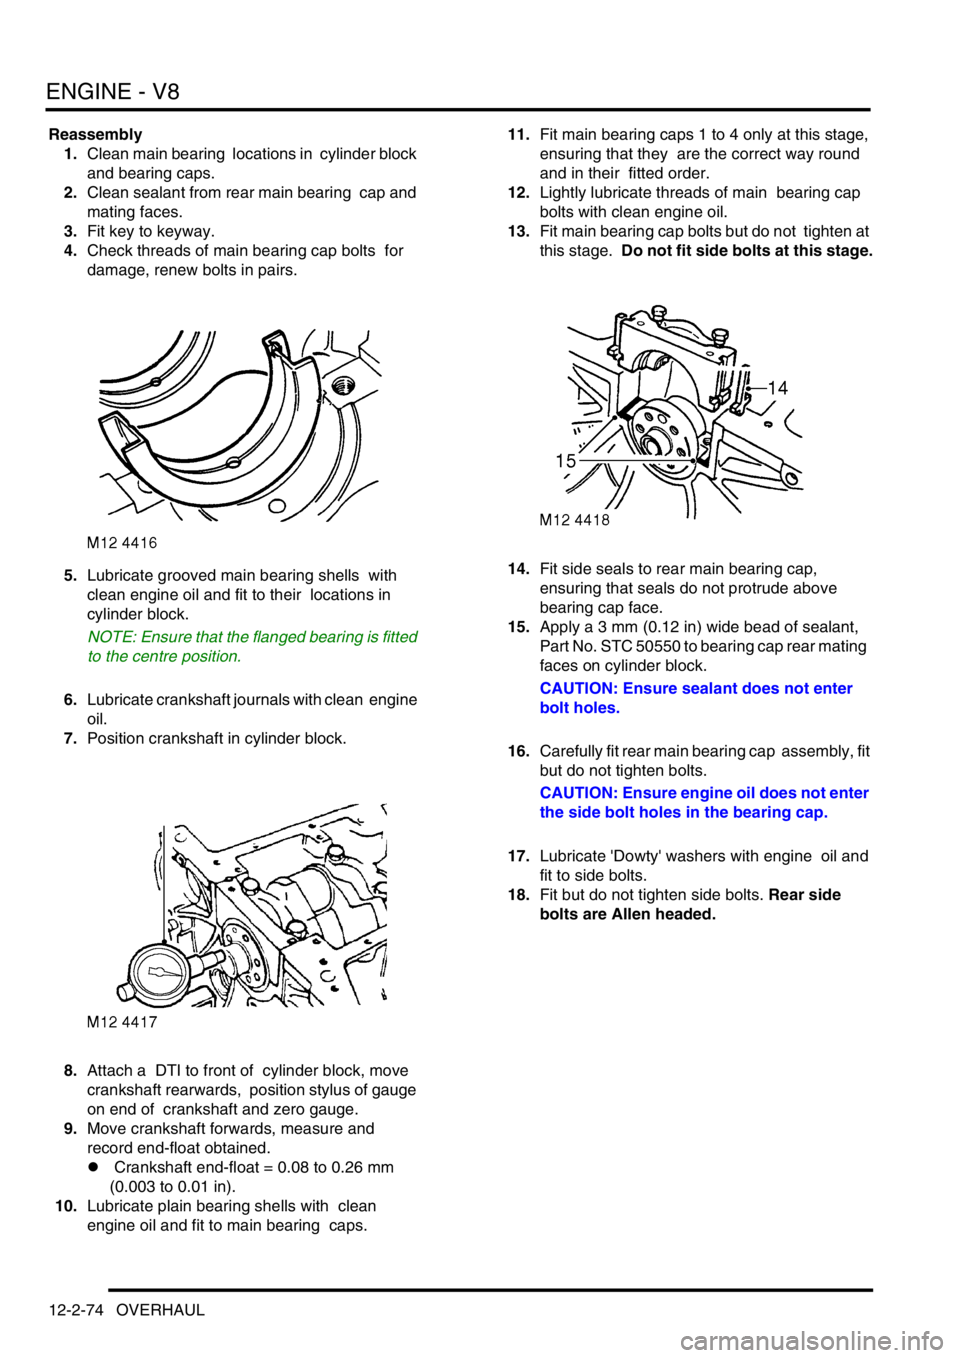
5.Lubricate grooved main bearing shells with
clean engine oil and fit to their locations in
cylinder block.
NOTE: Ensure that the flanged bearing is fitted
to the centre position.
6.Lubricate crankshaft journals with clean engine
oil.
7.Position crankshaft in cylinder block.
8.Attach a DTI to front of cylinder block, move
crankshaft rearwards, position stylus of gauge
on end of crankshaft and zero gauge.
9.Move crankshaft forwards, measure and
record end-float obtained.
l Crankshaft end-float = 0.08 to 0.26 mm
(0.003 to 0.01 in).
10.Lubricate plain bearing shells with clean
engine oil and fit to main bearing caps. 11.Fit main bearing caps 1 to 4 only at this stage,
ensuring that they are the correct way round
and in their fitted order.
12.Lightly lubricate threads of main bearing cap
bolts with clean engine oil.
13.Fit main bearing cap bolts but do not tighten at
this stage. Do not fit side bolts at this stage.
14.Fit side seals to rear main bearing cap,
ensuring that seals do not protrude above
bearing cap face.
15.Apply a 3 mm (0.12 in) wide bead of sealant,
Part No. STC 50550 to bearing cap rear mating
faces on cylinder block.
CAUTION: Ensure sealant does not enter
bolt holes.
16.Carefully fit rear main bearing cap assembly, fit
but do not tighten bolts.
CAUTION: Ensure engine oil does not enter
the side bolt holes in the bearing cap.
17.Lubricate 'Dowty' washers with engine oil and
fit to side bolts.
18.Fit but do not tighten side bolts. Rear side
bolts are Allen headed.
Page 325 of 1672
EMISSION CONTROL - TD5
17-1-4 DESCRIPTION AND OPERATION
Emission Control Systems
Engine design has evolved in order to minimise the emission of harmful by-products. Emission control systems fitted
to Land Rover vehicles are designed to maintain the emission levels within the legal limits pertaining for the specified
market.
Despite the utilisation of specialised emission control equipment, it is still necessary to ensure that the engine is
correctly maintained and is in good mechanical order, so that it operates at its optimum condition.
In addition to emissions improvements through engine design and the application of electronic engine management
systems, special emission control systems are used to limit the pollutant levels developed under certain conditions.
Two main types of additional emission control system are utilised with the Td5 engine to reduce the levels of harmful
emissions released into the atmosphere. These are as follows:
1Crankcase emission control – also known as blow-by gas emissions from the engine crankcase.
2Exhaust gas recirculation – to reduce NO
2 emissions.
Crankcase emission control
All internal combustion engines generate oil vapour and smoke in the crankcase as a result of high crankcase
temperatures and piston ring and valve stem blow-by, a closed crankcase ventilation system is used to vent
crankcase gases back to the air induction system and so reduce the emission of hydrocarbons.
Gases from the crankcase are drawn into the inlet manifold to be burnt in the combustion chambers with the fresh air/
fuel mixture. The system provides effective emission control under all engine operating conditions.
Crankcase gases are drawn through the breather port in the top of the camshaft cover and routed through the breather
hose and breather valve on the flexible air intake duct to be drawn into the turbocharger intake for delivery to the air
inlet manifold via an intercooler.
An oil separator plate is included in the camshaft cover which removes the heavy particles of oil before the crankcase
gas leaves via the camshaft cover port. The rocker cover features circular chambers which promote swirl in the oil
mist emanating from the cylinder head and camshaft carrier. As the mist passes through the series of chambers
between the rocker cover and oil separator plate, oil particles are thrown against the separator walls where they
condense and fall back into the cylinder head via two air inlet holes located at each end of the rocker cover.
The breather valve is a depression limiting valve which progressively closes as engine speed increases, thereby
limiting the depression in the crankcase. The valve is of moulded plastic construction and has a port on the underside
which plugs into a port in the flexible air intake duct. A port on the side of the breather valve connects to the camshaft
cover port by means of a breather hose which is constructed from a heavy-duty braided rubber hose which is held in
place by hose clips. A corrugated plastic sleeve is used to give further protection to the breather hose. The breather
valve is orientation sensitive, and “TOP” is marked on the upper surface to ensure it is mounted correctly.
It is important that the system is airtight so hose connections to ports should be checked and the condition of the
breather hose should be periodically inspected to ensure it is in good condition.
Page 346 of 1672
EMISSION CONTROL - V8
DESCRIPTION AND OPERATION 17-2-9
Emission Control Systems
Engine design has evolved in order to minimise the emission of harmful by-products. Emission control systems are
fitted to Land Rover vehicles which are designed to maintain the emission levels within the legal limits pertaining for
the specified market.
Despite the utilisation of specialised emission control equipment, it is still necessary to ensure that the engine is
correctly maintained and is in good mechanical order so that it operates at its optimal condition. In particular, ignition
timing has an effect on the production of HC and NO
x emissions, with the harmful emissions rising as the ignition
timing is advanced.
CAUTION: In many countries it is against the law for a vehicle owner or an unauthorised dealer to modify or
tamper with emission control equipment. In some cases, the vehicle owner and/or the dealer may even be
liable for prosecution.
The engine management ECM is fundamental for controlling the emission control systems. In addition to controlling
normal operation, the system complies with On Board Diagnostic (OBD) system strategies. The system monitors and
reports on faults detected with ignition, fuelling and exhaust systems which cause an excessive increase in tailpipe
emissions. This includes component failures, engine misfire, catalyst damage, catalyst efficiency, fuel evaporative
loss and exhaust leaks.
When an emission relevant fault is determined, the fault condition is stored in the ECM memory. For NAS vehicles,
the MIL warning light on the instrument pack will be illuminated when the fault is confirmed. Confirmation of a fault
condition occurs if the fault is still found to be present during the driving cycle subsequent to the one when the fault
was first detected.
+ ENGINE MANAGEMENT SYSTEM - V8, DESCRIPTION AND OPERATION, Description - engine
management.
The following types of supplementary control system are used to reduce harmful emissions released into the
atmosphere from the vehicle:
1Crankcase emission control – also known as blow-by gas emissions from the engine crankcase.
2Exhaust emission control – to limit the undesirable by-products of combustion.
3Fuel vapour evaporative loss control – to restrict the emission of fuel through evaporation from the fuel
system.
4Fuel leak detection system (NAS only) – there are two types of system which may be used to check the
evaporative emission system for the presence of leaks from the fuel tank to purge valve.
aVacuum leak detection test – checks for leaks down to 1 mm (0.04 in.) in diameter.
bPositive pressure leak detection test – utilises a leak detection pump to check for leaks down to 0.5 mm (0.02
in.) in diameter.
5Secondary air injection system (NAS only) – to reduce emissions experienced during cold starting.
Crankcase emission control system
The concentration of hydrocarbons in the crankcase of an engine is much greater than that in the vehicle's exhaust
system. In order to prevent the emission of these hydrocarbons into the atmosphere, crankcase emission control
systems are employed and are a standard legal requirement.
The crankcase ventilation system is an integral part of the air supply to the engine combustion chambers and it is
often overlooked when diagnosing problems associated with engine performance. A blocked ventilation pipe or filter
or excessive air leak into the inlet system through a damaged pipe or a leaking gasket can affect the air:fuel mixture,
performance and efficiency of the engine. Periodically check the ventilation hoses are not cracked and that they are
securely fitted to form airtight connections at their relevant ports.
The purpose of the crankcase ventilation system is to ensure that any noxious gas generated in the engine crankcase
is rendered harmless by complete burning of the fuel in the combustion chamber. Burning the crankcase vapours in
a controlled manner decreases the HC pollutants that could be emitted and helps to prevent the development of
sludge in the engine oil as well as increasing fuel economy.