LAND ROVER FREELANDER 2001 Workshop Manual
Manufacturer: LAND ROVER, Model Year: 2001, Model line: FREELANDER, Model: LAND ROVER FREELANDER 2001Pages: 1007, PDF Size: 23.47 MB
Page 961 of 1007
WINDOWS
86-5-4 REPAIRS
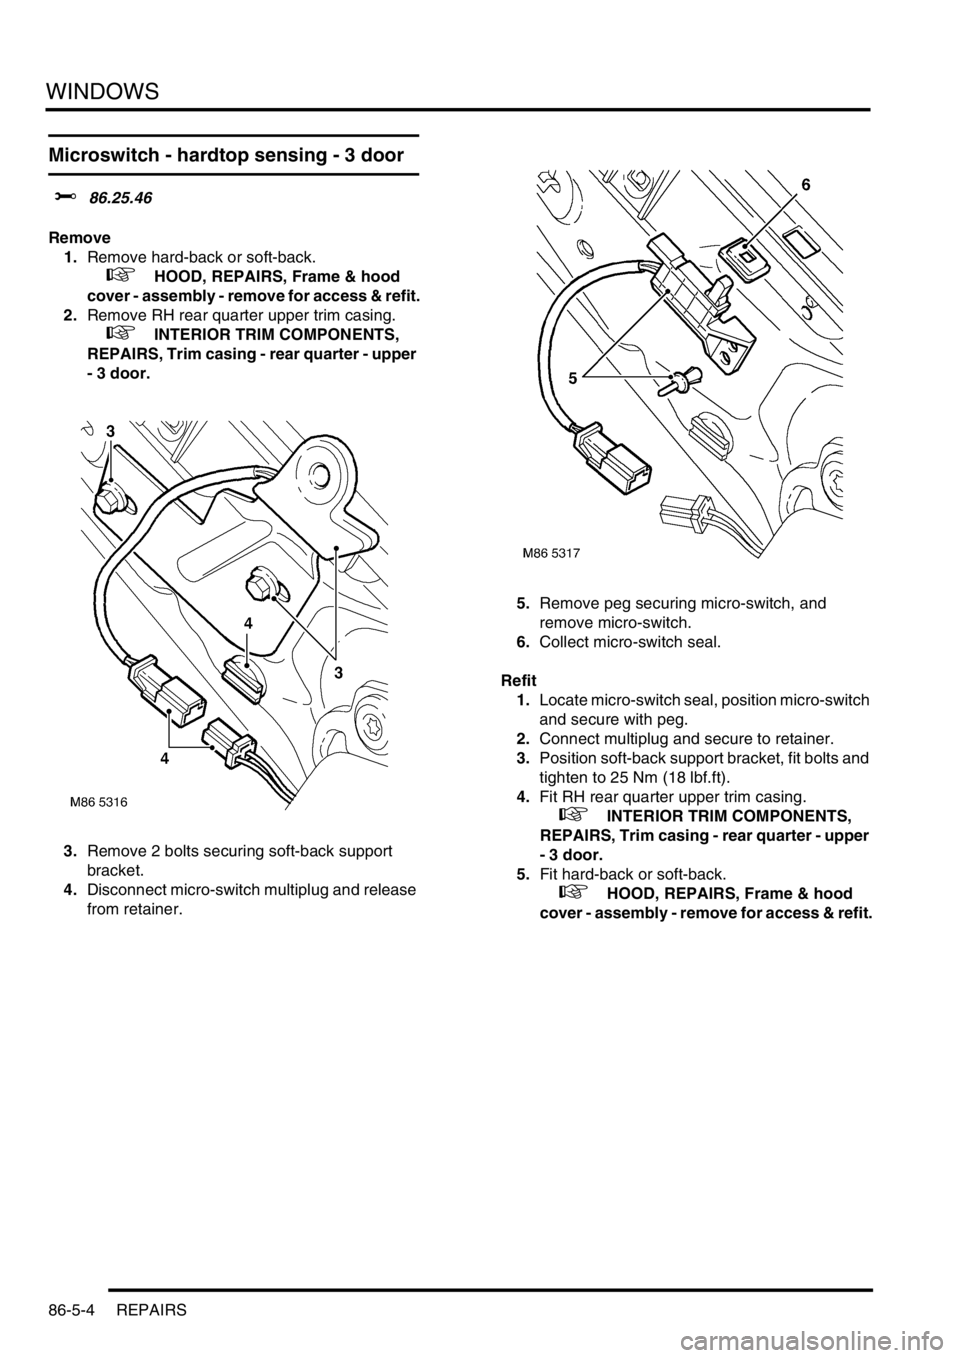
Microswitch - hardtop sensing - 3 door
$% 86.25.46
Remove
1.Remove hard-back or soft-back.
+ HOOD, REPAIRS, Frame & hood
cover - assembly - remove for access & refit.
2.Remove RH rear quarter upper trim casing.
+ INTERIOR TRIM COMPONENTS,
REPAIRS, Trim casing - rear quarter - upper
- 3 door.
3.Remove 2 bolts securing soft-back support
bracket.
4.Disconnect micro-switch multiplug and release
from retainer.5.Remove peg securing micro-switch, and
remove micro-switch.
6.Collect micro-switch seal.
Refit
1.Locate micro-switch seal, position micro-switch
and secure with peg.
2.Connect multiplug and secure to retainer.
3.Position soft-back support bracket, fit bolts and
tighten to 25 Nm (18 lbf.ft).
4.Fit RH rear quarter upper trim casing.
+ INTERIOR TRIM COMPONENTS,
REPAIRS, Trim casing - rear quarter - upper
- 3 door.
5.Fit hard-back or soft-back.
+ HOOD, REPAIRS, Frame & hood
cover - assembly - remove for access & refit.
Page 962 of 1007
WINDOWS
REPAIRS 86-5-5
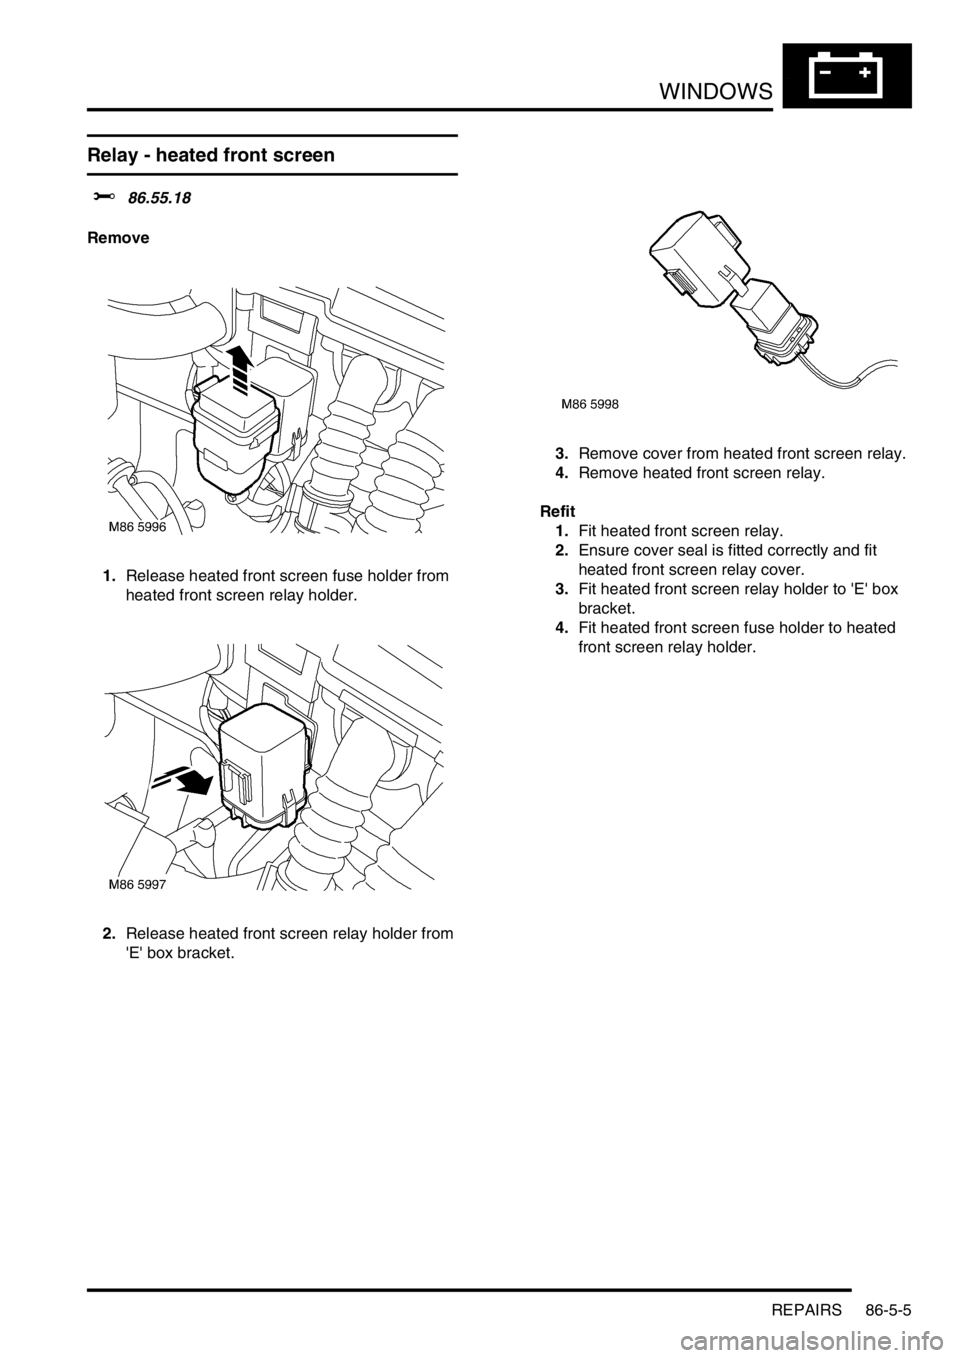
Relay - heated front screen
$% 86.55.18
Remove
1.Release heated front screen fuse holder from
heated front screen relay holder.
2.Release heated front screen relay holder from
'E' box bracket.3.Remove cover from heated front screen relay.
4.Remove heated front screen relay.
Refit
1.Fit heated front screen relay.
2.Ensure cover seal is fitted correctly and fit
heated front screen relay cover.
3.Fit heated front screen relay holder to 'E' box
bracket.
4.Fit heated front screen fuse holder to heated
front screen relay holder.
Page 963 of 1007
WINDOWS
86-5-6 REPAIRS
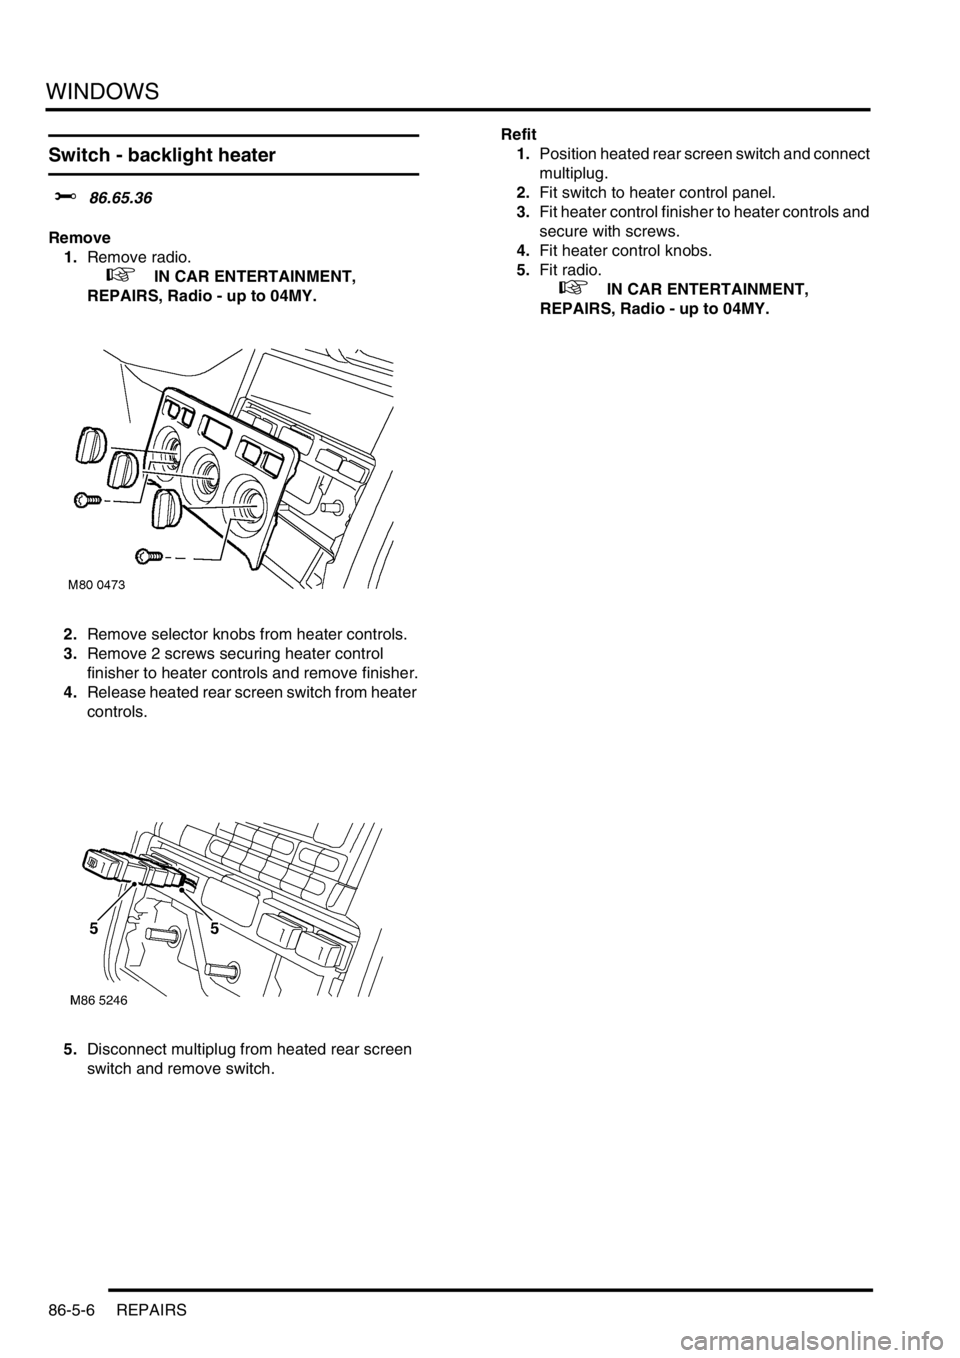
Switch - backlight heater
$% 86.65.36
Remove
1.Remove radio.
+ IN CAR ENTERTAINMENT,
REPAIRS, Radio - up to 04MY.
2.Remove selector knobs from heater controls.
3.Remove 2 screws securing heater control
finisher to heater controls and remove finisher.
4.Release heated rear screen switch from heater
controls.
5.Disconnect multiplug from heated rear screen
switch and remove switch.Refit
1.Position heated rear screen switch and connect
multiplug.
2.Fit switch to heater control panel.
3.Fit heater control finisher to heater controls and
secure with screws.
4.Fit heater control knobs.
5.Fit radio.
+ IN CAR ENTERTAINMENT,
REPAIRS, Radio - up to 04MY.
Page 964 of 1007
IN CAR ENTERTAINMENT
REPAIRS 86-6-1
IN CAR ENTERTA INMENT REPAIRS
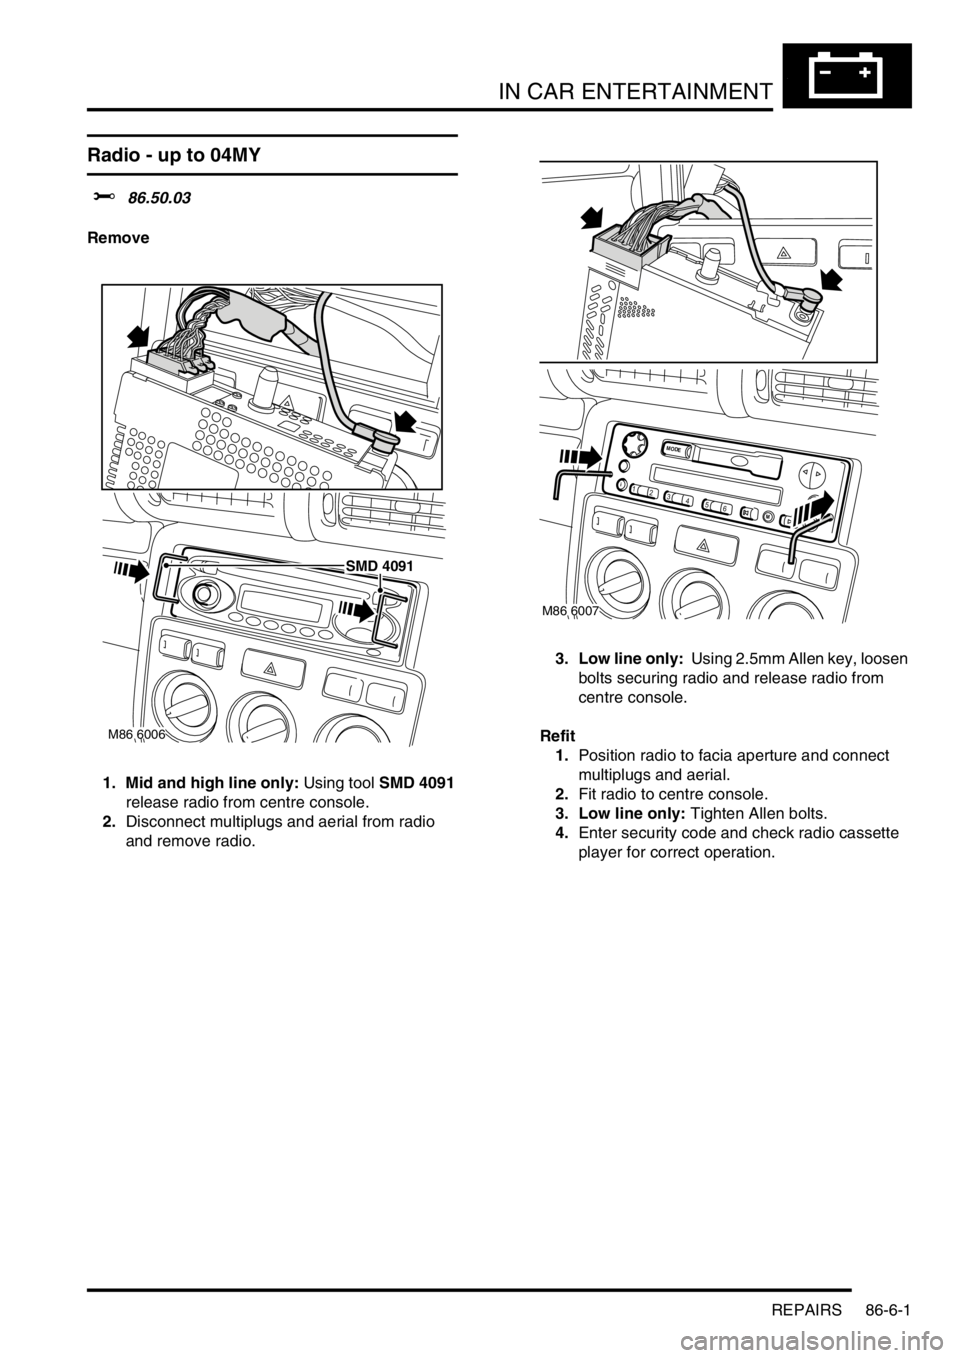
Radio - up to 04MY
$% 86.50.03
Remove
1. Mid and high line only: Using tool SMD 4091
release radio from centre console.
2.Disconnect multiplugs and aerial from radio
and remove radio.3. Low line only: Using 2.5mm Allen key, loosen
bolts securing radio and release radio from
centre console.
Refit
1.Position radio to facia aperture and connect
multiplugs and aerial.
2.Fit radio to centre console.
3. Low line only: Tighten Allen bolts.
4.Enter security code and check radio cassette
player for correct operation.
M86 6006
SMD 4091
1
23
4
5
6FM
i
M
MODE
M86 6007
Page 965 of 1007
IN CAR ENTERTAINMENT
86-6-2 REPAIRS
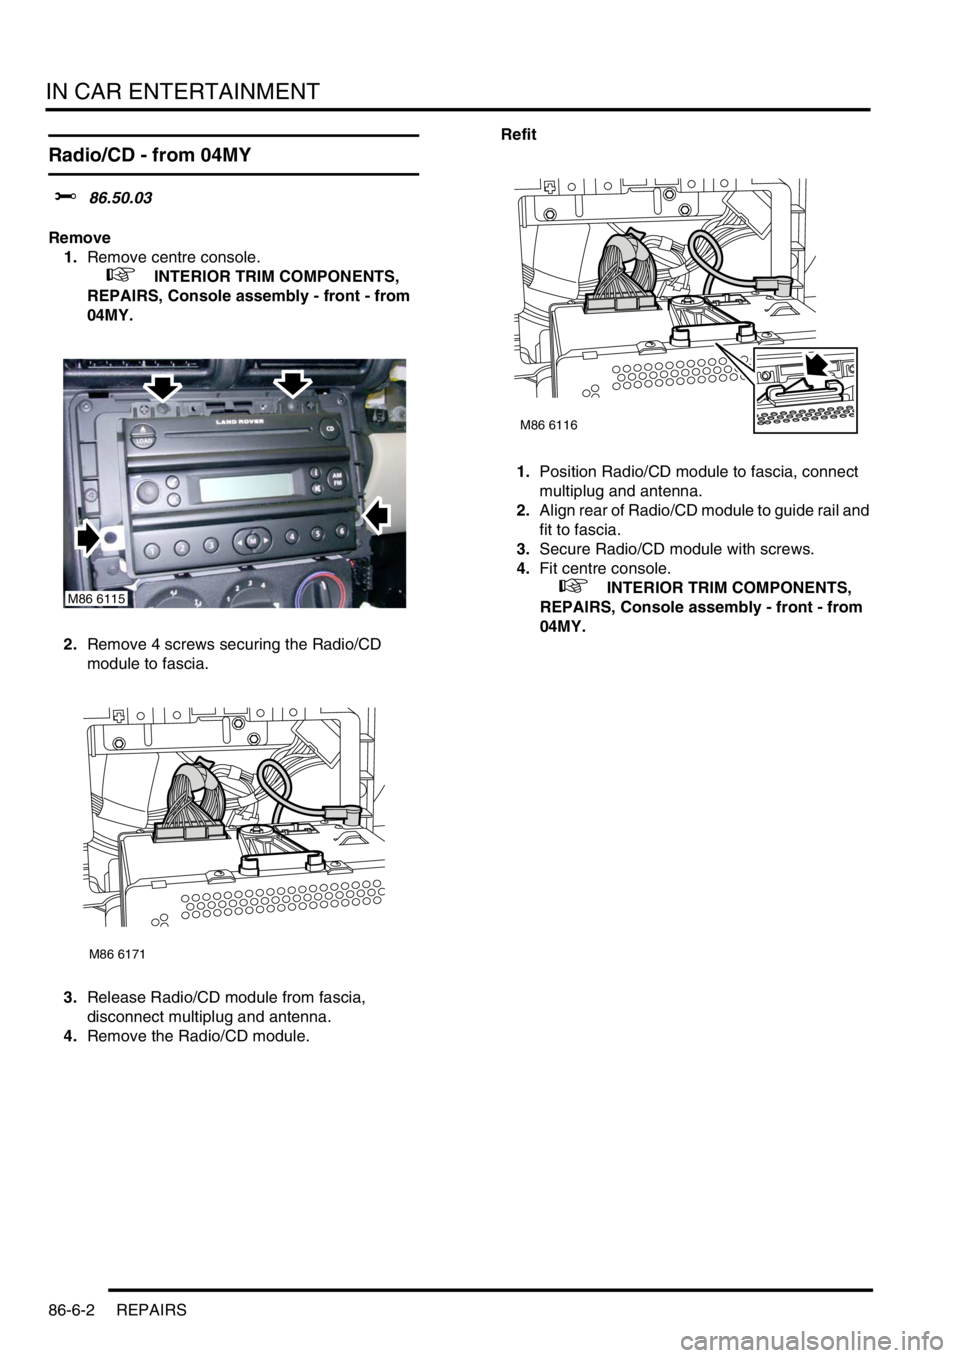
Radio/CD - from 04MY
$% 86.50.03
Remove
1.Remove centre console.
+ INTERIOR TRIM COMPONENTS,
REPAIRS, Console assembly - front - from
04MY.
2.Remove 4 screws securing the Radio/CD
module to fascia.
3.Release Radio/CD module from fascia,
disconnect multiplug and antenna.
4.Remove the Radio/CD module.Refit
1.Position Radio/CD module to fascia, connect
multiplug and antenna.
2.Align rear of Radio/CD module to guide rail and
fit to fascia.
3.Secure Radio/CD module with screws.
4.Fit centre console.
+ INTERIOR TRIM COMPONENTS,
REPAIRS, Console assembly - front - from
04MY.M86 6115
M86 6171
M86 6116
Page 966 of 1007
IN CAR ENTERTAINMENT
REPAIRS 86-6-3
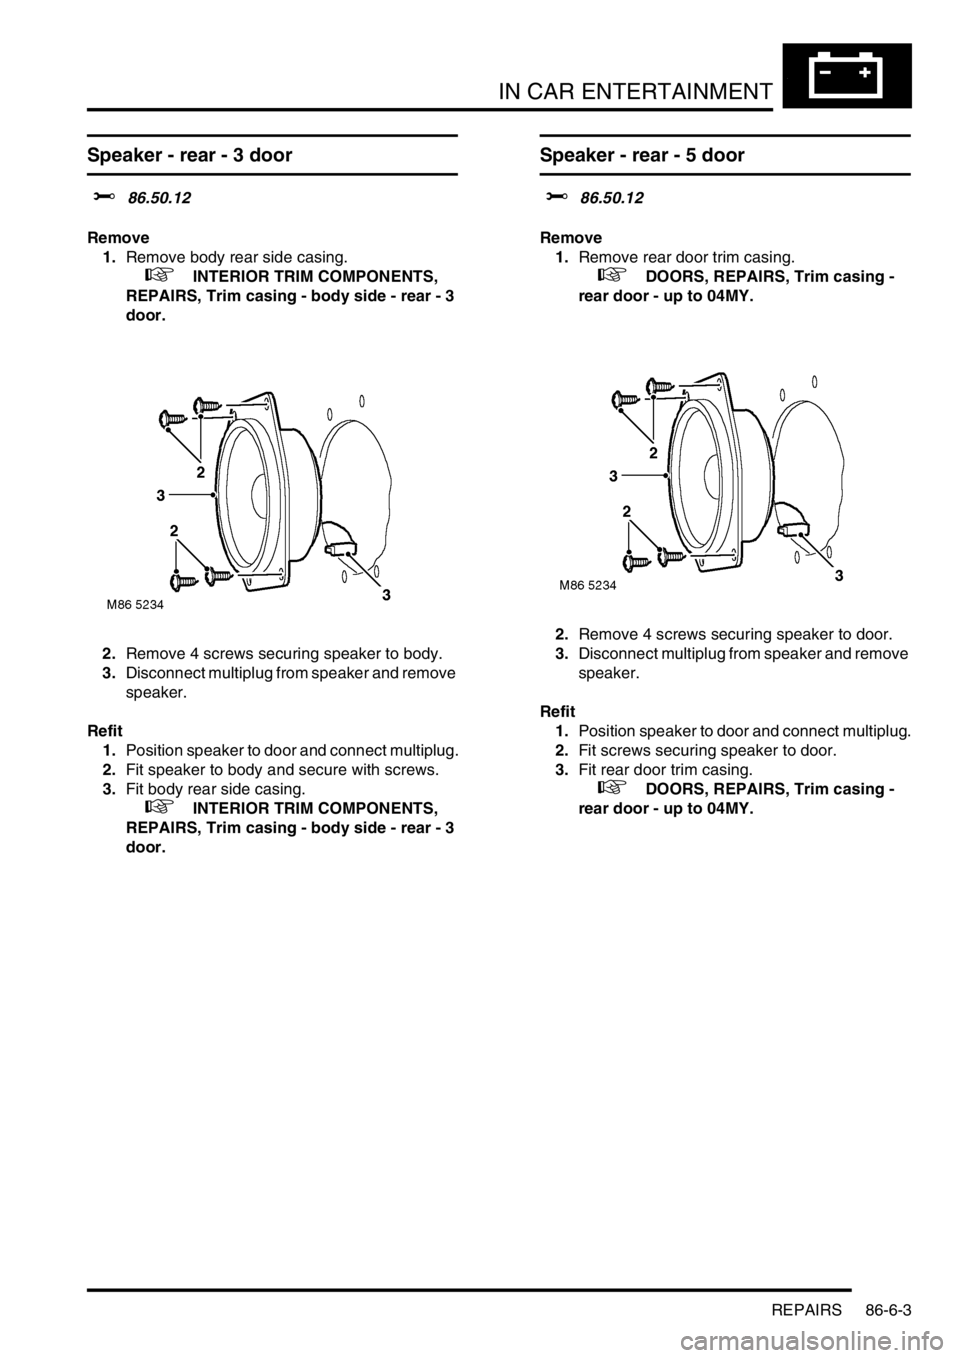
Speaker - rear - 3 door
$% 86.50.12
Remove
1.Remove body rear side casing.
+ INTERIOR TRIM COMPONENTS,
REPAIRS, Trim casing - body side - rear - 3
door.
2.Remove 4 screws securing speaker to body.
3.Disconnect multiplug from speaker and remove
speaker.
Refit
1.Position speaker to door and connect multiplug.
2.Fit speaker to body and secure with screws.
3.Fit body rear side casing.
+ INTERIOR TRIM COMPONENTS,
REPAIRS, Trim casing - body side - rear - 3
door.
Speaker - rear - 5 door
$% 86.50.12
Remove
1.Remove rear door trim casing.
+ DOORS, REPAIRS, Trim casing -
rear door - up to 04MY.
2.Remove 4 screws securing speaker to door.
3.Disconnect multiplug from speaker and remove
speaker.
Refit
1.Position speaker to door and connect multiplug.
2.Fit screws securing speaker to door.
3.Fit rear door trim casing.
+ DOORS, REPAIRS, Trim casing -
rear door - up to 04MY.
Page 967 of 1007

IN CAR ENTERTAINMENT
86-6-4 REPAIRS
Speaker - front
$% 86.50.15
Remove
1.Remove front door trim casing.
+ DOORS, REPAIRS, Trim casing -
front door - 3 door.
+ DOORS, REPAIRS, Trim casing -
front door - 5 door - up to 04MY.
2.Remove 4 screws securing speaker to front
door.
3.Disconnect multiplug from speaker and remove
speaker.
Refit
1.Position speaker to door and connect multiplug.
2.Fit speaker to door and secure with screws.
3.Fit front door trim casing.
+ DOORS, REPAIRS, Trim casing -
front door - 3 door.
+ DOORS, REPAIRS, Trim casing -
front door - 5 door - up to 04MY.
Aerial - manual - 3 door
$% 86.50.18
Remove
1.Remove headlining.
+ INTERIOR TRIM COMPONENTS,
REPAIRS, Headlining - 3 door.
2.Remove 2 screws and release volumetric
sensor mounting bracket.
3.Remove nut securing coaxial cable to aerial
base.
4.Remove aerial base from roof panel and
remove rubber seal.
Refit
1.Position rubber seal and fit aerial base to roof
panel.
2.Connect coaxial cable and secure with nut.
3.Position volumetric sensor bracket and secure
with screws.
4.Fit headlining.
+ INTERIOR TRIM COMPONENTS,
REPAIRS, Headlining - 3 door.
Page 968 of 1007
IN CAR ENTERTAINMENT
REPAIRS 86-6-5
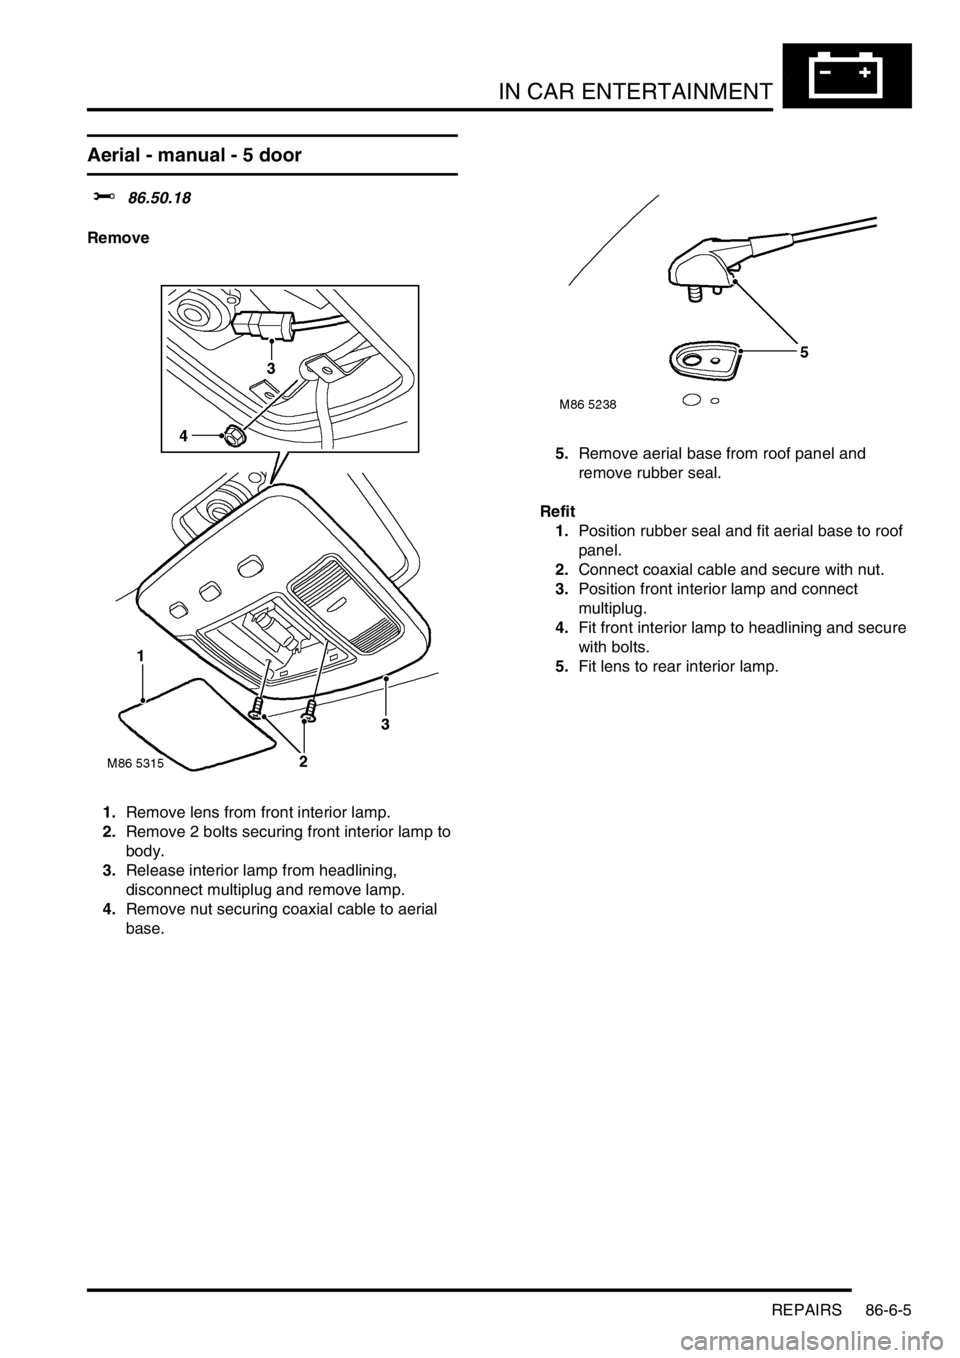
Aerial - manual - 5 door
$% 86.50.18
Remove
1.Remove lens from front interior lamp.
2.Remove 2 bolts securing front interior lamp to
body.
3.Release interior lamp from headlining,
disconnect multiplug and remove lamp.
4.Remove nut securing coaxial cable to aerial
base.5.Remove aerial base from roof panel and
remove rubber seal.
Refit
1.Position rubber seal and fit aerial base to roof
panel.
2.Connect coaxial cable and secure with nut.
3.Position front interior lamp and connect
multiplug.
4.Fit front interior lamp to headlining and secure
with bolts.
5.Fit lens to rear interior lamp.
Page 969 of 1007
IN CAR ENTERTAINMENT
86-6-6 REPAIRS
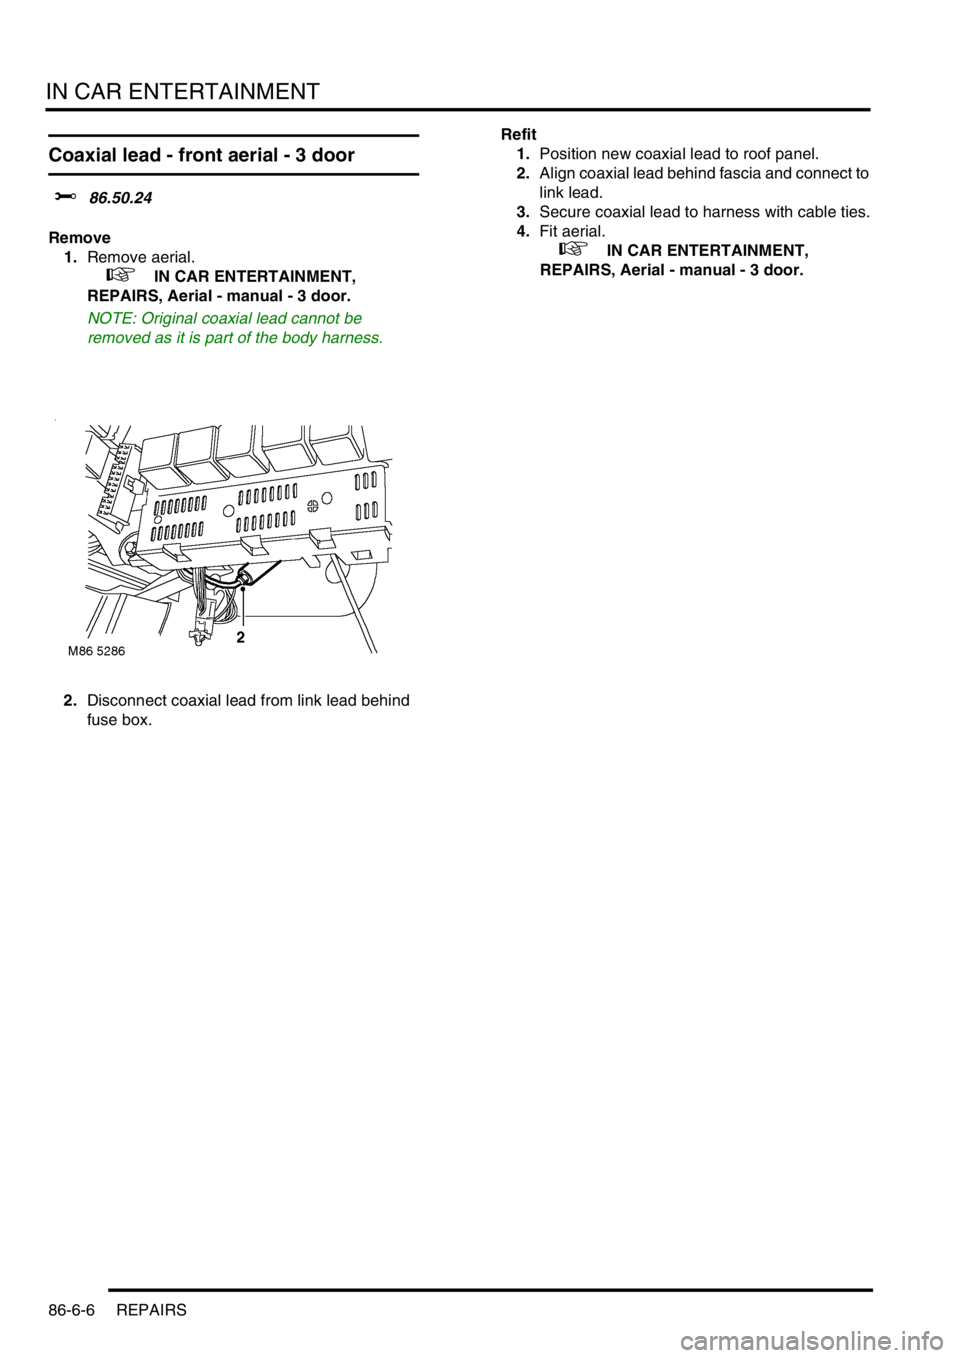
Coaxial lead - front aerial - 3 door
$% 86.50.24
Remove
1.Remove aerial.
+ IN CAR ENTERTAINMENT,
REPAIRS, Aerial - manual - 3 door.
NOTE: Original coaxial lead cannot be
removed as it is part of the body harness.
2.Disconnect coaxial lead from link lead behind
fuse box.Refit
1.Position new coaxial lead to roof panel.
2.Align coaxial lead behind fascia and connect to
link lead.
3.Secure coaxial lead to harness with cable ties.
4.Fit aerial.
+ IN CAR ENTERTAINMENT,
REPAIRS, Aerial - manual - 3 door.
Page 970 of 1007
IN CAR ENTERTAINMENT
REPAIRS 86-6-7
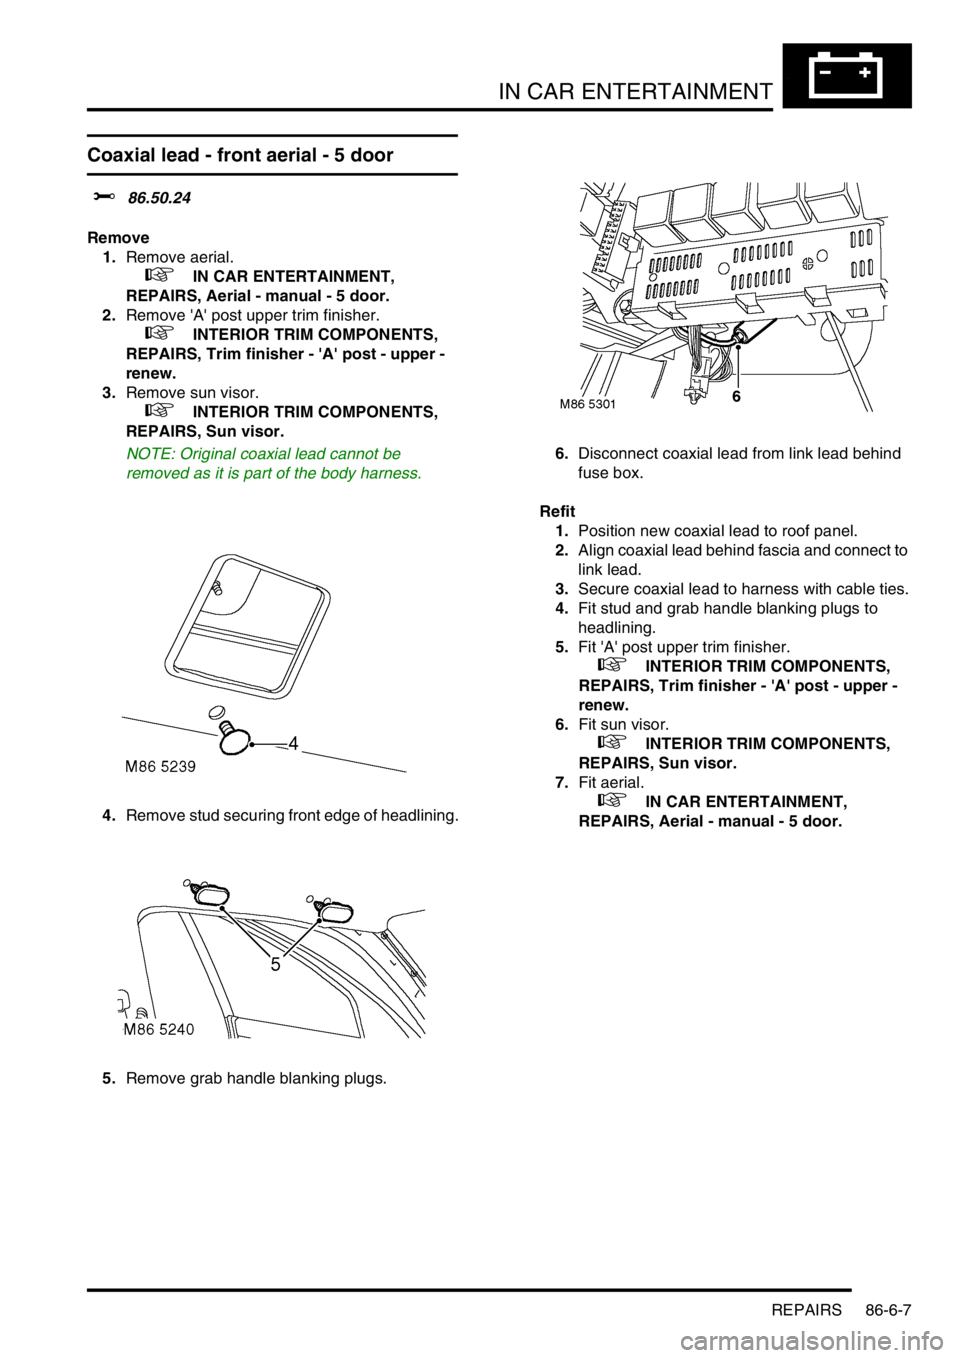
Coaxial lead - front aerial - 5 door
$% 86.50.24
Remove
1.Remove aerial.
+ IN CAR ENTERTAINMENT,
REPAIRS, Aerial - manual - 5 door.
2.Remove 'A' post upper trim finisher.
+ INTERIOR TRIM COMPONENTS,
REPAIRS, Trim finisher - 'A' post - upper -
renew.
3.Remove sun visor.
+ INTERIOR TRIM COMPONENTS,
REPAIRS, Sun visor.
NOTE: Original coaxial lead cannot be
removed as it is part of the body harness.
4.Remove stud securing front edge of headlining.
5.Remove grab handle blanking plugs.6.Disconnect coaxial lead from link lead behind
fuse box.
Refit
1.Position new coaxial lead to roof panel.
2.Align coaxial lead behind fascia and connect to
link lead.
3.Secure coaxial lead to harness with cable ties.
4.Fit stud and grab handle blanking plugs to
headlining.
5.Fit 'A' post upper trim finisher.
+ INTERIOR TRIM COMPONENTS,
REPAIRS, Trim finisher - 'A' post - upper -
renew.
6.Fit sun visor.
+ INTERIOR TRIM COMPONENTS,
REPAIRS, Sun visor.
7.Fit aerial.
+ IN CAR ENTERTAINMENT,
REPAIRS, Aerial - manual - 5 door.