LAND ROVER FREELANDER 2001 Workshop Manual
FREELANDER 2001
LAND ROVER
LAND ROVER
https://www.carmanualsonline.info/img/64/57250/w960_57250-0.png
LAND ROVER FREELANDER 2001 Workshop Manual
Trending: battery location, ad blue, transmission fluid, oil dipstick, jacking points, open bonnet, mirror
Page 931 of 1007
CHARGING AND STARTING
86-1-18 REPAIRS
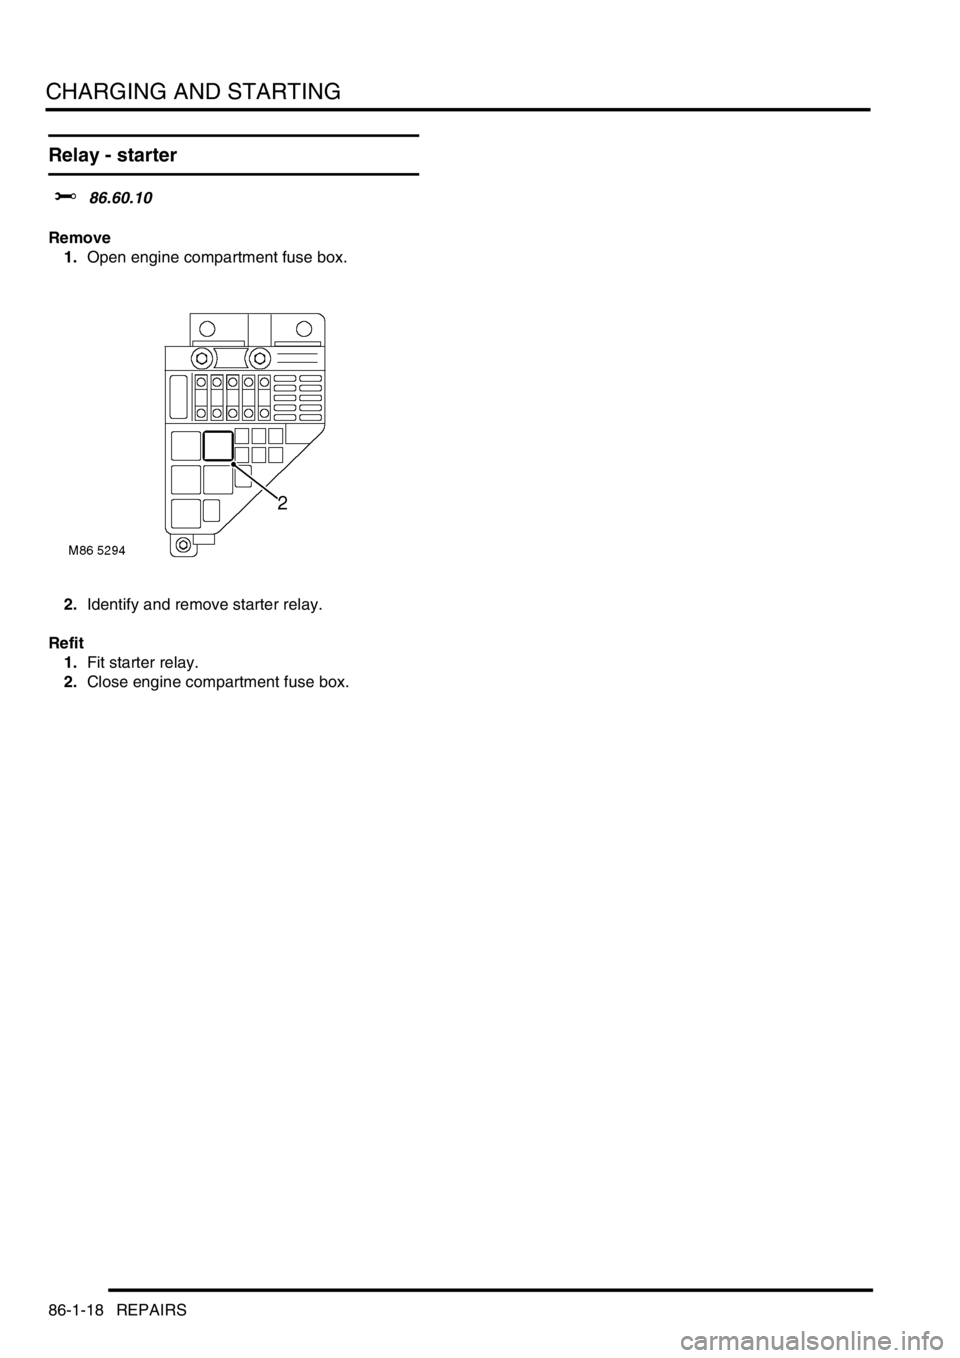
Relay - starter
$% 86.60.10
Remove
1.Open engine compartment fuse box.
2.Identify and remove starter relay.
Refit
1.Fit starter relay.
2.Close engine compartment fuse box.
Page 932 of 1007
LIGHTING
ADJUSTMENTS 86-2-1
LIGHTING ADJUST ME NTS
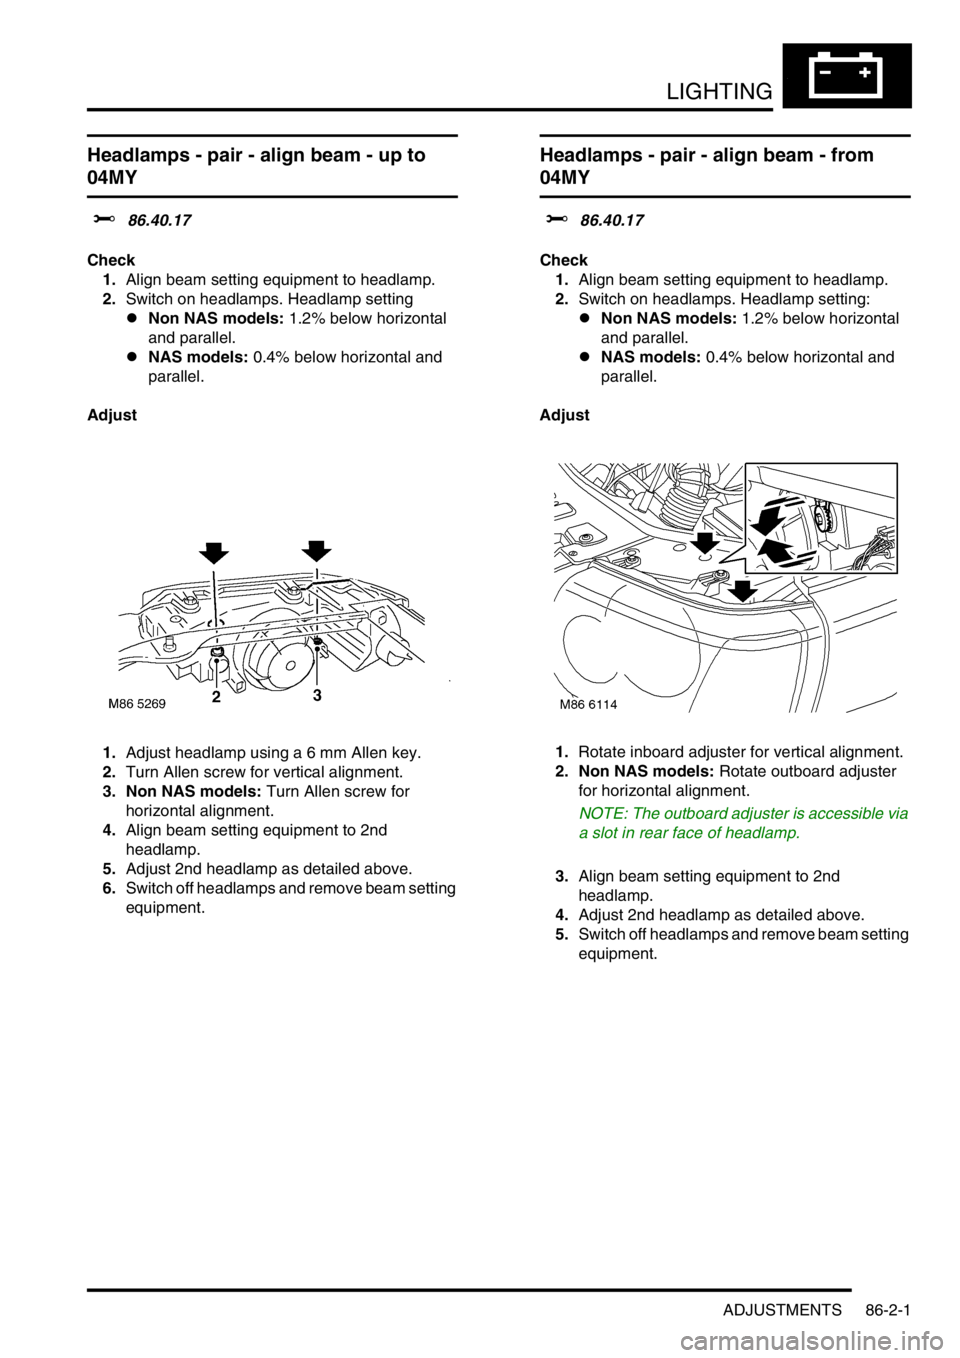
Headlamps - pair - align beam - up to
04MY
$% 86.40.17
Check
1.Align beam setting equipment to headlamp.
2.Switch on headlamps. Headlamp setting
lNon NAS models: 1.2% below horizontal
and parallel.
lNAS models: 0.4% below horizontal and
parallel.
Adjust
1.Adjust headlamp using a 6 mm Allen key.
2.Turn Allen screw for vertical alignment.
3. Non NAS models: Turn Allen screw for
horizontal alignment.
4.Align beam setting equipment to 2nd
headlamp.
5.Adjust 2nd headlamp as detailed above.
6.Switch off headlamps and remove beam setting
equipment.
Headlamps - pair - align beam - from
04MY
$% 86.40.17
Check
1.Align beam setting equipment to headlamp.
2.Switch on headlamps. Headlamp setting:
lNon NAS models: 1.2% below horizontal
and parallel.
lNAS models: 0.4% below horizontal and
parallel.
Adjust
1.Rotate inboard adjuster for vertical alignment.
2. Non NAS models: Rotate outboard adjuster
for horizontal alignment.
NOTE: The outboard adjuster is accessible via
a slot in rear face of headlamp.
3.Align beam setting equipment to 2nd
headlamp.
4.Adjust 2nd headlamp as detailed above.
5.Switch off headlamps and remove beam setting
equipment.
Page 933 of 1007
Page 934 of 1007
LIGHTING
REPAIRS 86-2-3
REPAIRS
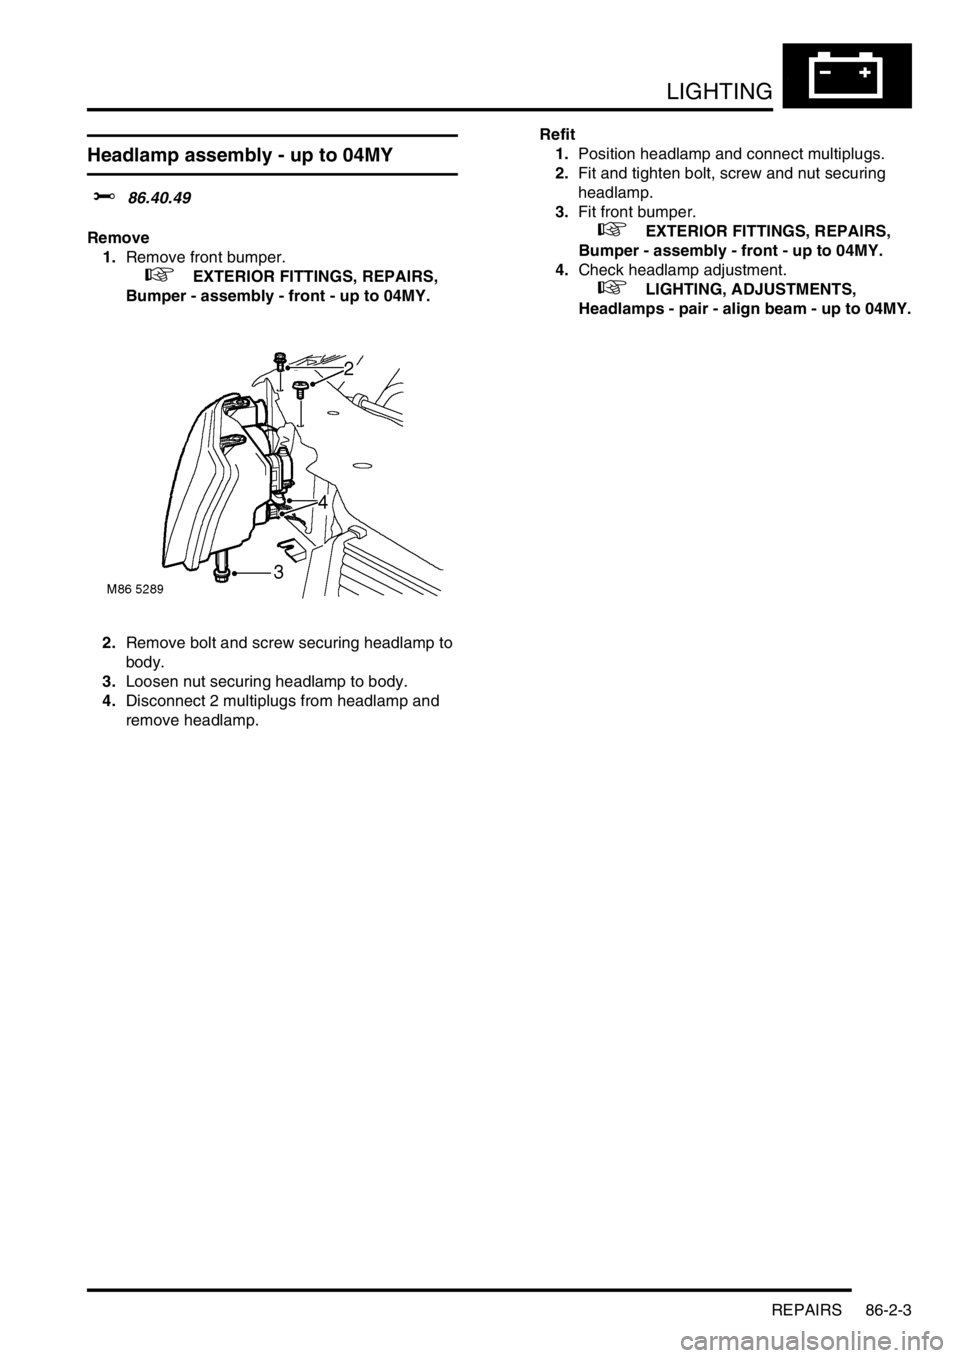
Headlamp assembly - up to 04MY
$% 86.40.49
Remove
1.Remove front bumper.
+ EXTERIOR FITTINGS, REPAIRS,
Bumper - assembly - front - up to 04MY.
2.Remove bolt and screw securing headlamp to
body.
3.Loosen nut securing headlamp to body.
4.Disconnect 2 multiplugs from headlamp and
remove headlamp.Refit
1.Position headlamp and connect multiplugs.
2.Fit and tighten bolt, screw and nut securing
headlamp.
3.Fit front bumper.
+ EXTERIOR FITTINGS, REPAIRS,
Bumper - assembly - front - up to 04MY.
4.Check headlamp adjustment.
+ LIGHTING, ADJUSTMENTS,
Headlamps - pair - align beam - up to 04MY.
Page 935 of 1007
LIGHTING
86-2-4 REPAIRS
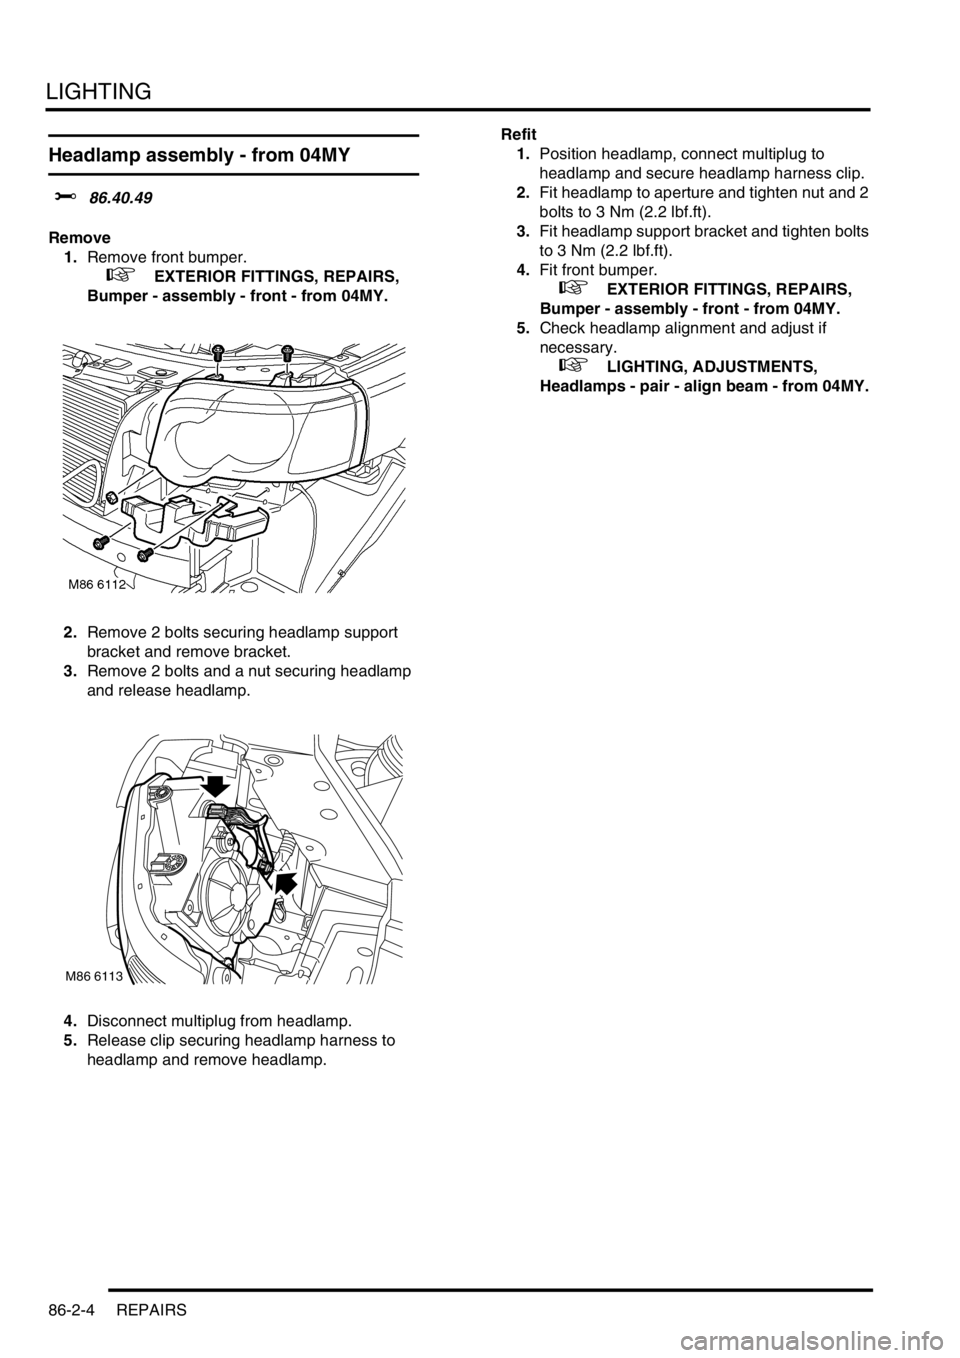
Headlamp assembly - from 04MY
$% 86.40.49
Remove
1.Remove front bumper.
+ EXTERIOR FITTINGS, REPAIRS,
Bumper - assembly - front - from 04MY.
2.Remove 2 bolts securing headlamp support
bracket and remove bracket.
3.Remove 2 bolts and a nut securing headlamp
and release headlamp.
4.Disconnect multiplug from headlamp.
5.Release clip securing headlamp harness to
headlamp and remove headlamp.Refit
1.Position headlamp, connect multiplug to
headlamp and secure headlamp harness clip.
2.Fit headlamp to aperture and tighten nut and 2
bolts to 3 Nm (2.2 lbf.ft).
3.Fit headlamp support bracket and tighten bolts
to 3 Nm (2.2 lbf.ft).
4.Fit front bumper.
+ EXTERIOR FITTINGS, REPAIRS,
Bumper - assembly - front - from 04MY.
5.Check headlamp alignment and adjust if
necessary.
+ LIGHTING, ADJUSTMENTS,
Headlamps - pair - align beam - from 04MY.
M86 6113
Page 936 of 1007
LIGHTING
REPAIRS 86-2-5
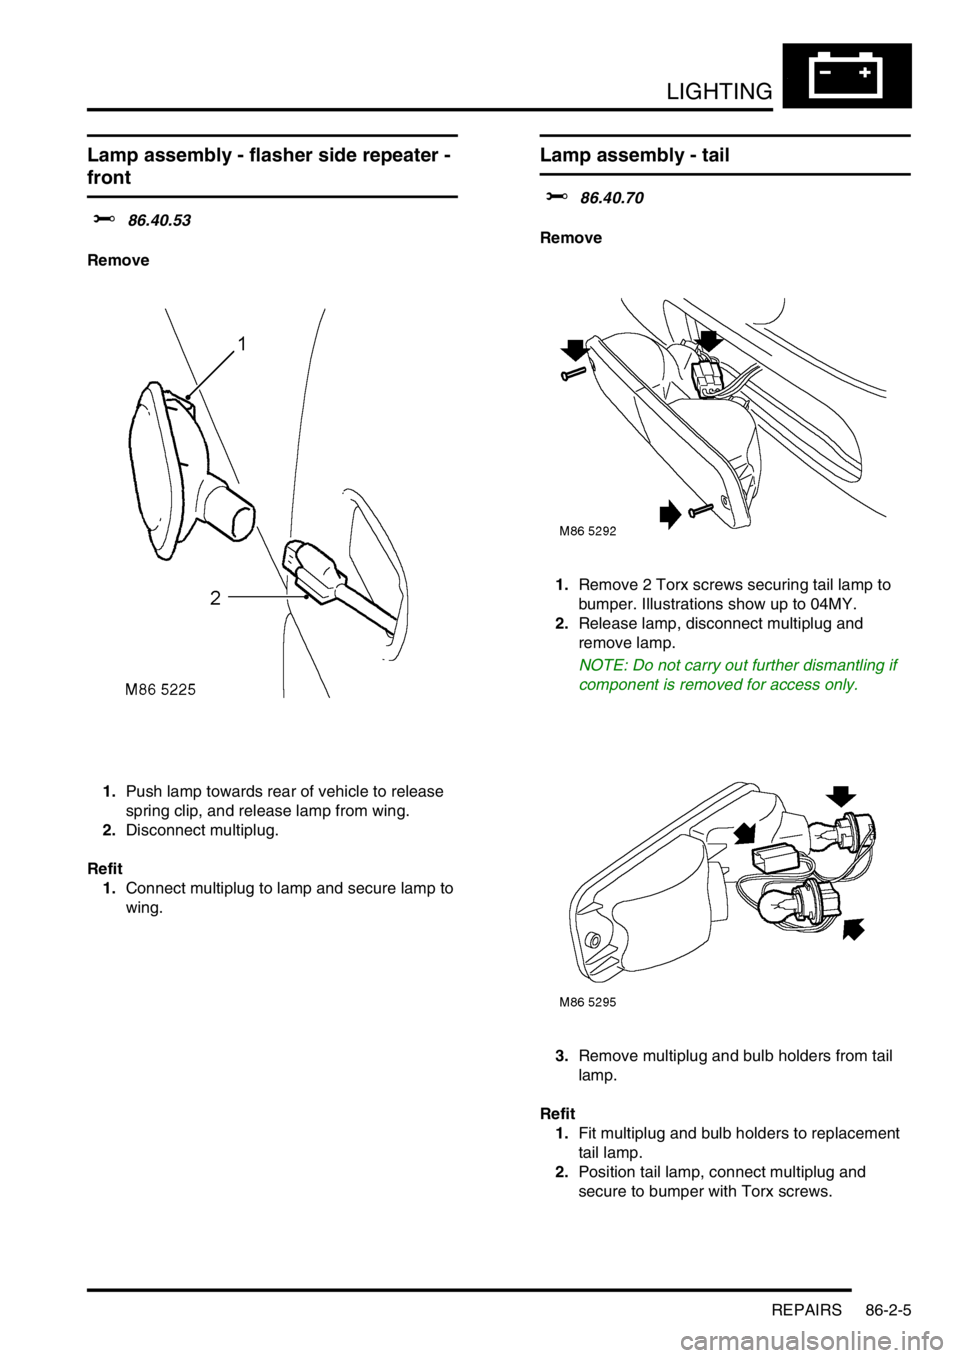
Lamp assembly - flasher side repeater -
front
$% 86.40.53
Remove
1.Push lamp towards rear of vehicle to release
spring clip, and release lamp from wing.
2.Disconnect multiplug.
Refit
1.Connect multiplug to lamp and secure lamp to
wing.
Lamp assembly - tail
$% 86.40.70
Remove
1.Remove 2 Torx screws securing tail lamp to
bumper. Illustrations show up to 04MY.
2.Release lamp, disconnect multiplug and
remove lamp.
NOTE: Do not carry out further dismantling if
component is removed for access only.
3.Remove multiplug and bulb holders from tail
lamp.
Refit
1.Fit multiplug and bulb holders to replacement
tail lamp.
2.Position tail lamp, connect multiplug and
secure to bumper with Torx screws.
Page 937 of 1007
LIGHTING
86-2-6 REPAIRS
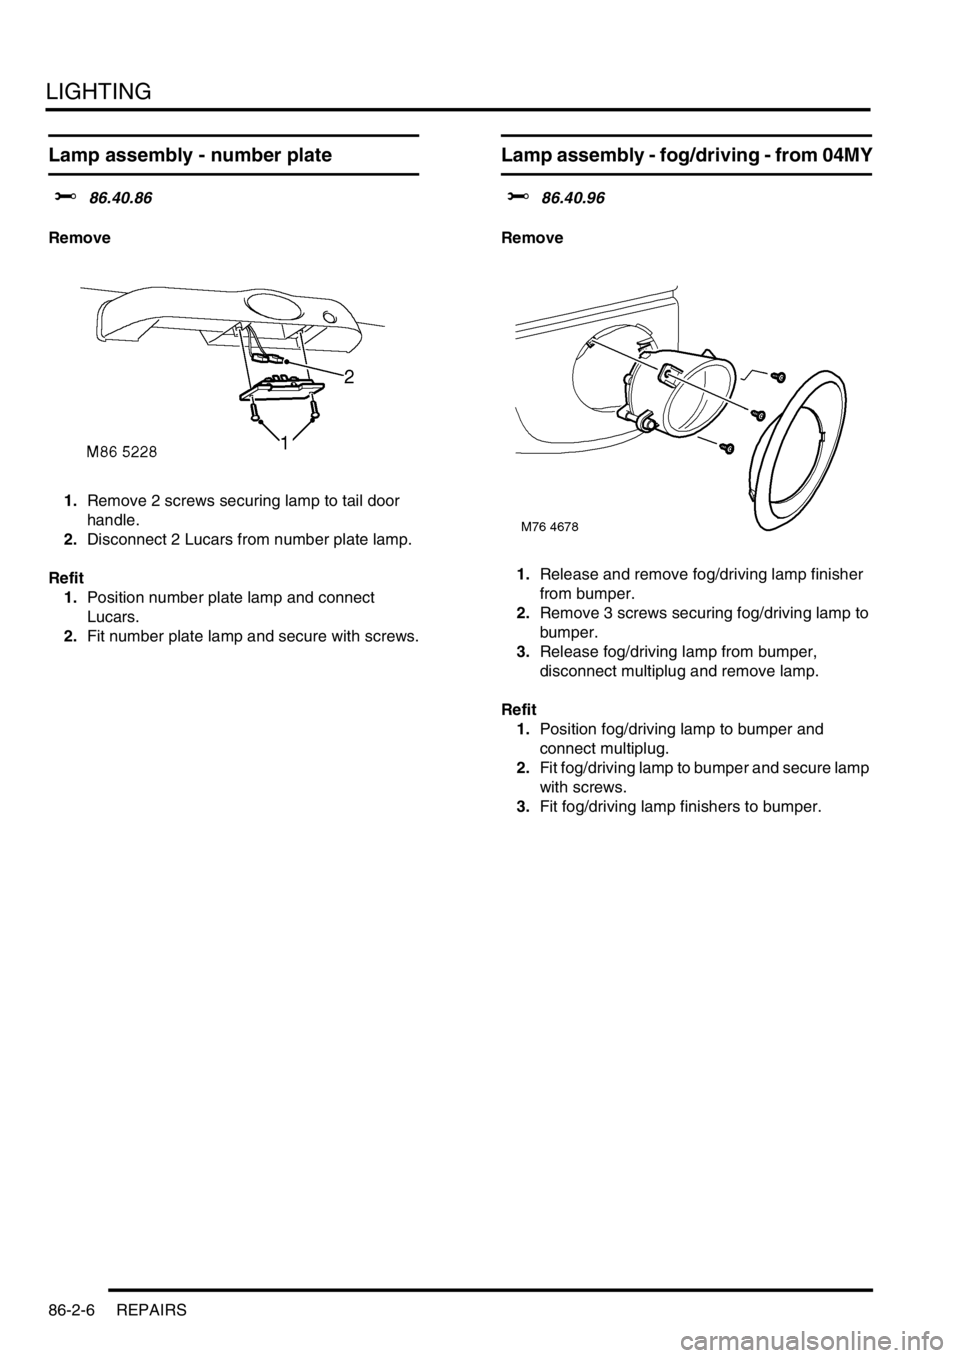
Lamp assembly - number plate
$% 86.40.86
Remove
1.Remove 2 screws securing lamp to tail door
handle.
2.Disconnect 2 Lucars from number plate lamp.
Refit
1.Position number plate lamp and connect
Lucars.
2.Fit number plate lamp and secure with screws.
Lamp assembly - fog/driving - from 04MY
$% 86.40.96
Remove
1.Release and remove fog/driving lamp finisher
from bumper.
2.Remove 3 screws securing fog/driving lamp to
bumper.
3.Release fog/driving lamp from bumper,
disconnect multiplug and remove lamp.
Refit
1.Position fog/driving lamp to bumper and
connect multiplug.
2.Fit fog/driving lamp to bumper and secure lamp
with screws.
3.Fit fog/driving lamp finishers to bumper.
Page 938 of 1007
LIGHTING
REPAIRS 86-2-7
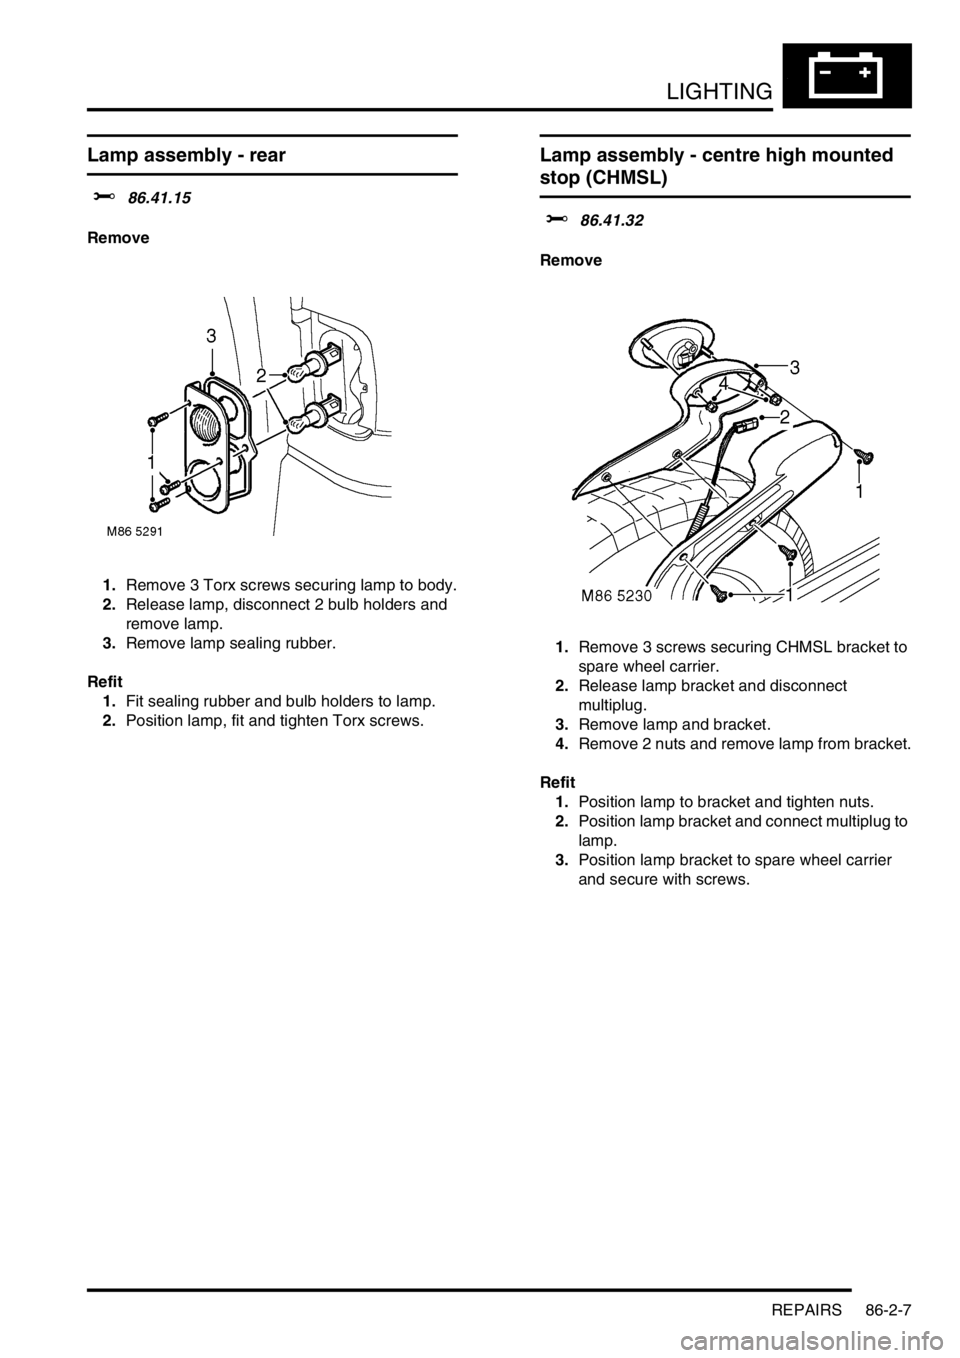
Lamp assembly - rear
$% 86.41.15
Remove
1.Remove 3 Torx screws securing lamp to body.
2.Release lamp, disconnect 2 bulb holders and
remove lamp.
3.Remove lamp sealing rubber.
Refit
1.Fit sealing rubber and bulb holders to lamp.
2.Position lamp, fit and tighten Torx screws.
Lamp assembly - centre high mounted
stop (CHMSL)
$% 86.41.32
Remove
1.Remove 3 screws securing CHMSL bracket to
spare wheel carrier.
2.Release lamp bracket and disconnect
multiplug.
3.Remove lamp and bracket.
4.Remove 2 nuts and remove lamp from bracket.
Refit
1.Position lamp to bracket and tighten nuts.
2.Position lamp bracket and connect multiplug to
lamp.
3.Position lamp bracket to spare wheel carrier
and secure with screws.
Page 939 of 1007
LIGHTING
86-2-8 REPAIRS
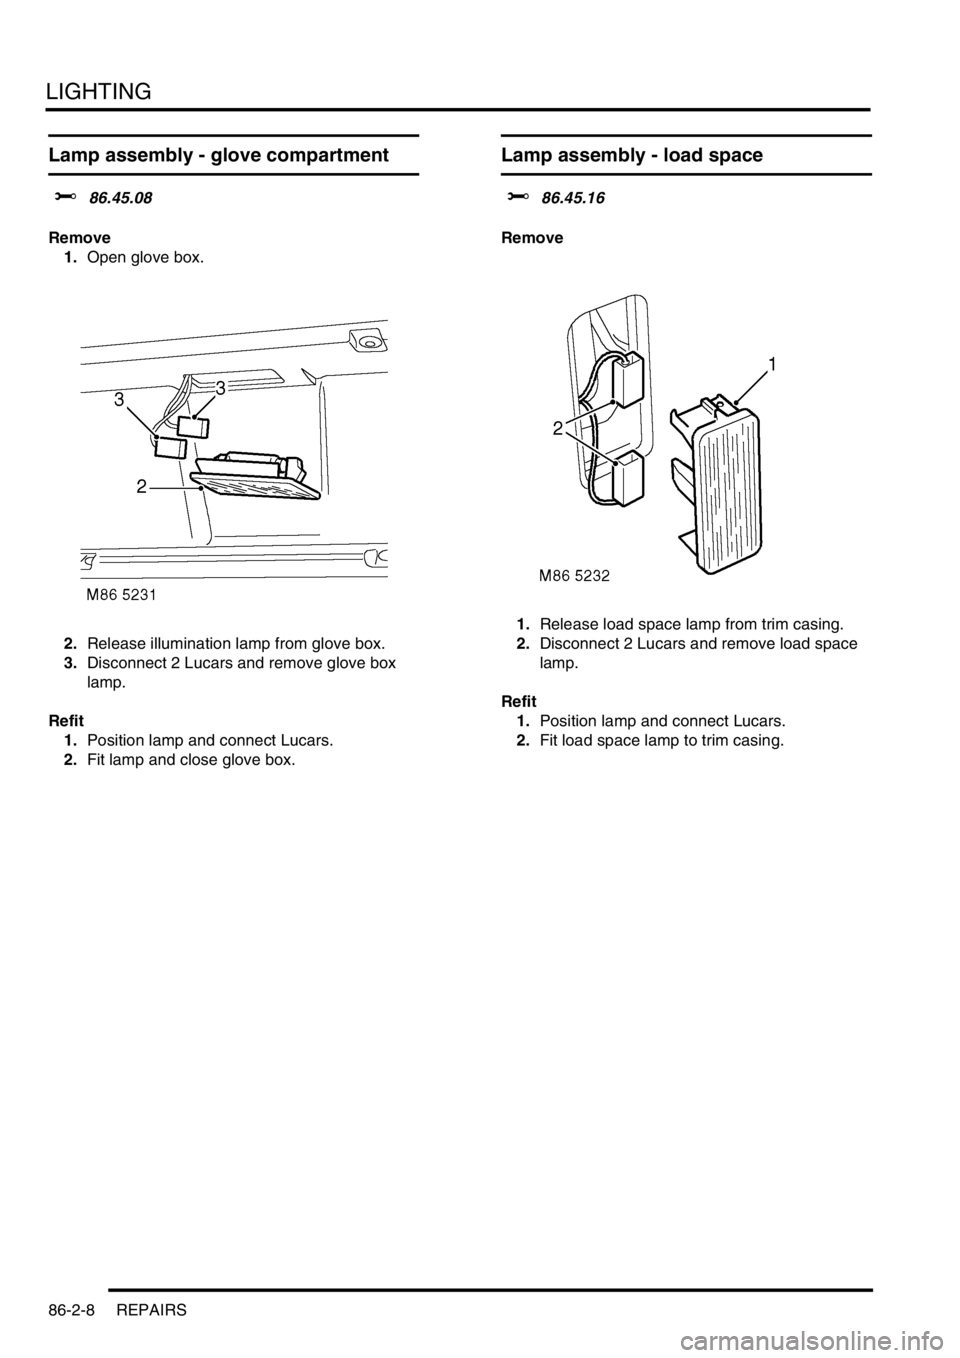
Lamp assembly - glove compartment
$% 86.45.08
Remove
1.Open glove box.
2.Release illumination lamp from glove box.
3.Disconnect 2 Lucars and remove glove box
lamp.
Refit
1.Position lamp and connect Lucars.
2.Fit lamp and close glove box.
Lamp assembly - load space
$% 86.45.16
Remove
1.Release load space lamp from trim casing.
2.Disconnect 2 Lucars and remove load space
lamp.
Refit
1.Position lamp and connect Lucars.
2.Fit load space lamp to trim casing.
Page 940 of 1007
LIGHTING
REPAIRS 86-2-9
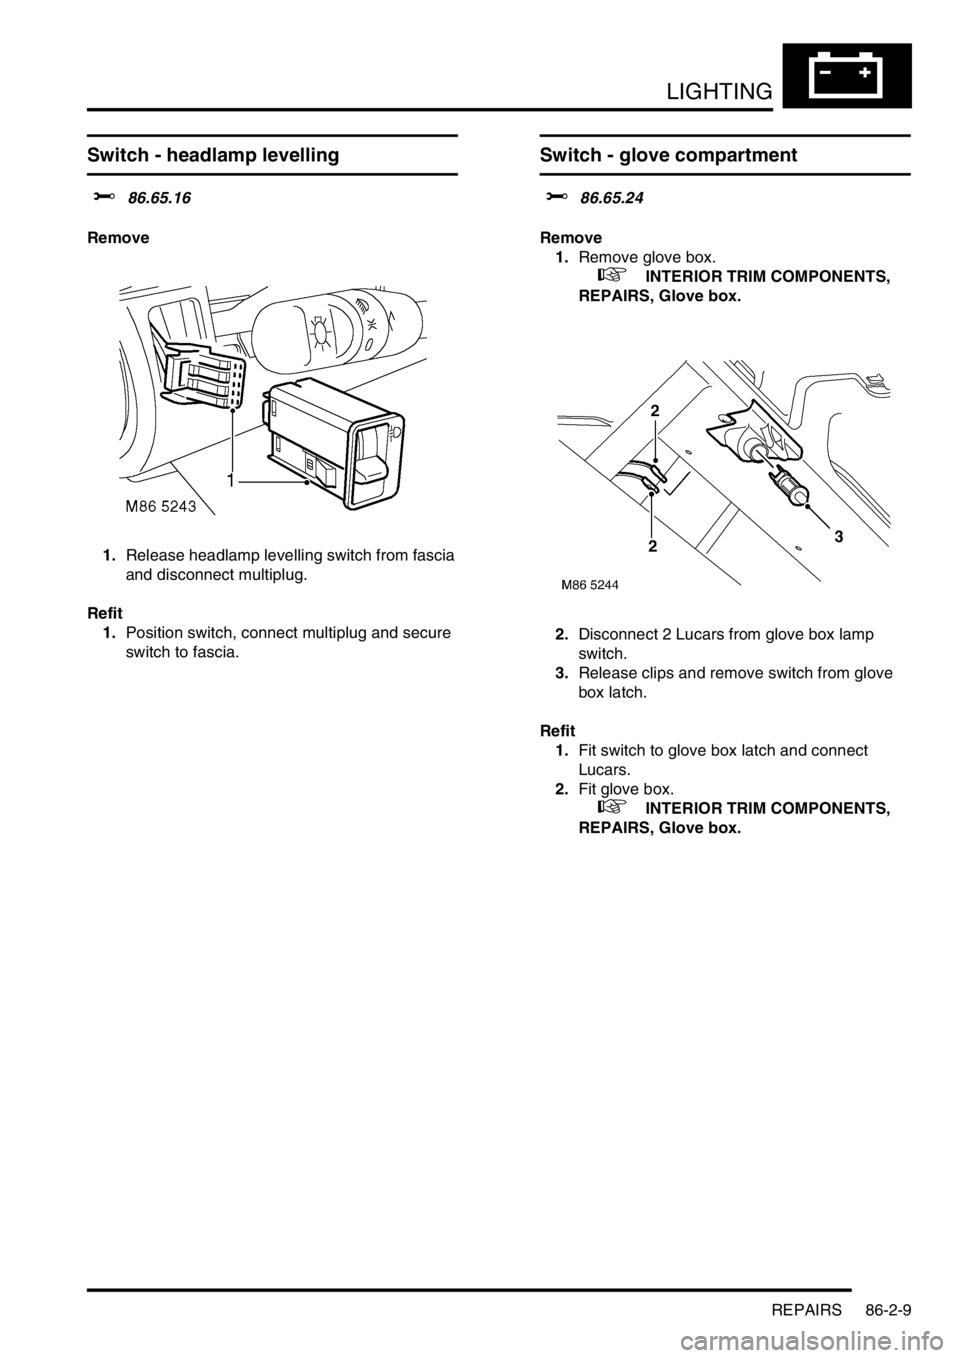
Switch - headlamp levelling
$% 86.65.16
Remove
1.Release headlamp levelling switch from fascia
and disconnect multiplug.
Refit
1.Position switch, connect multiplug and secure
switch to fascia.
Switch - glove compartment
$% 86.65.24
Remove
1.Remove glove box.
+ INTERIOR TRIM COMPONENTS,
REPAIRS, Glove box.
2.Disconnect 2 Lucars from glove box lamp
switch.
3.Release clips and remove switch from glove
box latch.
Refit
1.Fit switch to glove box latch and connect
Lucars.
2.Fit glove box.
+ INTERIOR TRIM COMPONENTS,
REPAIRS, Glove box.
Trending: dimensions, automatic transmission, seats, alternator, parking brake, run flat, diagram
