LAND ROVER FREELANDER 2001 Workshop Manual
FREELANDER 2001
LAND ROVER
LAND ROVER
https://www.carmanualsonline.info/img/64/57250/w960_57250-0.png
LAND ROVER FREELANDER 2001 Workshop Manual
Trending: coolant reservoir, spare wheel, change wheel, oil dipstick, roof rack, light, mileage
Page 941 of 1007
LIGHTING
86-2-10 REPAIRS
Switch - hazard warning
$% 86.65.50
Remove
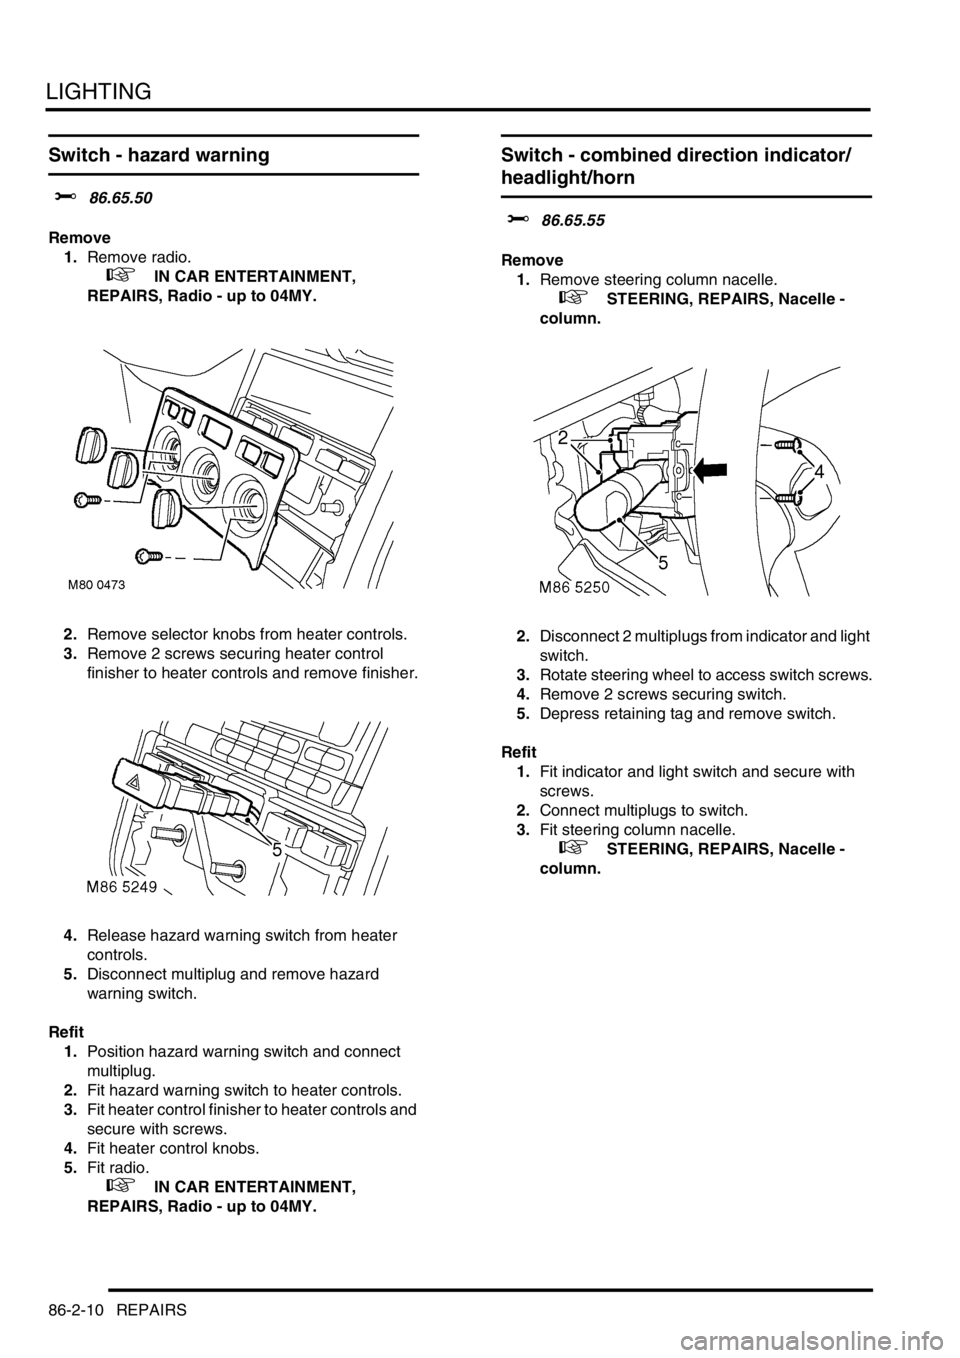
1.Remove radio.
+ IN CAR ENTERTAINMENT,
REPAIRS, Radio - up to 04MY.
2.Remove selector knobs from heater controls.
3.Remove 2 screws securing heater control
finisher to heater controls and remove finisher.
4.Release hazard warning switch from heater
controls.
5.Disconnect multiplug and remove hazard
warning switch.
Refit
1.Position hazard warning switch and connect
multiplug.
2.Fit hazard warning switch to heater controls.
3.Fit heater control finisher to heater controls and
secure with screws.
4.Fit heater control knobs.
5.Fit radio.
+ IN CAR ENTERTAINMENT,
REPAIRS, Radio - up to 04MY.
Switch - combined direction indicator/
headlight/horn
$% 86.65.55
Remove
1.Remove steering column nacelle.
+ STEERING, REPAIRS, Nacelle -
column.
2.Disconnect 2 multiplugs from indicator and light
switch.
3.Rotate steering wheel to access switch screws.
4.Remove 2 screws securing switch.
5.Depress retaining tag and remove switch.
Refit
1.Fit indicator and light switch and secure with
screws.
2.Connect multiplugs to switch.
3.Fit steering column nacelle.
+ STEERING, REPAIRS, Nacelle -
column.
Page 942 of 1007
LIGHTING
REPAIRS 86-2-11
Switch - rear fog lamp
$% 86.65.65
Remove
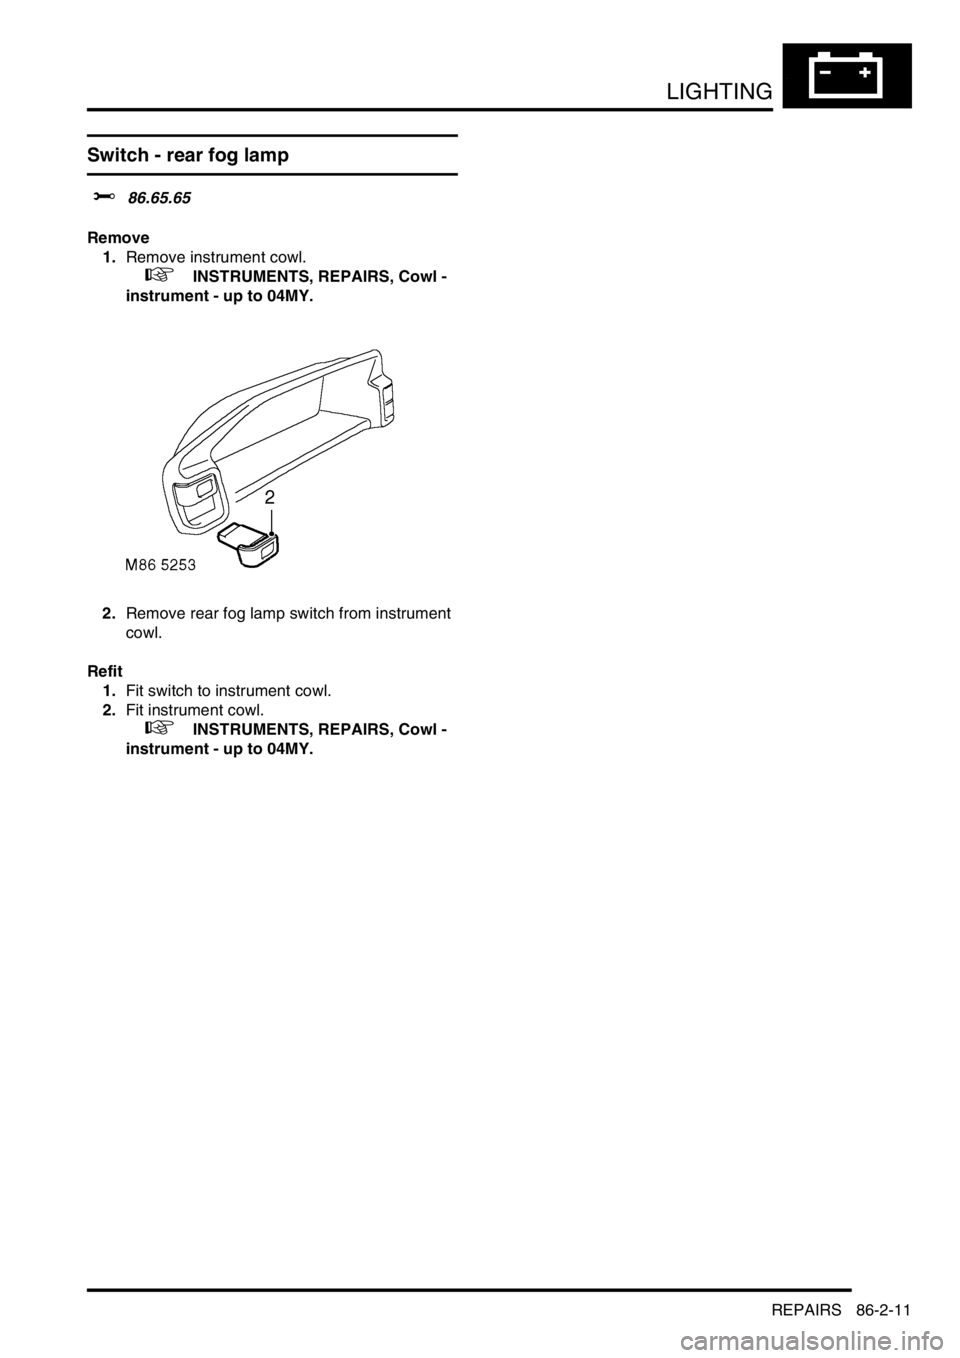
1.Remove instrument cowl.
+ INSTRUMENTS, REPAIRS, Cowl -
instrument - up to 04MY.
2.Remove rear fog lamp switch from instrument
cowl.
Refit
1.Fit switch to instrument cowl.
2.Fit instrument cowl.
+ INSTRUMENTS, REPAIRS, Cowl -
instrument - up to 04MY.
Page 943 of 1007
Page 944 of 1007
CONTROL UNITS
REPAIRS 86-3-1
CONTROL UNITS REPAIRS
Control unit - window lift
$% 86.25.39
Remove
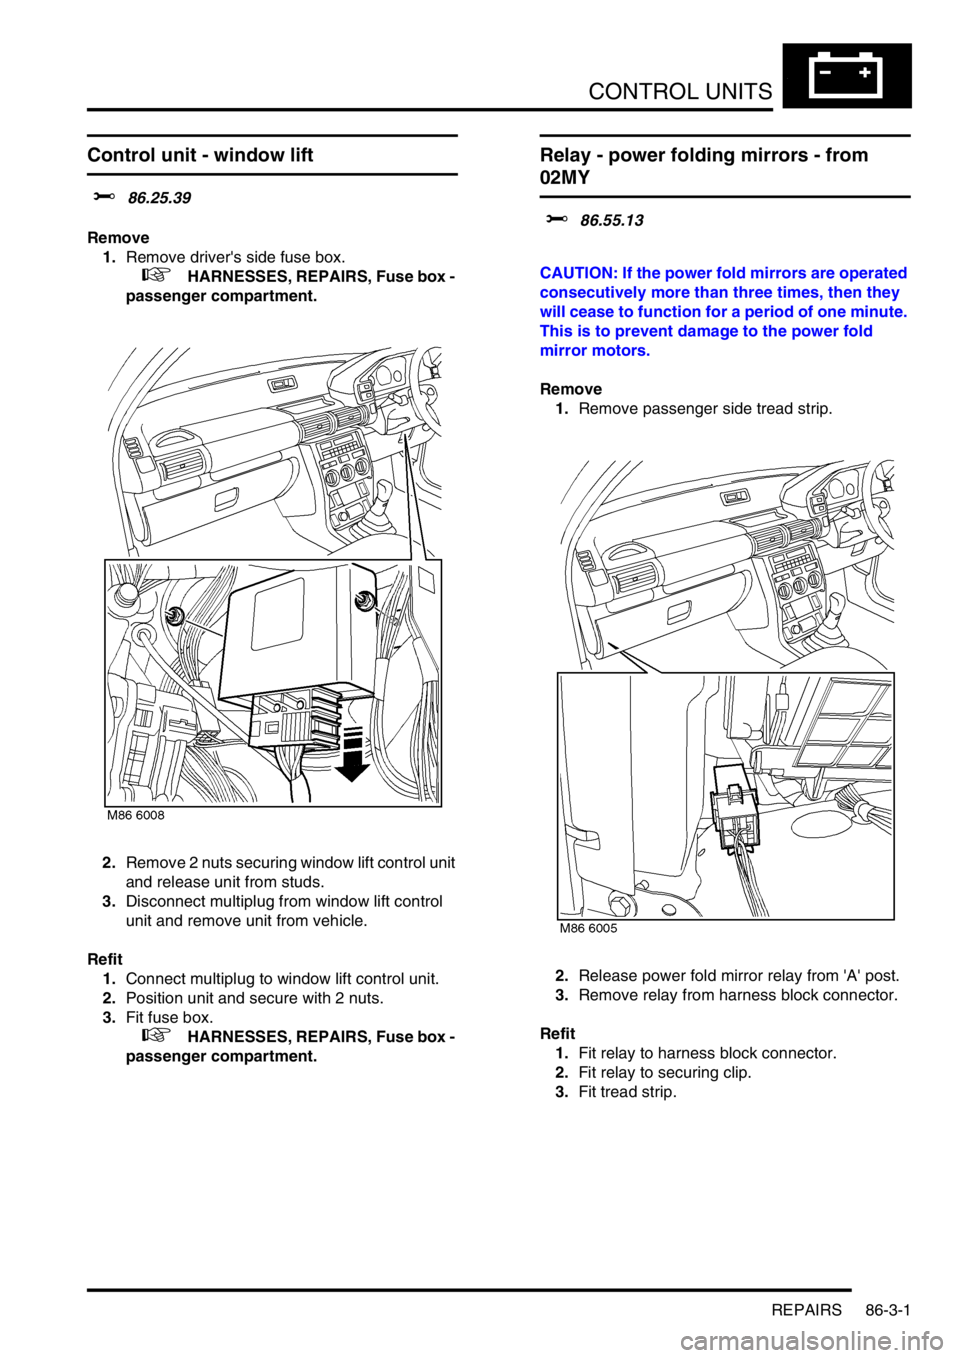
1.Remove driver's side fuse box.
+ HARNESSES, REPAIRS, Fuse box -
passenger compartment.
2.Remove 2 nuts securing window lift control unit
and release unit from studs.
3.Disconnect multiplug from window lift control
unit and remove unit from vehicle.
Refit
1.Connect multiplug to window lift control unit.
2.Position unit and secure with 2 nuts.
3.Fit fuse box.
+ HARNESSES, REPAIRS, Fuse box -
passenger compartment.
Relay - power folding mirrors - from
02MY
$% 86.55.13
CAUTION: If the power fold mirrors are operated
consecutively more than three times, then they
will cease to function for a period of one minute.
This is to prevent damage to the power fold
mirror motors.
Remove
1.Remove passenger side tread strip.
2.Release power fold mirror relay from 'A' post.
3.Remove relay from harness block connector.
Refit
1.Fit relay to harness block connector.
2.Fit relay to securing clip.
3.Fit tread strip.
Page 945 of 1007
CONTROL UNITS
86-3-2 REPAIRS
Central Control Unit (CCU)
$% 86.55.75
Remove
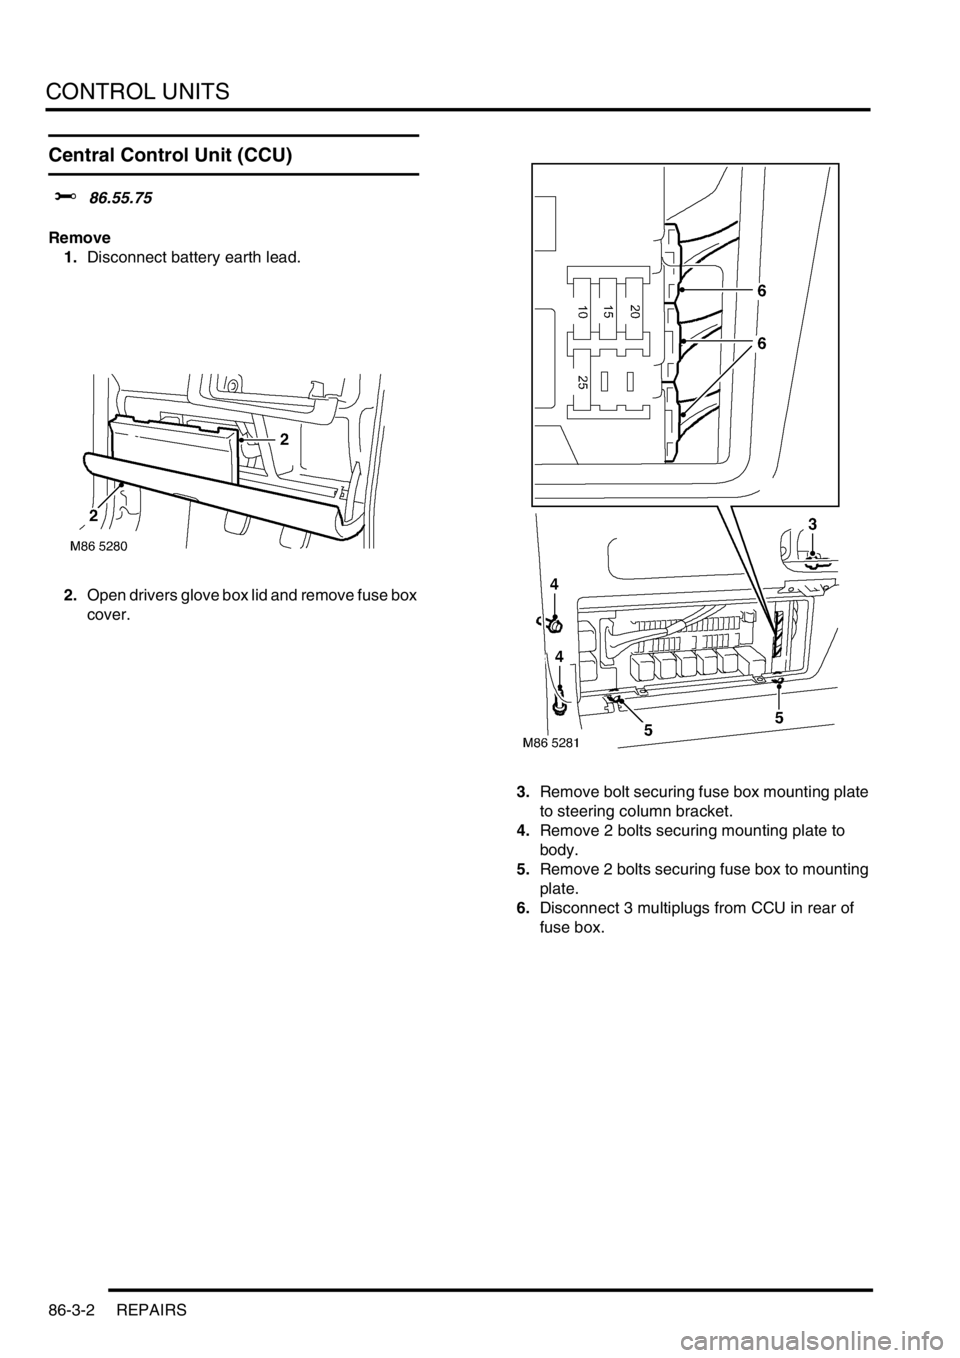
1.Disconnect battery earth lead.
2.Open drivers glove box lid and remove fuse box
cover.
3.Remove bolt securing fuse box mounting plate
to steering column bracket.
4.Remove 2 bolts securing mounting plate to
body.
5.Remove 2 bolts securing fuse box to mounting
plate.
6.Disconnect 3 multiplugs from CCU in rear of
fuse box.
Page 946 of 1007
CONTROL UNITS
REPAIRS 86-3-3
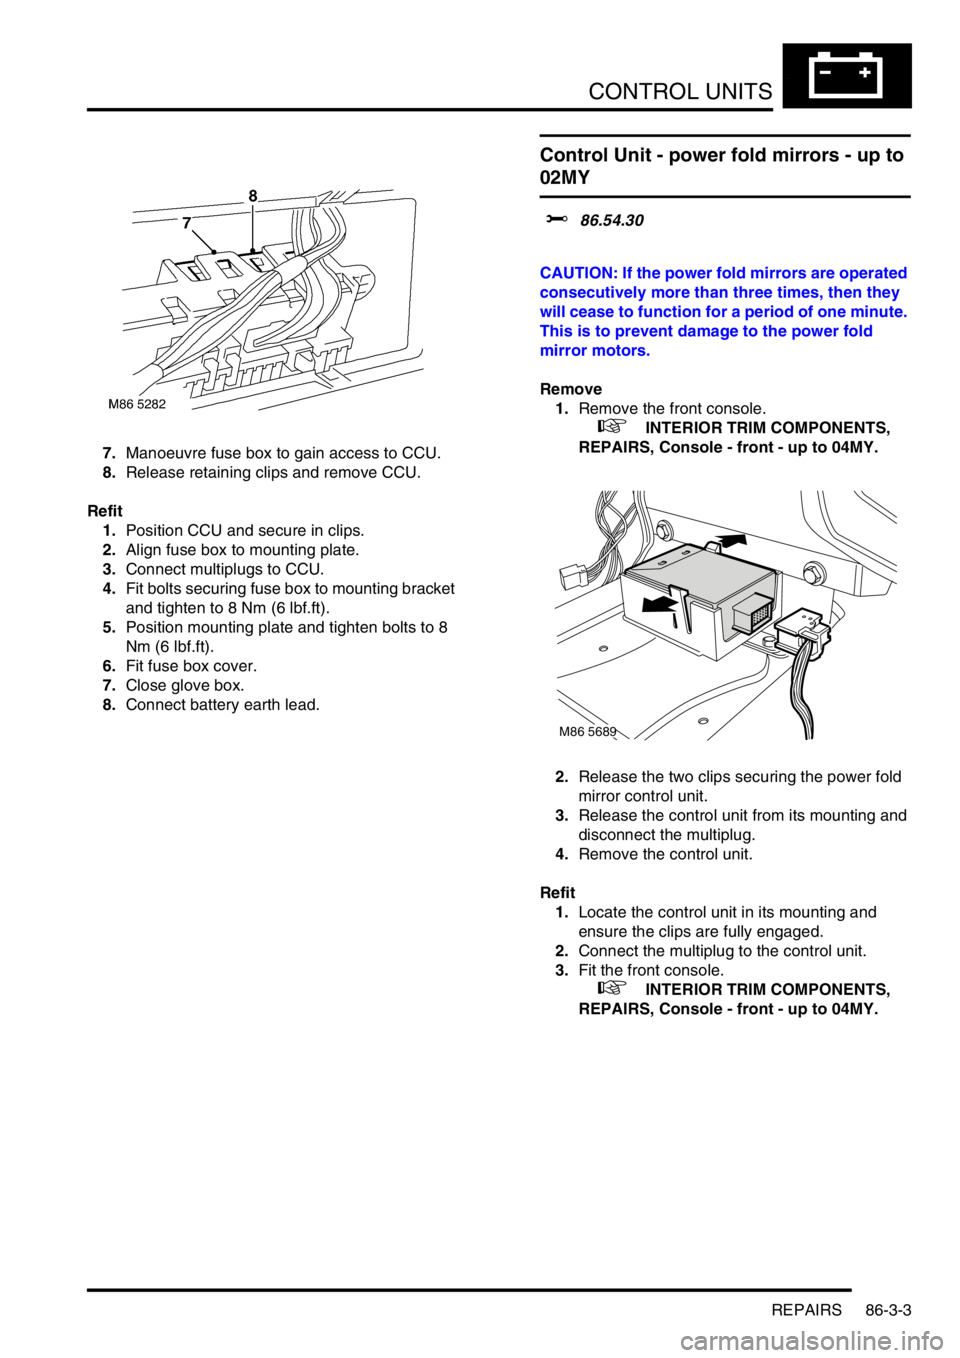
7.Manoeuvre fuse box to gain access to CCU.
8.Release retaining clips and remove CCU.
Refit
1.Position CCU and secure in clips.
2.Align fuse box to mounting plate.
3.Connect multiplugs to CCU.
4.Fit bolts securing fuse box to mounting bracket
and tighten to 8 Nm (6 lbf.ft).
5.Position mounting plate and tighten bolts to 8
Nm (6 lbf.ft).
6.Fit fuse box cover.
7.Close glove box.
8.Connect battery earth lead.
Control Unit - power fold mirrors - up to
02MY
$% 86.54.30
CAUTION: If the power fold mirrors are operated
consecutively more than three times, then they
will cease to function for a period of one minute.
This is to prevent damage to the power fold
mirror motors.
Remove
1.Remove the front console.
+ INTERIOR TRIM COMPONENTS,
REPAIRS, Console - front - up to 04MY.
2.Release the two clips securing the power fold
mirror control unit.
3.Release the control unit from its mounting and
disconnect the multiplug.
4.Remove the control unit.
Refit
1.Locate the control unit in its mounting and
ensure the clips are fully engaged.
2.Connect the multiplug to the control unit.
3.Fit the front console.
+ INTERIOR TRIM COMPONENTS,
REPAIRS, Console - front - up to 04MY.
M86 5689
Page 947 of 1007
Page 948 of 1007
SECURITY
REPAIRS 86-4-1
SECURITY REPAIRS
Solenoid/motor - taildoor
$% 86.26.02
Remove
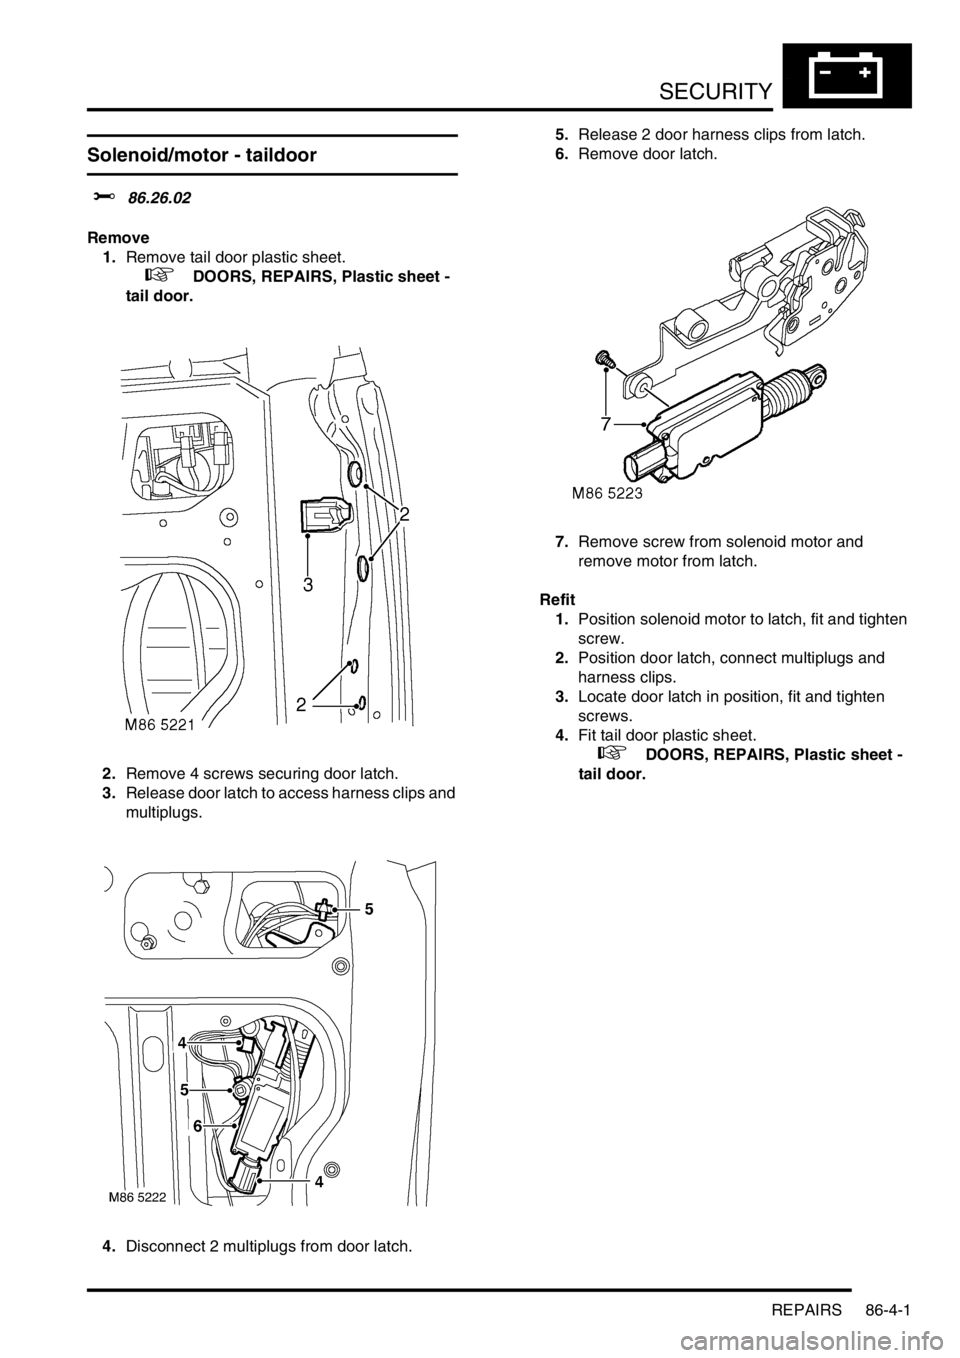
1.Remove tail door plastic sheet.
+ DOORS, REPAIRS, Plastic sheet -
tail door.
2.Remove 4 screws securing door latch.
3.Release door latch to access harness clips and
multiplugs.
4.Disconnect 2 multiplugs from door latch.5.Release 2 door harness clips from latch.
6.Remove door latch.
7.Remove screw from solenoid motor and
remove motor from latch.
Refit
1.Position solenoid motor to latch, fit and tighten
screw.
2.Position door latch, connect multiplugs and
harness clips.
3.Locate door latch in position, fit and tighten
screws.
4.Fit tail door plastic sheet.
+ DOORS, REPAIRS, Plastic sheet -
tail door.
Page 949 of 1007
SECURITY
86-4-2 REPAIRS
Switch/push - horn
$% 86.30.01
Remove
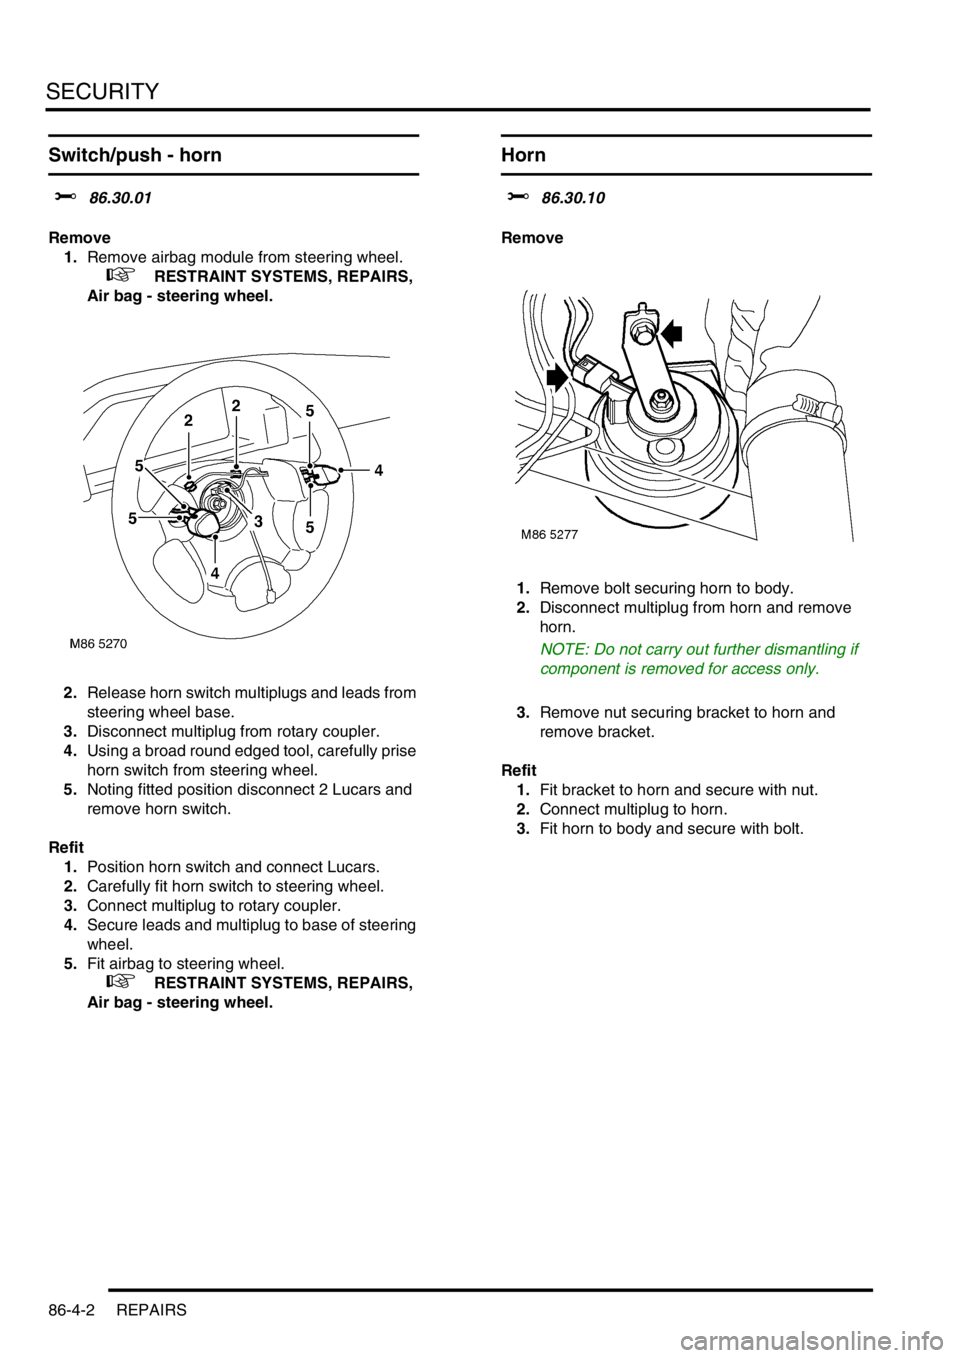
1.Remove airbag module from steering wheel.
+ RESTRAINT SYSTEMS, REPAIRS,
Air bag - steering wheel.
2.Release horn switch multiplugs and leads from
steering wheel base.
3.Disconnect multiplug from rotary coupler.
4.Using a broad round edged tool, carefully prise
horn switch from steering wheel.
5.Noting fitted position disconnect 2 Lucars and
remove horn switch.
Refit
1.Position horn switch and connect Lucars.
2.Carefully fit horn switch to steering wheel.
3.Connect multiplug to rotary coupler.
4.Secure leads and multiplug to base of steering
wheel.
5.Fit airbag to steering wheel.
+ RESTRAINT SYSTEMS, REPAIRS,
Air bag - steering wheel.
Horn
$% 86.30.10
Remove
1.Remove bolt securing horn to body.
2.Disconnect multiplug from horn and remove
horn.
NOTE: Do not carry out further dismantling if
component is removed for access only.
3.Remove nut securing bracket to horn and
remove bracket.
Refit
1.Fit bracket to horn and secure with nut.
2.Connect multiplug to horn.
3.Fit horn to body and secure with bolt.
Page 950 of 1007
SECURITY
REPAIRS 86-4-3
Immobilisation - electronic control unit
(ECU) -
$% 86.77.07
Remove
1.Disconnect battery earth lead.
2.Remove fascia.
+ INTERIOR TRIM COMPONENTS,
REPAIRS, Fascia - up to 04MY.
3.Remove 2 plastic nuts securing immobilisation
ECU and disconnect multiplug. Remove
immobilisation ECU.
Refit
1.Connect multiplug to immobilisation ECU.
2.Position ECU, fit and tighten 2 plastic nuts.
3.Fit fascia.
+ INTERIOR TRIM COMPONENTS,
REPAIRS, Fascia - up to 04MY.
4.Connect battery earth lead.
5.Initiate using TestBook/T4.
Sensor - volumetric - alarm system - 3
door
$% 86.77.29
Remove
1.Remove roof lamp lens.
2.Remove 2 screws, release roof lamp and
disconnect multiplug.
3.Release headlining rear finisher from roof panel
and remove finisher.
M86 5633
Trending: clutch, ad blue, automatic transmission fluid, trailer, fuel additives, radiator cap, mirror controls

