LAND ROVER FRELANDER 2 2006 Repair Manual
Manufacturer: LAND ROVER, Model Year: 2006, Model line: FRELANDER 2, Model: LAND ROVER FRELANDER 2 2006Pages: 3229, PDF Size: 78.5 MB
Page 2241 of 3229
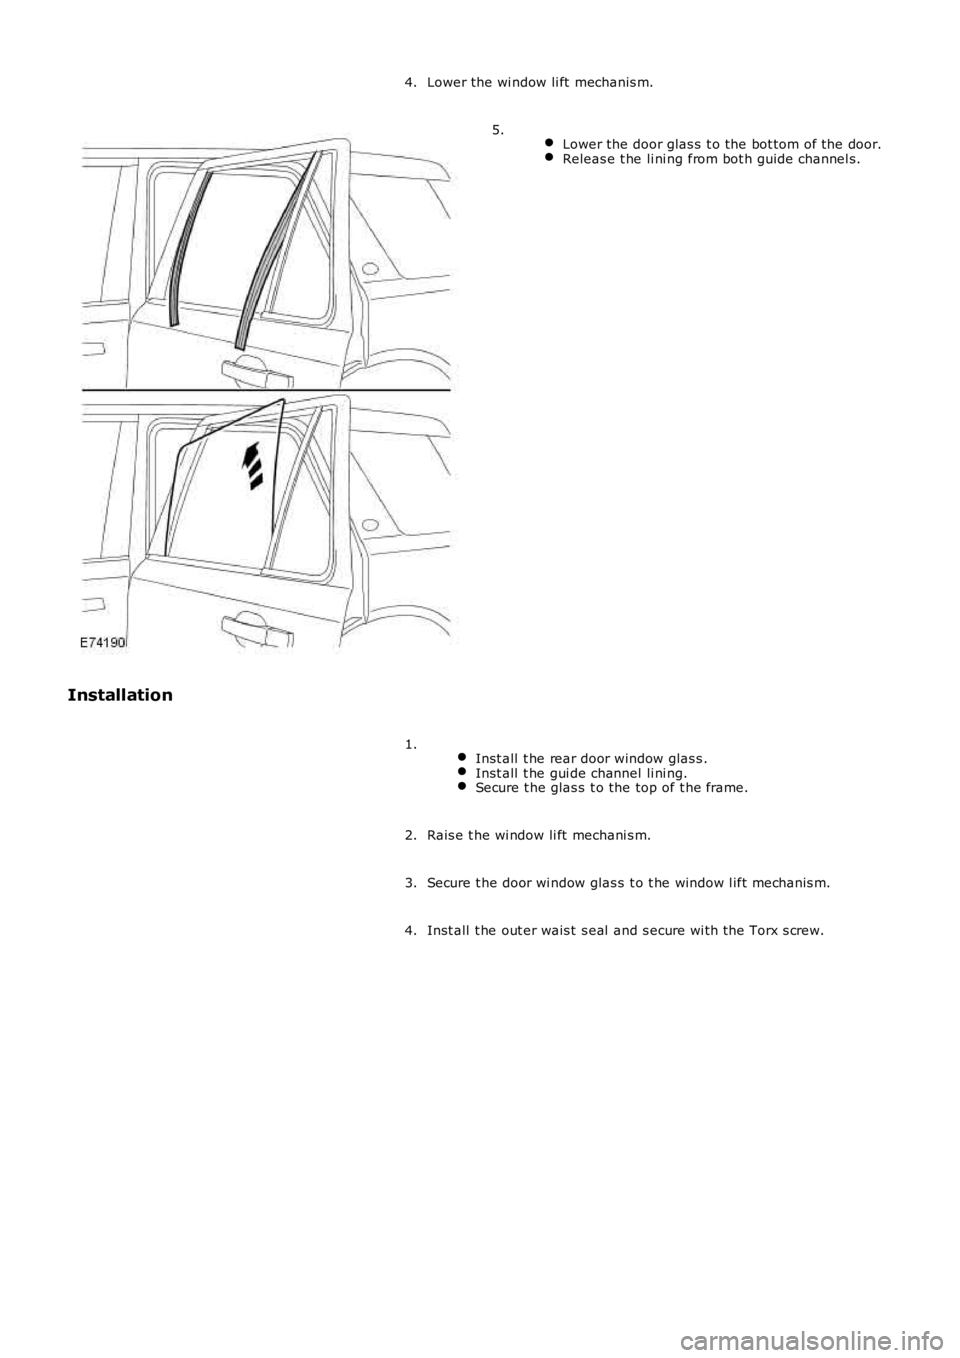
Lower the wi ndow li ft mechanis m.4.
Lower the door glas s t o the bot tom of the door.Releas e t he li ni ng from bot h guide channel s.
5.
Installation
Inst all t he rear door window glas s .Inst all t he gui de channel li ni ng.Secure t he glas s t o the top of t he frame.
1.
Rais e t he wi ndow li ft mechani s m.2.
Secure t he door wi ndow glas s t o t he window l ift mechanis m.3.
Inst all t he out er wais t s eal and s ecure wi th the Torx s crew.4.
Page 2242 of 3229
Publi s hed: 11-May-2011
Glass, Frames and Mechanisms - Rear Quarter Window Glass
Removal and Inst all ati on
Removal
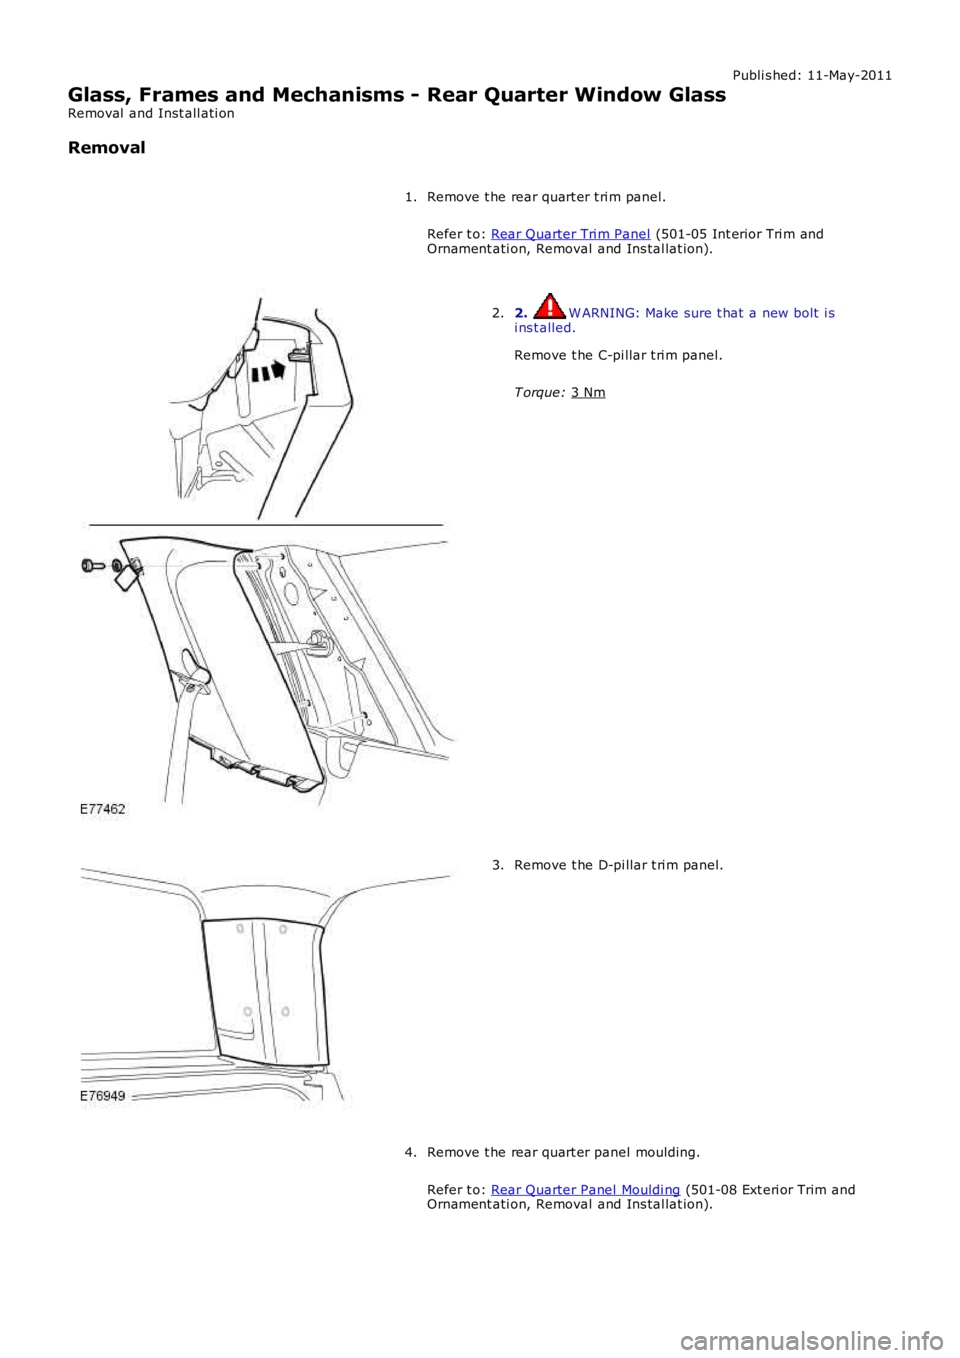
Remove t he rear quart er t ri m panel.
Refer t o: Rear Quarter Tri m Panel (501-05 Int erior Tri m and
Ornament ati on, Removal and Ins tal lat ion).
1. 2. W ARNING: Make sure t hat a new bolt i s
i ns t alled.
Remove t he C-pi llar t ri m panel.
T orque: 3 Nm 2.
Remove t he D-pi llar t ri m panel.
3.
Remove t he rear quart er panel moulding.
Refer t o: Rear Quarter Panel Mouldi ng (501-08 Ext eri or Trim and
Ornament ati on, Removal and Ins tal lat ion).
4.
Page 2243 of 3229
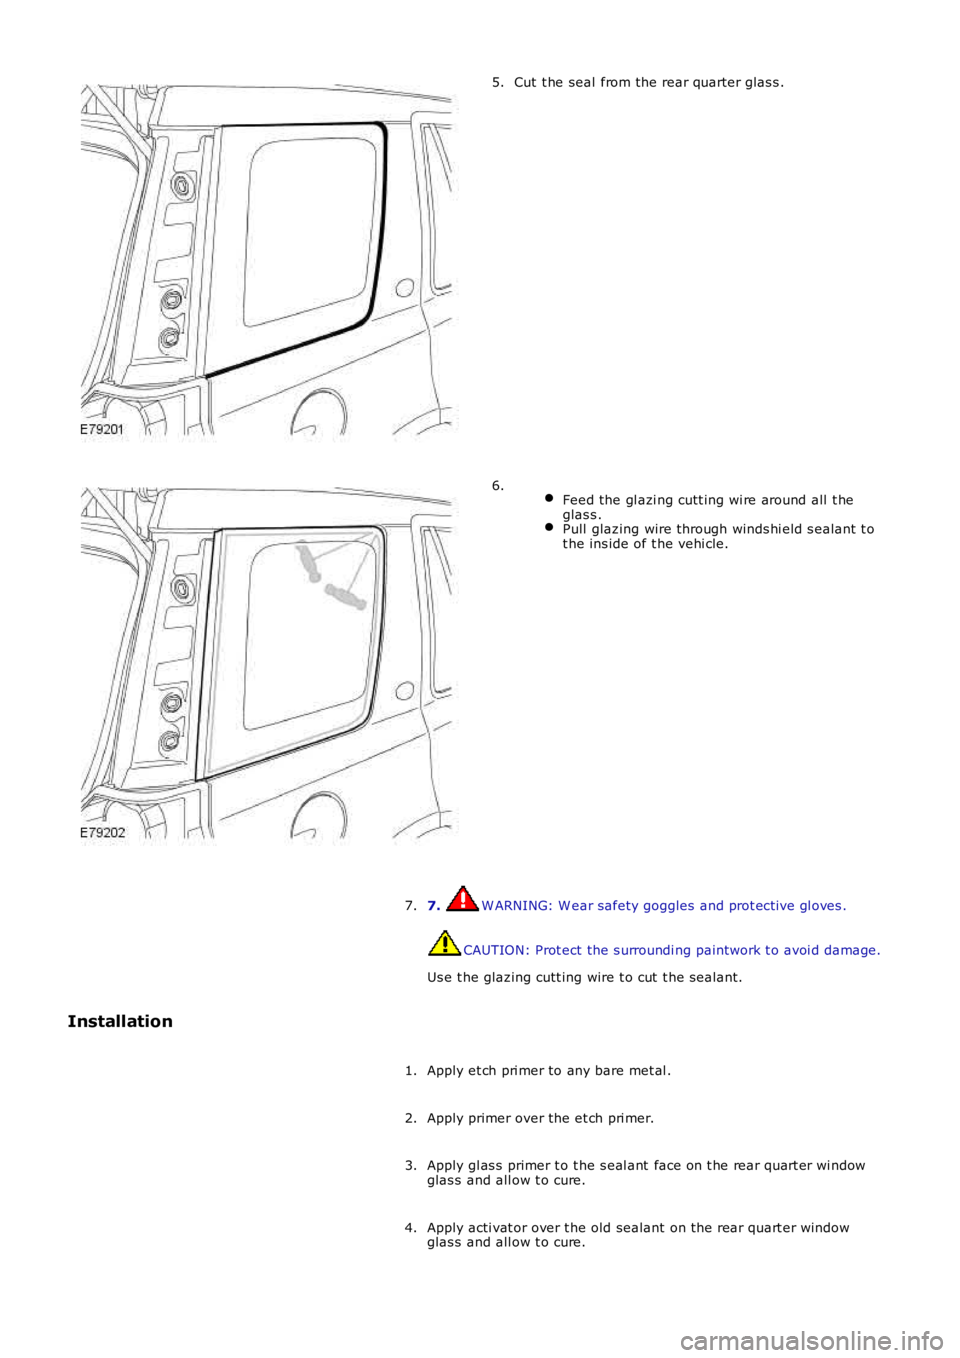
Cut t he seal from the rear quarter glas s .5.
Feed the gl azi ng cutt ing wi re around all t heglas s .Pull glazing wire through winds hi eld s ealant t ot he ins ide of t he vehi cle.
6.
7. W ARNING: W ear safety goggles and prot ecti ve gl oves .
CAUTION: Prot ect the s urroundi ng paintwork t o avoi d damage.
Us e t he glazing cutt ing wire t o cut t he s ealant.
7.
Installation
Apply et ch pri mer to any bare met al .1.
Apply primer over the et ch pri mer.2.
Apply gl as s primer t o t he s eal ant face on t he rear quart er wi ndowglas s and all ow t o cure.3.
Apply acti vat or over t he old sealant on t he rear quart er windowglas s and all ow t o cure.4.
Page 2244 of 3229
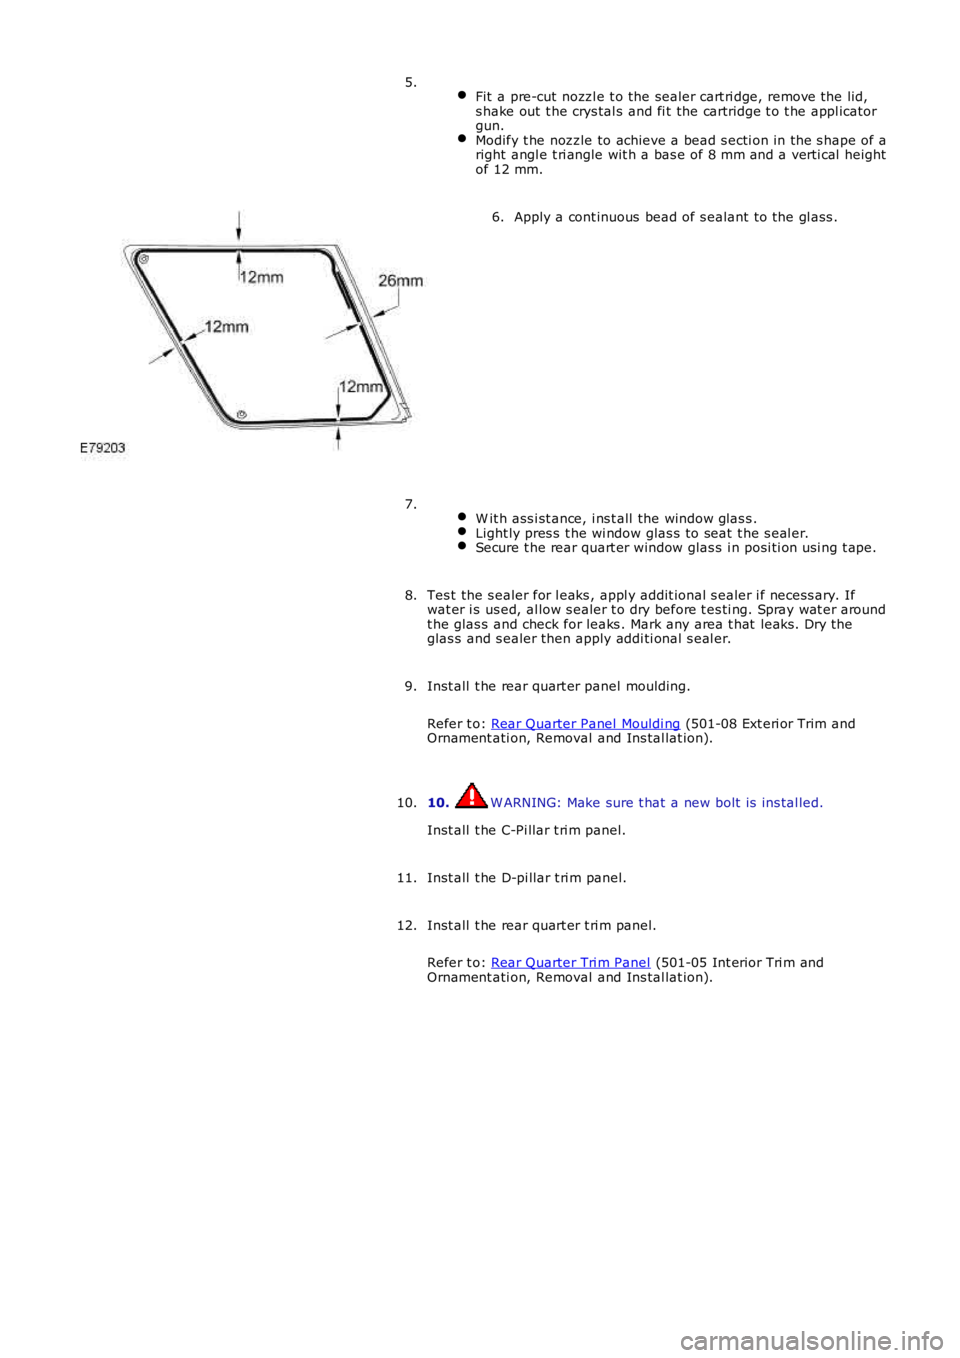
Fit a pre-cut nozzl e t o the sealer cart ri dge, remove the lid,s hake out t he crys tal s and fi t the cartridge t o t he appl icatorgun.Modify t he nozzle to achieve a bead s ecti on in the s hape of aright angl e t ri angle wit h a bas e of 8 mm and a verti cal heightof 12 mm.
5.
Apply a cont inuous bead of s ealant to the gl ass .6.
W it h ass i st ance, i ns t all the window glas s .Light ly pres s t he wi ndow glas s to seat t he s eal er.Secure t he rear quart er window glas s i n posi ti on usi ng t ape.
7.
Tes t the s ealer for l eaks , appl y addit ional s ealer i f necess ary. Ifwat er i s us ed, al low s ealer t o dry before t es ti ng. Spray wat er aroundt he glas s and check for leaks . Mark any area t hat leaks . Dry theglas s and s ealer then apply addi ti onal s eal er.
8.
Inst all t he rear quart er panel moulding.
Refer t o: Rear Quarter Panel Mouldi ng (501-08 Ext eri or Trim andOrnament ati on, Removal and Ins tal lat ion).
9.
10. W ARNING: Make sure t hat a new bolt is ins tal led.
Inst all t he C-Pi llar t ri m panel.
10.
Inst all t he D-pi llar t ri m panel.11.
Inst all t he rear quart er t ri m panel.
Refer t o: Rear Quarter Tri m Panel (501-05 Int erior Tri m andOrnament ati on, Removal and Ins tal lat ion).
12.
Page 2245 of 3229
Publi s hed: 11-May-2011
Glass, Frames and Mechanisms - Liftgate Window Glass
Removal and Inst all ati on
Removal
Remove t he rear window wiper motor.
Refer t o: Rear W indow W iper Motor (501-16 W i pers and W as hers ,Removal and Ins tall ati on).
1.
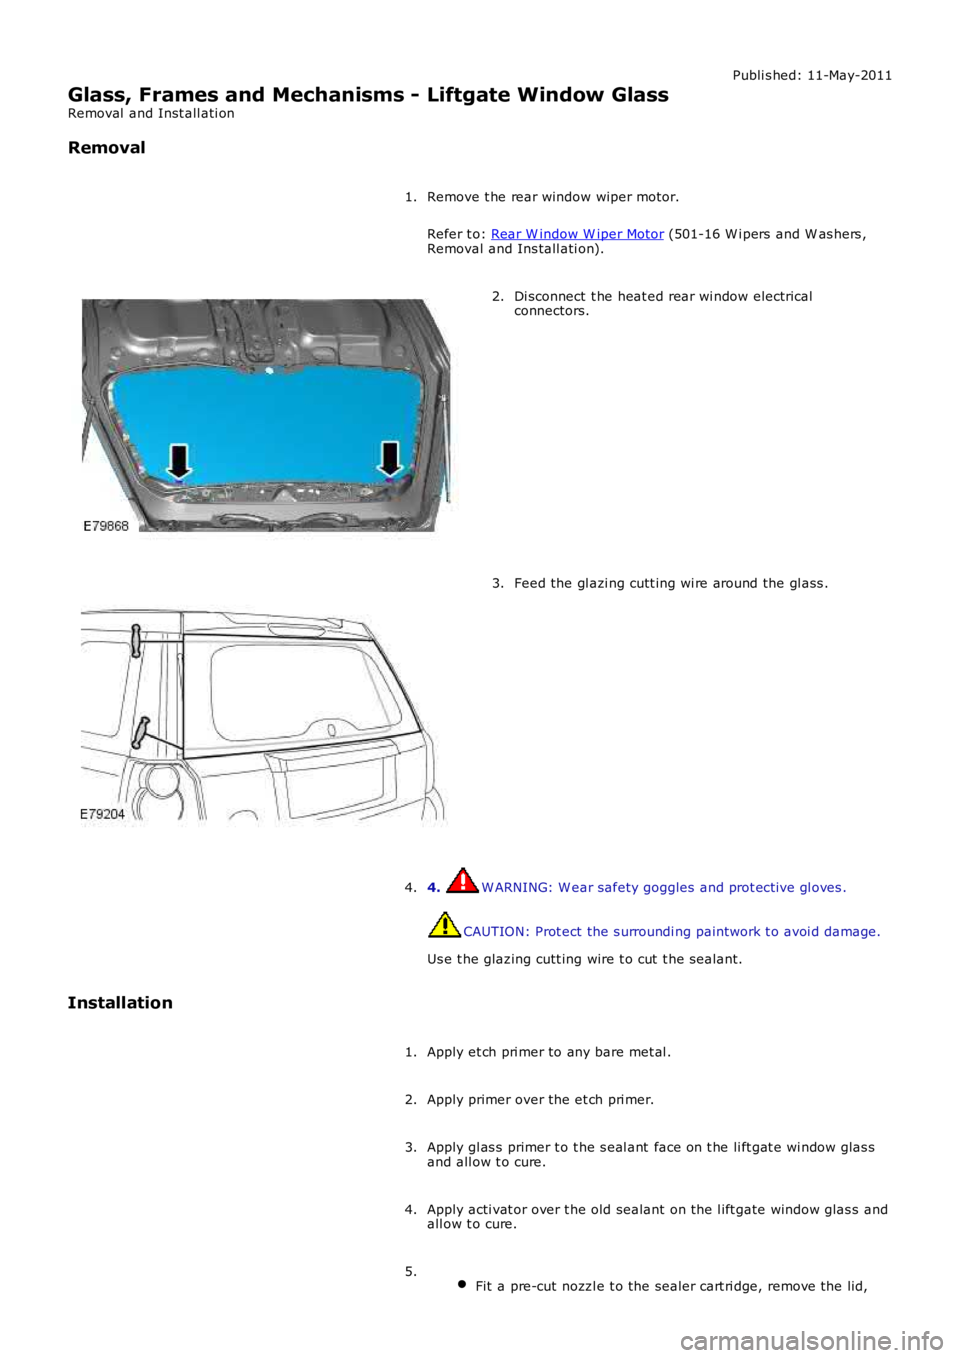
Di sconnect t he heat ed rear wi ndow electricalconnectors.2.
Feed the gl azi ng cutt ing wi re around the gl ass .3.
4. W ARNING: W ear safety goggles and prot ecti ve gl oves .
CAUTION: Prot ect the s urroundi ng paintwork t o avoi d damage.
Us e t he glazing cutt ing wire t o cut t he s ealant.
4.
Installation
Apply et ch pri mer to any bare met al .1.
Apply primer over the et ch pri mer.2.
Apply gl as s primer t o t he s eal ant face on t he li ft gat e wi ndow glas sand all ow t o cure.3.
Apply acti vat or over t he old sealant on t he l ift gate window glas s andall ow t o cure.4.
Fit a pre-cut nozzl e t o the sealer cart ri dge, remove the lid,5.
Page 2246 of 3229
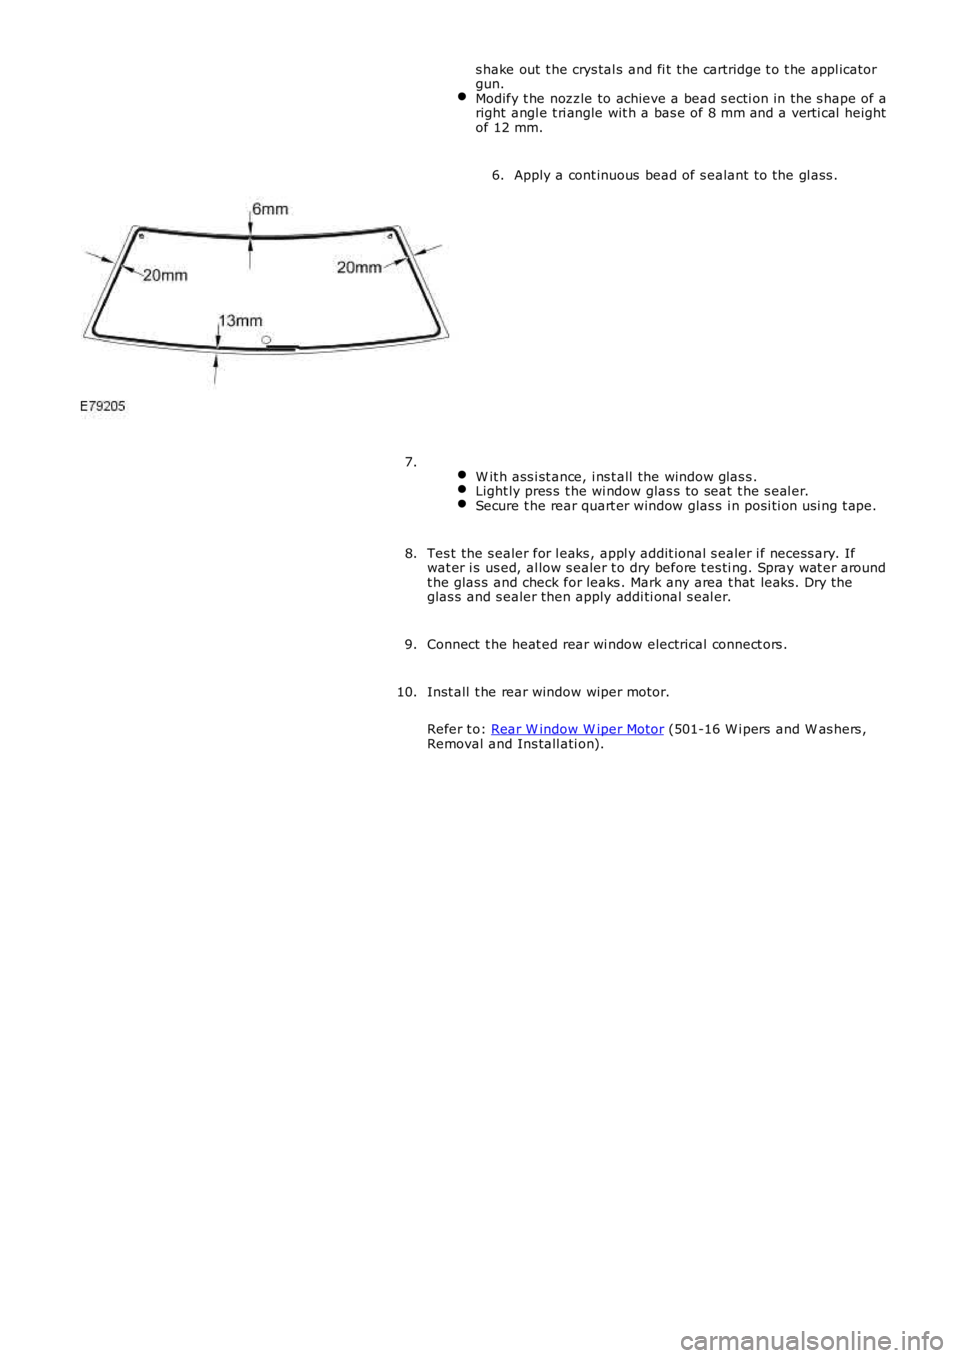
s hake out t he crys tal s and fi t the cartridge t o t he appl icatorgun.Modify t he nozzle to achieve a bead s ecti on in the s hape of aright angl e t ri angle wit h a bas e of 8 mm and a verti cal heightof 12 mm.
Apply a cont inuous bead of s ealant to the gl ass .6.
W it h ass i st ance, i ns t all the window glas s .Light ly pres s t he wi ndow glas s to seat t he s eal er.Secure t he rear quart er window glas s i n posi ti on usi ng t ape.
7.
Tes t the s ealer for l eaks , appl y addit ional s ealer i f necess ary. Ifwat er i s us ed, al low s ealer t o dry before t es ti ng. Spray wat er aroundt he glas s and check for leaks . Mark any area t hat leaks . Dry theglas s and s ealer then apply addi ti onal s eal er.
8.
Connect t he heat ed rear wi ndow electrical connect ors .9.
Inst all t he rear window wiper motor.
Refer t o: Rear W indow W iper Motor (501-16 W i pers and W as hers ,Removal and Ins tall ati on).
10.
Page 2247 of 3229
Publi s hed: 11-May-2011
Glass, Frames and Mechanisms - Windshield Glass
Removal and Inst all ati on
Removal
Remove t he int erior mi rror.
Refer t o: Int erior Rear View Mirror (501-09 Rear Vi ew Mi rrors ,Removal and Ins tall ati on).
1.
Remove t he A-pi llar t ri m panels .
Refer t o: A-Pil lar Tri m Panel (501-05 Int erior Trim andOrnament ati on, Removal and Ins tal lat ion).
2.
Remove t he plenum chamber panel.
Refer t o: Plenum Chamber (412-01 Cl imat e Control, Removal andInst all at ion).
3.
Di sconnect t he heat ed front s creen elect rical connect ors , if i ns t alled.4.
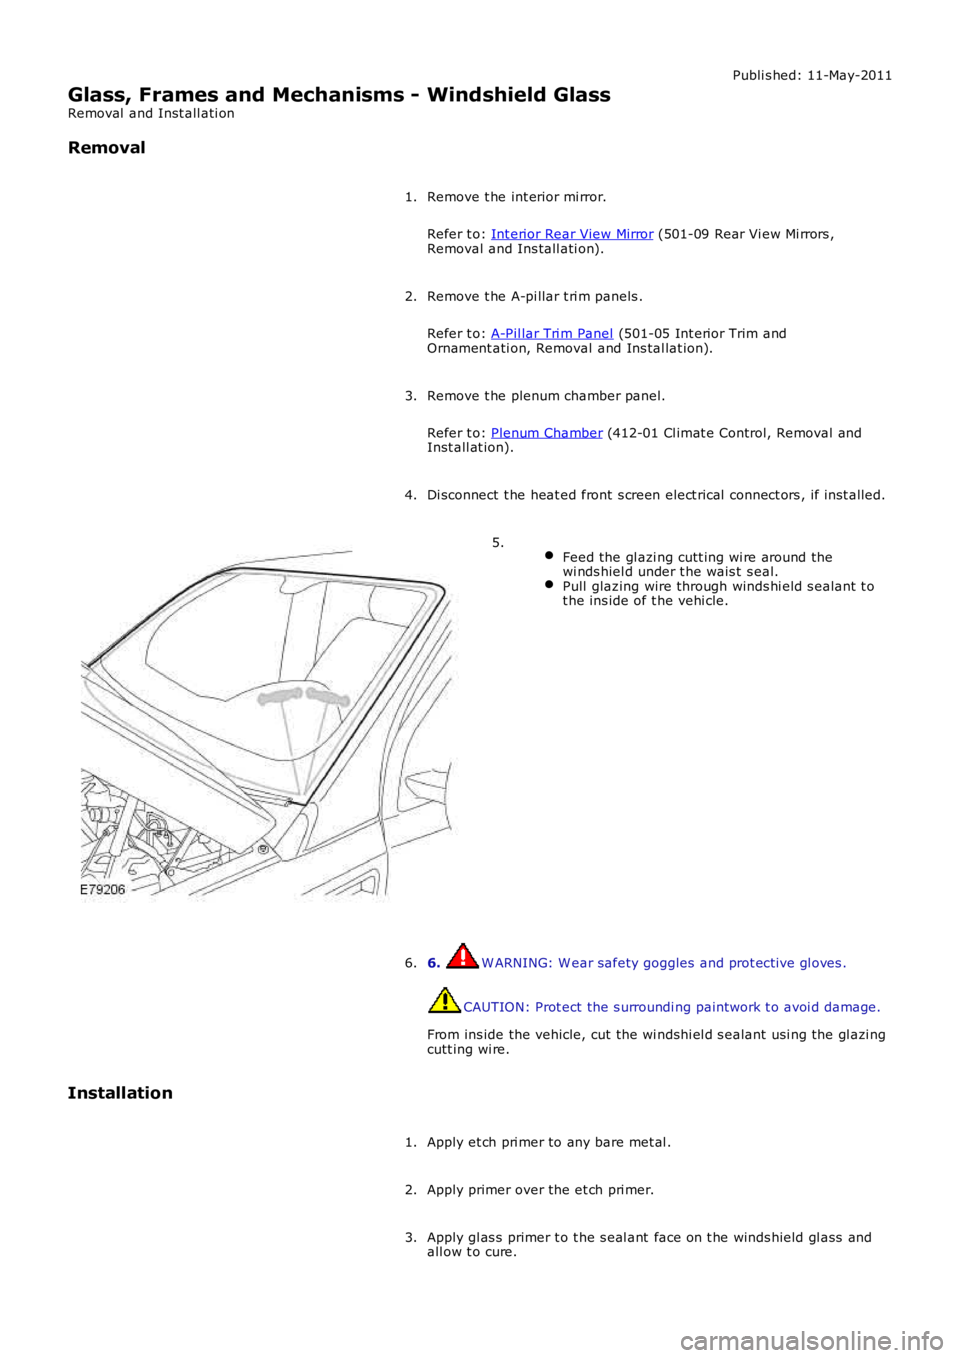
Feed the gl azi ng cutt ing wi re around thewi nds hiel d under t he wais t s eal.Pull glazing wire through winds hi eld s ealant t ot he ins ide of t he vehi cle.
5.
6. W ARNING: W ear safety goggles and prot ecti ve gl oves .
CAUTION: Prot ect the s urroundi ng paintwork t o avoi d damage.
From ins ide the vehicle, cut the wi ndshi el d s ealant usi ng the gl azi ngcutt ing wi re.
6.
Installation
Apply et ch pri mer to any bare met al .1.
Apply primer over the et ch pri mer.2.
Apply gl as s primer t o t he s eal ant face on t he winds hield gl ass andall ow t o cure.3.
Page 2248 of 3229
Apply acti vat or over t he old sealant on t he wi nds hiel d glas s andall ow t o cure.4.
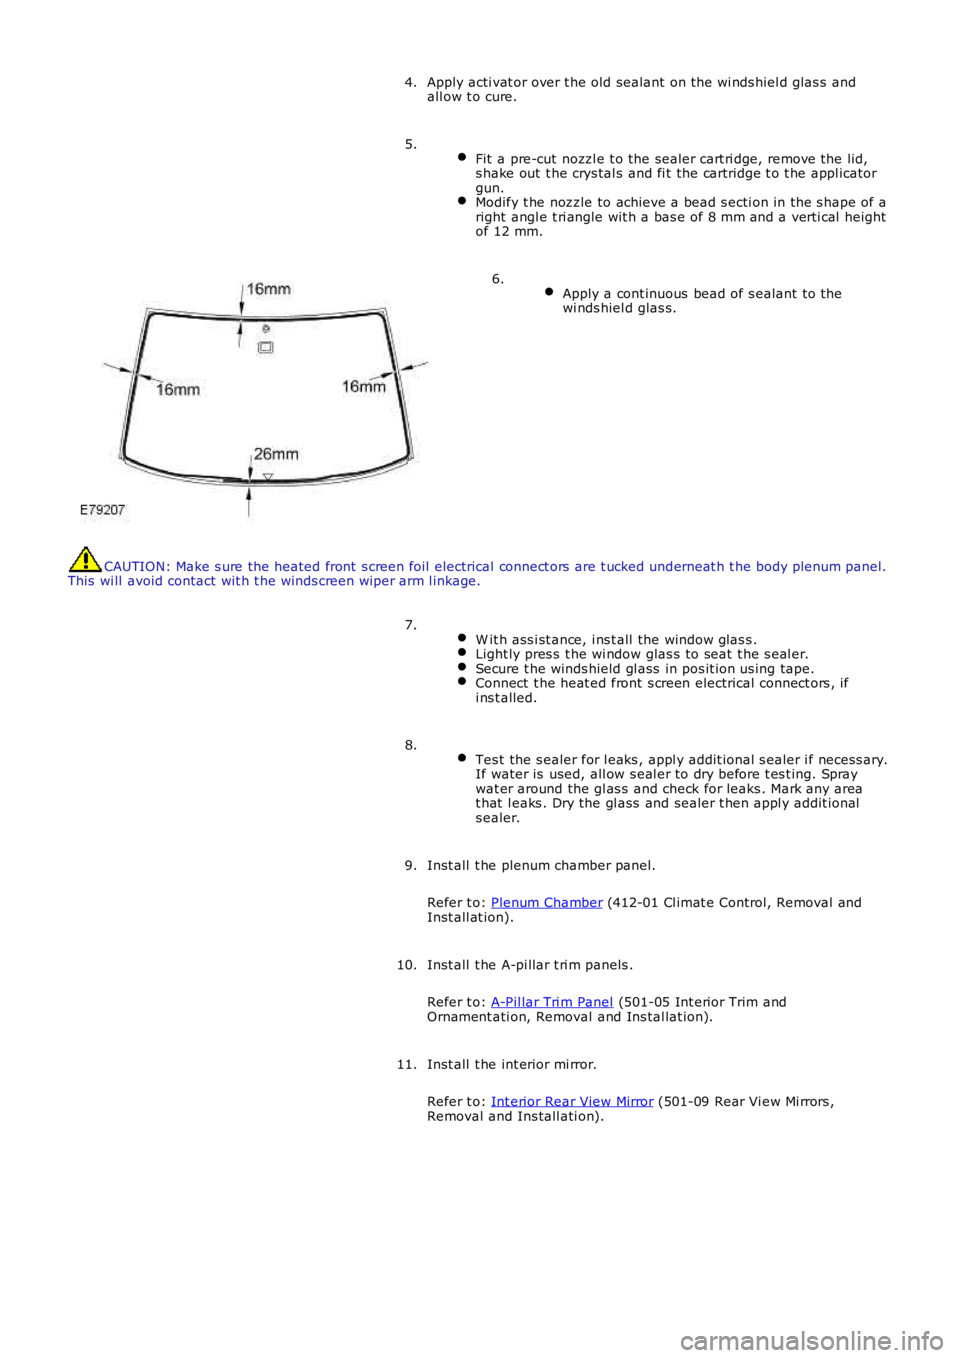
Fit a pre-cut nozzl e t o the sealer cart ri dge, remove the lid,s hake out t he crys tal s and fi t the cartridge t o t he appl icatorgun.Modify t he nozzle to achieve a bead s ecti on in the s hape of aright angl e t ri angle wit h a bas e of 8 mm and a verti cal heightof 12 mm.
5.
Apply a cont inuous bead of s ealant to thewi nds hiel d glas s.
6.
CAUTION: Make s ure the heated front s creen foil electrical connect ors are t ucked underneat h t he body plenum panel.This wi ll avoid contact wit h t he winds creen wi per arm l inkage.
W it h ass i st ance, i ns t all the window glas s .Light ly pres s t he wi ndow glas s to seat t he s eal er.Secure t he winds hield gl ass in pos it ion us ing tape.Connect t he heat ed front s creen electrical connect ors , ifi ns t alled.
7.
Tes t the s ealer for l eaks , appl y addit ional s ealer i f necess ary.If water is used, all ow s eal er to dry before t es t ing. Spraywat er around the gl as s and check for leaks . Mark any areat hat l eaks . Dry the gl ass and sealer t hen appl y addit ionals ealer.
8.
Inst all t he plenum chamber panel.
Refer t o: Plenum Chamber (412-01 Cl imat e Control, Removal andInst all at ion).
9.
Inst all t he A-pi llar t ri m panels .
Refer t o: A-Pil lar Tri m Panel (501-05 Int erior Trim andOrnament ati on, Removal and Ins tal lat ion).
10.
Inst all t he int erior mi rror.
Refer t o: Int erior Rear View Mirror (501-09 Rear Vi ew Mi rrors ,Removal and Ins tall ati on).
11.
Page 2249 of 3229
Publi s hed: 11-May-2011
Glass, Frames and Mechanisms - Front Door Window Regulator and Motor
Removal and Inst all ati on
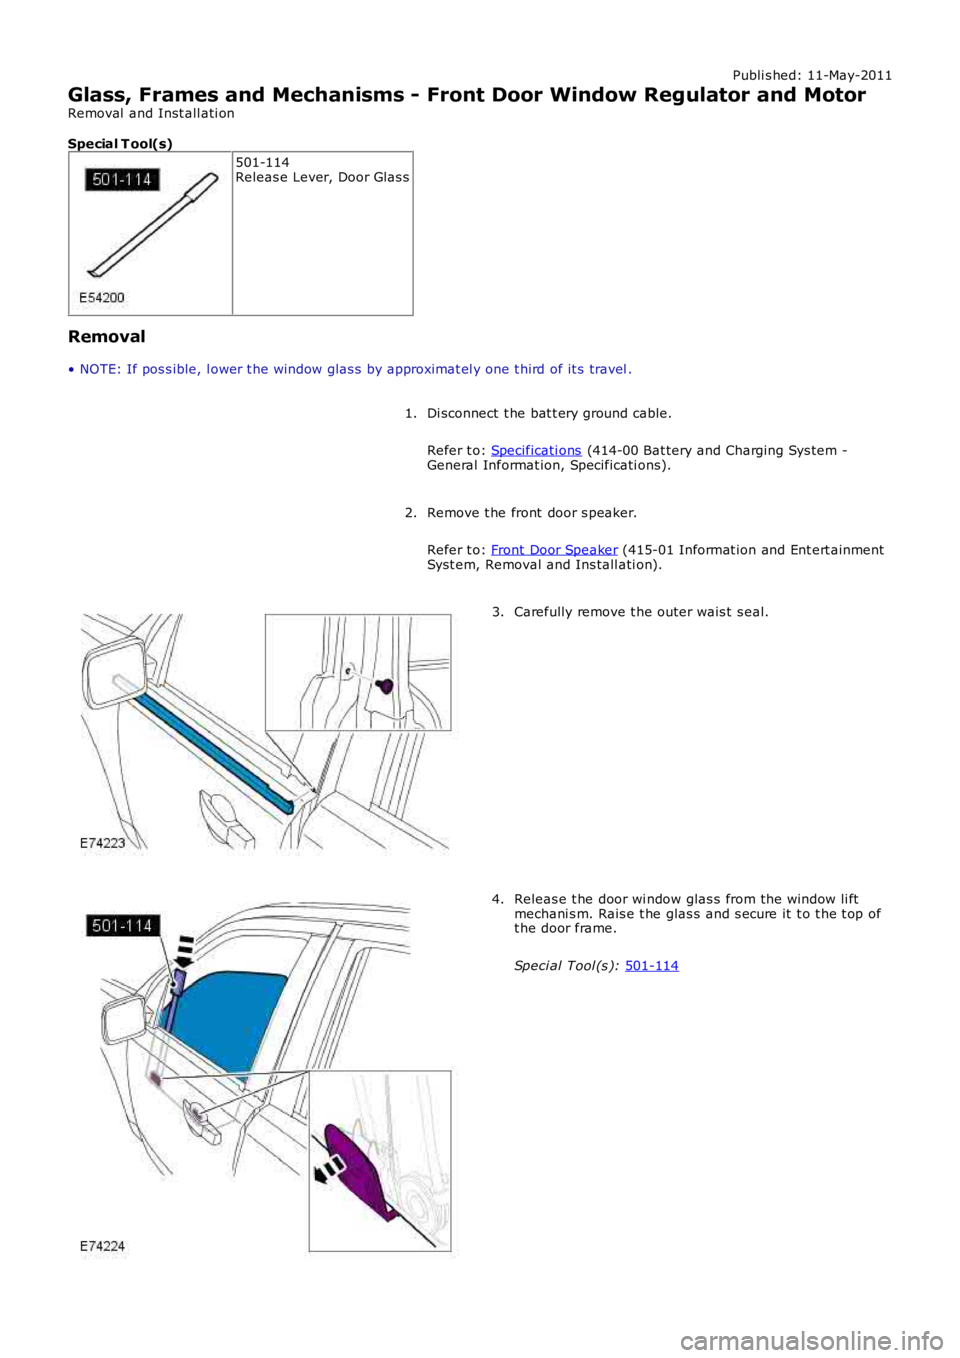
Special T ool(s) 501-114
Releas e Lever, Door Glas s
Removal
• NOTE: If pos s ible, l ower t he wi ndow glas s by approximat el y one t hird of it s travel .
Di sconnect t he bat t ery ground cable.
Refer t o: Specificati ons (414-00 Bat tery and Charging Sys tem -
General Informat ion, Specificati ons).
1.
Remove t he front door s peaker.
Refer t o: Front Door Speaker (415-01 Informat ion and Ent ert ainment
Syst em, Removal and Ins tall ati on).
2. Carefully remove t he outer wais t s eal.
3. Releas e t he door wi ndow glas s from the wi ndow li ft
mechani s m. Rais e t he glas s and s ecure it t o t he t op of
t he door frame.
Speci al Tool (s ): 501-114 4.
Page 2250 of 3229
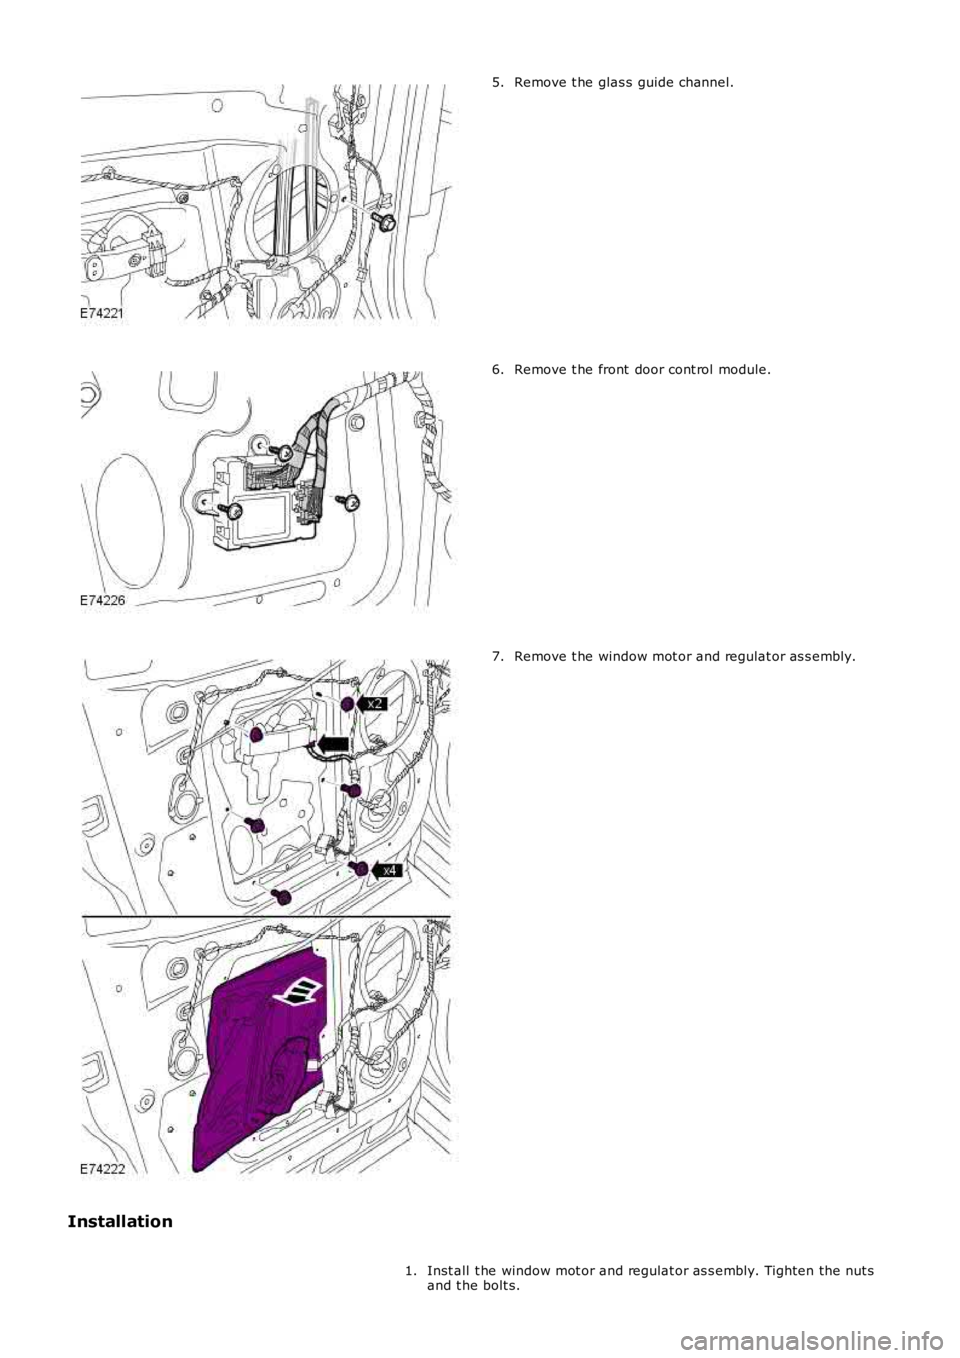
Remove t he glas s guide channel.5.
Remove t he front door cont rol module.6.
Remove t he window mot or and regulat or as s embly.7.
Installation
Inst all t he window mot or and regulat or as s embly. Tighten the nut sand t he bolt s.1.