LAND ROVER FRELANDER 2 2006 Repair Manual
Manufacturer: LAND ROVER, Model Year: 2006, Model line: FRELANDER 2, Model: LAND ROVER FRELANDER 2 2006Pages: 3229, PDF Size: 78.5 MB
Page 2621 of 3229
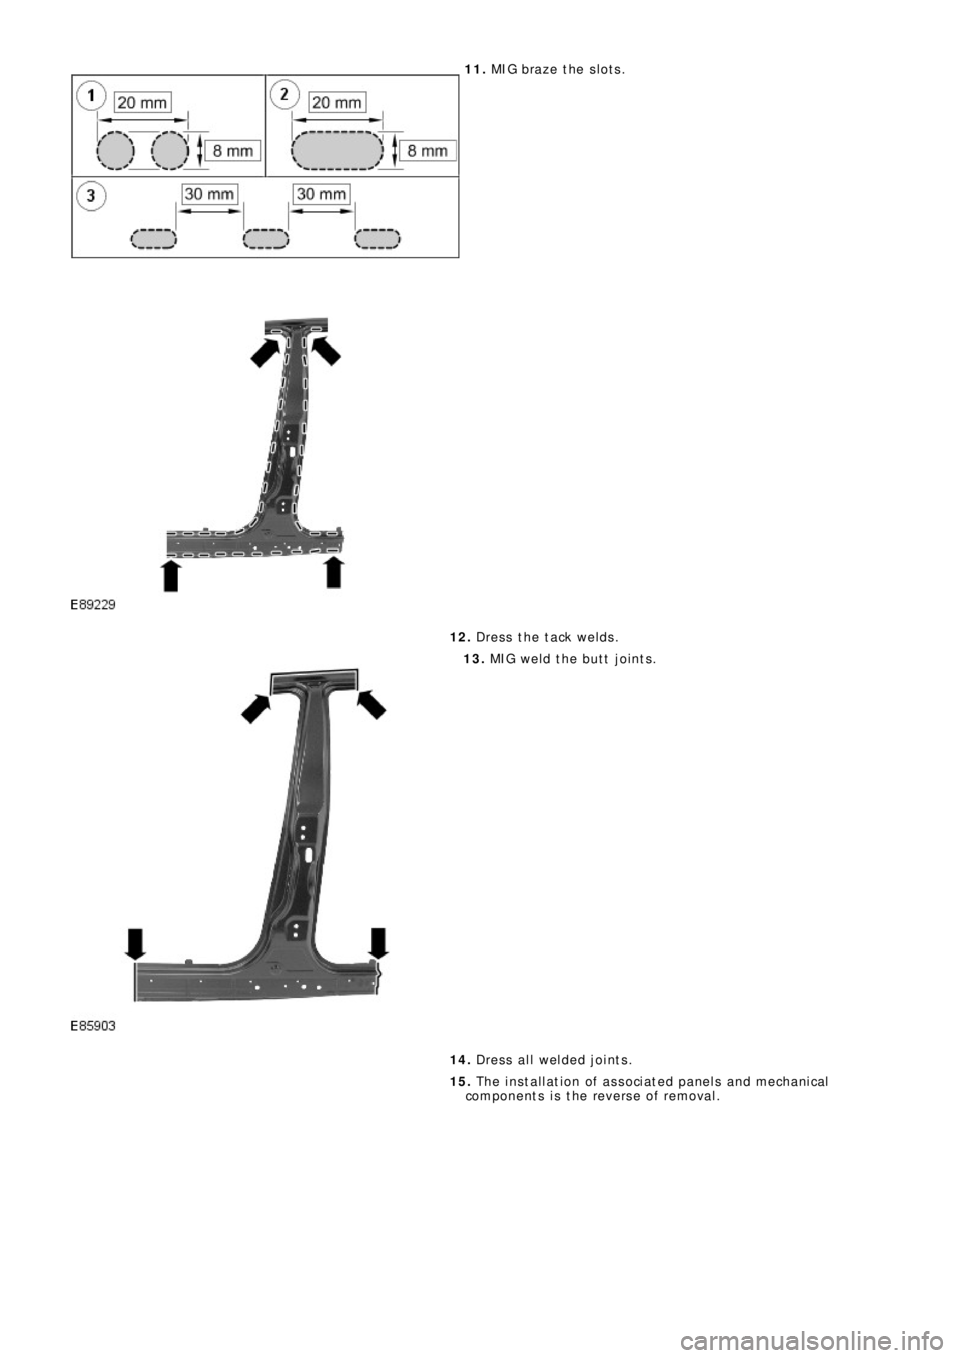
11. MIG braze the slots.
12. Dress the tack welds.
13. MIG weld the butt joints.
14. Dress all welded joints.
15. The installation of associated panels and mechanical
components is the reverse of removal.
Page 2622 of 3229
Publ is hed: 11-May-2011
Side Panel Sheet Metal Repairs - B-Pillar Reinforcement
Removal and Installation
Removal
• CAUTIONS:
The B-Pillar reinforcement is BH300, (Bake Hardened steel). It must be MIG plug welded to the B-Pillar inner, the
ro cke r p a ne l i nne r re i nf o rce me nt a nd t he ca nt ra i l re i nf o rce me nt . Spot we lds must not be use d.
Ensure that all welded joints are suitably sealed and waterproofed, particularly in the areas where the original panel
adhesive / sealer cannot be replicated. W here necessary, seal the joints prior to the fitment of outer panels.
• NOTE: The B-Pillar reinforcement is unpicked from the side panel reinforcement, 'ring-frame', it is not serviced
separately.
• NOTE: There is a NVH element located between the B-Pillar reinforcement and the B-Pillar inner.
1. The B-Pillar reinforcement is replaced in conjunction with:
Front door
Rear door
Headli ni ng
B-Pillar outer panel
2. Fo r a d d i t i o na l i nf o rma t i o n re l a t i ng t o t hi s re p a i r p ro ce d ure
please see the following:
Fo r a d d i t i o na l i nf o rma t i o n, re f e r t o : Body and Frame
(501-26
Body Repairs - Vehicle Specific Information and Tolerance
Checks, Description and Operation) /
St a nd a rd W o rks ho p P ra ct i ce s
(100-00 Ge ne ra l I nf o rma t i o n,
Description and Operation).
3. Remove the B-Pillar outer panel.
Fo r a d d i t i o na l i nf o rma t i o n, re f e r t o : B -P i l l a r O ut e r P a ne l
(501-29 Side Panel Sheet Metal Repairs, Removal and
Installation).
4. NOTE: It will be necessary to use a HSS spot weld drill bit
on the A-Pillar upper / cantrail and rocker panel areas.
• NOTE: Holes should be drilled through the B-Pillar
reinforcement and the B-Pillar inner panel at the door
apertures. This enables MIG plug welds to be installed through
the inner panel.
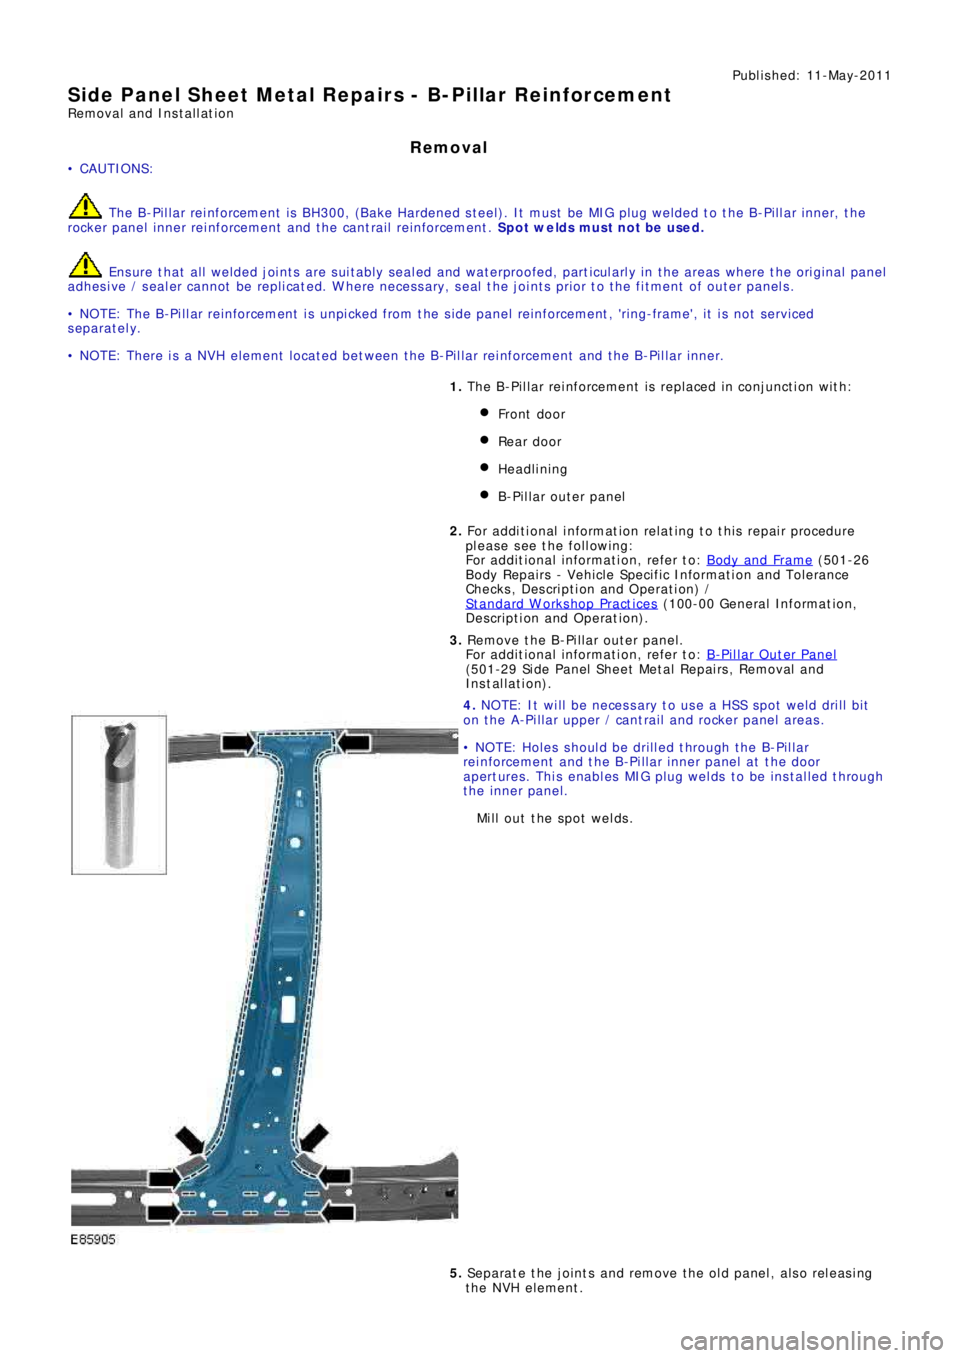
Mill out the spot welds.
5. Separate the joints and remove the old panel, also releasing
the NVH element.
Page 2623 of 3229
Installation
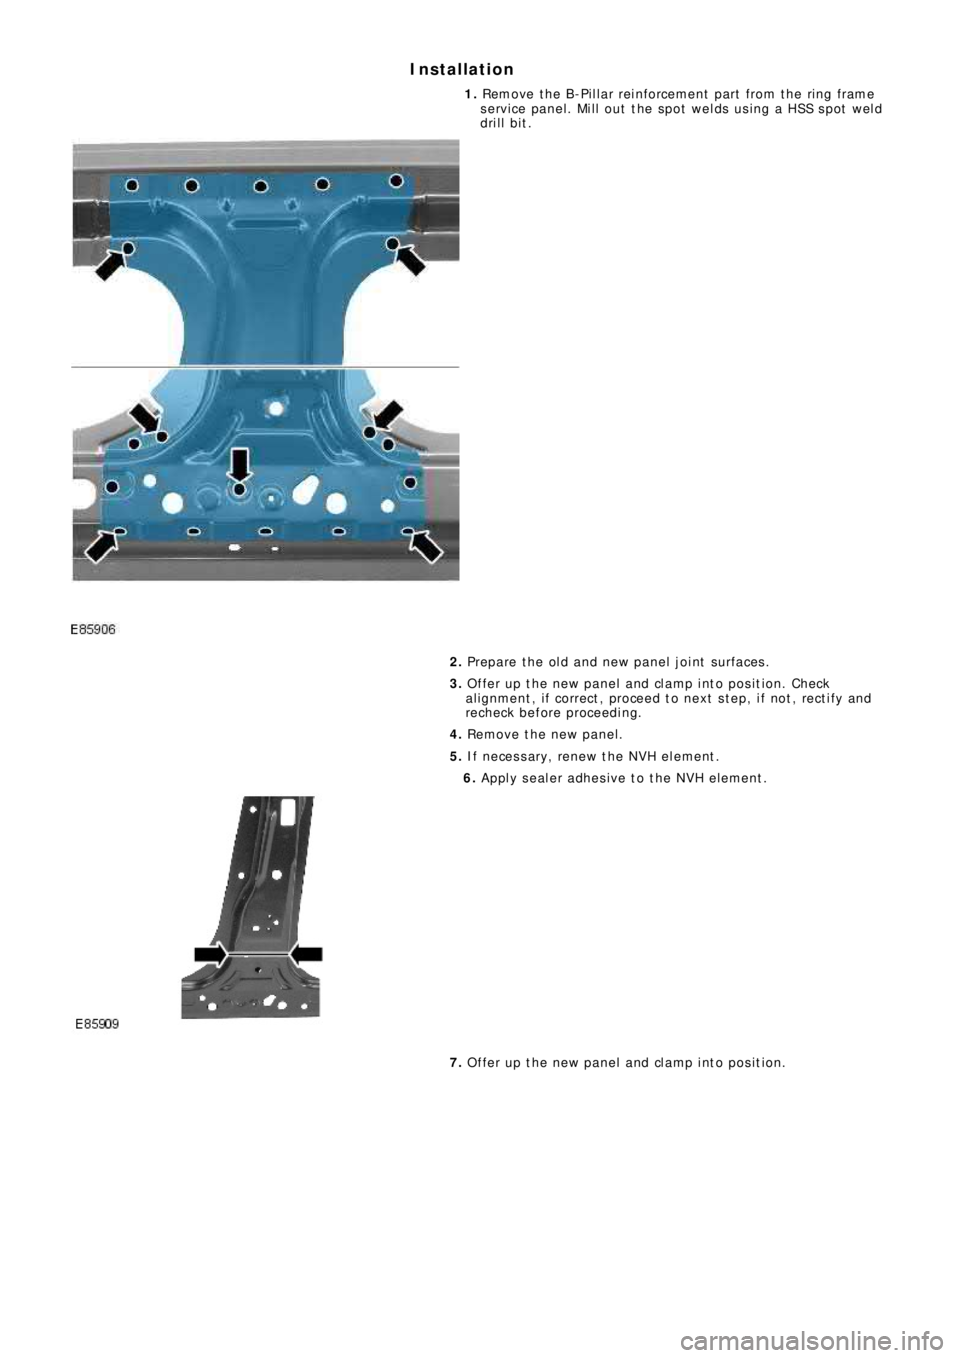
1. Remove the B-Pillar reinforcement part from the ring frame
service panel. Mill out the spot welds using a HSS spot weld
drill bit.
2. Prepare the old and new panel joint surfaces.
3. Offer up the new panel and clamp into position. Check
al ignment , i f correct , proceed t o next s t ep, i f not , rect i fy and
recheck before proceeding.
4. Remove the new panel.
5. If necessary, renew the NVH element.
6. Apply sealer adhesive to the NVH element.
7. Offer up the new panel and clamp into position.
Page 2624 of 3229
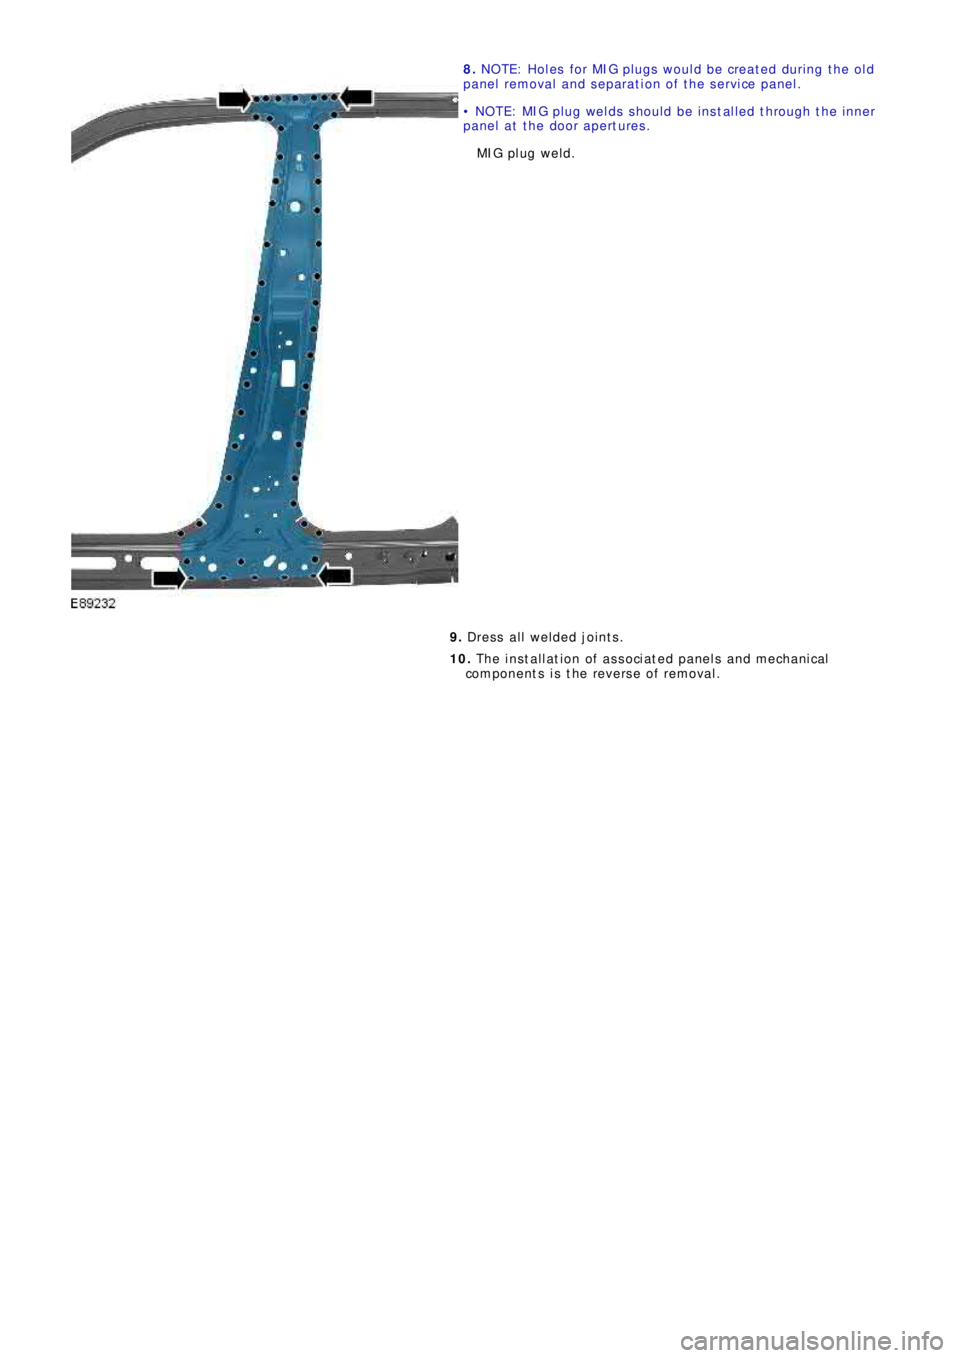
8. NOTE: Holes for MIG plugs would be created during the old
p a ne l re mo va l a nd s e p a ra t i o n o f t he s e rvi ce p a ne l .
• NOTE: MIG plug welds s hould be i ns t al led t hrough t he i nner
panel at the door apertures.
MI G pl ug we l d.
9. Dress all welded joints.
10. The installation of associated panels and mechanical
components is the reverse of removal.
Page 2625 of 3229
Publ is hed: 11-May-2011
Side Panel Sheet Metal Repairs - B-Pillar Inner Panel
Removal and Installation
Removal
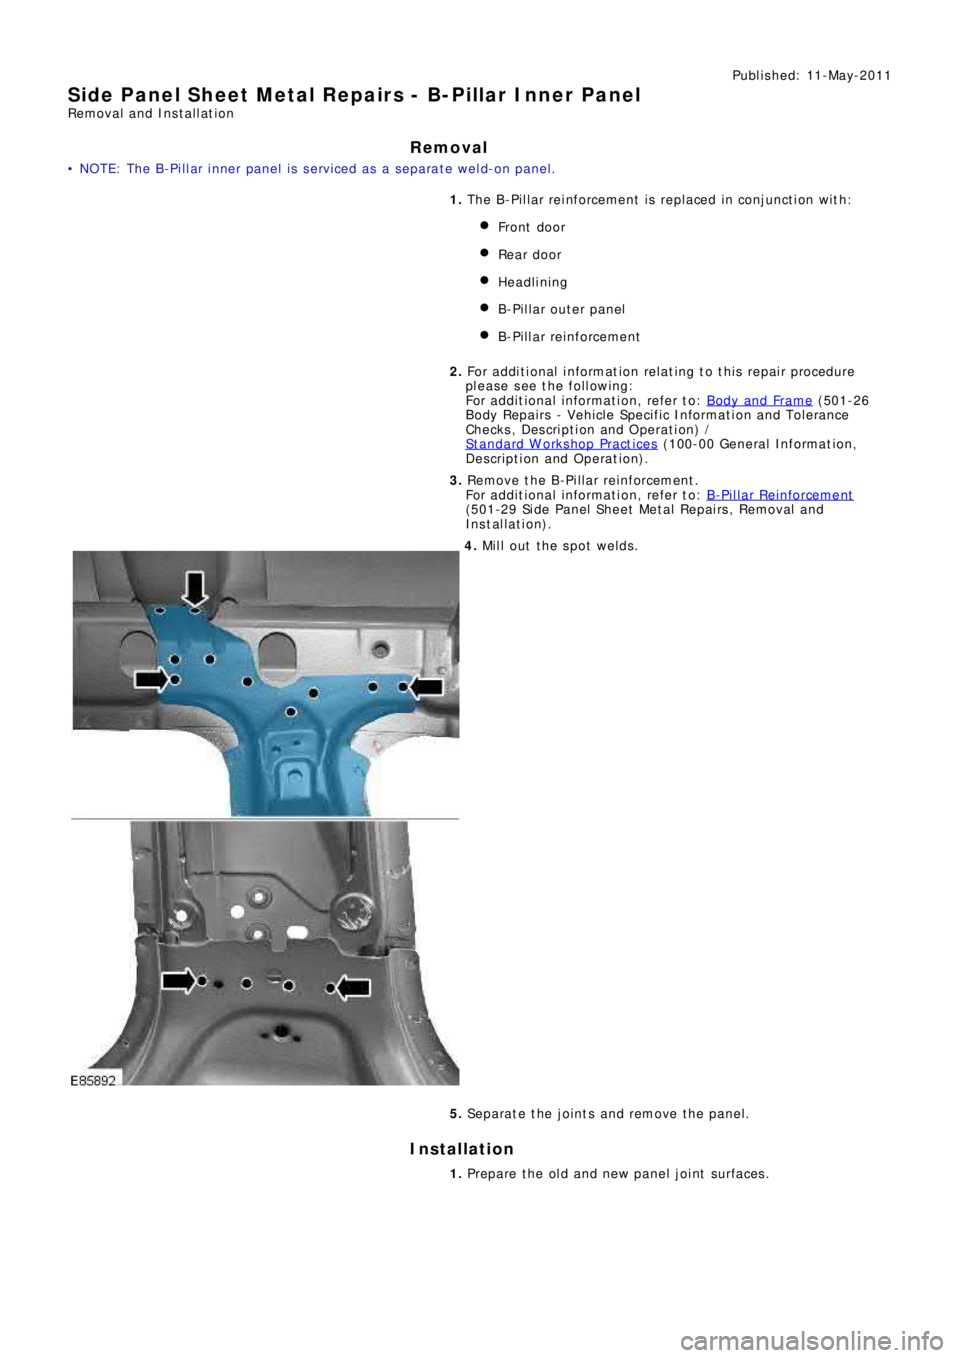
• NOTE: The B-Pillar inner panel is serviced as a separate weld-on panel.
1. The B-Pillar reinforcement is replaced in conjunction with:
Front door
Rear door
Headli ni ng
B-Pillar outer panel
B-Pillar reinforcement
2. Fo r a d d i t i o na l i nf o rma t i o n re l a t i ng t o t hi s re p a i r p ro ce d ure
please see the following:
Fo r a d d i t i o na l i nf o rma t i o n, re f e r t o : Body and Frame
(501-26
Body Repairs - Vehicle Specific Information and Tolerance
Checks, Description and Operation) /
St a nd a rd W o rks ho p P ra ct i ce s
(100-00 Ge ne ra l I nf o rma t i o n,
Description and Operation).
3. Remove the B-Pillar reinforcement.
Fo r a d d i t i o na l i nf o rma t i o n, re f e r t o : B-Pillar Reinforcement
(501-29 Side Panel Sheet Metal Repairs, Removal and
Installation).
4. Mill out the spot welds.
5. Separate the joints and remove the panel.
Installation
1. Prepare the old and new panel joint surfaces.
Page 2626 of 3229
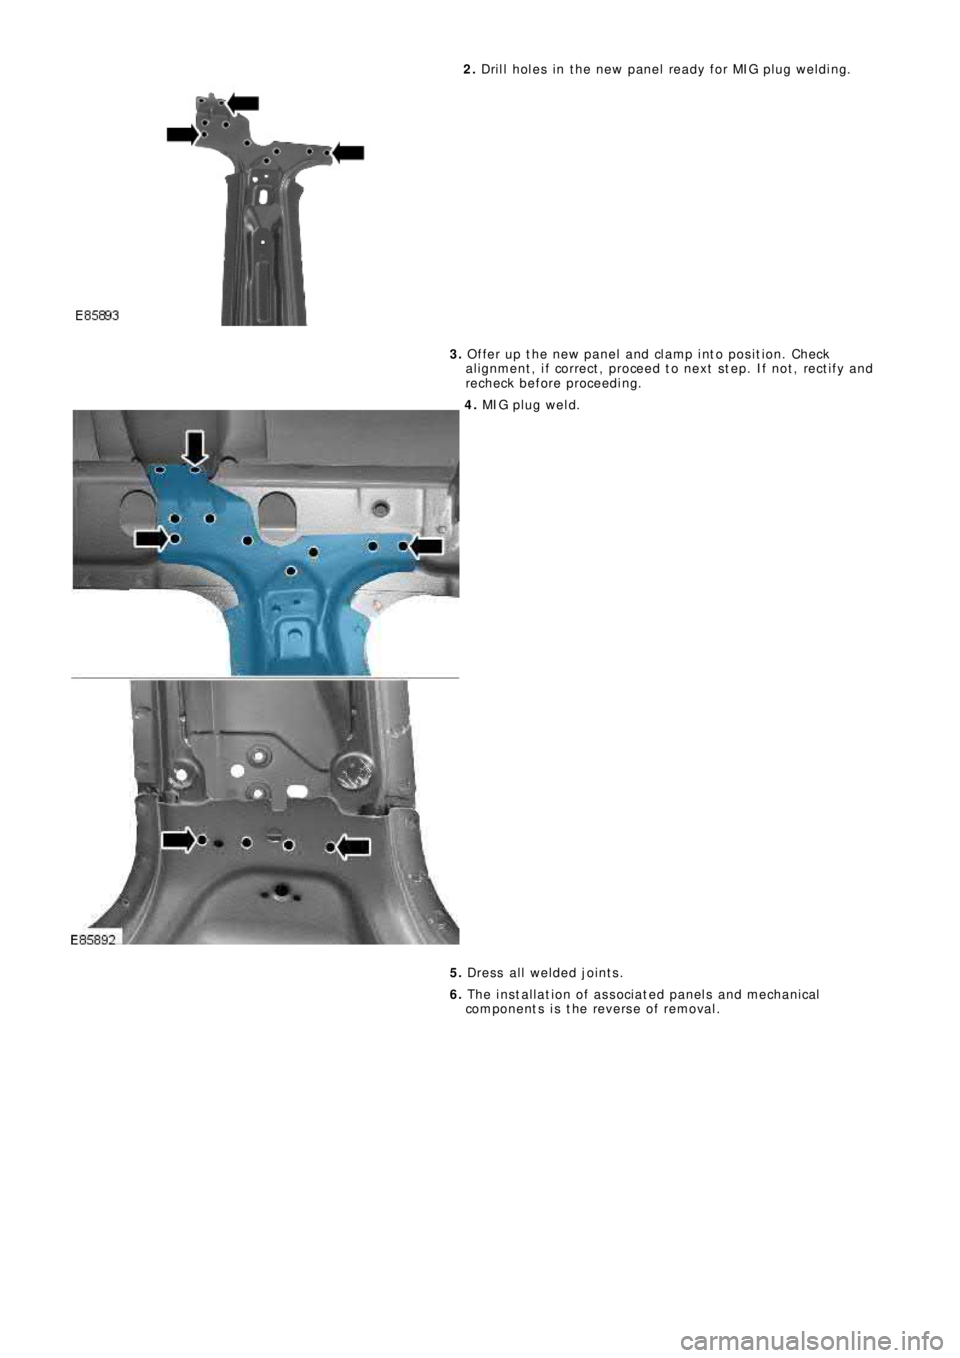
2. Drill holes in the new panel ready for MIG plug welding.
3. Offer up the new panel and clamp into position. Check
alignment, if correct, proceed to next step. If not, rectify and
recheck before proceeding.
4. MIG pl ug we l d.
5. Dress all welded joints.
6. The installation of associated panels and mechanical
components is the reverse of removal.
Page 2627 of 3229
Publ is hed: 11-May-2011
Side Panel Sheet Metal Repairs - Rocker Panel Inner Reinforcement
Removal and Installation
Removal
• CAUTIONS:
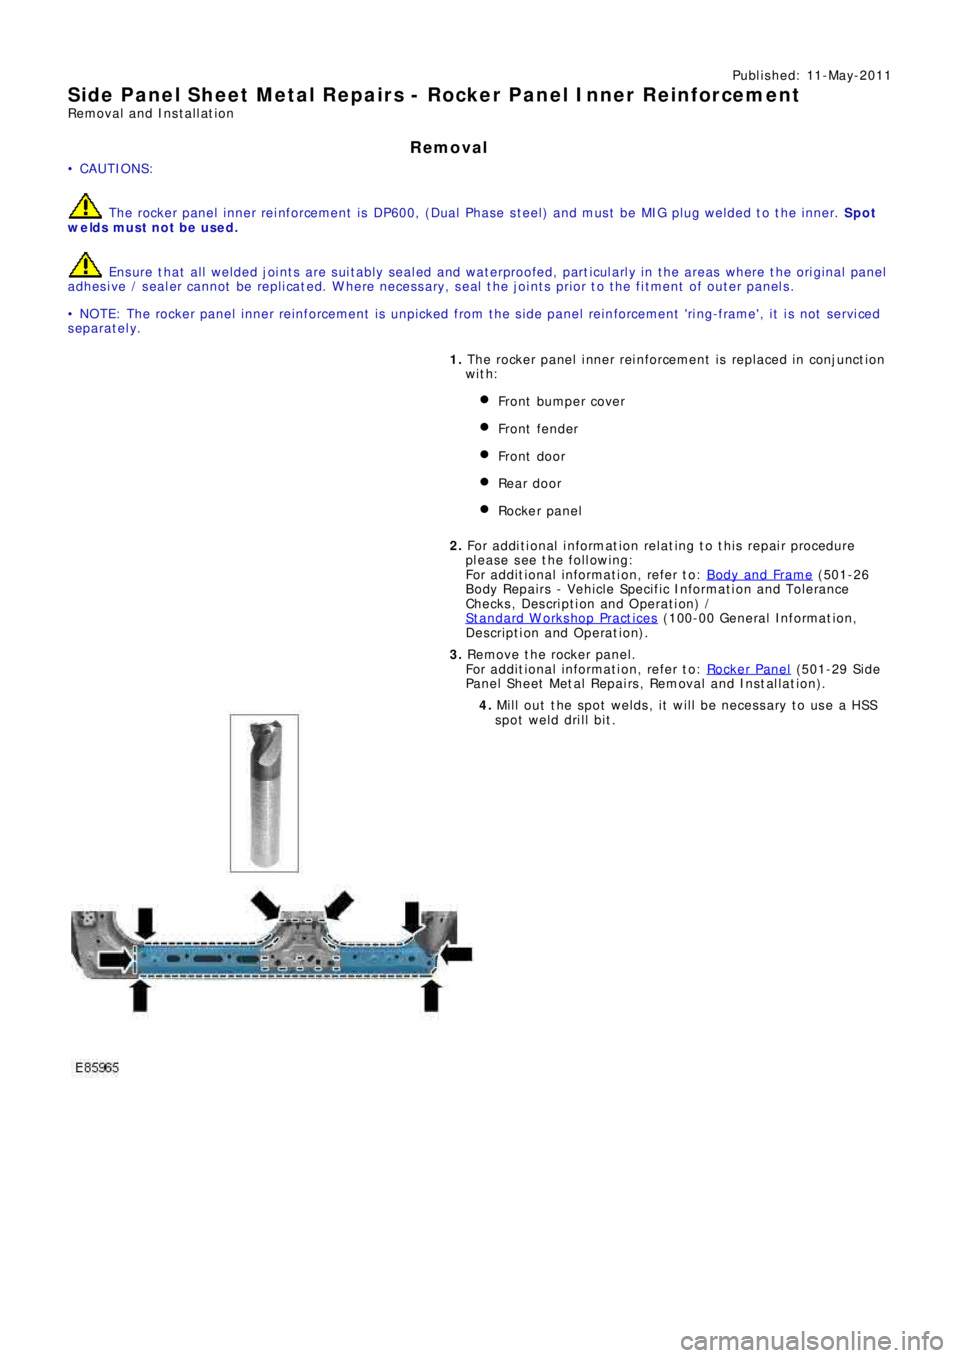
The rocker panel inner reinforcement is DP600, (Dual Phase steel) and must be MIG plug welded to the inner. Spot
we lds must not be used.
Ensure that all welded joints are suitably sealed and waterproofed, particularly in the areas where the original panel
adhesive / sealer cannot be replicated. W here necessary, seal the joints prior to the fitment of outer panels.
• NOTE: The rocker panel inner reinforcement is unpicked from the side panel reinforcement 'ring-frame', it is not serviced
separately.
1. T he ro cke r p a ne l i nne r re i nf o rce me nt i s re p l a ce d i n co nj unct i o n
with:
Front bumper cover
Front fender
Front door
Rear door
Rocker panel
2. Fo r a d d i t i o na l i nf o rma t i o n re l a t i ng t o t hi s re p a i r p ro ce d ure
please see the following:
Fo r a d d i t i o na l i nf o rma t i o n, re f e r t o : Body and Frame
(501-26
Body Repairs - Vehicle Specific Information and Tolerance
Checks, Description and Operation) /
St a nd a rd W o rks ho p P ra ct i ce s
(100-00 Ge ne ra l I nf o rma t i o n,
Description and Operation).
3. Remove the rocker panel.
Fo r a d d i t i o na l i nf o rma t i o n, re f e r t o : Rocker Panel
(501-29 Si de
Panel Sheet Metal Repairs, Removal and Installation).
4. Mill out the spot welds, it will be necessary to use a HSS
spot weld drill bit.
Page 2628 of 3229
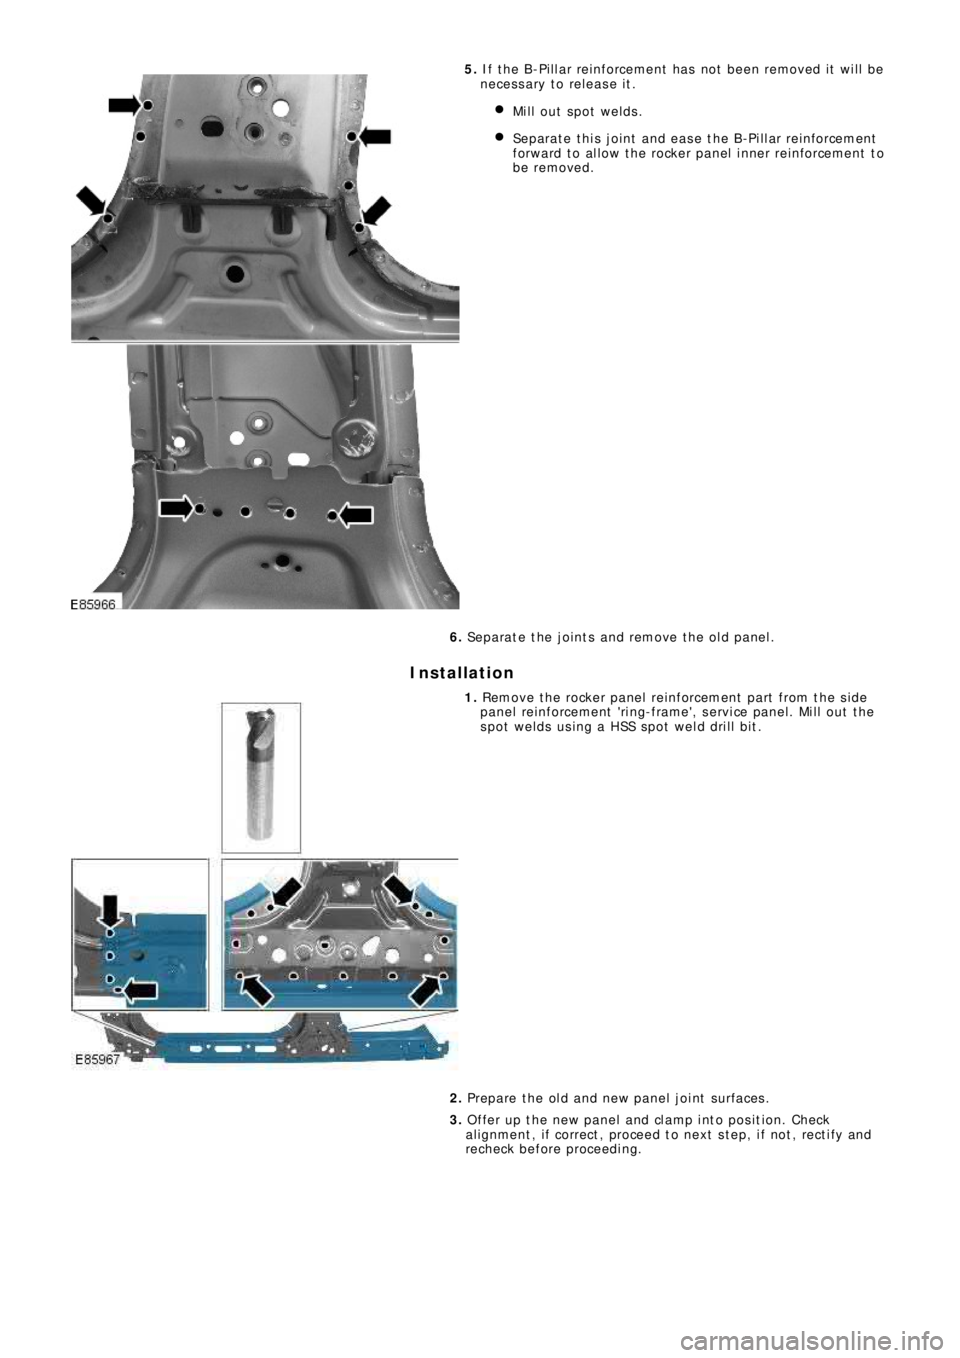
5. I f t he B-P i l l a r re i nf o rce me nt ha s no t b e e n re mo ve d i t w i l l b e
ne ce s s a ry t o re l e a s e i t .
Mill out spot welds.
Separate this joint and ease the B-Pillar reinforcement
f o rw a rd t o a l l o w t he ro cke r p a ne l i nne r re i nf o rce me nt t o
be removed.
6. Separate the joints and remove the old panel.
Installation
1. Remove the rocker panel reinforcement part from the side
panel reinforcement 'ring-frame', service panel. Mill out the
spot welds using a HSS spot weld drill bit.
2. Prepare the old and new panel joint surfaces.
3. Offer up the new panel and clamp into position. Check
al ignment , i f correct , proceed t o next s t ep, i f not , rect i fy and
recheck before proceeding.
Page 2629 of 3229
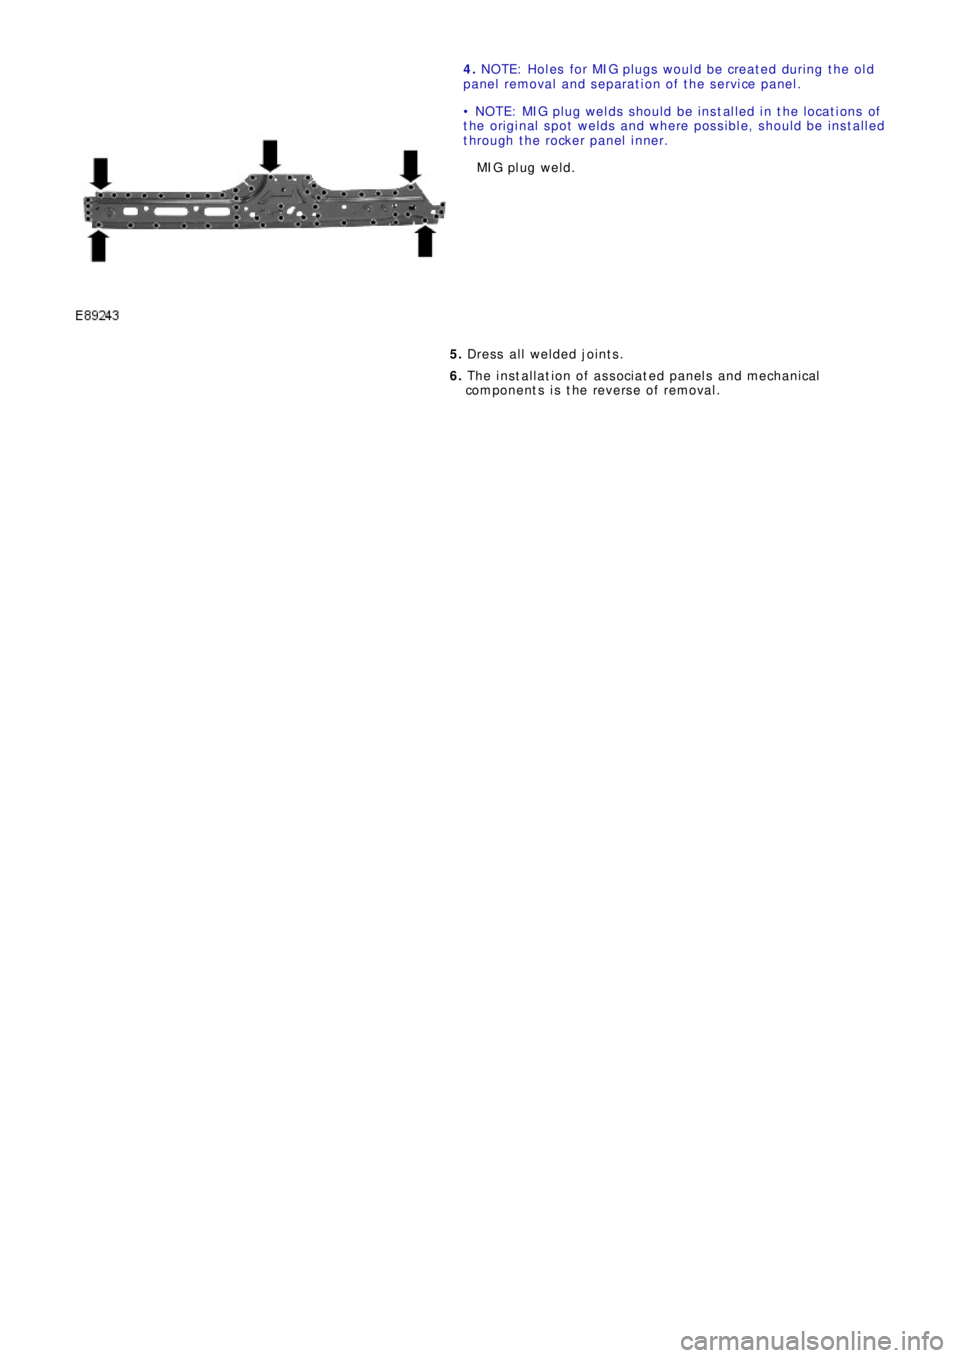
4. NOTE: Holes for MIG plugs would be created during the old
p a ne l re mo va l a nd s e p a ra t i o n o f t he s e rvi ce p a ne l .
• NOTE: MIG plug welds should be installed in the locations of
the original spot welds and where possible, should be installed
t hro ug h t he ro cke r p a ne l i nne r.
MI G pl ug we l d.
5. Dress all welded joints.
6. The installation of associated panels and mechanical
components is the reverse of removal.
Page 2630 of 3229
Publ is hed: 11-May-2011
Side Panel Sheet Metal Repairs - Rocker Panel
Removal and Installation
Removal
CAUTION: The rocker panel must be MIG slot brazed to the rocker panel inner reinforcement, which is DP600, (Dual
Phase steel). MIG plug we lds / spot w elds must not be use d.
• N O T E: T he ro cke r p a ne l i s s e rvi ce d a s a s e p a ra t e w e l d -o n p a ne l .
1. The rocker pane l i s repl ace d i n conjunct i on wi t h:
Front bumper cover
Front fender
Front door
Rear door
2. Fo r a d d i t i o na l i nf o rma t i o n re l a t i ng t o t hi s re p a i r p ro ce d ure
please see the following:
Fo r a d d i t i o na l i nf o rma t i o n, re f e r t o : Body and Frame
(501-26
Body Repairs - Vehicle Specific Information and Tolerance
Checks, Description and Operation) /
St a nd a rd W o rks ho p P ra ct i ce s
(100-00 Ge ne ra l I nf o rma t i o n,
Description and Operation).
3. Remove the fender.
4. Remove the front door.
Fo r a d d i t i o na l i nf o rma t i o n, re f e r t o : Front Door
(501-03 Body
Closures, Removal and Installation).
5. Remove the rear door.
Fo r a d d i t i o na l i nf o rma t i o n, re f e r t o : Rear Door
(501-03 Body
Closures, Removal and Installation).
6. Remove the front road wheel.
Fo r a d d i t i o na l i nf o rma t i o n, re f e r t o : Wheel and Tire
(204-04
Wheels and Tires, Removal and Installation).
7. Re mo ve t he re a r ro a d w he e l .
Fo r a d d i t i o na l i nf o rma t i o n, re f e r t o : Wheel and Tire
(204-04
Wheels and Tires, Removal and Installation).
8. LH side: Remove the hood release handle.
9. Remove the front seat.
Fo r a d d i t i o na l i nf o rma t i o n, re f e r t o : Front Seat
(501-10
Seating, Removal and Installation).
10. Remove the floor console.
Fo r a d d i t i o na l i nf o rma t i o n, re f e r t o : Floor Console
(501-12
Instrument Panel and Console, Removal and Installation).
11. Remove the front door aperture weatherseal.
12. Remove the rear door aperture weatherseal.
13. Remove the cowl side trim panel.
Fo r a d d i t i o na l i nf o rma t i o n, re f e r t o : Cowl Side Trim Panel
(501-05 Int eri or Trim and Ornament at i on, Removal and
Installation).
14. Re mo ve t he B -P i l l a r up p e r t ri m.
Fo r a d d i t i o na l i nf o rma t i o n, re f e r t o : B-Pillar Upper Trim Panel
(501-05 Int eri or Trim and Ornament at i on, Removal and
Installation).
15. Remove the RH & LH B-Pillar lower trims.
Fo r a d d i t i o na l i nf o rma t i o n, re f e r t o : B-Pillar Lower Trim Panel
(501-05 Int eri or Trim and Ornament at i on, Removal and
Installation).
16. Remove the rear quarter trim panel.
Fo r a d d i t i o na l i nf o rma t i o n, re f e r t o : Rear Quarter Trim Panel
(501-05 Int eri or Trim and Ornament at i on, Removal and
Installation).
17. Remove the RH & LH rocker panel inner trims.
18. Remove the rocker panel outer moulding.
19. Remove the back panel inner trim.
20. Remove the rear seat cushion.
Fo r a d d i t i o na l i nf o rma t i o n, re f e r t o : Rear Seat Cushion
(501-10
Seating, Removal and Installation).
21. Remove the front safety belt retractor.