LAND ROVER FRELANDER 2 2006 Repair Manual
Manufacturer: LAND ROVER, Model Year: 2006, Model line: FRELANDER 2, Model: LAND ROVER FRELANDER 2 2006Pages: 3229, PDF Size: 78.5 MB
Page 2801 of 3229
81
Lighting
R
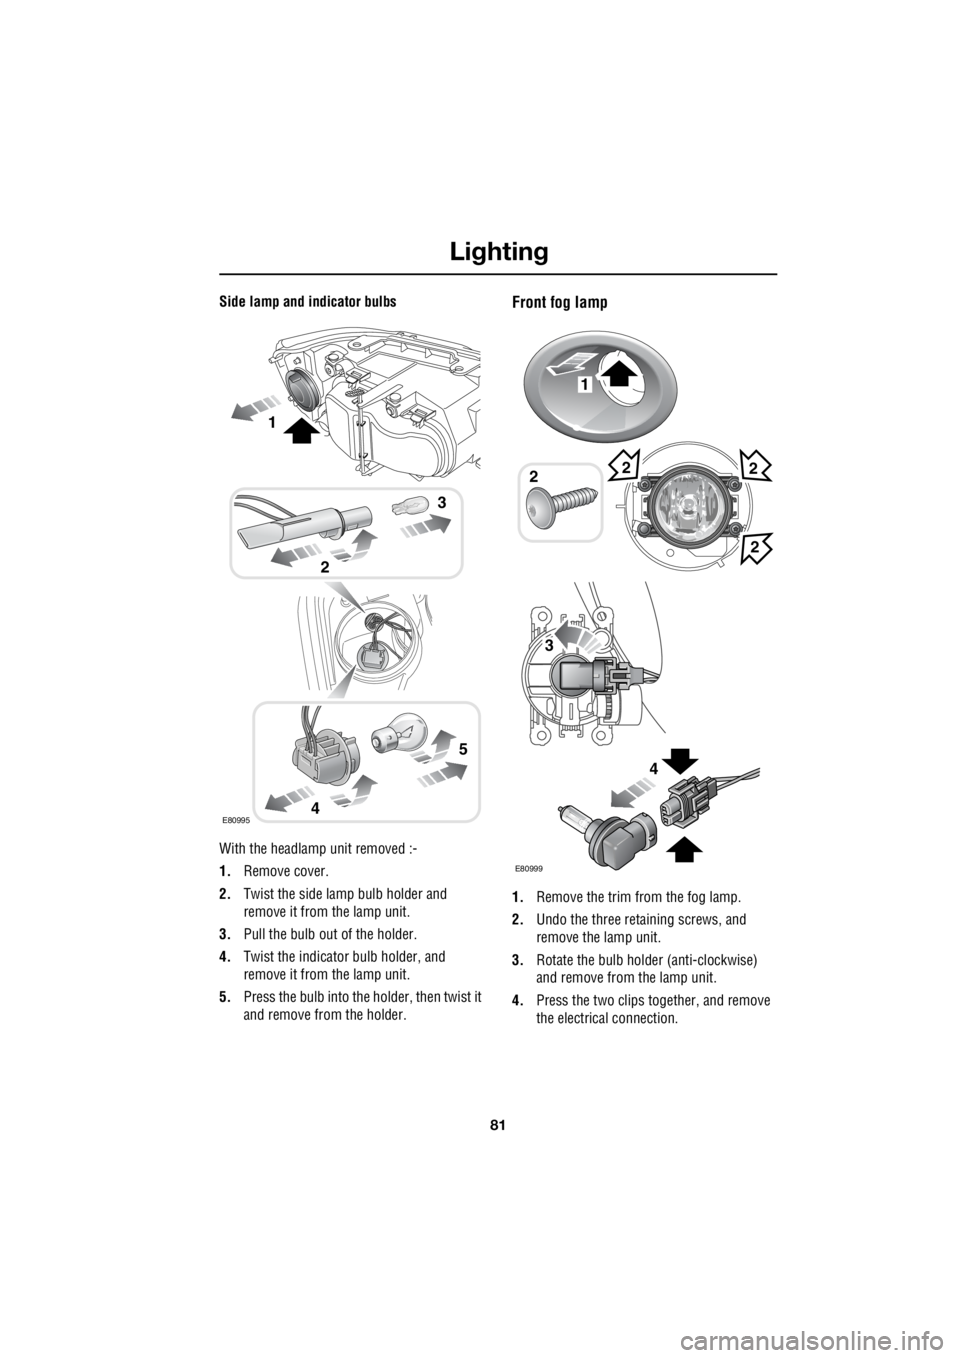
Side lamp and indicator bulbs
With the headlamp unit removed :-
1. Remove cover.
2. Twist the side lamp bulb holder and
remove it from the lamp unit.
3. Pull the bulb out of the holder.
4. Twist the indicato r bulb holder, and
remove it from the lamp unit.
5. Press the bulb into the holder, then twist it
and remove from the holder.Front fog lamp
1. Remove the trim from the fog lamp.
2. Undo the three retaining screws, and
remove the lamp unit.
3. Rotate the bulb holder (anti-clockwise)
and remove from the lamp unit.
4. Press the two clips together, and remove
the electrical connection.
E80995
2
3
4
5
1
1
22
2
E80999
2
3
4
Page 2802 of 3229
Lighting
82
L
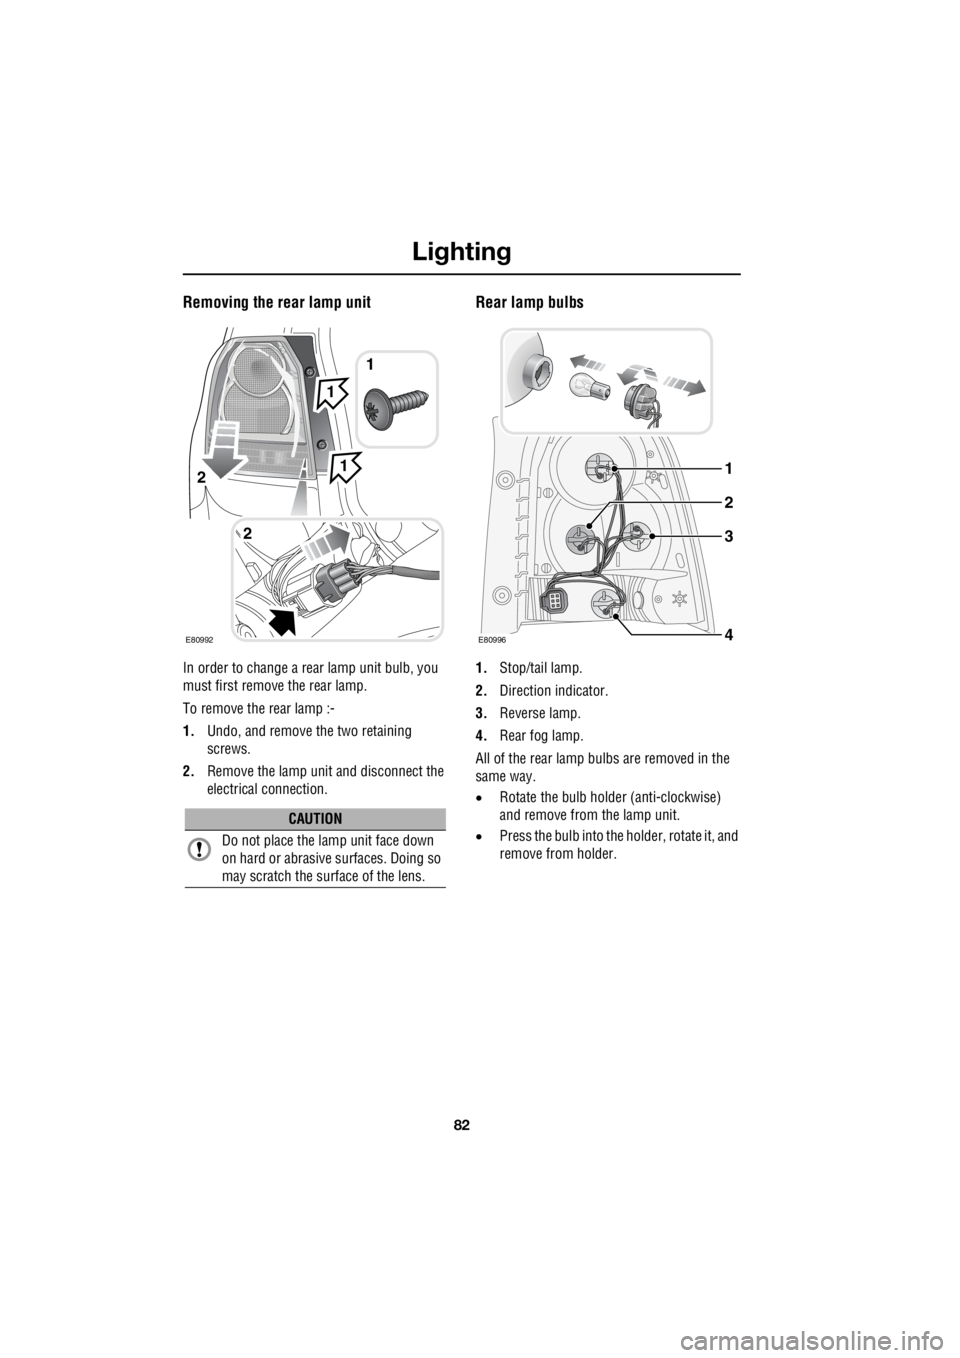
Removing the rear lamp unit
In order to change a re ar lamp unit bulb, you
must first remove the rear lamp.
To remove the rear lamp :-
1. Undo, and remove the two retaining
screws.
2. Remove the lamp unit and disconnect the
electrical connection.
Rear lamp bulbs
1. Stop/tail lamp.
2. Direction indicator.
3. Reverse lamp.
4. Rear fog lamp.
All of the rear lamp bulbs are removed in the
same way.
• Rotate the bulb holder (anti-clockwise)
and remove from the lamp unit.
• Press the bulb into the holder, rotate it, and
remove from holder.
CAUTION
Do not place the lamp unit face down
on hard or abrasive surfaces. Doing so
may scratch the surface of the lens.
2
1
E80992
2
1
1
E80996
1
3
2
4
Page 2803 of 3229
83
Lighting
R
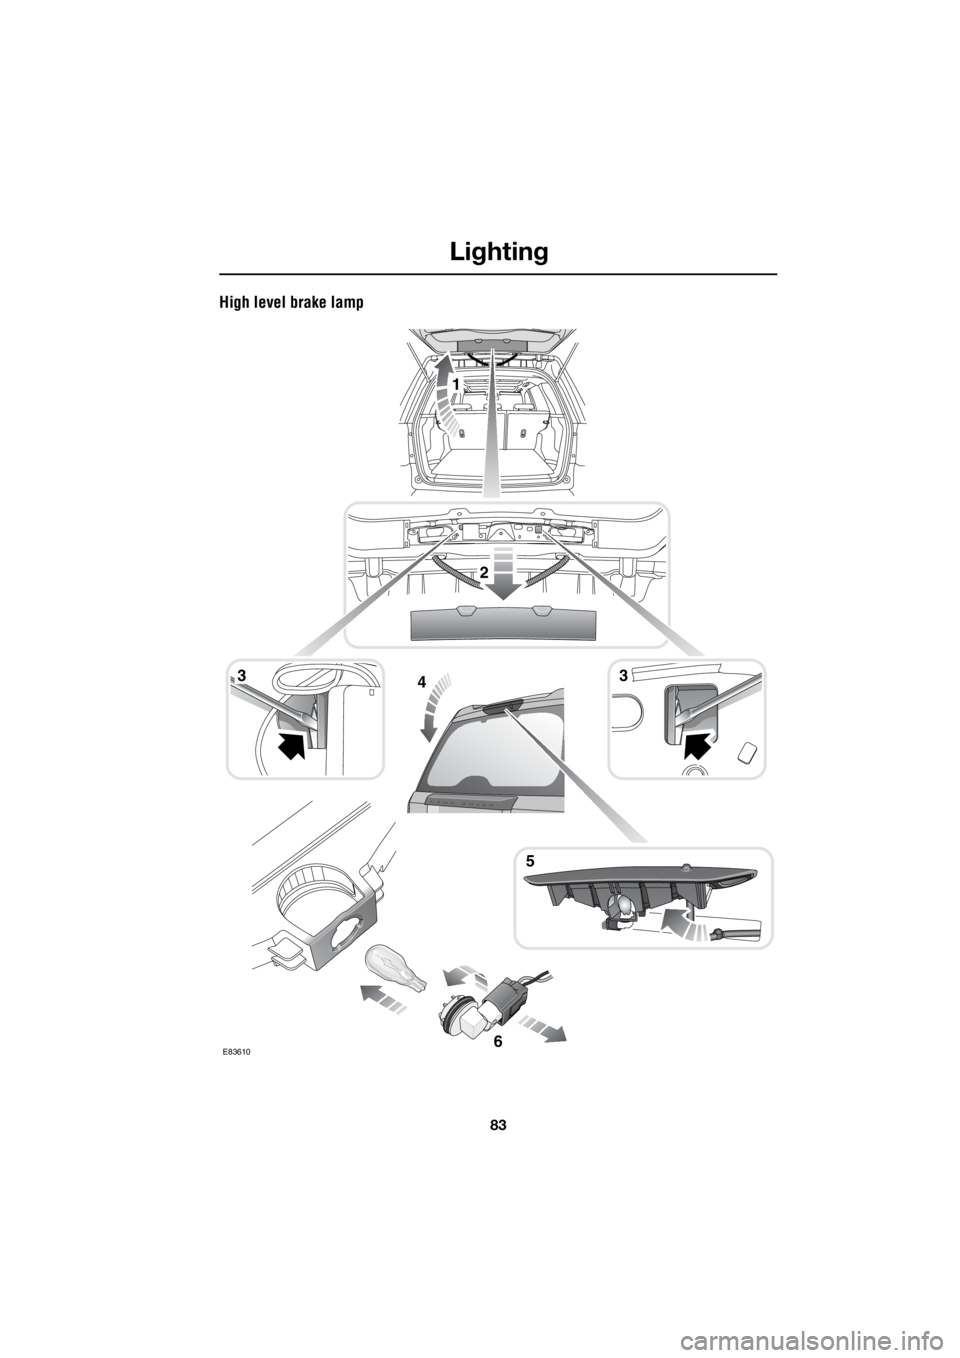
High level brake lamp
6
1
E83610
2
34
5
3
Page 2804 of 3229
Lighting
84
L
1. Open the tailgate.
2. Remove the interior trim cover.
3. Using a suitable implement, press in the
retaining clips.
4. Close the tailgate.
5. Remove the lamp unit from the tailgate.
6. Rotate the bulb holder and remove it from
the lamp unit, then pull the bulb out of the
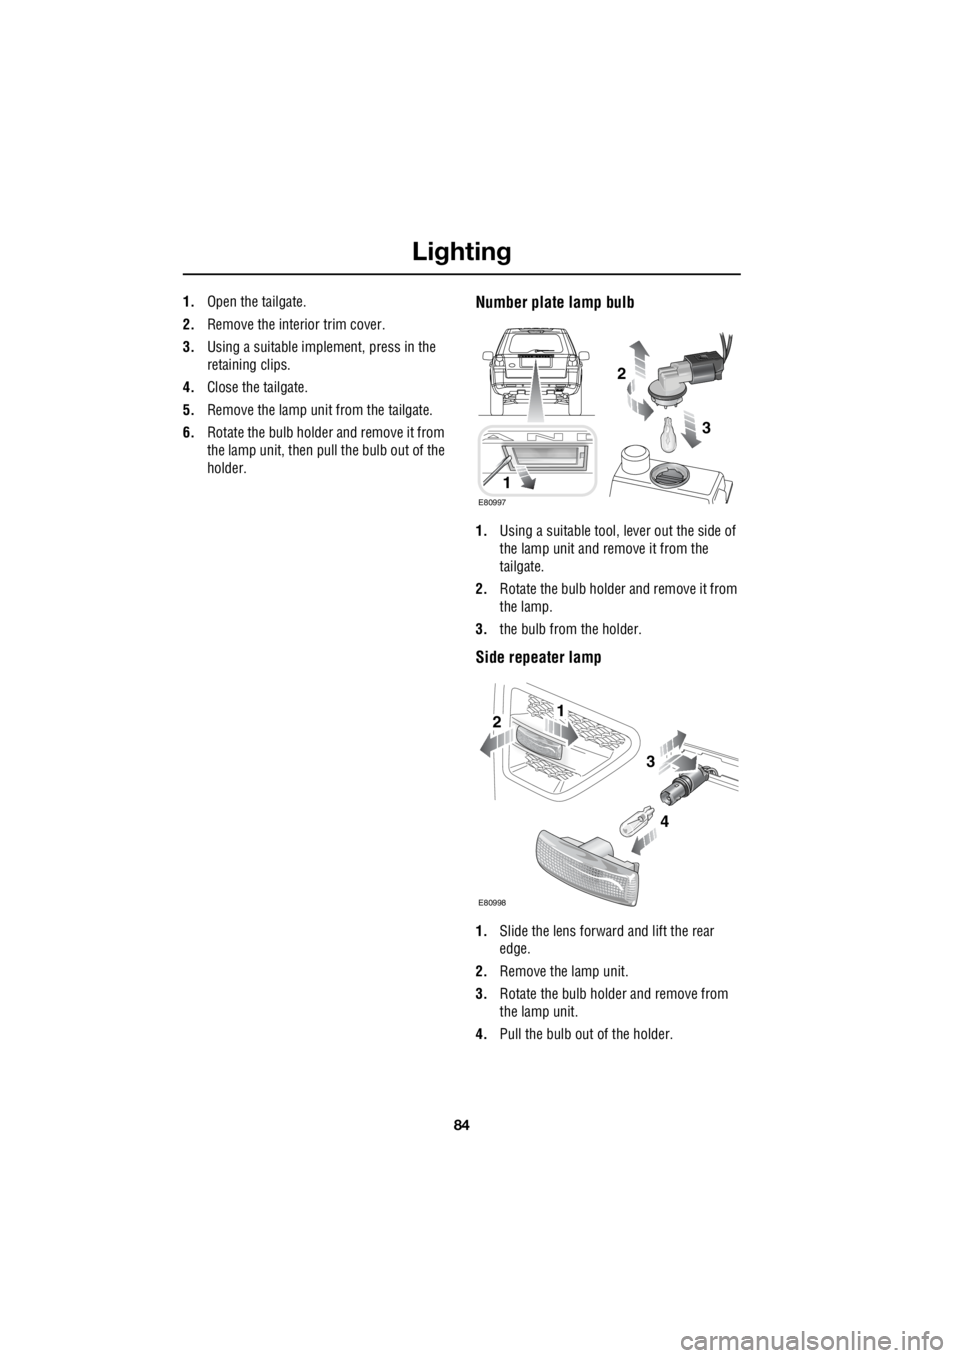
holder.Number plate lamp bulb
1. Using a suitable tool, lever out the side of
the lamp unit and remove it from the
tailgate.
2. Rotate the bulb holder and remove it from
the lamp.
3. the bulb from the holder.
Side repeater lamp
1.Slide the lens forward and lift the rear
edge.
2. Remove the lamp unit.
3. Rotate the bulb holder and remove from
the lamp unit.
4. Pull the bulb out of the holder.
1
E80997
2
3
1
E80998
2
3
4
Page 2805 of 3229
85
Lighting
R
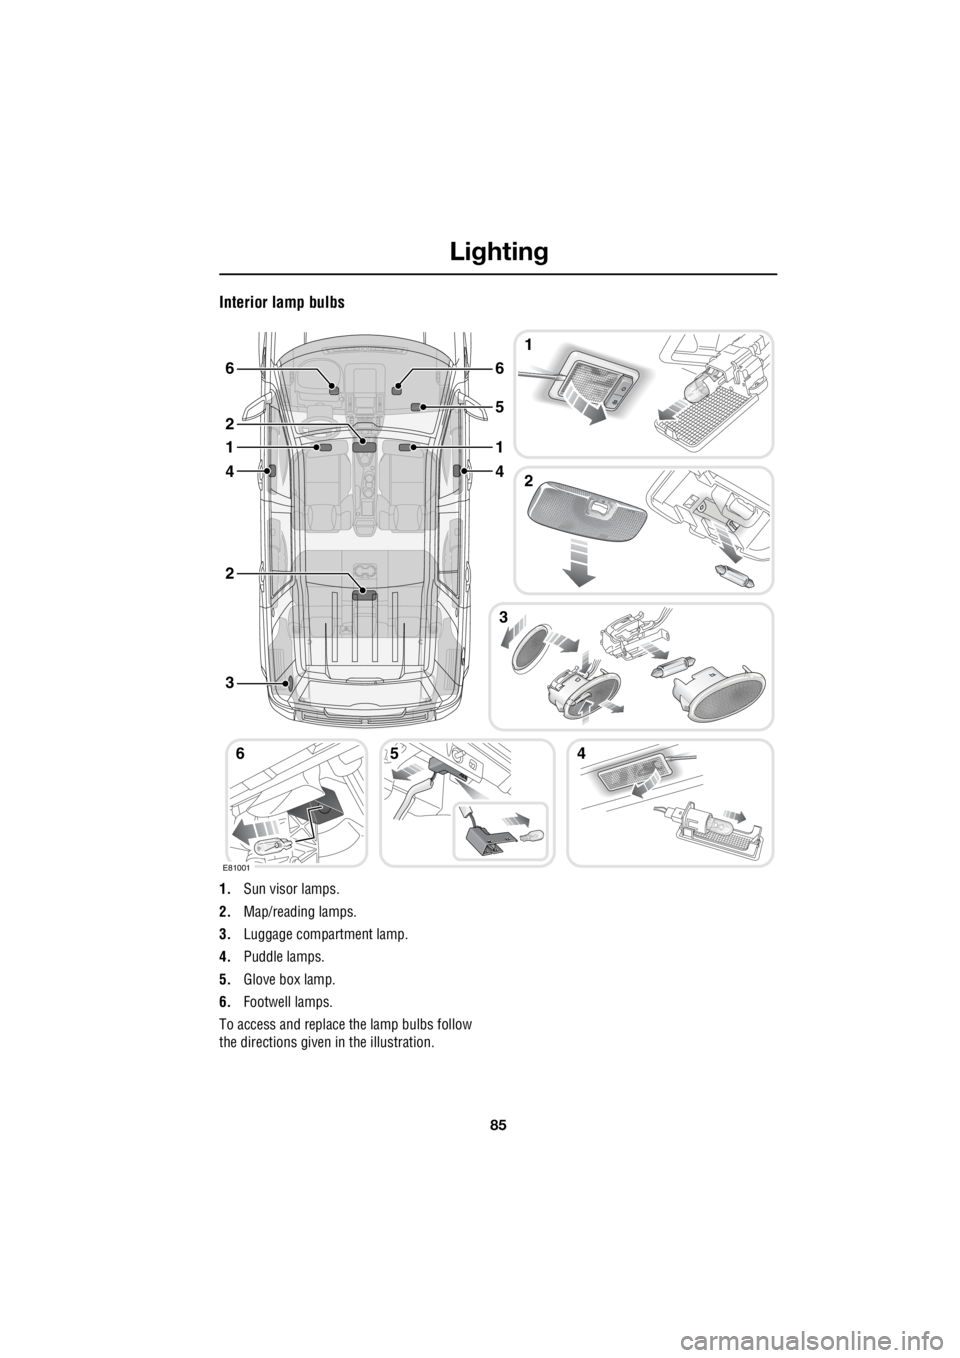
Interior lamp bulbs
1. Sun visor lamps.
2. Map/reading lamps.
3. Luggage compartment lamp.
4. Puddle lamps.
5. Glove box lamp.
6. Footwell lamps.
To access and replace the lamp bulbs follow
the directions given in the illustration.
1
3
2
3
456
2
4
1
2
6
4
1
5
6
E81001
Page 2806 of 3229

Lighting
86
L
BULB SPECIFICATION CHART
CAUTION
Before attempting to replace a bulb,
ensure that both the affected lamp, and
the vehicle's ignition, are turned off. If
the circuit is live a s hort circuit can occur
which may damage the vehicle's electrical
system.
Lamp Specification Power (Watts)
Halogen headlamp (Dip and Main beam). H7 55
Xenon headlamp (Dip and Main beam). D1S 35
Front side lamps. W5W 5
Front direction i ndicators. PY21W 21
Rear direction i ndicators. PY21W 21
Front fog lamps. H11 55
Side repeater lamps. W5W 5
Reverse lamps. P21W 21
Rear fog lamps. P21W 21 Stop/tail lamps. P21/5W 21/5
High mounted stop lamp W16W 16 Number plate lamps. W5W 5 Puddle lamps. W5W 5
Interior lamps. W5W 5
Luggage/footwell lamps. W5W 5 Luggage/tailgate lamps. W5W 5
Glovebox lamp. W5W 5
Vanity mirror lamp. W5W 5
Page 2807 of 3229
87
Wipers and washers
R
Wipers and washersWINDSCREEN WIPERS
Note: If the wiper blades do become stuck, or
jammed, an electronic cut-out may temporarily
halt the operation of the wipers. If this
happens, switch off the wipers and the ignition.
Clear any obstructions, and free the wiper
blades before attempting to switch on the
ignition.
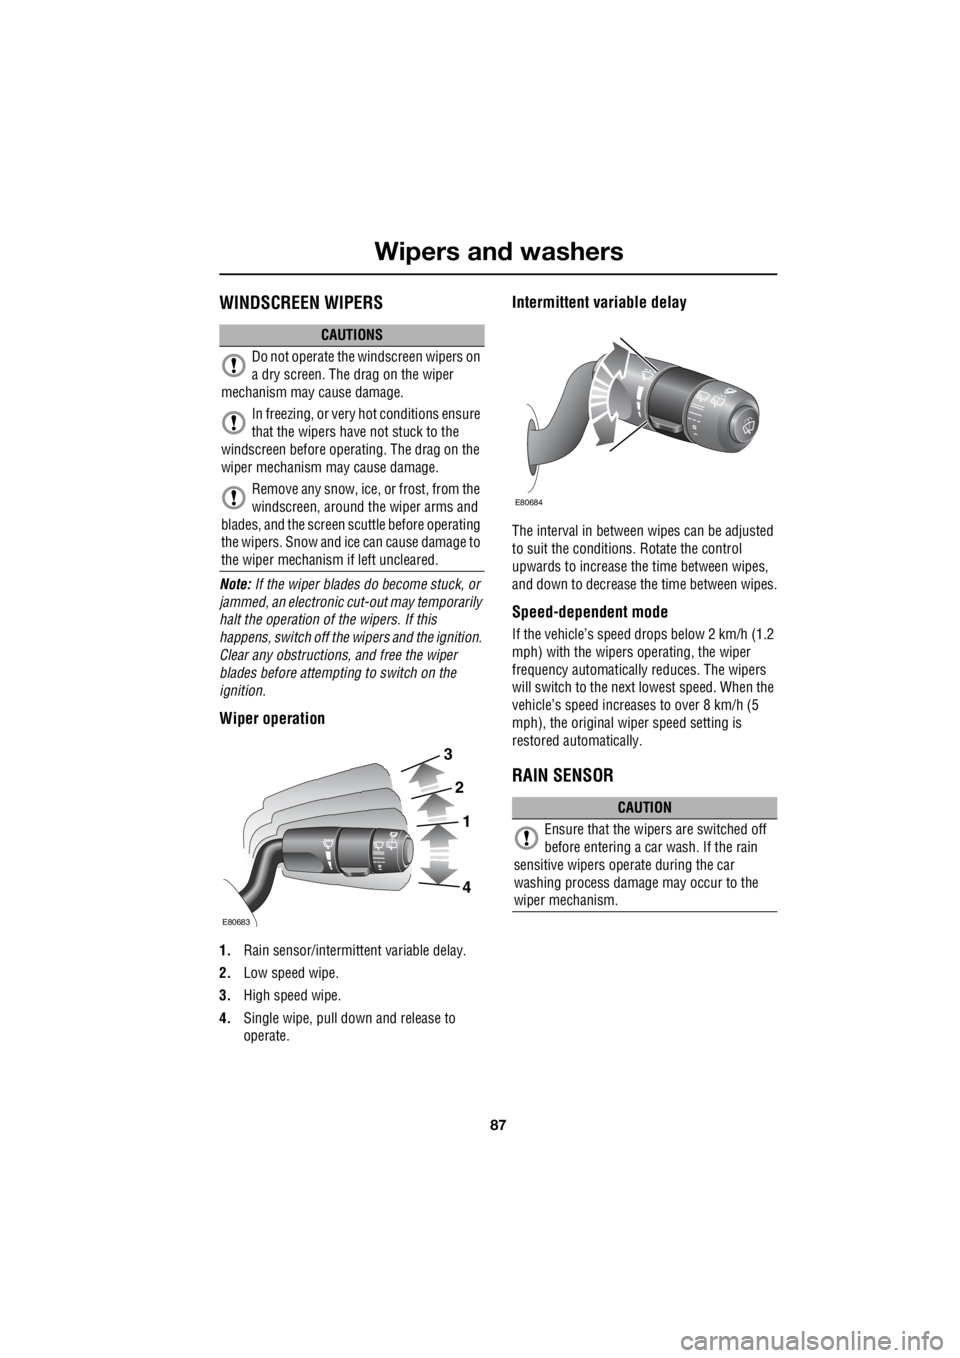
Wiper operation
1. Rain sensor/intermitt ent variable delay.
2. Low speed wipe.
3. High speed wipe.
4. Single wipe, pull down and release to
operate.
Intermittent variable delay
The interval in between wipes can be adjusted
to suit the conditions. Rotate the control
upwards to increase th e time between wipes,
and down to decrease the time between wipes.
Speed-dependent mode
If the vehicle’s speed drops below 2 km/h (1.2
mph) with the wipers operating, the wiper
frequency automatically reduces. The wipers
will switch to the next lowest speed. When the
vehicle’s speed increases to over 8 km/h (5
mph), the original wiper speed setting is
restored automatically.
RAIN SENSOR
CAUTIONS
Do not operate the windscreen wipers on
a dry screen. The drag on the wiper
mechanism may cause damage.
In freezing, or very hot conditions ensure
that the wipers have not stuck to the
windscreen before operating. The drag on the
wiper mechanism ma y cause damage.
Remove any snow, ice, or frost, from the
windscreen, around the wiper arms and
blades, and the screen scuttle before operating
the wipers. Snow and ic e can cause damage to
the wiper mechanism if left uncleared.
3
2
1
4
E80683
CAUTION
Ensure that the wipers are switched off
before entering a car wash. If the rain
sensitive wipers ope rate during the car
washing process damage may occur to the
wiper mechanism.
E80684
Page 2808 of 3229
Wipers and washers
88
L
The rain sensor is able to detect the presence
and amount of rain/dirt/snow on the
windscreen.
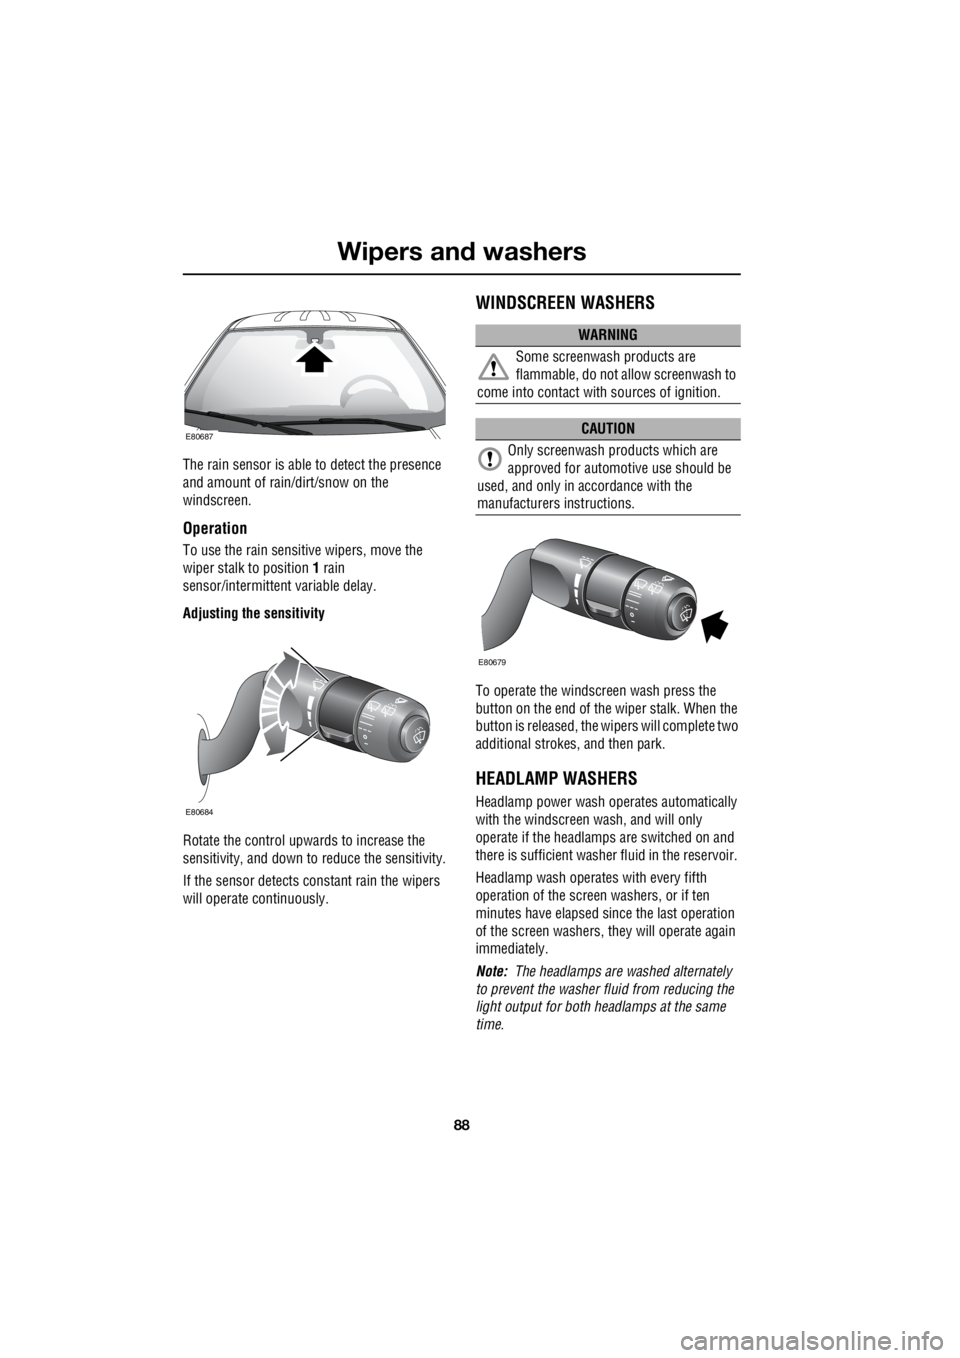
Operation
To use the rain sensitive wipers, move the
wiper stalk to position 1 rain
sensor/intermittent variable delay.
Adjusting the sensitivity
Rotate the control upwards to increase the
sensitivity, and down to reduce the sensitivity.
If the sensor detects co nstant rain the wipers
will operate continuously.
WINDSCREEN WASHERS
To operate the windscreen wash press the
button on the end of the wiper stalk. When the
button is released, the wi pers will complete two
additional strokes, and then park.
HEADLAMP WASHERS
Headlamp power wash operates automatically
with the windscreen wash, and will only
operate if the headlamps are switched on and
there is sufficient washer fluid in the reservoir.
Headlamp wash operates with every fifth
operation of the screen washers, or if ten
minutes have elapsed si nce the last operation
of the screen washers, they will operate again
immediately.
Note: The headlamps are washed alternately
to prevent the washer fluid from reducing the
light output for both headlamps at the same
time.
E80687
E80684
WARNING
Some screenwash products are
flammable, do not allow screenwash to
come into contact with sources of ignition.
CAUTION
Only screenwash products which are
approved for automotive use should be
used, and only in accordance with the
manufacturers instructions.
E80679
Page 2809 of 3229
89
Wipers and washers
R
REAR WINDOW WIPER AND
WASHERS
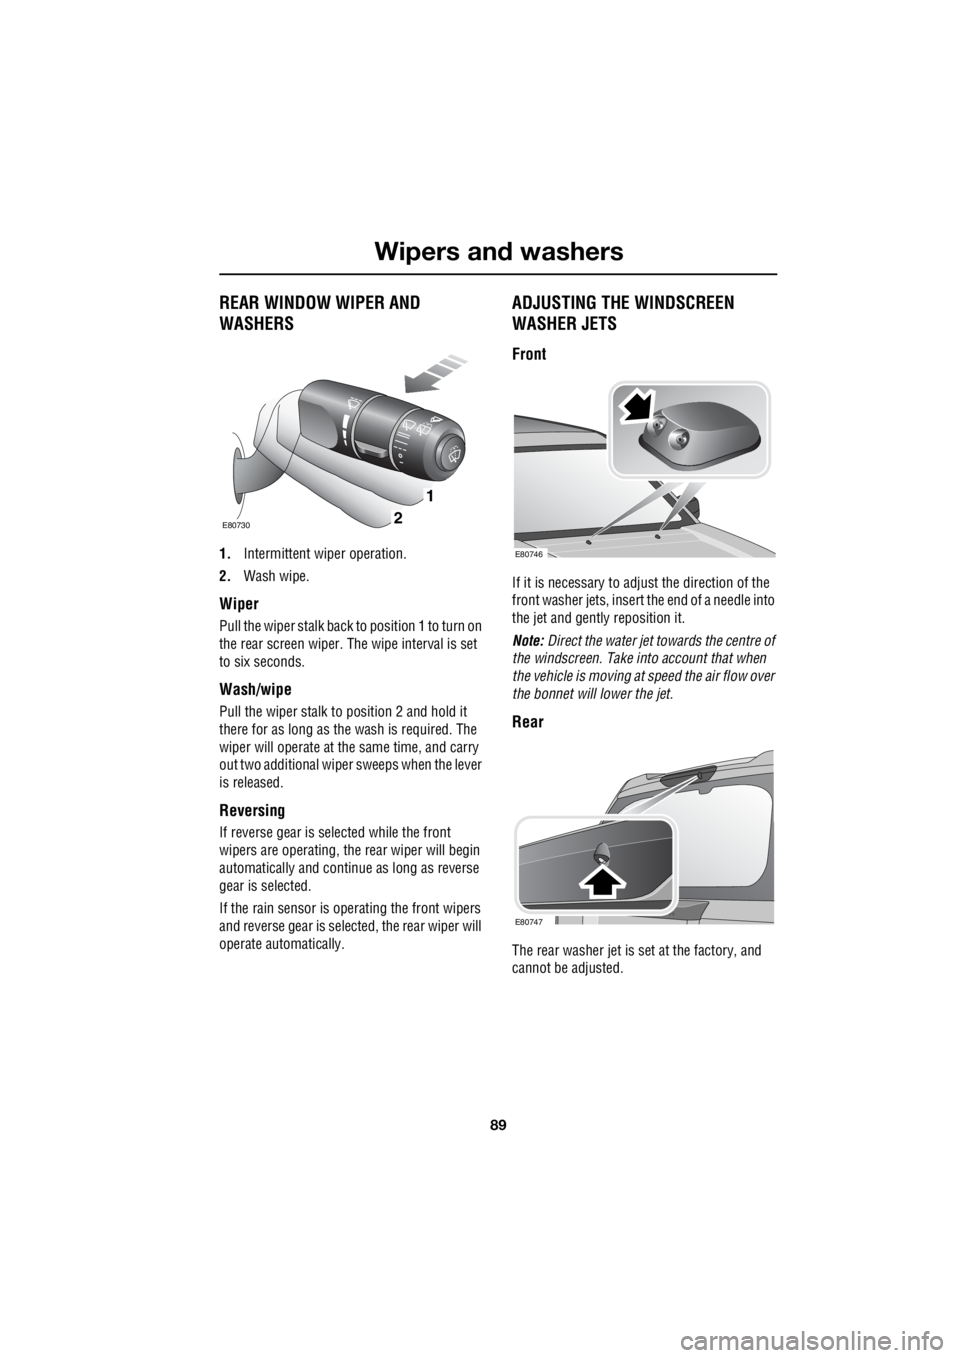
1. Intermittent wiper operation.
2. Wash wipe.
Wiper
Pull the wiper stalk back to position 1 to turn on
the rear screen wiper. The wipe interval is set
to six seconds.
Wash/wipe
Pull the wiper stalk to position 2 and hold it
there for as long as the wash is required. The
wiper will operate at the same time, and carry
out two additional wiper sweeps when the lever
is released.
Reversing
If reverse gear is selected while the front
wipers are operating, the rear wiper will begin
automatically and conti nue as long as reverse
gear is selected.
If the rain sensor is ope rating the front wipers
and reverse gear is sele cted, the rear wiper will
operate automatically.
ADJUSTING THE WINDSCREEN
WASHER JETS
Front
If it is necessary to adjust the direction of the
front washer jets, insert the end of a needle into
the jet and gently reposition it.
Note: Direct the water jet towards the centre of
the windscreen. Take into account that when
the vehicle is moving at speed the air flow over
the bonnet will lower the jet.
Rear
The rear washer jet is set at the factory, and
cannot be adjusted.
1
2E80730
E80746
E80747
Page 2810 of 3229
Wipers and washers
90
L
Blocked jets
If a washer jet becomes blocked, use a thin
strand of wire to unblock the jet by inserting
the wire into the jet. Ensure that the wire is
completely remove d after unblocking.
CHECKING THE WIPER BLADES
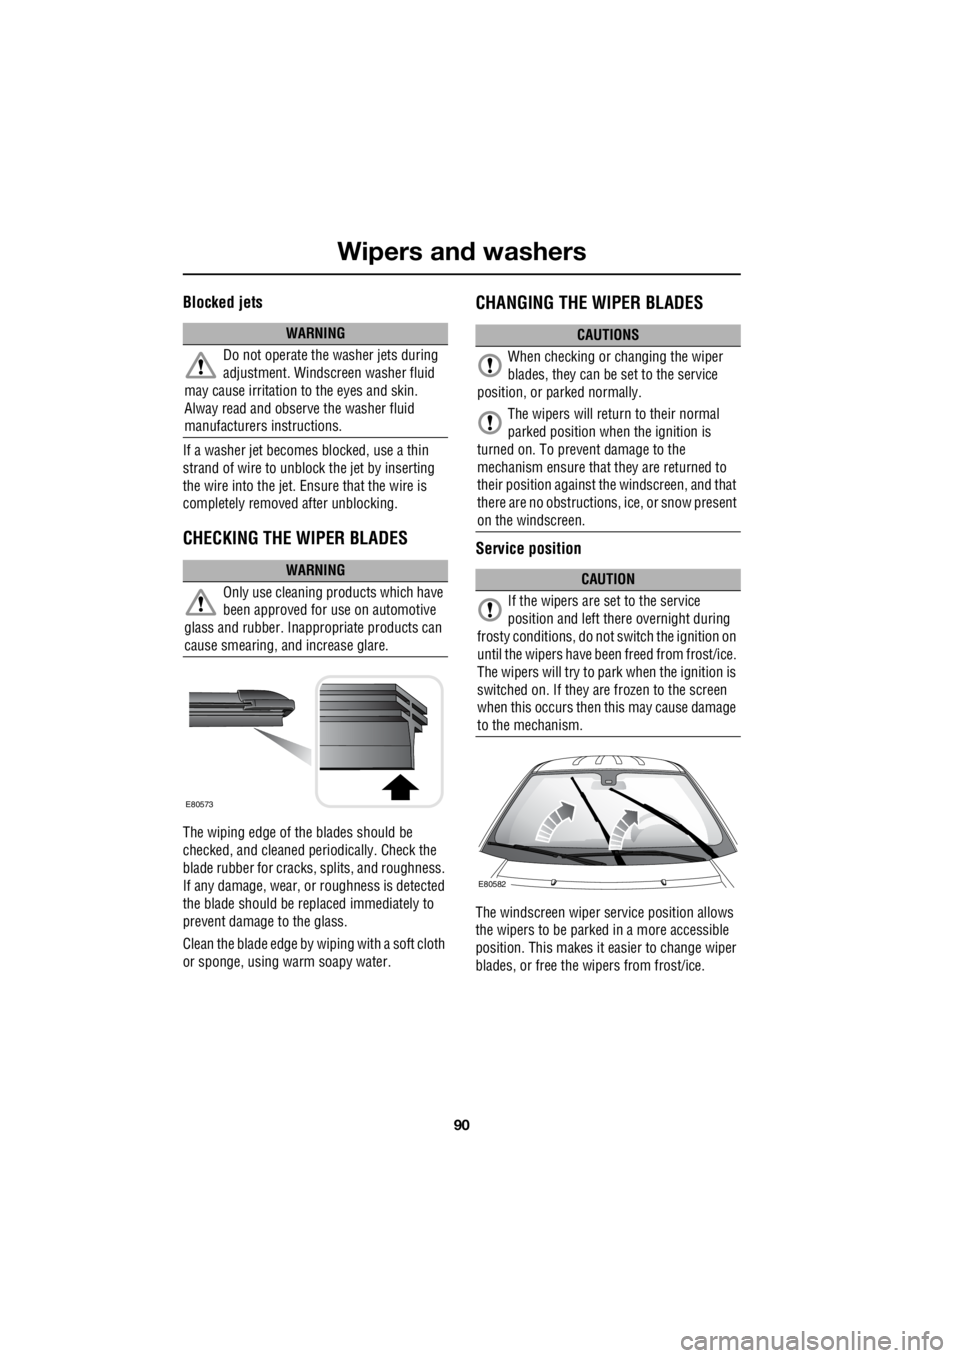
The wiping edge of the blades should be
checked, and cleaned pe riodically. Check the
blade rubber for cracks , splits, and roughness.
If any damage, wear, or roughness is detected
the blade should be repl aced immediately to
prevent damage to the glass.
Clean the blade edge by wiping with a soft cloth
or sponge, using warm soapy water.
CHANGING THE WIPER BLADES
Service position
The windscreen wiper se rvice position allows
the wipers to be parked in a more accessible
position. This makes it ea sier to change wiper
blades, or free the wipers from frost/ice.
WARNING
Do not operate the washer jets during
adjustment. Windscreen washer fluid
may cause irritation to the eyes and skin.
Alway read and observe the washer fluid
manufacturers instructions.
WARNING
Only use cleaning pr oducts which have
been approved for use on automotive
glass and rubber. Inappr opriate products can
cause smearing, and increase glare.
E80573
CAUTIONS
When checking or changing the wiper
blades, they can be set to the service
position, or parked normally.
The wipers will return to their normal
parked position when the ignition is
turned on. To prevent damage to the
mechanism ensure that they are returned to
their position against th e windscreen, and that
there are no obstructions, ice, or snow present
on the windscreen.
CAUTION
If the wipers are set to the service
position and left there overnight during
frosty conditions, do not switch the ignition on
until the wipers have been freed from frost/ice.
The wipers will try to park when the ignition is
switched on. If they are frozen to the screen
when this occurs then this may cause damage
to the mechanism.
E80582