LAND ROVER FRELANDER 2 2006 Repair Manual
Manufacturer: LAND ROVER, Model Year: 2006, Model line: FRELANDER 2, Model: LAND ROVER FRELANDER 2 2006Pages: 3229, PDF Size: 78.5 MB
Page 2971 of 3229
251
Auxiliary input (AUX IN) socket
R
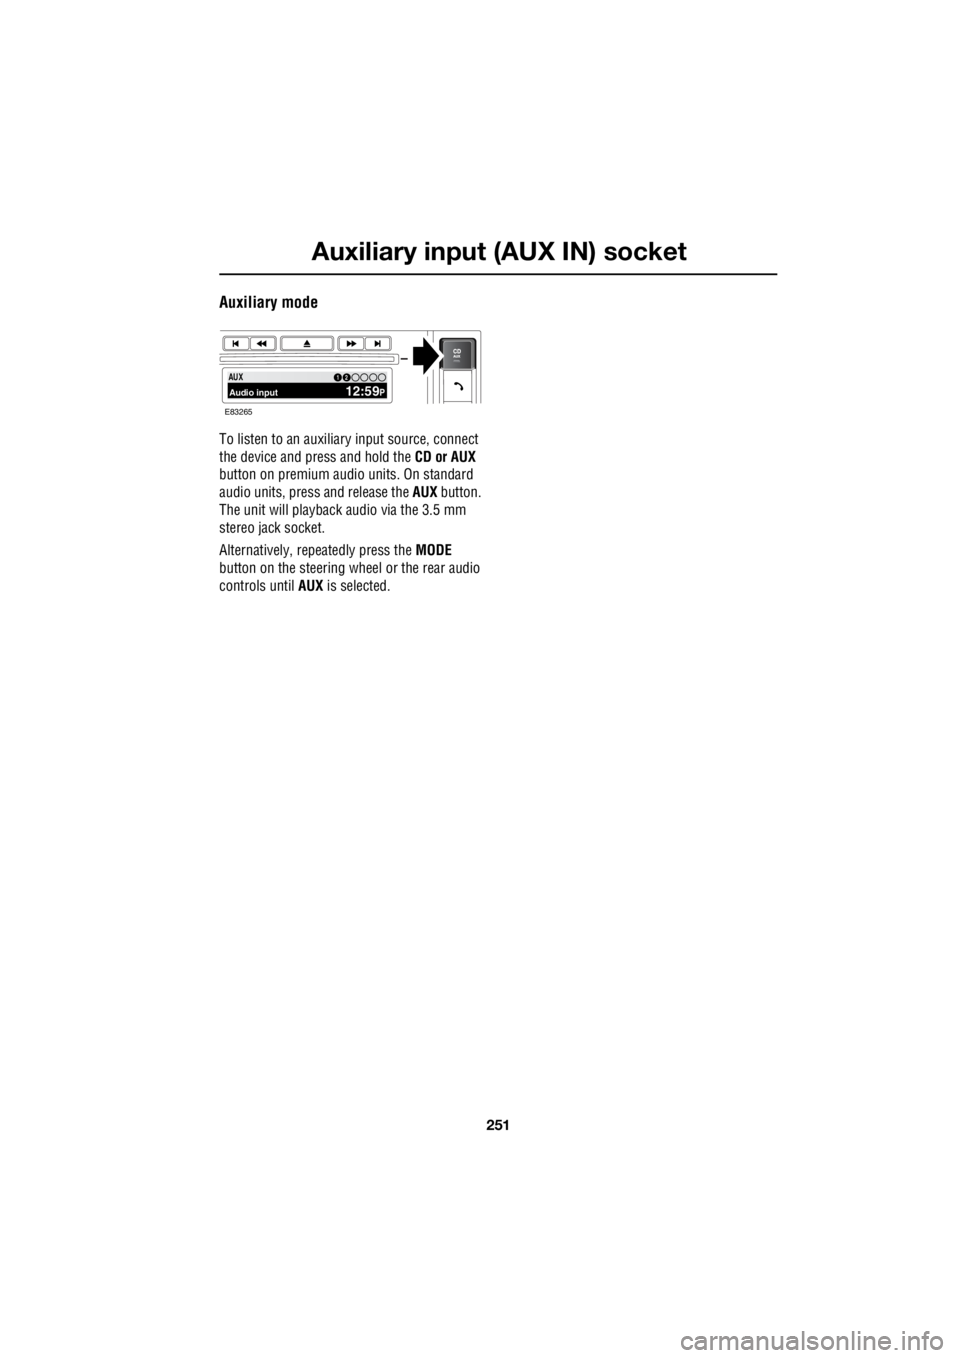
Auxiliary mode
To listen to an auxiliary input source, connect
the device and press and hold the CD or AUX
button on premium audio units. On standard
audio units, pres s and release the AUX button.
The unit will playback audio via the 3.5 mm
stereo jack socket.
Alternatively, repeatedly press the MODE
button on the steering wheel or the rear audio
controls until AUX is selected.
PTY100.7112 3 4 6AUX Audio input 12:59P12
E83265
Page 2972 of 3229
Rear passenger controls
252
L
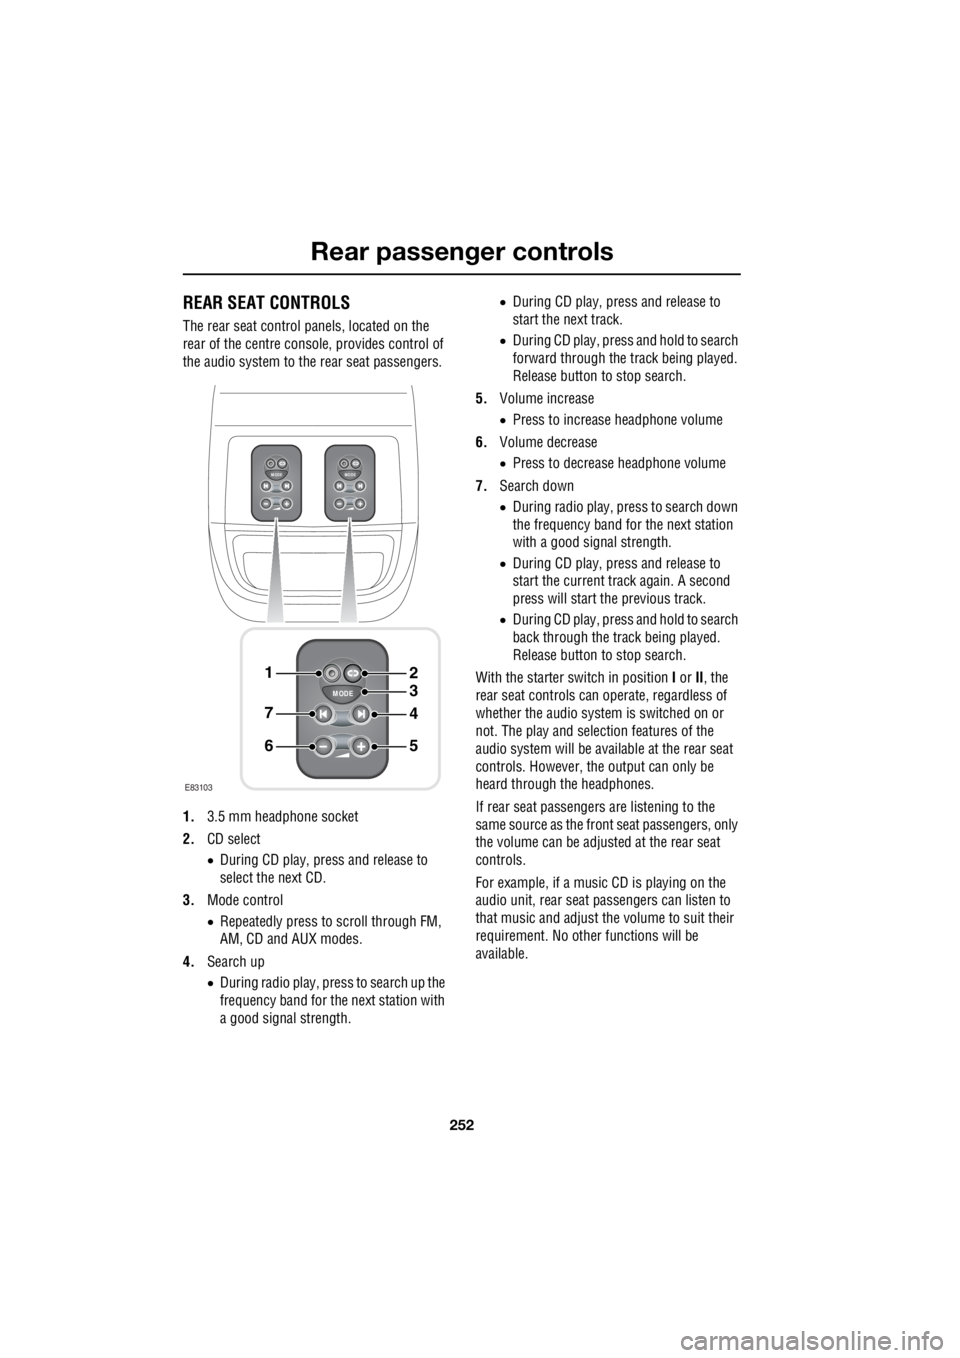
Rear passenger controlsREAR SEAT CONTROLS
The rear seat control panels, located on the
rear of the centre consol e, provides control of
the audio system to the rear seat passengers.
1. 3.5 mm headphone socket
2. CD select
• During CD play, press and release to
select the next CD.
3. Mode control
• Repeatedly press to scroll through FM,
AM, CD and AUX modes.
4. Search up
• During radio play, press to search up the
frequency band for the next station with
a good signal strength. •
During CD play, press and release to
start the next track.
• During CD play, press and hold to search
forward through the track being played.
Release button to stop search.
5. Volume increase
• Press to increase headphone volume
6. Volume decrease
• Press to decrease headphone volume
7. Search down
• During radio play, press to search down
the frequency band for the next station
with a good signal strength.
• During CD play, press and release to
start the current track again. A second
press will start the previous track.
• During CD play, press and hold to search
back through the track being played.
Release button to stop search.
With the starter switch in position I or II, the
rear seat controls can operate, regardless of
whether the audio system is switched on or
not. The play and selection features of the
audio system will be available at the rear seat
controls. However, the output can only be
heard through the headphones.
If rear seat passengers are listening to the
same source as the front seat passengers, only
the volume can be adjusted at the rear seat
controls.
For example, if a music CD is playing on the
audio unit, rear seat pa ssengers can listen to
that music and adjust the volume to suit their
requirement. No other functions will be
available.
MODE
+
MODE
+
MODE
+
1
7
6
4
3
2
5
E83103
Page 2973 of 3229

253
Rear passenger controls
R
If however, the audio unit is switched to
another source, e.g. radi o, all CD related rear
seat controls become operable. If the audio
source is subsequently switched back to CD,
the rear seat controls will again be limited to
volume control only.
The same logic applie s to radio functions.
Adjustments can be made to other functions of
the audio system.
For example, if a music CD is selected on the
audio unit, radio can be selected and controlled
using the rear seat cont rols. All radio related
rear seat controls become operable.
HEADPHONES
Note: Only headphones compatible with a 3.5
mm jack plug socket can be used. To obtain
optimum sound quality, use headphones with
an impedance of 32 ohms.
Note: When the headphones are not
connected, the rear se at controls remain
operational. It is still possible to select CD,
while the radio is playi ng on the audio unit. CD
play will remain opera tional until the mode
control is pressed again.
Note: The mode in use when the starter key is
removed will resume if the starter switch is
turned on again (position I or II) within two
minutes. If the starter switch is turned off for
longer than two minutes AUX mode will be
selected when the starter switch is next turned
on. For example, if a CD is playing when the key
is removed, play will restart when the starter
switch is next turned to position I, or the engine
is started, whether th e headphones are in use
or not.
Note: Adjusting the volume on the audio unit,
does not alter the headphone volume. The
volume of each controller can be adjusted
independently.
Page 2974 of 3229
Telephone
254
L
TelephoneGENERAL INFORMATION
Note: The vehicle tele phone system is
designed to function with a wide variety of
Bluetooth telephones. As these telephones
have a wide range of audio and echo
performance characteristics, it may take a few
seconds for the vehicl e telephone system to
adapt and deliver optimum audio performance.
It may be necessary to reduce the in-vehicle
volume slightly to fully optimise audio
performance and reduce echo. Note:
The vehicle's Bluetooth telephone
system can be used with an appropriate
Bluetooth-equipped mobile telephone.
Note: Please refer to your Land Rover
Dealer/Authorised Repairer for a list of
compatible telephones.
Telephone networks
The Telephone netw ork standard allows you to
use your telephone in many countries.
However, telephone reception may be poor or
unavailable in remote re gions. This may be due
to the inadequate power of the transmitter,
which results in a weak signal or incomplete
coverage.
WARNINGS
Using the telephone ne ar the car: do not
telephone inside a garage or near an
open car bonnet. The air may contain fuel
vapours and the tele phone could produce
sparks and start a fire.
Unusual ambient conditions: Switch off
the telephone in areas where high
explosives are being used. High frequency
remote controls could be interfered with and
cause an explosion. Switch off your telephone
in areas with a high explosion risk. This
includes filling stations, fuel storage areas or
chemical factories, as well as places where the
air contains fuel vapour, chemicals or metal
dust. The telephone might possibly produce
sparks and cause a fire or explosion.
Medical equipment: The functioning of
cardiac pacemakers or hearing aids
may be impaired when the phone is in use.
Check with a doctor or manufacturer whether
any such devices you or your passengers are
using are sufficiently protected against
high-frequency energy.
Always stow your mobile phone
securely. In an accident loose items can
cause injury.
Page 2975 of 3229
255
Telephone
R
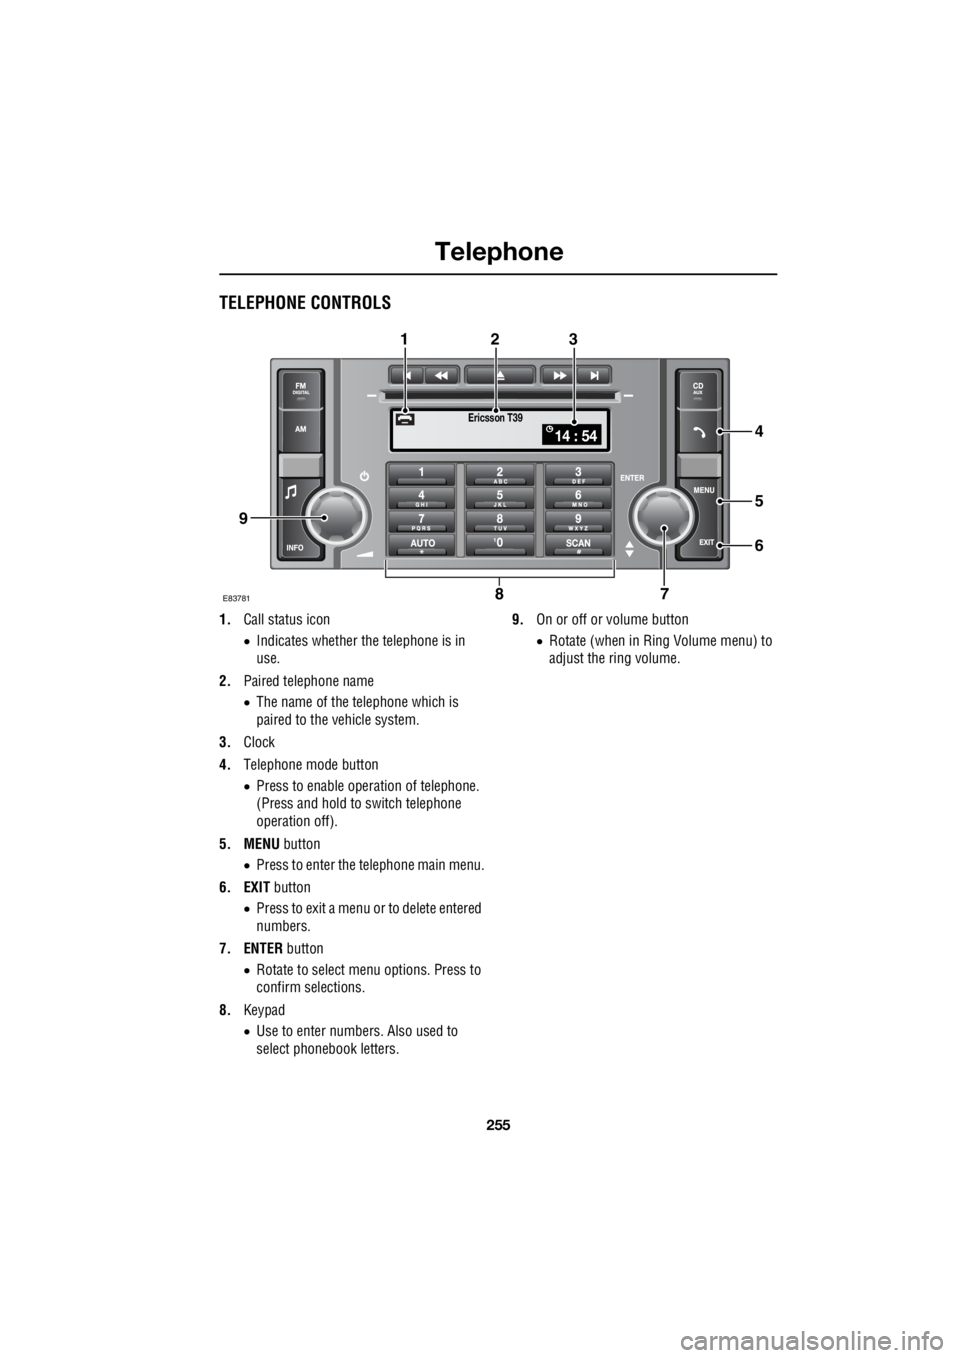
TELEPHONE CONTROLS
1. Call status icon
• Indicates whether the telephone is in
use.
2. Paired telephone name
• The name of the telephone which is
paired to the vehicle system.
3. Clock
4. Telephone mode button
• Press to enable opera tion of telephone.
(Press and hold to switch telephone
operation off).
5. MENU button
• Press to enter the telephone main menu.
6. EXIT button
• Press to exit a menu or to delete entered
numbers.
7. ENTER button
• Rotate to select me nu options. Press to
confirm selections.
8. Keypad
• Use to enter numbers. Also used to
select phonebook letters. 9.
On or off or volume button
• Rotate (when in Ring Volume menu) to
adjust the ring volume.
Ericsson T39
14 : 54
E837817
5
6
4
8
123
9
Page 2976 of 3229
Telephone
256
L
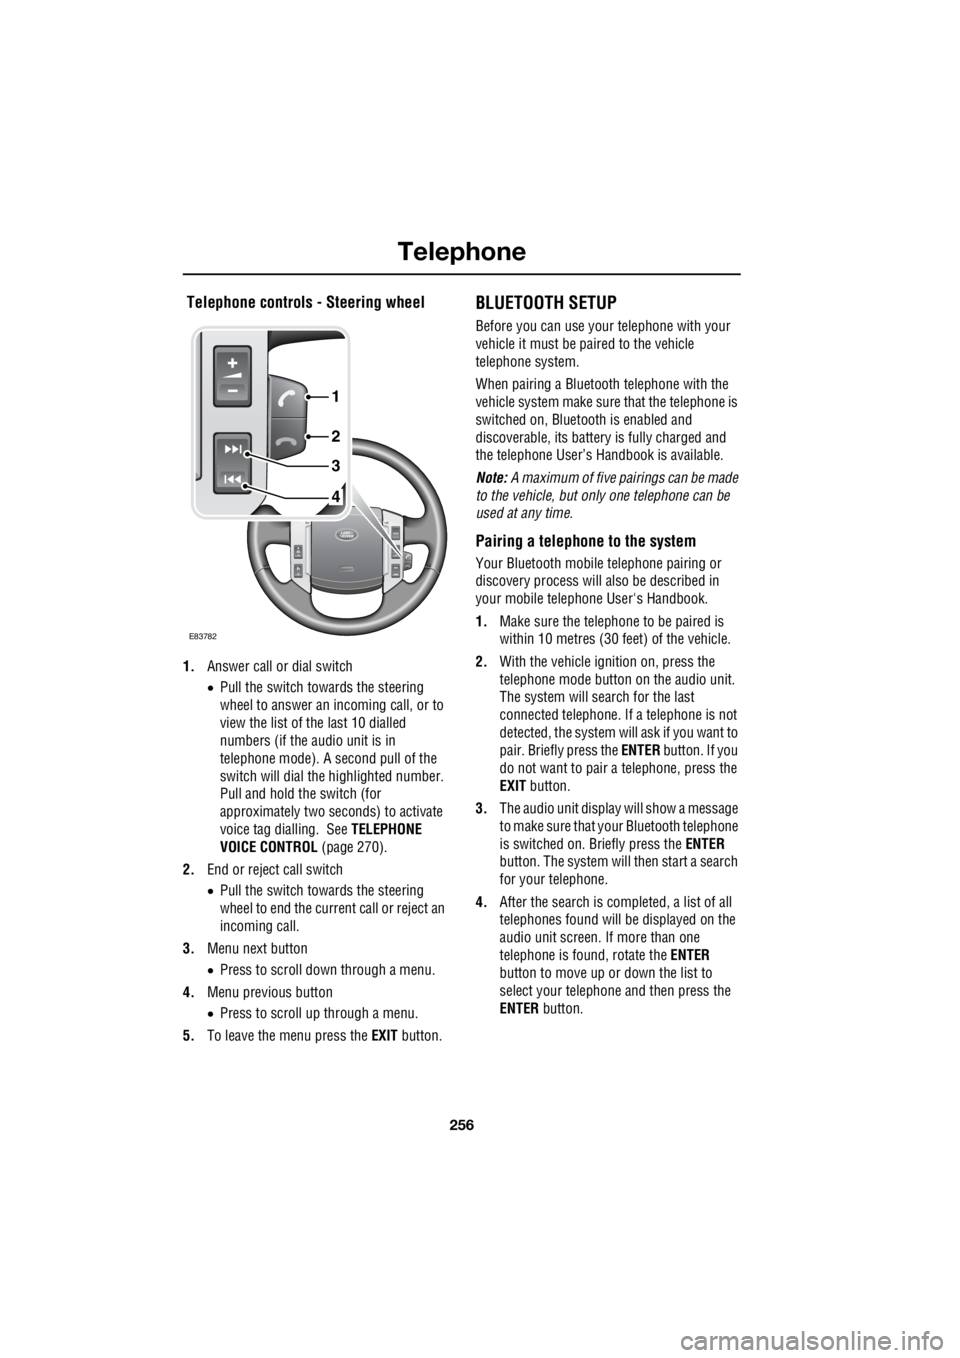
Telephone controls - Steering wheel
1. Answer call or dial switch
• Pull the switch towards the steering
wheel to answer an incoming call, or to
view the list of the last 10 dialled
numbers (if the audio unit is in
telephone mode). A second pull of the
switch will dial th e highlighted number.
Pull and hold the switch (for
approximately two seconds) to activate
voice tag dialling. See TELEPHONE
VOICE CONTROL (page 270).
2. End or reject call switch
• Pull the switch towards the steering
wheel to end the current call or reject an
incoming call.
3. Menu next button
• Press to scroll down through a menu.
4. Menu previous button
• Press to scroll up through a menu.
5. To leave the menu press the EXIT button.
BLUETOOTH SETUP
Before you can use your telephone with your
vehicle it must be paired to the vehicle
telephone system.
When pairing a Bluet ooth telephone with the
vehicle system ma ke sure that the telephone is
switched on, Bluetooth is enabled and
discoverable, its battery is fully charged and
the telephone User’s Handbook is available.
Note: A maximum of five pairings can be made
to the vehicle, but only one telephone can be
used at any time.
Pairing a telephone to the system
Your Bluetooth mobile telephone pairing or
discovery process will al so be described in
your mobile telephone User's Handbook.
1. Make sure the telephone to be paired is
within 10 metres (30 feet) of the vehicle.
2. With the vehicle ignition on, press the
telephone mode button on the audio unit.
The system will search for the last
connected tele phone. If a telephone is not
detected, the system w ill ask if you want to
pair. Briefly press the ENTER button. If you
do not want to pair a telephone, press the
EXIT button.
3. The audio unit display will show a message
to make sure that yo ur Bluetooth telephone
is switched on. Briefly press the ENTER
button. The system will then start a search
for your telephone.
4. After the search is completed, a list of all
telephones found will be displayed on the
audio unit screen. If more than one
telephone is found, rotate the ENTER
button to move up or down the list to
select your telephone and then press the
ENTER button.
4
3
2
1
E83782
Page 2977 of 3229

257
Telephone
R
5. The audio unit will now display a Bluetooth
access code numbe r which must be
entered into your telephone.
6. A message on the audio unit display will
confirm the system is connecting with
your telephone. When it is successfully
connected, the telephone will be paired
and connected with the vehicle and can
now be used with the vehicle telephone
system.
7. If the pairing fails, a message will appear
on the audio unit di splay; press the ENTER
button to retry or press the EXIT button
and restart the process.
8. The last connected telephone will be
available for use when the system and
telephone are switched on again.
9. If you wish to pair additional telephones,
repeat the process.
Adding or changing a telephone
1. Select the te lephone main menu. See
TELEPHONE SETUP (page 258).
2. Select Bluetooth , then select the option to
change a telephone .
3. Add new phone will appear at the top of
the list. Repeat the procedure for pairing a
telephone to the system.
If the maximum number of telephones are
already paired to the system, a message will be
displayed and you are given the option to
remove one. This must be carried out before a
new telephone can be paired.
Removing a telephone from the system
1.Select the te lephone main menu. See
TELEPHONE SETUP (page 258).
2. Select Bluetooth , then select the option to
remove a telephone . 3.
Select a telephone by rotating the ENTER
button, highlight the telephone to be
removed then press the ENTER button. A
confirmation message to remove a
telephone will appear on the audio unit
display, press the ENTER button.
4. The remove telephone screen will be
displayed, and if no further telephones are
to be removed, press the EXIT button.
Loss of Bluetooth link
If the link between the telephone and the
vehicle is lost, you have the choice to
reconnect or to exit fr om the telephone system.
To reconnect press the ENTER button. There
will be a short delay whilst the connection is
established and then y our telephone name will
be shown in the display.
Alternatively, press the EXIT button if you do
not wish to reconne ct your telephone.
Page 2978 of 3229
Telephone
258
L
TELEPHONE SETUP
Telephone main menu
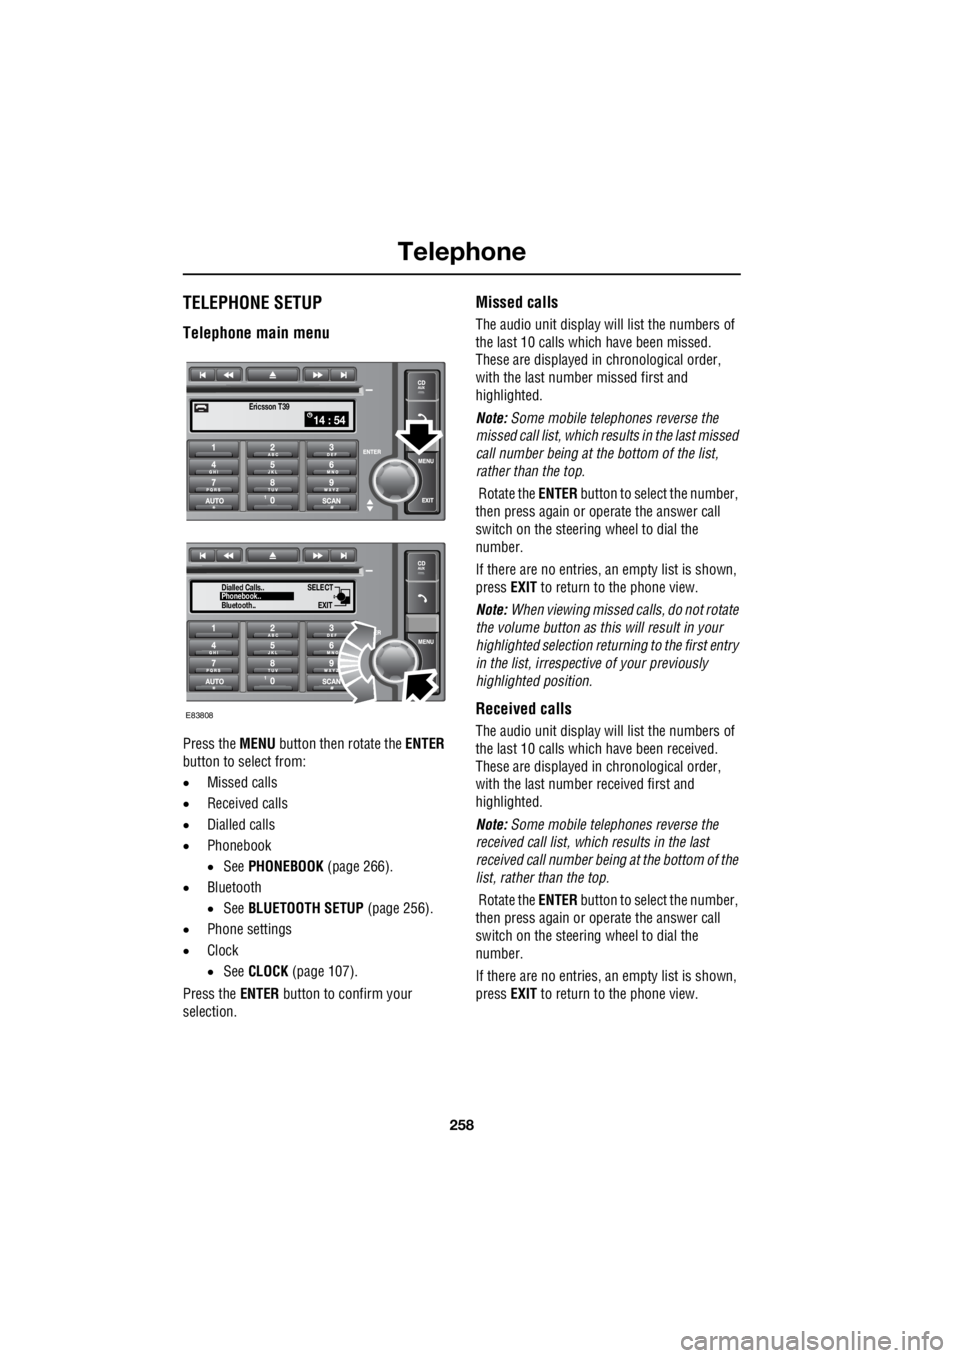
Press the MENU button then rotate the ENTER
button to select from:
• Missed calls
• Received calls
• Dialled calls
• Phonebook
• See PHONEBOOK (page 266).
• Bluetooth
• See BLUETOOTH SETUP (page 256).
• Phone settings
• Clock
• See CLOCK (page 107).
Press the ENTER button to confirm your
selection.
Missed calls
The audio unit display wi ll list the numbers of
the last 10 calls which have been missed.
These are displayed in chronological order,
with the last number missed first and
highlighted.
Note: Some mobile telephones reverse the
missed call list, which results in the last missed
call number being at the bottom of the list,
rather than the top.
Rotate the ENTER button to select the number,
then press again or operate the answer call
switch on the steering wheel to dial the
number.
If there are no entries, an empty list is shown,
press EXIT to return to the phone view.
Note: When viewing missed calls, do not rotate
the volume button as this will result in your
highlighted select ion returning to the first entry
in the list, irrespective of your previously
highlighted position.
Received calls
The audio unit display wi ll list the numbers of
the last 10 calls which have been received.
These are displayed in chronological order,
with the last number received first and
highlighted.
Note: Some mobile telephones reverse the
received call list, which results in the last
received call number be ing at the bottom of the
list, rather than the top.
Rotate the ENTER button to select the number,
then press again or operate the answer call
switch on the steering wheel to dial the
number.
If there are no entries, an empty list is shown,
press EXIT to return to the phone view.
14 : 54Ericsson T39
SELECT
EXITPhonebook..
Dialled Calls..
Bluetooth..
E83808
Page 2979 of 3229
259
Telephone
R
Note: When viewing received calls, do not
rotate the volume button as this will result in
your highlighted selection returning to the first
entry in the list, irrespective of your previously
highlighted position.
Dialled calls
The audio unit display will list the numbers of
the last 10 calls which ha ve been dialled. These
are displayed in chronological order, with the
last number dialled fi rst and highlighted.
Note: Some mobile telephones reverse the
dialled call list, which re sults in the last dialled
call number being at the bottom of the list,
rather than the top.
The dialled calls list can also be accessed by
pressing the ENTER button, when telephone
mode is selected.
Rotate the ENTER button to select the number.
Then to dial the number, press ENTER again, or
operate the answer call switch on the steering
wheel.
If there are no entries, an empty list is shown,
press EXIT to return to the phone view.
Note: When viewing dialled calls, do not press
the volume button as this will take you back to
the radio or CD.
Phone settings
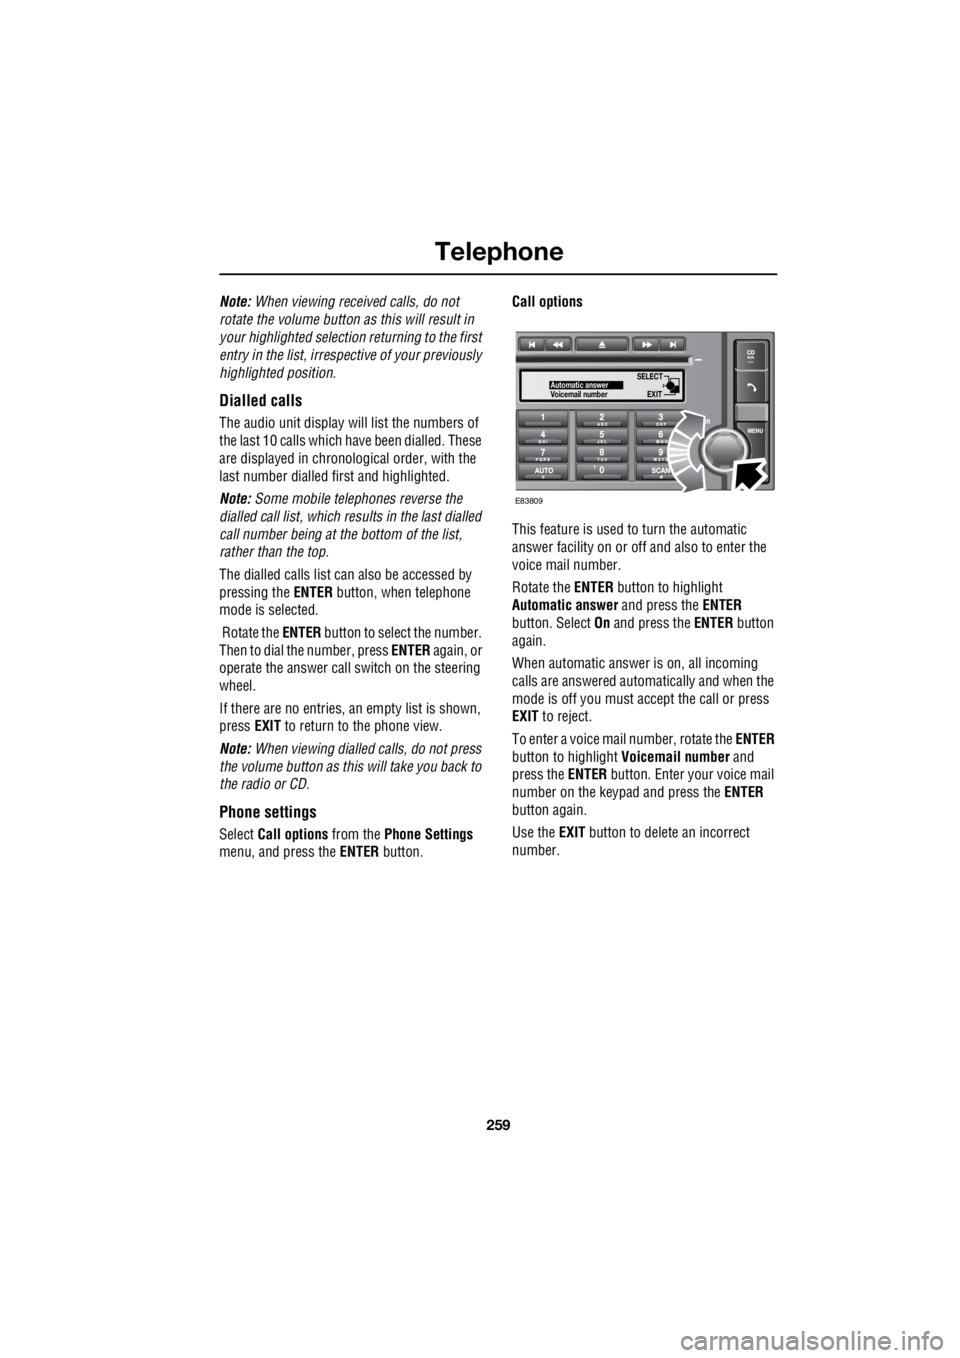
Select Call options from the Phone Settings
menu, and press the ENTER button. Call options
This feature is used to turn the automatic
answer facility on or off and also to enter the
voice mail number.
Rotate the ENTER button to highlight
Automatic answer and press the ENTER
button. Select On and press the ENTER button
again.
When automatic answer is on, all incoming
calls are answered automatically and when the
mode is off you must ac cept the call or press
EXIT to reject.
To enter a voice mail number, rotate the ENTER
button to highlight Voicemail number and
press the ENTER button. Enter your voice mail
number on the keypad and press the ENTER
button again.
Use the EXIT button to delete an incorrect
number.
SELECT
EXITAutomatic answer
Voicemail number
E83809
Page 2980 of 3229
Telephone
260
L
Sounds and alerts
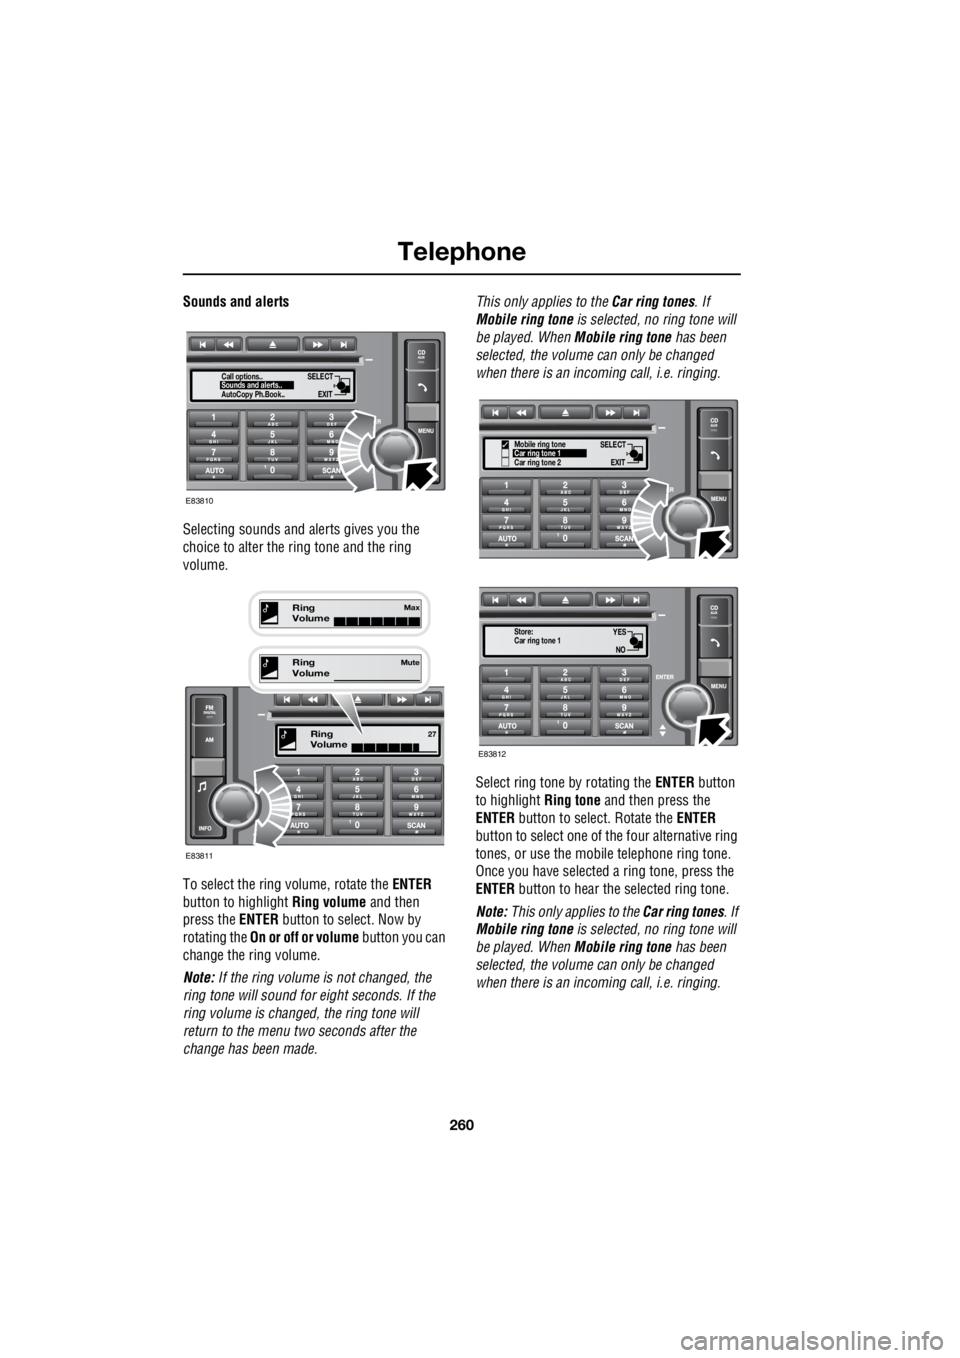
Selecting sounds and alerts gives you the
choice to alter the ri ng tone and the ring
volume.
To select the ring volume, rotate the ENTER
button to highlight Ring volume and then
press the ENTER button to se lect. Now by
rotating the On or off or volume button you can
change the ring volume.
Note: If the ring volume is not changed, the
ring tone will sound for eight seconds. If the
ring volume is changed, the ring tone will
return to the menu two seconds after the
change has been made. This only applies to the
Car ring tones. If
Mobile ring tone is selected, no ring tone will
be played. When Mobile ring tone has been
selected, the volume can only be changed
when there is an incoming call, i.e. ringing.
Select ring tone by rotating the ENTER button
to highlight Ring tone and then press the
ENTER button to select. Rotate the ENTER
button to select one of the four alternative ring
tones, or use the mobi le telephone ring tone.
Once you have selected a ring tone, press the
ENTER button to hear the selected ring tone.
Note: This only applies to the Car ring tones. If
Mobile ring tone is selected, no ring tone will
be played. When Mobile ring tone has been
selected, the volume can only be changed
when there is an incoming call, i.e. ringing.
SELECT
EXITSounds and alerts..
Call options..
AutoCopy Ph.Book..
E83810
Ring
Volume27
E83811
Ring
VolumeMute
Ring
VolumeMax
SELECT
EXITCar ring tone 1
Car ring tone 2
Mobile ring tone
YES
NOCar ring tone 1
Store:
E83812