LAND ROVER FRELANDER 2 2006 Repair Manual
FRELANDER 2 2006
LAND ROVER
LAND ROVER
https://www.carmanualsonline.info/img/64/57251/w960_57251-0.png
LAND ROVER FRELANDER 2 2006 Repair Manual
Trending: spark plugs, odometer, rear entertainment, air condition, headrest, fuel pressure, heater
Page 691 of 3229
Publi s hed: 11-May-2011
Engine - I6 3.2L Petrol - Oil Pump
Removal and Inst all ati on
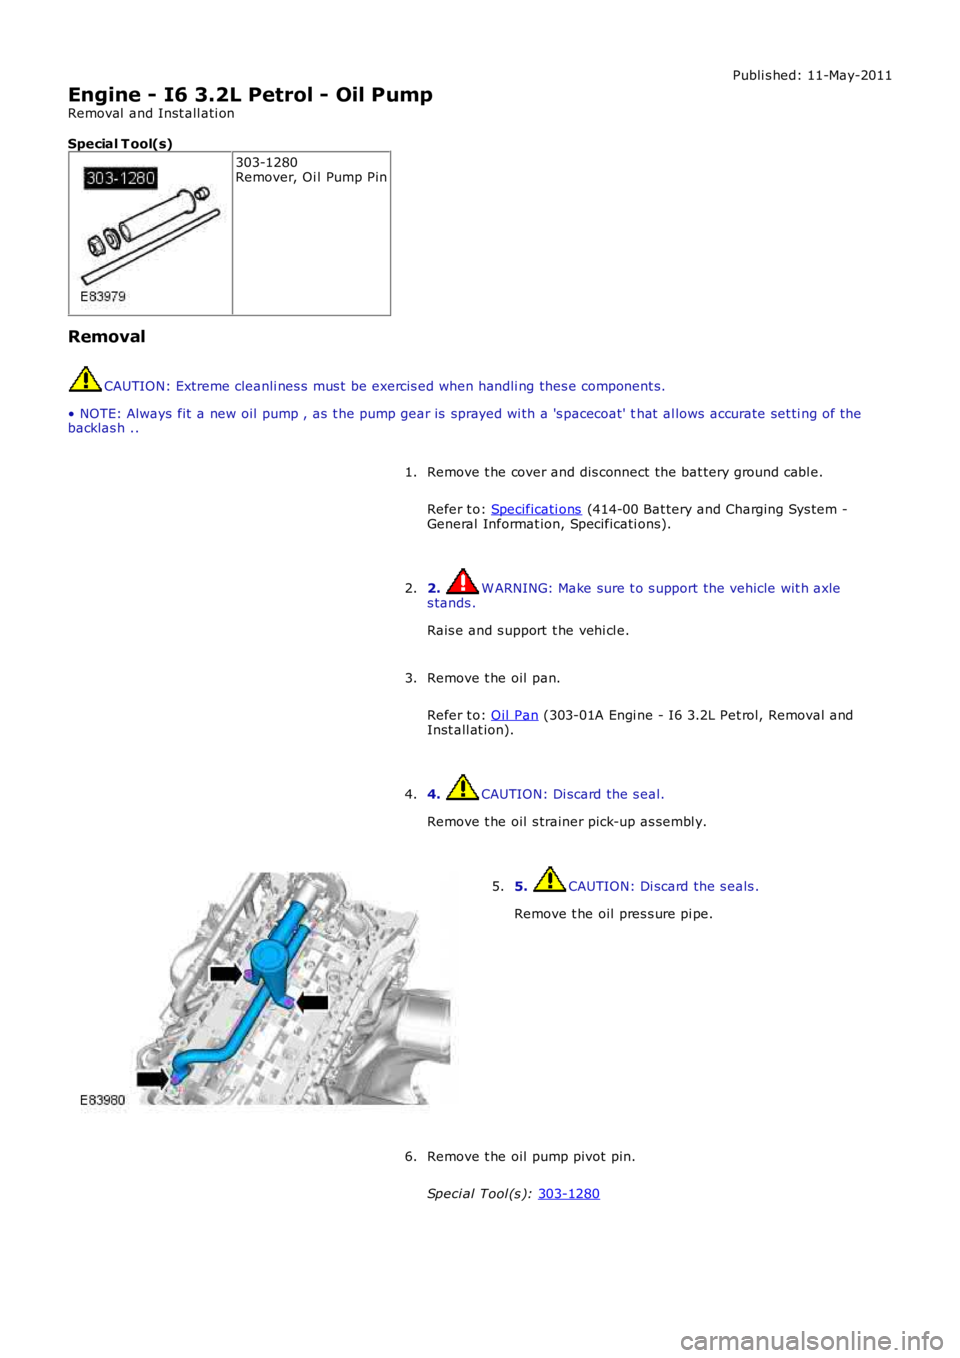
Special T ool(s) 303-1280
Remover, Oi l Pump Pin
Removal CAUTION: Extreme cleanli nes s mus t be exercis ed when handli ng thes e component s.
• NOTE: Always fit a new oil pump , as t he pump gear is sprayed wi th a 's pacecoat' t hat al lows accurate set ti ng of the
backlas h ..
Remove t he cover and dis connect the bat tery ground cabl e.
Refer t o: Specificati ons (414-00 Bat tery and Charging Sys tem -
General Informat ion, Specificati ons).
1.
2. W ARNING: Make sure t o s upport the vehicle wit h axle
s tands .
Rais e and s upport t he vehi cl e.
2.
Remove t he oil pan.
Refer t o: Oil Pan (303-01A Engi ne - I6 3.2L Pet rol, Removal and
Inst all at ion).
3.
4. CAUTION: Di scard the s eal.
Remove t he oil s trainer pick-up as sembl y.
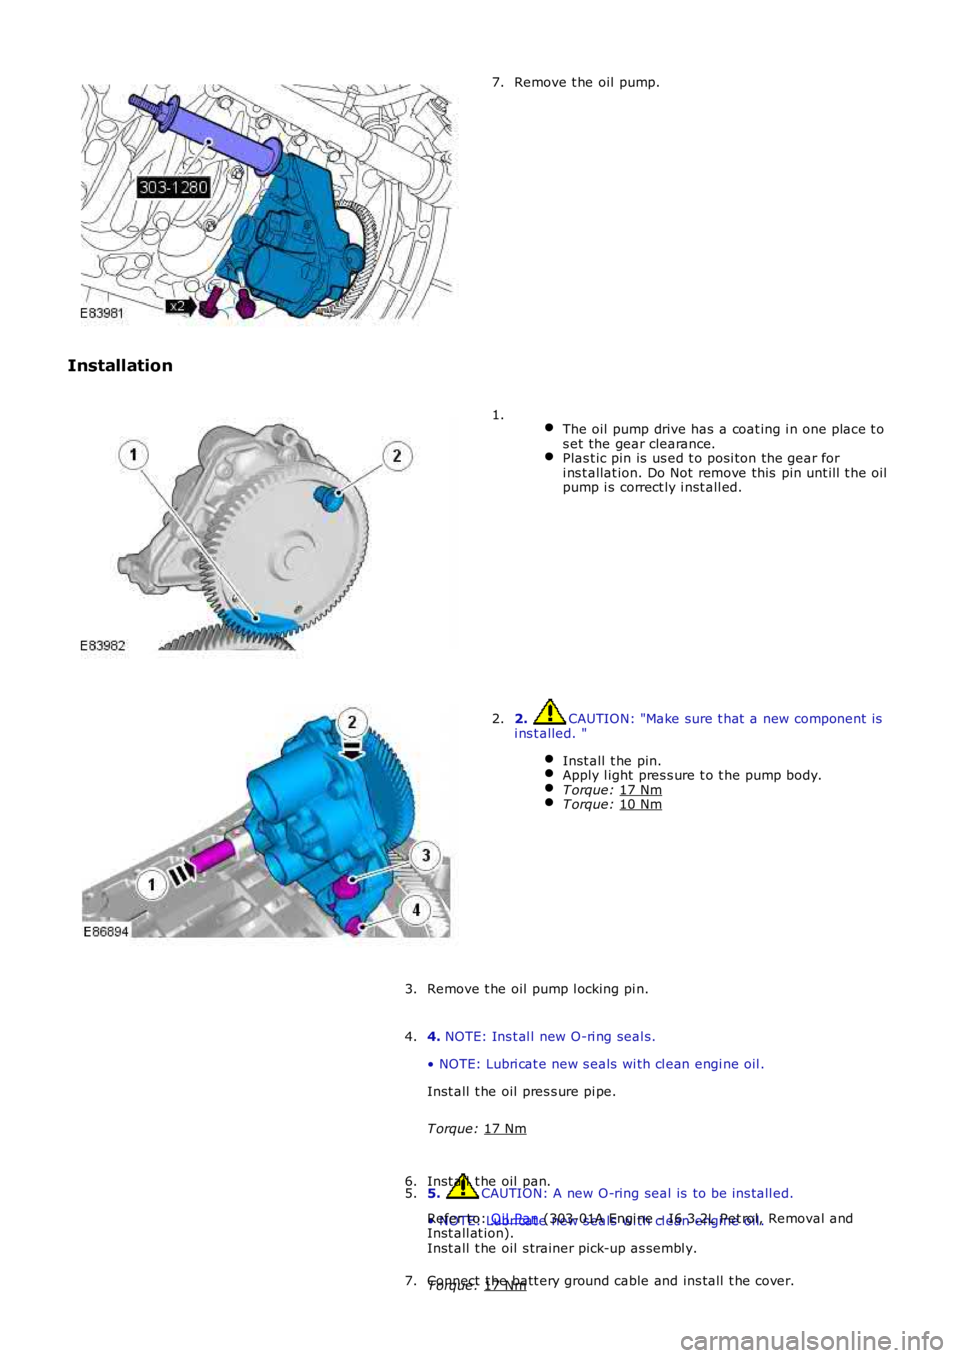
4. 5. CAUTION: Di scard the s eals .
Remove t he oil pres s ure pi pe.
5.
Remove t he oil pump pivot pin.
Speci al Tool (s ): 303-1280 6.
Page 692 of 3229
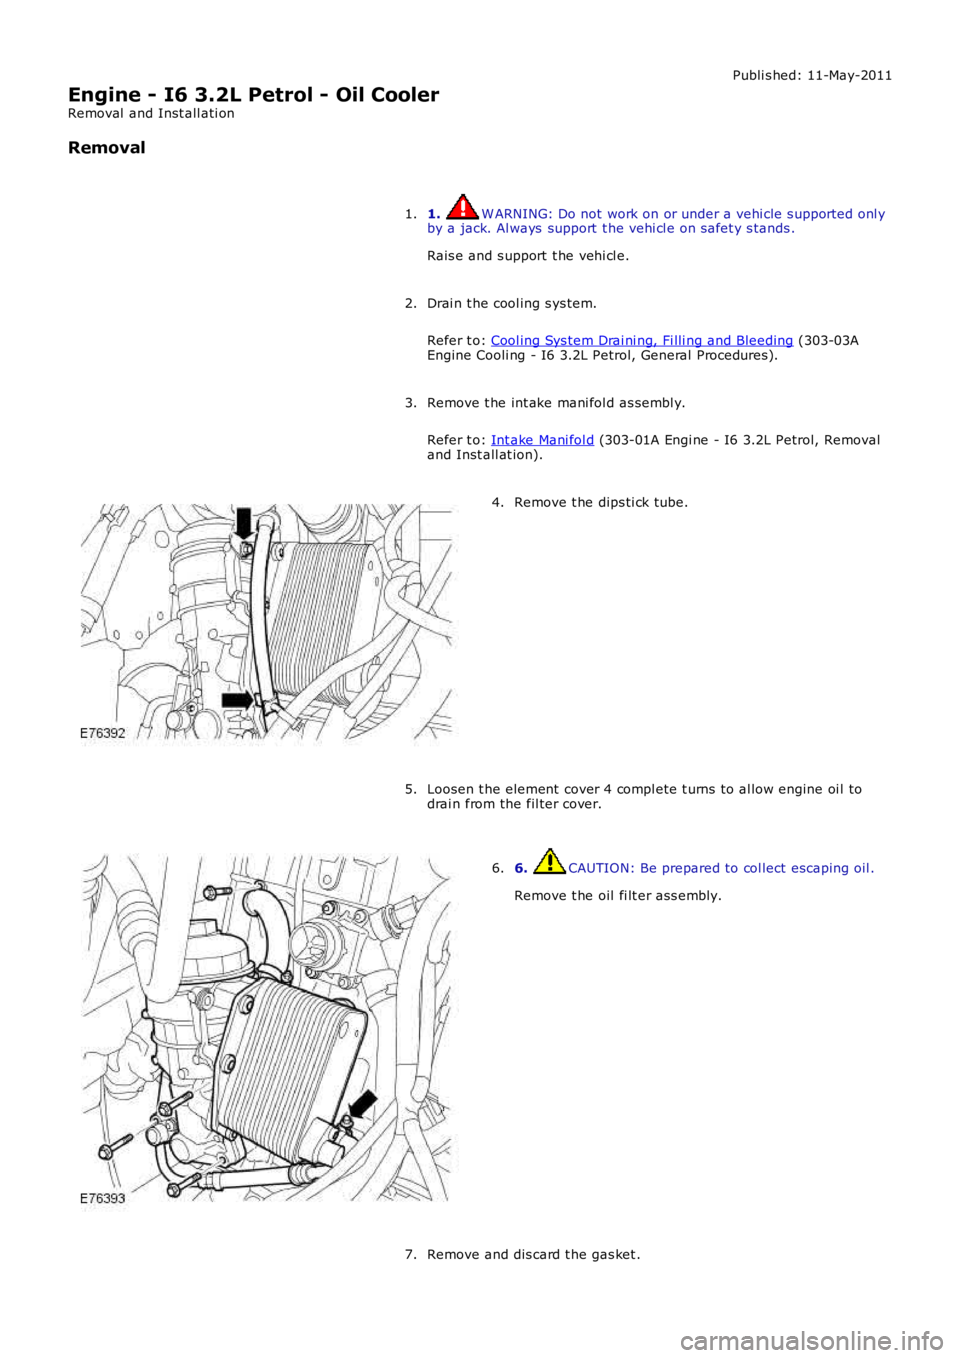
Remove t he oil pump.
7.
Installation
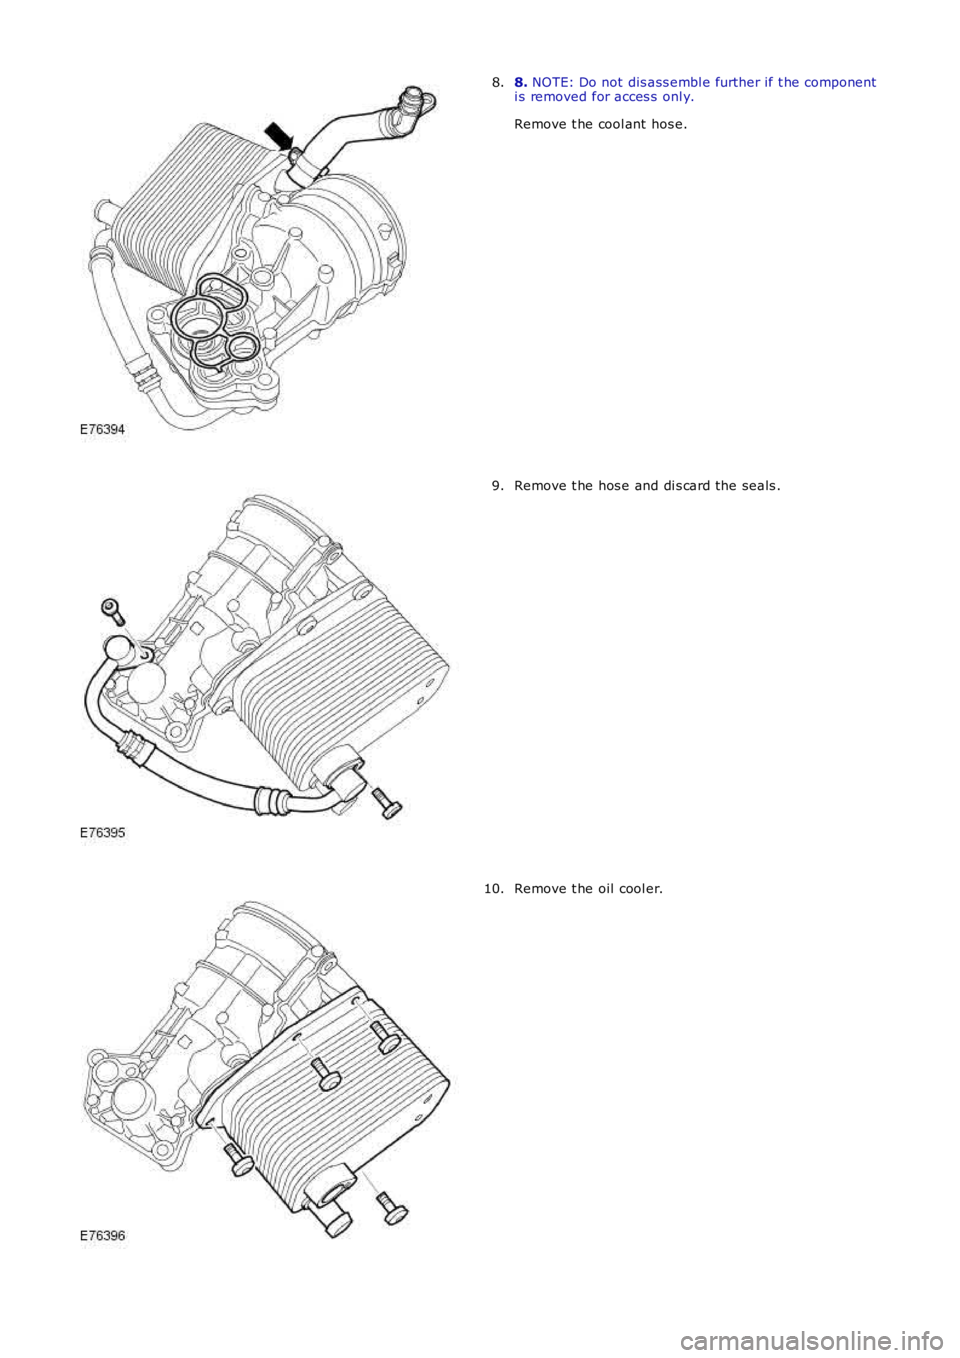
The oil pump drive has a coat ing i n one place t o
s et the gear clearance. Plas t ic pin is us ed t o posi ton the gear for
i ns t allat ion. Do Not remove this pin unt ill t he oil
pump i s correct ly i nst all ed. 1.
2. CAUTION: "Make sure t hat a new component is
i ns t alled. "
Inst all t he pin. Apply l ight pres s ure t o t he pump body.
T orque:
17 Nm T orque:
10 Nm 2.
Remove t he oil pump l ocking pi n.
3.
4. NOTE: Ins t al l new O-ri ng seal s.
• NOTE: Lubri cat e new s eals wi th cl ean engi ne oil .
Inst all t he oil pres s ure pi pe.
T orque: 17 Nm 4.
5. CAUTION: A new O-ring seal is to be ins tall ed.
• NOTE: Lubri cat e new s eals wi th cl ean engi ne oil .
Inst all t he oil s trainer pick-up as sembl y.
T orque: 17 Nm 5.
Inst all t he oil pan.
Refer t o: Oil Pan (303-01A Engi ne - I6 3.2L Pet rol, Removal and
Inst all at ion).
6.
Connect t he batt ery ground cable and ins tall t he cover.
7.
Page 693 of 3229
Refer t o: Specificati ons (414-00 Bat tery and Charging Sys tem -General Informat ion, Specificati ons).
Page 694 of 3229
Publi s hed: 11-May-2011
Engine - I6 3.2L Petrol - Oil Cooler
Removal and Inst all ati on
Removal
1. W ARNING: Do not work on or under a vehi cle s upported onl yby a jack. Al ways support t he vehi cl e on s afet y s tands .
Rais e and s upport t he vehi cl e.
1.
Drai n t he cool ing s ys tem.
Refer t o: Cool ing Sys tem Drai ni ng, Fi lli ng and Bleeding (303-03AEngine Cooli ng - I6 3.2L Petrol, General Procedures).
2.
Remove t he int ake mani fol d as sembl y.
Refer t o: Int ake Mani fol d (303-01A Engi ne - I6 3.2L Petrol, Removaland Inst all at ion).
3.
Remove t he dips ti ck tube.4.
Loosen t he element cover 4 compl ete t urns t o al low engine oi l todrai n from the fil ter cover.5.
6. CAUTION: Be prepared to col lect escaping oil .
Remove t he oil fi lt er ass embly.
6.
Remove and dis card t he gas ket .7.
Page 695 of 3229
8. NOTE: Do not dis ass embl e further if t he componenti s removed for acces s onl y.
Remove t he cool ant hos e.
8.
Remove t he hos e and di s card the seals .9.
Remove t he oil cool er.10.
Page 696 of 3229
Remove and dis card t he 2 gas ket s .
11.
Installation
Inst all new gas ket s .
1.
Inst all t he engi ne oil cool er.
T orque: 10 Nm 2.
Inst all t he hos e.
T orque: 10 Nm 3.
Inst all and t ighten t he engine oi l fil ter.
T orque: 5 Nm 4.
Inst all t he cool ant hos e.
5.
Inst all t he new gasket .
6.
Inst all t he dips ti ck tube.
T orque: 10 Nm 7.
Inst all t he int ake mani fol d as sembl y.
Refer t o: Int ake Mani fol d (303-01A Engi ne - I6 3.2L Petrol, Removal
and Inst all at ion).
8.
Fil l and bl eed the cooli ng s ys t em.
Refer t o: Cool ing Sys tem Drai ni ng, Fi lli ng and Bleeding (303-03A
Engine Cooli ng - I6 3.2L Petrol, General Procedures).
9.
Check and top-up the engine oi l if required.
10.
Page 697 of 3229
Publi s hed: 11-May-2011
Engine - I6 3.2L Petrol - Oil Filter Element
Removal and Inst all ati on
Removal
Releas e t he PAS fl uid reservoi r from t he bracket and ti e as ide.
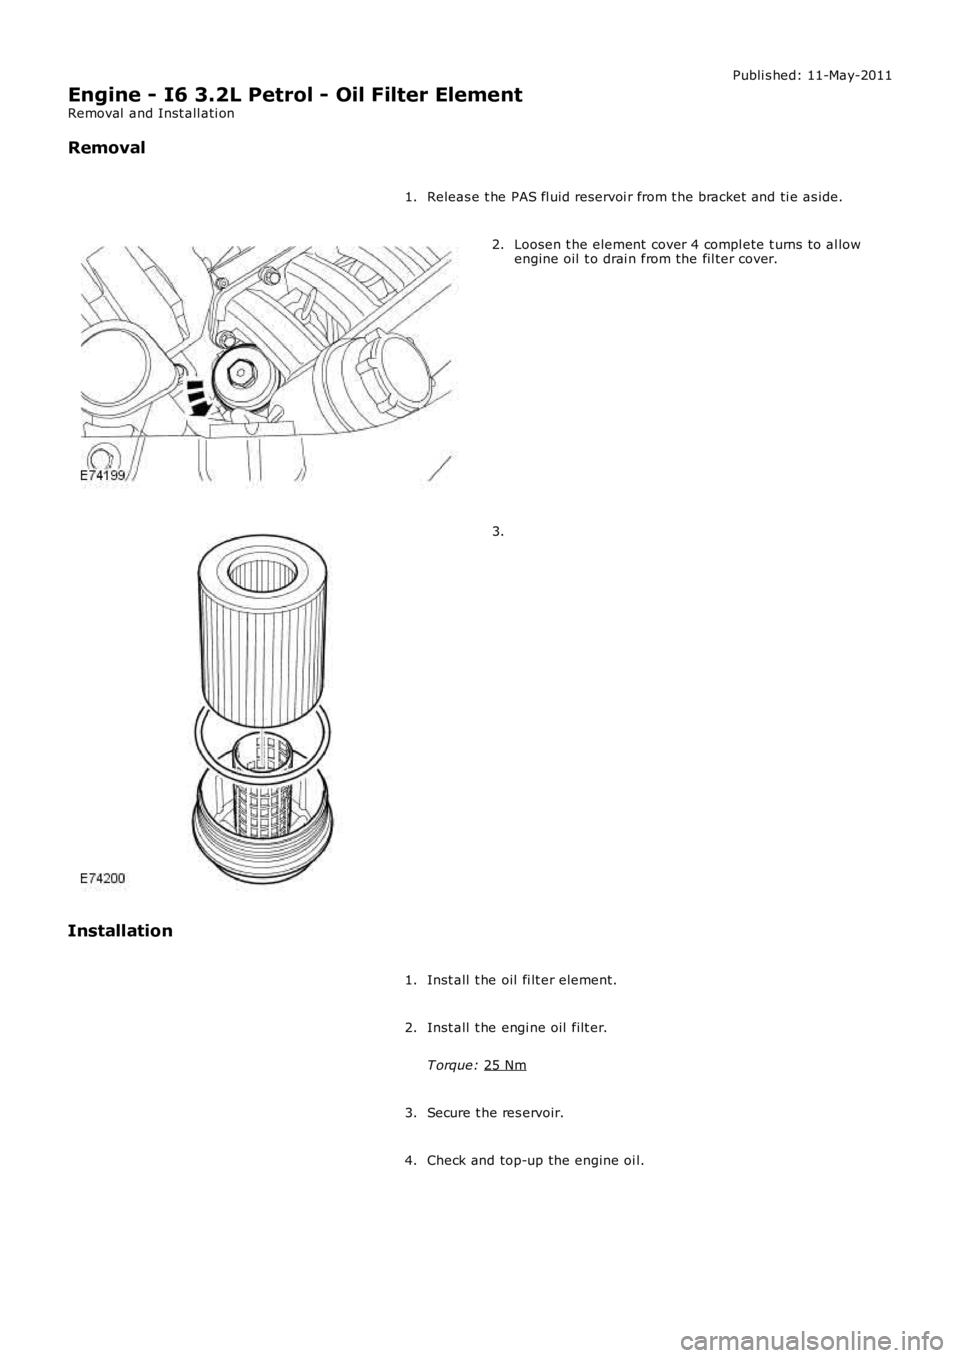
1. Loosen t he element cover 4 compl ete t urns t o al low
engine oil t o drai n from the fil ter cover.
2. 3.
Installation Inst all t he oil fi lt er element.
1.
Inst all t he engi ne oil filt er.
T orque: 25 Nm 2.
Secure t he res ervoir.
3.
Check and top-up the engine oi l.
4.
Page 698 of 3229
Publi s hed: 11-May-2011
Engine - I6 3.2L Petrol - Engine Upper Support Insulator
Removal and Inst all ati on
Removal
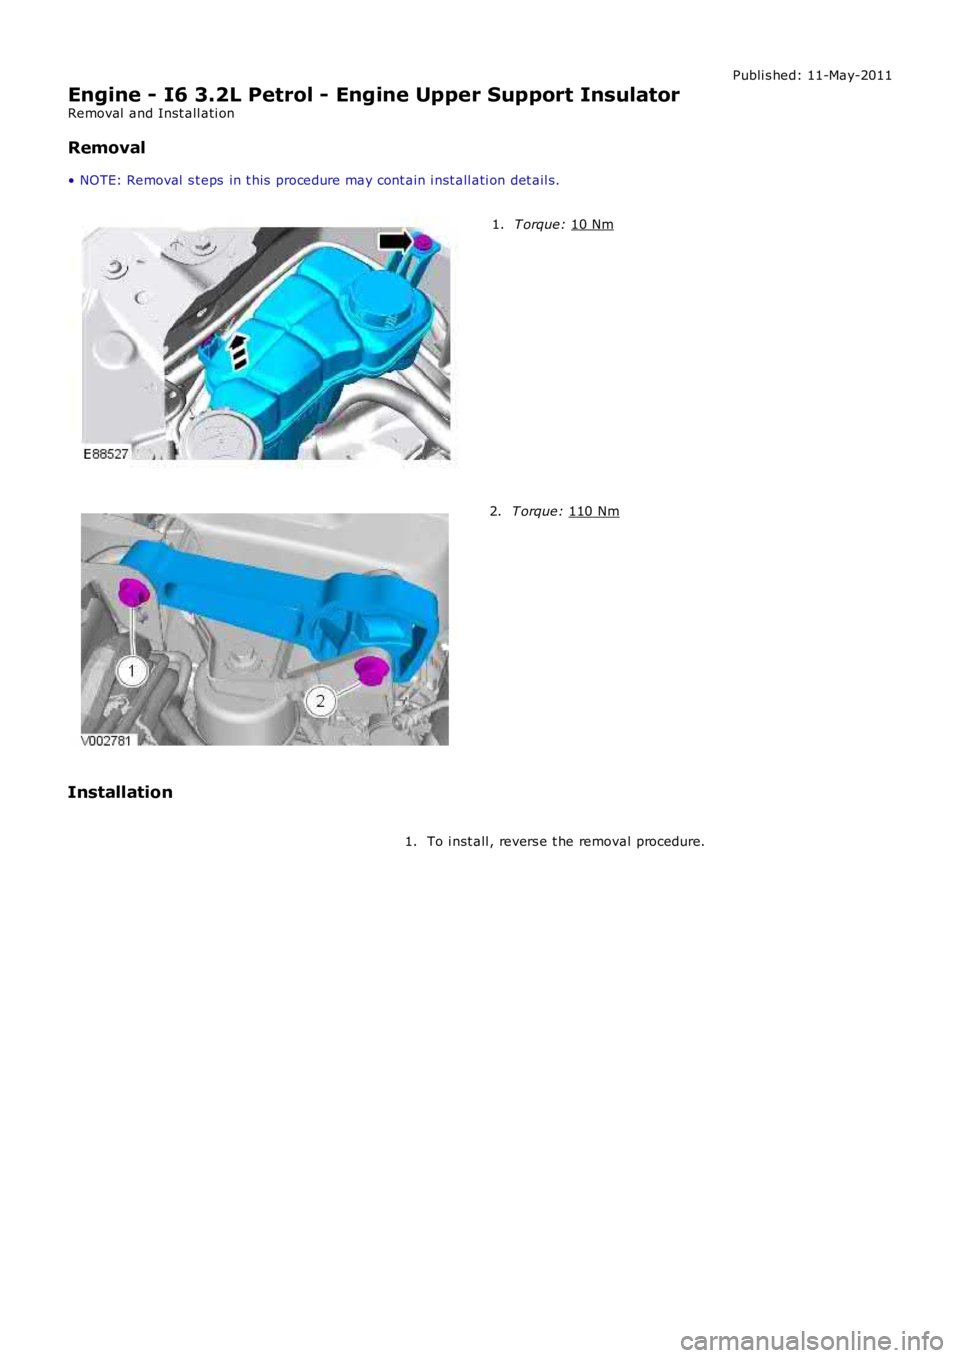
• NOTE: Removal s t eps in t his procedure may cont ain i nst all ati on det ail s. T orque:
10 Nm 1.
T orque:
110 Nm 2.
Installation To i nst all , revers e t he removal procedure.
1.
Page 699 of 3229
Publi s hed: 11-May-2011
Engine - I6 3.2L Petrol - Engine Lower Support Insulator
Removal and Inst all ati on
Removal
• NOTE: Removal s t eps in t his procedure may cont ain i nst all ati on det ail s. All vehicles
1. W ARNING: Make sure t o s upport the vehicle wit h axle
s tands .
Rais e and s upport t he vehi cl e.
1.
Remove t he engi ne undershi eld.
Refer t o: Engi ne Unders hi eld (501-02 Front End Body Panel s ,
Removal and Ins tall ati on).
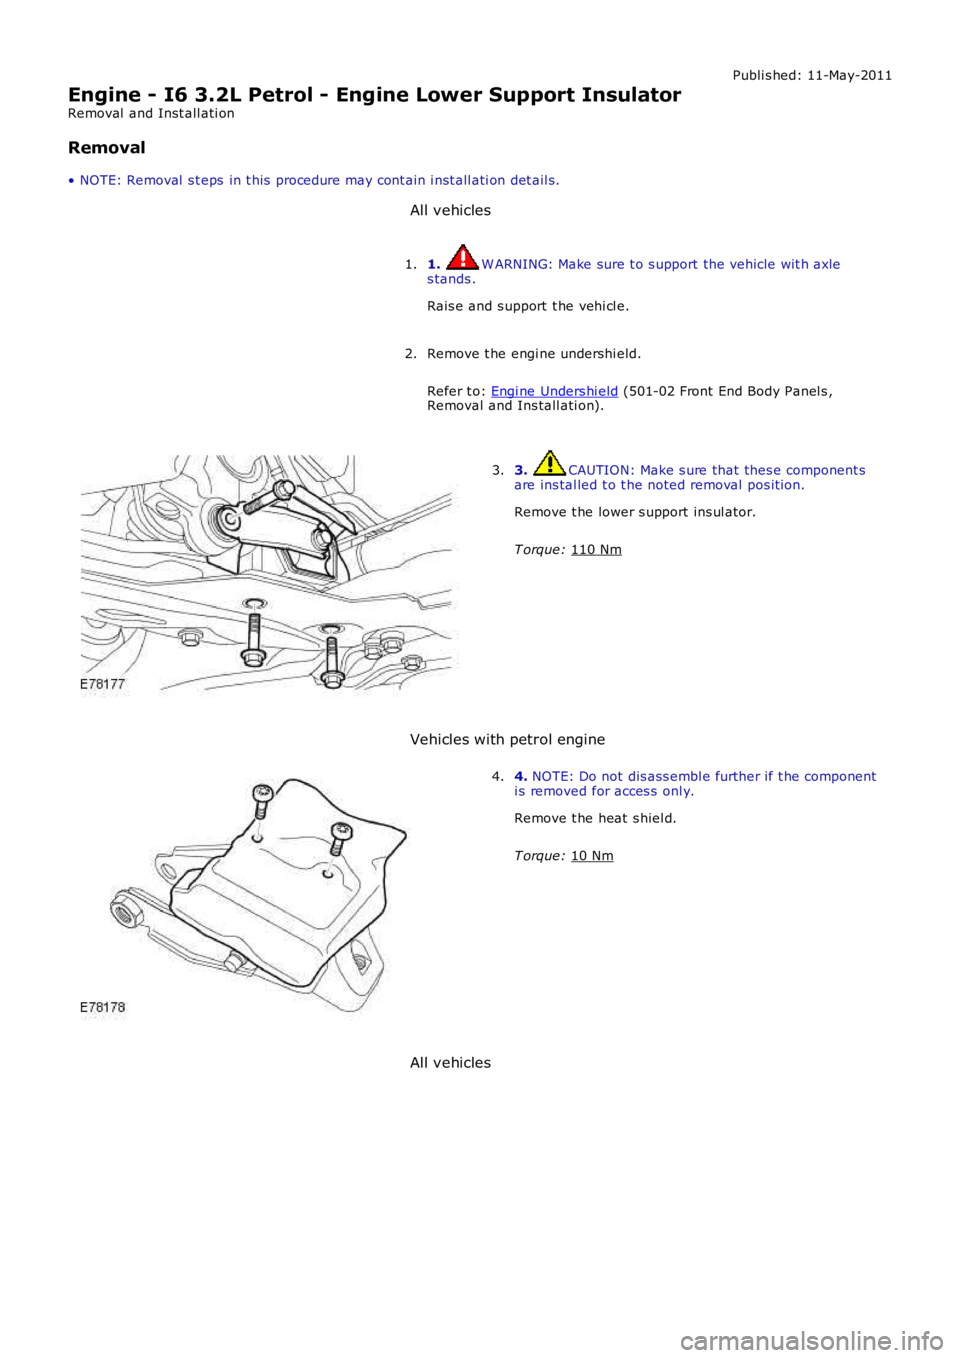
2. 3. CAUTION: Make s ure that thes e component s
are ins tal led t o t he noted removal pos it ion.
Remove t he lower s upport ins ul ator.
T orque: 110 Nm 3.
Vehicles with petrol engine 4.
NOTE: Do not dis ass embl e further if t he component
i s removed for acces s onl y.
Remove t he heat s hiel d.
T orque: 10 Nm 4.
All vehicles
Page 700 of 3229
Remove t he engi ne mount li nk bracket s.
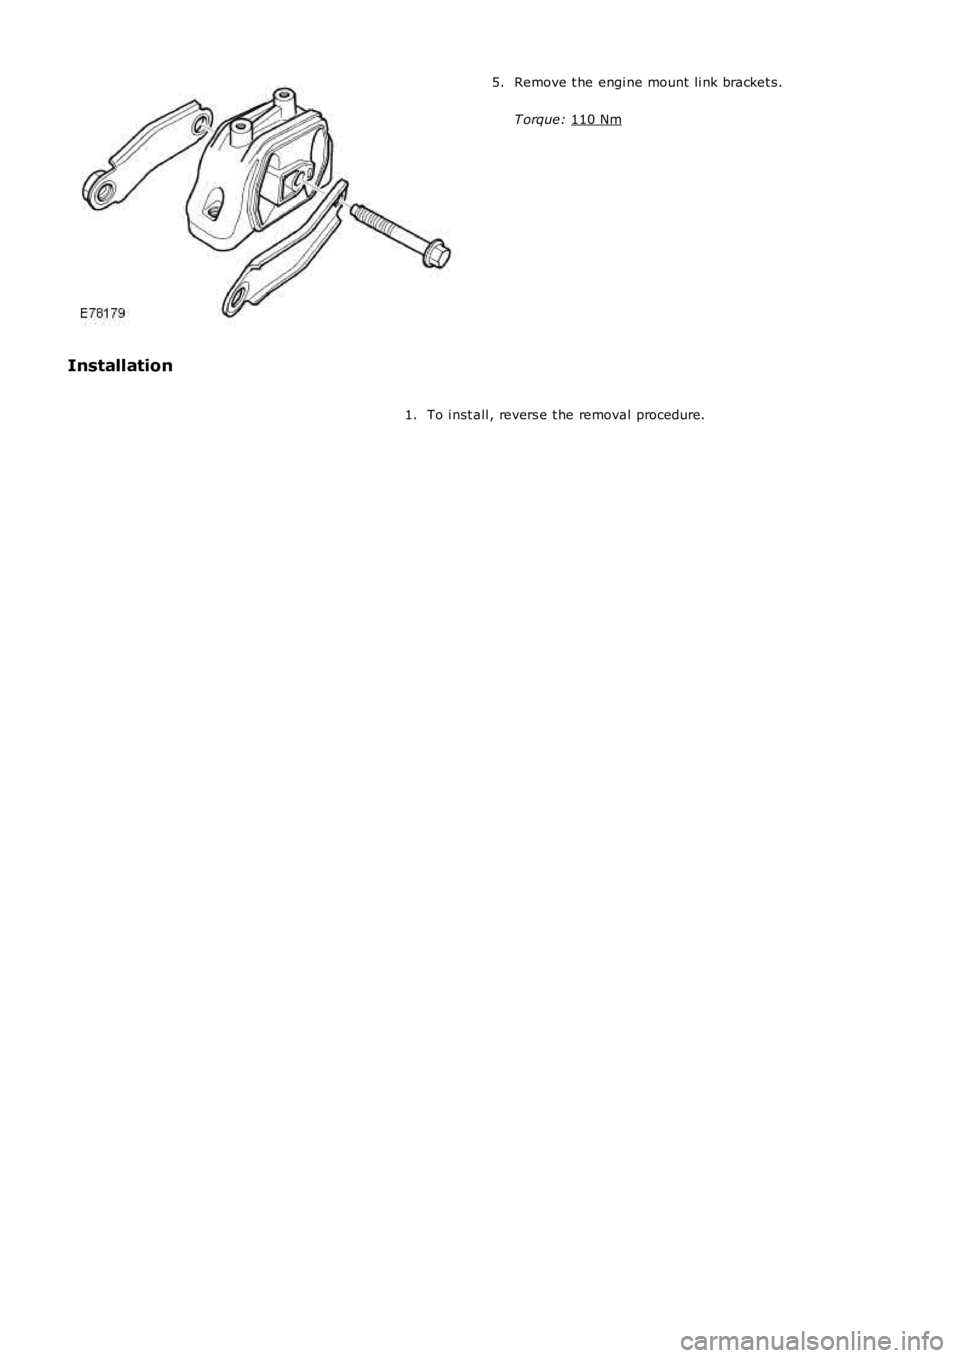
T orque: 110 Nm 5.
Installation To i nst all , revers e t he removal procedure.
1.
Trending: fuel, air bleeding, clock, fuse box, turn signal, weight, climate control
