LAND ROVER FRELANDER 2 2006 Repair Manual
Manufacturer: LAND ROVER, Model Year: 2006, Model line: FRELANDER 2, Model: LAND ROVER FRELANDER 2 2006Pages: 3229, PDF Size: 78.5 MB
Page 671 of 3229
Torque:
6 Nm 13.
CAUTIONS: Extreme cleanli ness must be exerci sed when handli ng this component.
A new O-ring seal is t o be instal led.
Install the CPS solenoids.
Torque: 10 Nm 13.
Connect the CPS solenoi ds.
14.
15. CAUTIONS: Apply clean engi ne oil to t he VVT sol enoid shaft.
Extreme cleanli ness must be exerci sed when handli ng this component.
A new O-ring seal is t o be instal led.
Install the VVT solenoid.
Torque: 10 Nm 15.
Connect the VVT solenoid.
16.
Install the CMP sensors.
Torque: 10 Nm 17.
Connect and secure the CMP sensor electrical connectors.
18.
Connect the fuel i nj ector electrical connectors.
19.
Connect the ground cabl e.
Torque: 6 Nm 20.
Install the engine mount.
Refer to: Engine Mount RH (303-01A Engi ne - I6 3.2L Petrol, Removal and
Installation).
21.
Install the i gniti on coil-on-pl ugs.
Refer to: Igni tion Coil-On-Plug (303-07A Engine Igni tion, Removal and
Installation).
22.
Install the crankcase vent oil separator.
Refer to: Crankcase Vent Oi l Separator (303-08A Engine Emi ssi on Control - I6 3.2L
Petrol, Removal and Installation).
23.
Install the ti ming component housi ng.
Refer to: Timing Components Housing (303-01A Engine - I6 3.2L Pet rol , Removal
and Install ati on).
24.
Connect the battery ground cable and instal l the cover.
Refer to: Specifi cati ons (414-00 Battery and Charging System - General
Information, Specifi cati ons).
25.
Page 672 of 3229
Publi s hed: 11-May-2011
Engine - I6 3.2L Petrol - Camshafts
Removal and Inst all ati on
Removal
1. W ARNING: Make sure t o s upport the vehicle wit h axles tands .
Rais e and s upport t he vehi cl e.
1.
Remove t he cover and dis connect the bat tery ground cabl e.
Refer t o: Specificati ons (414-00 Bat tery and Charging Sys tem -General Informat ion, Specificati ons).
2.
Remove t he camshaft bearing housi ng.
Refer t o: Val ve Cover (303-01A Engine - I6 3.2L Pet rol , Removal andInst all at ion).
3.
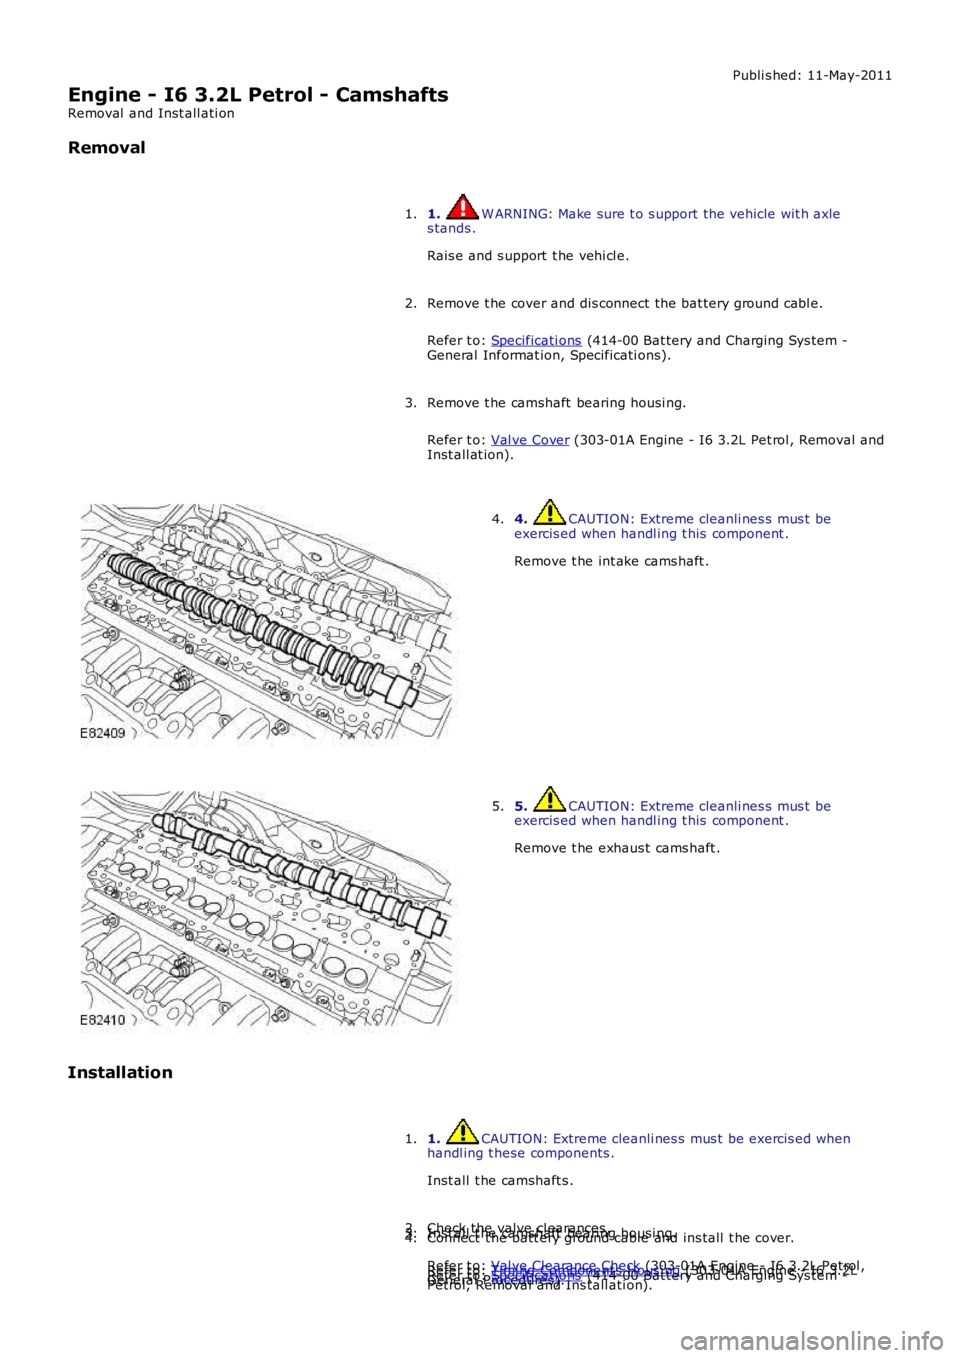
4. CAUTION: Extreme cleanli nes s mus t beexercis ed when handl ing t his component .
Remove t he int ake cams haft .
4.
5. CAUTION: Extreme cleanli nes s mus t beexercis ed when handl ing t his component .
Remove t he exhaus t cams haft .
5.
Installation
1. CAUTION: Extreme cleanli nes s mus t be exercis ed whenhandl ing t hese components .
Inst all t he camshaft s .
1.
Check the valve cl earances .
Refer t o: Val ve Clearance Check (303-01A Engine - I6 3.2L Petrol ,General Procedures).
2.Inst all t he camshaft bearing housi ng.
Refer t o: Timi ng Component s Hous i ng (303-01A Engine - I6 3.2LPetrol, Removal and Ins tall ati on).
3.Connect t he batt ery ground cable and ins tall t he cover.
Refer t o: Specificati ons (414-00 Bat tery and Charging Sys tem -
4.
Page 673 of 3229
Publi s hed: 11-May-2011
Engine - I6 3.2L Petrol - Timing Chain
Removal and Inst all ati on
Special T ool(s)
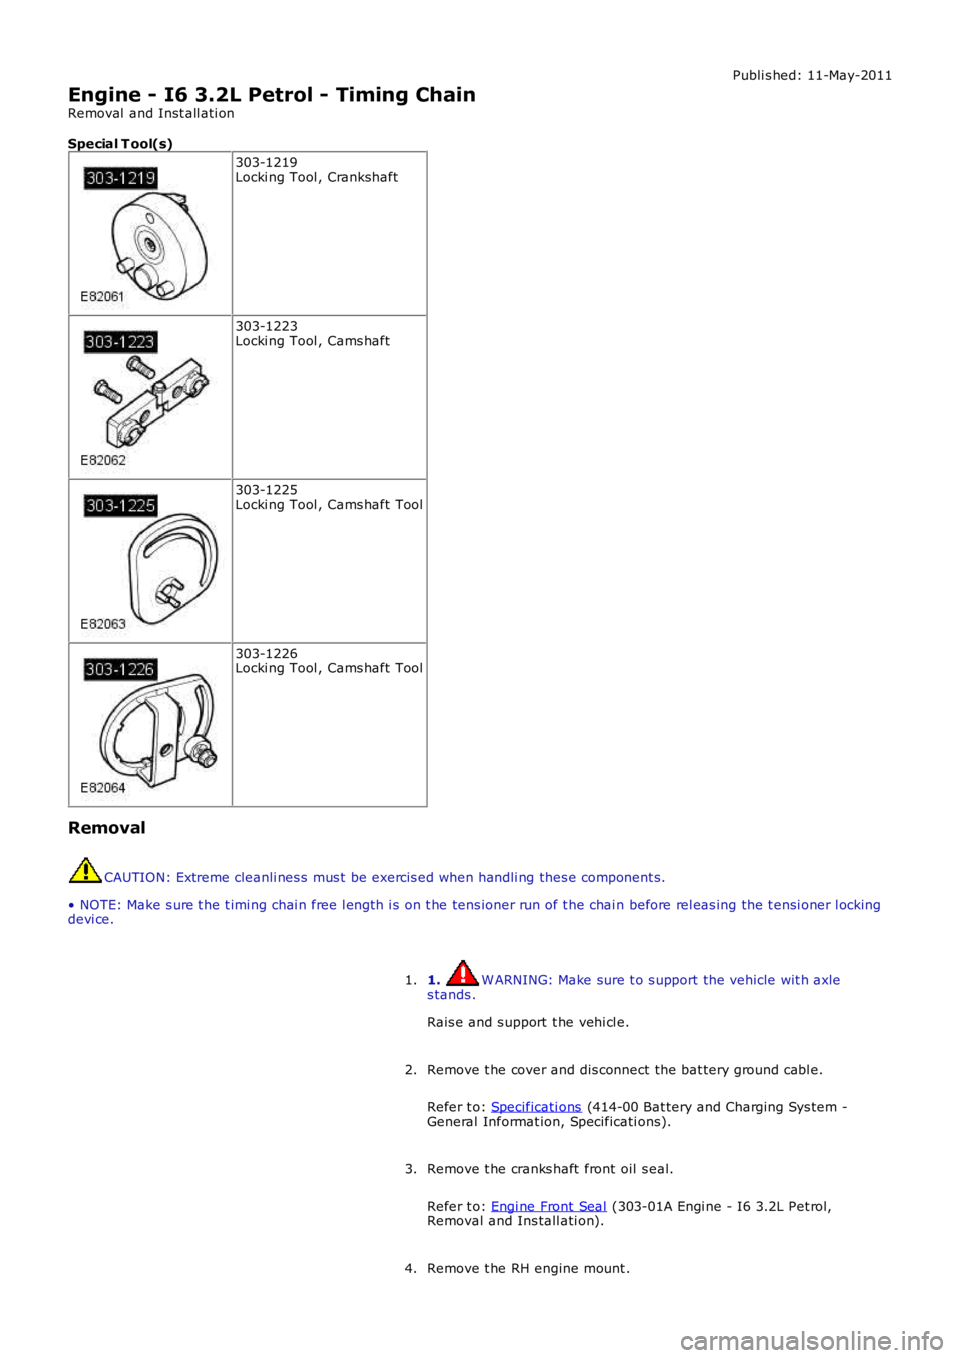
303-1219Locki ng Tool , Crankshaft
303-1223Locki ng Tool , Cams haft
303-1225Locki ng Tool , Cams haft Tool
303-1226Locki ng Tool , Cams haft Tool
Removal
CAUTION: Extreme cleanli nes s mus t be exercis ed when handli ng thes e component s.
• NOTE: Make s ure t he t imi ng chai n free l engt h i s on t he tens ioner run of t he chai n before rel eas ing the t ensi oner l ockingdevi ce.
1. W ARNING: Make sure t o s upport the vehicle wit h axles tands .
Rais e and s upport t he vehi cl e.
1.
Remove t he cover and dis connect the bat tery ground cabl e.
Refer t o: Specificati ons (414-00 Bat tery and Charging Sys tem -General Informat ion, Specificati ons).
2.
Remove t he cranks haft front oil s eal.
Refer t o: Engi ne Front Seal (303-01A Engi ne - I6 3.2L Pet rol,Removal and Ins tall ati on).
3.
Remove t he RH engine mount .4.
Page 674 of 3229
Refer t o:
Engi ne Mount RH (303-01A Engi ne - I6 3.2L Petrol,
Removal and Ins tall ati on).
Remove t he ti ming cover.
Refer t o: Timi ng Cover (303-01A Engi ne - I6 3.2L Pet rol, Removal
and Inst all at ion).
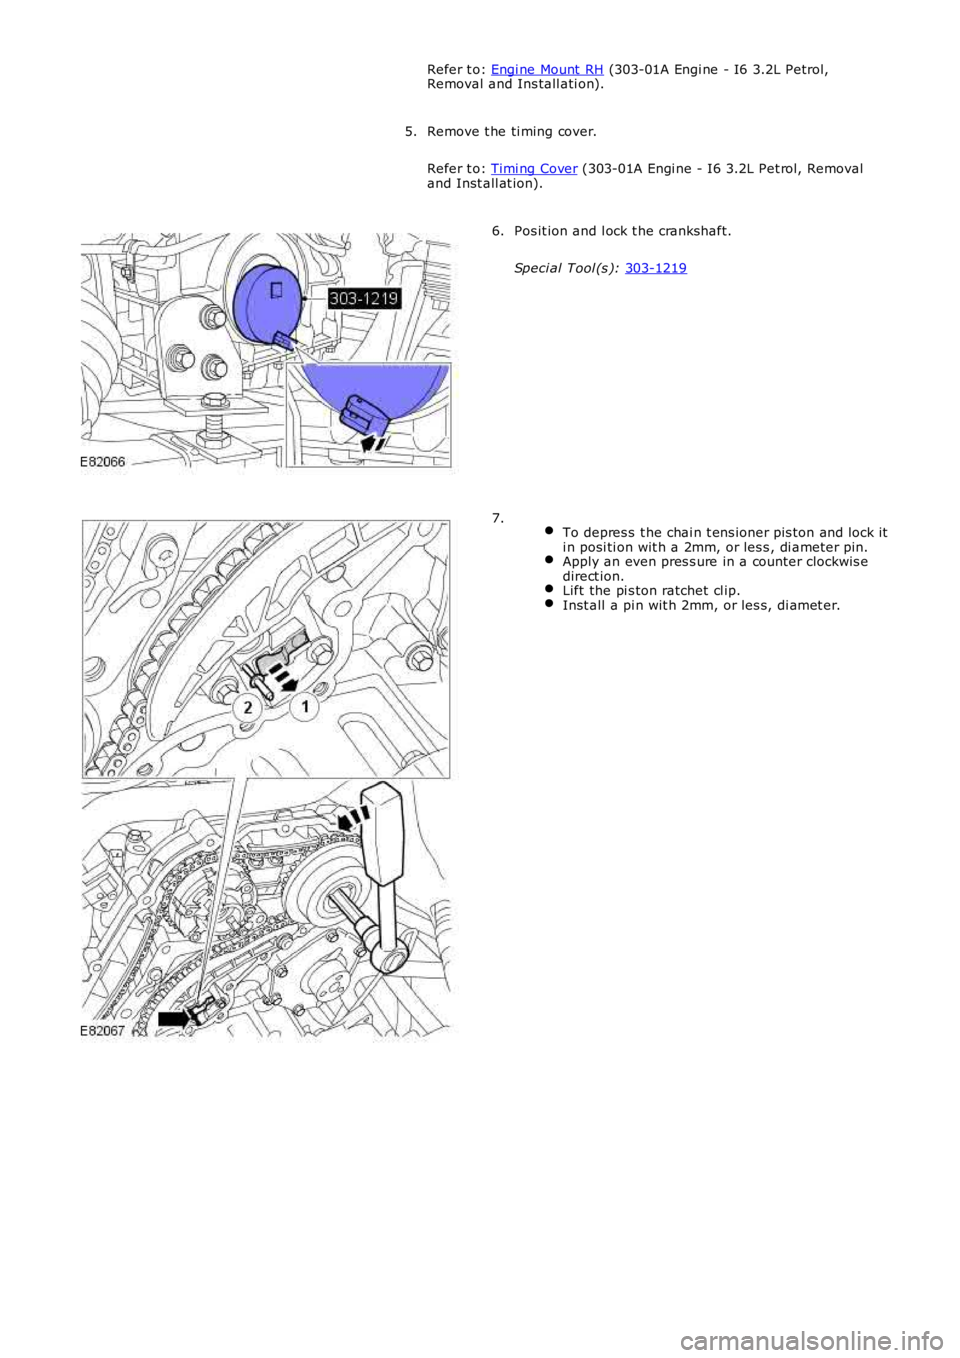
5. Pos it ion and l ock t he crankshaft.
Speci al Tool (s ): 303-1219 6.
To depres s t he chai n t ens ioner pis ton and lock it
i n posi ti on wit h a 2mm, or les s , di ameter pin. Apply an even pres s ure in a counter clockwis e
direct ion. Lift the pi s ton ratchet cl ip.
Inst all a pi n wit h 2mm, or les s, di amet er.7.
Page 675 of 3229
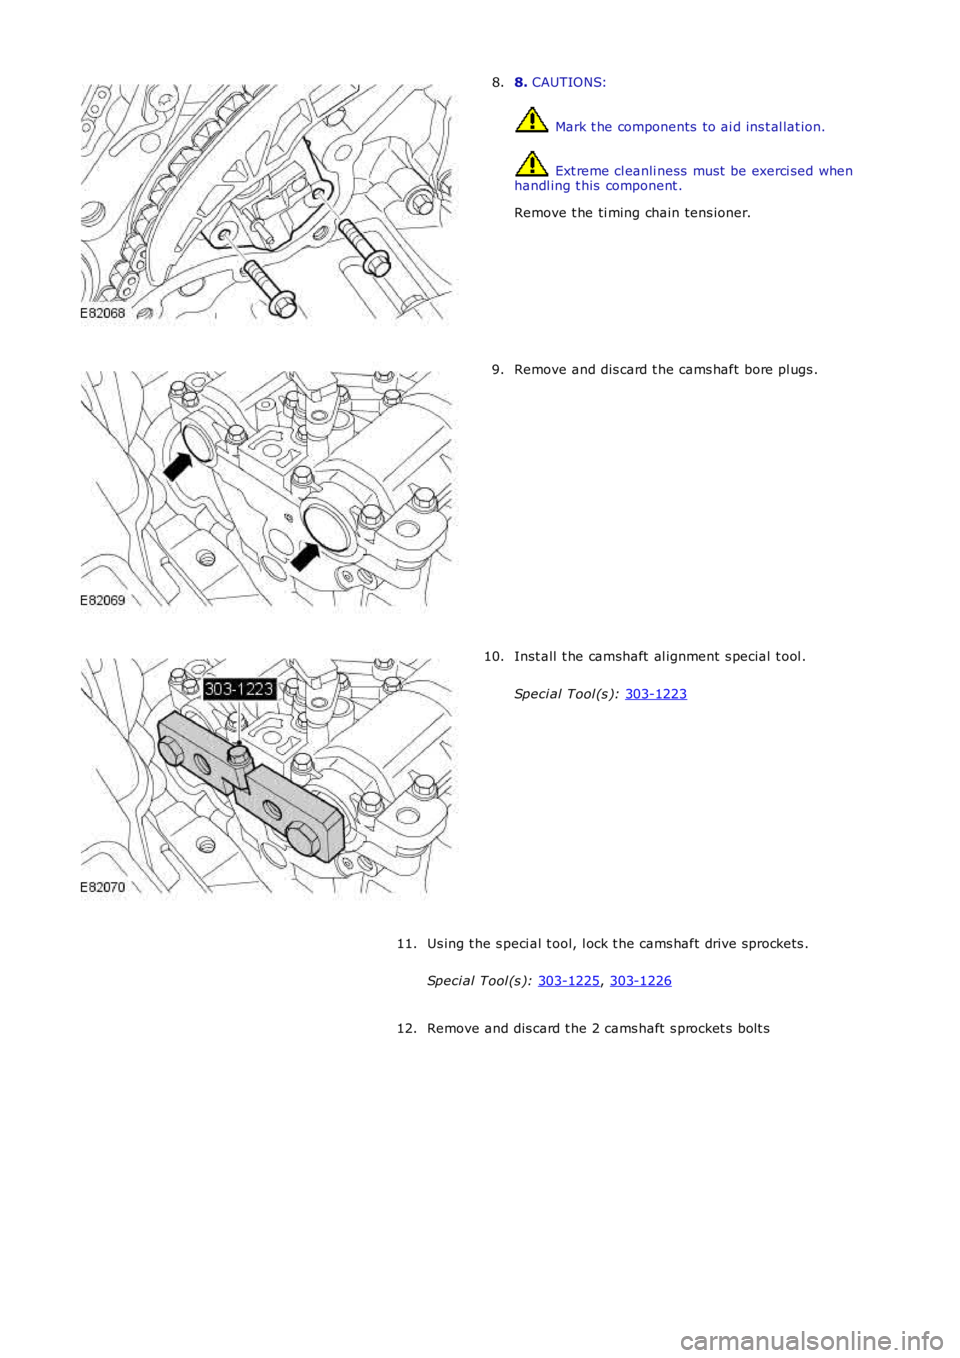
8.
CAUTIONS: Mark t he components to ai d ins t al lat ion.
Ext reme cl eanli ness must be exerci sed when
handl ing t his component .
Remove t he ti ming chain tens ioner.
8. Remove and dis card t he cams haft bore pl ugs .
9. Inst all t he camshaft al ignment s pecial t ool .
Speci al Tool (s ): 303-1223 10.
Us ing t he s peci al t ool, l ock t he cams haft dri ve sprockets .
Speci al Tool (s ): 303-1225 ,
303-1226 11.
Remove and dis card t he 2 cams haft s procket s bolt s
12.
Page 676 of 3229
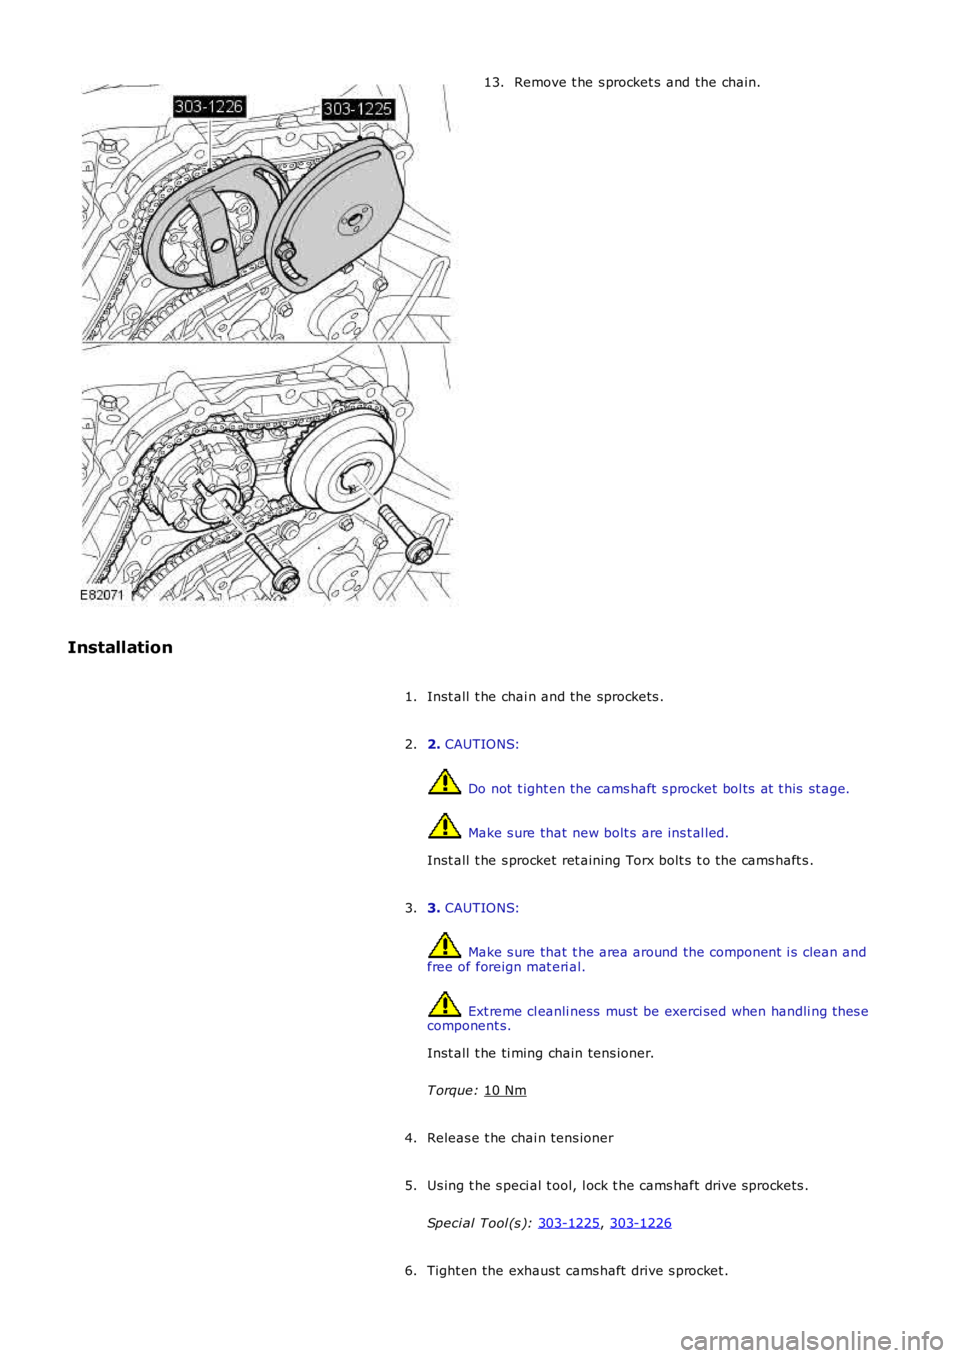
Remove t he s procket s and the chain.
13.
Installation Inst all t he chai n and the sprockets .
1.
2. CAUTIONS: Do not t ight en the cams haft s procket bol ts at t his st age.
Make s ure that new bolt s are ins t al led.
Inst all t he s procket ret aining Torx bolt s t o the cams haft s .
2.
3. CAUTIONS: Make s ure that t he area around the component i s clean and
free of foreign mat eri al. Ext reme cl eanli ness must be exerci sed when handli ng t hes e
component s.
Inst all t he ti ming chain tens ioner.
T orque: 10 Nm 3.
Releas e t he chai n tens ioner
4.
Us ing t he s peci al t ool, l ock t he cams haft dri ve sprockets .
Speci al Tool (s ): 303-1225 ,
303-1226 5.
Tight en the exhaust cams haft drive s procket .
6.
Page 677 of 3229
Stage 1:
Stage 2:
T orque:
75 Nm 90°
Tight en the inlet cams haft dri ve sprocket.
T orque: 110 Nm 7.
Remove t he camshaft al ignment s pecial t ool .
8.
9. CAUTIONS: Make s ure that t he area around the component i s clean and
free of foreign mat eri al. The pl ugs must be ins tall ed dry.
Inst all new cams haft bore pl ugs .
9.
Remove t he cranks haft l ocking tool.
10.
Inst all t he cranks haft front oil s eal.
Refer t o: Engi ne Front Seal (303-01A Engi ne - I6 3.2L Pet rol,
Removal and Ins tall ati on).
11.
Inst all t he ti ming cover.
Refer t o: Timi ng Cover (303-01A Engi ne - I6 3.2L Pet rol, Removal
and Inst all at ion).
12.
Inst all t he RH engine mount .
Refer t o: Engi ne Mount RH (303-01A Engi ne - I6 3.2L Petrol,
Removal and Ins tall ati on).
13.
Connect t he batt ery ground cable and ins tall t he cover.
Refer t o: Specificati ons (414-00 Bat tery and Charging Sys tem -
General Informat ion, Specificati ons).
14.
Page 678 of 3229
Publi s hed: 11-May-2011
Engine - I6 3.2L Petrol - Exhaust Manifold
Removal and Inst all ati on
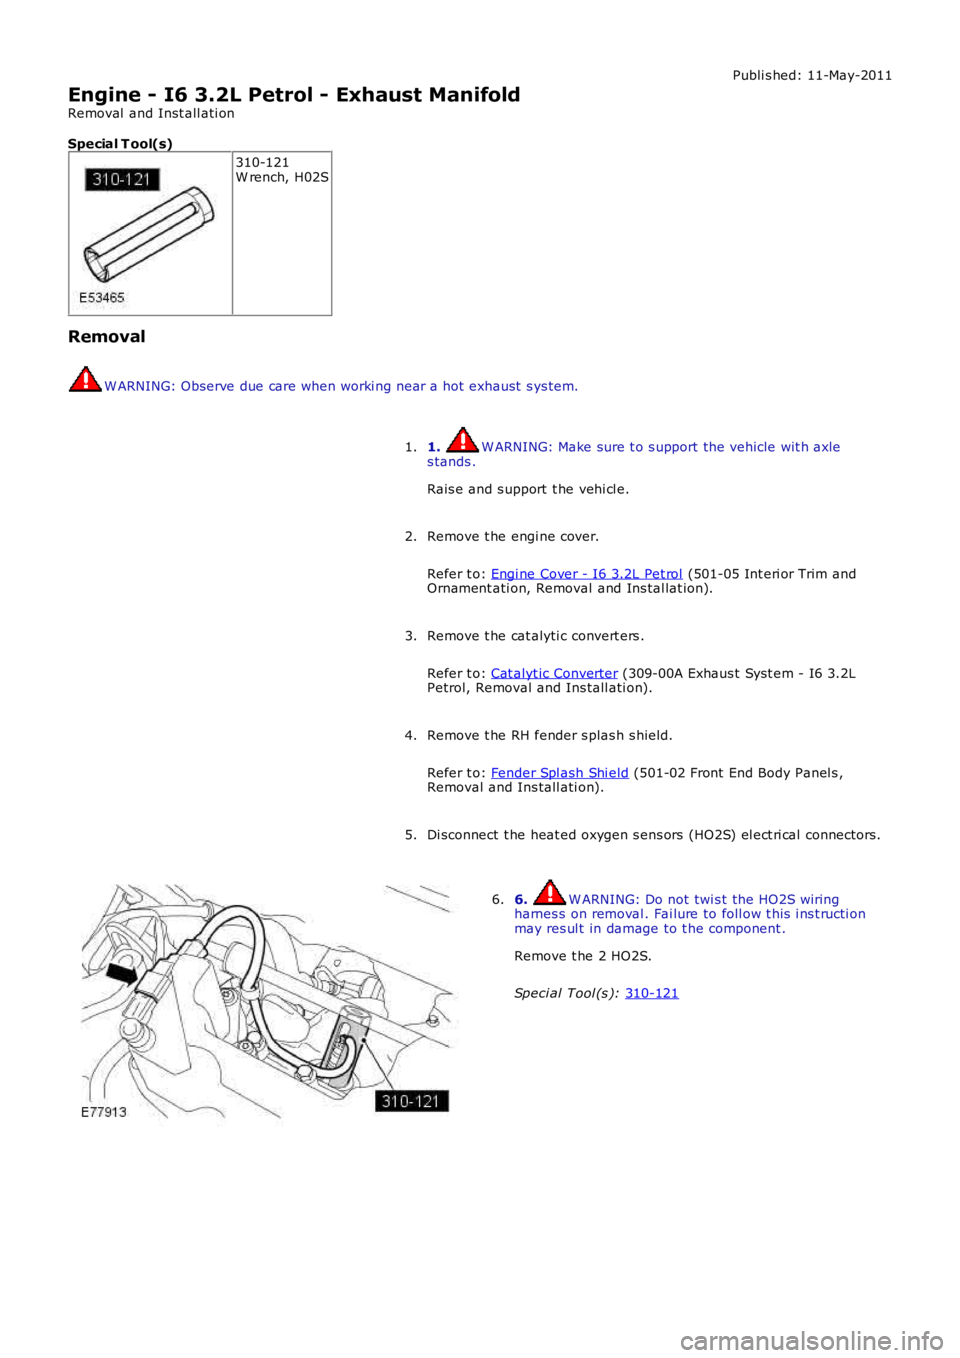
Special T ool(s) 310-121
W rench, H02S
Removal W ARNING: Observe due care when worki ng near a hot exhaust s ys tem.
1. W ARNING: Make sure t o s upport the vehicle wit h axle
s tands .
Rais e and s upport t he vehi cl e.
1.
Remove t he engi ne cover.
Refer t o: Engi ne Cover - I6 3.2L Pet rol (501-05 Int eri or Trim and
Ornament ati on, Removal and Ins tal lat ion).
2.
Remove t he cat alyti c convert ers .
Refer t o: Cat alyt ic Converter (309-00A Exhaus t Syst em - I6 3.2L
Petrol, Removal and Ins tall ati on).
3.
Remove t he RH fender s plas h s hield.
Refer t o: Fender Spl ash Shi eld (501-02 Front End Body Panel s ,
Removal and Ins tall ati on).
4.
Di sconnect t he heat ed oxygen s ens ors (HO2S) el ect ri cal connectors .
5. 6. W ARNING: Do not twi s t the HO2S wiring
harnes s on removal . Fai lure to foll ow t his i ns t ructi on
may res ul t in damage to t he component .
Remove t he 2 HO2S.
Speci al Tool (s ): 310-121 6.
Page 679 of 3229
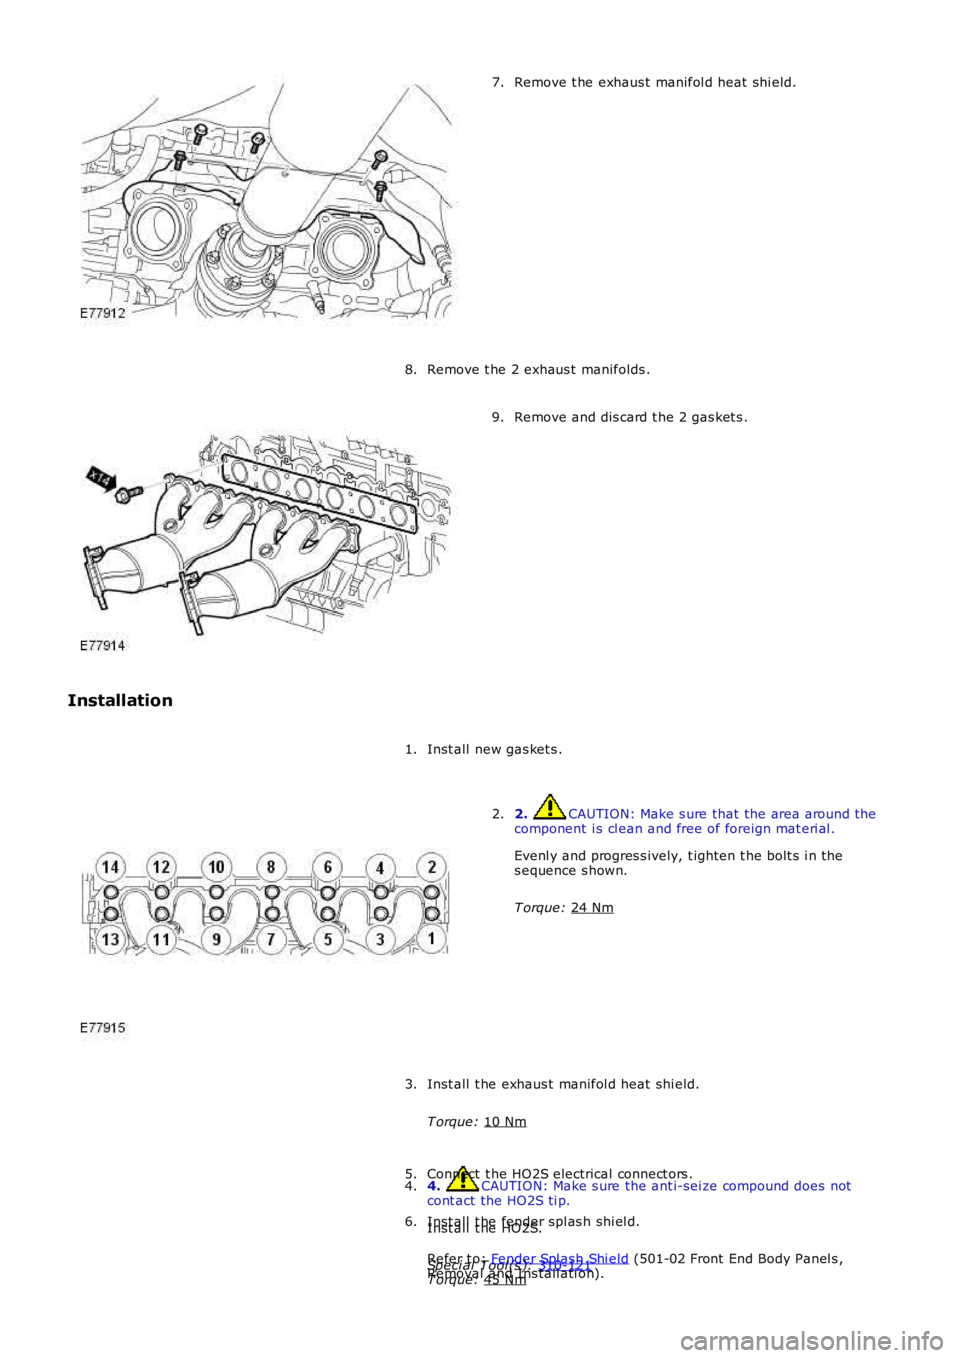
Remove t he exhaus t manifol d heat shi eld.
7.
Remove t he 2 exhaus t manifolds .
8. Remove and dis card t he 2 gas ket s .
9.
Installation Inst all new gas ket s .
1. 2. CAUTION: Make s ure that the area around t he
component i s cl ean and free of foreign mat eri al .
Evenl y and progres s ively, t ighten t he bolt s i n the
s equence s hown.
T orque: 24 Nm 2.
Inst all t he exhaus t manifol d heat shi eld.
T orque: 10 Nm 3.
4. CAUTION: Make s ure the ant i-sei ze compound does not
cont act the HO2S ti p.
Inst all t he HO2S.
Speci al Tool (s ): 310-121 T orque:
45 Nm 4.
Connect t he HO2S electrical connect ors .
5.
Inst all t he fender spl as h shi el d.
Refer t o: Fender Spl ash Shi eld (501-02 Front End Body Panel s ,
Removal and Ins tall ati on).
6.
Page 680 of 3229

Remove t he cat alyti c convert ers .
Refer t o: Cat alyt ic Converter (309-00A Exhaus t Syst em - I6 3.2LPetrol, Removal and Ins tall ati on).
7.
Inst all t he engi ne cover.
Refer t o: Engi ne Cover - I6 3.2L Pet rol (501-05 Int eri or Trim andOrnament ati on, Removal and Ins tal lat ion).
8.