LAND ROVER FRELANDER 2 2006 Repair Manual
FRELANDER 2 2006
LAND ROVER
LAND ROVER
https://www.carmanualsonline.info/img/64/57251/w960_57251-0.png
LAND ROVER FRELANDER 2 2006 Repair Manual
Trending: service reset, seat memory, overheating, octane, engine oil, key battery, change time
Page 731 of 3229
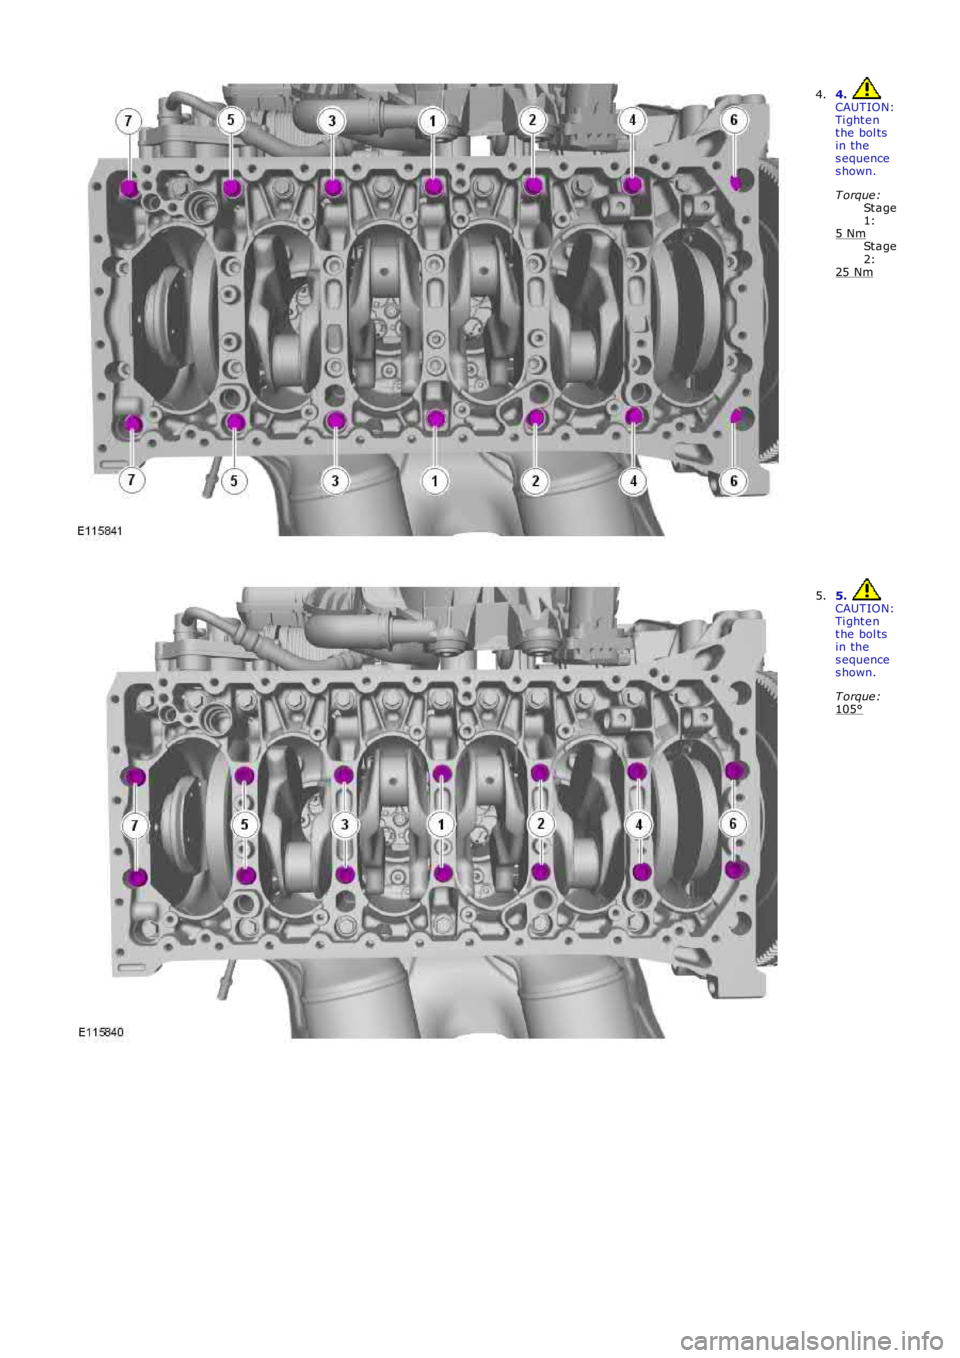
St a ge
1:
St a ge
2: 4.
CAUTION:
Ti ght e n
t he bol ts
in the
s equence
s hown.
T orque :
5 Nm 25 Nm4.
5.
CAUTION:
Ti ght e n
t he bol ts
in the
s equence
s hown.
T orque :
105° 5.
Page 732 of 3229
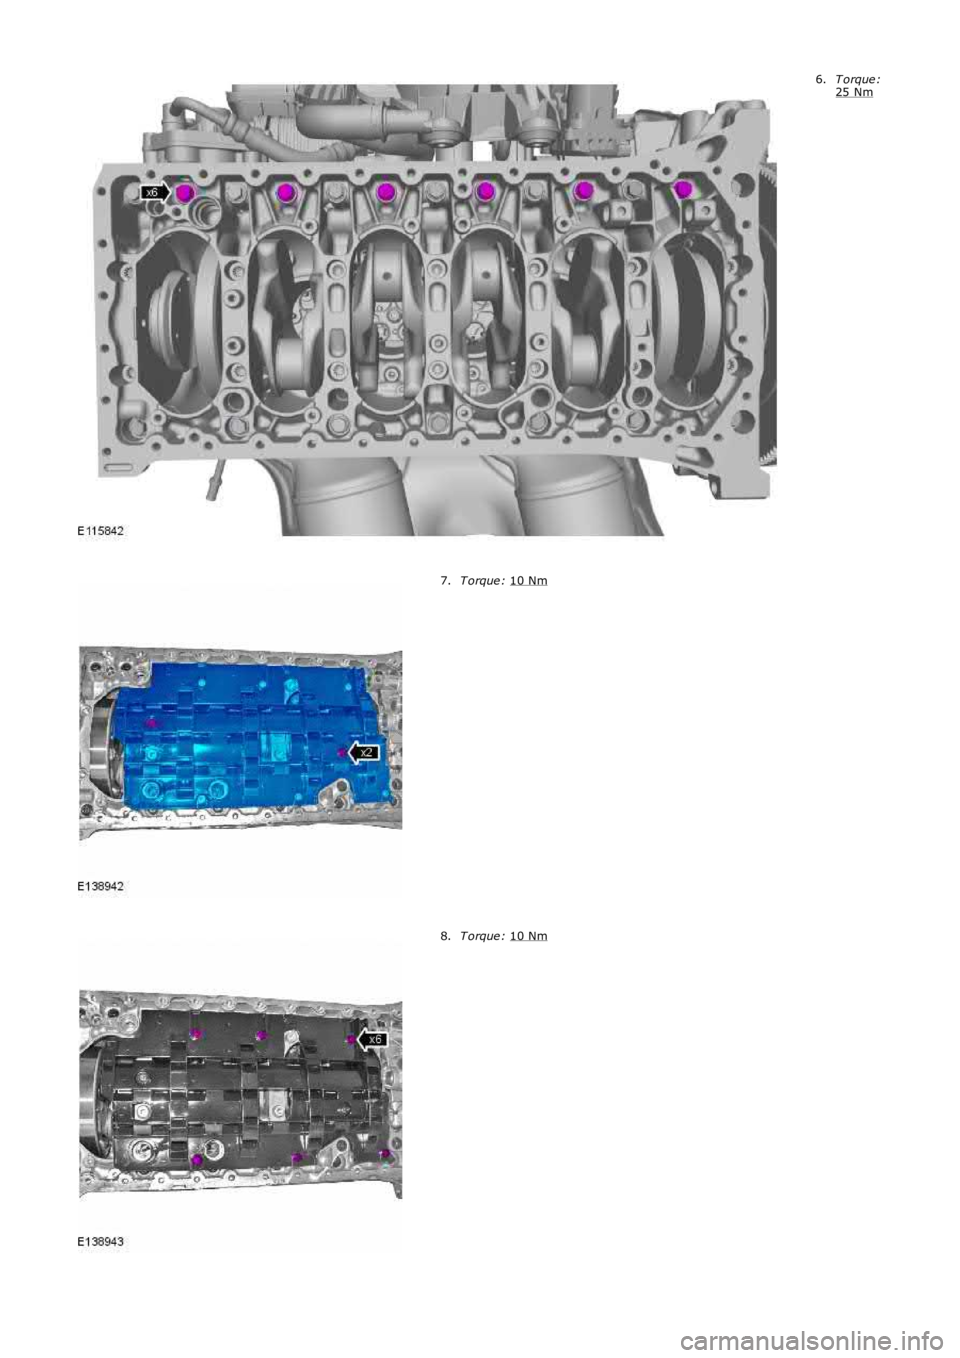
T orque :
25 Nm 6.
T orque :
10 Nm 7.
T orque :
10 Nm 8.
Page 733 of 3229
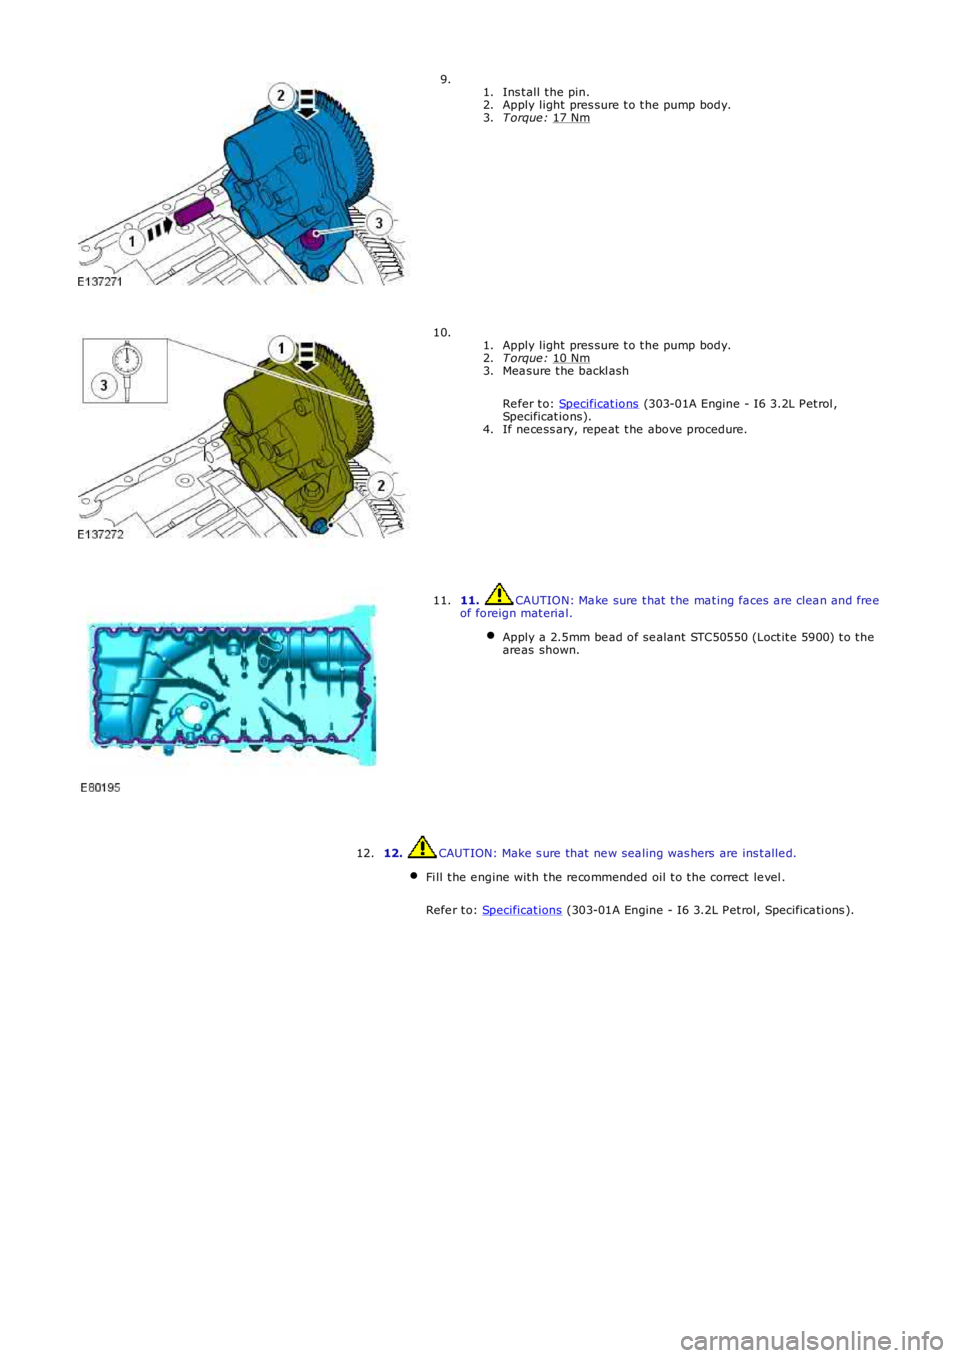
Ins t all t he pin.
1.
Apply light pres sure t o t he pump body.
2.
T orque : 17 Nm 3.
9.
Apply light pres sure t o t he pump body.
1.
T orque : 10 Nm 2.
Mea sure t he backl ash
Re fer t o: Specificat ions (303-01A Engine - I6 3.2L P et rol ,
Specificat ions).
3.
If ne ce ss ary, repe at t he above procedure.
4.
10. 11. CAUTION: Ma ke sure t hat t he ma t ing fa ces a re clea n and fre e
of foreign mat eria l.
Apply a 2.5mm be ad of se alant STC50550 (Loct it e 5900) t o t he
are as shown. 11.
12. CAUTION: Make s ure that ne w sea ling was hers are ins t alle d.
Fi ll t he e ngine wit h t he re commended oil t o t he correct le vel .
Refe r t o: Specificat ions (303-01A Engine - I6 3.2L P et rol, Specifica ti ons ).12.
Page 734 of 3229
Publi s hed: 11-May-2011
Engine - I6 3.2L Petrol - Rear End Accessory Drive (READ) Idler Shaft
Assembly
Removal and Inst all ati on
Special T ool(s) 303-1486
Mandrel 303-1488
Rear End Acces sory Drive (READ) Idler Shaft As s embl y Extract or
Removal
• NOTE: Removal s t eps in t his procedure may cont ain i nst all ati on det ail s.
Refer t o: Specificati ons (414-00 Bat tery and Charging Sys tem -
General Informat ion, Specificati ons).
1.
2. W ARNING: Do not work on or under a vehi cle s upported onl y
by a jack. Al ways support t he vehi cl e on s afet y s tands .
Rais e and s upport t he vehi cl e.
2.
Refer t o: Rear End Acces s ory Drive (READ) (303-05A Access ory Dri ve
- I6 3.2L Pet rol , Removal and Ins t al lat ion).
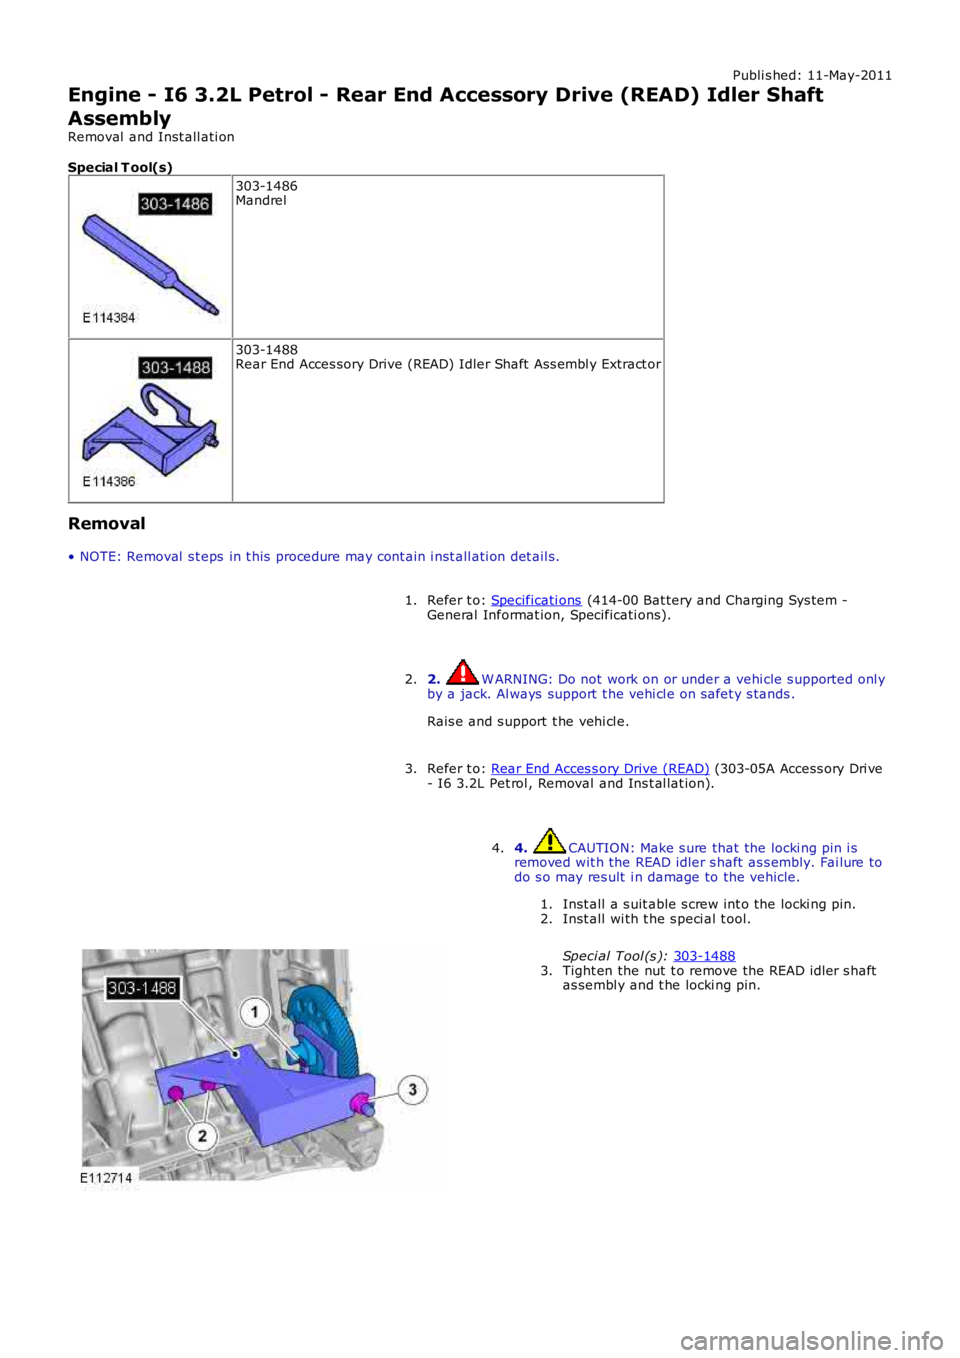
3. 4. CAUTION: Make s ure that the locki ng pin i s
removed wit h the READ idler s haft as s embly. Fai lure to
do s o may res ult i n damage to the vehicle.
Inst all a s uit able s crew int o the locki ng pin.
1.
Inst all wi th t he s peci al t ool.
Speci al Tool (s ): 303-1488 2.
Tight en the nut t o remove the READ idler s haft
as sembl y and t he locki ng pin.
3.
4.
Page 735 of 3229
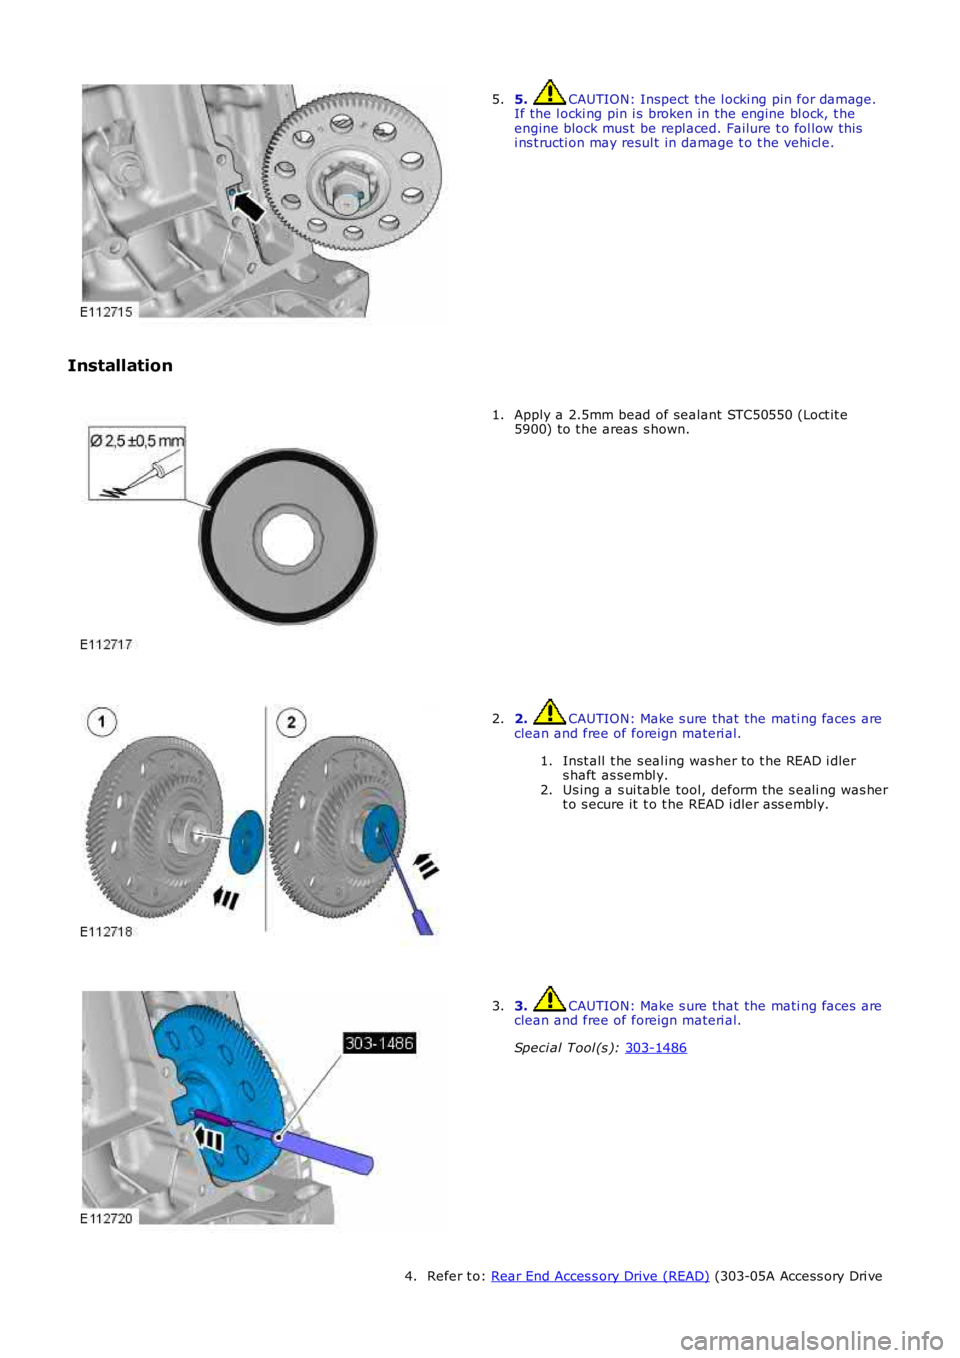
5. CAUTION: Inspect the l ocki ng pin for damage.
If the l ocki ng pin i s broken in the engine bl ock, t he
engine block mus t be repl aced. Failure t o fol low this
i ns t ructi on may resul t in damage t o t he vehi cl e.
5.
Installation Apply a 2.5mm bead of sealant STC50550 (Loct it e
5900) to t he areas s hown.
1. 2. CAUTION: Make s ure that the mati ng faces are
clean and free of foreign materi al.
Inst all t he s eal ing was her to t he READ i dler
s haft as sembl y.
1.
Us ing a s ui table tool, deform the s eali ng was her
t o s ecure it t o t he READ i dler ass embly.
2.
2. 3. CAUTION: Make s ure that the mati ng faces are
clean and free of foreign materi al.
Speci al Tool (s ): 303-1486 3.
Refer t o: Rear End Acces s ory Drive (READ) (303-05A Access ory Dri ve
4.
Page 736 of 3229
- I6 3.2L Pet rol , Removal and Ins t al lat ion).
Lower the vehicle.5.
Refer t o: Specificati ons (414-00 Bat tery and Charging Sys tem -General Informat ion, Specificati ons).6.
Page 737 of 3229
Publi s hed: 11-May-2011
Engine - I6 3.2L Petrol - Engine
Removal
Special T ool(s)
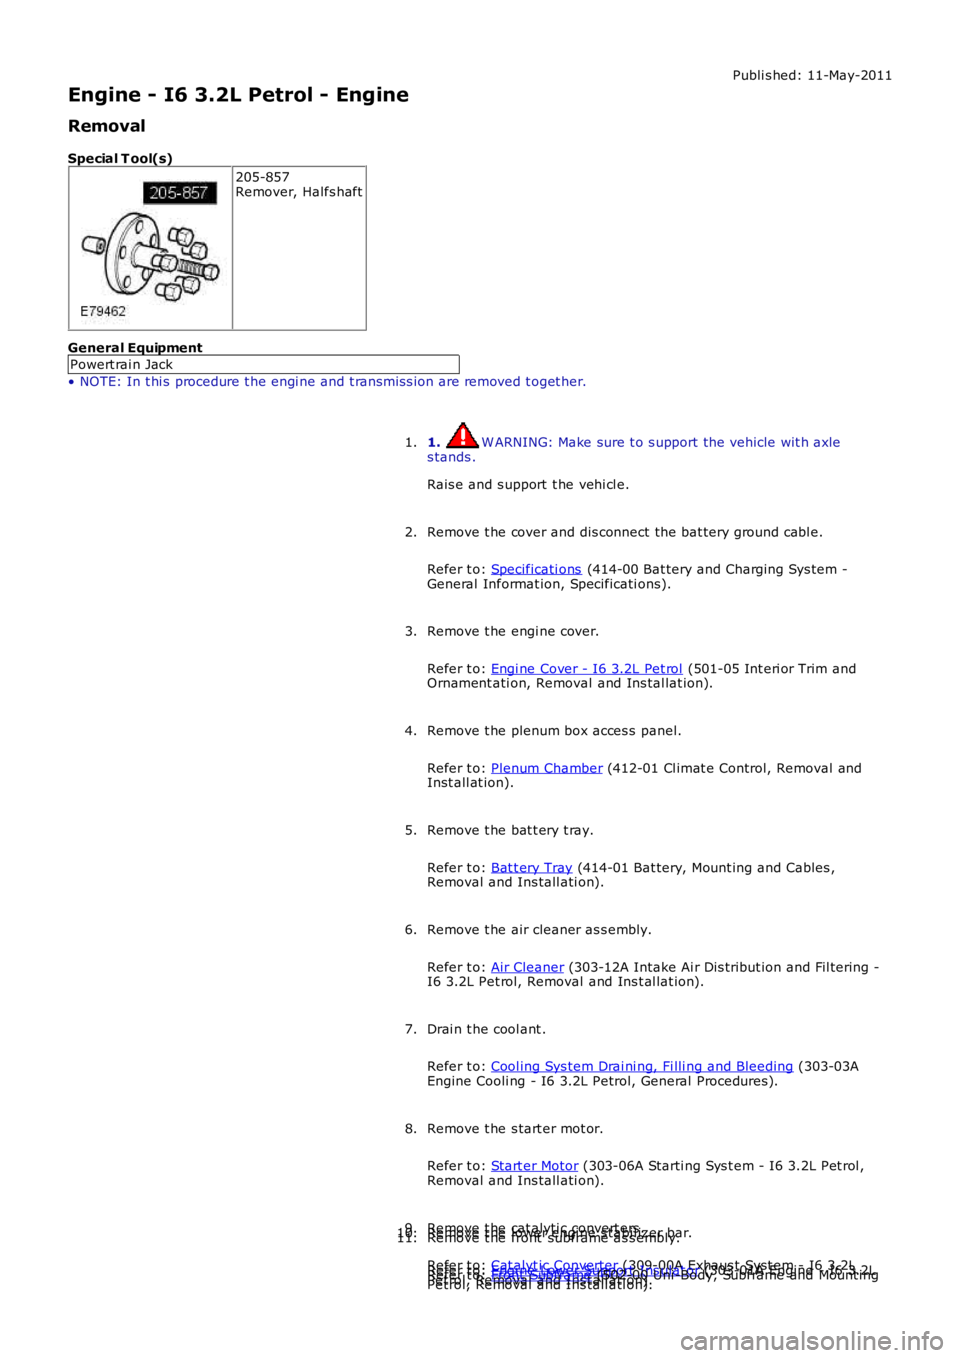
205-857Remover, Halfs haft
General Equipment
Powert rai n Jack
• NOTE: In t hi s procedure t he engi ne and t rans mis s ion are removed t oget her.
1. W ARNING: Make sure t o s upport the vehicle wit h axles tands .
Rais e and s upport t he vehi cl e.
1.
Remove t he cover and dis connect the bat tery ground cabl e.
Refer t o: Specificati ons (414-00 Bat tery and Charging Sys tem -General Informat ion, Specificati ons).
2.
Remove t he engi ne cover.
Refer t o: Engi ne Cover - I6 3.2L Pet rol (501-05 Int eri or Trim andOrnament ati on, Removal and Ins tal lat ion).
3.
Remove t he plenum box acces s panel.
Refer t o: Plenum Chamber (412-01 Cl imat e Control, Removal andInst all at ion).
4.
Remove t he bat t ery t ray.
Refer t o: Bat t ery Tray (414-01 Bat tery, Mount ing and Cables ,Removal and Ins tall ati on).
5.
Remove t he air cleaner as s embly.
Refer t o: Air Cleaner (303-12A Intake Ai r Dis tribut ion and Fil tering -I6 3.2L Pet rol, Removal and Ins t al lat ion).
6.
Drai n t he cool ant .
Refer t o: Cool ing Sys tem Drai ni ng, Fi lli ng and Bleeding (303-03AEngine Cooli ng - I6 3.2L Petrol, General Procedures).
7.
Remove t he s tart er mot or.
Refer t o: Start er Motor (303-06A Starti ng Sys t em - I6 3.2L Pet rol ,Removal and Ins tall ati on).
8.
Remove t he cat alyti c convert ers .
Refer t o: Cat alyt ic Converter (309-00A Exhaus t Syst em - I6 3.2LPetrol, Removal and Ins tall ati on).
9.Remove t he lower engi ne s tabil izer bar.
Refer t o: Engi ne Lower Support Ins ulat or (303-01A Engine - I6 3.2LPetrol, Removal and Ins tall ati on).
10.Remove t he front subframe as s embly.
Refer t o: Front Subframe (502-00 Uni -Body, Subframe and Mount ing
11.
Page 738 of 3229
Syst em, Removal and Ins tall ati on).
Siphon t he fl uid from t he power s t eering res ervoi r.12.
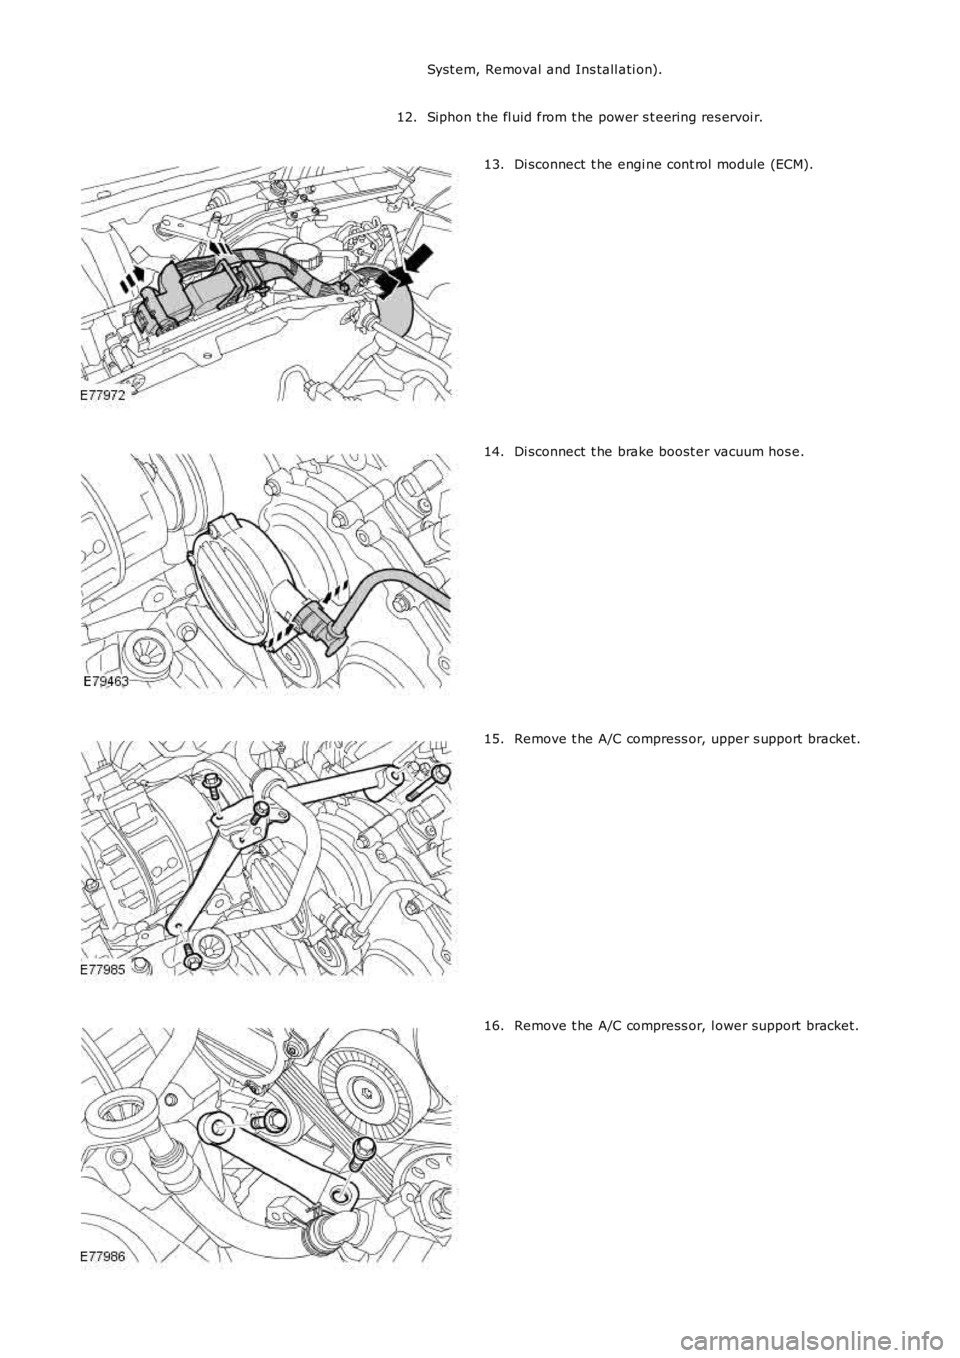
Di sconnect t he engi ne cont rol module (ECM).13.
Di sconnect t he brake boost er vacuum hos e.14.
Remove t he A/C compress or, upper s upport bracket.15.
Remove t he A/C compress or, l ower support bracket.16.
Page 739 of 3229
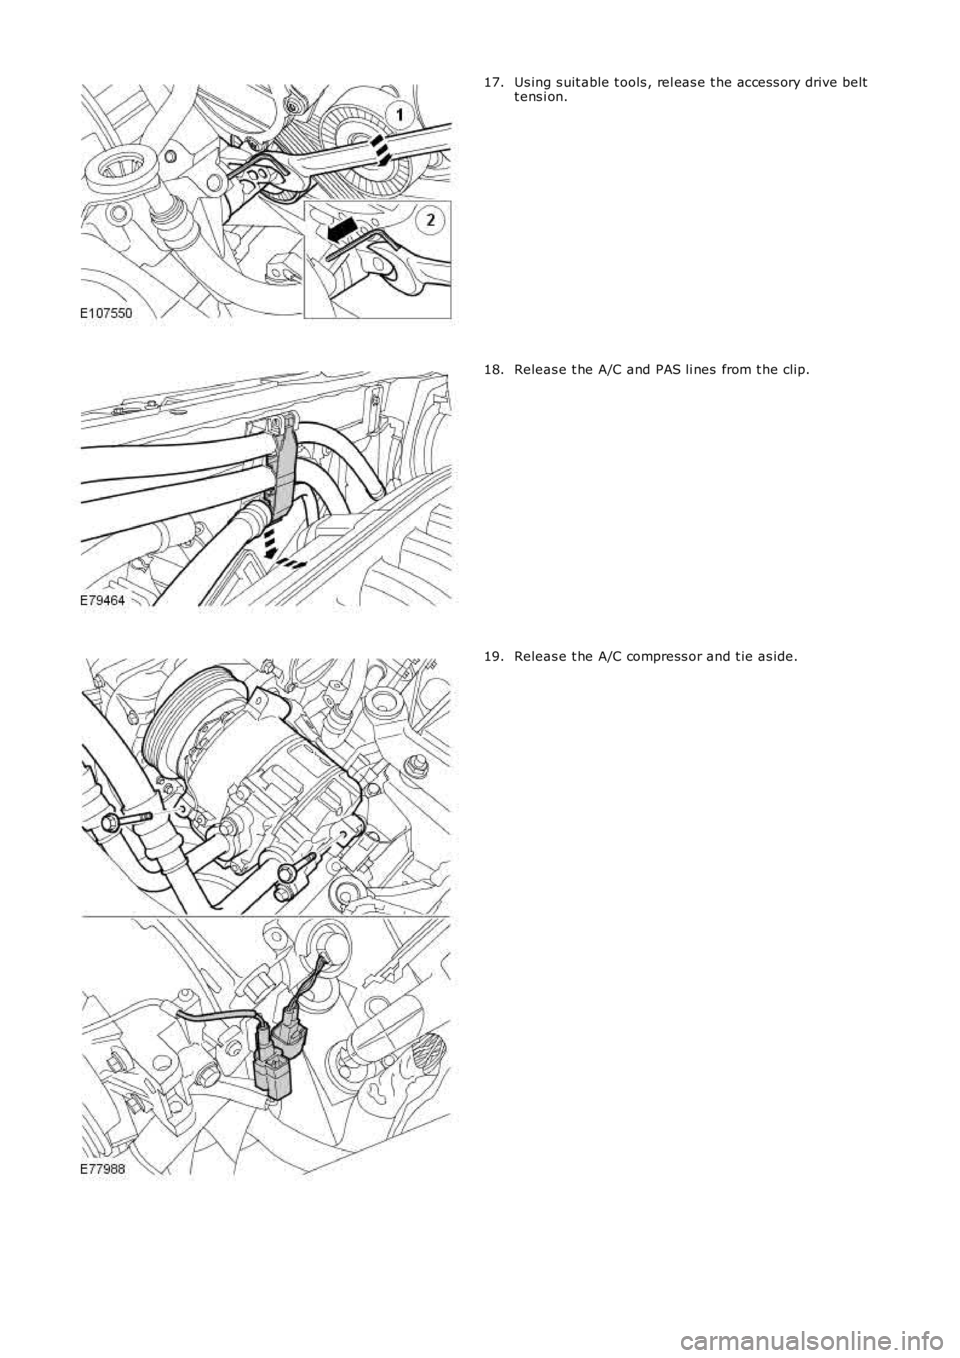
Us ing s uit able t ools , rel eas e t he acces s ory drive beltt ens i on.17.
Releas e t he A/C and PAS li nes from t he clip.18.
Releas e t he A/C compress or and t ie as ide.19.
Page 740 of 3229
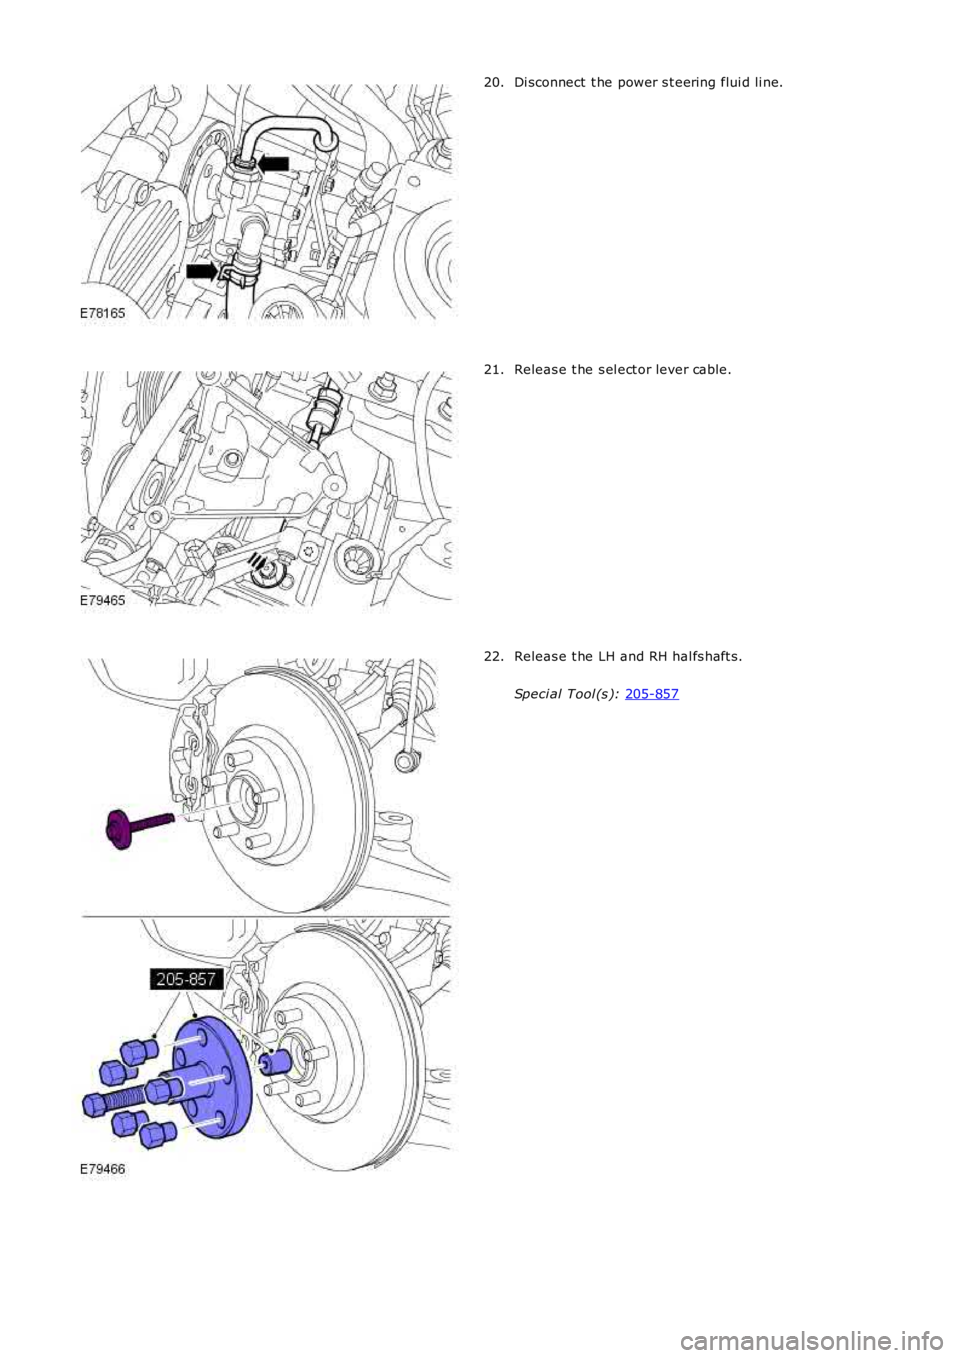
Di sconnect t he power s t eering flui d li ne.20.
Releas e t he s el ect or lever cable.21.
Releas e t he LH and RH hal fs haft s.
Speci al Tool (s ): 205-857
22.
Trending: battery location, auxiliary battery, clock, ground clearance, cooling, odometer, load capacity
