LAND ROVER FRELANDER 2 2006 Repair Manual
FRELANDER 2 2006
LAND ROVER
LAND ROVER
https://www.carmanualsonline.info/img/64/57251/w960_57251-0.png
LAND ROVER FRELANDER 2 2006 Repair Manual
Trending: cruise control, fan, navigation system, wheel bolt torque, headlamp, cabin filter, spare wheel
Page 651 of 3229
Publi s hed: 11-May-2011
Engine - I6 3.2L Petrol - Engine Oil Draining and Filling
General Procedures
• NOTE: Removal s t eps in t his procedure may cont ain i nst all ati on det ail s.
1. W ARNING: Make sure t o s upport the vehicle wit h axle
s tands .
Rais e and s upport t he vehi cl e.
1.
Remove t he oil fi lt er.
Refer t o: Oil Fil ter Element (303-01A Engi ne - I6 3.2L Pet rol,
Removal and Ins tall ati on).
2.
Remove t he engi ne undershi eld.
Refer t o: Engi ne Unders hi eld (501-02 Front End Body Panel s ,
Removal and Ins tall ati on).
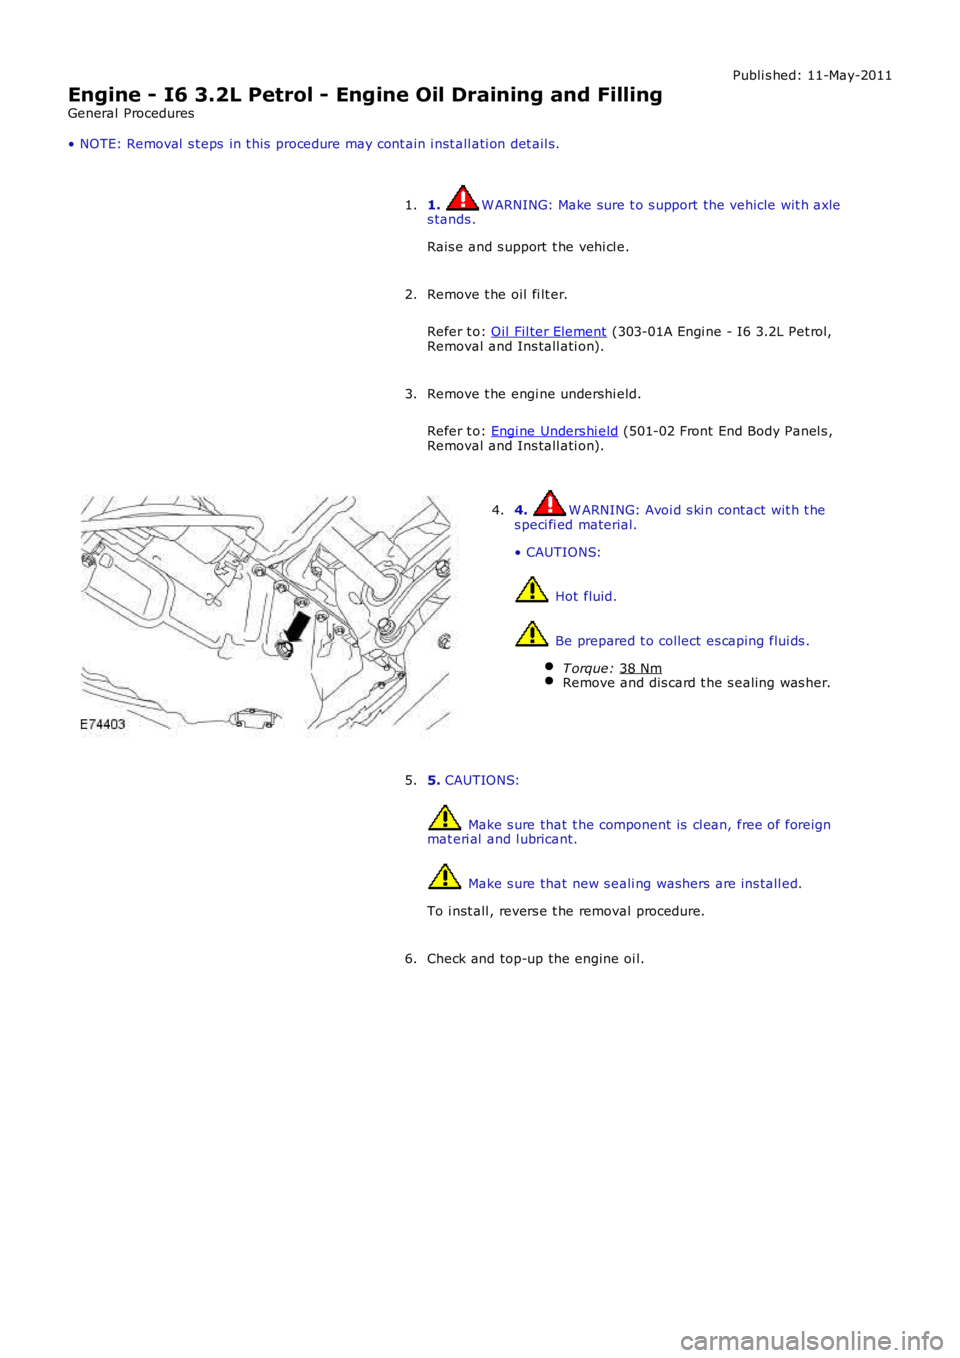
3. 4. W ARNING: Avoi d s ki n cont act wit h t he
s peci fi ed material.
• CAUTIONS: Hot fluid.
Be prepared t o collect es caping flui ds .
T orque: 38 Nm Remove and dis card t he s ealing was her.4.
5. CAUTIONS: Make s ure that t he component is cl ean, free of foreign
mat eri al and l ubricant. Make s ure that new s eali ng washers are ins tall ed.
To i nst all , revers e t he removal procedure.
5.
Check and top-up the engine oi l.
6.
Page 652 of 3229
Publi s hed: 11-May-2011
Engine - I6 3.2L Petrol - Valve Clearance Adjustment
General Procedures
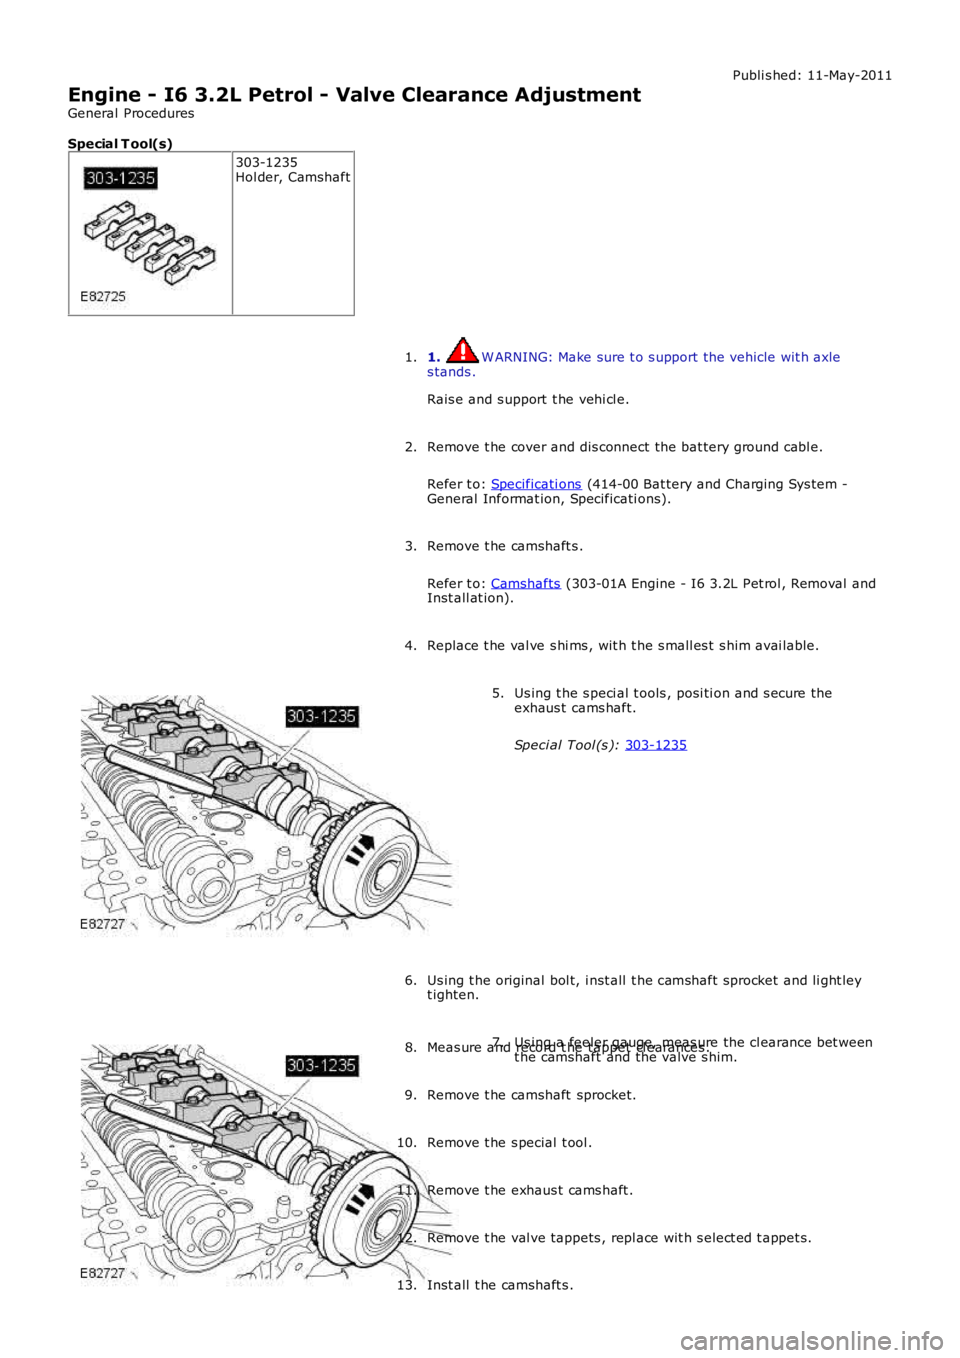
Special T ool(s) 303-1235
Hol der, Camshaft
1. W ARNING: Make sure t o s upport the vehicle wit h axle
s tands .
Rais e and s upport t he vehi cl e.
1.
Remove t he cover and dis connect the bat tery ground cabl e.
Refer t o: Specificati ons (414-00 Bat tery and Charging Sys tem -
General Informat ion, Specificati ons).
2.
Remove t he camshaft s .
Refer t o: Camshafts (303-01A Engine - I6 3.2L Pet rol , Removal and
Inst all at ion).
3.
Replace t he val ve s hi ms , wit h t he s mall es t s him avai lable.
4. Us ing t he s peci al t ools , posi ti on and s ecure the
exhaus t cams haft.
Speci al Tool (s ): 303-1235 5.
Us ing t he original bol t, i nst all t he camshaft sprocket and li ght ley
t ighten.
6. Us ing a feeler gauge, meas ure the cl earance bet ween
t he camshaft and the valve s him.
7.
Meas ure and record t he tappet cl earances .
8.
Remove t he camshaft sprocket.
9.
Remove t he s pecial t ool .
10.
Remove t he exhaus t cams haft .
11.
Remove t he val ve tappets , repl ace wit h s elect ed t appet s.
12.
Inst all t he camshaft s .
13.
Page 653 of 3229
Refer t o: Camshafts (303-01A Engine - I6 3.2L Pet rol , Removal andInst all at ion).
Connect t he batt ery ground cable and ins tall t he cover.
Refer t o: Specificati ons (414-00 Bat tery and Charging Sys tem -General Informat ion, Specificati ons).
14.
Page 654 of 3229
Publi s hed: 11-May-2011
Engine - I6 3.2L Petrol - Valve Clearance Check
General Procedures
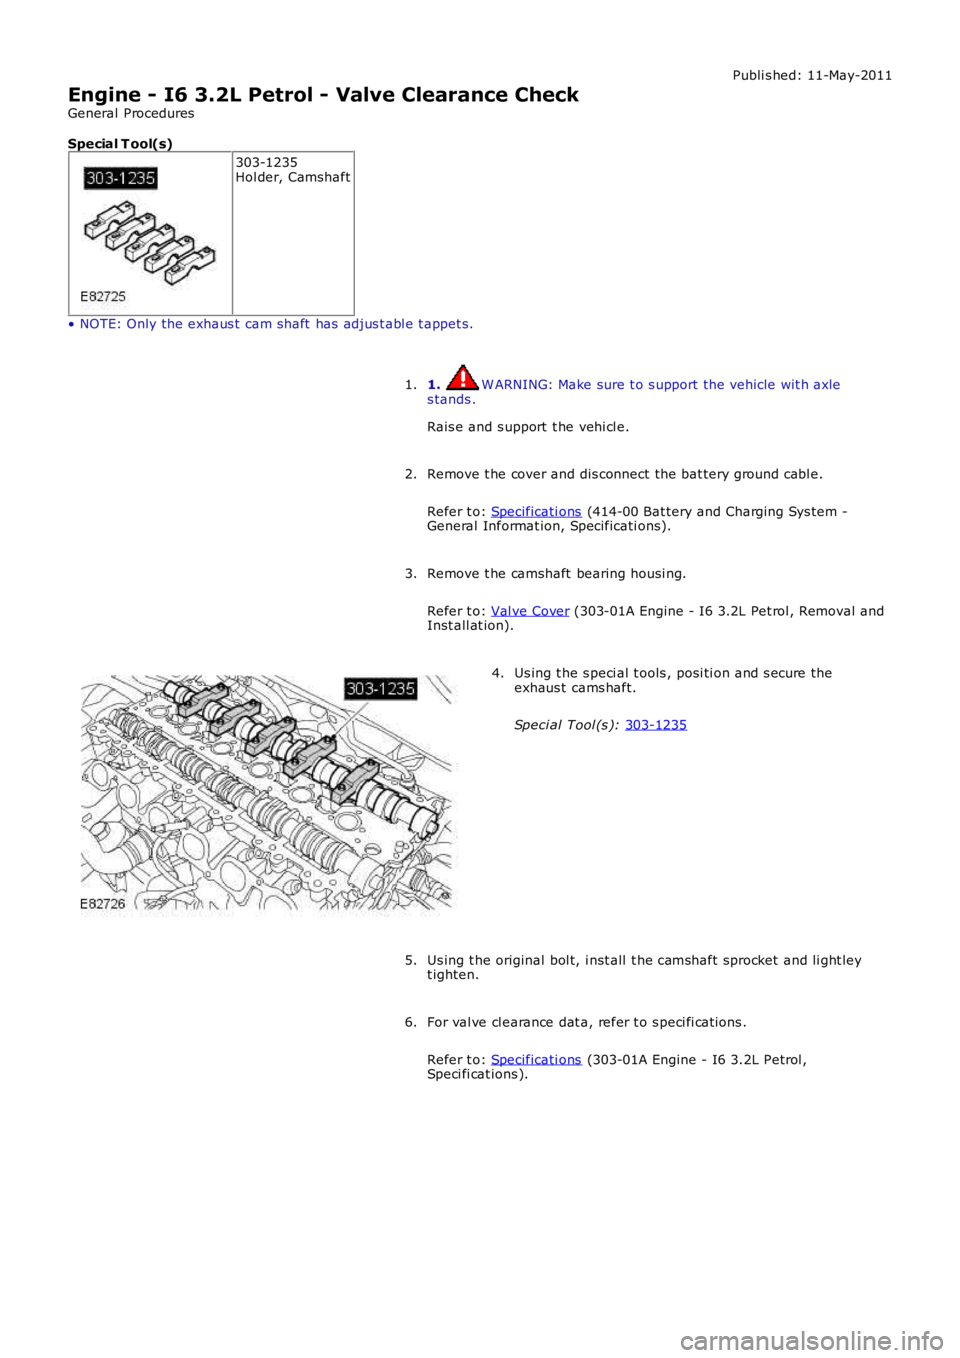
Special T ool(s) 303-1235
Hol der, Camshaft
• NOTE: Only the exhaus t cam shaft has adjus t abl e t appet s. 1. W ARNING: Make sure t o s upport the vehicle wit h axle
s tands .
Rais e and s upport t he vehi cl e.
1.
Remove t he cover and dis connect the bat tery ground cabl e.
Refer t o: Specificati ons (414-00 Bat tery and Charging Sys tem -
General Informat ion, Specificati ons).
2.
Remove t he camshaft bearing housi ng.
Refer t o: Val ve Cover (303-01A Engine - I6 3.2L Pet rol , Removal and
Inst all at ion).
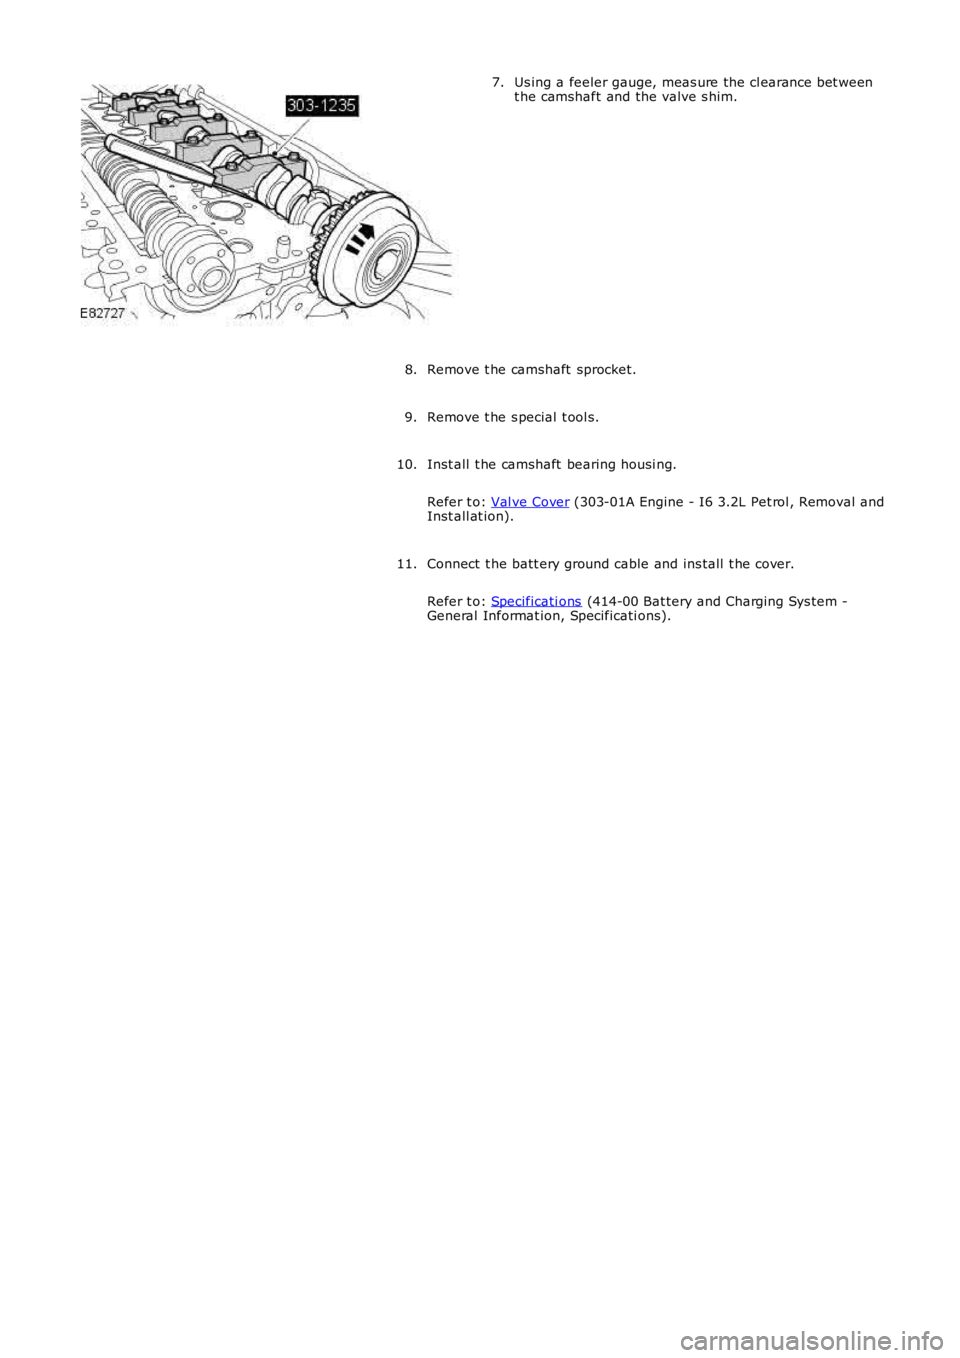
3. Us ing t he s peci al t ools , posi ti on and s ecure the
exhaus t cams haft.
Speci al Tool (s ): 303-1235 4.
Us ing t he original bol t, i nst all t he camshaft sprocket and li ght ley
t ighten.
5.
For val ve cl earance dat a, refer t o s peci fi cat ions .
Refer t o: Specificati ons (303-01A Engine - I6 3.2L Petrol ,
Speci fi cat ions ).
6.
Page 655 of 3229
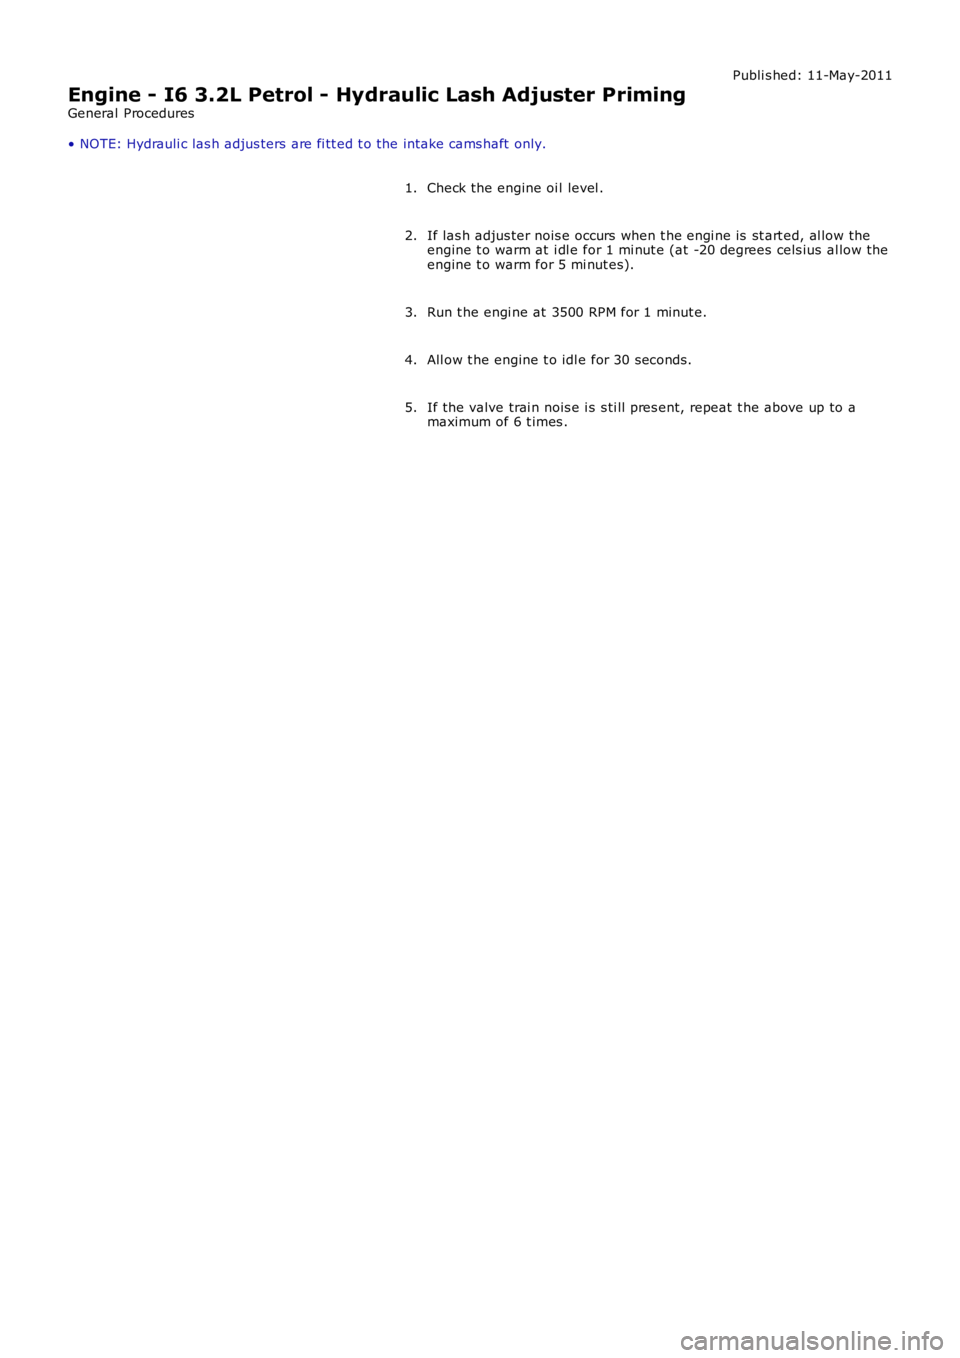
Us ing a feeler gauge, meas ure the cl earance bet weent he camshaft and the valve s him.7.
Remove t he camshaft sprocket.8.
Remove t he s pecial t ool s.9.
Inst all t he camshaft bearing housi ng.
Refer t o: Val ve Cover (303-01A Engine - I6 3.2L Pet rol , Removal andInst all at ion).
10.
Connect t he batt ery ground cable and ins tall t he cover.
Refer t o: Specificati ons (414-00 Bat tery and Charging Sys tem -General Informat ion, Specificati ons).
11.
Page 656 of 3229
Publi s hed: 11-May-2011
Engine - I6 3.2L Petrol - Hydraulic Lash Adjuster Priming
General Procedures
• NOTE: Hydrauli c las h adjus ters are fi tt ed t o the intake cams haft only.
Check the engine oi l level .1.
If las h adjus ter nois e occurs when t he engi ne is st art ed, al low theengine t o warm at i dl e for 1 mi nut e (at -20 degrees cels ius al low theengine t o warm for 5 mi nut es).
2.
Run t he engi ne at 3500 RPM for 1 minut e.3.
All ow t he engine t o idl e for 30 seconds .4.
If the valve trai n nois e i s s ti ll pres ent, repeat t he above up to amaximum of 6 t imes .5.
Page 657 of 3229
Publi s hed: 11-May-2011
Engine - I6 3.2L Petrol - Intake Manifold
Removal and Inst all ati on
Removal
Di sconnect t he bat t ery ground cable.
Refer t o: Specificati ons (414-00 Bat tery and Charging Sys tem -General Informat ion, Specificati ons).
1.
Remove t he engi ne cover.
Refer t o: Engi ne Cover - I6 3.2L Pet rol (501-05 Int eri or Trim andOrnament ati on, Removal and Ins tal lat ion).
2.
Remove t he air cleaner as s embly.
Refer t o: Air Cleaner (303-12B Intake Ai r Dis tribut ion and Fil tering -TD4 2.2L Dies el, Removal and Inst all ati on).
3.
4. W ARNING: Do not work on or under a vehi cle s upported onl yby a jack. Al ways support t he vehi cl e on s afet y s tands .
Rais e and s upport t he vehi cl e.
4.
Remove t he engi ne undershi eld.
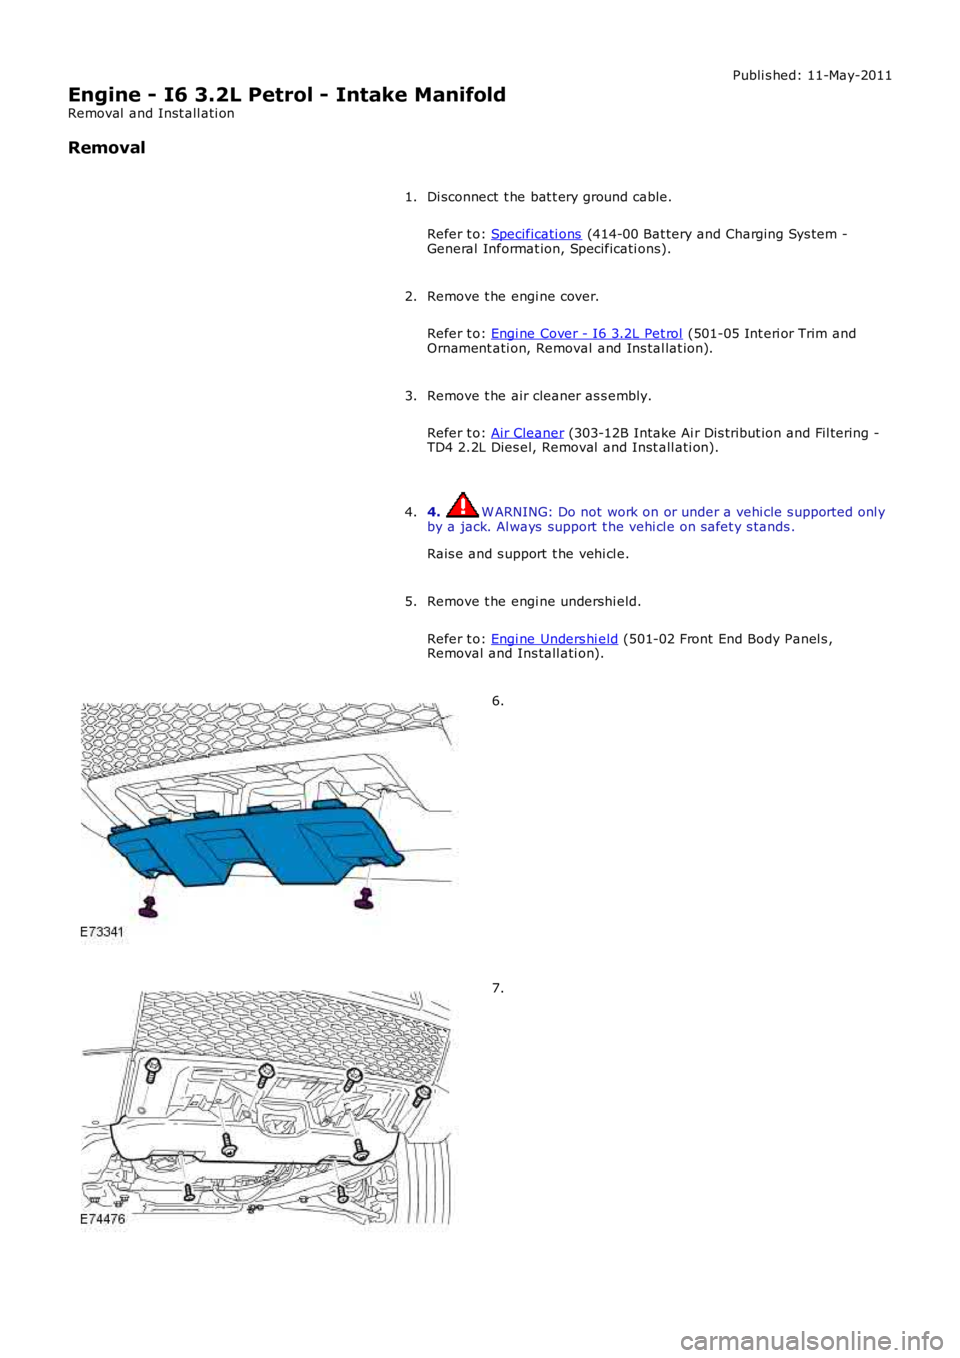
Refer t o: Engi ne Unders hi eld (501-02 Front End Body Panel s ,Removal and Ins tall ati on).
5.
6.
7.
Page 658 of 3229
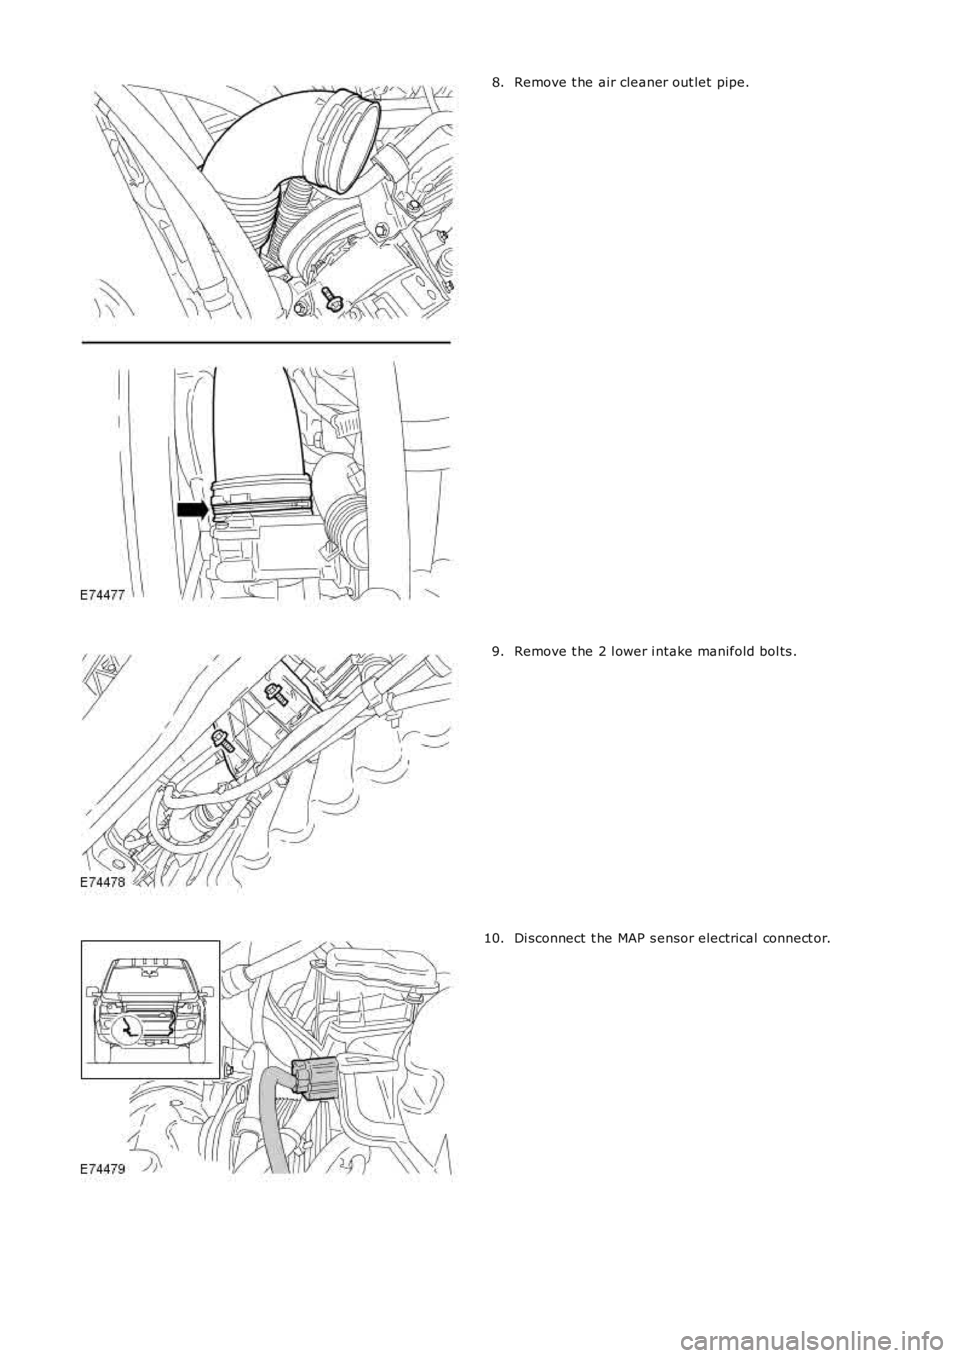
Remove t he air cleaner out let pipe.8.
Remove t he 2 l ower i ntake manifold bol ts .9.
Di sconnect t he MAP s ensor electrical connect or.10.
Page 659 of 3229
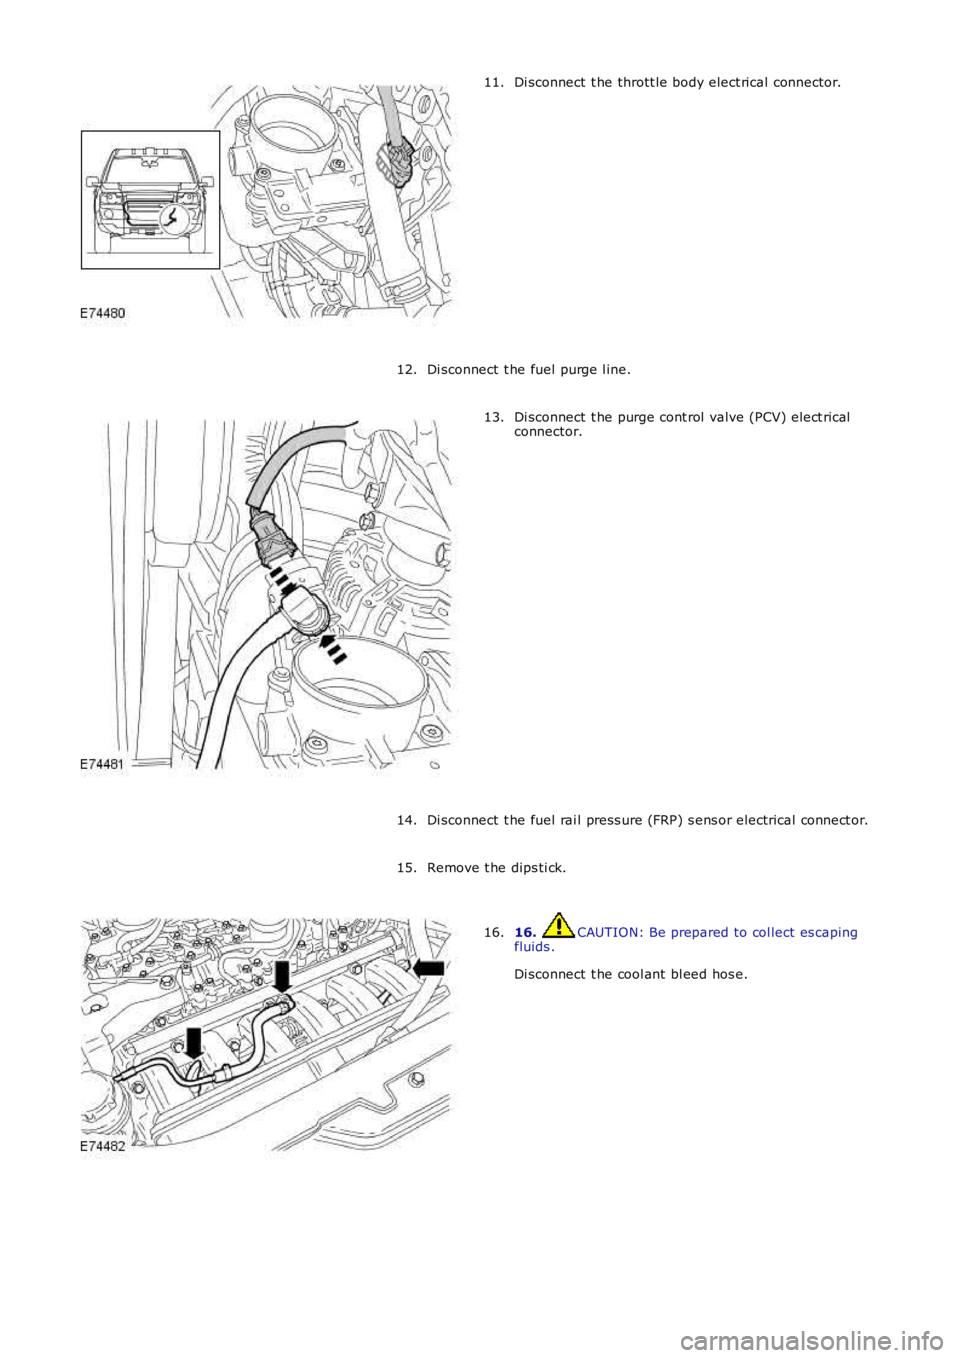
Di sconnect t he thrott le body elect rical connector.11.
Di sconnect t he fuel purge l ine.12.
Di sconnect t he purge cont rol valve (PCV) elect ricalconnector.13.
Di sconnect t he fuel rai l press ure (FRP) s ens or electrical connect or.14.
Remove t he dips ti ck.15.
16. CAUTION: Be prepared to col lect es capingfluids .
Di sconnect t he cool ant bl eed hos e.
16.
Page 660 of 3229
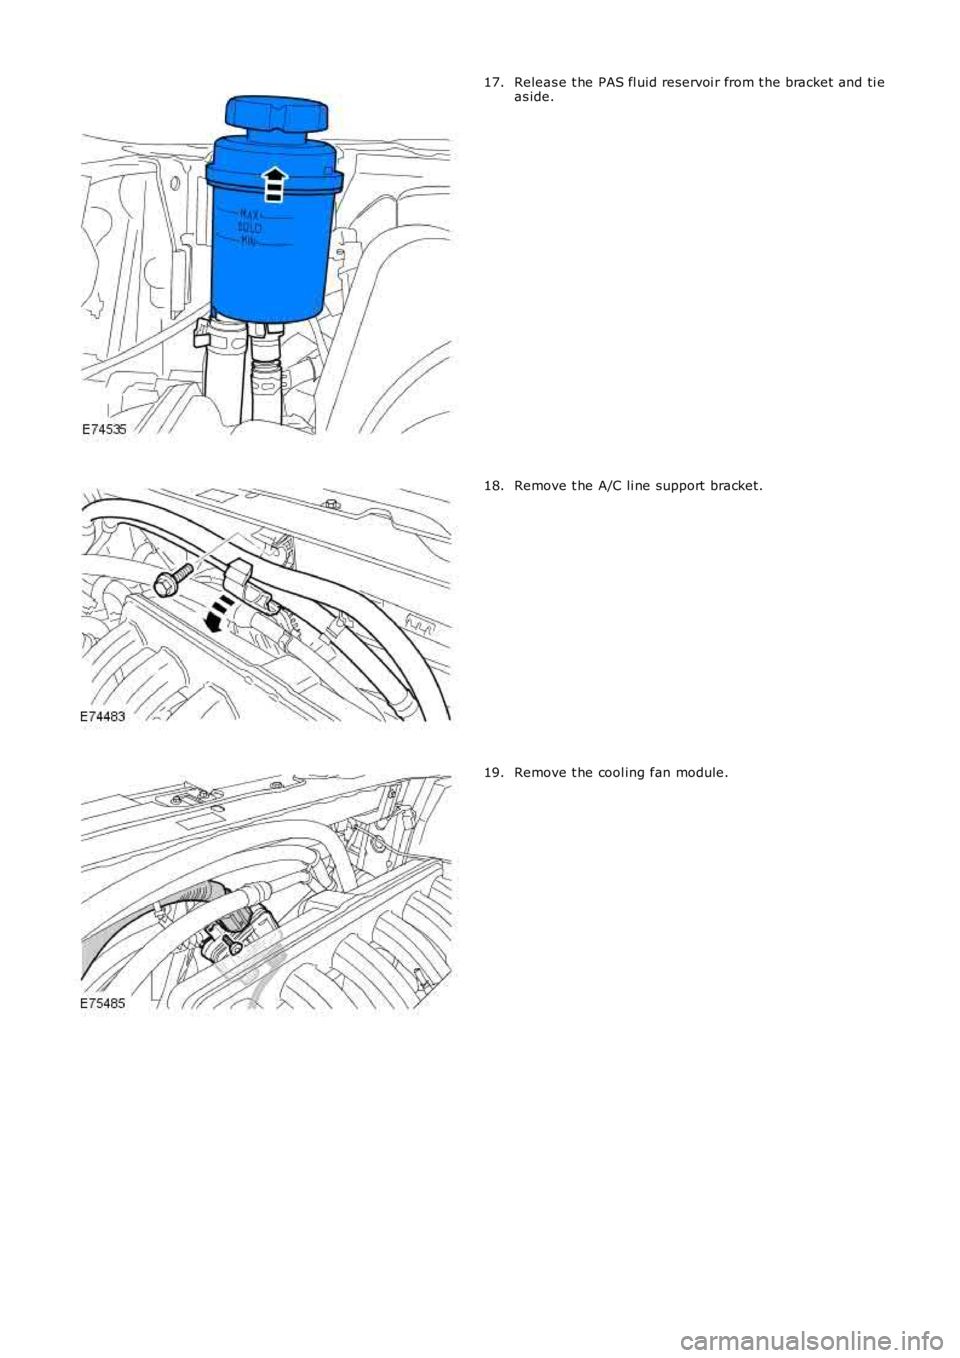
Releas e t he PAS fl uid reservoi r from t he bracket and ti eas ide.17.
Remove t he A/C li ne support bracket.18.
Remove t he cool ing fan module.19.
Trending: open hood, drain bolt, deactivate airbag, airbag off, deactivate passenger airbag, clock reset, fuel


