navigation Lexus CT200h 2014 Navigation manual (in English)
[x] Cancel search | Manufacturer: LEXUS, Model Year: 2014, Model line: CT200h, Model: Lexus CT200h 2014Pages: 410, PDF Size: 42.88 MB
Page 127 of 410
127
2. DESTINATION SEARCH
CT200h_Navi_OM76113E_(EE)
13.12.06 15:16
3
NAVIGATION SYSTEM
1Display the “Destination” screen.
(P.118)
2Select “Motorway ent./exit”.
3Enter a motorway name and select
“OK”.
4Select the desired motorway.
5Select “Entrance” or “Exit”.
6Select the desired entrance or exit
name.
“Enter name”: Select to enter an en-
trance or exit name to narrow down the
listed items.
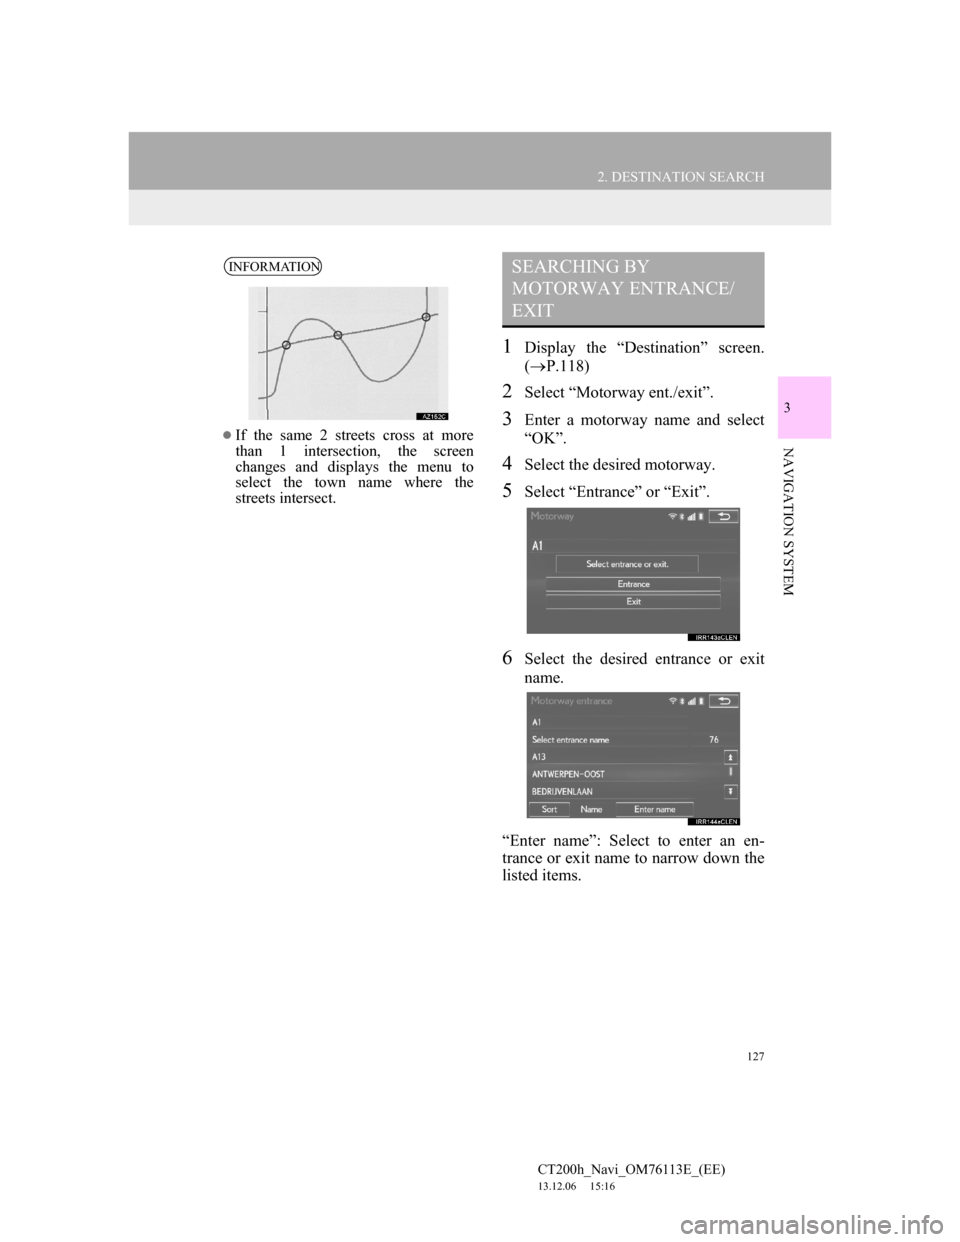
INFORMATION
If the same 2 streets cross at more
than 1 intersection, the screen
changes and displays the menu to
select the town name where the
streets intersect.
SEARCHING BY
MOTORWAY ENTRANCE/
EXIT
Page 129 of 410
129
2. DESTINATION SEARCH
CT200h_Navi_OM76113E_(EE)
13.12.06 15:16
3
NAVIGATION SYSTEM1Display the “Destination” screen.
(P.118)
2Select “POI near cursor”.
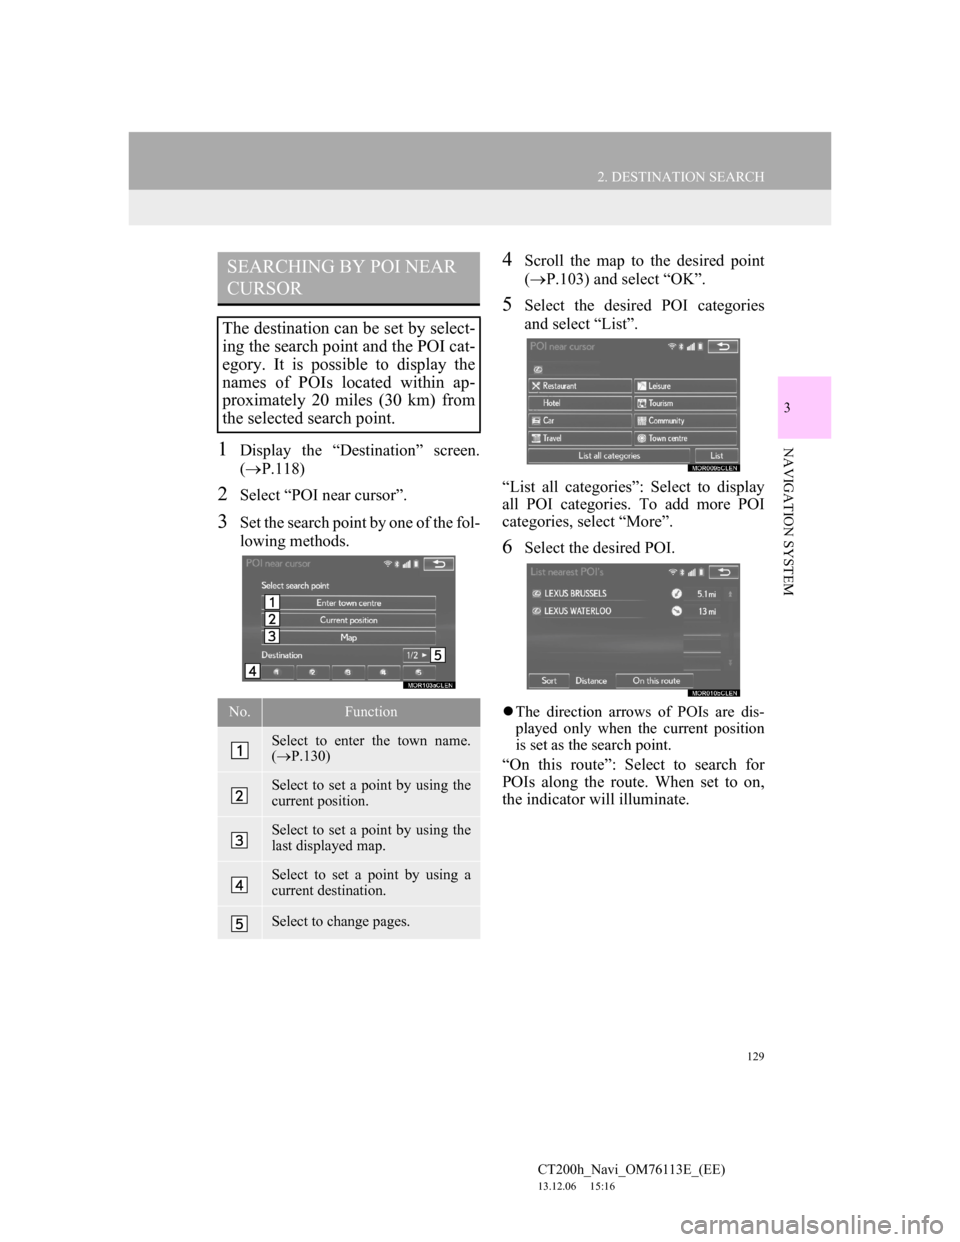
3Set the search point by one of the fol-
lowing methods.
4Scroll the map to the desired point
(P.103) and select “OK”.
5Select the desired POI categories
and select “List”.
“List all categories”: Select to display
all POI categories. To add more POI
categories, select “More”.
6Select the desired POI.
The direction arrows of POIs are dis-
played only when the current position
is set as the search point.
“On this route”: Select to search for
POIs along the route. When set to on,
the indicator will illuminate.
SEARCHING BY POI NEAR
CURSOR
The destination can be set by select-
ing the search point and the POI cat-
egory. It is possible to display the
names of POIs located within ap-
proximately 20 miles (30 km) from
the selected search point.
No.Function
Select to enter the town name.
(P.130)
Select to set a point by using the
current position.
Select to set a point by using the
last displayed map.
Select to set a point by using a
current destination.
Select to change pages.
Page 131 of 410
131
2. DESTINATION SEARCH
CT200h_Navi_OM76113E_(EE)
13.12.06 15:16
3
NAVIGATION SYSTEM
3. STARTING ROUTE GUIDANCE
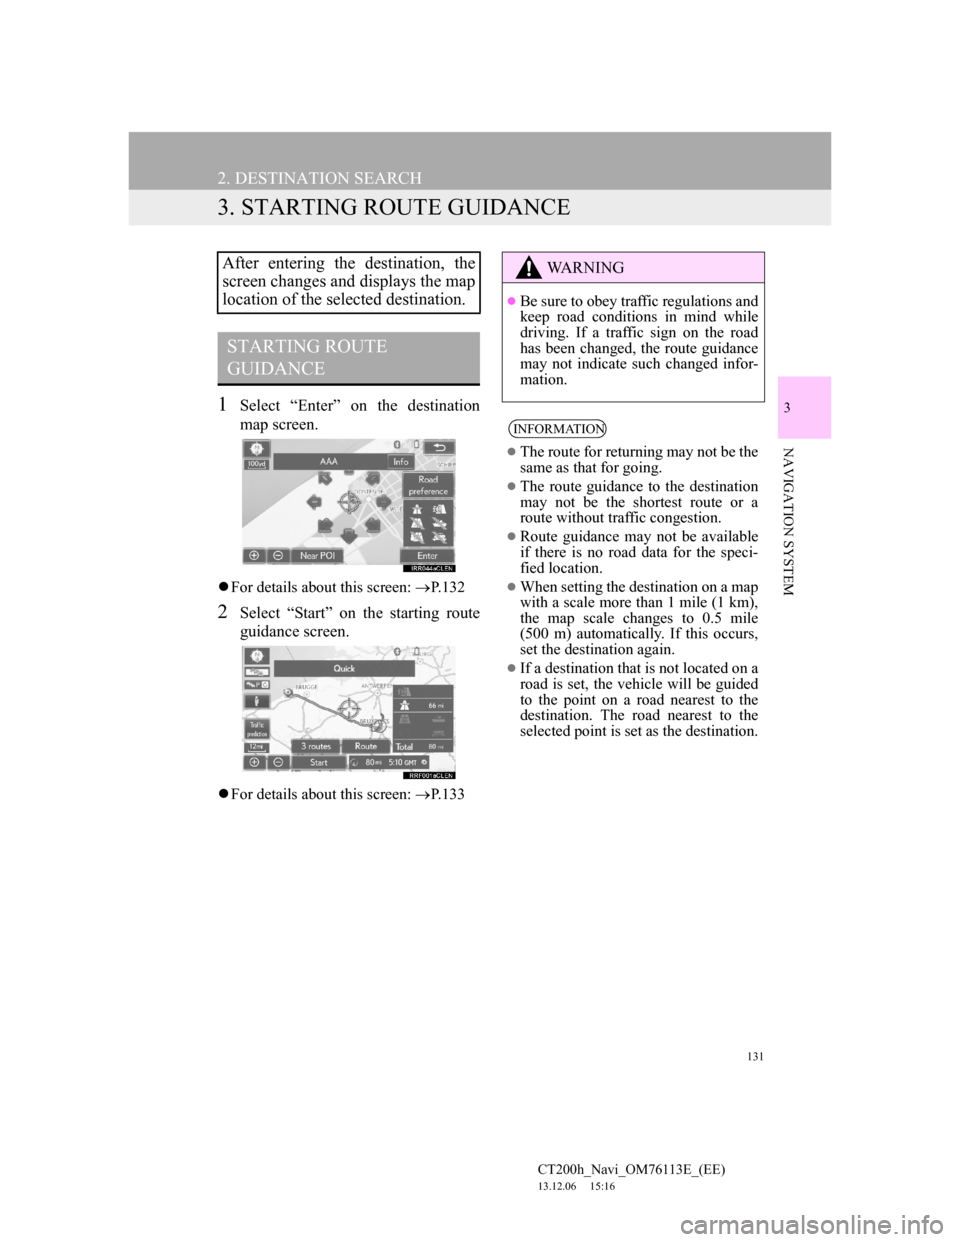
1Select “Enter” on the destination
map screen.
For details about this screen: P.132
2Select “Start” on the starting route
guidance screen.
For details about this screen: P.133
After entering the destination, the
screen changes and displays the map
location of the selected destination.
STARTING ROUTE
GUIDANCE
WA R N I N G
Be sure to obey traffic regulations and
keep road conditions in mind while
driving. If a traffic sign on the road
has been changed, the route guidance
may not indicate such changed infor-
mation.
INFORMATION
The route for returning may not be the
same as that for going.
The route guidance to the destination
may not be the shortest route or a
route without traffic congestion.
Route guidance may not be available
if there is no road data for the speci-
fied location.
When setting the destination on a map
with a scale more than 1 mile (1 km),
the map scale changes to 0.5 mile
(500 m) automatically. If this occurs,
set the destination again.
If a destination that is not located on a
road is set, the vehicle will be guided
to the point on a road nearest to the
destination. The road nearest to the
selected point is set as the destination.
Page 133 of 410
133
2. DESTINATION SEARCH
CT200h_Navi_OM76113E_(EE)
13.12.06 15:16
3
NAVIGATION SYSTEM
*: Can only be used when receiving
TPEG (Transport Protocol Experts
Group) information. Depending on the
country or area, receiving TPEG infor-
mation may not be possible.
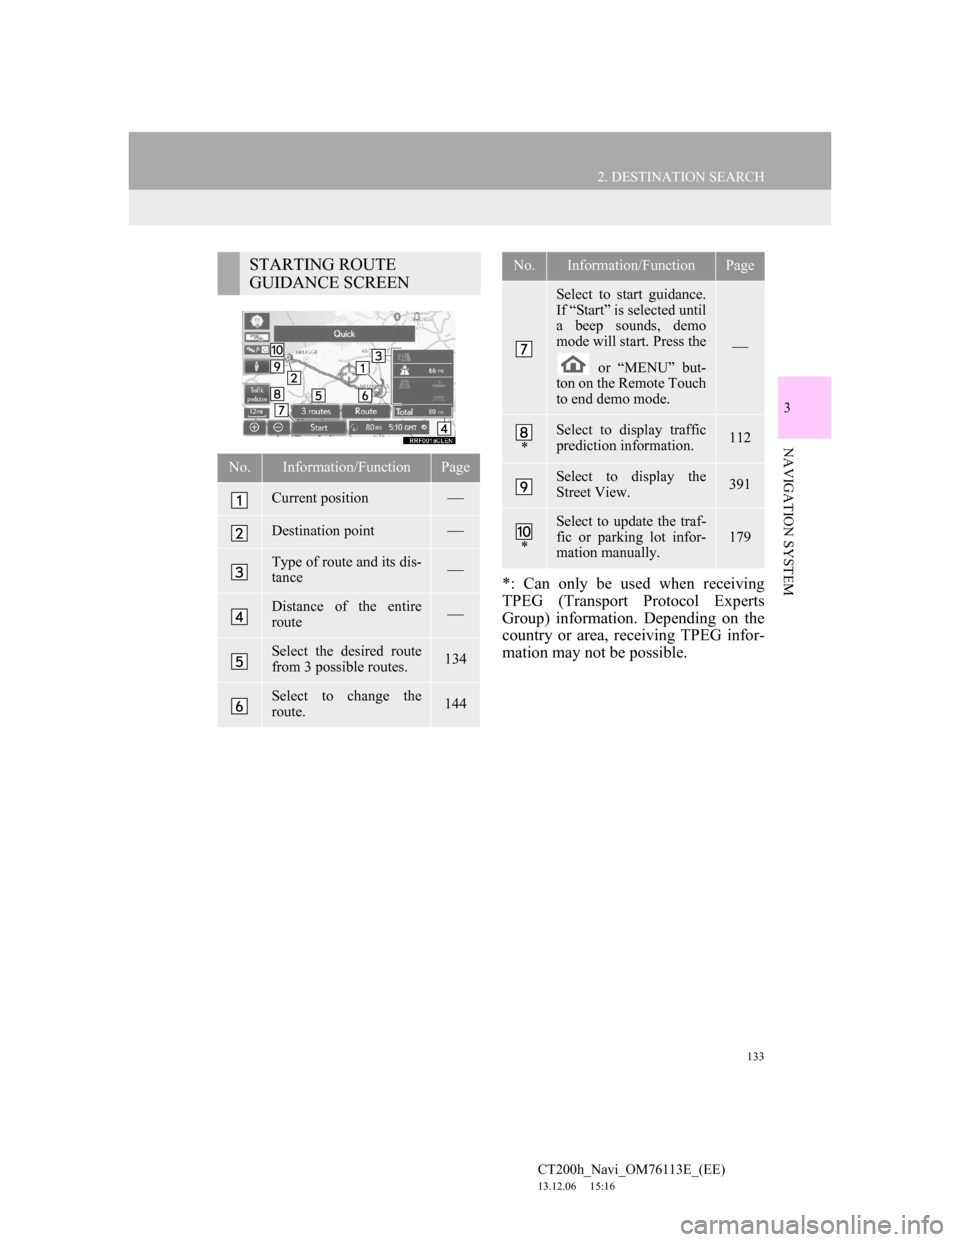
STARTING ROUTE
GUIDANCE SCREEN
No.Information/FunctionPage
Current position
Destination point
Type of route and its dis-
tance
Distance of the entire
route
Select the desired route
from 3 possible routes.134
Select to change the
route.144
Select to start guidance.
If “Start” is selected until
a beep sounds, demo
mode will start. Press the
or “MENU” but-
ton on the Remote Touch
to end demo mode.
*
Select to display traffic
prediction information.112
Select to display the
Street View.391
*
Select to update the traf-
fic or parking lot infor-
mation manually.
179
No.Information/FunctionPage
Page 135 of 410
135
2. DESTINATION SEARCH
CT200h_Navi_OM76113E_(EE)
13.12.06 15:16
3
NAVIGATION SYSTEM
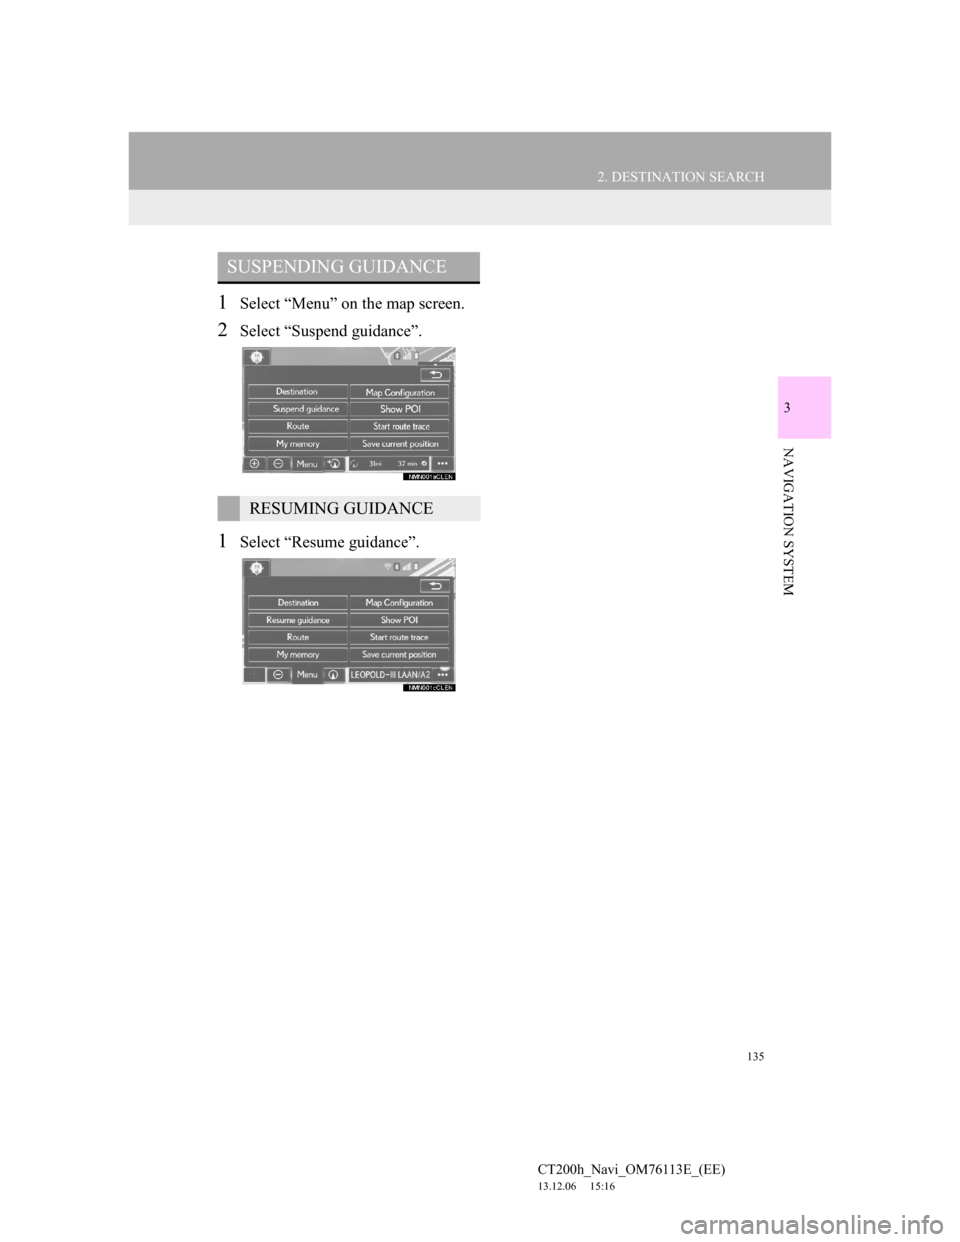
1Select “Menu” on the map screen.
2Select “Suspend guidance”.
1Select “Resume guidance”.
SUSPENDING GUIDANCE
RESUMING GUIDANCE
Page 137 of 410
137
3. ROUTE GUIDANCE
CT200h_Navi_OM76113E_(EE)
13.12.06 15:16
3
NAVIGATION SYSTEM
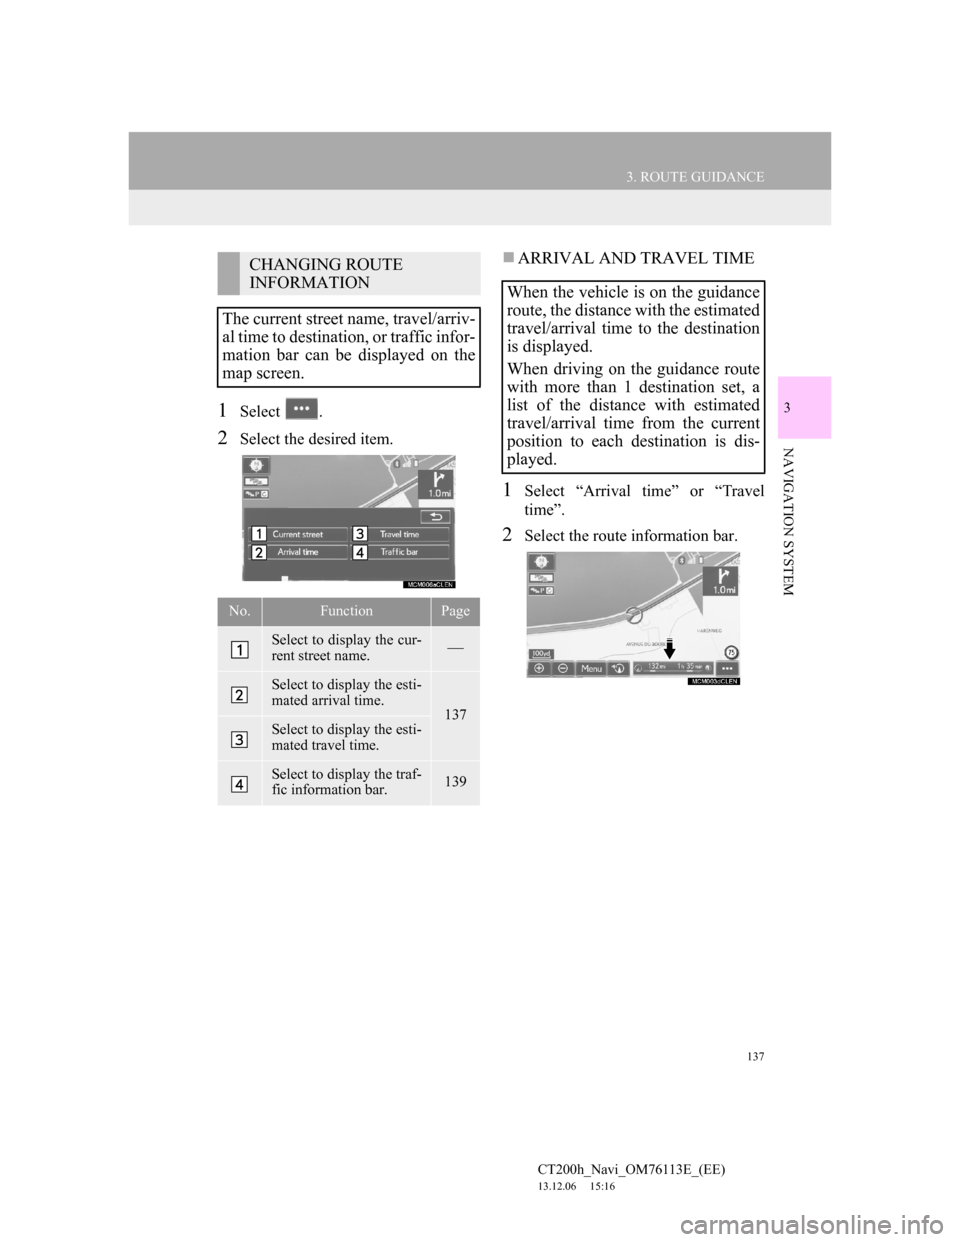
1Select .
2Select the desired item.
ARRIVAL AND TRAVEL TIME
1Select “Arrival time” or “Travel
time”.
2Select the route information bar.
CHANGING ROUTE
INFORMATION
The current street name, travel/arriv-
al time to destination, or traffic infor-
mation bar can be displayed on the
map screen.
No.FunctionPage
Select to display the cur-
rent street name.
Select to display the esti-
mated arrival time.
137Select to display the esti-
mated travel time.
Select to display the traf-
fic information bar.139
When the vehicle is on the guidance
route, the distance with the estimated
travel/arrival time to the destination
is displayed.
When driving on the guidance route
with more than 1 destination set, a
list of the distance with estimated
travel/arrival time from the current
position to each destination is dis-
played.
Page 139 of 410
139
3. ROUTE GUIDANCE
CT200h_Navi_OM76113E_(EE)
13.12.06 15:16
3
NAVIGATION SYSTEM
TRAFFIC INFORMATION
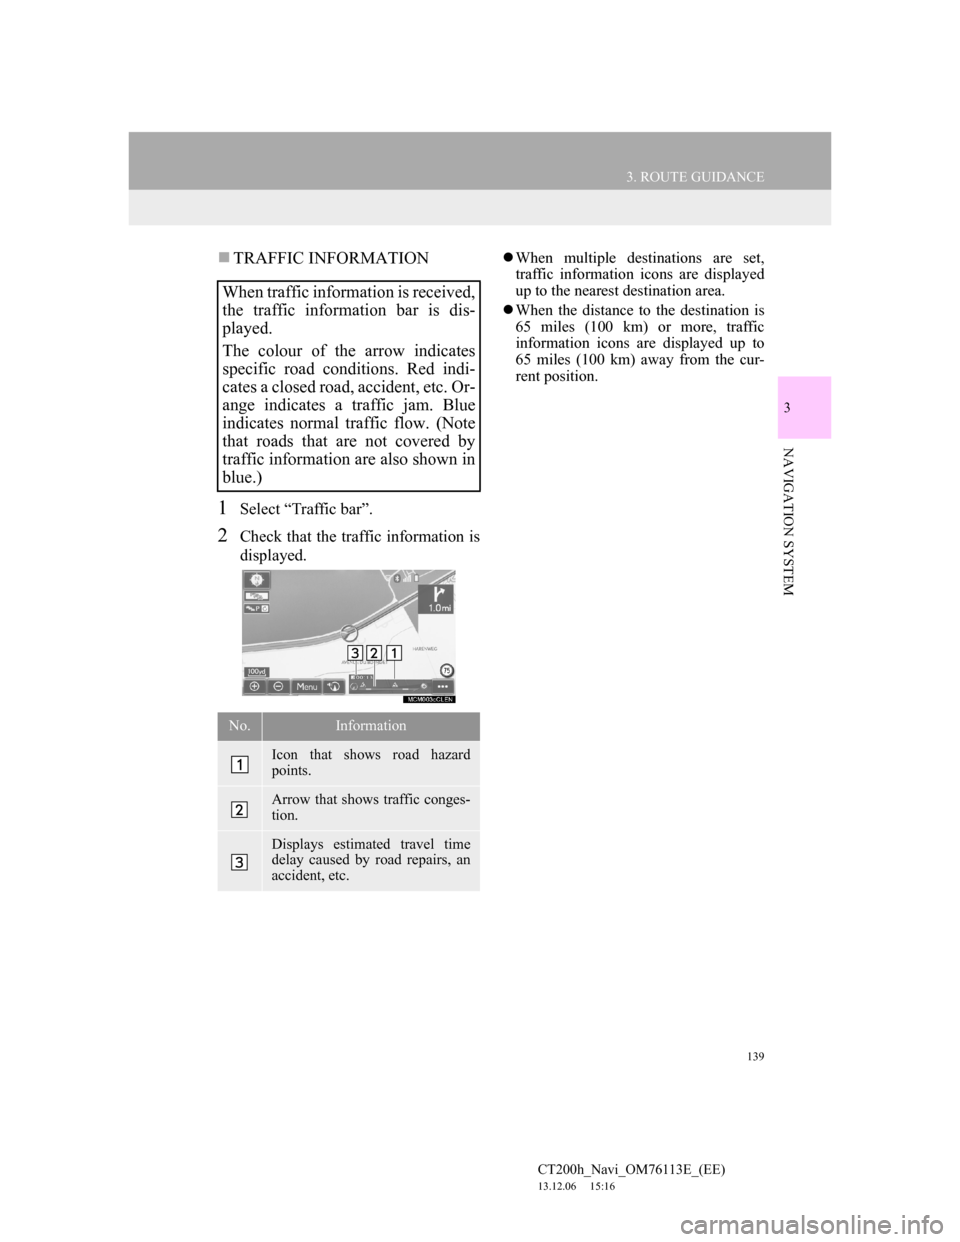
1Select “Traffic bar”.
2Check that the traffic information is
displayed.
When multiple destinations are set,
traffic information icons are displayed
up to the nearest destination area.
When the distance to the destination is
65 miles (100 km) or more, traffic
information icons are displayed up to
65 miles (100 km) away from the cur-
rent position.
When traffic information is received,
the traffic information bar is dis-
played.
The colour of the arrow indicates
specific road conditions. Red indi-
cates a closed road, accident, etc. Or-
ange indicates a traffic jam. Blue
indicates normal traffic flow. (Note
that roads that are not covered by
traffic information are also shown in
blue.)
No.Information
Icon that shows road hazard
points.
Arrow that shows traffic conges-
tion.
Displays estimated travel time
delay caused by road repairs, an
accident, etc.
Page 141 of 410
141
3. ROUTE GUIDANCE
CT200h_Navi_OM76113E_(EE)
13.12.06 15:16
3
NAVIGATION SYSTEM
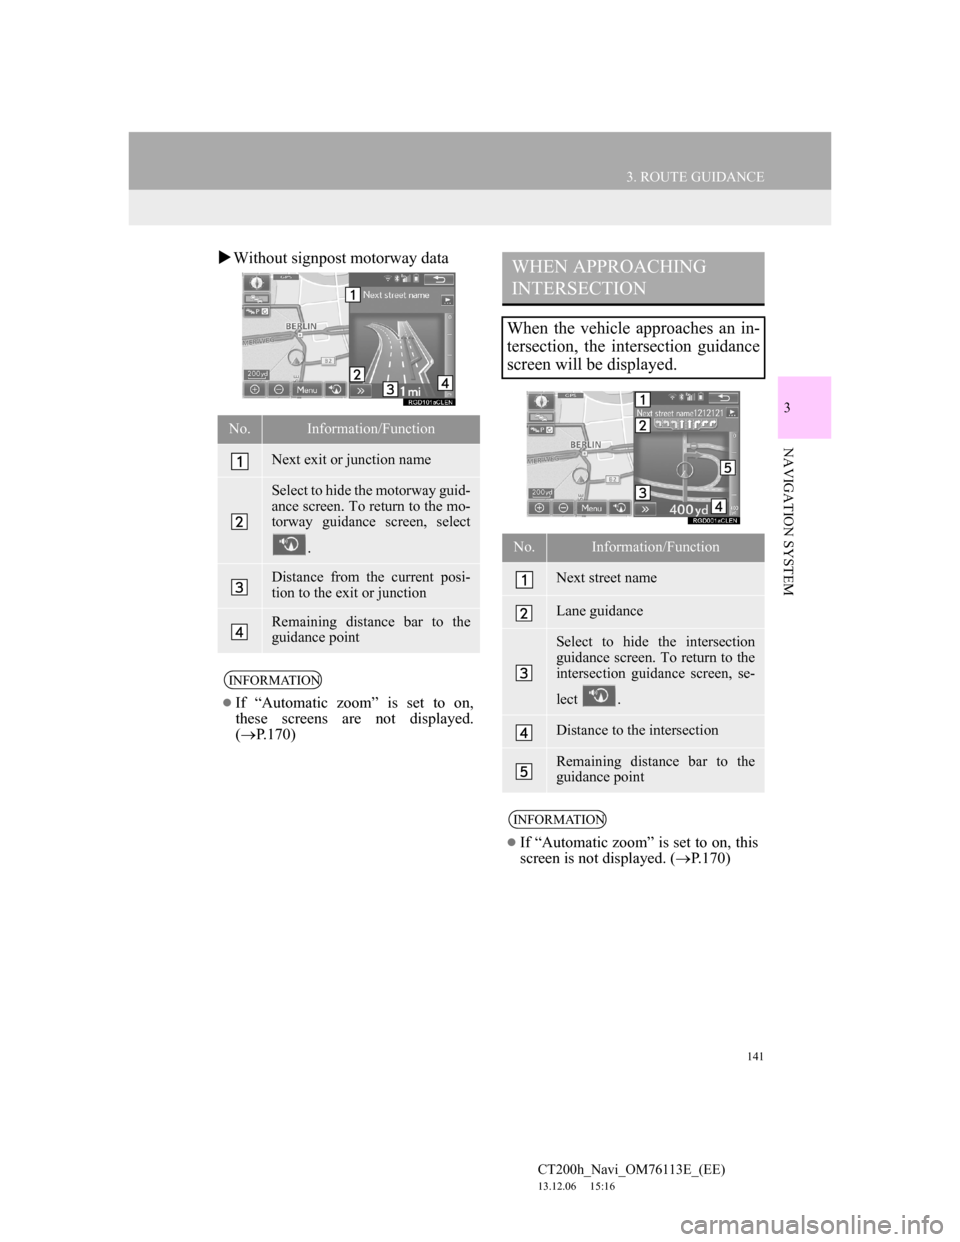
Without signpost motorway data
No.Information/Function
Next exit or junction name
Select to hide the motorway guid-
ance screen. To return to the mo-
torway guidance screen, select
.
Distance from the current posi-
tion to the exit or junction
Remaining distance bar to the
guidance point
INFORMATION
If “Automatic zoom” is set to on,
these screens are not displayed.
(P.170)
WHEN APPROACHING
INTERSECTION
When the vehicle approaches an in-
tersection, the intersection guidance
screen will be displayed.
No.Information/Function
Next street name
Lane guidance
Select to hide the intersection
guidance screen. To return to the
intersection guidance screen, se-
lect .
Distance to the intersection
Remaining distance bar to the
guidance point
INFORMATION
If “Automatic zoom” is set to on, this
screen is not displayed. (P.170)
Page 143 of 410
143
3. ROUTE GUIDANCE
CT200h_Navi_OM76113E_(EE)
13.12.06 15:16
3
NAVIGATION SYSTEM
2. TYPICAL VOICE GUIDANCE PROMPTS
As the vehicle approaches an inter-
section, or point, where maneuvering
the vehicle is necessary, the system’s
voice guidance will provide various
messages.
WA R N I N G
Be sure to obey the traffic regulations
and keep the road condition in mind
especially when you are driving on
IPD roads (roads that are not com-
pletely digitized in our database). The
route guidance may not have the
updated information such as the
direction of a one way street.
INFORMATION
If a voice guidance command cannot
be heard, select on the map
screen to hear it again.
To adjust the voice guidance volume:
P. 8 3
Voice guidance may be made early or
late.
If the system cannot determine the
current position correctly, you may
not hear voice guidance or may not
see the magnified intersection on the
screen.
Page 145 of 410
145
3. ROUTE GUIDANCE
CT200h_Navi_OM76113E_(EE)
13.12.06 15:16
3
NAVIGATION SYSTEM
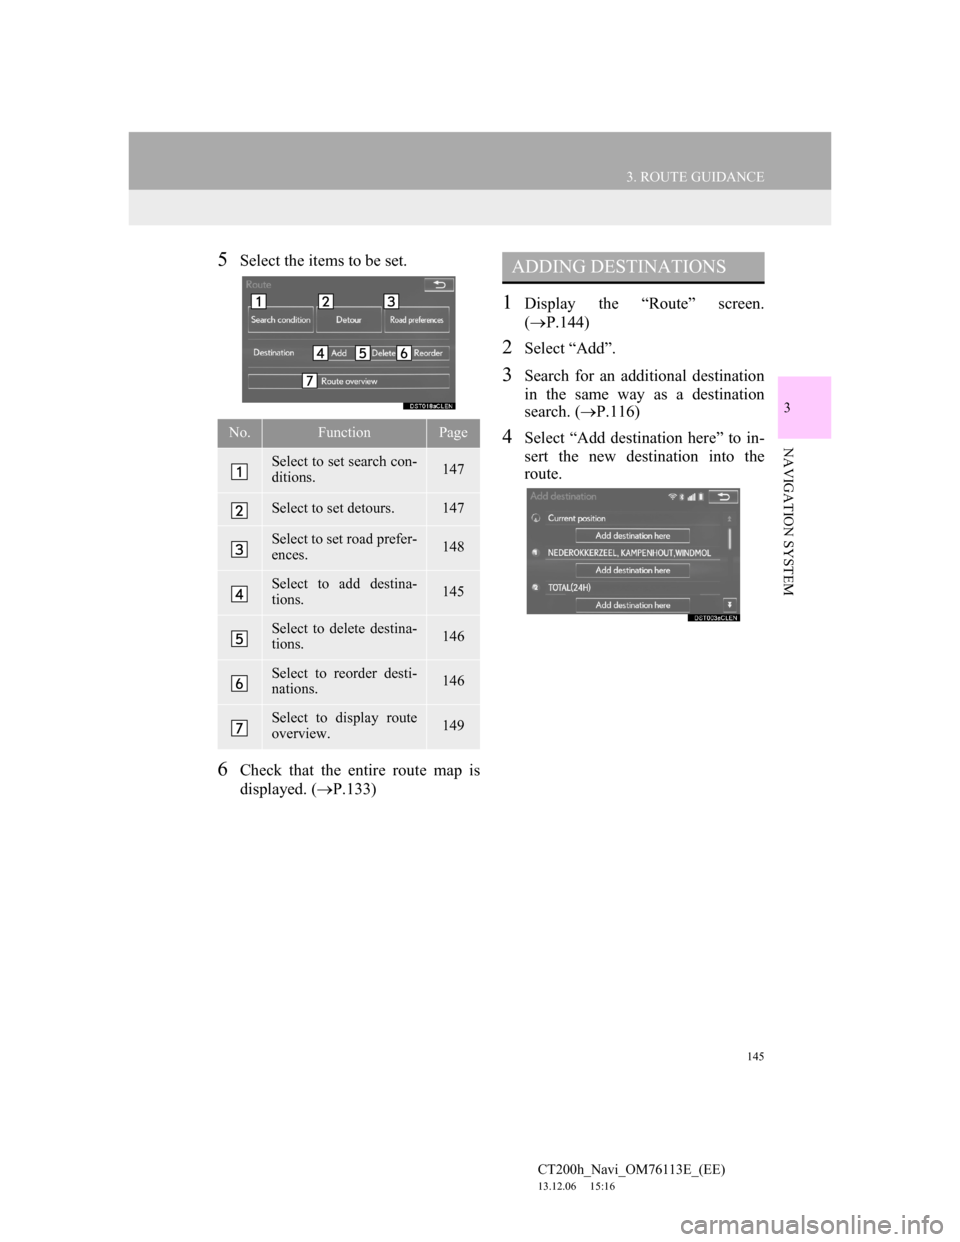
5Select the items to be set.
6Check that the entire route map is
displayed. (P.133)
1Display the “Route” screen.
(P.144)
2Select “Add”.
3Search for an additional destination
in the same way as a destination
search. (P.116)
4Select “Add destination here” to in-
sert the new destination into the
route.No.FunctionPage
Select to set search con-
ditions.147
Select to set detours.147
Select to set road prefer-
ences.148
Select to add destina-
tions.145
Select to delete destina-
tions.146
Select to reorder desti-
nations.146
Select to display route
overview.149
ADDING DESTINATIONS