Lexus IS220d 2012 Navigation manual
Manufacturer: LEXUS, Model Year: 2012, Model line: IS220d, Model: Lexus IS220d 2012Pages: 407, PDF Size: 23.8 MB
Page 41 of 407
41
1. BASIC INFORMATION BEFORE OPERATION
2
BASIC FUNCTION
ISF_IS_ISC_Navi_EE
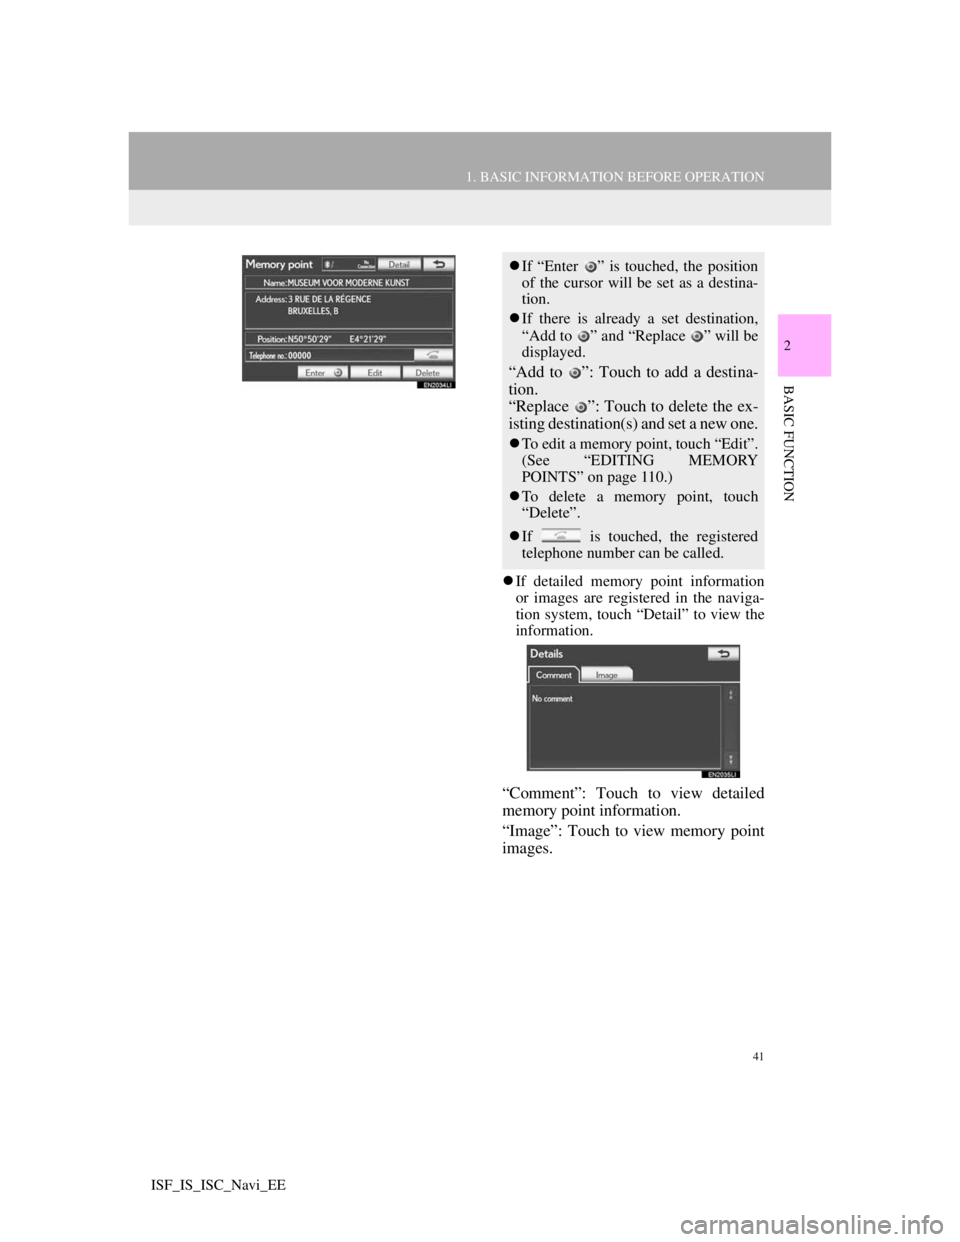
If detailed memory point information
or images are registered in the naviga-
tion system, touch “Detail” to view the
information.
“Comment”: Touch to view detailed
memory point information.
“Image”: Touch to view memory point
images.
If “Enter ” is touched, the position
of the cursor will be set as a destina-
tion.
If there is already a set destination,
“Add to ” and “Replace ” will be
displayed.
“Add to ”: Touch to add a destina-
tion.
“Replace ”: Touch to delete the ex-
isting destination(s) and set a new one.
To edit a memory point, touch “Edit”.
(See “EDITING MEMORY
POINTS” on page 110.)
To delete a memory point, touch
“Delete”.
If is touched, the registered
telephone number can be called.
Page 42 of 407
42
1. BASIC INFORMATION BEFORE OPERATION
ISF_IS_ISC_Navi_EE
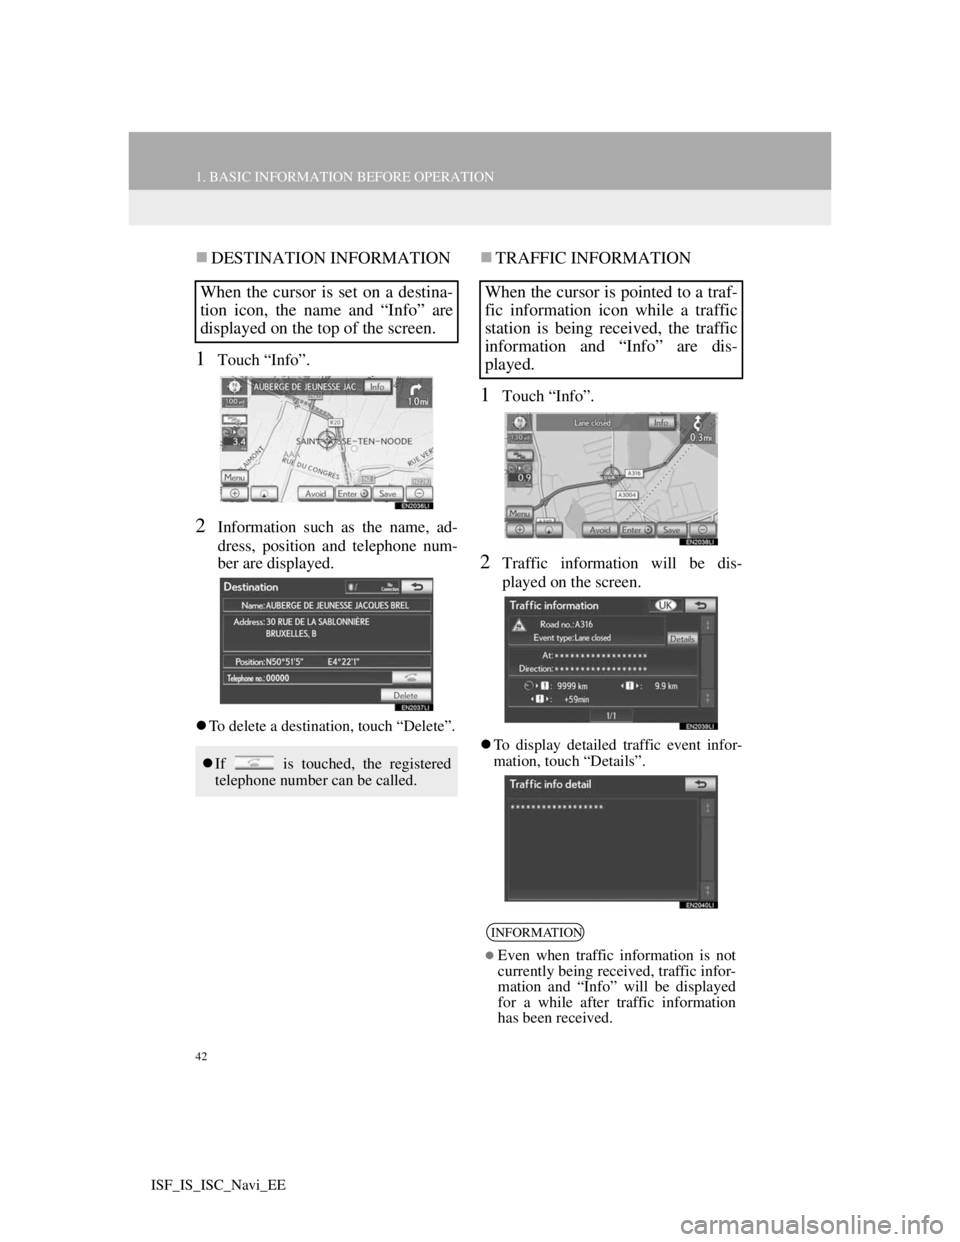
DESTINATION INFORMATION
1Touch “Info”.
2Information such as the name, ad-
dress, position and telephone num-
ber are displayed.
To delete a destination, touch “Delete”.
TRAFFIC INFORMATION
1Touch “Info”.
2Traffic information will be dis-
played on the screen.
To display detailed traffic event infor-
mation, touch “Details”.
When the cursor is set on a destina-
tion icon, the name and “Info” are
displayed on the top of the screen.
If is touched, the registered
telephone number can be called.
When the cursor is pointed to a traf-
fic information icon while a traffic
station is being received, the traffic
information and “Info” are dis-
played.
INFORMATION
Even when traffic information is not
currently being received, traffic infor-
mation and “Info” will be displayed
for a while after traffic information
has been received.
Page 43 of 407
43
1. BASIC INFORMATION BEFORE OPERATION
2
BASIC FUNCTION
ISF_IS_ISC_Navi_EE
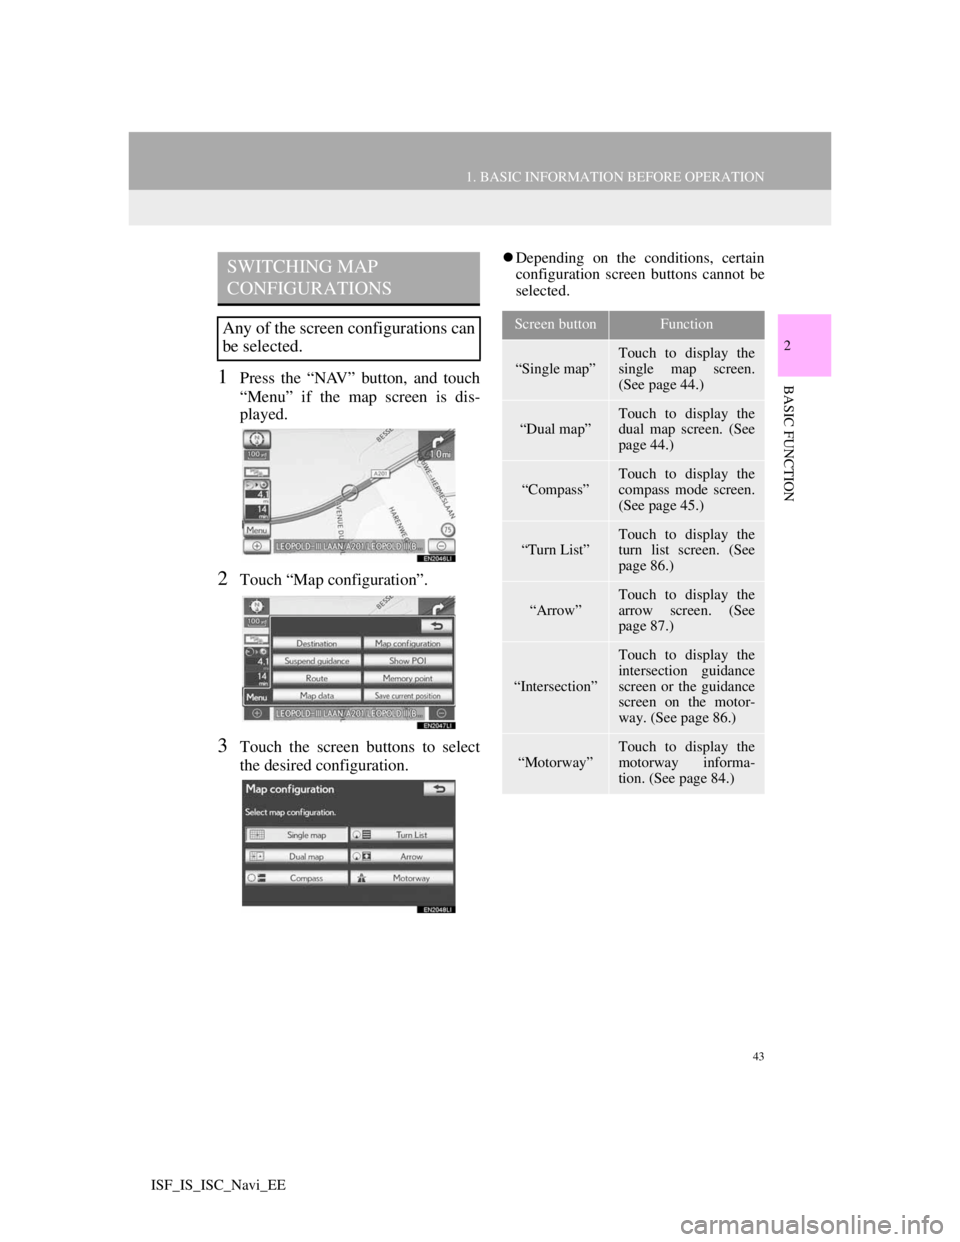
1Press the “NAV” button, and touch
“Menu” if the map screen is dis-
played.
2Touch “Map configuration”.
3Touch the screen buttons to select
the desired configuration.
Depending on the conditions, certain
configuration screen buttons cannot be
selected.SWITCHING MAP
CONFIGURATIONS
Any of the screen configurations can
be selected.Screen buttonFunction
“Single map”
Touch to display the
single map screen.
(See page 44.)
“Dual map”Touch to display the
dual map screen. (See
page 44.)
“Compass”
Touch to display the
compass mode screen.
(See page 45.)
“Turn List”
Touch to display the
turn list screen. (See
page 86.)
“Arrow”Touch to display the
arrow screen. (See
page 87.)
“Intersection”
Touch to display the
intersection guidance
screen or the guidance
screen on the motor-
way. (See page 86.)
“Motorway”
Touch to display the
motorway informa-
tion. (See page 84.)
Page 44 of 407
44
1. BASIC INFORMATION BEFORE OPERATION
ISF_IS_ISC_Navi_EE
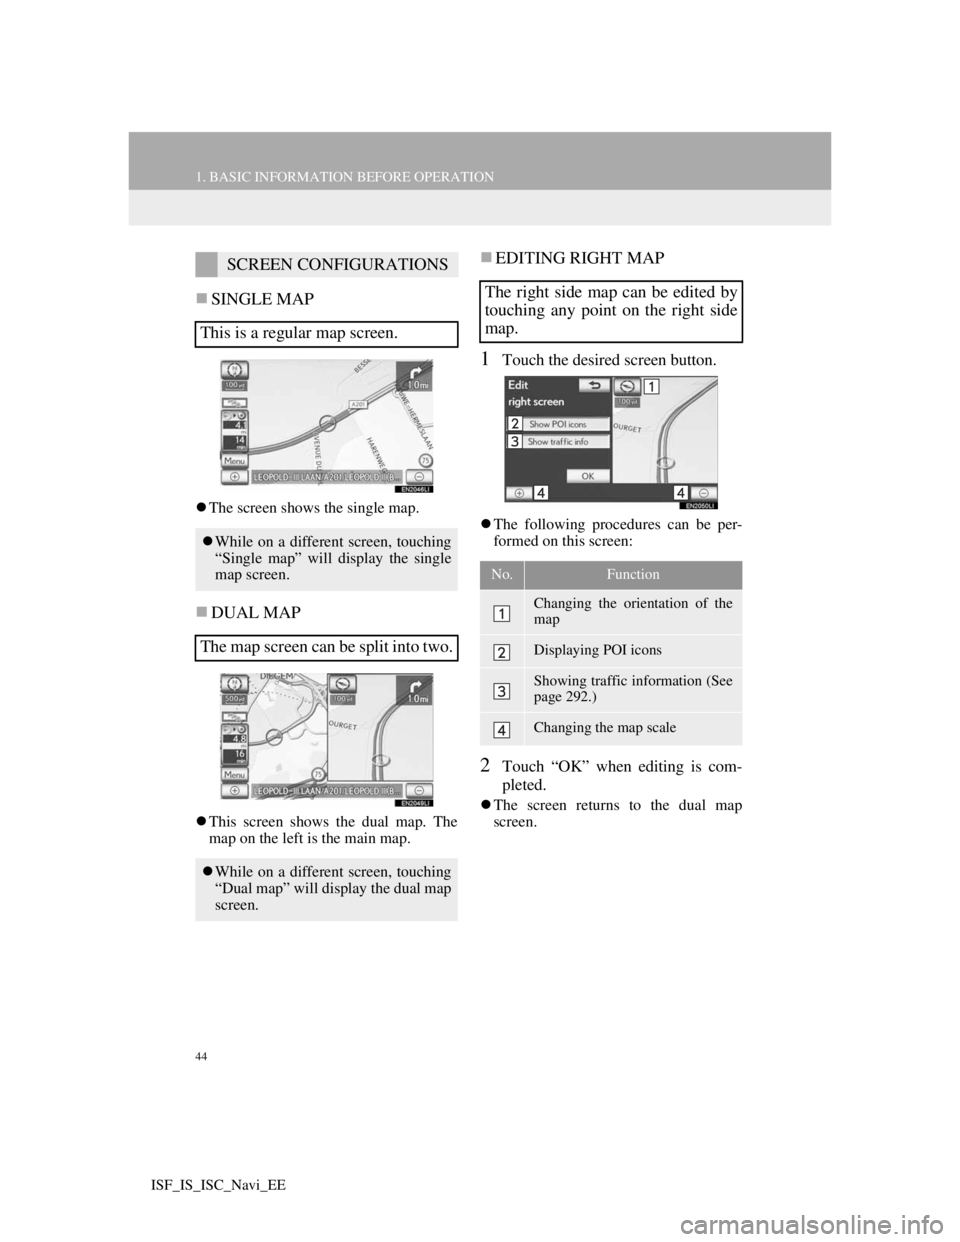
SINGLE MAP
The screen shows the single map.
DUAL MAP
This screen shows the dual map. The
map on the left is the main map.
EDITING RIGHT MAP
1Touch the desired screen button.
The following procedures can be per-
formed on this screen:
2Touch “OK” when editing is com-
pleted.
The screen returns to the dual map
screen.
SCREEN CONFIGURATIONS
This is a regular map screen.
While on a different screen, touching
“Single map” will display the single
map screen.
The map screen can be split into two.
While on a different screen, touching
“Dual map” will display the dual map
screen.
The right side map can be edited by
touching any point on the right side
map.
No.Function
Changing the orientation of the
map
Displaying POI icons
Showing traffic information (See
page 292.)
Changing the map scale
Page 45 of 407
45
1. BASIC INFORMATION BEFORE OPERATION
2
BASIC FUNCTION
ISF_IS_ISC_Navi_EE
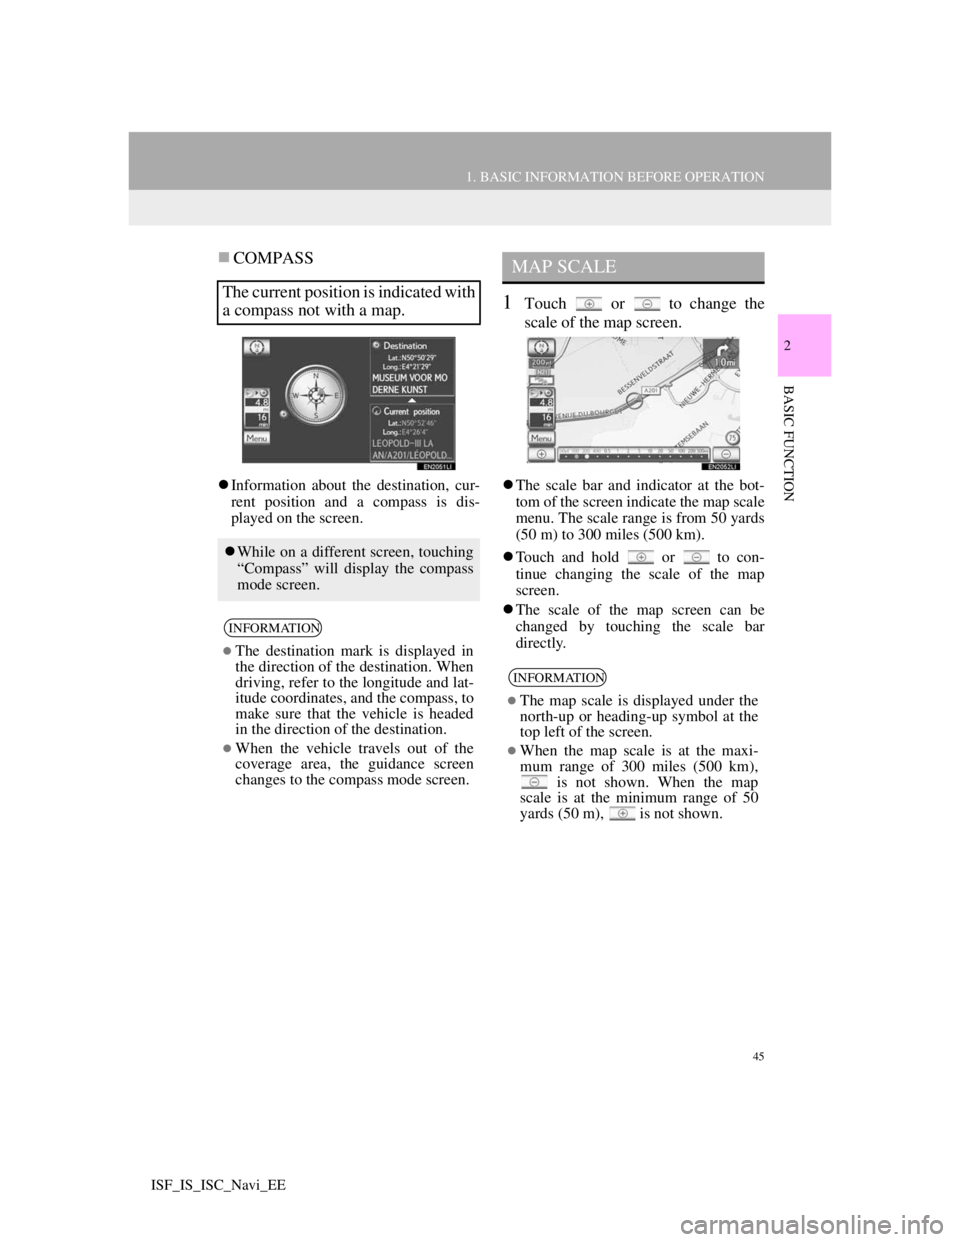
COMPASS
Information about the destination, cur-
rent position and a compass is dis-
played on the screen.
1Touch or to change the
scale of the map screen.
The scale bar and indicator at the bot-
tom of the screen indicate the map scale
menu. The scale range is from 50 yards
(50 m) to 300 miles (500 km).
Touch and hold or to con-
tinue changing the scale of the map
screen.
The scale of the map screen can be
changed by touching the scale bar
directly.
The current position is indicated with
a compass not with a map.
While on a different screen, touching
“Compass” will display the compass
mode screen.
INFORMATION
The destination mark is displayed in
the direction of the destination. When
driving, refer to the longitude and lat-
itude coordinates, and the compass, to
make sure that the vehicle is headed
in the direction of the destination.
When the vehicle travels out of the
coverage area, the guidance screen
changes to the compass mode screen.
MAP SCALE
INFORMATION
The map scale is displayed under the
north-up or heading-up symbol at the
top left of the screen.
When the map scale is at the maxi-
mum range of 300 miles (500 km),
is not shown. When the map
scale is at the minimum range of 50
yards (50 m),
is not shown.
Page 46 of 407
46
1. BASIC INFORMATION BEFORE OPERATION
ISF_IS_ISC_Navi_EE
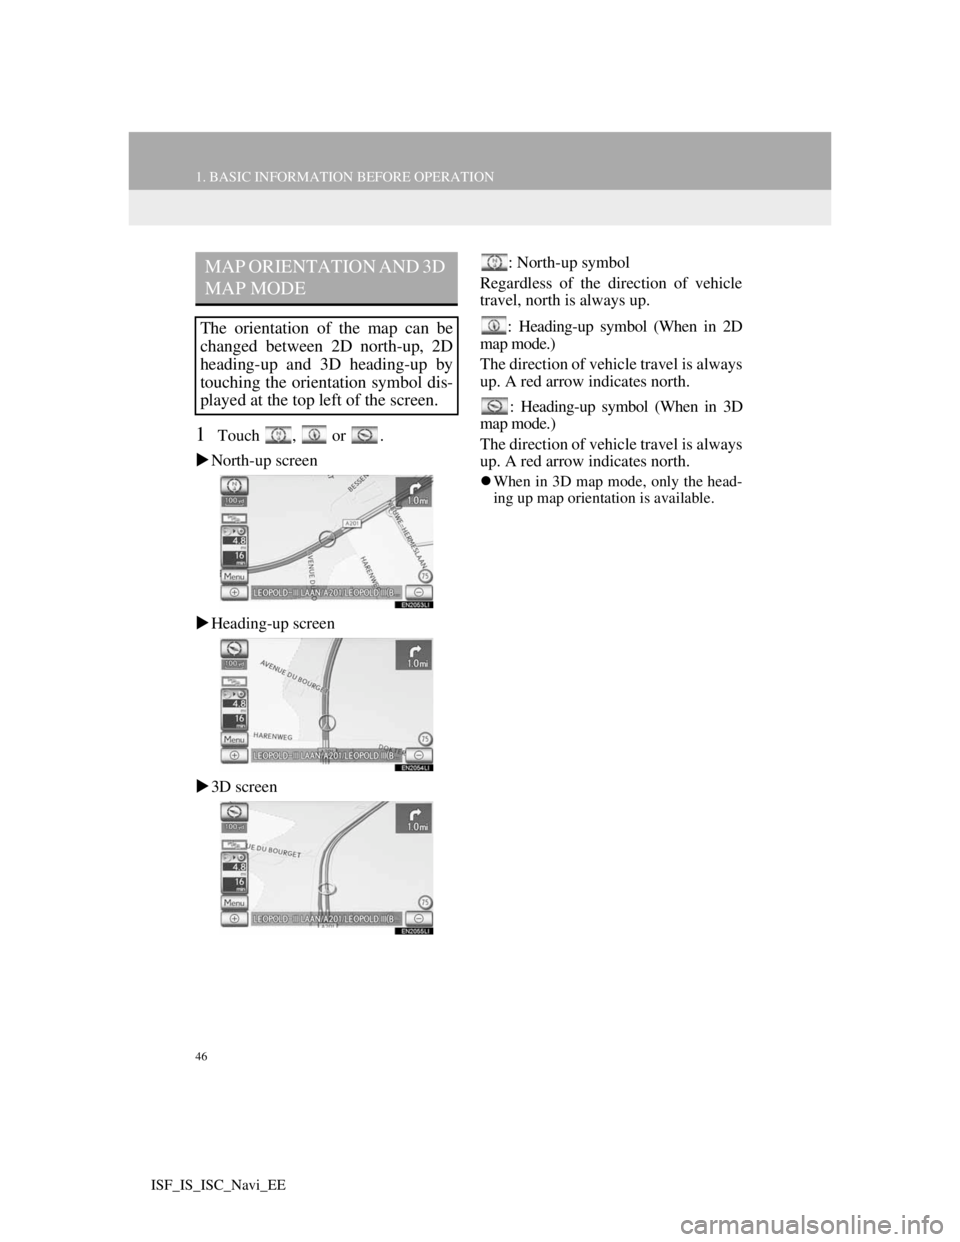
1Touch , or .
North-up screen
Heading-up screen
3D screen: North-up symbol
Regardless of the direction of vehicle
travel, north is always up.
: Heading-up symbol (When in 2D
map mode.)
The direction of vehicle travel is always
up. A red arrow indicates north.
: Heading-up symbol (When in 3D
map mode.)
The direction of vehicle travel is always
up. A red arrow indicates north.
When in 3D map mode, only the head-
ing up map orientation is available.
MAP ORIENTATION AND 3D
MAP MODE
The orientation of the map can be
changed between 2D north-up, 2D
heading-up and 3D heading-up by
touching the orientation symbol dis-
played at the top left of the screen.
Page 47 of 407
47
1. BASIC INFORMATION BEFORE OPERATION
2
BASIC FUNCTION
ISF_IS_ISC_Navi_EE
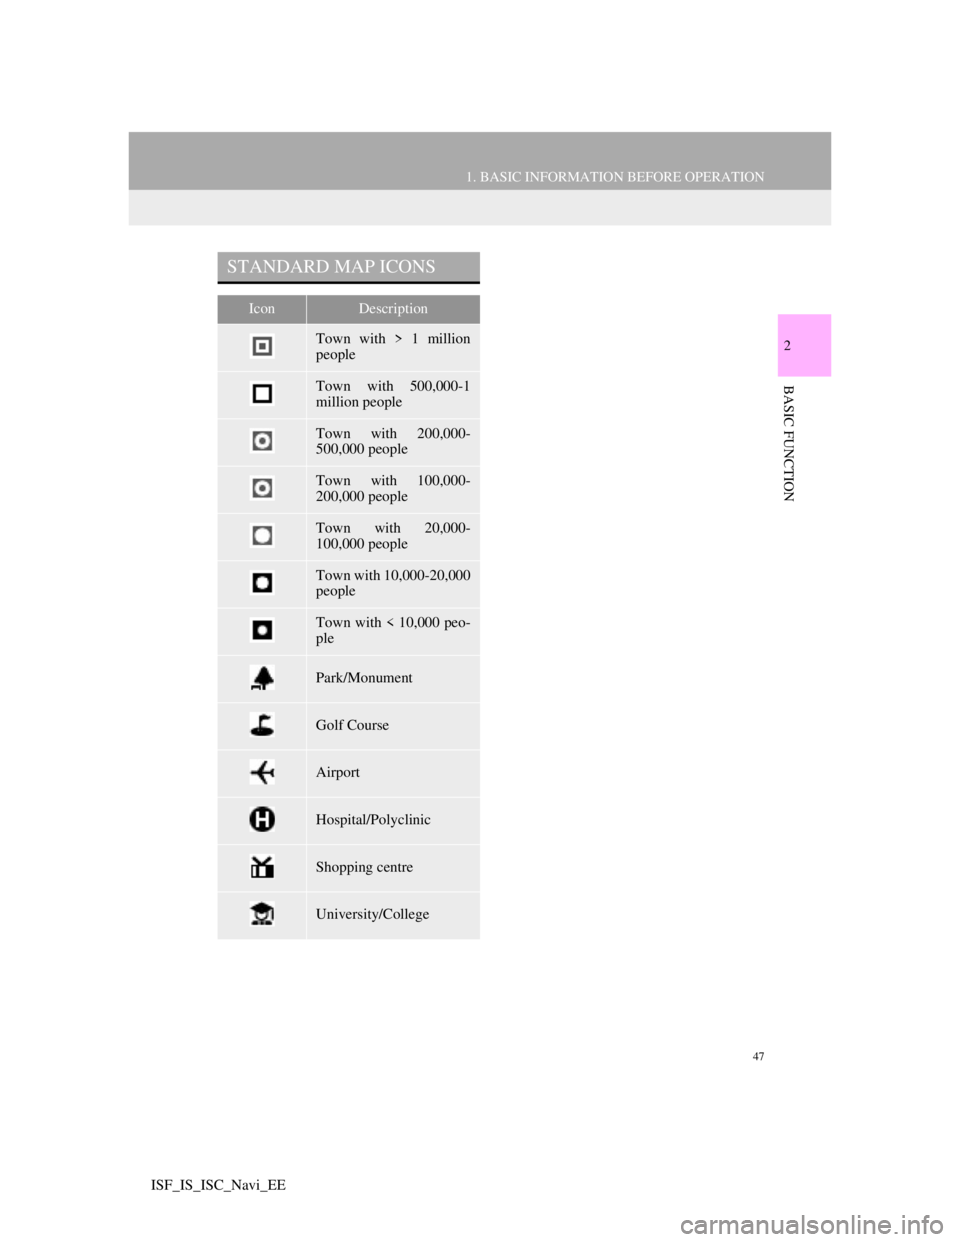
STANDARD MAP ICONS
IconDescription
Town with > 1 million
people
Town with 500,000-1
million people
Town with 200,000-
500,000 people
Town with 100,000-
200,000 people
Town with 20,000-
100,000 people
Town with 10,000-20,000
people
Town with < 10,000 peo-
ple
Park/Monument
Golf Course
Airport
Hospital/Polyclinic
Shopping centre
University/College
Page 48 of 407

48
1. BASIC INFORMATION BEFORE OPERATION
ISF_IS_ISC_Navi_EE
Page 49 of 407
47
2
BASIC FUNCTION
ISF_IS_ISC_Navi_EE
2. SETUP
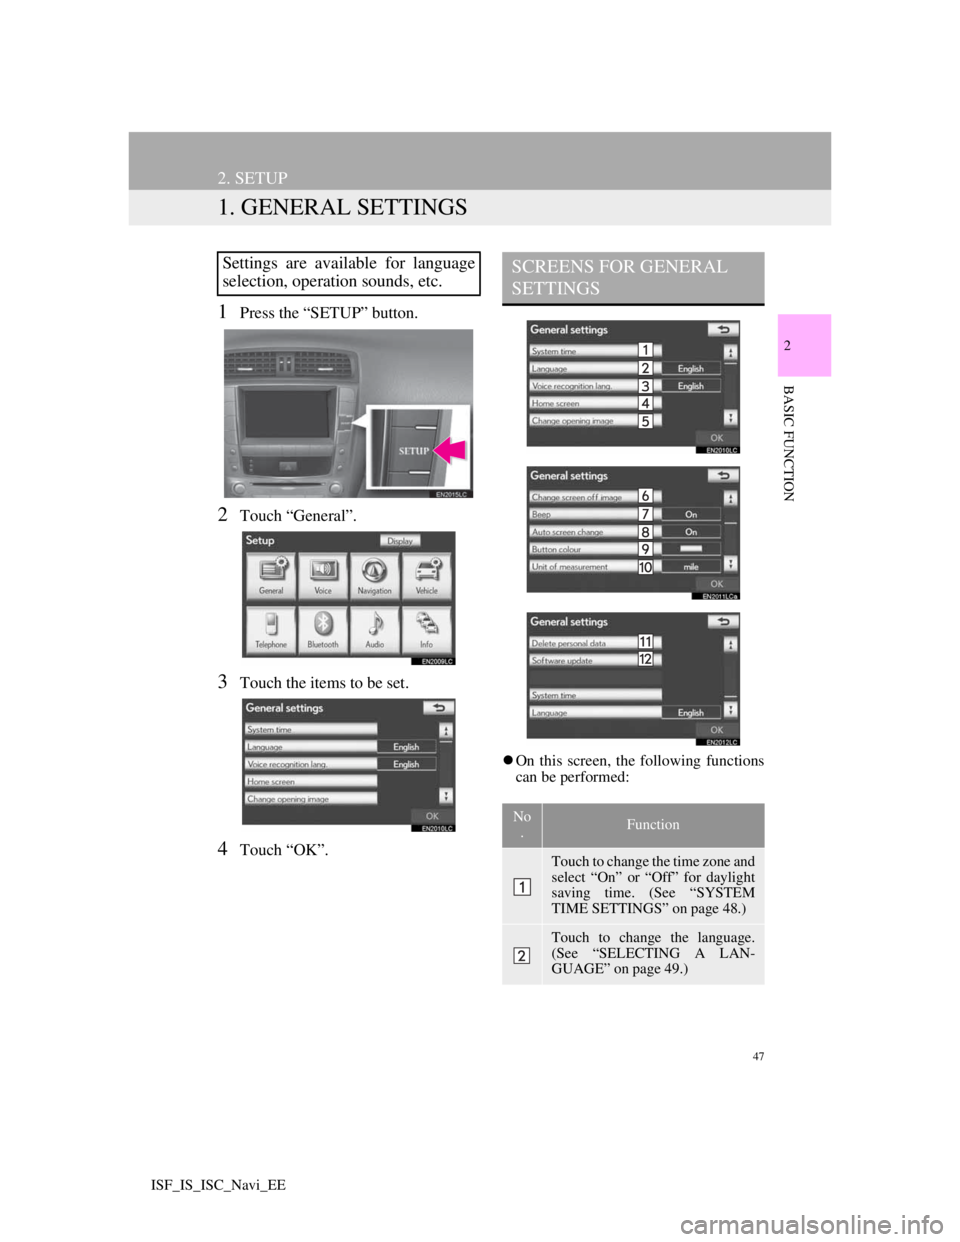
1. GENERAL SETTINGS
1Press the “SETUP” button.
2Touch “General”.
3Touch the items to be set.
4Touch “OK”.
On this screen, the following functions
can be performed:
Settings are available for language
selection, operation sounds, etc.SCREENS FOR GENERAL
SETTINGS
No
.Function
Touch to change the time zone and
select “On” or “Off” for daylight
saving time. (See “SYSTEM
TIME SETTINGS” on page 48.)
Touch to change the language.
(See “SELECTING A LAN-
GUAGE” on page 49.)
Page 50 of 407
48
2. SETUP
ISF_IS_ISC_Navi_EE
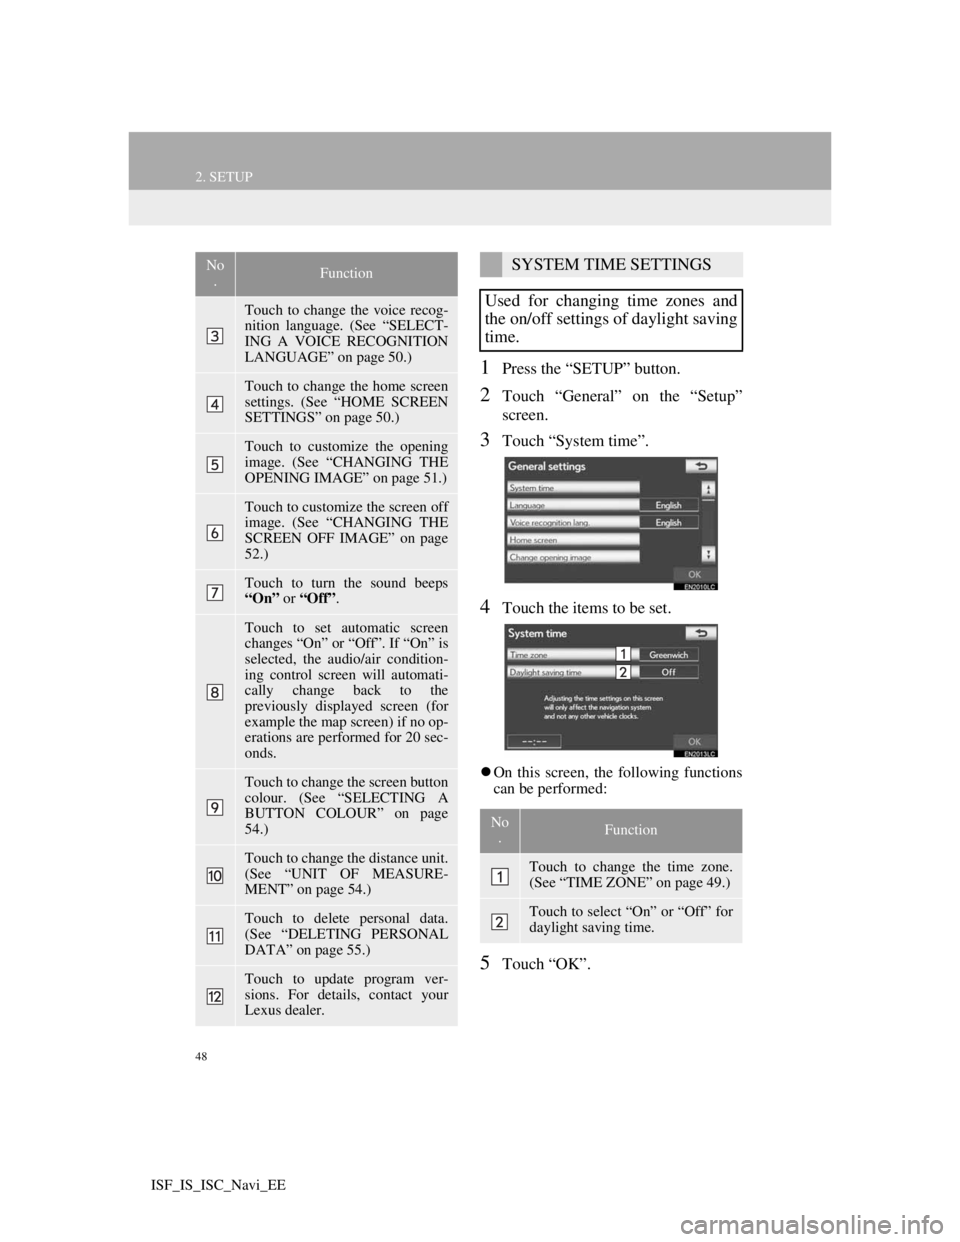
1Press the “SETUP” button.
2Touch “General” on the “Setup”
screen.
3Touch “System time”.
4Touch the items to be set.
On this screen, the following functions
can be performed:
5Touch “OK”.
Touch to change the voice recog-
nition language. (See “SELECT-
ING A VOICE RECOGNITION
LANGUAGE” on page 50.)
Touch to change the home screen
settings. (See “HOME SCREEN
SETTINGS” on page 50.)
Touch to customize the opening
image. (See “CHANGING THE
OPENING IMAGE” on page 51.)
Touch to customize the screen off
image. (See “CHANGING THE
SCREEN OFF IMAGE” on page
52.)
Touch to turn the sound beeps
“On” or “Off”.
Touch to set automatic screen
changes “On” or “Off”. If “On” is
selected, the audio/air condition-
ing control screen will automati-
cally change back to the
previously displayed screen (for
example the map screen) if no op-
erations are performed for 20 sec-
onds.
Touch to change the screen button
colour. (See “SELECTING A
BUTTON COLOUR” on page
54.)
Touch to change the distance unit.
(See “UNIT OF MEASURE-
MENT” on page 54.)
Touch to delete personal data.
(See “DELETING PERSONAL
DATA” on page 55.)
Touch to update program ver-
sions. For details, contact your
Lexus dealer.
No
.FunctionSYSTEM TIME SETTINGS
Used for changing time zones and
the on/off settings of daylight saving
time.
No
.Function
Touch to change the time zone.
(See “TIME ZONE” on page 49.)
Touch to select “On” or “Off” for
daylight saving time.