LEXUS LS430 2003 Factory Repair Manual
Manufacturer: LEXUS, Model Year: 2003,
Model line: LS430,
Model: LEXUS LS430 2003
Pages: 4500, PDF Size: 87.45 MB
LEXUS LS430 2003 Factory Repair Manual
LS430 2003
LEXUS
LEXUS
https://www.carmanualsonline.info/img/36/57050/w960_57050-0.png
LEXUS LS430 2003 Factory Repair Manual
Trending: B1278, Bean, Rear control Arm, seat adjustment, seats, spark plugs replace, battery capacity
Page 431 of 4500
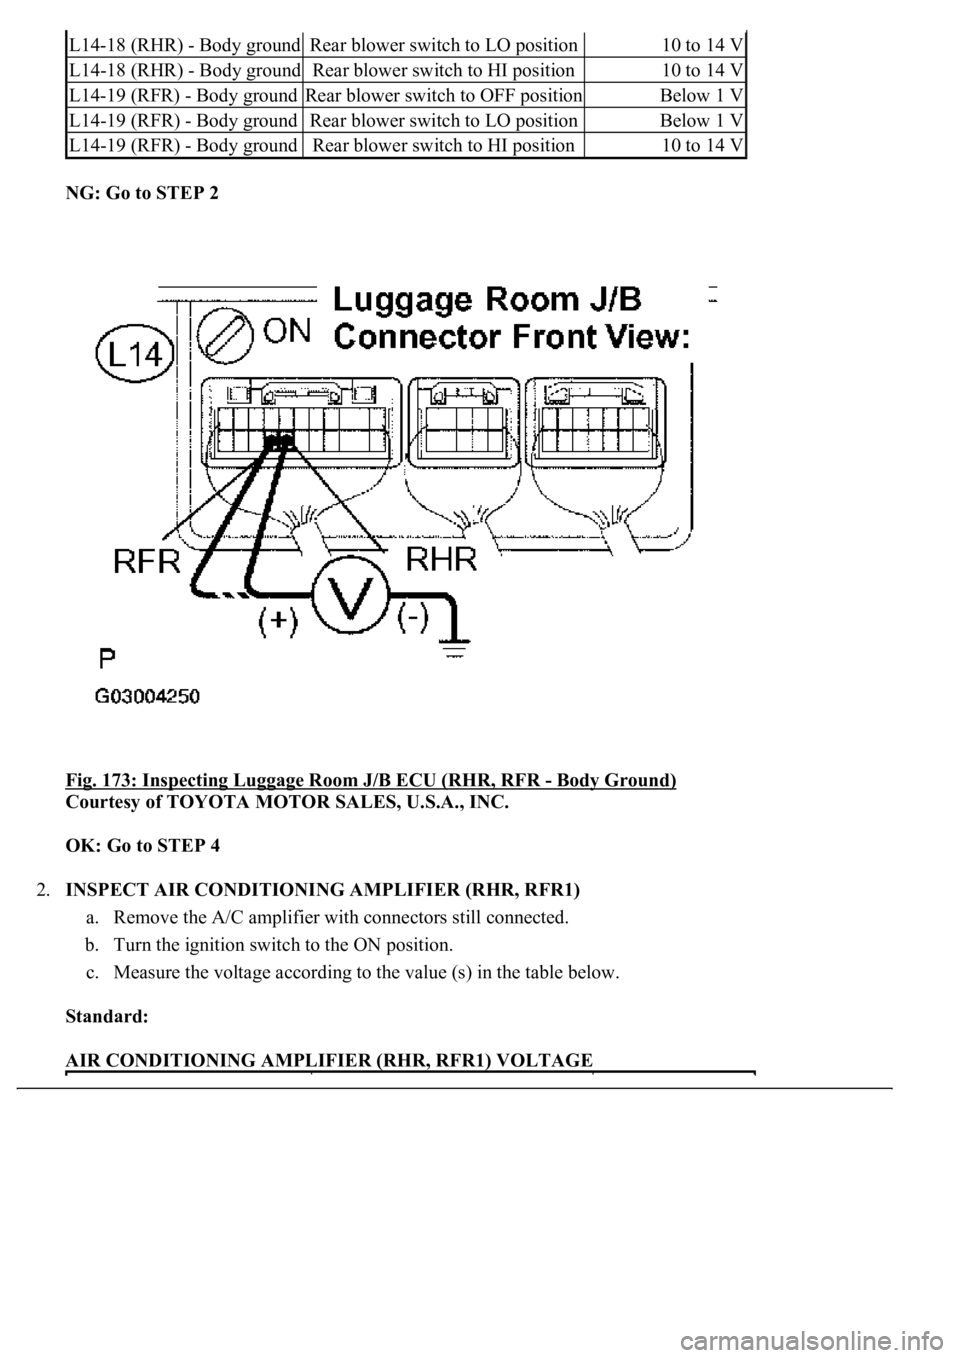
NG: Go to STEP 2
Fig. 173: Inspecting Luggage Room J/B ECU (RHR, RFR
- Body Ground)
Courtesy of TOYOTA MOTOR SALES, U.S.A., INC.
OK: Go to STEP 4
2.INSPECT AIR CONDITIONING AMPLIFIER (RHR, RFR1)
a. Remove the A/C amplifier with connectors still connected.
b. Turn the ignition switch to the ON position.
c. Measure the voltage according to the value (s) in the table below.
Standard:
AIR CONDITIONING AMPLIFIER (RHR, RFR1) VOLTAGE
L14-18 (RHR) - Body groundRear blower switch to LO position10 to 14 V
L14-18 (RHR) - Body groundRear blower switch to HI position10 to 14 V
L14-19 (RFR) - Body groundRear blower switch to OFF positionBelow 1 V
L14-19 (RFR) - Body groundRear blower switch to LO positionBelow 1 V
L14-19 (RFR) - Body groundRear blower switch to HI position10 to 14 V
Page 432 of 4500
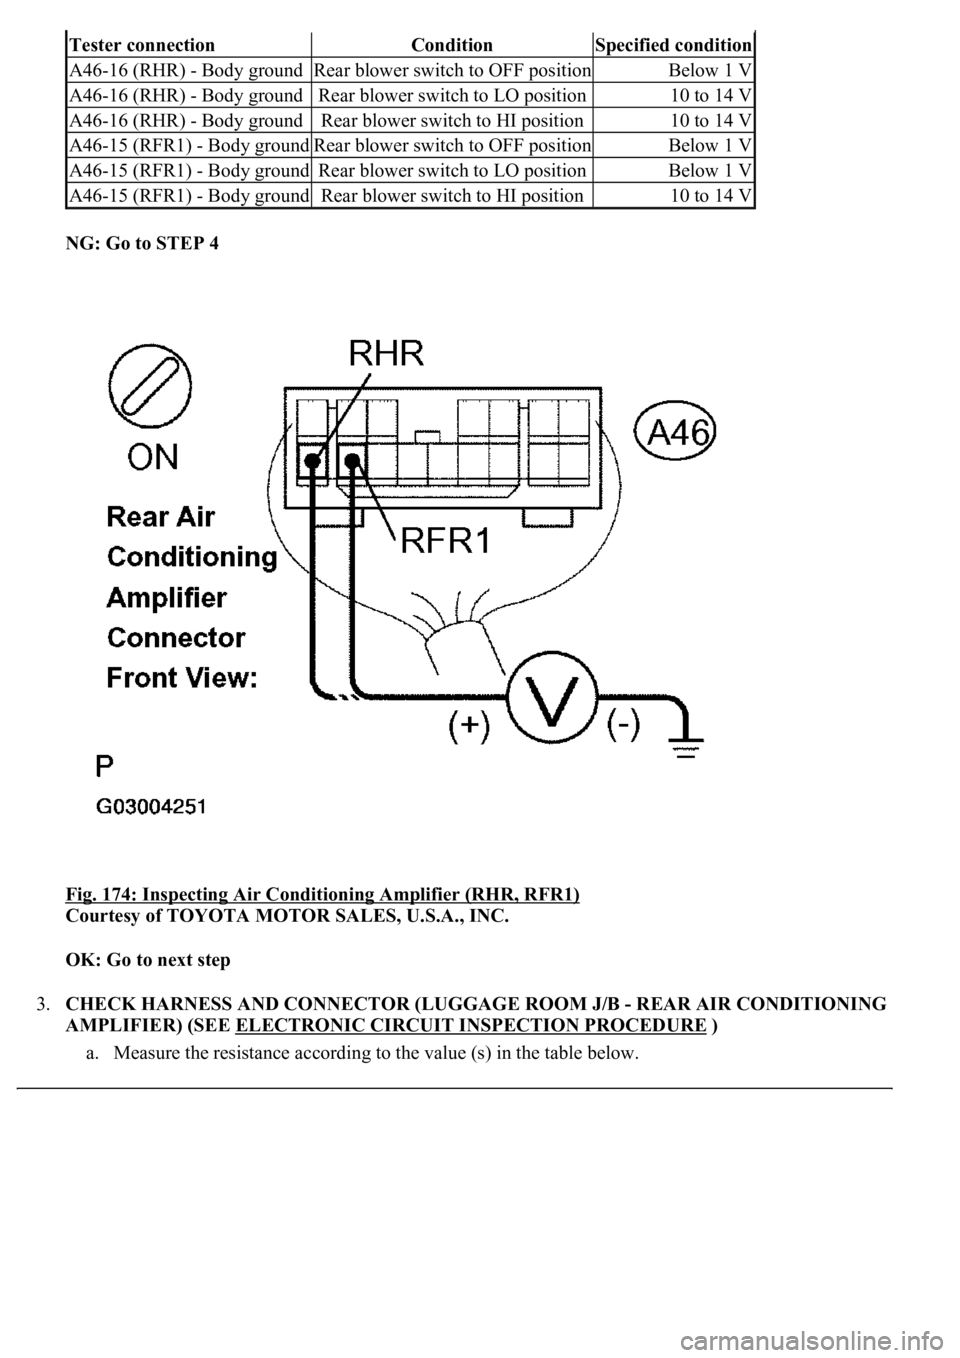
NG: Go to STEP 4
Fig. 174: Inspecting Air Conditioning Amplifier (RHR, RFR1)
Courtesy of TOYOTA MOTOR SALES, U.S.A., INC.
OK: Go to next step
3.CHECK HARNESS AND CONNECTOR (LUGGAGE ROOM J/B - REAR AIR CONDITIONING
AMPLIFIER) (SEE ELECTRONIC CIRCUIT INSPECTION PROCEDURE
)
a. Measure the resistance accordin
g to the value (s) in the table below.
Tester connectionConditionSpecified condition
A46-16 (RHR) - Body groundRear blower switch to OFF positionBelow 1 V
A46-16 (RHR) - Body groundRear blower switch to LO position10 to 14 V
A46-16 (RHR) - Body groundRear blower switch to HI position10 to 14 V
A46-15 (RFR1) - Body groundRear blower switch to OFF positionBelow 1 V
A46-15 (RFR1) - Body groundRear blower switch to LO positionBelow 1 V
A46-15 (RFR1) - Body groundRear blower switch to HI position10 to 14 V
Page 433 of 4500
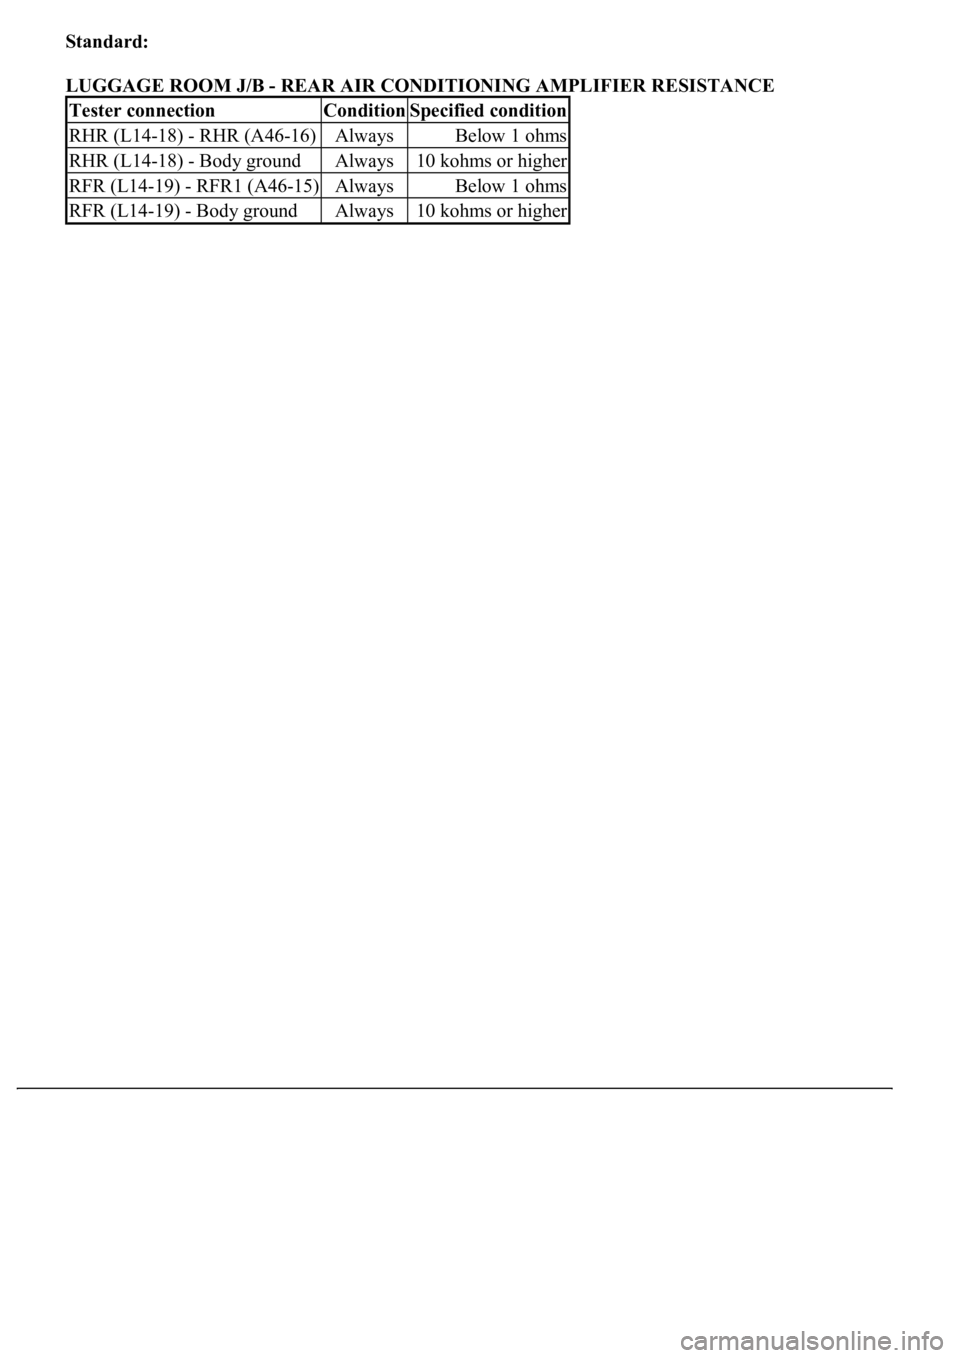
Standard:
LUGGAGE ROOM J/B - REAR AIR CONDITIONING AMPLIFIER RESISTANCE
Tester connectionConditionSpecified condition
RHR (L14-18) - RHR (A46-16)AlwaysBelow 1 ohms
RHR (L14-18) - Body groundAlways10 kohms or higher
RFR (L14-19) - RFR1 (A46-15)AlwaysBelow 1 ohms
RFR (L14-19) - Body groundAlways10 kohms or higher
Page 434 of 4500
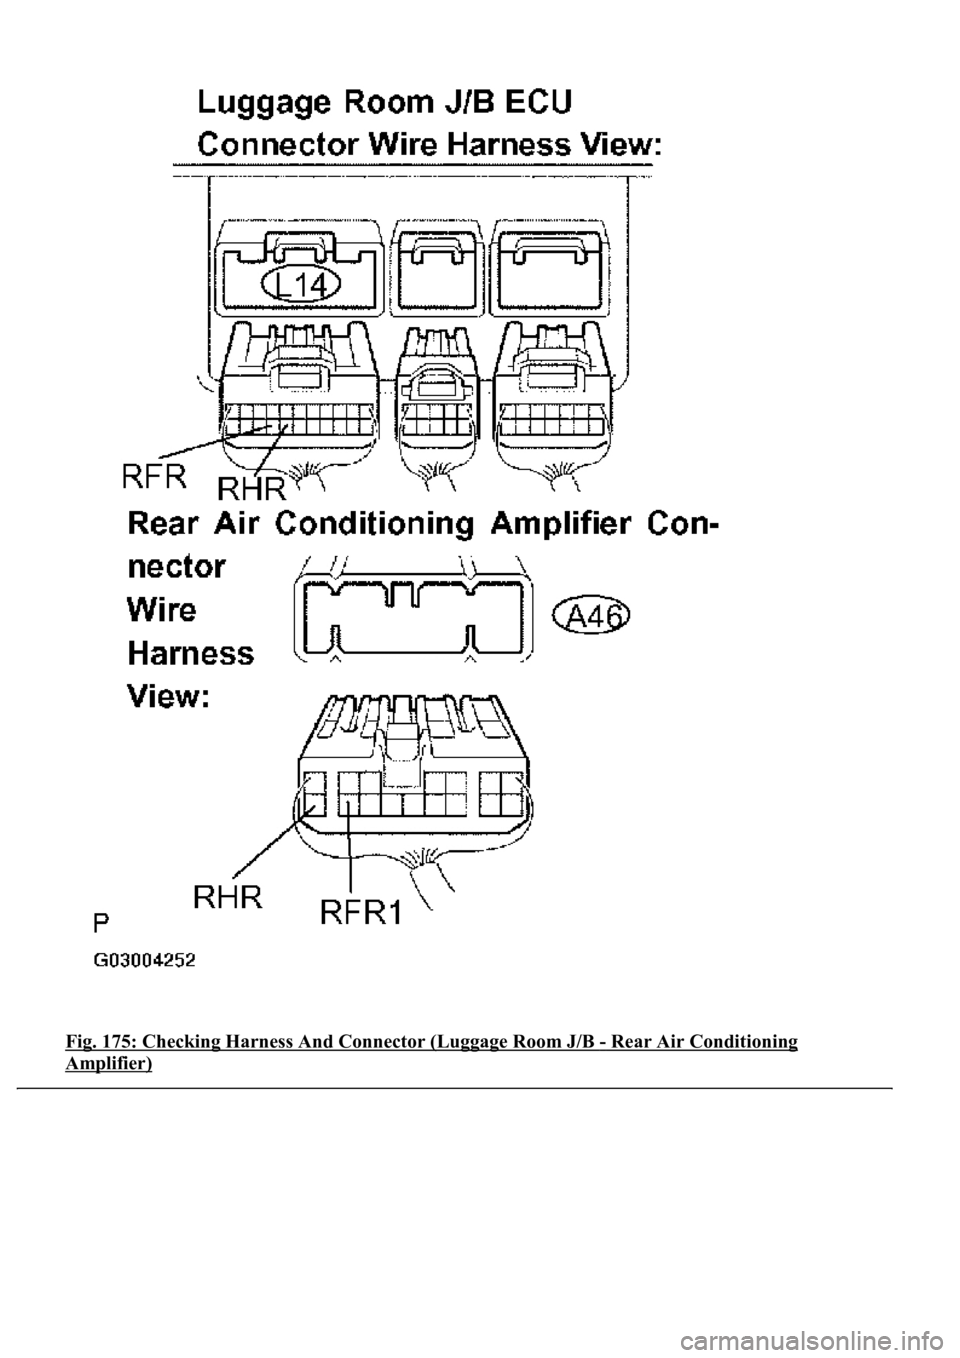
Fig. 175: Checking Harness And Connector (Luggage Room J/B - Rear Air Conditioning
Amplifier)
Page 435 of 4500
Courtesy of TOYOTA MOTOR SALES, U.S.A., INC.
NG: REPAIR OR REPLACE HARNESS OR CONNECTOR
OK: Go to next step
REPLACE LUGGAGE ROOM J/B
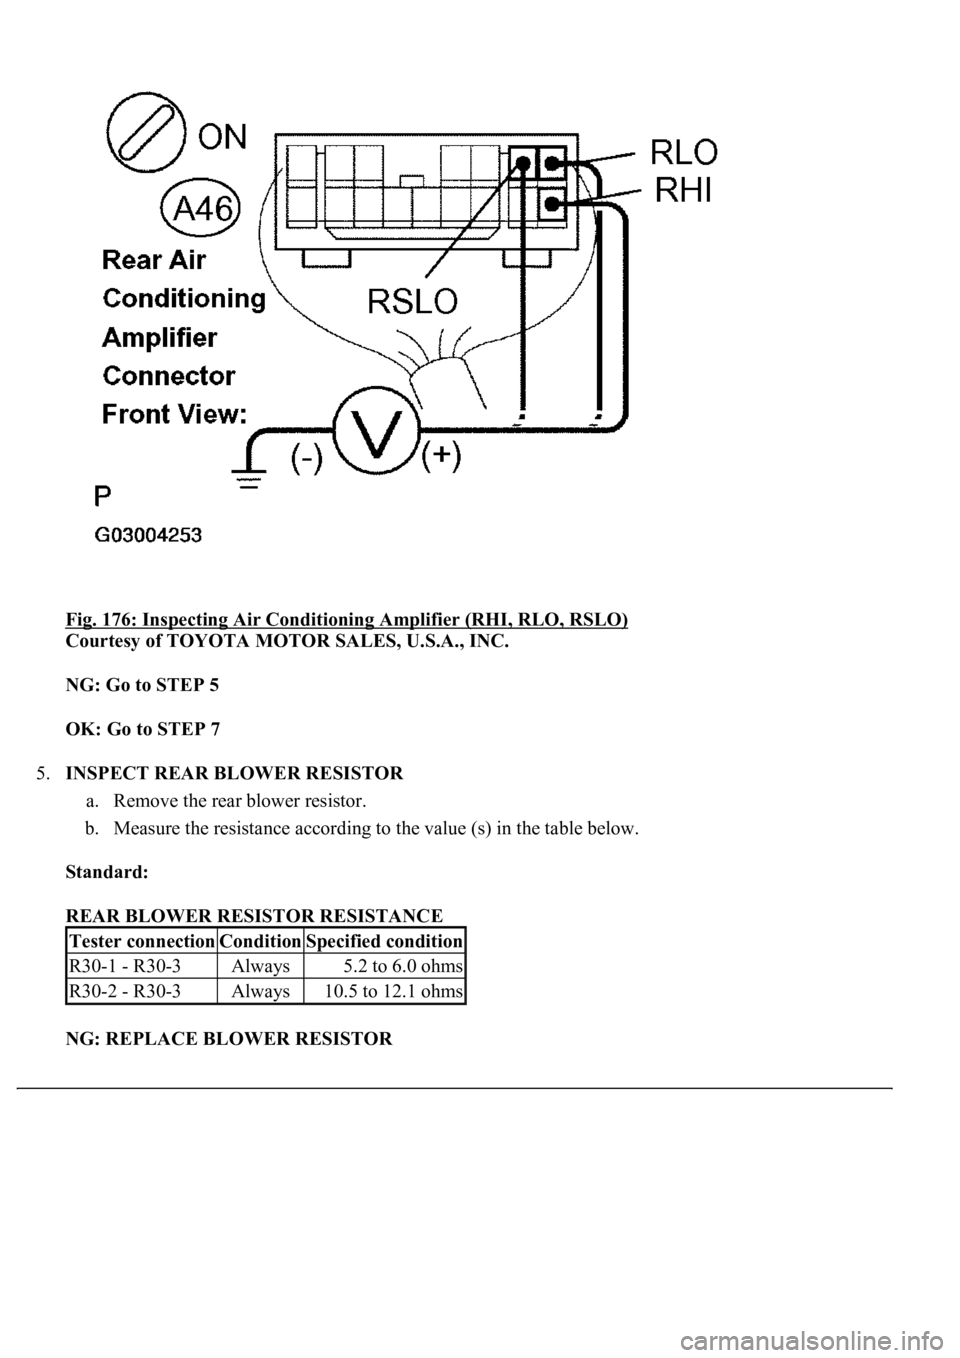
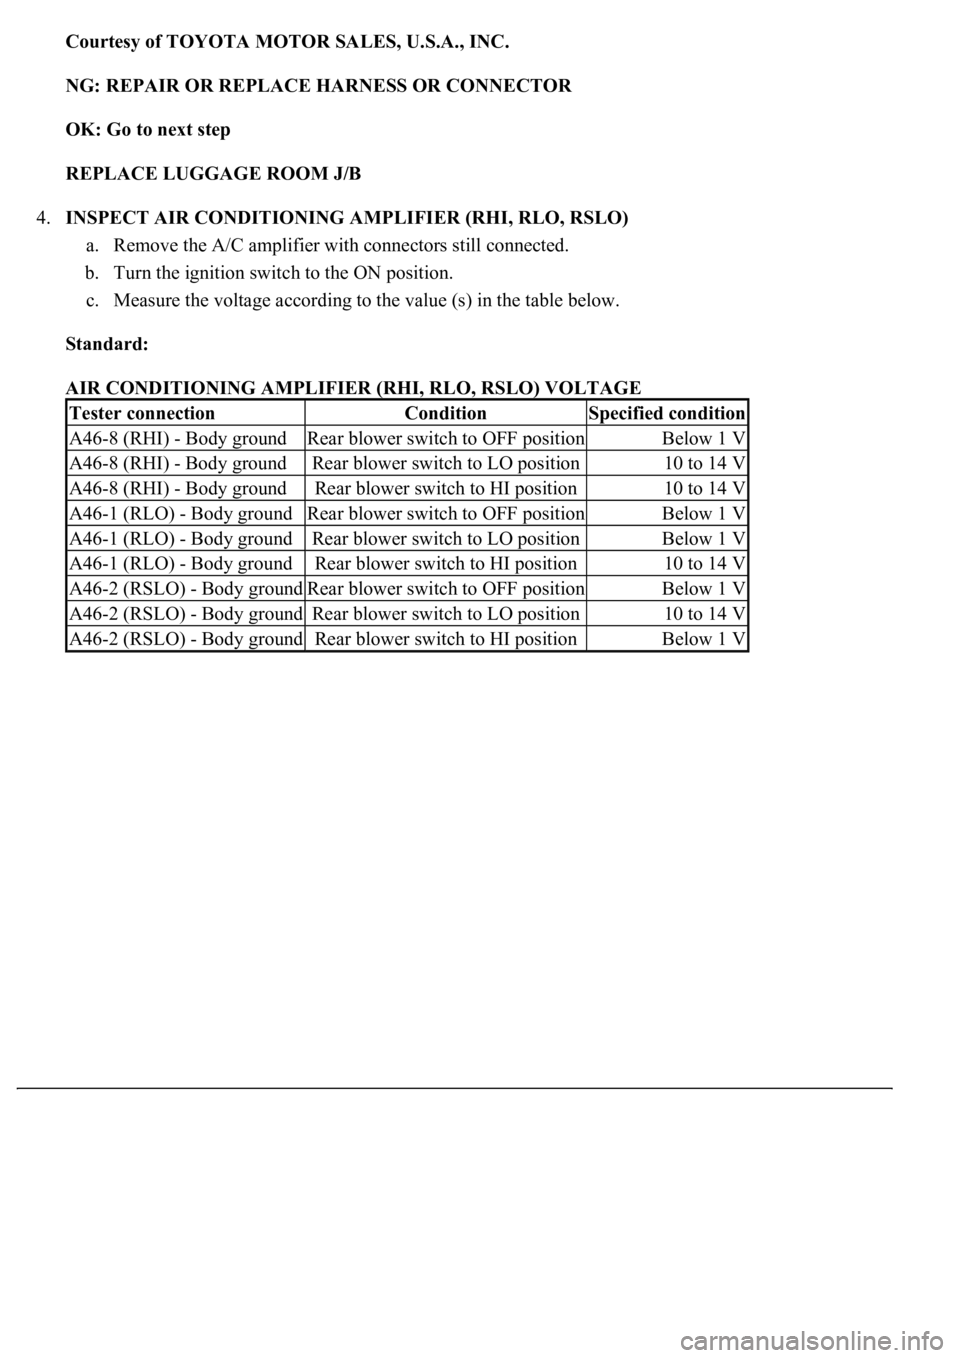
4.INSPECT AIR CONDITIONING AMPLIFIER (RHI, RLO, RSLO)
a. Remove the A/C amplifier with connectors still connected.
b. Turn the ignition switch to the ON position.
c. Measure the voltage according to the value (s) in the table below.
Standard:
AIR CONDITIONING AMPLIFIER (RHI, RLO, RSLO) VOLTAGE
Tester connectionConditionSpecified condition
A46-8 (RHI) - Body groundRear blower switch to OFF positionBelow 1 V
A46-8 (RHI) - Body groundRear blower switch to LO position10 to 14 V
A46-8 (RHI) - Body groundRear blower switch to HI position10 to 14 V
A46-1 (RLO) - Body groundRear blower switch to OFF positionBelow 1 V
A46-1 (RLO) - Body groundRear blower switch to LO positionBelow 1 V
A46-1 (RLO) - Body groundRear blower switch to HI position10 to 14 V
A46-2 (RSLO) - Body groundRear blower switch to OFF positionBelow 1 V
A46-2 (RSLO) - Body groundRear blower switch to LO position10 to 14 V
A46-2 (RSLO) - Body groundRear blower switch to HI positionBelow 1 V
Page 436 of 4500
Fig. 176: Inspecting Air Conditioning Amplifier (RHI, RLO, RSLO)
Courtesy of TOYOTA MOTOR SALES, U.S.A., INC.
NG: Go to STEP 5
OK: Go to STEP 7
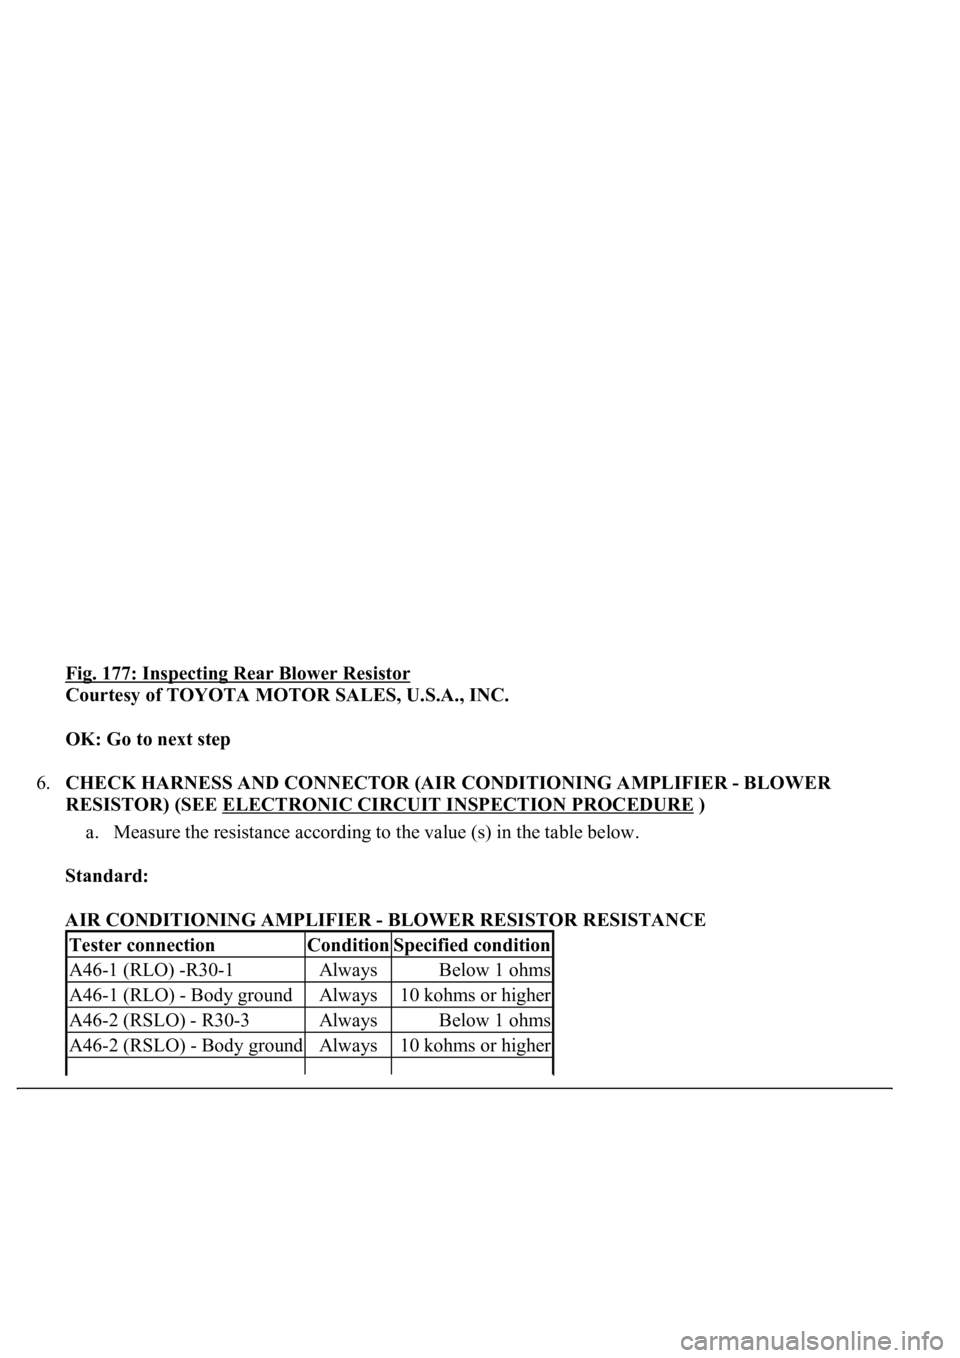
5.INSPECT REAR BLOWER RESISTOR
a. Remove the rear blower resistor.
b. Measure the resistance according to the value (s) in the table below.
Standard:
REAR BLOWER RESISTOR RESISTANCE
NG: REPLACE BLOWER RESISTOR
Tester connectionConditionSpecified condition
R30-1 - R30-3Always5.2 to 6.0 ohms
R30-2 - R30-3Always10.5 to 12.1 ohms
Page 437 of 4500
Fig. 177: Inspecting Rear Blower Resistor
Courtesy of TOYOTA MOTOR SALES, U.S.A., INC.
OK: Go to next step
6.CHECK HARNESS AND CONNECTOR (AIR CONDITIONING AMPLIFIER - BLOWER
RESISTOR) (SEE ELECTRONIC CIRCUIT INSPECTION PROCEDURE
)
a. Measure the resistance according to the value (s) in the table below.
Standard:
AIR CONDITIONING AMPLIFIER - BLOWER RESISTOR RESISTANCE
Tester connectionConditionSpecified condition
A46-1 (RLO) -R30-1AlwaysBelow 1 ohms
A46-1 (RLO) - Body groundAlways10 kohms or higher
A46-2 (RSLO) - R30-3AlwaysBelow 1 ohms
A46-2 (RSLO) - Body groundAlways10 kohms or higher
Page 438 of 4500
A46-8 (RHI) - R30-2AlwaysBelow 1 ohms
A46-8 (RHI) - Body groundAlways10 kohms or higher
A46-8 (RHI) - R29-1 (+)AlwaysBelow 1 ohms
A46-6 (GND) - R29-2 (GND)AlwaysBelow 1 ohms
A46-6 (GND) - Body groundAlwaysBelow 1 ohms
Page 439 of 4500
Fig. 178: Checking Harness And Connector (Air Conditioning Amplifier - Blower Resistor)
Courtesy of TOYOTA MOTOR SALES, U.S.A., INC.
NG: REPAIR OR REPLACE HARNESS OR CONNECTOR
Page 440 of 4500
OK: Go to next step
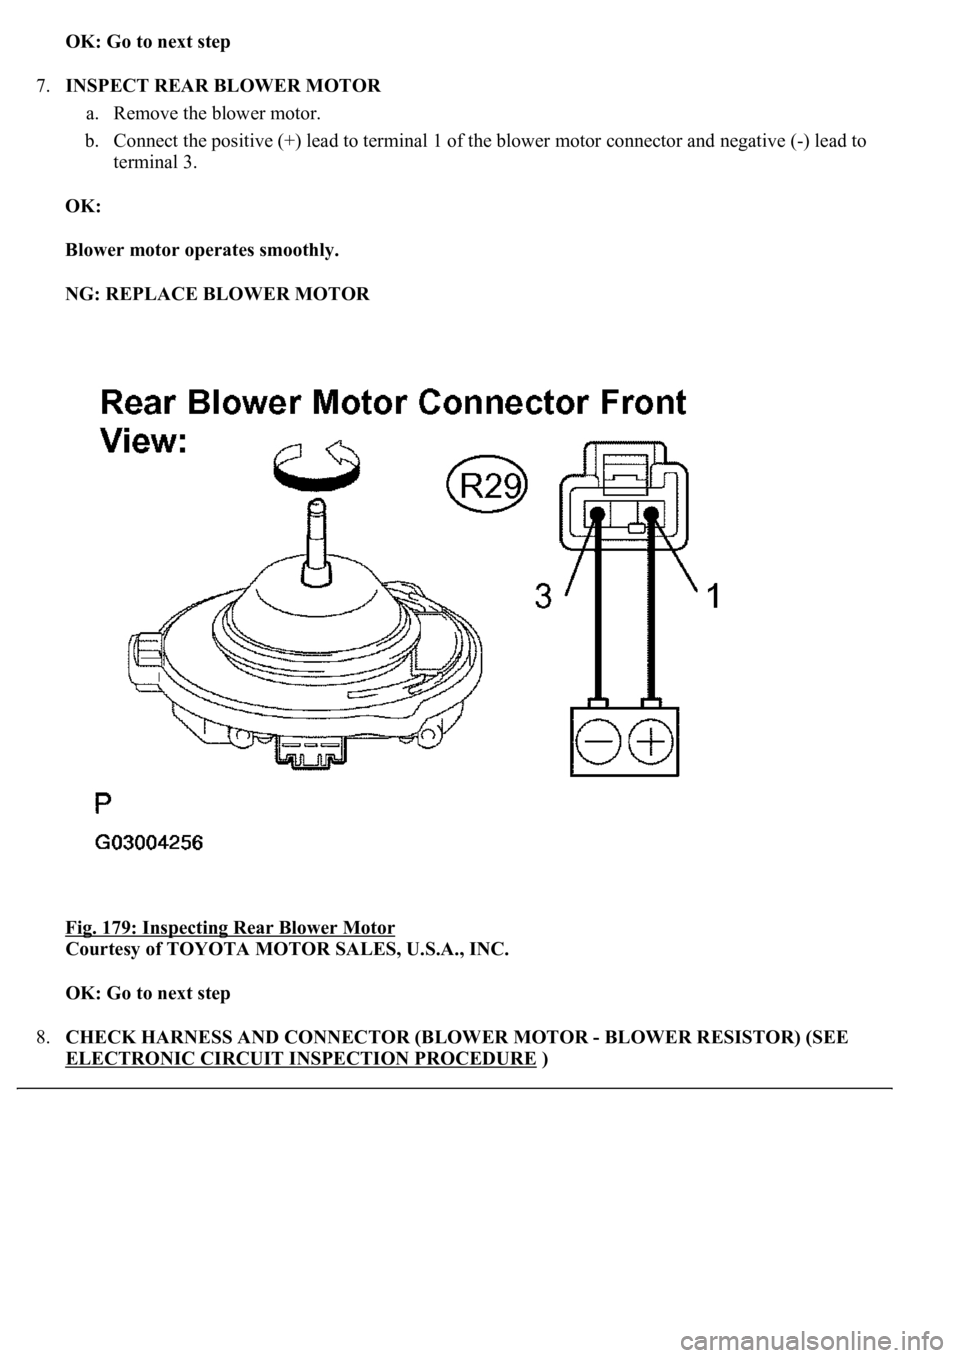
7.INSPECT REAR BLOWER MOTOR
a. Remove the blower motor.
b. Connect the positive (+) lead to terminal 1 of the blower motor connector and negative (-) lead to
terminal 3.
OK:
Blower motor operates smoothly.
NG: REPLACE BLOWER MOTOR
Fig. 179: Inspecting Rear Blower Motor
Courtesy of TOYOTA MOTOR SALES, U.S.A., INC.
OK: Go to next step
8.CHECK HARNESS AND CONNECTOR (BLOWER MOTOR - BLOWER RESISTOR) (SEE
ELECTRONIC CIRCUIT INSPECTION PROCEDURE
)
Trending: B2620, mirror, AC Compressor control valve, Spd, headlamp, fuel pressure, power steering fluid
