LEXUS LS430 2003 Factory Repair Manual
Manufacturer: LEXUS, Model Year: 2003,
Model line: LS430,
Model: LEXUS LS430 2003
Pages: 4500, PDF Size: 87.45 MB
LEXUS LS430 2003 Factory Repair Manual
LS430 2003
LEXUS
LEXUS
https://www.carmanualsonline.info/img/36/57050/w960_57050-0.png
LEXUS LS430 2003 Factory Repair Manual
Trending: differential, wiring diagram, oxygen sensor, tensioner pulley, ECO mode, width, lights
Page 421 of 4500
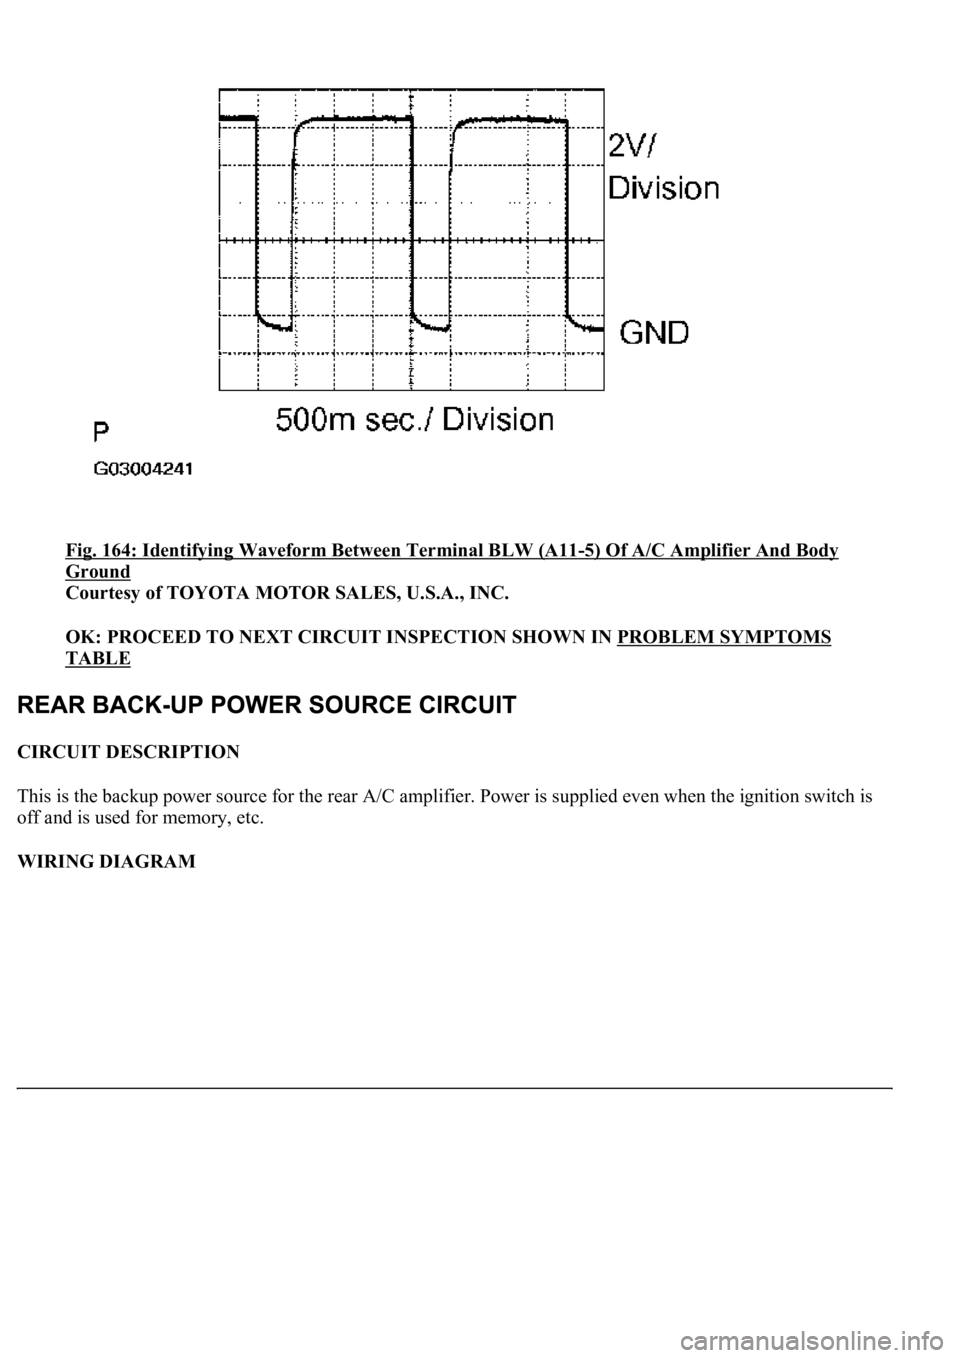
Fig. 164: Identifying Waveform Between Terminal BLW (A11-5) Of A/C Amplifier And Body
Ground
Courtesy of TOYOTA MOTOR SALES, U.S.A., INC.
OK: PROCEED TO NEXT CIRCUIT INSPECTION SHOWN IN PROBLEM SYMPTOMS
TABLE
CIRCUIT DESCRIPTION
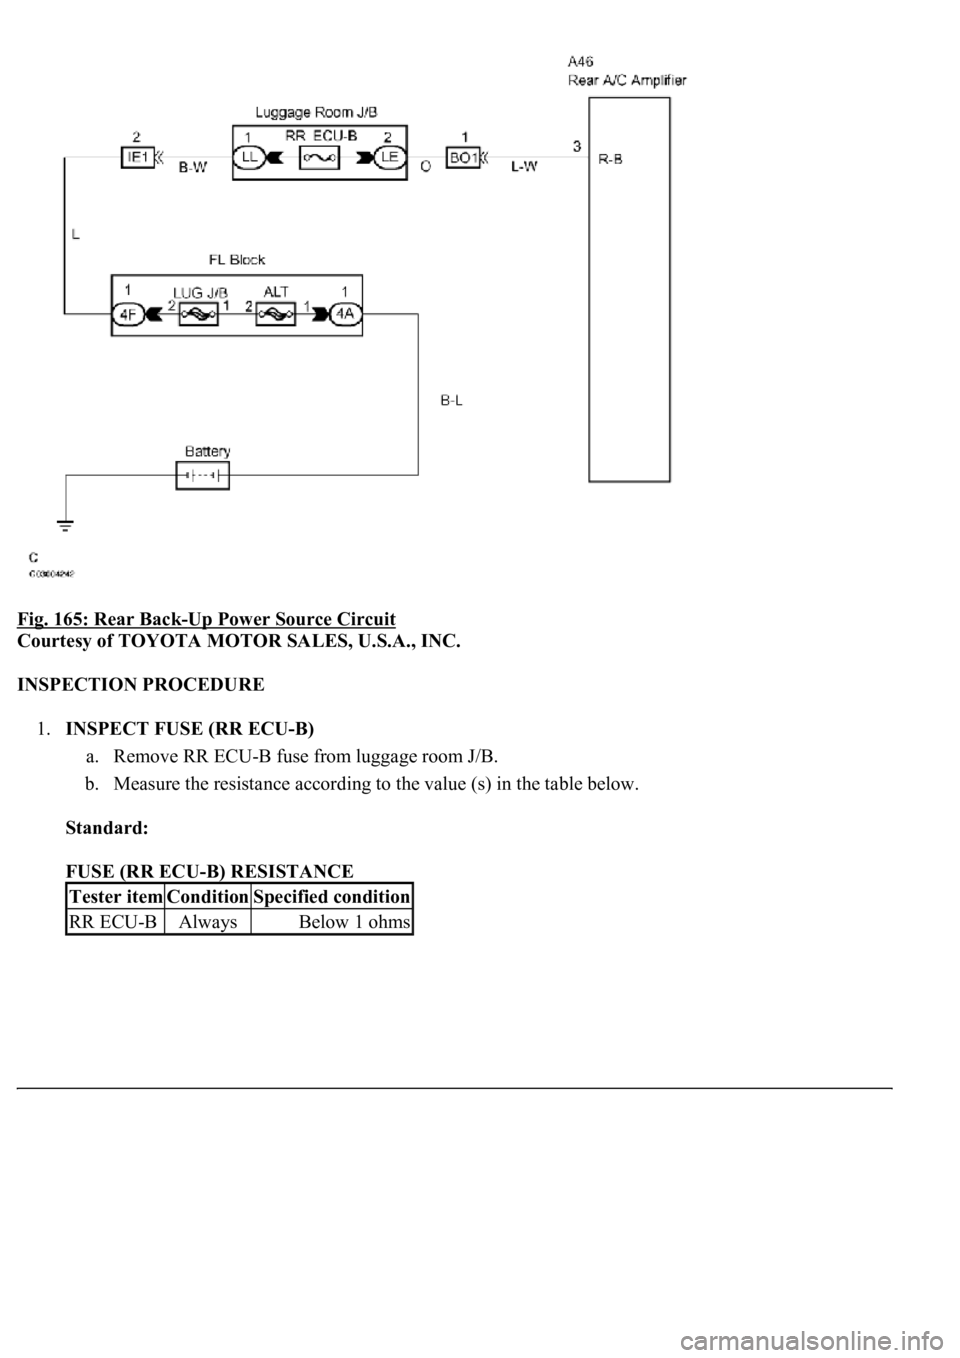
This is the backup power source for the rear A/C amplifier. Power is supplied even when the ignition switch is
off and is used for memory, etc.
WIRING DIAGRAM
Page 422 of 4500
Fig. 165: Rear Back-Up Power Source Circuit
Courtesy of TOYOTA MOTOR SALES, U.S.A., INC.
INSPECTION PROCEDURE
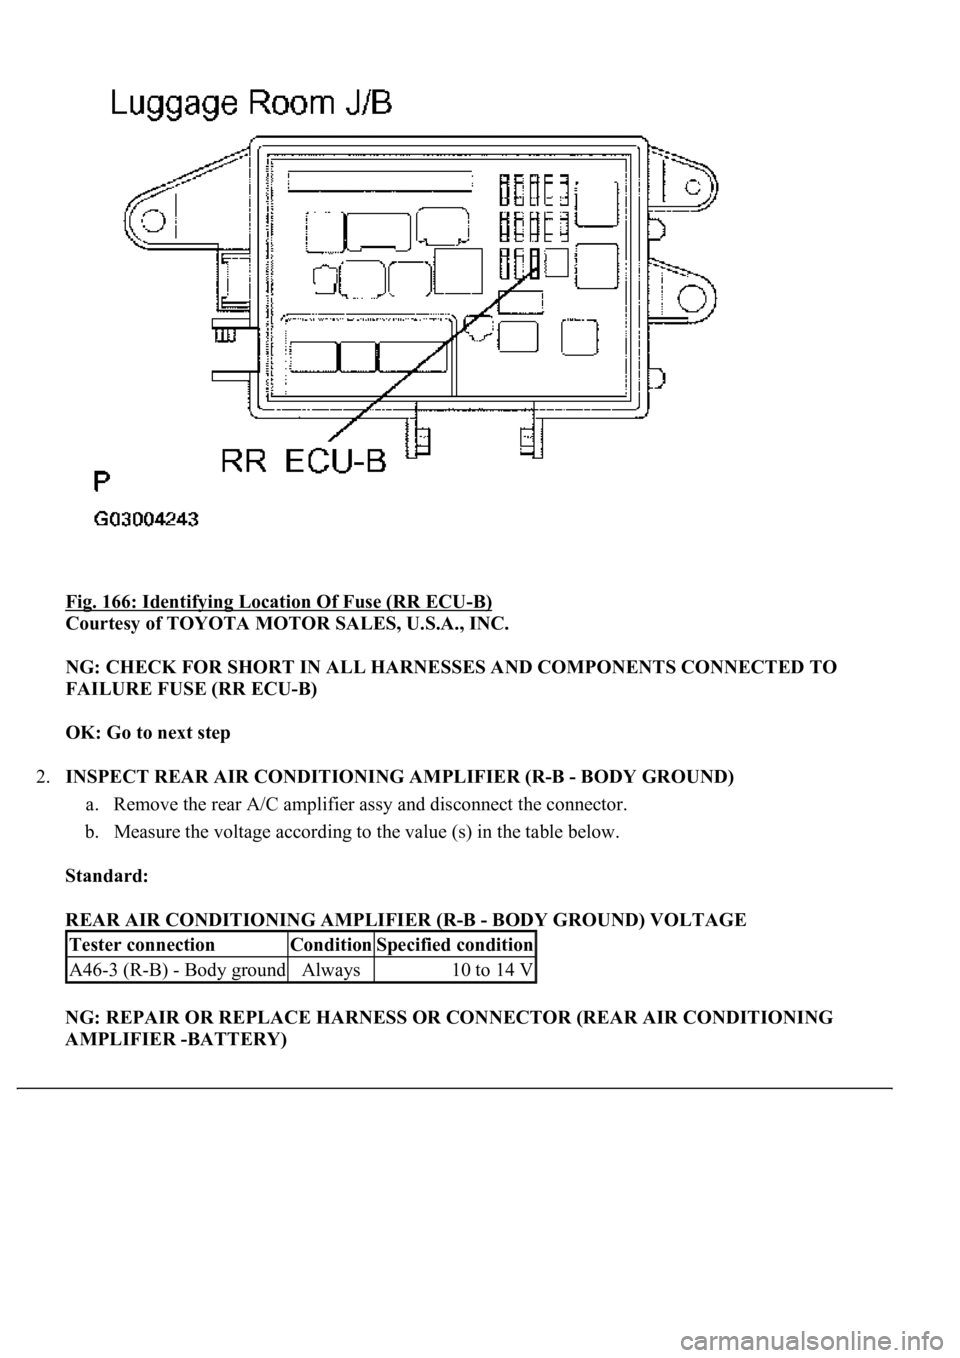
1.INSPECT FUSE (RR ECU-B)
a. Remove RR ECU-B fuse from luggage room J/B.
b. Measure the resistance according to the value (s) in the table below.
Standard:
FUSE (RR ECU-B) RESISTANCE
Tester itemConditionSpecified condition
RR ECU-BAlwaysBelow 1 ohms
Page 423 of 4500
Fig. 166: Identifying Location Of Fuse (RR ECU-B)
Courtesy of TOYOTA MOTOR SALES, U.S.A., INC.
NG: CHECK FOR SHORT IN ALL HARNESSES AND COMPONENTS CONNECTED TO
FAILURE FUSE (RR ECU-B)
OK: Go to next step
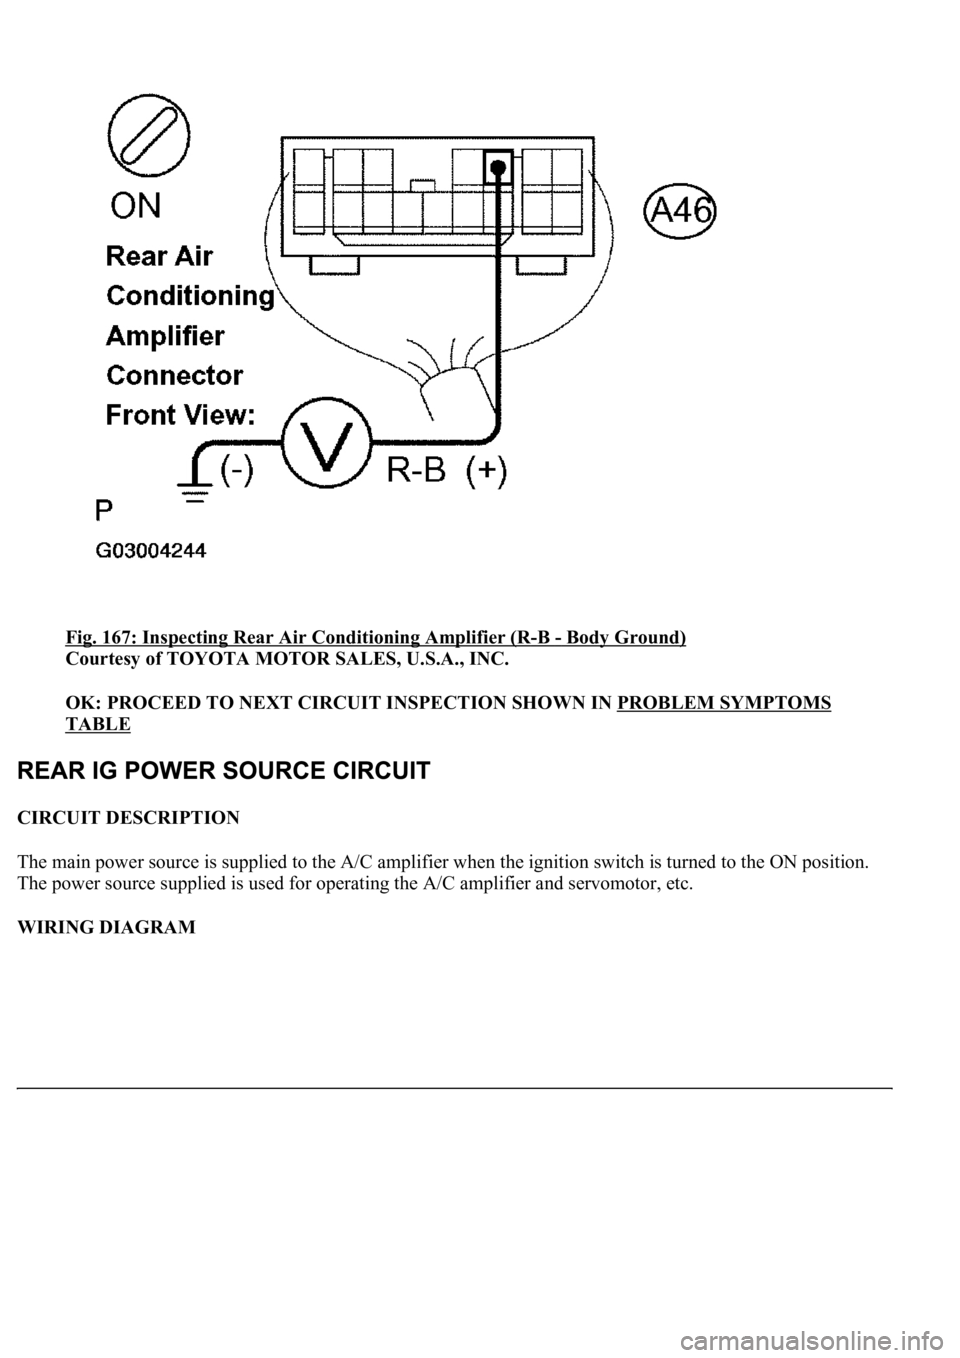
2.INSPECT REAR AIR CONDITIONING AMPLIFIER (R-B - BODY GROUND)
a. Remove the rear A/C amplifier assy and disconnect the connector.
b. Measure the voltage according to the value (s) in the table below.
Standard:
REAR AIR CONDITIONING AMPLIFIER (R-B - BODY GROUND) VOLTAGE
NG: REPAIR OR REPLACE HARNESS OR CONNECTOR (REAR AIR CONDITIONING
AMPLIFIER -BATTERY)
Tester connectionConditionSpecified condition
A46-3 (R-B) - Body groundAlways10 to 14 V
Page 424 of 4500
Fig. 167: Inspecting Rear Air Conditioning Amplifier (R-B - Body Ground)
Courtesy of TOYOTA MOTOR SALES, U.S.A., INC.
OK: PROCEED TO NEXT CIRCUIT INSPECTION SHOWN IN PROBLEM SYMPTOMS
TABLE
CIRCUIT DESCRIPTION
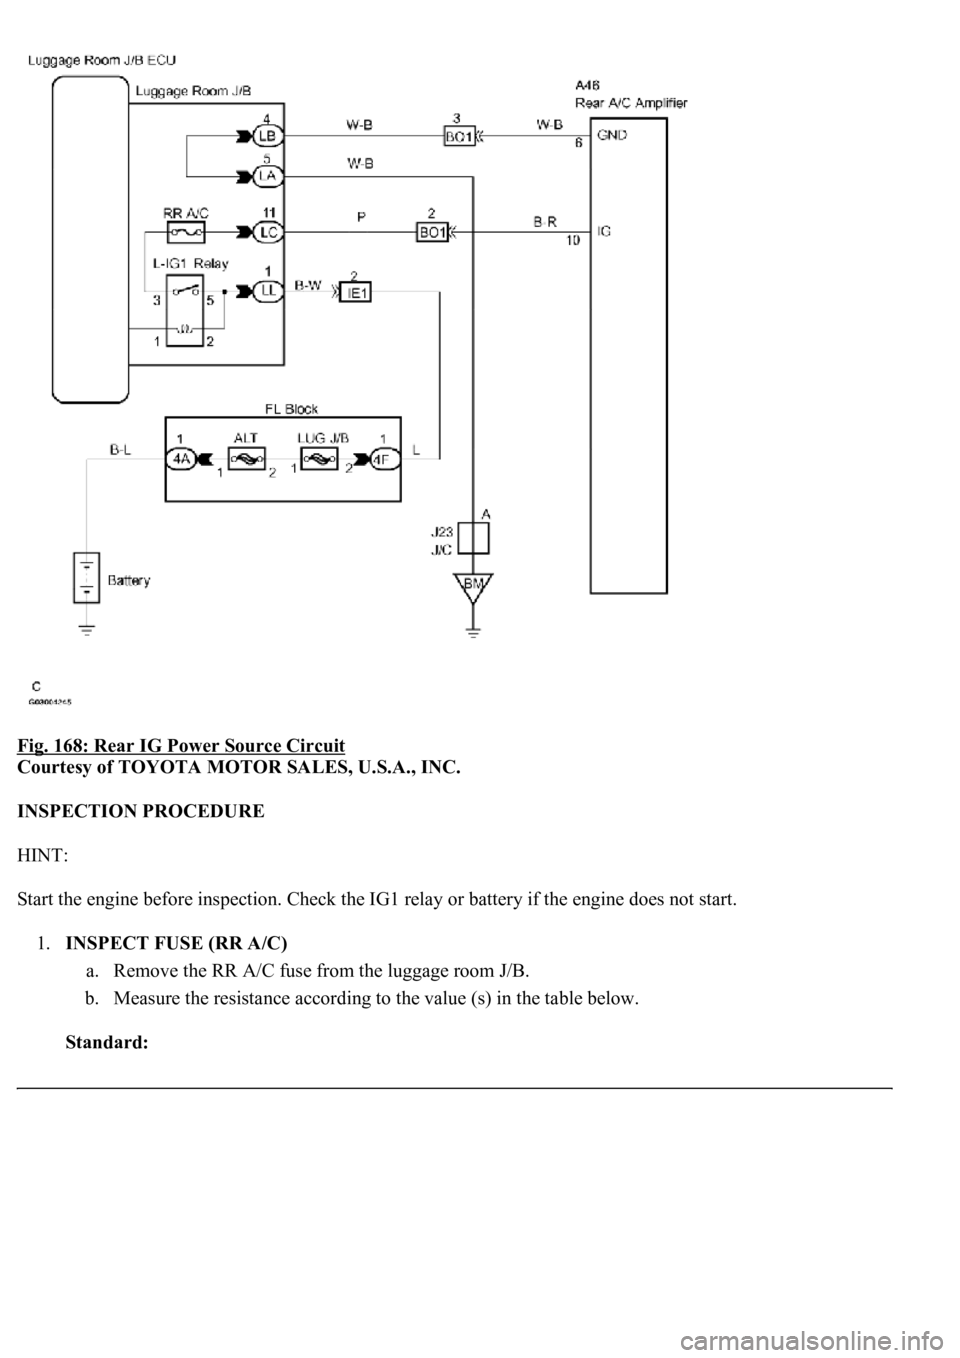
The main power source is supplied to the A/C amplifier when the ignition switch is turned to the ON position.
The power source supplied is used for operating the A/C amplifier and servomotor, etc.
WIRING DIAGRAM
Page 425 of 4500
Fig. 168: Rear IG Power Source Circuit
Courtesy of TOYOTA MOTOR SALES, U.S.A., INC.
INSPECTION PROCEDURE
HINT:
Start the engine before inspection. Check the IG1 relay or battery if the engine does not start.
1.INSPECT FUSE (RR A/C)
a. Remove the RR A/C fuse from the luggage room J/B.
b. Measure the resistance according to the value (s) in the table below.
Standard:
Page 426 of 4500
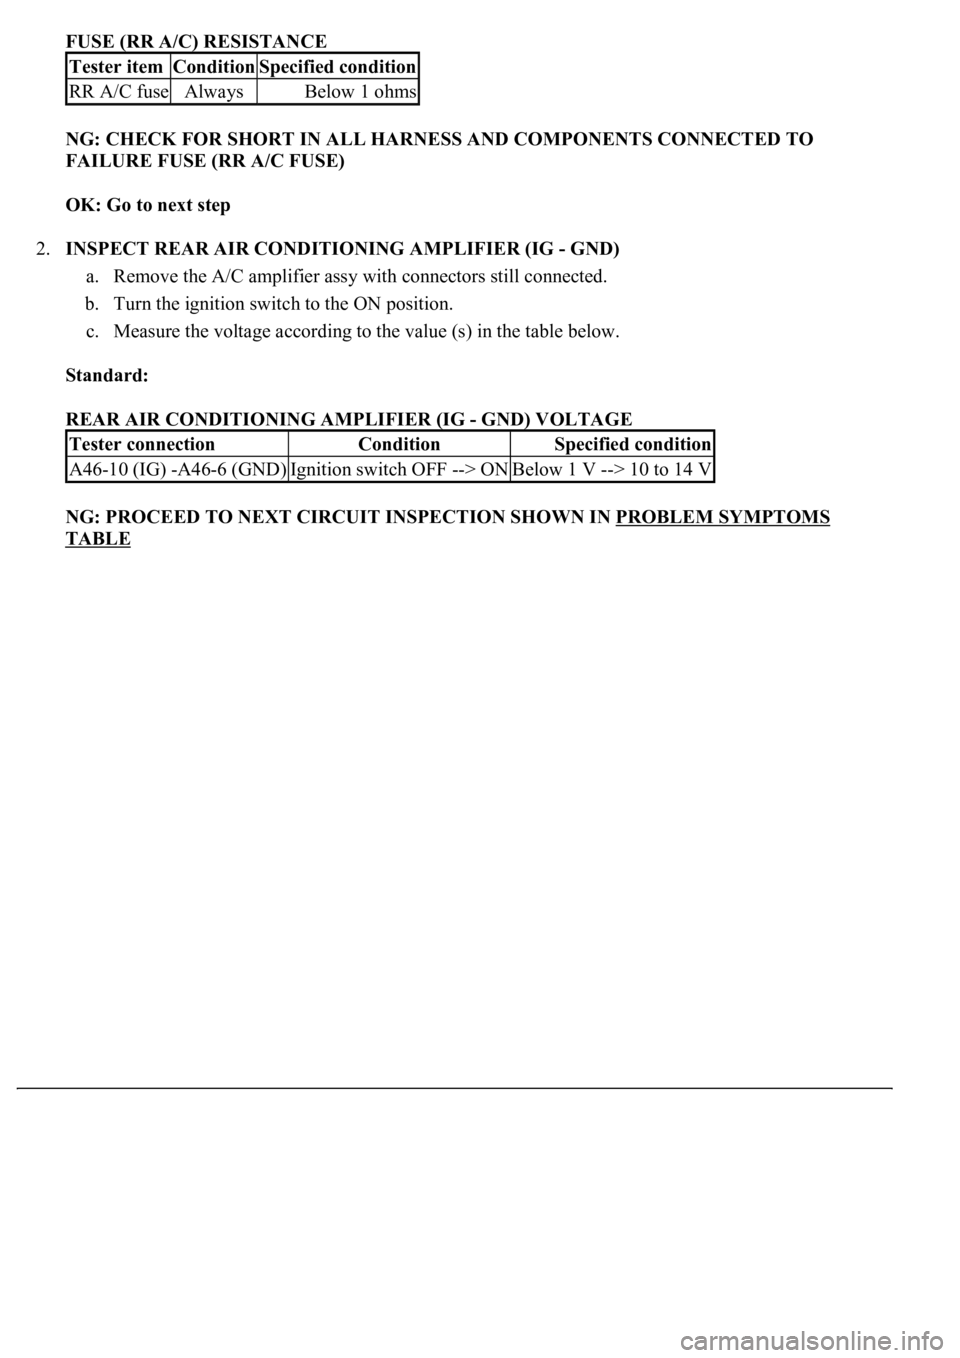
FUSE (RR A/C) RESISTANCE
NG: CHECK FOR SHORT IN ALL HARNESS AND COMPONENTS CONNECTED TO
FAILURE FUSE (RR A/C FUSE)
OK: Go to next step
2.INSPECT REAR AIR CONDITIONING AMPLIFIER (IG - GND)
a. Remove the A/C amplifier assy with connectors still connected.
b. Turn the ignition switch to the ON position.
c. Measure the voltage according to the value (s) in the table below.
Standard:
REAR AIR CONDITIONING AMPLIFIER (IG - GND) VOLTAGE
NG: PROCEED TO NEXT CIRCUIT INSPECTION SHOWN IN PROBLEM SYMPTOMS
TABLE
Tester itemConditionSpecified condition
RR A/C fuseAlwaysBelow 1 ohms
Tester connectionConditionSpecified condition
A46-10 (IG) -A46-6 (GND)Ignition switch OFF --> ONBelow 1 V --> 10 to 14 V
Page 427 of 4500
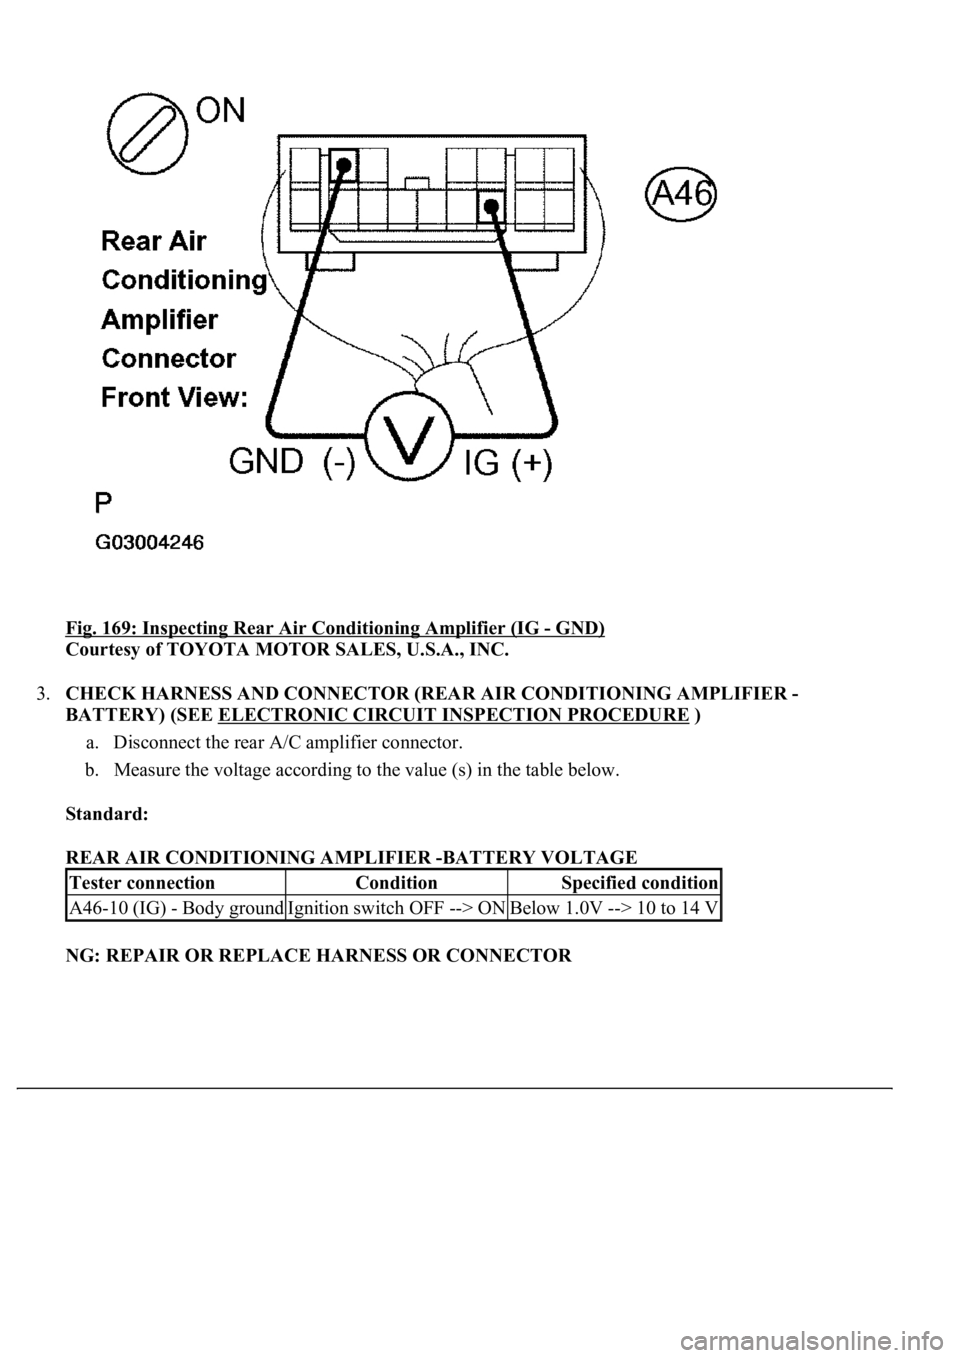
Fig. 169: Inspecting Rear Air Conditioning Amplifier (IG - GND)
Courtesy of TOYOTA MOTOR SALES, U.S.A., INC.
3.CHECK HARNESS AND CONNECTOR (REAR AIR CONDITIONING AMPLIFIER -
BATTERY) (SEE ELECTRONIC CIRCUIT INSPECTION PROCEDURE
)
a. Disconnect the rear A/C amplifier connector.
b. Measure the voltage according to the value (s) in the table below.
Standard:
REAR AIR CONDITIONING AMPLIFIER -BATTERY VOLTAGE
NG: REPAIR OR REPLACE HARNESS OR CONNECTOR
Tester connectionConditionSpecified condition
A46-10 (IG) - Body groundIgnition switch OFF --> ONBelow 1.0V --> 10 to 14 V
Page 428 of 4500
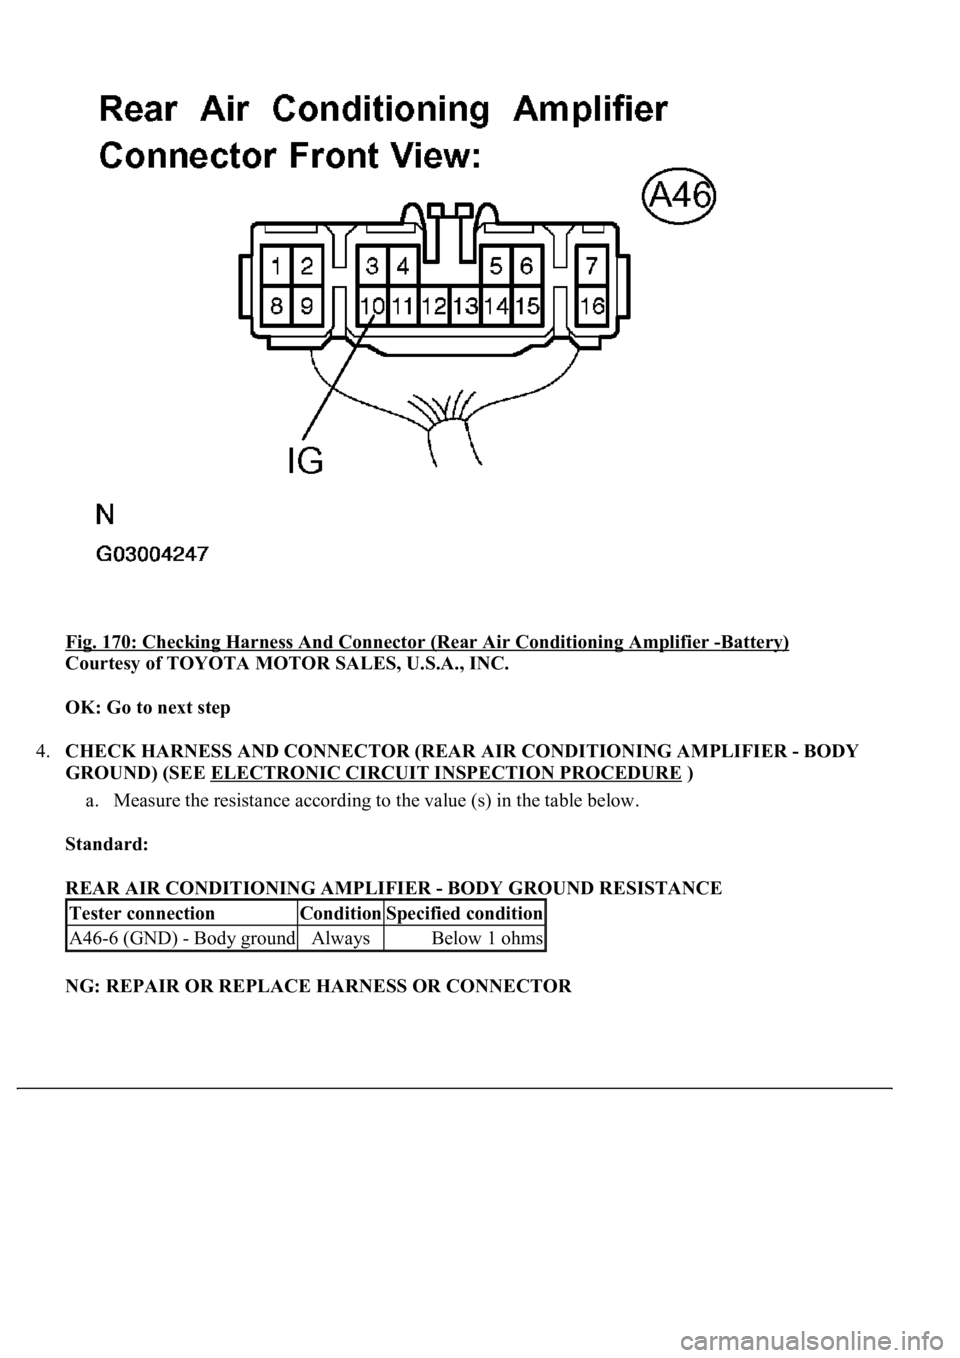
Fig. 170: Checking Harness And Connector (Rear Air Conditioning Amplifier -Battery)
Courtesy of TOYOTA MOTOR SALES, U.S.A., INC.
OK: Go to next step
4.CHECK HARNESS AND CONNECTOR (REAR AIR CONDITIONING AMPLIFIER - BODY
GROUND) (SEE ELECTRONIC CIRCUIT INSPECTION PROCEDURE
)
a. Measure the resistance according to the value (s) in the table below.
Standard:
REAR AIR CONDITIONING AMPLIFIER - BODY GROUND RESISTANCE
NG: REPAIR OR REPLACE HARNESS OR CONNECTOR
Tester connectionConditionSpecified condition
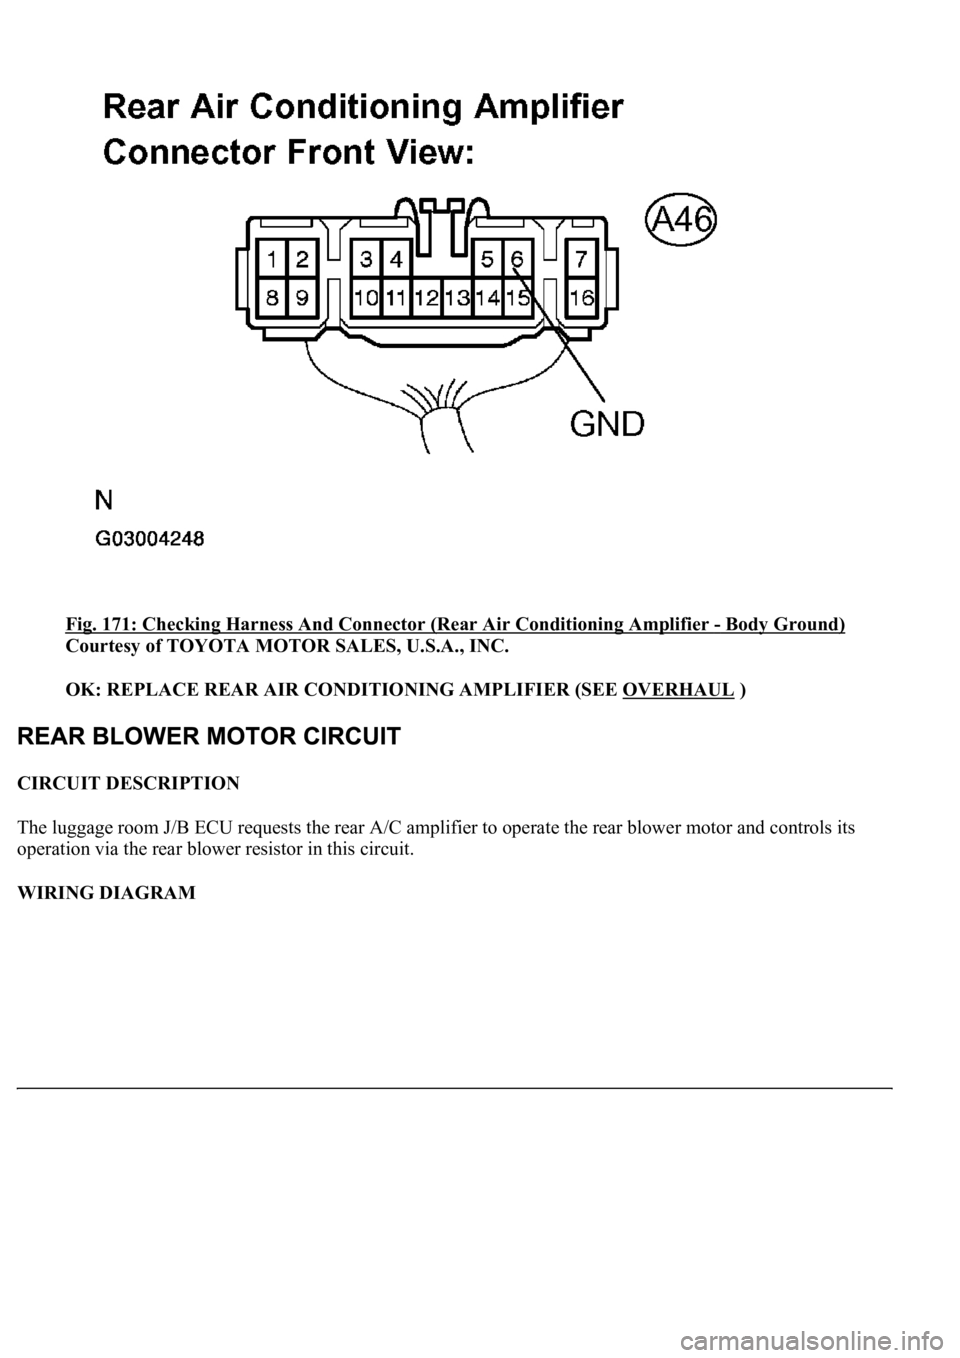
A46-6 (GND) - Body groundAlwaysBelow 1 ohms
Page 429 of 4500
Fig. 171: Checking Harness And Connector (Rear Air Conditioning Amplifier - Body Ground)
Courtesy of TOYOTA MOTOR SALES, U.S.A., INC.
OK: REPLACE REAR AIR CONDITIONING AMPLIFIER (SEE OVERHAUL
)
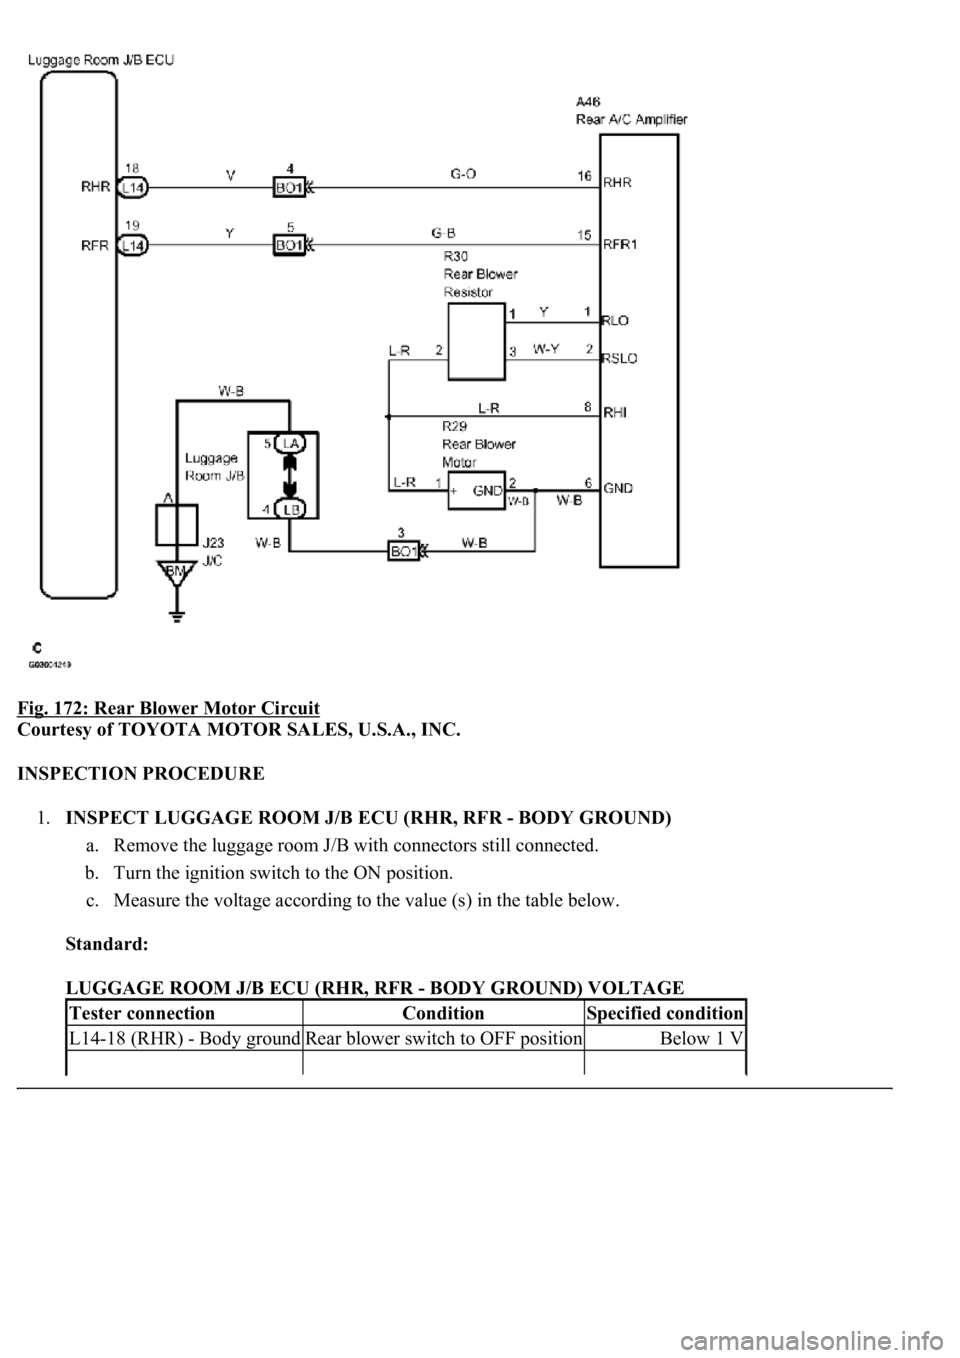
CIRCUIT DESCRIPTION
The luggage room J/B ECU requests the rear A/C amplifier to operate the rear blower motor and controls its
operation via the rear blower resistor in this circuit.
WIRING DIAGRAM
Page 430 of 4500
Fig. 172: Rear Blower Motor Circuit
Courtesy of TOYOTA MOTOR SALES, U.S.A., INC.
INSPECTION PROCEDURE
1.INSPECT LUGGAGE ROOM J/B ECU (RHR, RFR - BODY GROUND)
a. Remove the luggage room J/B with connectors still connected.
b. Turn the ignition switch to the ON position.
c. Measure the voltage according to the value (s) in the table below.
Standard:
LUGGAGE ROOM J/B ECU (RHR, RFR - BODY GROUND) VOLTAGE
Tester connectionConditionSpecified condition
L14-18 (RHR) - Body groundRear blower switch to OFF positionBelow 1 V
Trending: B2799, headlamp, low beam, mileage, check transmission fluid, Rear, steering interlock cable
