LEXUS LS430 2003 Factory Manual PDF
LS430 2003
LEXUS
LEXUS
https://www.carmanualsonline.info/img/36/57050/w960_57050-0.png
LEXUS LS430 2003 Factory Manual PDF
Page 3375 of 4500
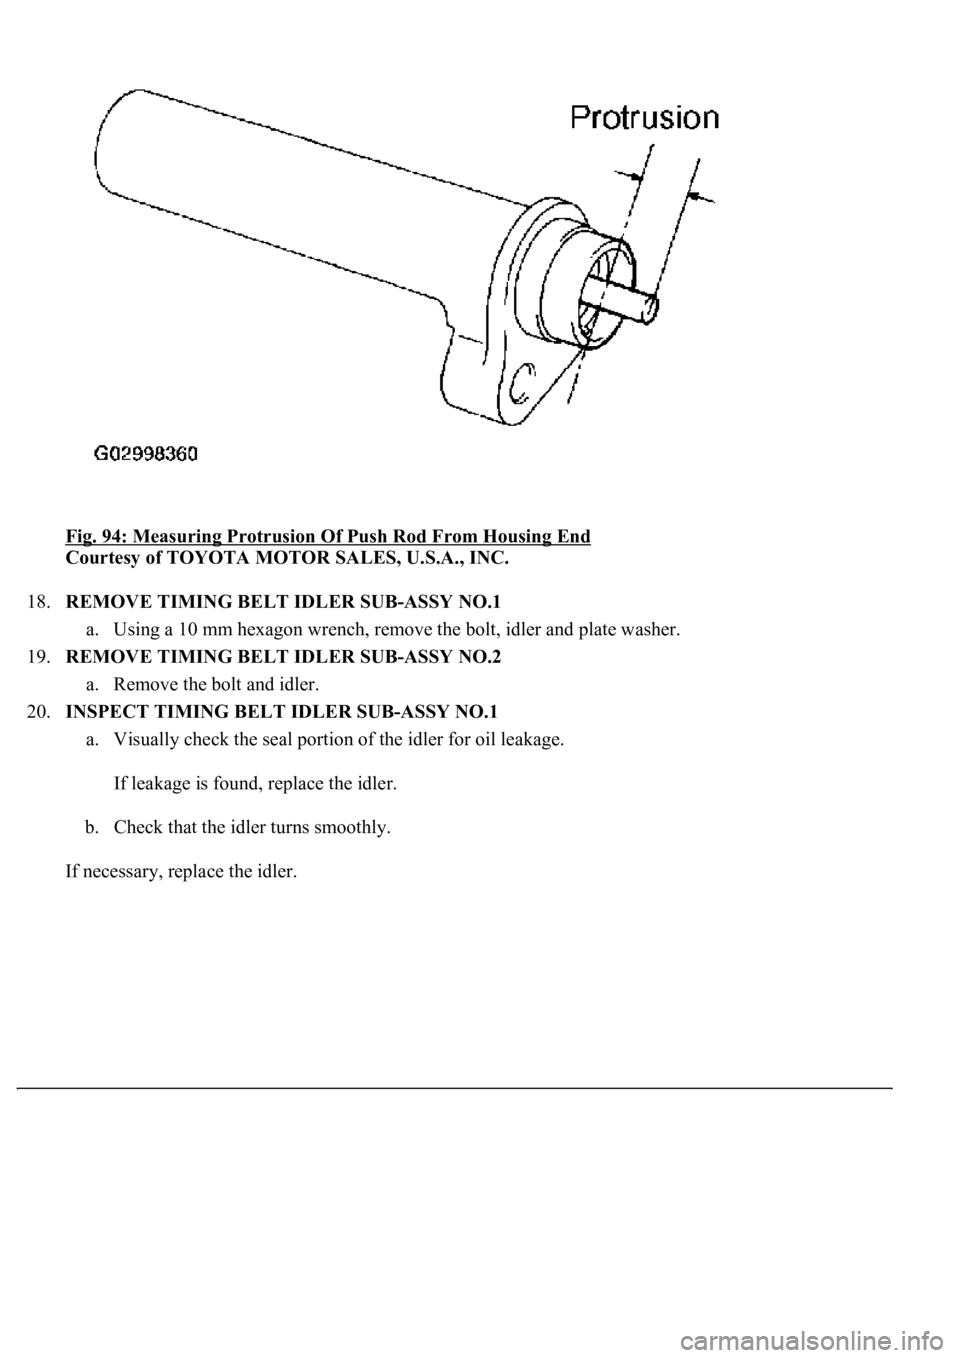
Fig. 94: Measuring Protrusion Of Push Rod From Housing End
Courtesy of TOYOTA MOTOR SALES, U.S.A., INC.
18.REMOVE TIMING BELT IDLER SUB-ASSY NO.1
a. Using a 10 mm hexagon wrench, remove the bolt, idler and plate washer.
19.REMOVE TIMING BELT IDLER SUB-ASSY NO.2
a. Remove the bolt and idler.
20.INSPECT TIMING BELT IDLER SUB-ASSY NO.1
a. Visually check the seal portion of the idler for oil leakage.
If leakage is found, replace the idler.
b. Check that the idler turns smoothly.
If necessar
y, replace the idler.
Page 3385 of 4500
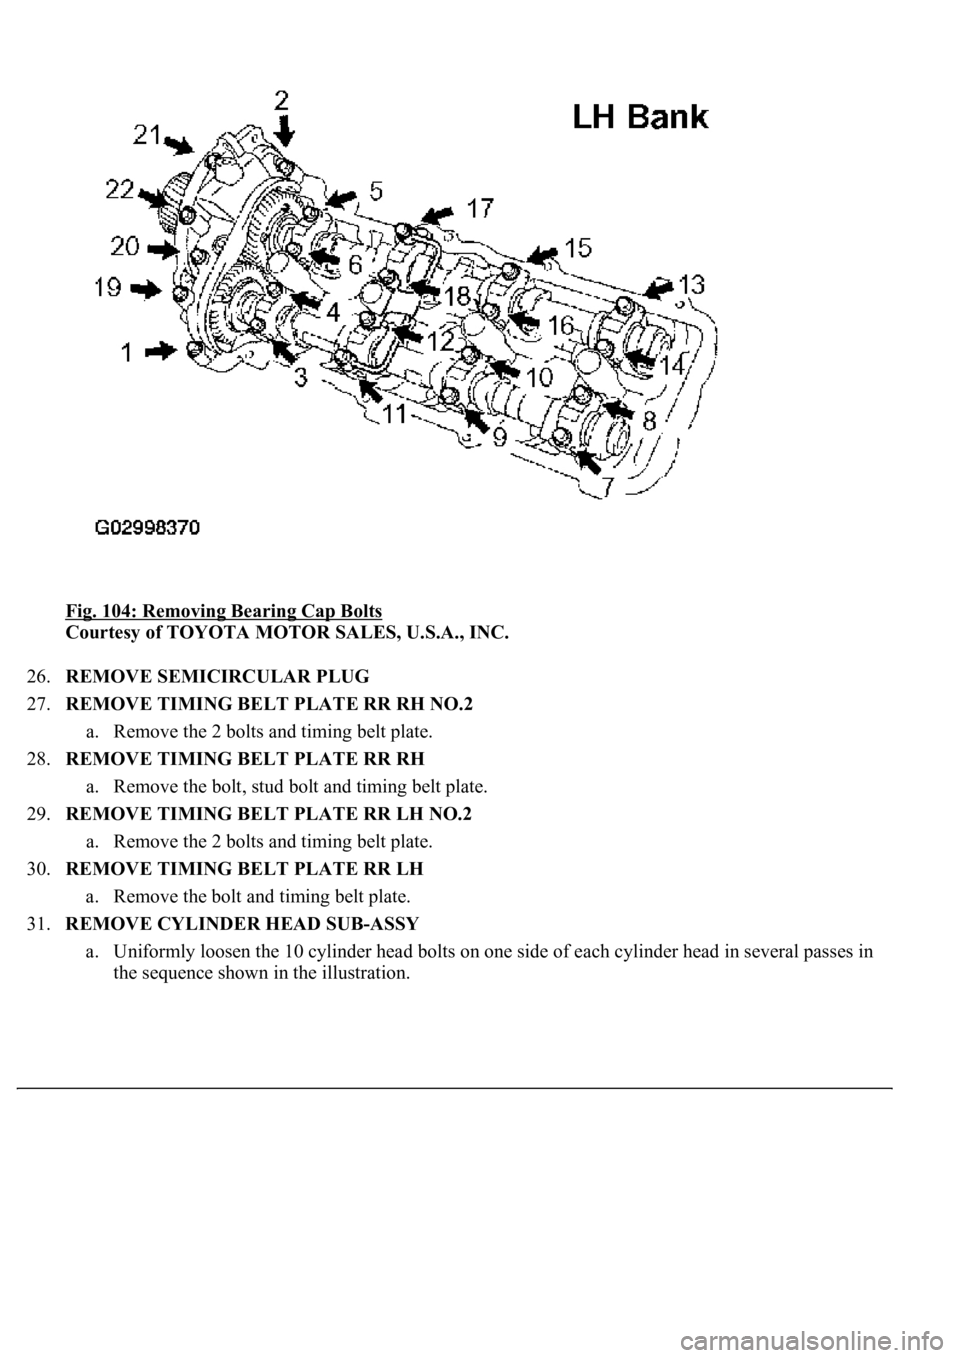
Fig. 104: Removing Bearing Cap Bolts
Courtesy of TOYOTA MOTOR SALES, U.S.A., INC.
26.REMOVE SEMICIRCULAR PLUG
27.REMOVE TIMING BELT PLATE RR RH NO.2
a. Remove the 2 bolts and timing belt plate.
28.REMOVE TIMING BELT PLATE RR RH
a. Remove the bolt, stud bolt and timing belt plate.
29.REMOVE TIMING BELT PLATE RR LH NO.2
a. Remove the 2 bolts and timing belt plate.
30.REMOVE TIMING BELT PLATE RR LH
a. Remove the bolt and timing belt plate.
31.REMOVE CYLINDER HEAD SUB-ASSY
a. Uniformly loosen the 10 cylinder head bolts on one side of each cylinder head in several passes in
the sequence shown in the illustration.
Page 3445 of 4500
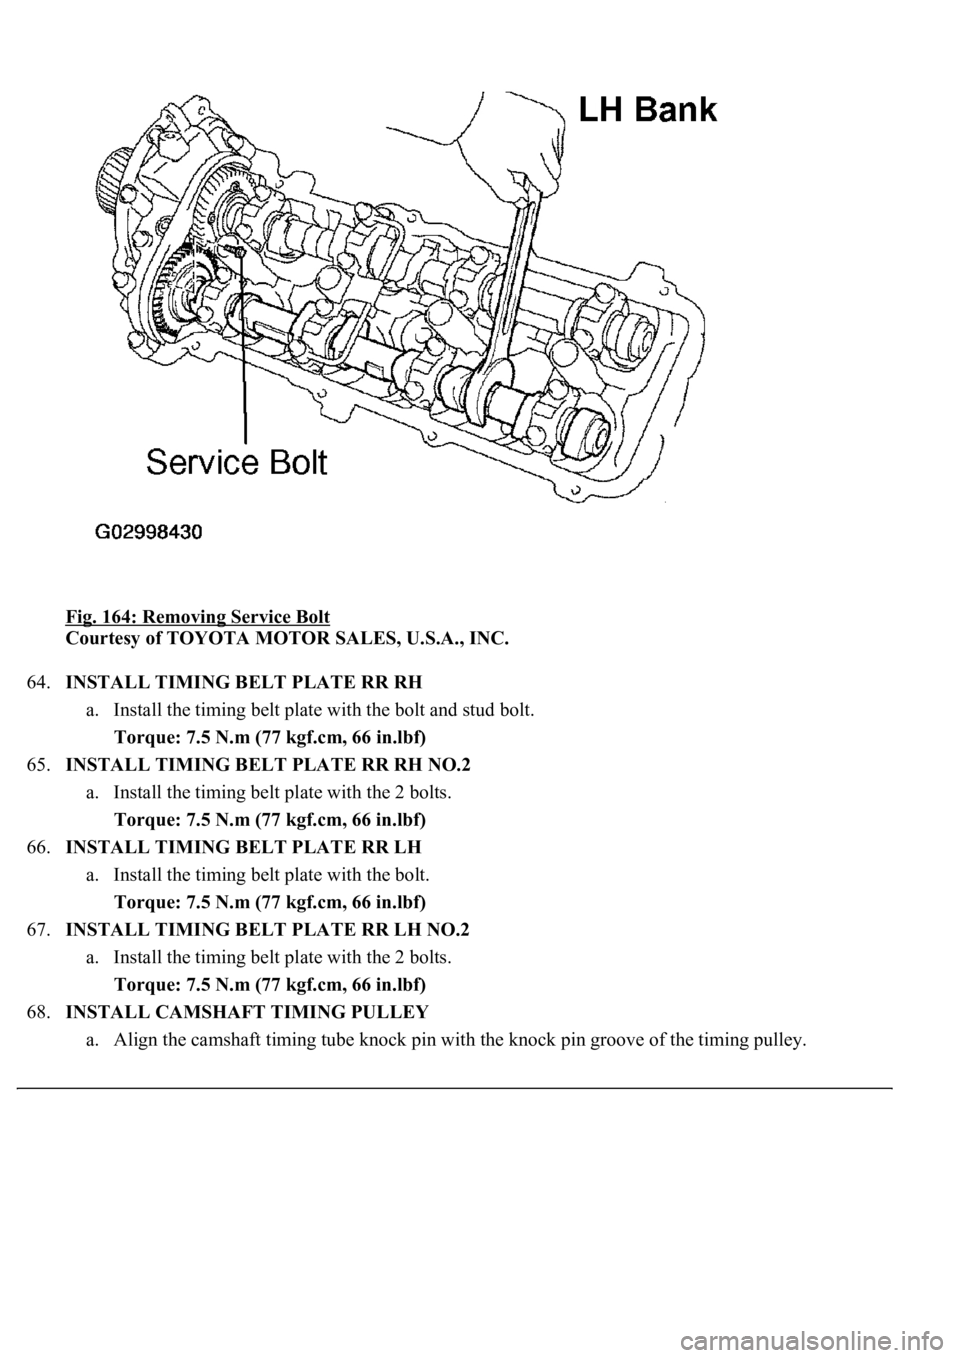
Fig. 164: Removing Service Bolt
Courtesy of TOYOTA MOTOR SALES, U.S.A., INC.
64.INSTALL TIMING BELT PLATE RR RH
a. Install the timing belt plate with the bolt and stud bolt.
Torque: 7.5 N.m (77 kgf.cm, 66 in.lbf)
65.INSTALL TIMING BELT PLATE RR RH NO.2
a. Install the timing belt plate with the 2 bolts.
Torque: 7.5 N.m (77 kgf.cm, 66 in.lbf)
66.INSTALL TIMING BELT PLATE RR LH
a. Install the timing belt plate with the bolt.
Torque: 7.5 N.m (77 kgf.cm, 66 in.lbf)
67.INSTALL TIMING BELT PLATE RR LH NO.2
a. Install the timing belt plate with the 2 bolts.
Torque: 7.5 N.m (77 kgf.cm, 66 in.lbf)
68.INSTALL CAMSHAFT TIMING PULLEY
a. Ali
gn the camshaft timing tube knock pin with the knock pin groove of the timing pulley.
Page 3448 of 4500
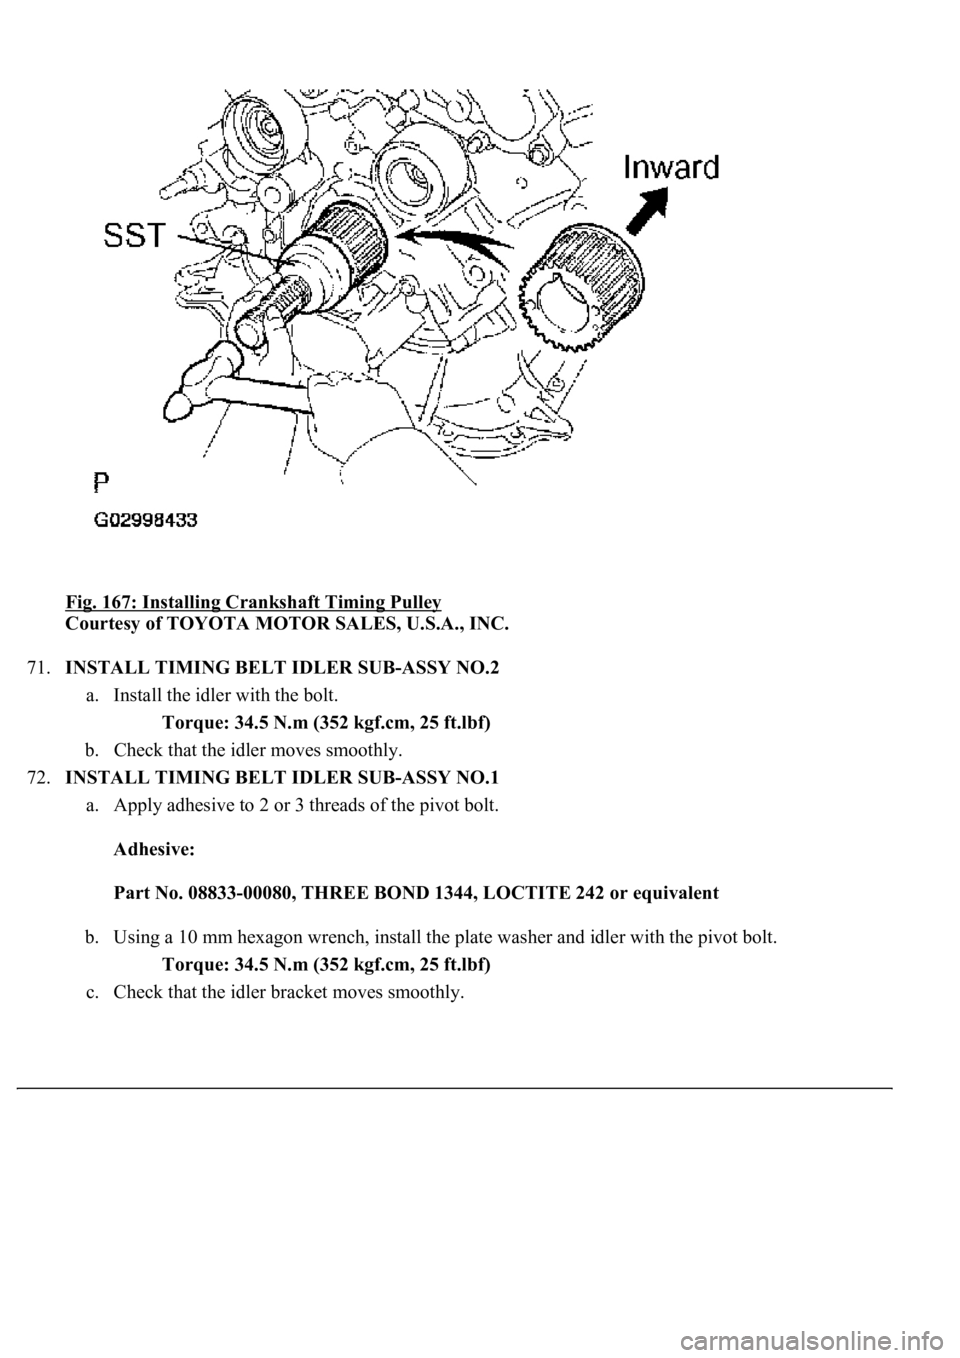
Fig. 167: Installing Crankshaft Timing Pulley
Courtesy of TOYOTA MOTOR SALES, U.S.A., INC.
71.INSTALL TIMING BELT IDLER SUB-ASSY NO.2
a. Install the idler with the bolt.
Torque: 34.5 N.m (352 kgf.cm, 25 ft.lbf)
b. Check that the idler moves smoothly.
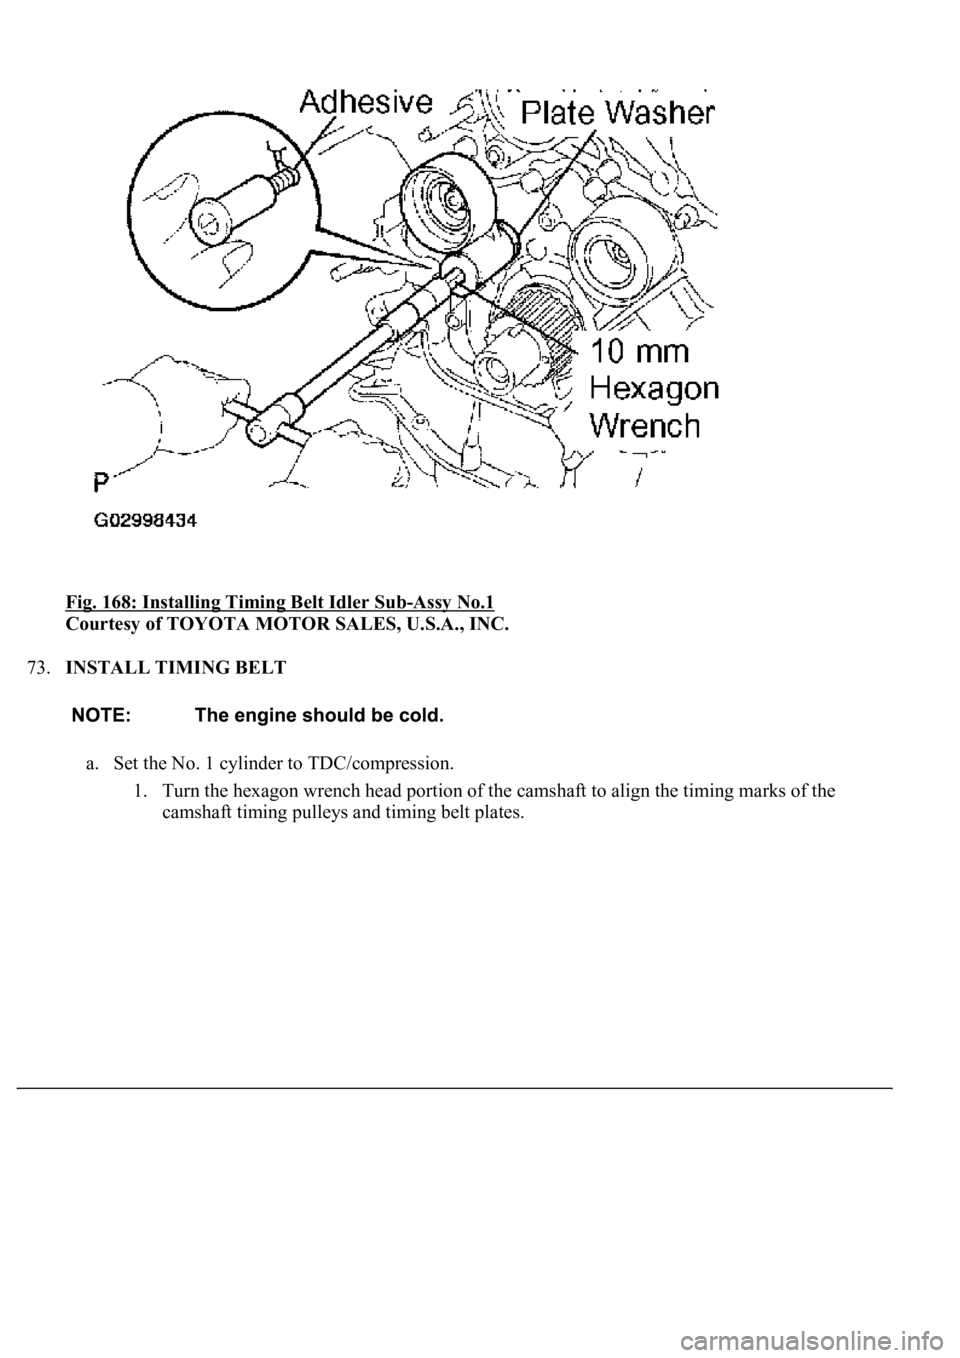
72.INSTALL TIMING BELT IDLER SUB-ASSY NO.1
a. Apply adhesive to 2 or 3 threads of the pivot bolt.
Adhesive:
Part No. 08833-00080, THREE BOND 1344, LOCTITE 242 or equivalent
b. Using a 10 mm hexagon wrench, install the plate washer and idler with the pivot bolt.
Torque: 34.5 N.m (352 kgf.cm, 25 ft.lbf)
c. Check that the idler bracket moves smoothl
y.
Page 3449 of 4500
Fig. 168: Installing Timing Belt Idler Sub-Assy No.1
Courtesy of TOYOTA MOTOR SALES, U.S.A., INC.
73.INSTALL TIMING BELT
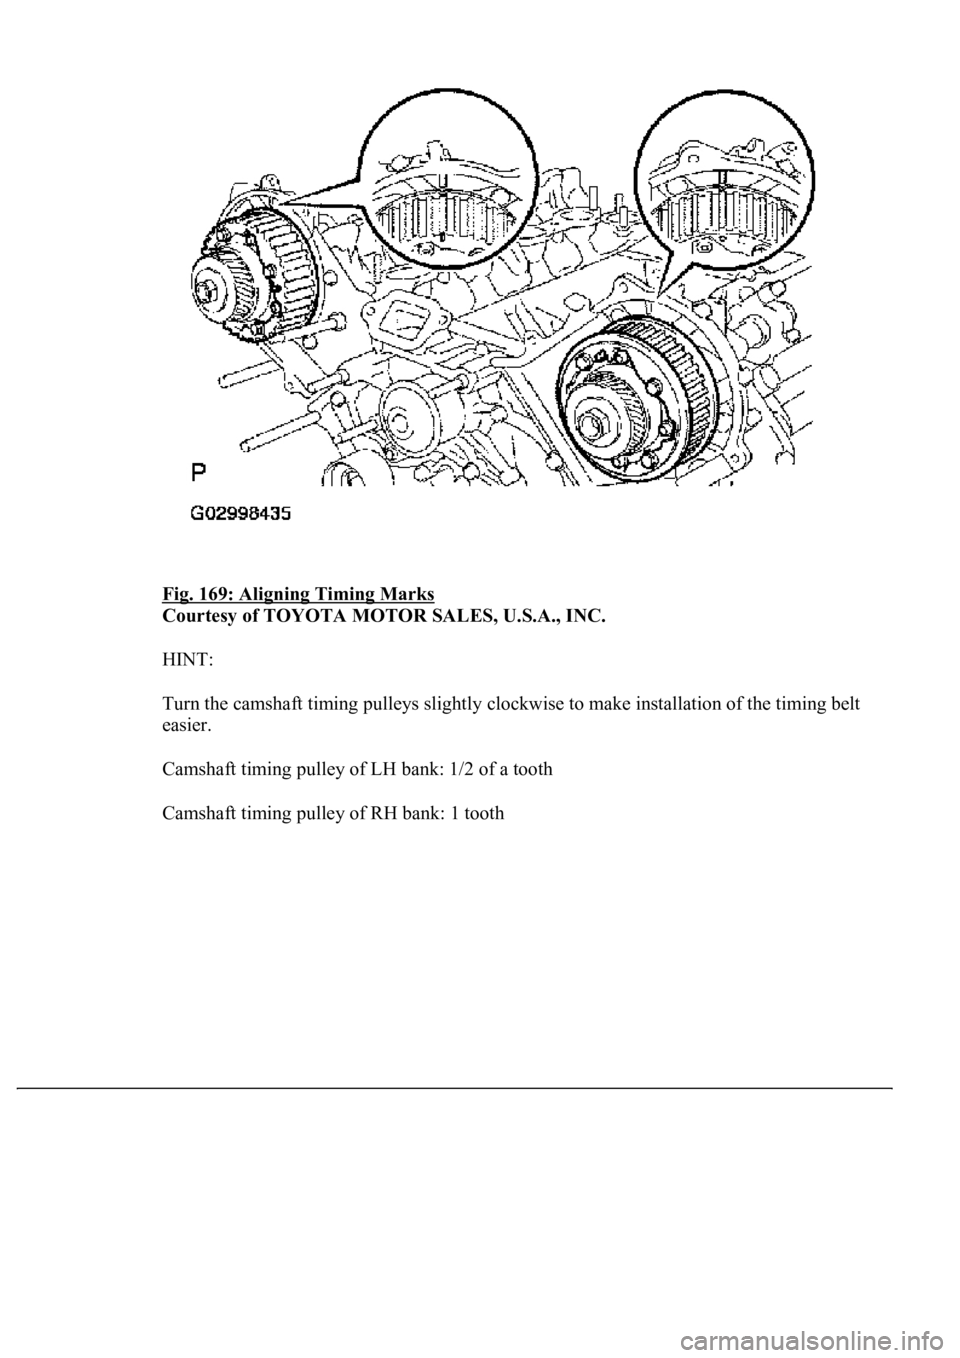
a. Set the No. 1 cylinder to TDC/compression.
1. Turn the hexagon wrench head portion of the camshaft to align the timing marks of the
camshaft timin
g pulleys and timing belt plates.
Page 3450 of 4500
Fig. 169: Aligning Timing Marks
Courtesy of TOYOTA MOTOR SALES, U.S.A., INC.
HINT:
Turn the camshaft timing pulleys slightly clockwise to make installation of the timing belt
easier.
Camshaft timing pulley of LH bank: 1/2 of a tooth
Camshaft timin
g pulley of RH bank: 1 tooth
Page 3452 of 4500
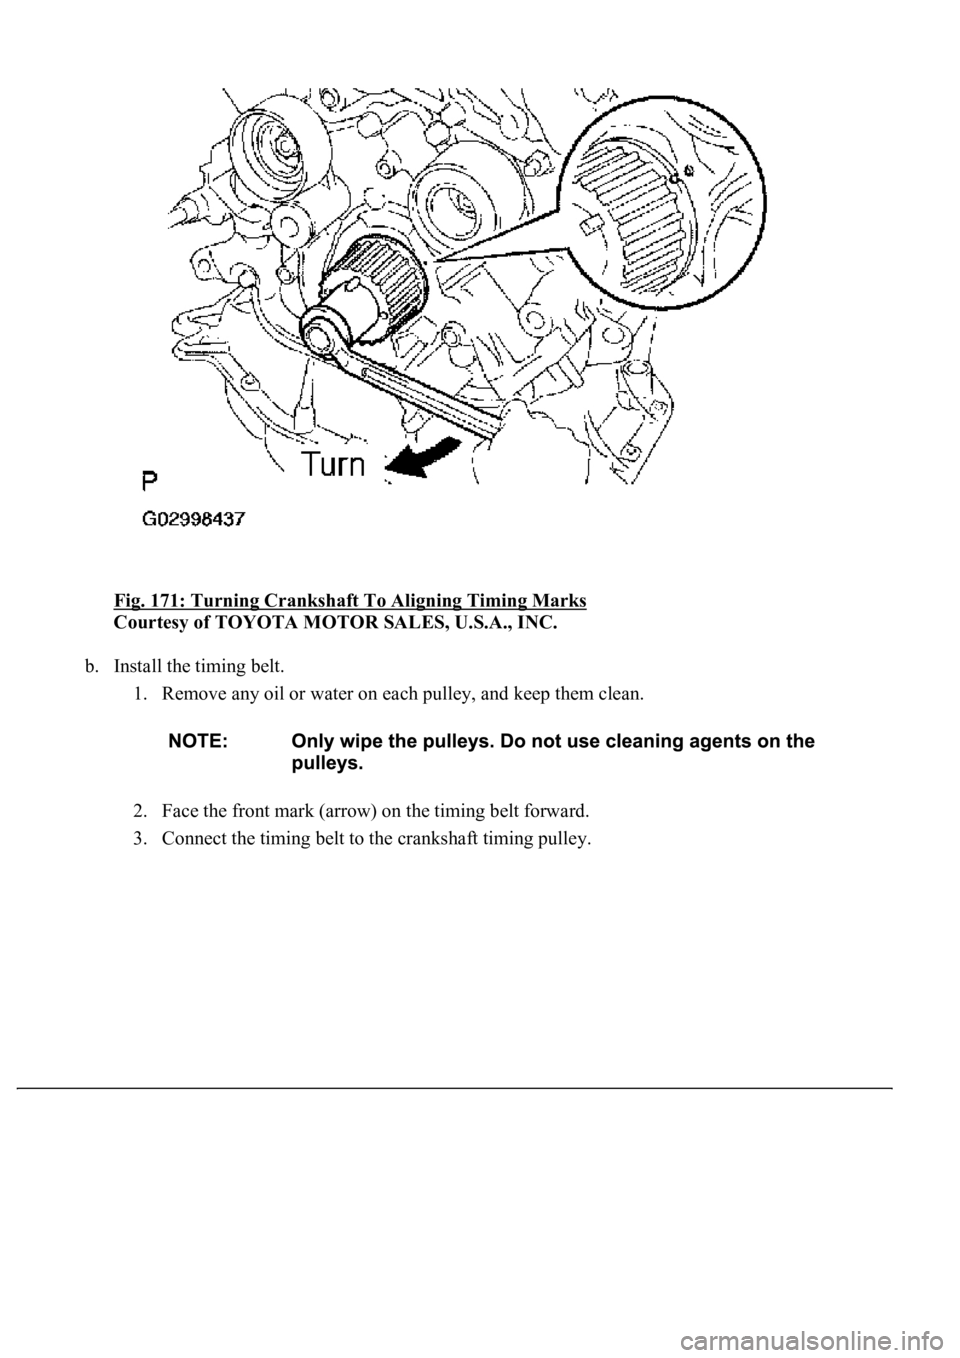
Fig. 171: Turning Crankshaft To Aligning Timing Marks
Courtesy of TOYOTA MOTOR SALES, U.S.A., INC.
b. Install the timing belt.
1. Remove any oil or water on each pulley, and keep them clean.
2. Face the front mark (arrow) on the timing belt forward.
3. Connect the timin
g belt to the crankshaft timing pulley.
Page 3453 of 4500
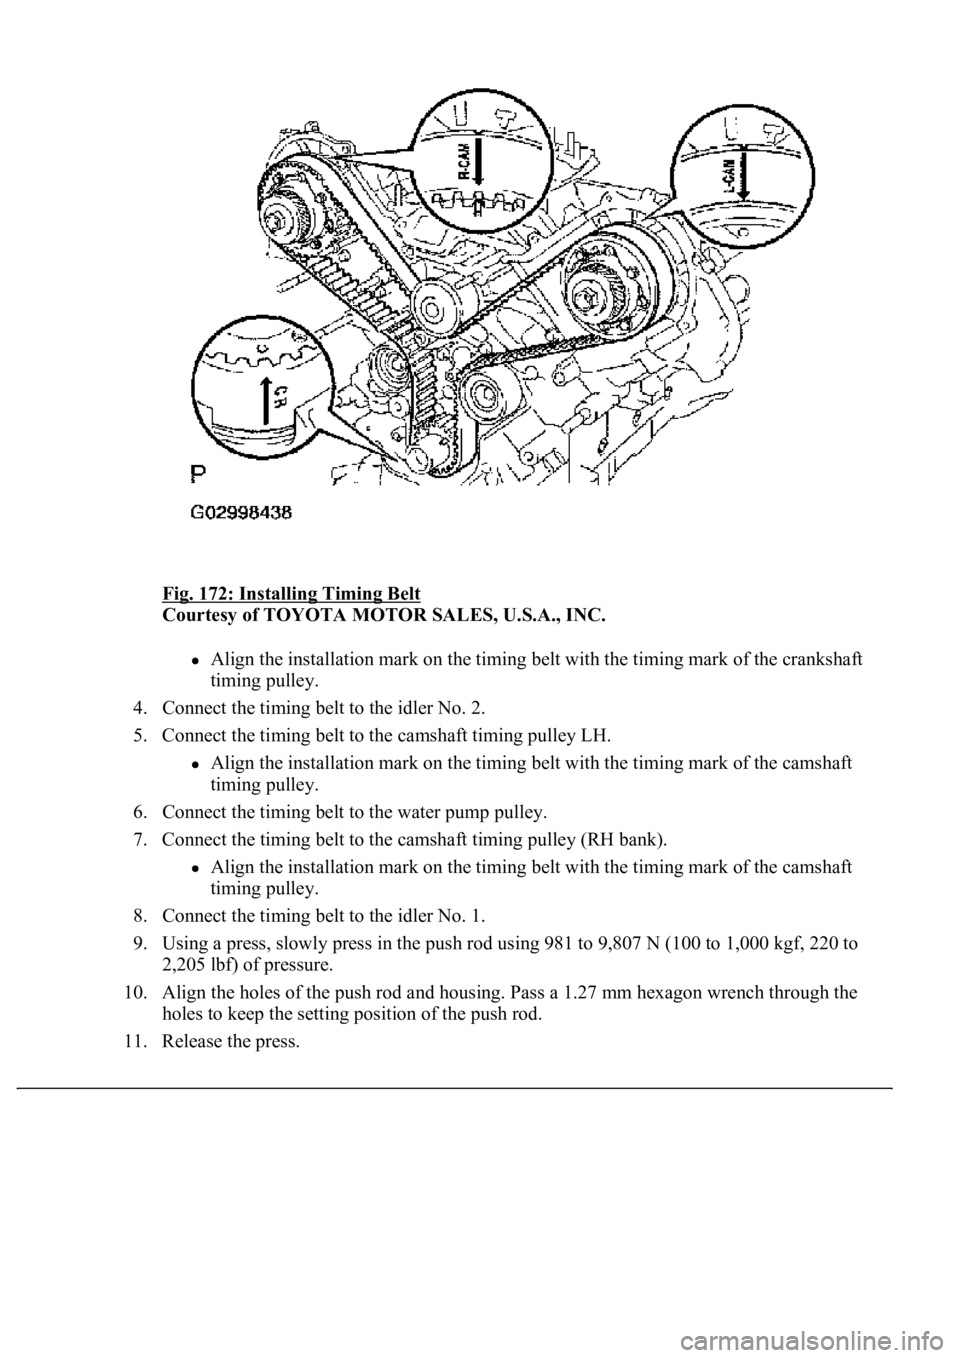
Fig. 172: Installing Timing Belt
Courtesy of TOYOTA MOTOR SALES, U.S.A., INC.
Align the installation mark on the timing belt with the timing mark of the crankshaft
timing pulley.
4. Connect the timing belt to the idler No. 2.
5. Connect the timing belt to the camshaft timing pulley LH.
Align the installation mark on the timing belt with the timing mark of the camshaft
timing pulley.
6. Connect the timing belt to the water pump pulley.
7. Connect the timing belt to the camshaft timing pulley (RH bank).
Align the installation mark on the timing belt with the timing mark of the camshaft
timing pulley.
8. Connect the timing belt to the idler No. 1.
9. Using a press, slowly press in the push rod using 981 to 9,807 N (100 to 1,000 kgf, 220 to
2,205 lbf) of pressure.
10. Align the holes of the push rod and housing. Pass a 1.27 mm hexagon wrench through the
<004b0052004f004800560003005700520003004e00480048005300030057004b004800030056004800570057004c0051004a0003005300520056004c0057004c0052005100030052004900030057004b00480003005300580056004b000300550052004700
1100030003[
11. Release the press.
Page 3454 of 4500
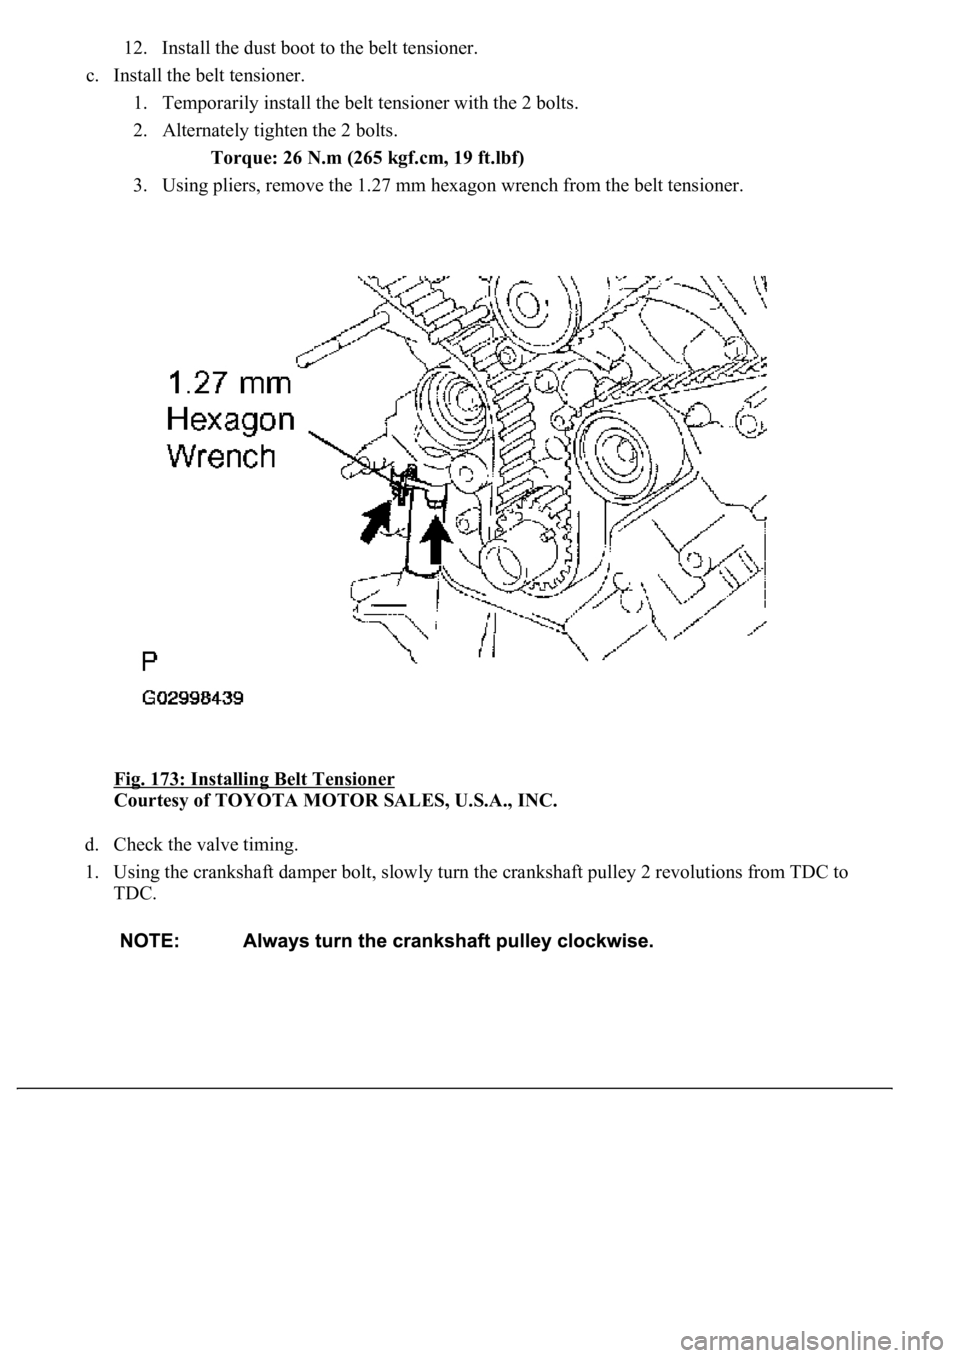
12. Install the dust boot to the belt tensioner.
c. Install the belt tensioner.
1. Temporarily install the belt tensioner with the 2 bolts.
2. Alternately tighten the 2 bolts.
Torque: 26 N.m (265 kgf.cm, 19 ft.lbf)
3. Using pliers, remove the 1.27 mm hexagon wrench from the belt tensioner.
Fig. 173: Installing Belt Tensioner
Courtesy of TOYOTA MOTOR SALES, U.S.A., INC.
d. Check the valve timing.
1. Using the crankshaft damper bolt, slowly turn the crankshaft pulley 2 revolutions from TDC to
TDC.
Page 3455 of 4500
Fig. 174: Turning Crankshaft Pulley
Courtesy of TOYOTA MOTOR SALES, U.S.A., INC.
2. Check that each pulley aligns with the timing marks as shown in the illustration.
If the timin
g marks do not align, remove the timing belt and reinstall it.
