MAZDA 6 2002 Workshop Manual Suplement
Manufacturer: MAZDA, Model Year: 2002, Model line: 6, Model: MAZDA 6 2002Pages: 909, PDF Size: 17.16 MB
Page 391 of 909

G–8
CHARGING SYSTEM
Generator
Voltage
1. Verify that the battery is fully charged.
•Charge if necessary. (See G–6 BATTERY RECHARGING.)
2. Inspect the drive belt deflection/tension.
(See B2–4 DRIVE BELT INSPECTION.)
•Replace if necessary. (See B2–4 DRIVE BELT REPLACEMENT.)
3. Turn off all electrical loads.
4. Turn the engine switch to start the engine and verify that the generator rotates smoothly without any noise
while the engine is running.
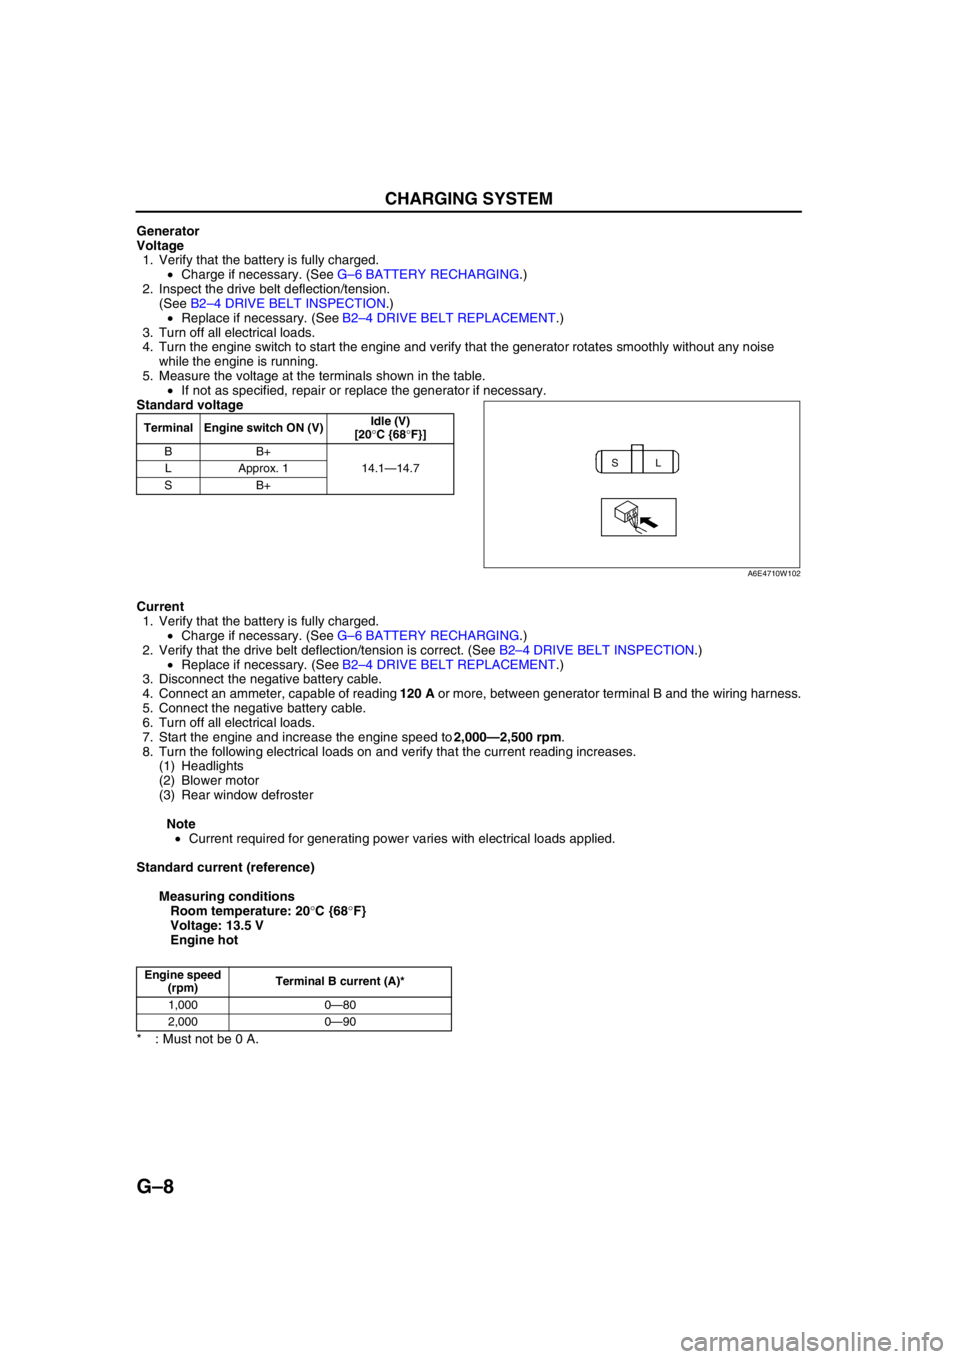
5. Measure the voltage at the terminals shown in the table.
•If not as specified, repair or replace the generator if necessary.
Standard voltage
Current
1. Verify that the battery is fully charged.
•Charge if necessary. (See G–6 BATTERY RECHARGING.)
2. Verify that the drive belt deflection/tension is correct. (See B2–4 DRIVE BELT INSPECTION.)
•Replace if necessary. (See B2–4 DRIVE BELT REPLACEMENT.)
3. Disconnect the negative battery cable.
4. Connect an ammeter, capable of reading 120 A or more, between generator terminal B and the wiring harness.
5. Connect the negative battery cable.
6. Turn off all electrical loads.
7. Start the engine and increase the engine speed to 2,000—2,500 rpm.
8. Turn the following electrical loads on and verify that the current reading increases.
(1) Headlights
(2) Blower motor
(3) Rear window defroster
Note
•Current required for generating power varies with electrical loads applied.
Standard current (reference)
Measuring conditions
Room temperature: 20°C {68°F}
Voltage: 13.5 V
Engine hot
* : Must not be 0 A.
End Of Sie
Terminal Engine switch ON (V)Idle (V)
[20°C {68°F}]
BB+
14.1—14.7 LApprox. 1
SB+
SL
A6E4710W102
Engine speed
(rpm)Terminal B current (A)*
1,000 0—80
2,000 0—90
Page 392 of 909

STARTING SYSTEM
G–9
G
STARTER REMOVAL/INSTALLATIONA6E471418400202
Warning
•When the battery cables are connected, touching the vehicle body with starter terminal B will
generate sparks. This can cause personal injury, fire, and damage to the electrical components.
Always disconnect the battery negative cables before performing the following operation.
1. Disconnect the negative battery cable.
2. Remove the plug hole plate. (L8, LF, and L3 engine models)
3. Remove the engine cover. (MZR-CD (RF Turbo) engine model) (See B2–9 TIMING BELT REMOVAL/
INSTALLATION.)
4. Remove the air cleaner assembly. (L8, LF, and L3 engine models).
5. Remove the under cover.
6. Remove the oil filter and oil cooler component with the cooling hose connected. Position the oil filter and oil
cooler component so that it is out of the way. (L3 engine model (4WD))
7. Remove the solenoid valve assembly with the vacuum hose and the connector connected. Position the
solenoid valve assembly so that it is out of the way. (MZR-CD (RF Turbo) engine model)
8. Remove the release cylinder with the oil pipe connected. Position the release cylinder so that it is out of the
way. (MTX)
9. Remove in the order indicated in the table.
10. Install in the reverse order of removal.
STARTING SYSTEM
Page 393 of 909

G–10
STARTING SYSTEM
Starter Removal Note (MZR-CD (RF Turbo))
1. Remove the starter from above.
End Of Sie
38—51
{3.8—5.3, 28—38}
N·m {kgf·m, ft·lbf} 64—89 {6.5—9.1, 48—65} 9.8—11.7 N·m
{100—120 kgf·cm,
87—104 in·lbf}9.8—11.7 N·m
{100—120 kgf·cm,
87—104 in·lbf}
9.8—11.7 N·m
{100—120 kgf·cm,
87—104 in·lbf}
9.8—11.7 N·m
{100—120 kgf·cm,
87—104 in·lbf}
31
2
3
1
2
FRONT L8, LF, L3
MZR-CD (RF TURBO)
HEATER HOSE
A6E4714W100
1Terminal B wire
2Terminal S wire
3Starter
(See G–10 Starter Removal Note (MZR-CD (RF
Turbo)))
Page 394 of 909

STARTING SYSTEM
G–11
G
STARTER INSPECTIONA6E471418400203MZR-CD (RF Turbo)
On-vehicle Inspection
1. Verify that the battery is fully charged.
•Charge if necessary. (See G–6 BATTERY RECHARGING.)
2. Crank the engine and verify that the starter rotates smoothly without any noise.
•If not as specified, inspect the following:
—Remove the starter, and inspect the magnetic switch and the starter.
—Inspect the related wiring harness and the engine switch.
No Load Test
1. Verify that the battery is fully charged.
•Charge if necessary. (See G–6 BATTERY RECHARGING.)
2. Connect the starter, battery, voltmeter and
ammeter as shown.
3. Operate the starter and verify that it rotates
smoothly.
4. Measure the voltage and current while the starter
is operating.
•If not as specified, replace the starter.
Specification
End Of Sie
Voltage (V)11
Current (A)Below 130
ENGINE
SWITCH
TERMINAL SB
M
STARTERVA
VOLTMETER
BATTERY
AMMETER
A6E4714W101
Page 395 of 909

H–1
H
HCLUTCH
OUTLINE................................................................ H-2
OUTLINE OF CONSTRUCTION.......................... H-2
FEATURES .......................................................... H-2
SPECIFICATIONS ............................................... H-2
OUTLINE................................................................ H-2
SUPPLEMENTAL SERVICE INFORMATION .....H-2
CLUTCH RELEASE CYLINDER............................ H-3
CLUTCH RELEASE CYLINDER
REMOVAL/INSTALLATION
(A65M-R MANUAL TRANSAXLE MODELS) ....H-3
CLUTCH RELEASE CYLINDER
DISASSEMBLY/ASSEMBLY (A65M-R
MANUAL TRANSAXLE MODELS) ................... H-4
CLUTCH UNIT........................................................H-5
CLUTCH UNIT REMOVAL/INSTALLATION
(A65M-R MANUAL TRANSAXLE MODELS) ....H-5
CLUTCH COVER INSPECTION (A65M-R
MANUAL TRANSAXLE MODELS) ................... H-7
FLYWHEEL............................................................ H-8
FLYWHEEL INSPECTION (A65M-R MANUAL
TRANSAXLE MODELS) ................................... H-8 FEATURES
SERVICE
Page 396 of 909

H–2
OUTLINE
OUTLINE OF CONSTRUCTIONA6E490216003201•The construction and operation of the clutch is essentially carried over from that of the current MPV (LW)
models, except for the following features. (See Mazda MPV Training Manual 3340-1*-99F.)
End Of Sie
FEATURESA6E490216003202Adoption of the A65M-R manual transaxle models
•The specifications for the A65M-R manual transaxle models have been added.
Increased torque transmission capacity
•Increased clutch cover set load.
Reduced noise
•The flywheel with a damper has been adopted for the A65M-R manual transaxle model.
End Of Sie
SPECIFICATIONSA6E490216003203
Bold frames:New specifications
End Of Sie
SUPPLEMENTAL SERVICE INFORMATIONA6E490216003204•The following changes have been made since publication of the Mazda6 Workshop Manual (1730-1*-02C).
CLUTCH RELEASE CYLINDER
•Removal/installation procedure has been modified.
•Disassembly/assembly procedure has been modified.
CLUTCH UNIT
•Removal/installation procedure has been modified.
•Clutch cover inspection procedure has been modified.
FLYWHEEL
•Flywheel inspection procedure has been modified.
End Of Sie
OUTLINE
Item New Mazda6 (GG, GY) Current MPV (LW)
EngineMZR-CD (RF Turbo)
Manual transaxle type A65M-R
Clutch control Hydraulic
Clutch coverSpring type Diaphragm
Set load (N {kgf, lbf}) 6,550 {668, 1,472}
Clutch discOuter diameter (mm {in}) 239 {9.41}
Inner diameter (mm {in}) 160 {6.30}
Clutch pedalType Suspended
Pedal ratio 5.9 6.41
Full stroke (mm {in}) 140 {5.51} 148 {5.83}
Clutch master cylinder inner diameter (mm {in}) 15.87 {0.625}
Clutch release cylinder inner diameter (mm {in}) 19.05 {0.750}
Clutch fluid type SAE J1703, FMVSS116 DOT-3 or DOT-4
OUTLINE
Page 397 of 909

CLUTCH RELEASE CYLINDER
H–3
H
CLUTCH RELEASE CYLINDER REMOVAL/INSTALLATION (A65M-R MANUAL TRANSAXLE MODELS)A6E4918419202011. Remove the under cover.
2. Remove in the order indicated in the table.
3. Install in the reverse order of removal.
.
End Of Sie
CLUTCH RELEASE CYLINDER
12.7—21.6 N·m
{130—220 kgf·cm,
113—190 in·lbf}
18.6—25.5 {1.90—2.60,13.8—18.8}
N.
m {kgf.
m,ft.
lbf}
3
GREASE
2
1
SST*
*
49 0259 770B
(MOLYBDENUM SULFIDE)
A6E4918W010
1 Clutch pipe
2Bolt3 Clutch release cylinder
Page 398 of 909

H–4
CLUTCH RELEASE CYLINDER
CLUTCH RELEASE CYLINDER DISASSEMBLY/ASSEMBLY (A65M-R MANUAL TRANSAXLE MODELS)A6E4918419202021. Disassemble in the order indicated in the table.
2. Assemble in the reverse order of disassembly.
.
End Of Sie
56
7
5.9—8.8 N.
m
{60—90 kgf.
cm,53—78 in.
lbf}
4
BRAKEFLUID
BRAKEFLUID3
1
2
A6E4918W011
1 Boot
2 Push rod
3 Piston and cap
4 Return spring5 Bleeder cap
6 Bleeder screw
7 Release cylinder body
Page 399 of 909

CLUTCH UNIT
H–5
H
CLUTCH UNIT REMOVAL/INSTALLATION (A65M-R MANUAL TRANSAXLE MODELS)A6E4920160002011. Remove in the order indicated in the table.
2. Install in the reverse order oremoval.
.
CLUTCH UNIT
SST
SST
SSTSEALANT
25—33
{2.6—3.3, 19—24}
151.3—161.1
{15.43—16.42, 111.6—118.8} 18.6—25.5
{1.90—2.60, 13.8—18.8}
1
GREASE
GREASE
GREASE
GREASE
GREASE
5
6
7
8
4
3
2
(MOLYBDENUM SULFIDE) TRANSAXLE SIDE ENGINE SIDE
N·m {kgf·m, ft·lbf}
A6E4920W010
1 Clutch release cylinder
2 Manual transaxle
(See J2–7 MANUAL TRANSAXLE REMOVAL/
INSTALLATION)
3Boot
4 Clutch release collar
5 Clutch release fork6 Clutch cover
(See H–6 Clutch Cover and Disc Removal Note)
(See H–7 Clutch Cover Installation Note)
7Clutch disc
(See H–6 Clutch Cover and Disc Removal Note)
(See H–7 Clutch Disc Installation Note)
8 Flywheel
(See H–6 Flywheel Removal Note)
(See H–6 Flywheel Installation Note)
Page 400 of 909

H–6
CLUTCH UNIT
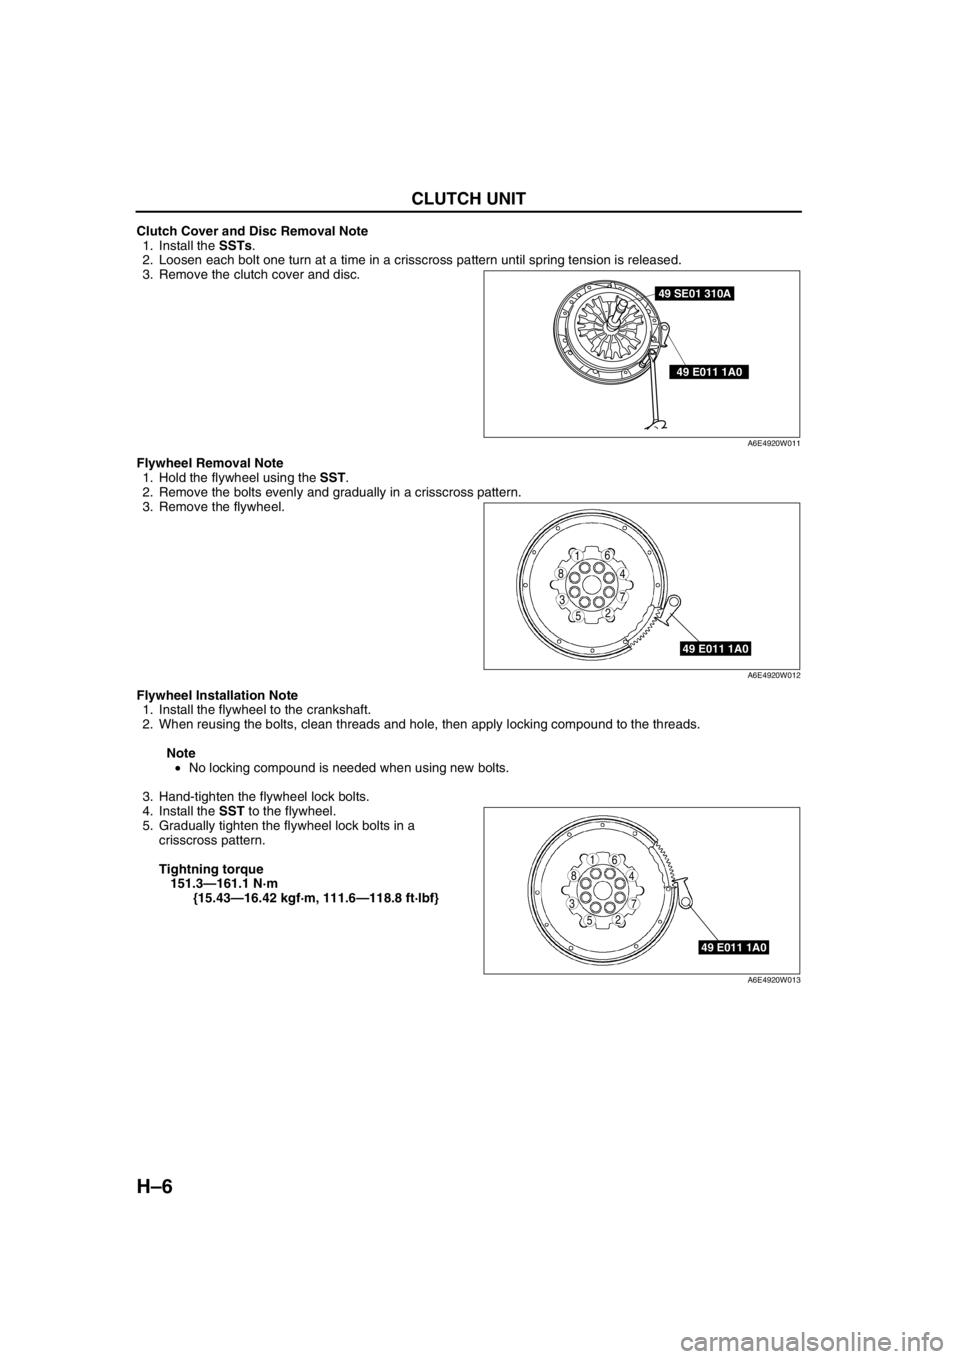
Clutch Cover and Disc Removal Note
1. Install the SSTs.
2. Loosen each bolt one turn at a time in a crisscross pattern until spring tension is released.
3. Remove the clutch cover and disc.
Flywheel Removal Note
1. Hold the flywheel using the SST.
2. Remove the bolts evenly and gradually in a crisscross pattern.
3. Remove the flywheel.
Flywheel Installation Note
1. Install the flywheel to the crankshaft.
2. When reusing the bolts, clean threads and hole, then apply locking compound to the threads.
Note
•No locking compound is needed when using new bolts.
3. Hand-tighten the flywheel lock bolts.
4. Install the SST to the flywheel.
5. Gradually tighten the flywheel lock bolts in a
crisscross pattern.
Tightning torque
151.3—161.1 N·m
{15.43—16.42 kgf·m, 111.6—118.8 ft·lbf}
49 SE01 310A
49 E011 1A0
A6E4920W011
49 E011 1A0
5
4
3
61
2
8
7
A6E4920W012
49 E011 1A0
5
4
3
61
2
8
7
A6E4920W013