MAZDA 626 1987 Workshop Manual
Manufacturer: MAZDA, Model Year: 1987, Model line: 626, Model: MAZDA 626 1987Pages: 1865, PDF Size: 94.35 MB
Page 1121 of 1865

OUTLINE 7C
Clutches
Front clutch
\ From oil pump
Rear clutch
pump
Oil Pump, and Turbine Shaft
76G07C-009
To oil pump
From oil pump ^^
Lubrication
t
To torque converter
From torque converter
Governor
Governor outlet pipe
Governor inlet pipe
From control valve
To control valve
76G07C-010
76G07C-011
7C-7
Page 1122 of 1865

7C TROUBLESHOOTING
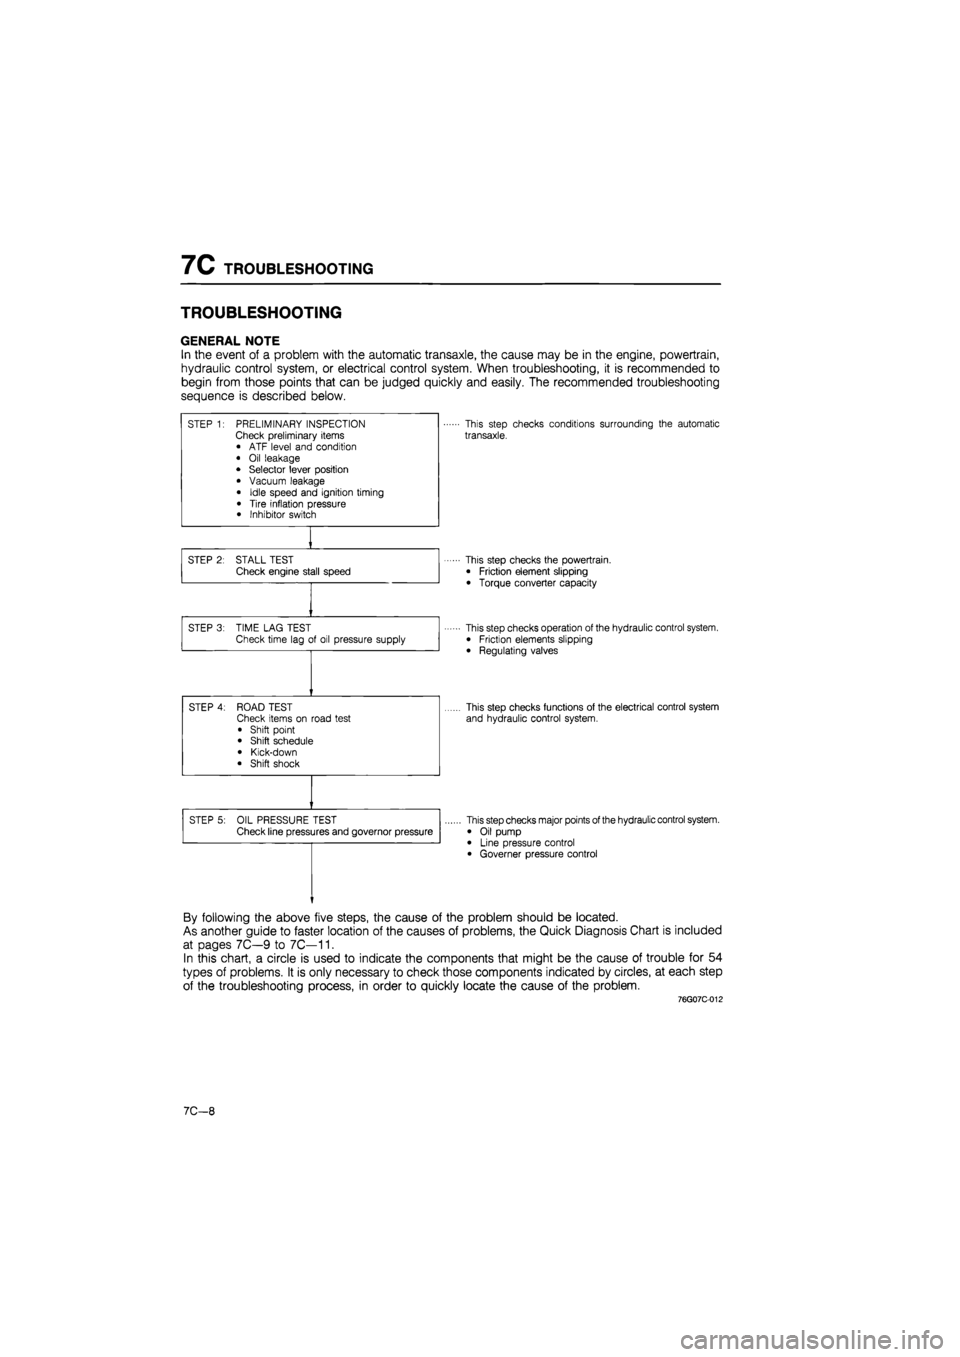
TROUBLESHOOTING
GENERAL NOTE
In the event of a problem with the automatic transaxle, the cause may be in the engine, powertrain,
hydraulic control system, or electrical control system. When troubleshooting, it is recommended to
begin from those points that can be judged quickly and easily. The recommended troubleshooting
sequence is described below.
STEP 1: PRELIMINARY INSPECTION Check preliminary items • ATF level and condition
• Oil leakage • Selector lever position
• Vacuum leakage
• Idle speed and ignition timing
• Tire inflation pressure • Inhibitor switch
This step checks conditions surrounding the automatic
transaxle.
STEP 2: STALL TEST Check engine stall speed This step checks the powertrain.
• Friction element slipping
• Torque converter capacity
STEP 3: TIME LAG TEST Check time lag of oil pressure supply This step checks operation of the hydraulic control system. • Friction elements slipping
• Regulating valves
STEP 4: ROAD TEST Check items on road test
• Shift point • Shift schedule
• Kick-down • Shift shock
This step checks functions of the electrical control system
and hydraulic control system.
STEP 5: OIL PRESSURE TEST Check line pressures and governor pressure This step checks major points of the hydraulic control system.
• Oil pump • Line pressure control • Governer pressure control
By following the above five steps, the cause of the problem should be located.
As another guide to faster location of the causes of problems, the Quick Diagnosis Chart is included
at pages 7C—9 to 7C—11.
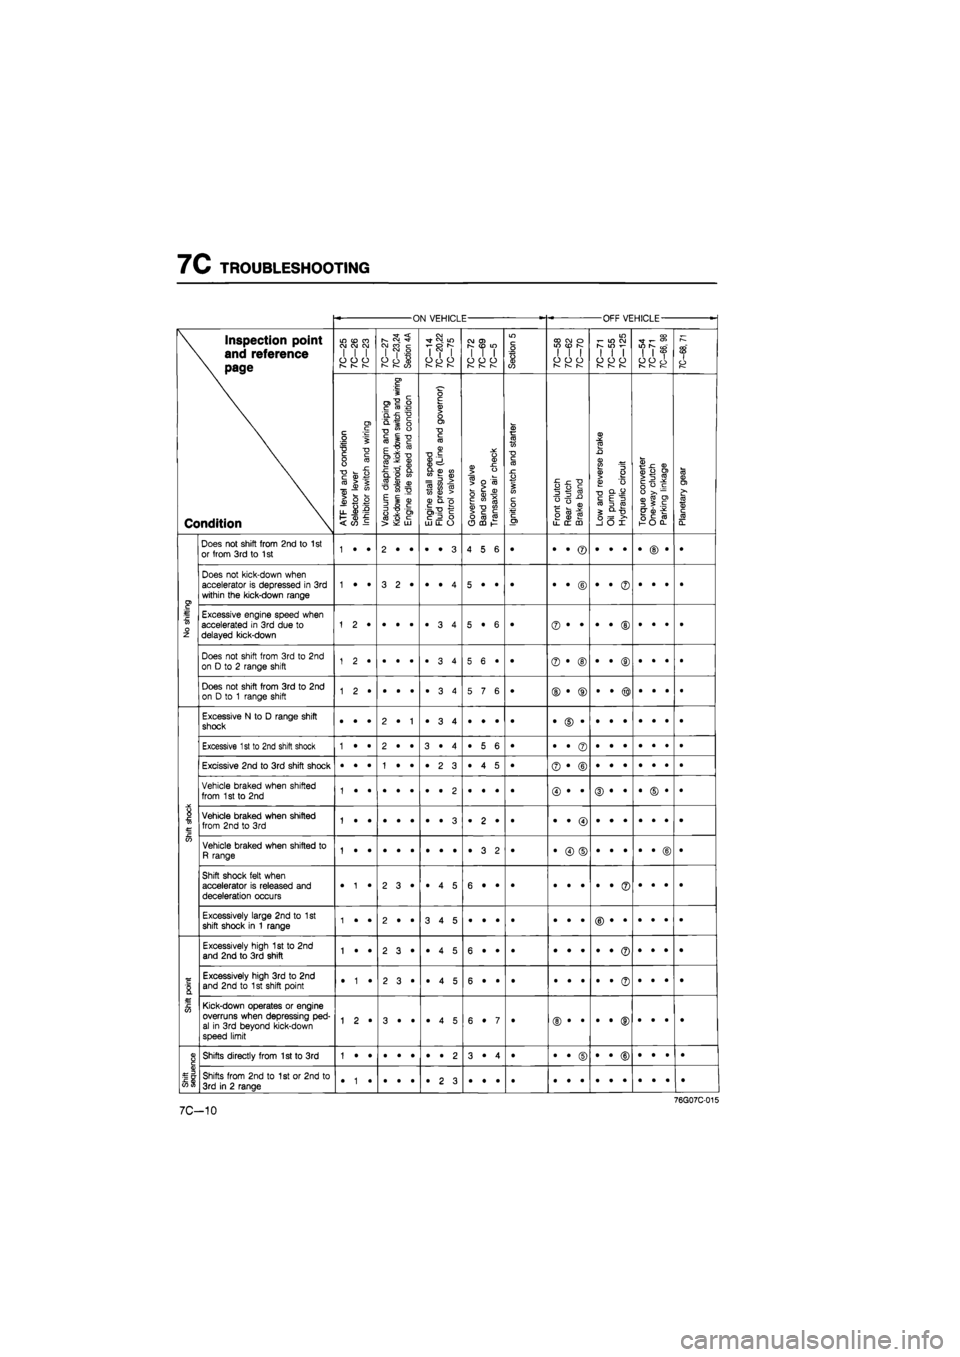
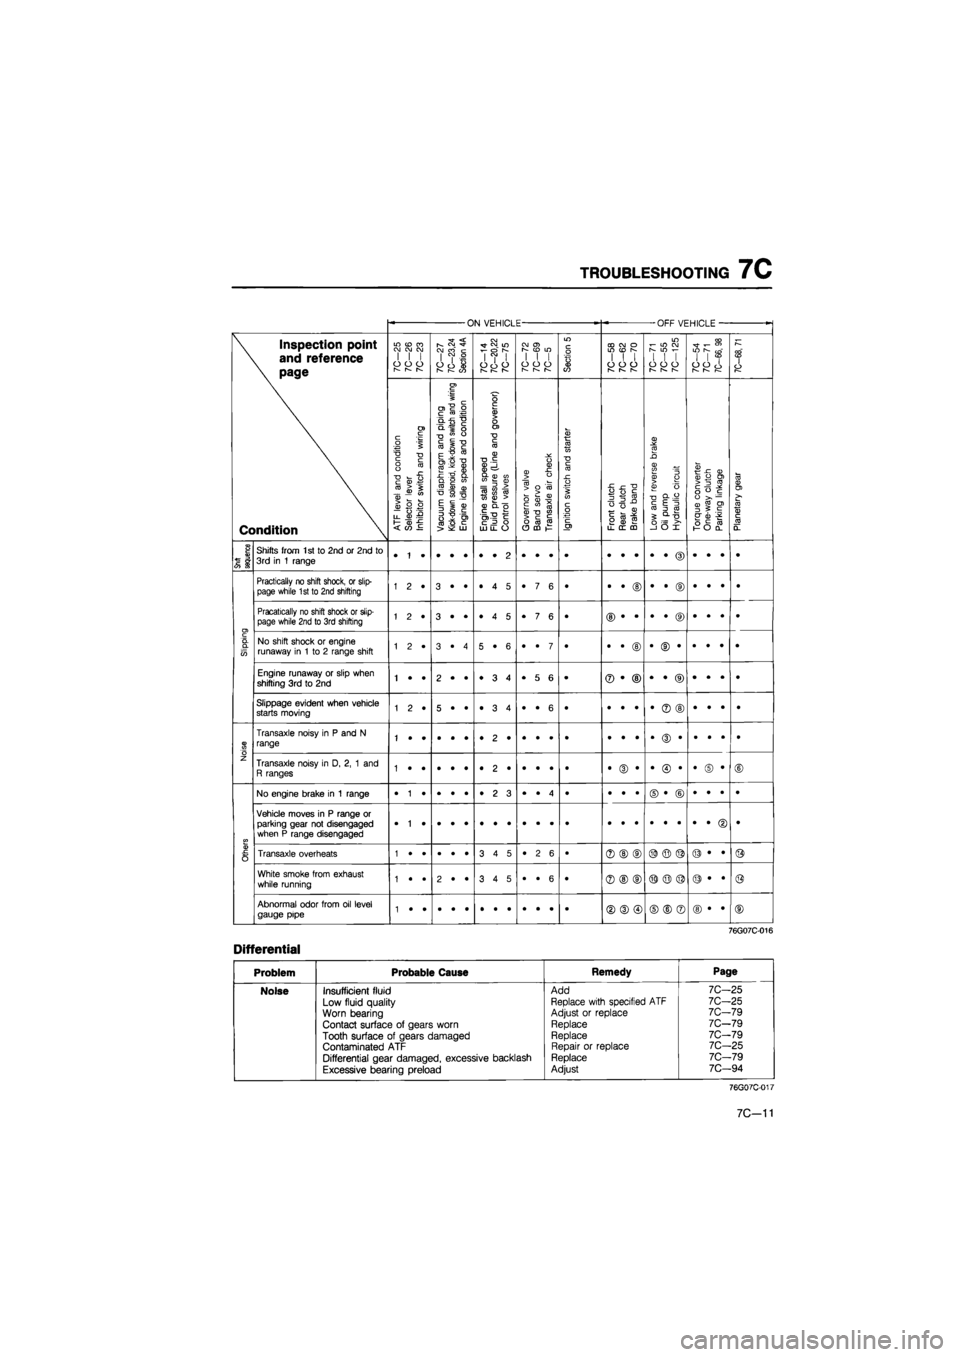
In this chart, a circle is used to indicate the components that might be the cause of trouble for 54
types of problems. It is only necessary to check those components indicated by circles, at each step
of the troubleshooting process, in order to quickly locate the cause of the problem.
76G07C-012
7C—8
Page 1123 of 1865

TROUBLESHOOTING
7C
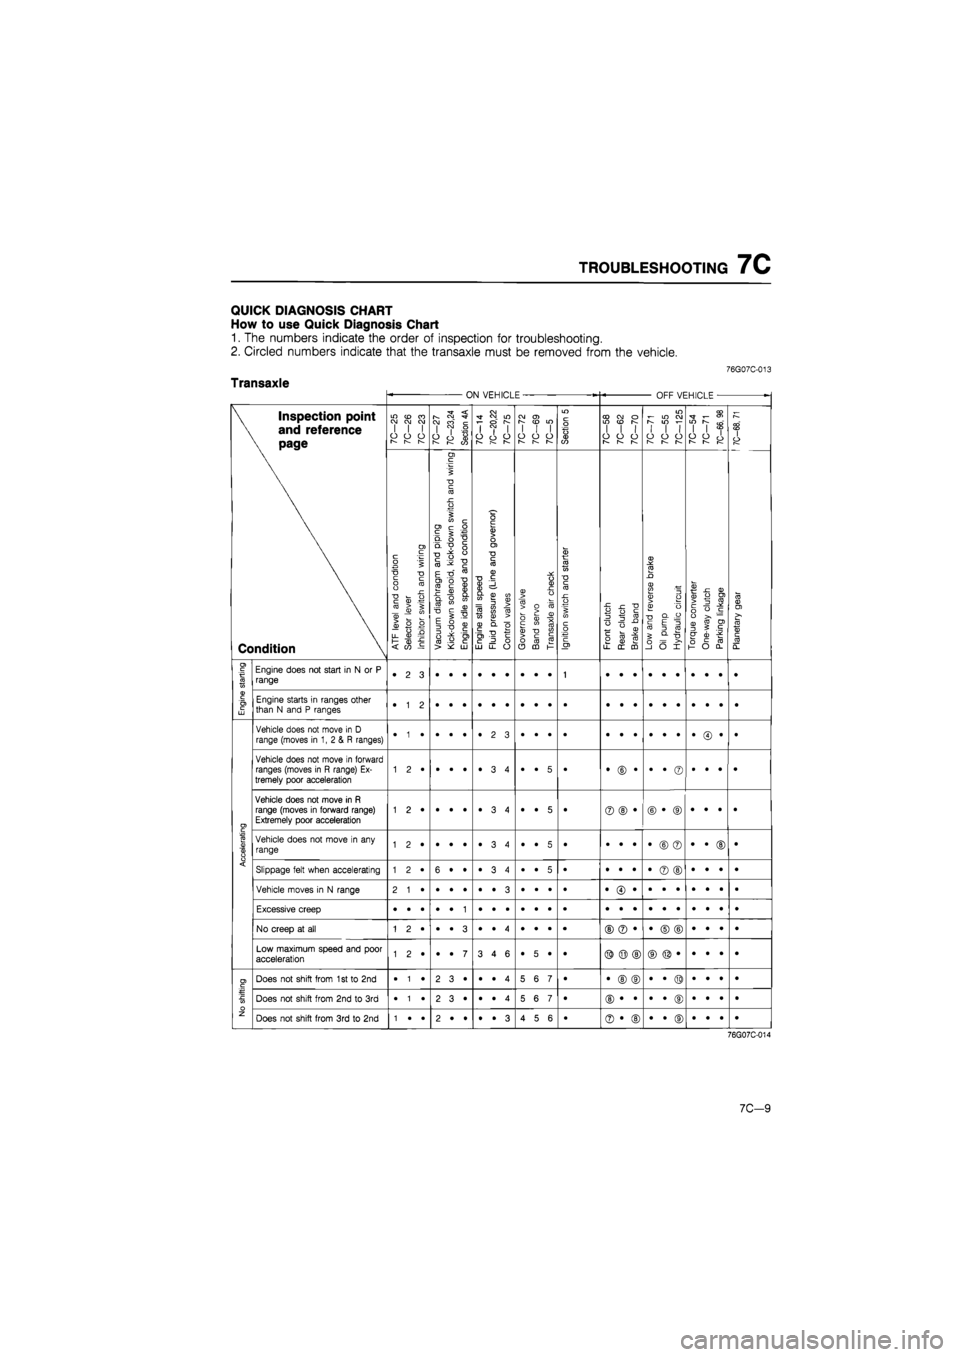
QUICK DIAGNOSIS CHART
How
to use
Quick Diagnosis Chart
1.
The
numbers indicate
the
order
of
inspection
for
troubleshooting.
2. Circled numbers indicate that
the
transaxle must
be
removed from
the
vehicle.
76G07C-013
Transaxle ON VEHICLE OFF VEHICLE
•
\ Inspection point
\
and
reference
\ page
Condition
7C-25
7C-26
7C-23
10—21
7C—23,24
Section
4A
7C-14
7C—20,22
10—lb
10-12 10—69
7C—5
Section
5
7C—58
7C-62
7C-70
7C-71
7C-55
7C-125
7C-54 7C-71
7C-66,
98
7C-68,
71
\ Inspection point
\
and
reference
\ page
Condition
ATF
level
and
condition
Selector
lever
Inhibitor
switch
and
wiring
^
Vacuum
diaphragm
and
piping
|
Kick-down
solenoid,
kick-down
switch
and
wiring
Engine
idle
speed
and
condition
Engine
stall
speed
Fluid
pressure
(Line
and
governor)
Control
valves
Governor
valve
Band
servo
Transaxle
air
check
Ignition
switch
and
starter
Front
clutch
Rear
clutch
Brake
band
Low
and
reverse
brake
Oil
pump Hydraulic
circuit
Torque
converter
One-way
clutch
Parking
linkage
Planetary
gear
I
Engine
starting
Engine does
not
start
in
N or P
range •
2 3
1
Engine
starting
Engine starts
in
ranges other than
N
and P
ranges •
1 2
Accelerating
Vehicle does
not
move
in
D
range (moves
in 1, 2 & R
ranges) •
• •
•
Accelerating
Vehicle does
not
move
in
forward ranges (moves
in R
range)
Ex-
tremely poor acceleration •
• 5
• •
© •
•
• ©
•
• •
•
Accelerating
Vehicle does
not
move
in R
range (moves
in
forward range) Extremely poor acceleration 1
2 •
•
• •
•
3 4
•
• 5
• ©
© •
©
• ©
•
• •
•
Accelerating
Vehicle does
not
move
in any
range 1
2 •
•
• •
•
3 4
•
• 5
• •
• •
•
© ©
•
• ©
•
Accelerating Slippage felt when accelerating 1
2 •
6
• •
•ST
CO
•
•
• 5
• •
• •
•
© ©
•
• •
• Accelerating
Vehicle moves
in
N
range
Accelerating
Excessive creep
Accelerating
No creep
at all
©
© •
•
© ©
•
• •
•
Accelerating
Low maximum speed
and
poor acceleration 1
2 •
•
• 7
3
4 6
•
5 •
• ©
© ©
No shifting
Does
not
shift from
1
st to 2nd
•
1 •
2
3 •
•
• 4
5
6 7
• •
© ©
•
• ©
•
• •
•
No shifting
Does
not
shift from
2nd to 3rd
•
1 •
2
3 •
•
• 4
5
6 7
•
No shifting
Does
not
shift from
3rd to 2nd
1
• •
2
• •
•
• 3
4
5 6
• ©
• ©
•
• ©
•
• •
•
76G07C-014
7C-9
Page 1124 of 1865

7C TROUBLESHOOTING
ON VEHICLE OFF VEHICLE
-
\ Inspection point
\ and reference
\ page
Condition
LO
(O
CO CJ OJ CM I
I I
O
O
CJ
r-~
r—
7C-27
7C—23,24
Section
4A
7C—14
7C—20,22
7C-75
CO
O)
I
I I
o
o o
r—
r—
Section
5
CO CO
o
WON I
I I
o
o o
1— 1—
m i-
in co
S
IO
i-
1
1 1
o
o o
—
I—
7C—54
7C-71
7C-66,
98
7C—68,
71
\ Inspection point
\ and reference
\ page
Condition
A.TF
level
and
condition
Selector
lever
Inhibitor
switch
and
wiring
Vacuum
diaphragm
and
piping
Kick-down
solenoid,
kick-down
switch
and
wiring
Engine
idle
speed
and
condition
Engine
stall
speed
Fluid
pressure
(Line
and
governor)
Control
valves
Governor
valve
Band
servo
Transaxle
air
check
Ignition
switch
and
starter
Front
clutch
Rear
clutch
Brake
band
Low
and
reverse
brake
Oil pump Hydraulic
circuit
Torque
converter
One-way
clutch
Parking
linkage
Planetary
gear
No
shifting
Does
not
shift from 2nd
to
1
st or from
3rd to
1
st 1
• •
2
• •
•
• 3
4
5 6
•
No
shifting
Does
not
kick-down when accelerator
is
depressed
in 3rd
within
the
kick-down range 1
• •
3
2*
•
• 4
5
• •
• •
• ©
•
• ©
•
• •
•
No
shifting
Excessive engine speed when accelerated
in 3rd
due
to
delayed kick-down 5
• 6
• ©
• •
•
• ©
•
• •
• No
shifting
Does
not
shift from
3rd to 2nd
on
D to
2
range shift 1
2 •
5
6 •
• ©
• ®
•
• ®
•
• •
•
No
shifting
Does
not
shift from
3rd to 2nd
on
D to 1
range shift 5
7 6
• ©
• ®
•
• ®
•
• •
•
Shift
shock
Excessive
N to
D
range shift shock •
• •
2
• 1
•
3 4
•
• •
• •
© •
•
• •
•
• •
•
Shift
shock
Excessive
1
st
to
2nd shift shock 1
• •
2
• •
3
• 4
•
5 6
• •
• ©
•
• •
•
• •
•
Shift
shock
Excissive 2nd
to 3rd
shift shock •
• •
1
• •
•
2 3
•
4 5
• ©
• ©
Shift
shock
Vehicle braked when shifted from
1
st
to 2nd
Shift
shock
Vehicle braked when shifted from 2nd
to 3rd
1
• •
•
• •
•
• 3
.
2 •
•
Shift
shock
Vehicle braked when shifted
to
R range 1
• •
•
• •
•
• •
•
3 2
• •
© ©
•
• •
•
• ©
•
Shift
shock
Shift shock felt when accelerator
is
released
and
deceleration occurs •
1 •
2
3*
•
4 5
6
• •
• •
• •
•
• ©
•
• *
•
Shift
shock
Excessively large 2nd
to 1st
shift shock
in 1
range 1
• •
2
• •
3
4 5
•
• •
•
Shift
point
Excessively high
1st to 2nd
and 2nd
to
3rd shift 1
• •
2
3 •
•
4 5
6
• •
•
Shift
point
Excessively high
3rd to 2nd
and
2nd to
1
st shift point •
1 •
2
3 •
•
4 5
6
• •
• •
• •
•
• ©
•
• •
•
Shift
point
Kick-down operates
or
engine overruns when depressing
ped-
al
in 3rd
beyond kick-down speed limit
1
2 •
3
• •
•
4 5
6
• 7
•
Shift
sequence
Shifts directly from 1st
to 3rd
1
• •
•
• •
•
• 2
3
• 4
• •
• ©
•
• ©
•
• •
•
Shift
sequence
Shifts from
2nd to 1st or
2nd
to
3rd
in
2
range •
1 •
•
• •
•
2 3
•
• •
•
7C-10
Page 1125 of 1865

TROUBLESHOOTING
7C
ON VEHICLE -OFF VEHICLE
-
\ Inspection point
\
and
reference
\ page
Condition
in cd
ra
CM CM CM
I
I I
o
o o
I—
r~—
r—
7C—27
7C—23,24
Section
4A
7C—14
7C—20,22
7C-75
CM
0>
[—
CO
LO I
I I
O
O O
r^ r—
Section
5
CD CM
O
in (D
s
I
I I
o
o o
r—
r^
w
CM
r-
m f-
I
I I
o
o o
r-— I—
r-—
7C—54
7C-71
7C—66,
98
7C-68,
71 \ Inspection point
\
and
reference
\ page
Condition
ATR
level
and
condition
Selector
lever
Inhibitor
switch
and
wiring
Vacuum
diaphragm
and
piping
Kick-down
solenoid,
kick-down
switch
and
wiring
Engine
idle
speed
and
condition
Engine
stall
speed
Fluid
pressure
(Line
and
governor)
Control
valves
Governor
valve
Band
servo
Transaxle
air
check
Ignition
switch
and
starter
Front
clutch
Rear
clutch
Brake
band
Low
and
reverse
brake
Oil
pump
Hydraulic
circuit
Torque
converter
One-way
clutch
Parking
linkage
Planetary
gear
Snift
sequence
Shifts from
1st to
2nd
or
2nd
to
3rd
in 1
range
Slipping
Practically
no
shift shock,
or
slip-page while 1st
to
2nd shifting 1
2 •
3
• •
•
4 5
•
7 6
• •
• ©
•
• ©
•
• •
•
Slipping
Pracatically
no
shift shock
or
slip-page while 2nd
to
3rd shifting 1
2 •
3
• •
•
4 5
•
7 6
•
Slipping
No shift shock
or
engine runaway
in 1 to 2
range shift 1
2 •
3
• 4
5
• 6
•
• 7
• •
• ©
•
© •
•
• •
•
Slipping
Engine runaway
or
slip when shifting
3rd to 2nd
1
• •
2
• •
•
3 4
•
5 6
• ®
• ©
•
• ®
•
• •
•
Slipping
Slippage evident when vehicle starts moving 1
2 •
5
• •
•
3 4
•
• 6
• •
• •
•
® ©
•
• •
•
Noise
Transaxle noisy
in P and N
range
Noise
Transaxle noisy
in D, 2, 1 and
R ranges •
(D •
•
© •
•
© •
©
Others
No engine brake
in 1
range •
1 •
•
• •
•
2 3
•
• 4
• •
• •
©
• ©
•
• •
•
Others
Vehicle moves
in P
range
or
parking gear
not
disengaged when
P
range disengaged
•
Others
Transaxle overheats 3
4 5
•
2 6
• ®
©
(D ©
© ©
©
• •
©
Others
White smoke from exhaust while running 1
• •
2
• •
3
4 5
•
• 6
• ®
© ©
©
© ©
©
• •
@
Others
Abnormal odor from
oil
level gauge pipe ©
® ©
©
© ®
©
• •
©
76G07C-016
Differential
Problem Probable Cause Remedy Page
Noise Insufficient fluid Add 7C—25
Low fluid quality Replace with specified
ATF
7C-25
Worn bearing Adjust
or
replace 7C-79
Contact surface
of
gears worn Replace 7C-79
Tooth surface
of
gears damaged Replace 7C-79
Contaminated
ATF
Repair
or
replace 7C-25
Differential gear damaged, excessive backlash Replace 7C-79
Excessive bearing preload Adjust 7C—94
76G07C-017
7C—11
Page 1126 of 1865

7C TROUBLESHOOTING
STEP 1 (PRELIMINARY INSPECTION)
In this step, the main points related to the automatic transaxle are checked. These items must be kept
in the correct condition at all times in order to assure proper operation of the automatic transaxle.
1. Automatic Transaxle Fluid (ATF)
Check ATF level and condition. (Refer to page 7C—25.)
2. Selector Lever
Check selector lever position and adjust it if necessary. (Refer to page 7C—26.)
76G07C-018
3. Oil Leakage
Check for oil leakage.
(1) Warm up the ATF.
(2) Apply the parking brake and block the wheels
to prevent the vehicle from rolling.
(3) Shift the selector lever to R range.
(4) Check if oil leaks from the noted oil seals or
gaskets.
(5) If oil leaks, replace the seal or gasket.
76G07C-019
7C-12
Page 1127 of 1865

TROUBLESHOOTING 7C
76G07C-020
76G07C-021
76G07C-022
4. Vacuum Leakage
Check for vacuum leakage.
(1) Disconnect the vacuum hose to the vacuum
diaphragm.
(2) Connect a vacuum pump to the hose.
(3) Apply vacuum and check if vacuum leaks.
(4) If vacuum leaks, check the vacuum hose and
vacuum diaphragm. Replace if necessary.
5. Idle Speed and Ignition Timing
Check idle speed and ignition timing. (Refer to Sec-
tion 4A.)
6. Tire Inflation Pressure
Check tire inflation pressure. (Refer to page 12—2.)
7. Inhibitor Switch
Check the inhibitor switch for operation. (Refer to
page 7C—23.)
76G07C-023
7C-13
Page 1128 of 1865

7C TROUBLESHOOTING
STEP 2 (STALL TEST)
This step is performed to determine if there is slippage of the friction elements or malfunction of the
hydraulic components.
Preparation
Check the following items prior to testing:
1. Engine coolant, engine oil and ATF levels.
2. Warm the engine thoroughly to raise the ATF temperature to operating level (50—80°C, 122—176°F).
3. Set the parking brake and block the front and rear of the wheels.
Pull the parking brake Water temperature
ATF
7C—14
76G07C-024
Page 1129 of 1865

TROUBLESHOOTING 7C
Procedure
76G07C-025
1. Connect a tachometer to the engine.
2. Shift the selector lever to D range.
3. Depress the brake pedal firmly with the left foot, and gradually depress the accelerator pedal with
the right foot.
4. Read and note the engine speed as soon as it becomes constant; then release the accelerator pedal.
Caution
Steps 3 to 4 must be done within 5 seconds.
5. Shift the selector to N range and let the engine idle for one minute or more.
Note The idling cools the ATF and prevents oil degeneration.
6. Perform stall tests for the following ranges in the same manner.
(1) 2 range
(2) 1 range
(3) R range
Standard stall speed:
FE engine 2050—2150 rpm
F6 engine 1800—2050 rpm
Caution
Always provide adequate cooling time between individual range stall tests.
7C-15
Page 1130 of 1865

7C TROUBLESHOOTING
Evaluation
Condition Possible cause
Worn oil pump
In all ranges Insufficient line
pressure
Oil leakage from oil pump, control
valve, and/or transaxle case
Stuck pressure regulator valve
In D, 2, and 1 Rear clutch slipping
Above specification In D range only One-way clutch slipping
In 2 range only Brake band slipping
Low and reverse brake slipping
Brake band slipping
In R range only Road test to determine if cause is low and reverse brake or reverse clutch:
a) Engine braking in 1 range Front clutch b) No engine braking in 1 range .... Low and reverse brake
Within specification All shift control elements within transaxle functioning normally
Below specification Engine out of tune Below specification
One-way clutch slipping within torque converter
76G07C-026
7C—16