check engine MAZDA 626 1987 Workshop Manual
[x] Cancel search | Manufacturer: MAZDA, Model Year: 1987, Model line: 626, Model: MAZDA 626 1987Pages: 1865, PDF Size: 94.35 MB
Page 1001 of 1865
INSPECTION AND REPAIR 7B
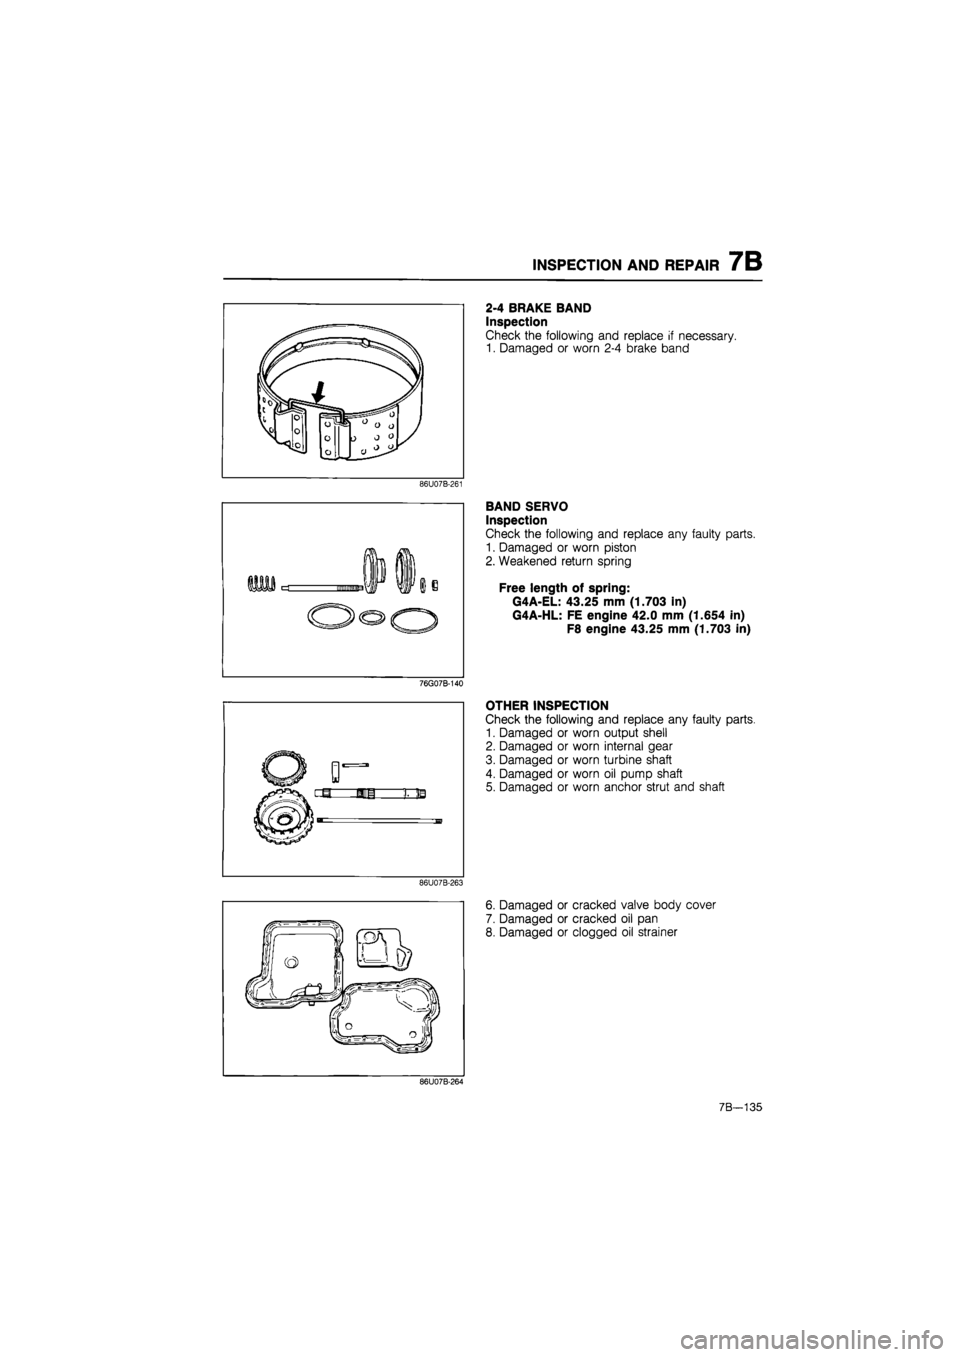
2-4 BRAKE BAND
Inspection
Check the following and replace if necessary.
1. Damaged or worn 2-4 brake band
86U07B-261
BAND SERVO
Inspection
Check the following and replace any faulty parts.
1. Damaged or worn piston
2. Weakened return spring
Free length of spring:
G4A-EL: 43.25 mm (1.703 in)
G4A-HL: FE engine 42.0 mm (1.654 in)
F8 engine 43.25 mm (1.703 in)
76G07B-140
OTHER INSPECTION
Check the following and replace any faulty parts.
1. Damaged or worn output shell
2. Damaged or worn internal gear
3. Damaged or worn turbine shaft
4. Damaged or worn oil pump shaft
5. Damaged or worn anchor strut and shaft
86U07B-263
6. Damaged or cracked valve body cover
7. Damaged or cracked oil pan
8. Damaged or clogged oil strainer
86U07B-264
7B—135
Page 1027 of 1865
INSPECTION AND REPAIR 7B
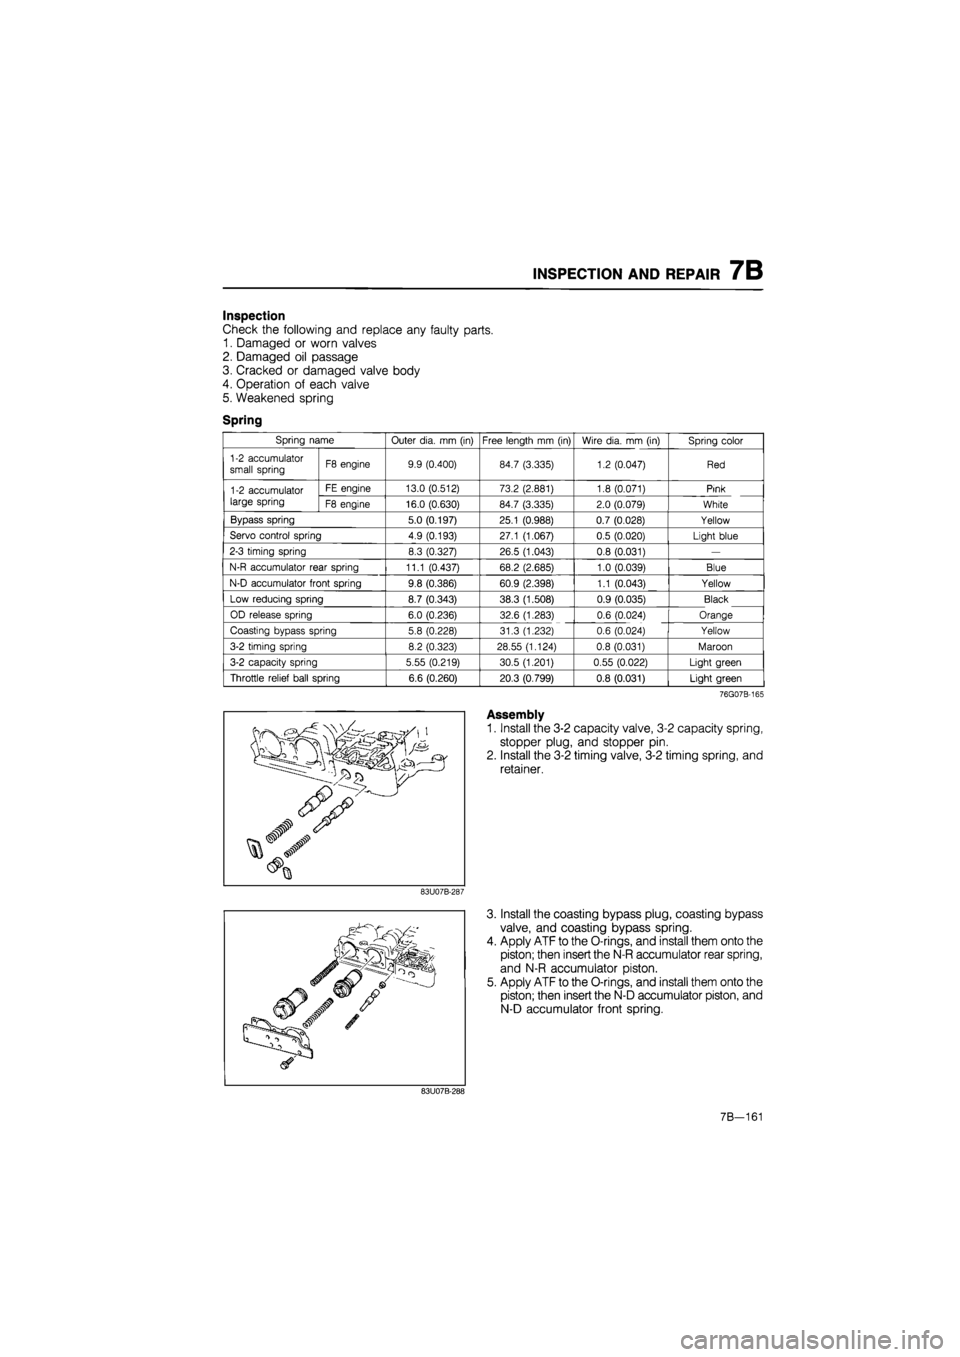
Inspection
Check the following and replace any faulty parts.
1. Damaged or worn valves
2. Damaged oil passage
3. Cracked or damaged valve body
4. Operation of each valve
5. Weakened spring
Spring
Spring name Outer dia.
mm
(in) Free length
mm (in)
Wire dia.
mm
(in) Spring color
1-2 accumulator small spring F8 engine 9.9 (0.400) 84.7 (3.335) 1.2 (0.047) Red
1-2 accumulator large spring
FE engine 13.0 (0.512) 73.2 (2.881) 1.8 (0.071) Pink 1-2 accumulator large spring F8 engine 16.0 (0.630) 84.7 (3.335) 2.0 (0.079) White
Bypass spring 5.0 (0.197) 25.1 (0.988) 0.7 (0.028) Yellow
Servo control spring 4.9 (0.193) 27.1 (1.067) 0.5 (0.020) Light blue
2-3 timing spring 8.3 (0.327) 26.5 (1.043) 0.8 (0.031)
—
N-R accumulator rear spring 11.1 (0.437) 68.2 (2.685) 1.0 (0.039) Blue
N-D accumulator front spring 9.8 (0.386) 60.9 (2.398) 1.1 (0.043) Yellow
Low reducing spring 8.7 (0.343) 38.3 (1.508) 0.9 (0.035) Black
OD release spring 6.0 (0.236) 32.6 (1.283) 0.6 (0.024) Orange
Coasting bypass spring 5.8 (0.228) 31.3 (1.232) 0.6 (0.024) Yellow
3-2 timing spring 8.2 (0.323) 28.55 (1.124) 0.8 (0.031) Maroon
3-2 capacity spring 5.55 (0.219) 30.5 (1.201) 0.55 (0.022) Light green
Throttle relief ball spring 6.6 (0.260) 20.3 (0.799) 0.8 (0.031) Light green
76G07B-165
Assembly
1. Install the 3-2 capacity valve, 3-2 capacity spring,
stopper plug, and stopper pin.
2. Install the 3-2 timing valve, 3-2 timing spring, and
retainer.
83U07B-287
3. Install the coasting bypass plug, coasting bypass
valve, and coasting bypass spring.
4. Apply ATF to the O-rings, and install them onto the
piston; then insert the N-R accumulator rear spring,
and N-R accumulator piston.
5. Apply ATF to the O-rings, and install them onto the
piston; then insert the N-D accumulator piston, and
N-D accumulator front spring.
83U07B-288
7B—161
Page 1086 of 1865
7B INSTALLATION
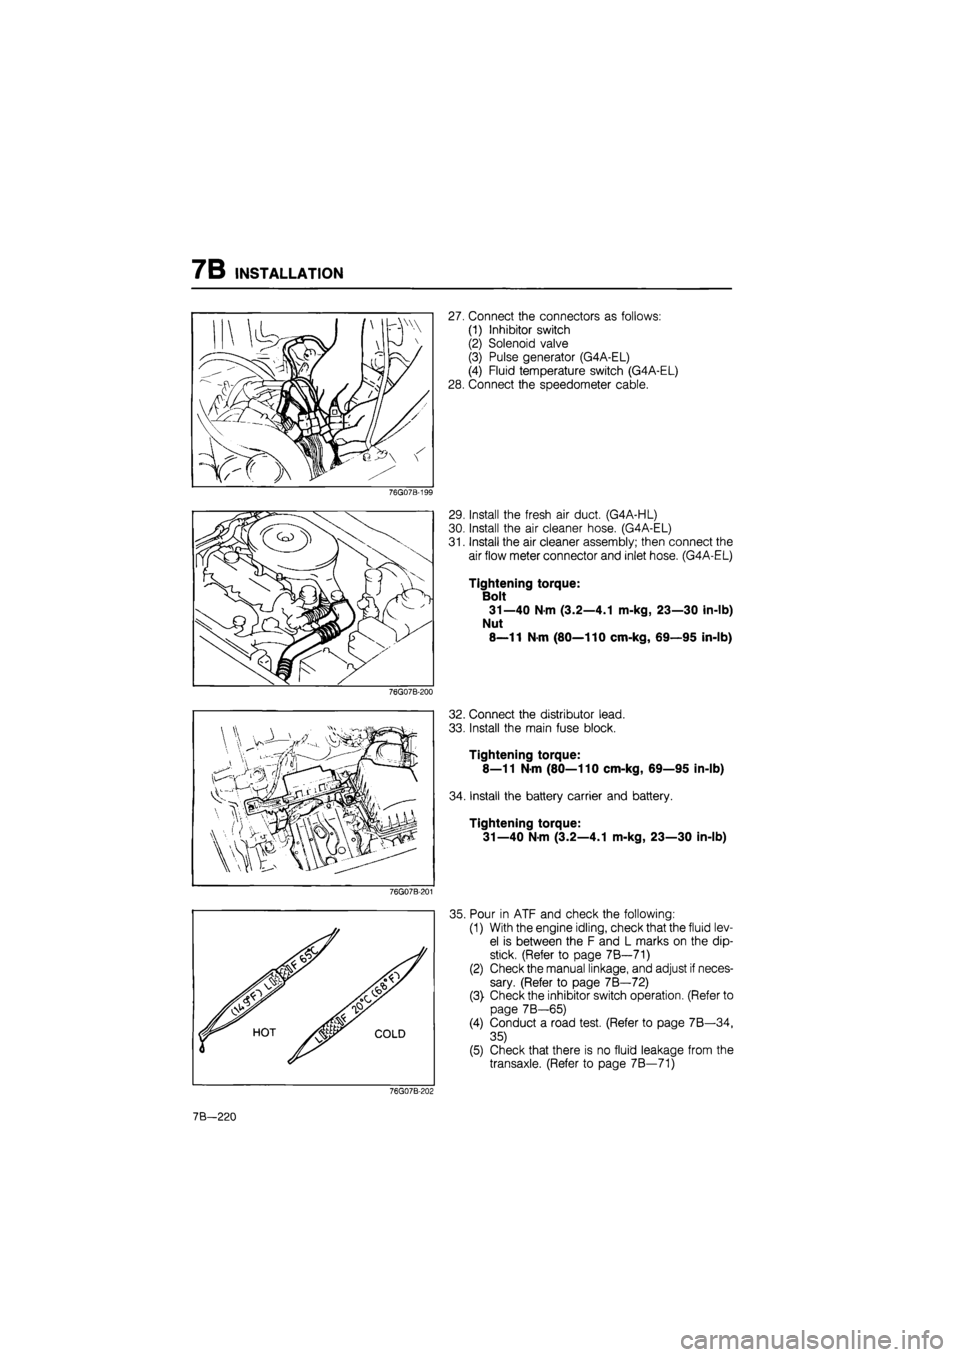
27. Connect the connectors as follows:
(1) Inhibitor switch
(2) Solenoid valve
(3) Pulse generator (G4A-EL)
(4) Fluid temperature switch (G4A-EL)
28. Connect the speedometer cable.
76G07B-199
76G07B-200
76G07B-201
29. Install the fresh air duct. (G4A-HL)
30. Install the air cleaner hose. (G4A-EL)
31. Install the air cleaner assembly; then connect the
air flow meter connector and inlet hose. (G4A-EL)
Tightening torque:
Bolt
31—40 N-m (3.2—4.1 m-kg, 23—30 in-lb)
Nut
8—11 N-m (80—110 cm-kg, 69—95 in-lb)
32. Connect the distributor lead.
33. Install the main fuse block.
Tightening torque:
8—11 N-m (80—110 cm-kg, 69—95 in-lb)
34. Install the battery carrier and battery.
Tightening torque:
31—40 N-m (3.2—4.1 m-kg, 23—30 in-lb)
35. Pour in ATF and check the following:
(1) With the engine idling, check that the fluid lev-
el is between the F and L marks on the dip-
stick. (Refer to page 7B—71)
(2) Check the manual linkage, and adjust if neces-
sary. (Refer to page 7B—72)
(3) Check the inhibitor switch operation. (Refer to
page 7B—65)
(4) Conduct a road test. (Refer to page 7B—34,
35)
(5) Check that there is no fluid leakage from the
transaxle. (Refer to page 7B—71)
76G07B-202
7B—220
Page 1122 of 1865
7C TROUBLESHOOTING
TROUBLESHOOTING
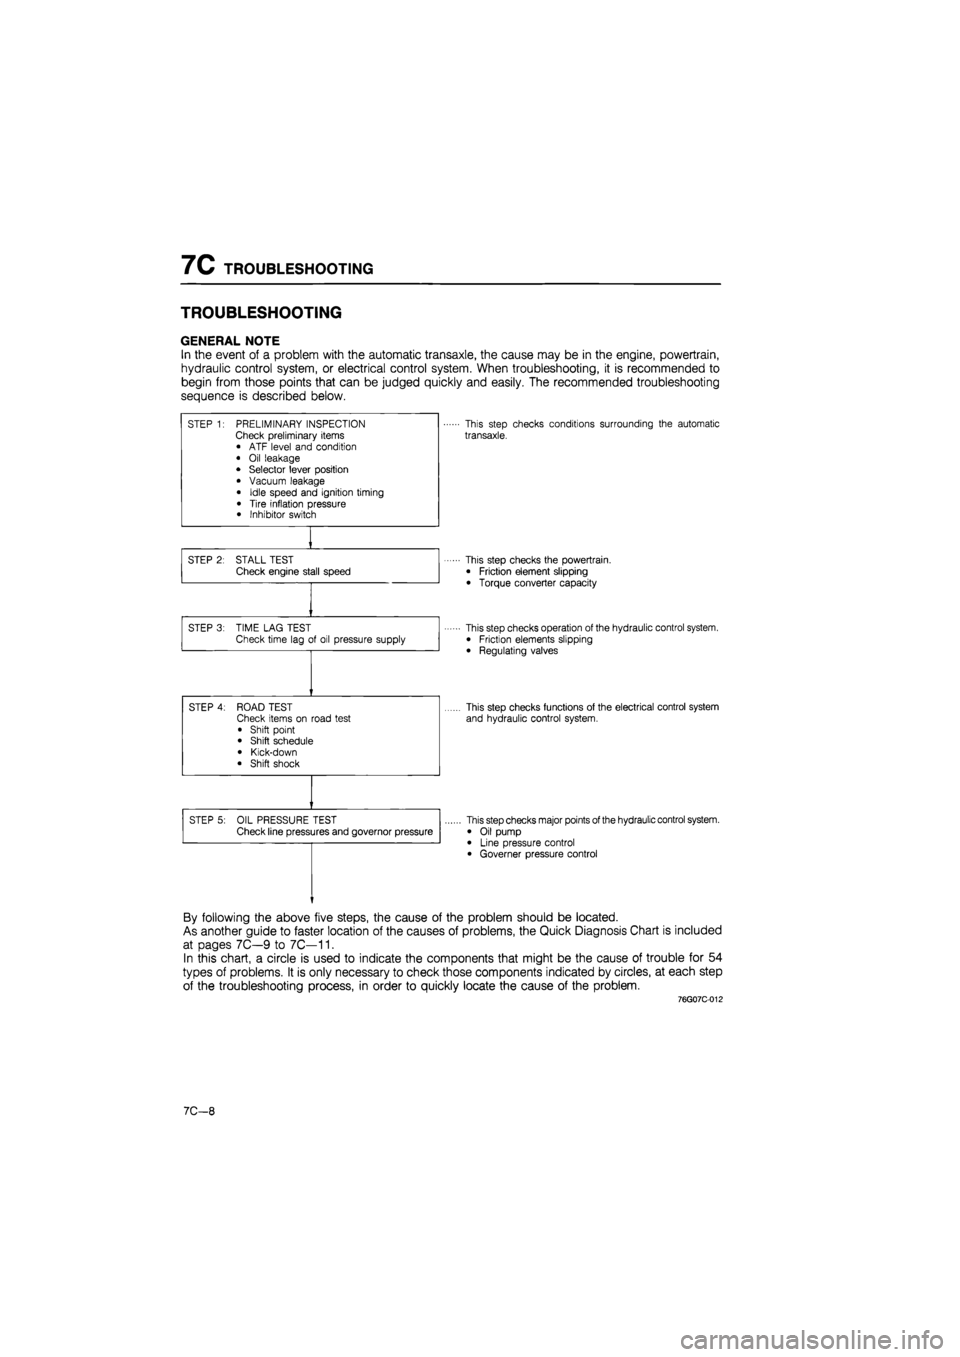
GENERAL NOTE
In the event of a problem with the automatic transaxle, the cause may be in the engine, powertrain,
hydraulic control system, or electrical control system. When troubleshooting, it is recommended to
begin from those points that can be judged quickly and easily. The recommended troubleshooting
sequence is described below.
STEP 1: PRELIMINARY INSPECTION Check preliminary items • ATF level and condition
• Oil leakage • Selector lever position
• Vacuum leakage
• Idle speed and ignition timing
• Tire inflation pressure • Inhibitor switch
This step checks conditions surrounding the automatic
transaxle.
STEP 2: STALL TEST Check engine stall speed This step checks the powertrain.
• Friction element slipping
• Torque converter capacity
STEP 3: TIME LAG TEST Check time lag of oil pressure supply This step checks operation of the hydraulic control system. • Friction elements slipping
• Regulating valves
STEP 4: ROAD TEST Check items on road test
• Shift point • Shift schedule
• Kick-down • Shift shock
This step checks functions of the electrical control system
and hydraulic control system.
STEP 5: OIL PRESSURE TEST Check line pressures and governor pressure This step checks major points of the hydraulic control system.
• Oil pump • Line pressure control • Governer pressure control
By following the above five steps, the cause of the problem should be located.
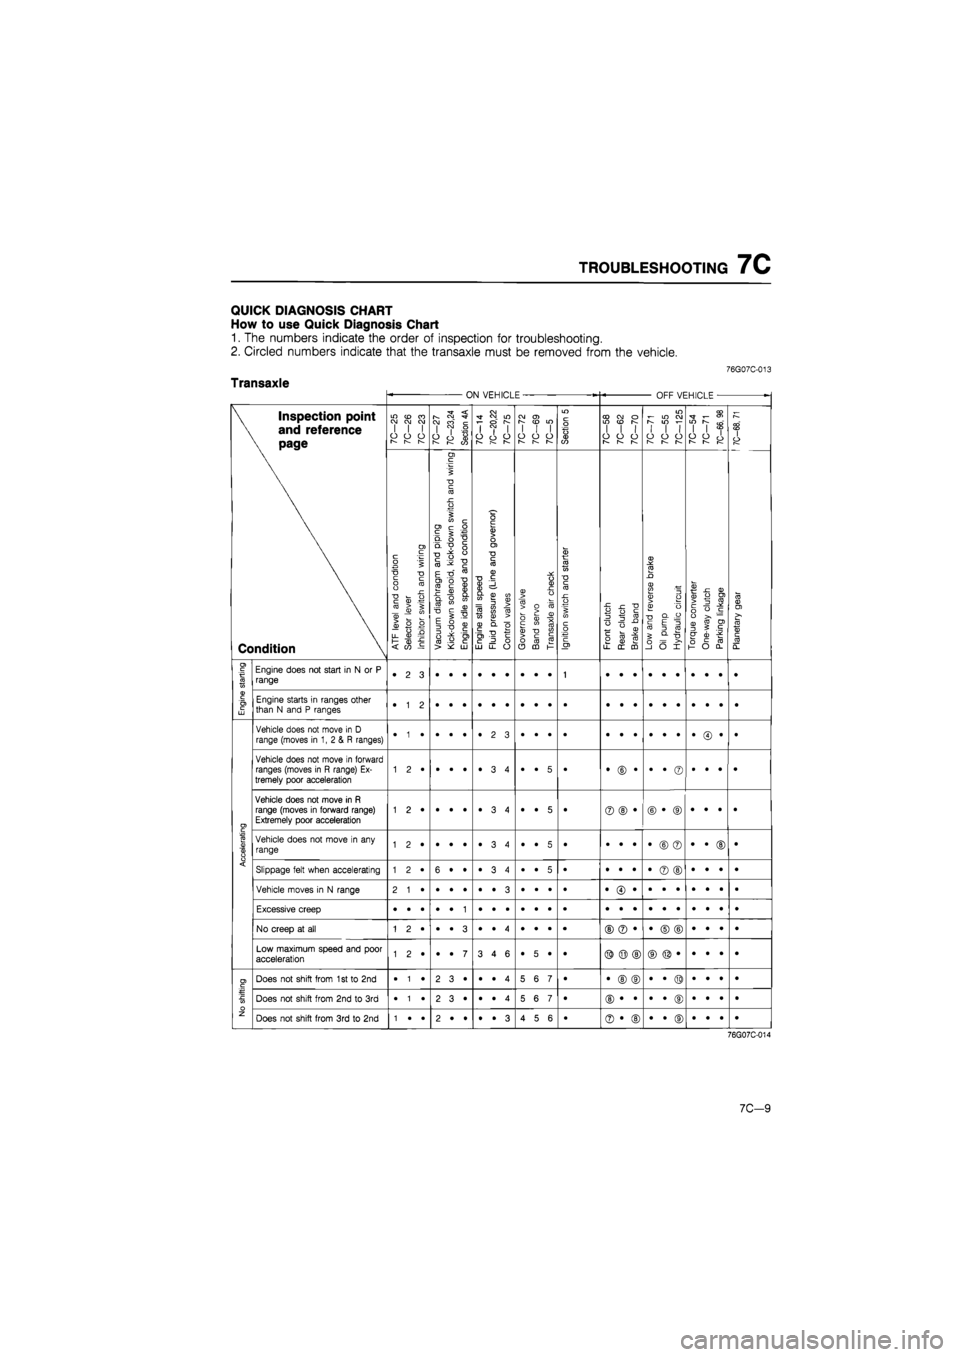
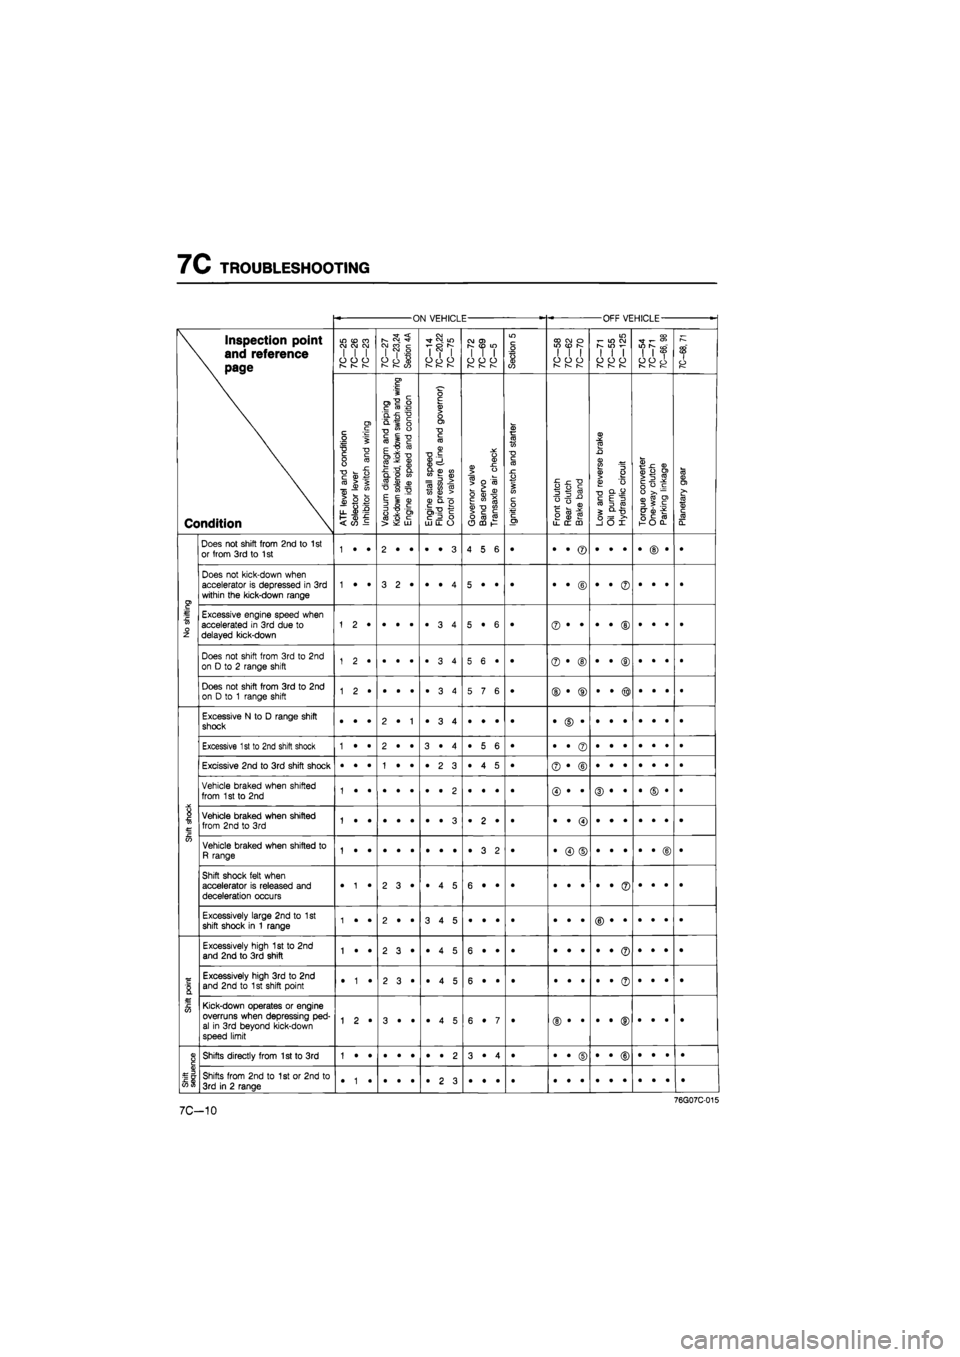
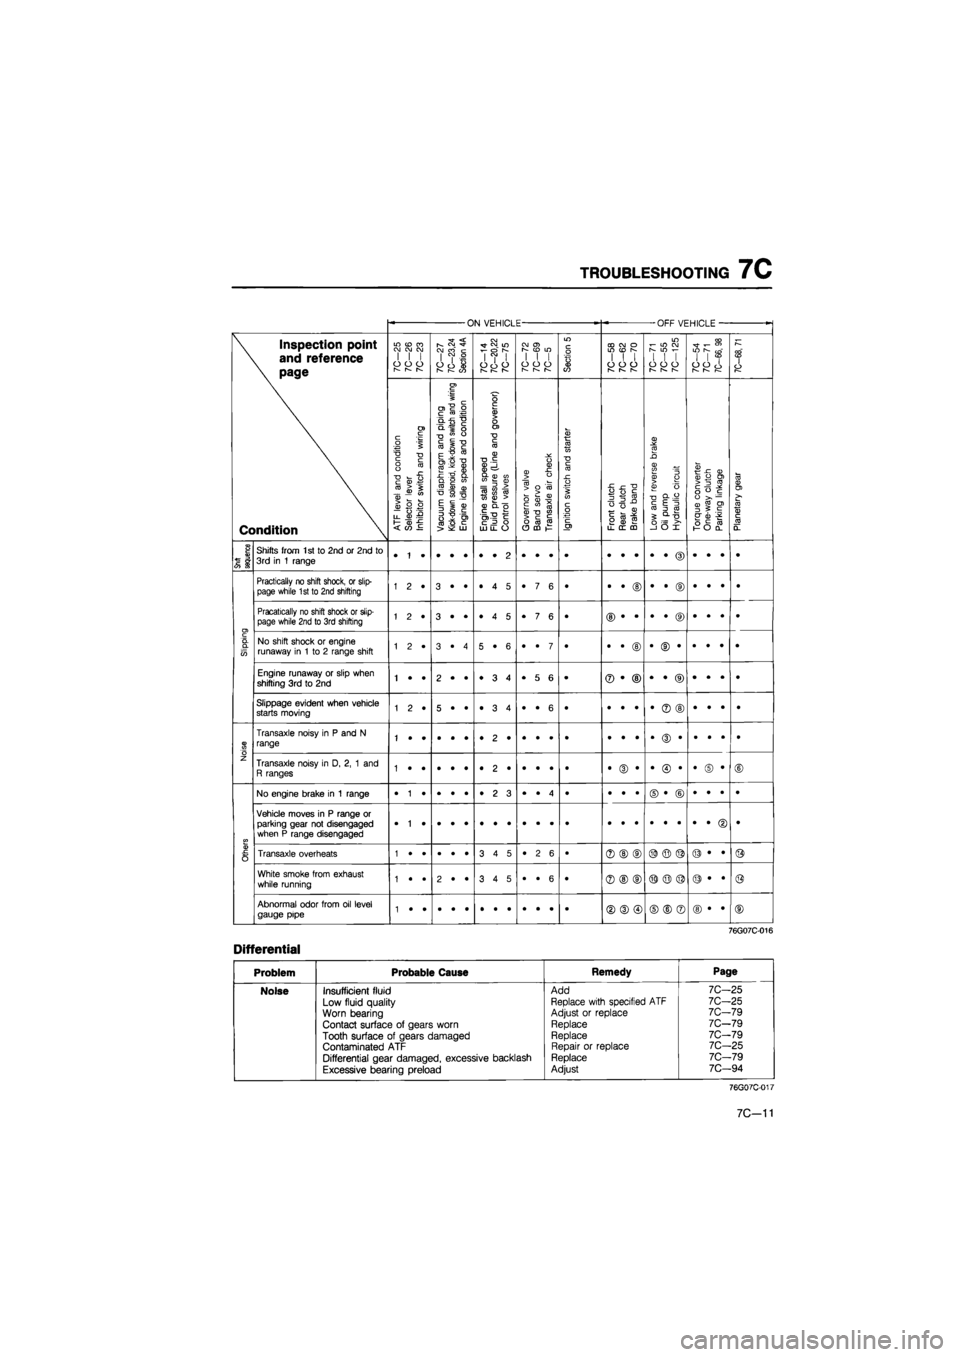
As another guide to faster location of the causes of problems, the Quick Diagnosis Chart is included
at pages 7C—9 to 7C—11.
In this chart, a circle is used to indicate the components that might be the cause of trouble for 54
types of problems. It is only necessary to check those components indicated by circles, at each step
of the troubleshooting process, in order to quickly locate the cause of the problem.
76G07C-012
7C—8
Page 1123 of 1865
TROUBLESHOOTING
7C
QUICK DIAGNOSIS CHART
How
to use
Quick Diagnosis Chart
1.
The
numbers indicate
the
order
of
inspection
for
troubleshooting.
2. Circled numbers indicate that
the
transaxle must
be
removed from
the
vehicle.
76G07C-013
Transaxle ON VEHICLE OFF VEHICLE
•
\ Inspection point
\
and
reference
\ page
Condition
7C-25
7C-26
7C-23
10—21
7C—23,24
Section
4A
7C-14
7C—20,22
10—lb
10-12 10—69
7C—5
Section
5
7C—58
7C-62
7C-70
7C-71
7C-55
7C-125
7C-54 7C-71
7C-66,
98
7C-68,
71
\ Inspection point
\
and
reference
\ page
Condition
ATF
level
and
condition
Selector
lever
Inhibitor
switch
and
wiring
^
Vacuum
diaphragm
and
piping
|
Kick-down
solenoid,
kick-down
switch
and
wiring
Engine
idle
speed
and
condition
Engine
stall
speed
Fluid
pressure
(Line
and
governor)
Control
valves
Governor
valve
Band
servo
Transaxle
air
check
Ignition
switch
and
starter
Front
clutch
Rear
clutch
Brake
band
Low
and
reverse
brake
Oil
pump Hydraulic
circuit
Torque
converter
One-way
clutch
Parking
linkage
Planetary
gear
I
Engine
starting
Engine does
not
start
in
N or P
range •
2 3
1
Engine
starting
Engine starts
in
ranges other than
N
and P
ranges •
1 2
Accelerating
Vehicle does
not
move
in
D
range (moves
in 1, 2 & R
ranges) •
• •
•
Accelerating
Vehicle does
not
move
in
forward ranges (moves
in R
range)
Ex-
tremely poor acceleration •
• 5
• •
© •
•
• ©
•
• •
•
Accelerating
Vehicle does
not
move
in R
range (moves
in
forward range) Extremely poor acceleration 1
2 •
•
• •
•
3 4
•
• 5
• ©
© •
©
• ©
•
• •
•
Accelerating
Vehicle does
not
move
in any
range 1
2 •
•
• •
•
3 4
•
• 5
• •
• •
•
© ©
•
• ©
•
Accelerating Slippage felt when accelerating 1
2 •
6
• •
•ST
CO
•
•
• 5
• •
• •
•
© ©
•
• •
• Accelerating
Vehicle moves
in
N
range
Accelerating
Excessive creep
Accelerating
No creep
at all
©
© •
•
© ©
•
• •
•
Accelerating
Low maximum speed
and
poor acceleration 1
2 •
•
• 7
3
4 6
•
5 •
• ©
© ©
No shifting
Does
not
shift from
1
st to 2nd
•
1 •
2
3 •
•
• 4
5
6 7
• •
© ©
•
• ©
•
• •
•
No shifting
Does
not
shift from
2nd to 3rd
•
1 •
2
3 •
•
• 4
5
6 7
•
No shifting
Does
not
shift from
3rd to 2nd
1
• •
2
• •
•
• 3
4
5 6
• ©
• ©
•
• ©
•
• •
•
76G07C-014
7C-9
Page 1124 of 1865
7C TROUBLESHOOTING
ON VEHICLE OFF VEHICLE
-
\ Inspection point
\ and reference
\ page
Condition
LO
(O
CO CJ OJ CM I
I I
O
O
CJ
r-~
r—
7C-27
7C—23,24
Section
4A
7C—14
7C—20,22
7C-75
CO
O)
I
I I
o
o o
r—
r—
Section
5
CO CO
o
WON I
I I
o
o o
1— 1—
m i-
in co
S
IO
i-
1
1 1
o
o o
—
I—
7C—54
7C-71
7C-66,
98
7C—68,
71
\ Inspection point
\ and reference
\ page
Condition
A.TF
level
and
condition
Selector
lever
Inhibitor
switch
and
wiring
Vacuum
diaphragm
and
piping
Kick-down
solenoid,
kick-down
switch
and
wiring
Engine
idle
speed
and
condition
Engine
stall
speed
Fluid
pressure
(Line
and
governor)
Control
valves
Governor
valve
Band
servo
Transaxle
air
check
Ignition
switch
and
starter
Front
clutch
Rear
clutch
Brake
band
Low
and
reverse
brake
Oil pump Hydraulic
circuit
Torque
converter
One-way
clutch
Parking
linkage
Planetary
gear
No
shifting
Does
not
shift from 2nd
to
1
st or from
3rd to
1
st 1
• •
2
• •
•
• 3
4
5 6
•
No
shifting
Does
not
kick-down when accelerator
is
depressed
in 3rd
within
the
kick-down range 1
• •
3
2*
•
• 4
5
• •
• •
• ©
•
• ©
•
• •
•
No
shifting
Excessive engine speed when accelerated
in 3rd
due
to
delayed kick-down 5
• 6
• ©
• •
•
• ©
•
• •
• No
shifting
Does
not
shift from
3rd to 2nd
on
D to
2
range shift 1
2 •
5
6 •
• ©
• ®
•
• ®
•
• •
•
No
shifting
Does
not
shift from
3rd to 2nd
on
D to 1
range shift 5
7 6
• ©
• ®
•
• ®
•
• •
•
Shift
shock
Excessive
N to
D
range shift shock •
• •
2
• 1
•
3 4
•
• •
• •
© •
•
• •
•
• •
•
Shift
shock
Excessive
1
st
to
2nd shift shock 1
• •
2
• •
3
• 4
•
5 6
• •
• ©
•
• •
•
• •
•
Shift
shock
Excissive 2nd
to 3rd
shift shock •
• •
1
• •
•
2 3
•
4 5
• ©
• ©
Shift
shock
Vehicle braked when shifted from
1
st
to 2nd
Shift
shock
Vehicle braked when shifted from 2nd
to 3rd
1
• •
•
• •
•
• 3
.
2 •
•
Shift
shock
Vehicle braked when shifted
to
R range 1
• •
•
• •
•
• •
•
3 2
• •
© ©
•
• •
•
• ©
•
Shift
shock
Shift shock felt when accelerator
is
released
and
deceleration occurs •
1 •
2
3*
•
4 5
6
• •
• •
• •
•
• ©
•
• *
•
Shift
shock
Excessively large 2nd
to 1st
shift shock
in 1
range 1
• •
2
• •
3
4 5
•
• •
•
Shift
point
Excessively high
1st to 2nd
and 2nd
to
3rd shift 1
• •
2
3 •
•
4 5
6
• •
•
Shift
point
Excessively high
3rd to 2nd
and
2nd to
1
st shift point •
1 •
2
3 •
•
4 5
6
• •
• •
• •
•
• ©
•
• •
•
Shift
point
Kick-down operates
or
engine overruns when depressing
ped-
al
in 3rd
beyond kick-down speed limit
1
2 •
3
• •
•
4 5
6
• 7
•
Shift
sequence
Shifts directly from 1st
to 3rd
1
• •
•
• •
•
• 2
3
• 4
• •
• ©
•
• ©
•
• •
•
Shift
sequence
Shifts from
2nd to 1st or
2nd
to
3rd
in
2
range •
1 •
•
• •
•
2 3
•
• •
•
7C-10
Page 1125 of 1865
TROUBLESHOOTING
7C
ON VEHICLE -OFF VEHICLE
-
\ Inspection point
\
and
reference
\ page
Condition
in cd
ra
CM CM CM
I
I I
o
o o
I—
r~—
r—
7C—27
7C—23,24
Section
4A
7C—14
7C—20,22
7C-75
CM
0>
[—
CO
LO I
I I
O
O O
r^ r—
Section
5
CD CM
O
in (D
s
I
I I
o
o o
r—
r^
w
CM
r-
m f-
I
I I
o
o o
r-— I—
r-—
7C—54
7C-71
7C—66,
98
7C-68,
71 \ Inspection point
\
and
reference
\ page
Condition
ATR
level
and
condition
Selector
lever
Inhibitor
switch
and
wiring
Vacuum
diaphragm
and
piping
Kick-down
solenoid,
kick-down
switch
and
wiring
Engine
idle
speed
and
condition
Engine
stall
speed
Fluid
pressure
(Line
and
governor)
Control
valves
Governor
valve
Band
servo
Transaxle
air
check
Ignition
switch
and
starter
Front
clutch
Rear
clutch
Brake
band
Low
and
reverse
brake
Oil
pump
Hydraulic
circuit
Torque
converter
One-way
clutch
Parking
linkage
Planetary
gear
Snift
sequence
Shifts from
1st to
2nd
or
2nd
to
3rd
in 1
range
Slipping
Practically
no
shift shock,
or
slip-page while 1st
to
2nd shifting 1
2 •
3
• •
•
4 5
•
7 6
• •
• ©
•
• ©
•
• •
•
Slipping
Pracatically
no
shift shock
or
slip-page while 2nd
to
3rd shifting 1
2 •
3
• •
•
4 5
•
7 6
•
Slipping
No shift shock
or
engine runaway
in 1 to 2
range shift 1
2 •
3
• 4
5
• 6
•
• 7
• •
• ©
•
© •
•
• •
•
Slipping
Engine runaway
or
slip when shifting
3rd to 2nd
1
• •
2
• •
•
3 4
•
5 6
• ®
• ©
•
• ®
•
• •
•
Slipping
Slippage evident when vehicle starts moving 1
2 •
5
• •
•
3 4
•
• 6
• •
• •
•
® ©
•
• •
•
Noise
Transaxle noisy
in P and N
range
Noise
Transaxle noisy
in D, 2, 1 and
R ranges •
(D •
•
© •
•
© •
©
Others
No engine brake
in 1
range •
1 •
•
• •
•
2 3
•
• 4
• •
• •
©
• ©
•
• •
•
Others
Vehicle moves
in P
range
or
parking gear
not
disengaged when
P
range disengaged
•
Others
Transaxle overheats 3
4 5
•
2 6
• ®
©
(D ©
© ©
©
• •
©
Others
White smoke from exhaust while running 1
• •
2
• •
3
4 5
•
• 6
• ®
© ©
©
© ©
©
• •
@
Others
Abnormal odor from
oil
level gauge pipe ©
® ©
©
© ®
©
• •
©
76G07C-016
Differential
Problem Probable Cause Remedy Page
Noise Insufficient fluid Add 7C—25
Low fluid quality Replace with specified
ATF
7C-25
Worn bearing Adjust
or
replace 7C-79
Contact surface
of
gears worn Replace 7C-79
Tooth surface
of
gears damaged Replace 7C-79
Contaminated
ATF
Repair
or
replace 7C-25
Differential gear damaged, excessive backlash Replace 7C-79
Excessive bearing preload Adjust 7C—94
76G07C-017
7C—11
Page 1128 of 1865

7C TROUBLESHOOTING
STEP 2 (STALL TEST)
This step is performed to determine if there is slippage of the friction elements or malfunction of the
hydraulic components.
Preparation
Check the following items prior to testing:
1. Engine coolant, engine oil and ATF levels.
2. Warm the engine thoroughly to raise the ATF temperature to operating level (50—80°C, 122—176°F).
3. Set the parking brake and block the front and rear of the wheels.
Pull the parking brake Water temperature
ATF
7C—14
76G07C-024
Page 1131 of 1865

TROUBLESHOOTING 7C
STEP 3 (TIME LAG TEST)
When the selector lever is shifted while the engine is idling, there is a certain time lapse, or time lag,
before shock is felt. This time lag test checks the condition of the front, rear, and one-way clutch, low
and reverse brake, and orifice check valve.
Preparation
Follow the test preparation procedure shown in STEP 2 (STALL TEST).
Procedure
1. Start the engine and verify that the idle speed is 950tso rpm.
2. Shift from N range to D range
3. Measure the time it takes from shifting until shock is felt with a stop watch.
4. Shift the selector to N range and run the engine at idle for one minute or more.
5. Perform the test for N range to R range in the same manner.
Note
Make three measurements for each test and take the average value.
Specified time lag: N D range 0.5—1.0 second
N R range 0.5—1.0 second
Evaluation
Condition Possible Cause
N -» D shift More than specification
Insufficient line pressure
N -» D shift More than specification Rear clutch slipping N -» D shift More than specification
One-way clutch slipping N -» D shift
Less than specification N-D accumulator not operating properly
N-R shift
More than specification
Insufficient line pressure
N-R shift
More than specification Low and reverse brake slipping
N-R shift
More than specification
Front clutch slipping N-R shift
Less than specification Stuck orifice check valve
N-R shift
Less than specification Excessive line pressure
76G07C-027
7C-17
Page 1132 of 1865

7C TROUBLESHOOTING
STEP 4 (ROAD TEST)
This step is performed to check for problems in the various ranges. If these tests show any problems,
adjust or replace by referring to the QUICK DIAGNOSIS CHART and mechanical sections.
Caution
Perform the test at normal ATF operating temperature (50—80°C, 122—176°F).
Gearshift Function Check Items
1. Shift shock must be minimal, and shifting must be smooth.
2. Engine speed must not run away, and the shifting must not be delayed.
3. Transaxle must shift through Di D2 -»• D3 in D range.
4. Transaxle must shift from 3rd in D range to 2nd gear when 2 range is selected.
5. Transaxle must shift from 2nd to 1st when 1 range is selected from 3rd gear in D range.
6. Transaxle must not upshift in 1 range.
7. Transaxle must remain in 2nd gear in 2 range.
8. Transaxle must positively lock in P range.
The transaxle must positively lock when P range is selected while moving at a speed below 4 km/h
(2.5 mph) on level ground. The transaxle must positively lock when set in P range with the vehicle
on a gentle slope and the brakes disengaged.
Shift Speed
Throttle condition
(manifold vacuum) Hange Shift Vehicle speed km/h (mph) Throttle condition
(manifold vacuum) Hange Shift FE engine F6 engine
Fully opened 0—100 mmHg (0-3.94 inHg)
D
1st - 2nd 47—57 (29—35) 44-54 (27-33)
Fully opened 0—100 mmHg (0-3.94 inHg)
D 2nd - 3rd 106-119 (66—74) 95-108 (59-67) Fully opened 0—100 mmHg (0-3.94 inHg)
D 3rd - 2nd 95-103 (59-64) 86-94 (53-58)
Fully opened 0—100 mmHg (0-3.94 inHg)
D
2nd - 1st 35-39 (22-24) 34-38 (21-24)
Half-throttle 130 mmHg (5.12 inHg) D 1st - 2nd 18-31 (11-19) 18-31 (11-19) Half-throttle 130 mmHg (5.12 inHg) D 2nd -»• 3rd 39-68 (24—42) 44-73 (27-45)
Fully closed D 2nd - 1st 10-15 (6-9) 10-15 (6-9) Fully closed 1 2nd - 1st 32—39 (20-24) 33-40 (20-25)
1. Full-throttle: The throttle opening during kick-down when the manifold vacuum is between 0—100
mmHg (0—3.94 inHg)
2. Half-throttle: The throttle opening at manifold vacuum of 130 mmHg (5.12 inHg) 76G07C-028
7C-18