MAZDA MODEL CX-9 2015 Navigation Manual (in English)
Manufacturer: MAZDA, Model Year: 2015, Model line: MODEL CX-9, Model: MAZDA MODEL CX-9 2015Pages: 48, PDF Size: 3.74 MB
Page 11 of 48
11
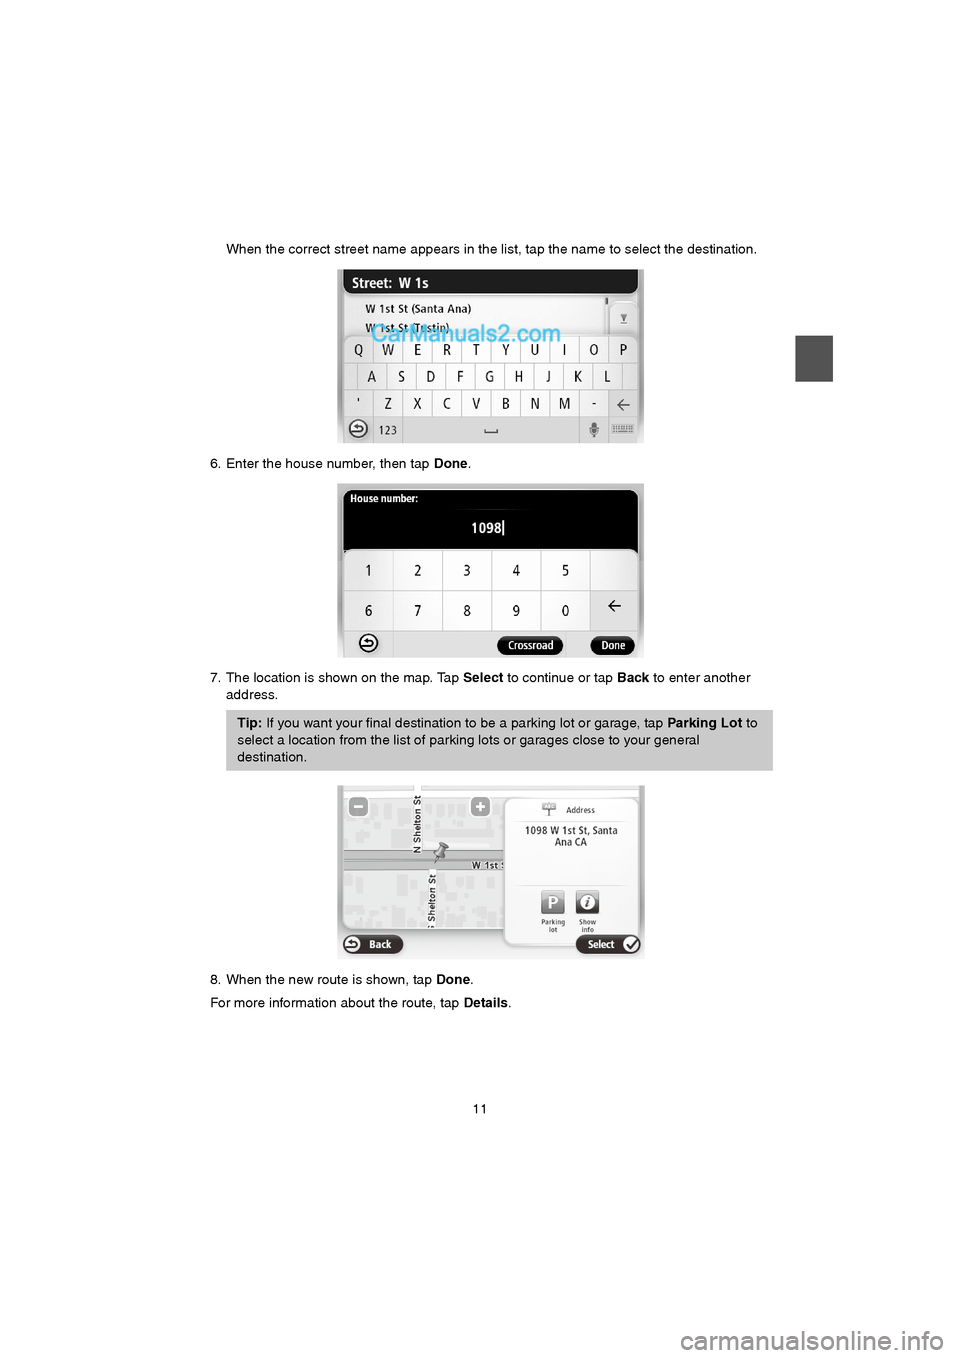
When the correct street name appears in the list, tap the name to select the destination.
6. Enter the house number, then tap Done.
7. The location is shown on the map. Tap Select to continue or tap Back to enter another
address.
8. When the new route is shown, tap Done.
For more information about the route, tap Details.
Tip: If you want your final destination to be a parking lot or garage, tap Parking Lot to
select a location from the list of parking lots or garages close to your general
destination.
USA_NAVI_EN.book 11 ページ 2014年5月8日 木曜日 午後12時51分
Page 12 of 48
12
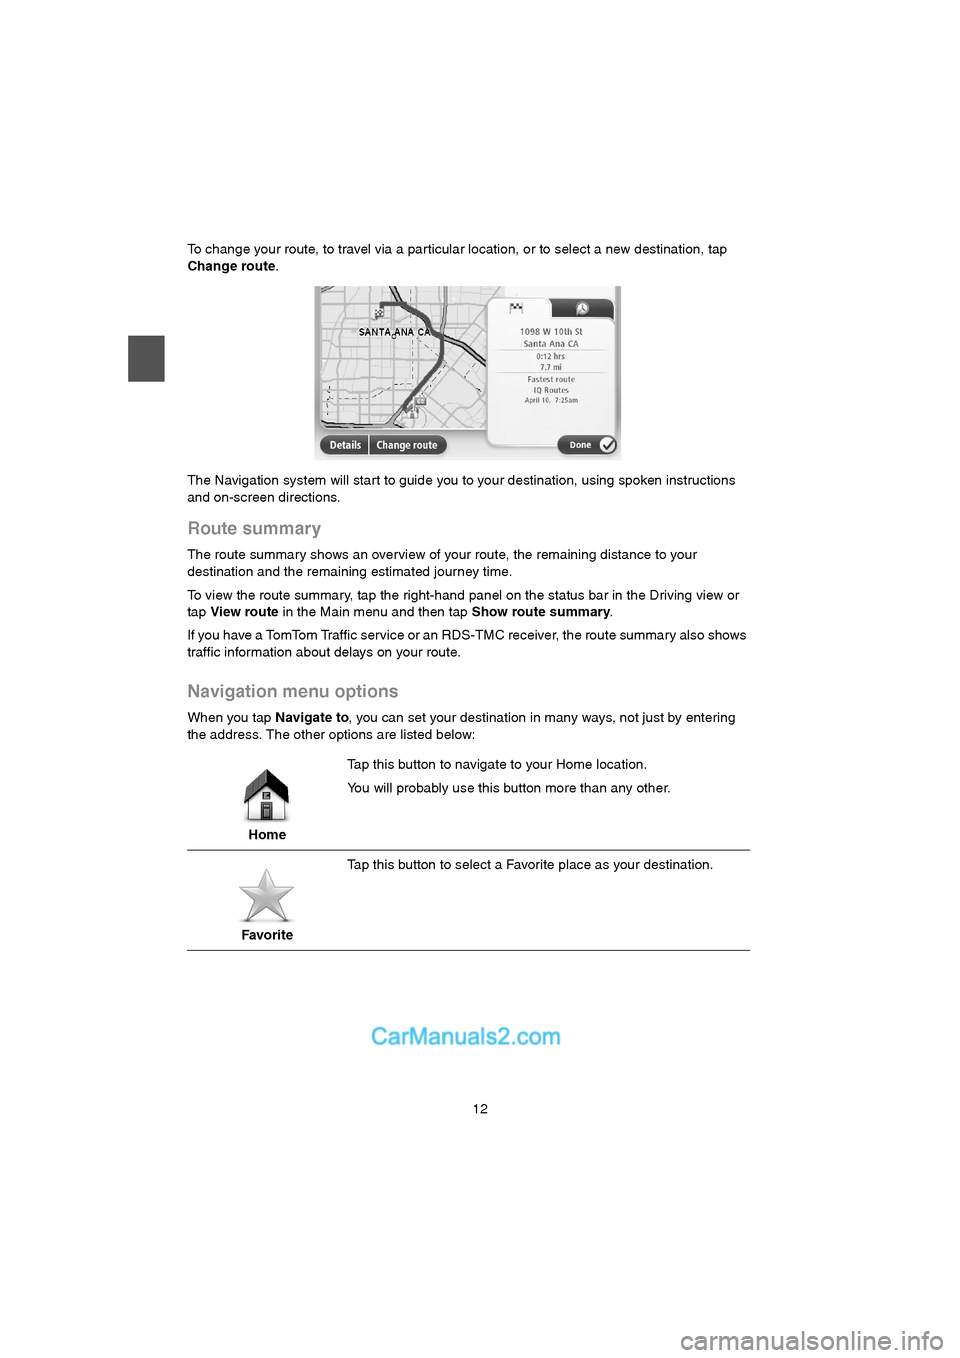
To change your route, to travel via a par ticular location, or to select a new destination, tap
Change route.
The Navigation system will start to guide you to your destination, using spoken instructions
and on-screen directions.
Route summary
The route summary shows an overview of your route, the remaining distance to your
destination and the remaining estimated journey time.
To view the route summary, tap the right-hand panel on the status bar in the Driving view or
tap View route in the Main menu and then tap Show route summary.
If you have a TomTom Traffic service or an RDS-TMC receiver, the route summary also shows
traffic information about delays on your route.
Navigation menu options
When you tap Navigate to, you can set your destination in many ways, not just by entering
the address. The other options are listed below:
HomeTap this button to navigate to your Home location.
You will probably use this button more than any other.
FavoriteTap this button to select a Favorite place as your destination.
USA_NAVI_EN.book 12 ページ 2014年5月8日 木曜日 午後12時51分
Page 13 of 48
13
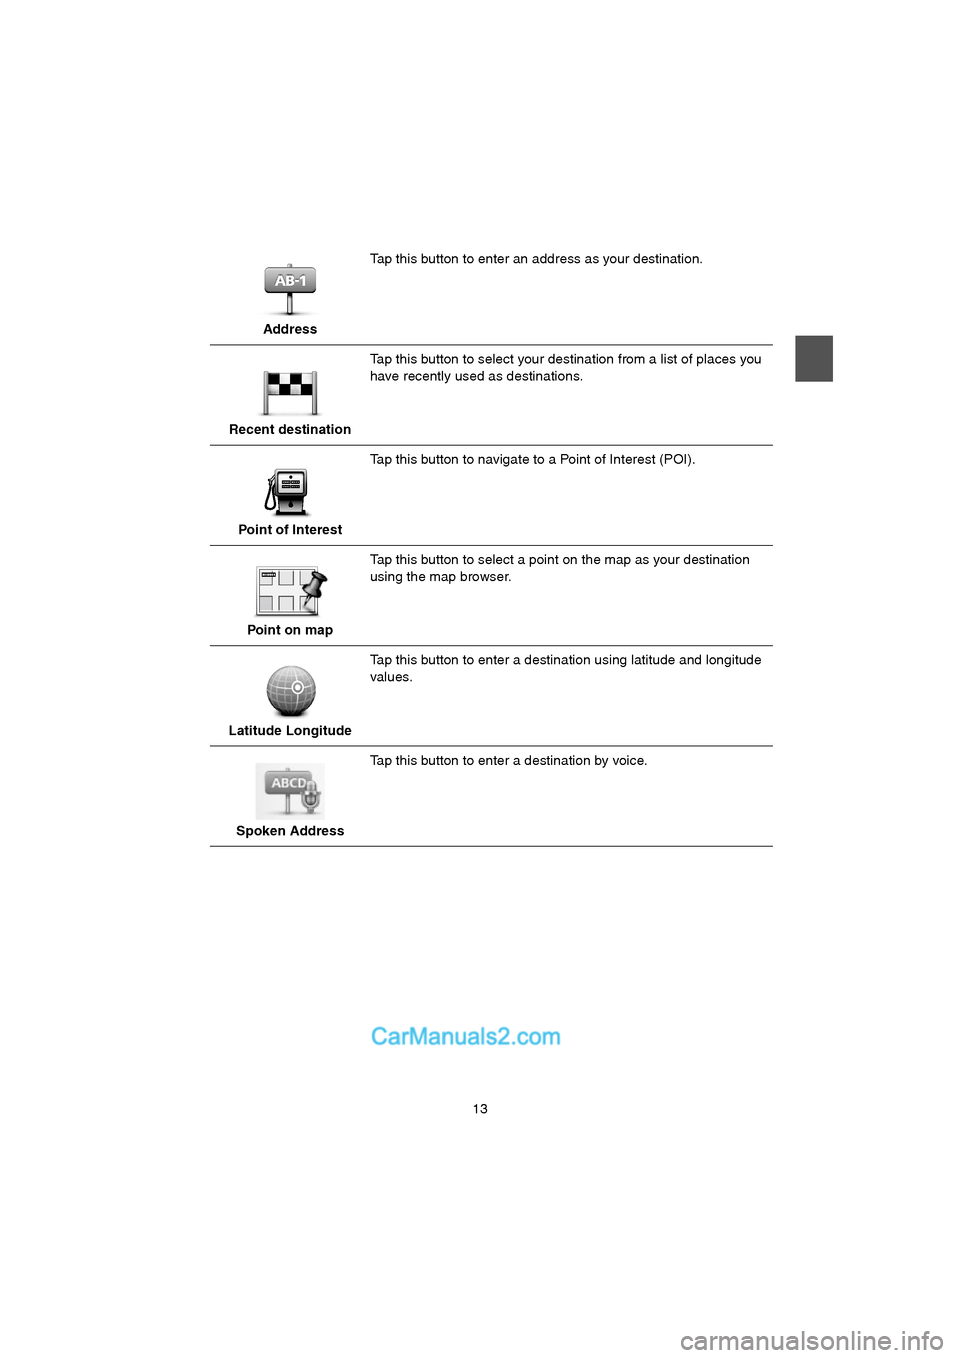
AddressTap this button to enter an address as your destination.
Recent destinationTap this button to select your destination from a list of places you
have recently used as destinations.
Point of InterestTap this button to navigate to a Point of Interest (POI).
Point on mapTap this button to select a point on the map as your destination
using the map browser.
Latitude LongitudeTap this button to enter a destination using latitude and longitude
values.
Spoken AddressTap this button to enter a destination by voice.
USA_NAVI_EN.book 13 ページ 2014年5月8日 木曜日 午後12時51分
Page 14 of 48
14
Voice control
Voice control
Instead of tapping the screen to control the Navigation system, you can use voice to control it.
For example, to increase the volume on the Navigation system, say, "Increase volume" or
"Volume 50%".
To view the list of available commands, tap Help in the Main menu, then tap Product
manuals and then tap What can I say.
A User's Guide is also available from TomTom which can be downloaded online.
Important: Voice control requires a computer voice. When there are no computer voices
installed on the Navigation system, this feature is not available.
To select a computer voice, tap Vo i c e s in the Settings menu, then tap Change voice and
select a computer voice.
USA_NAVI_EN.book 14 ページ 2014年5月8日 木曜日 午後12時51分
Page 15 of 48
15
Using voice control
Voice control is turned on by default if it is suppor ted by the chosen language.
The following example shows how to use voice control to plan a journey to your Home
address:
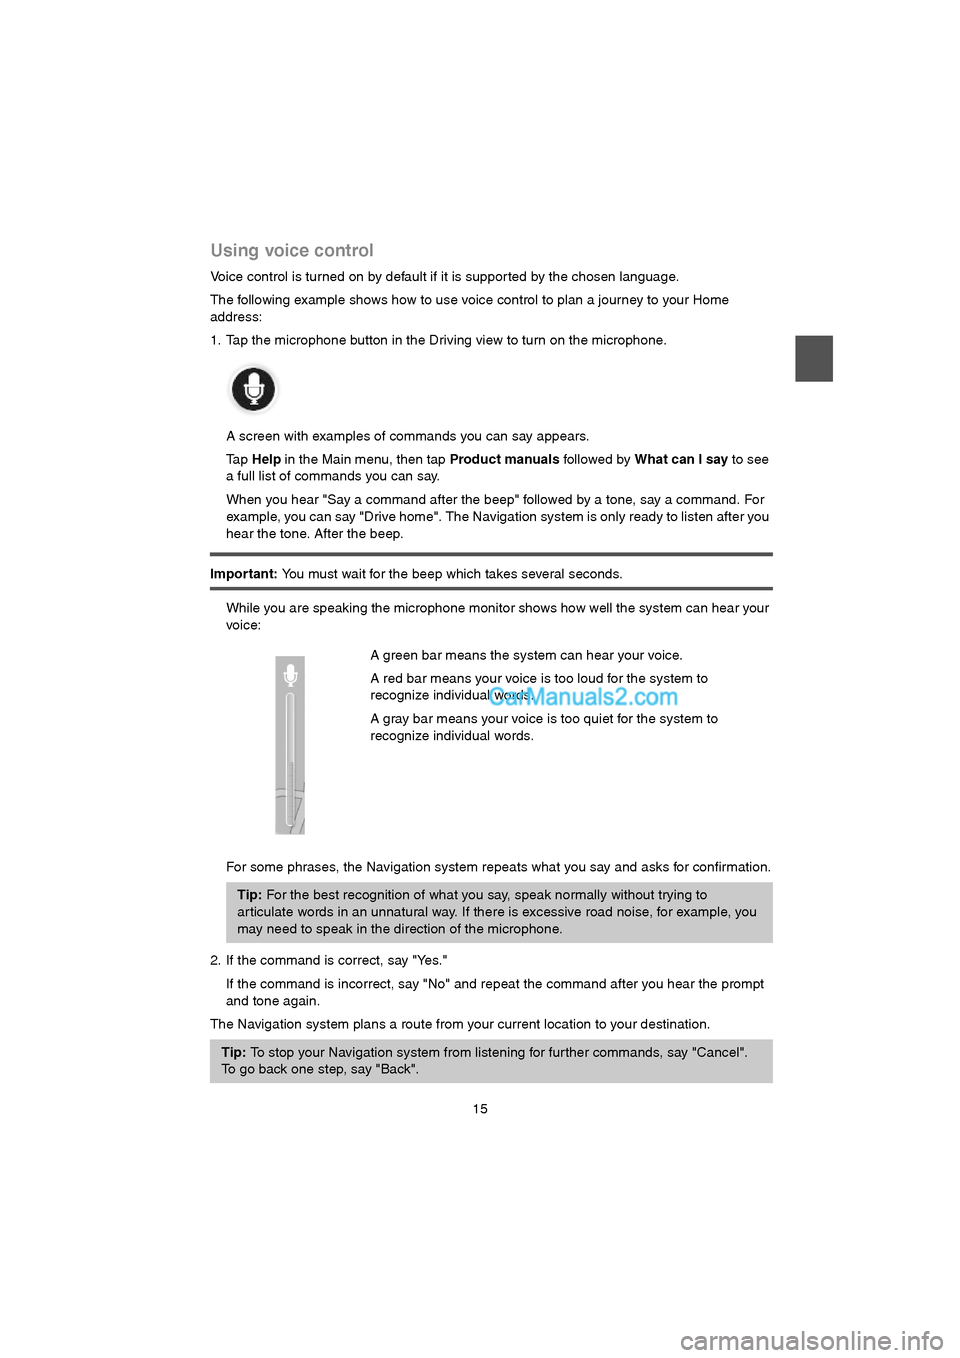
1. Tap the microphone button in the Driving view to turn on the microphone.
A screen with examples of commands you can say appears.
Tap Help in the Main menu, then tap Product manuals followed by What can I say to see
a full list of commands you can say.
When you hear "Say a command after the beep" followed by a tone, say a command. For
example, you can say "Drive home". The Navigation system is only ready to listen after you
hear the tone. After the beep.
Important: You must wait for the beep which takes several seconds.
While you are speaking the microphone monitor shows how well the system can hear your
voice:
For some phrases, the Navigation system repeats what you say and asks for confirmation.
2. If the command is correct, say "Yes."
If the command is incorrect, say "No" and repeat the command after you hear the prompt
and tone again.
The Navigation system plans a route from your current location to your destination.A green bar means the system can hear your voice.
A red bar means your voice is too loud for the system to
recognize individual words.
A gray bar means your voice is too quiet for the system to
recognize individual words.
Tip: For the best recognition of what you say, speak normally without trying to
ar ticulate words in an unnatural way. If there is excessive road noise, for example, you
may need to speak in the direction of the microphone.
Tip: To stop your Navigation system from listening for fur ther commands, say "Cancel".
To go back one step, say "Back".
USA_NAVI_EN.book 15 ページ 2014年5月8日 木曜日 午後12時51分
Page 16 of 48
16
Planning a journey using your voice
You can navigate to any of the following types of places using your voice:
An address, including home.
Cities and towns and their centers.
POI categories.
POIs for named brands. (for example, restaurants, gas stations, car rental and gyms.)
A recent destination.
To plan a route to an address using speech, do the following:
1. Tap the voice control button in the Driving view.
2. When you hear the tone, you can say, for example "Drive to an address".
3. Say the full address for your destination (for example, 112 James Street, Los Angeles, CA).
Numbers can be pronounced naturally or one at a time. For example, 357 can be
pronounced as "Three fifty seven" or "Three, five, seven".
The Navigation system tells you what it heard.
4. Say "Yes" if the address is correct. If shown a list of addresses, say the list number for the
correct address or say "none of these".
If par t of the address is incorrect, you can say something like "change the number",
"change the street", "change the city" or "change the state" to correct the incorrect par t.
To begin again, say "start over".
The Navigation system starts to guide you to your destination, using spoken instructions and
onscreen directions.
Note: It's not possible to plan a route using your voice for all maps in all countries, or in all
languages.
Tip: The Navigation system has Navigate to on the button in the Main Menu. When
planning a route to an address using speech, say "Navigate to address" if the button
shows Navigate to.
Tips: You can also use your voice to search for the nearest Point of interest (POI)
category by saying something like "Drive to the nearest doctor".
To select a Recent destination or a Favorite, say "Drive to a recent destination" or "Drive
to a Favorite".
USA_NAVI_EN.book 16 ページ 2014年5月8日 木曜日 午後12時51分
Page 17 of 48
17
The Driving View
About the Driving View
When the Navigation system star ts for the first time, you are shown the Driving View along
with detailed information about your current position.
Tap the center of the screen at any time to open the Main Menu.
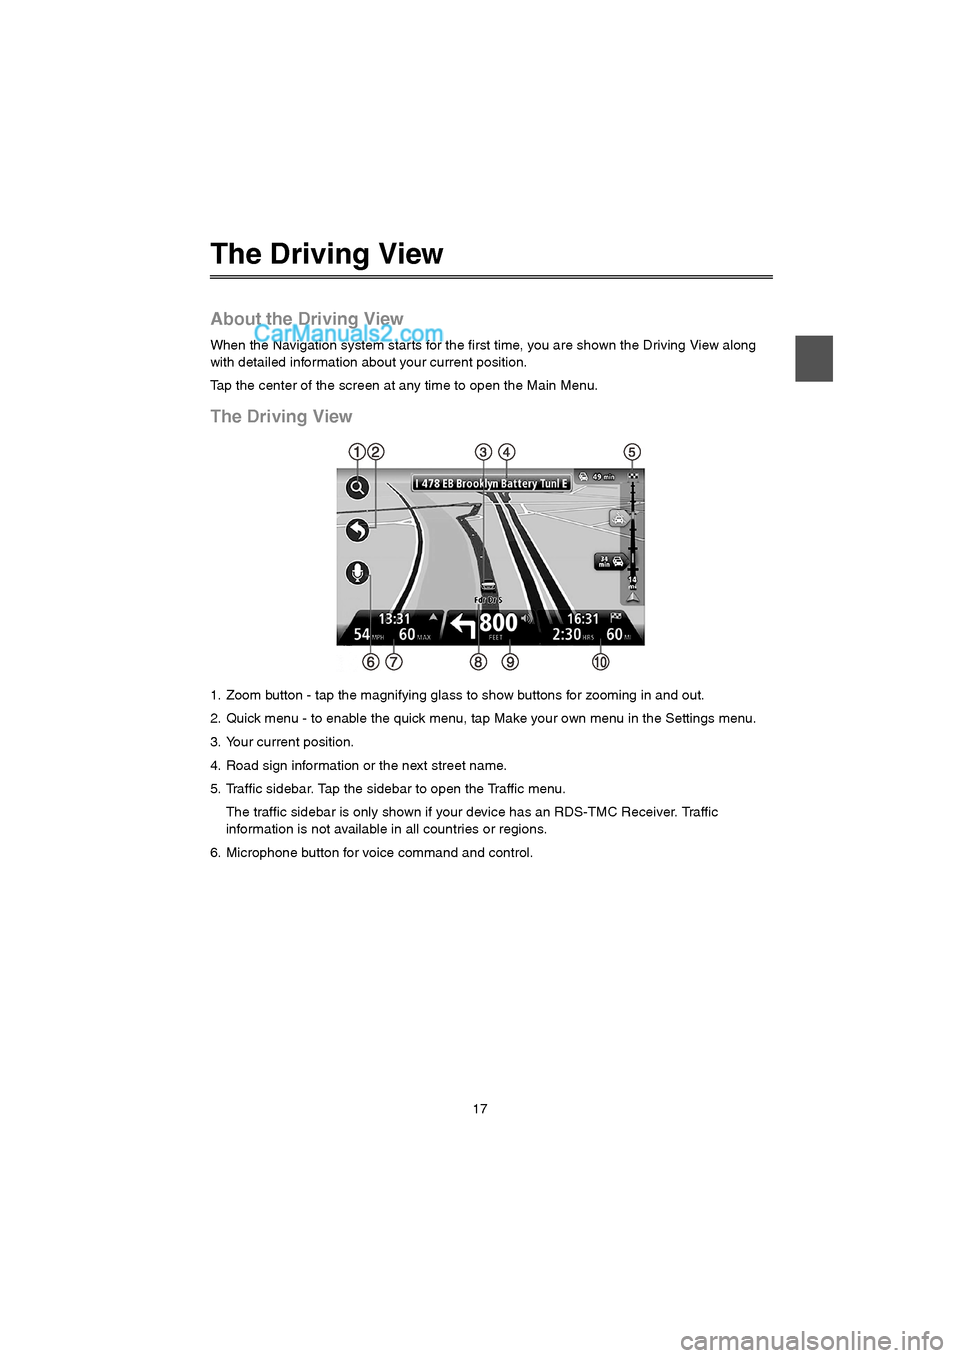
The Driving View
1. Zoom button - tap the magnifying glass to show buttons for zooming in and out.
2. Quick menu - to enable the quick menu, tap Make your own menu in the Settings menu.
3. Your current position.
4. Road sign information or the next street name.
5. Traffic sidebar. Tap the sidebar to open the Traffic menu.
The traffic sidebar is only shown if your device has an RDS-TMC Receiver. Traffic
information is not available in all countries or regions.
6. Microphone button for voice command and control.
USA_NAVI_EN.book 17 ページ 2014年5月8日 木曜日 午後12時51分
Page 18 of 48
18
7. The time, your current speed and the speed limit, if known.
Tap this part of the status bar to switch between a 3D map and a 2D map.
8. The name of the street you are on.
9. Navigation instruction for the road ahead and the distance to the next instruction. If the
second instruction is less that 150m after the first instruction, you see it shown immediately
instead of the distance.
Tap this par t of the status bar to repeat the last voice instruction and to change the volume.
You can also tap here to mute the sound.
10.The remaining trip time, the remaining distance and your estimated arrival time.
Tap this part of the status bar to open the Route Summary screen.
Driving View Symbols
Sound muted - this symbol is shown when the sound has been
muted.
To turn the sound back on, tap the middle panel in the status bar.
USA_NAVI_EN.book 18 ページ 2014年5月8日 木曜日 午後12時51分
Page 19 of 48
19
View map
About viewing the map
You can view the map in the same way as you might look at a traditional paper map. The map
shows your current location and many other locations such as Favorites and POIs.
To view the map in this way, tap View map or View route in the Main menu.
You view different locations on the map by moving the map across the screen. To move the
map, touch the screen and drag your finger across the screen.
To select a location on the map, tap the location on the map. The cursor highlights the
location and displays useful information about the location in an information panel. Tap the
information panel to create a Favorite or plan a route to that location.
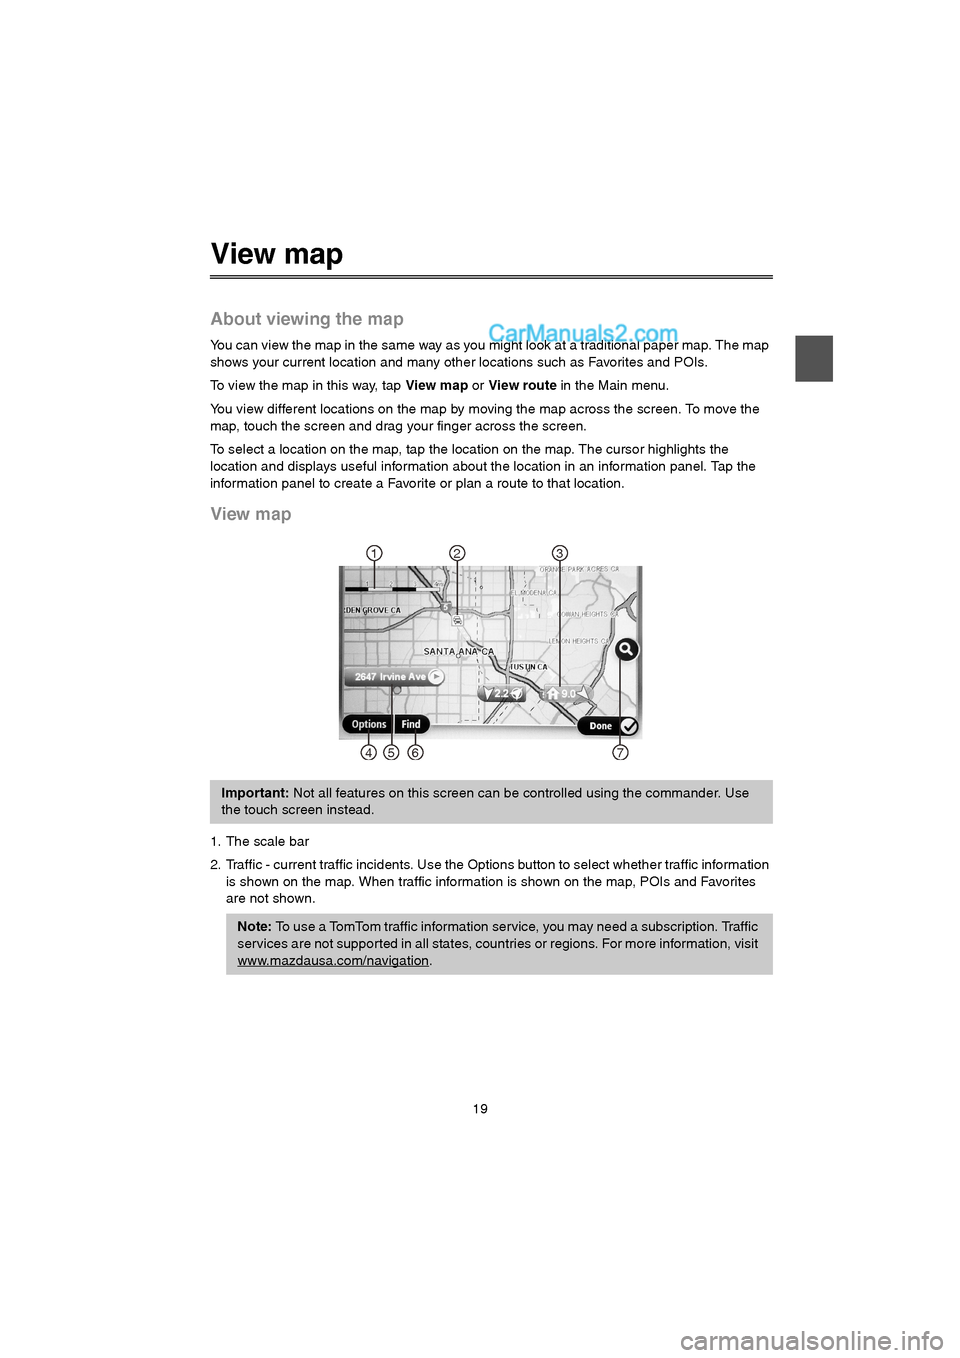
View map
1. The scale bar
2. Traffic - current traffic incidents. Use the Options button to select whether traffic information
is shown on the map. When traffic information is shown on the map, POIs and Favorites
are not shown.
Important: Not all features on this screen can be controlled using the commander. Use
the touch screen instead.
Note: To use a TomTom traffic information service, you may need a subscription. Traffic
services are not supported in all states, countries or regions. For more information, visit
www.mazdausa.com/navigation
.
12
7654
3
USA_NAVI_EN.book 19 ページ 2014年5月8日 木曜日 午後12時51分
Page 20 of 48
20
3. Marker
Markers point to your current location (blue), your home location (yellow) and your
destination (red). The marker shows the distance to the location.
Tap a marker to center the map on the location pointed to by the marker.
You can also set your own marker. Tap the cursor button, then tap Set marker position to
place a green marker at the cursor position.
To turn markers off, tap Options, then Advanced and clear the Markers checkbox.
4. Options button
5. The cursor with street name balloon
Tap the button in the street name balloon to open the cursor menu. You can navigate to the
cursor position, make a Favorite of the cursor position, or find a Point of Interest near the
cursor position.
6. The Find button
Tap this button to find specific addresses, favorites or Points of Interest.
7. The zoom bar
Zoom in and out by moving the slider.
USA_NAVI_EN.book 20 ページ 2014年5月8日 木曜日 午後12時51分