MERCEDES-BENZ METRIS 2020 MY20 Operator’s Manual
Manufacturer: MERCEDES-BENZ, Model Year: 2020, Model line: METRIS, Model: MERCEDES-BENZ METRIS 2020Pages: 320, PDF Size: 26.38 MB
Page 271 of 320
Cleaning the steering wheel and selec-
tor lever
X
Thoroughly wipe with a damp cloth.
X Vehicles with leather upholstery: after
cleaning, use leather care agents that have
been recommended and approved by
Mercedes-Benz.
Cleaning the trim elements !
Do not use solvent-based cleaning agents
such as tar remover, wheel cleaners, pol-
ishes or waxes. There is otherwise a risk of
damaging the surface.
X Wipe the trim elements with a damp, lint-
free cloth, e.g. a microfiber cloth.
X Heavy soiling: use care products and
cleaning agents recommended and
approved by Mercedes-Benz.
Cleaning the seat covers !
Do not use microfiber cloths to clean gen-
uine leather or artificial leather covers. If
used often, a microfiber cloth can damage
the cover.
! Clean:
R artificial leather covers with a cloth mois-
tened with a solution containing 1% deter-
gent, e.g. dish washing liquid.
R cloth covers with a microfiber cloth mois-
tened with a solution containing 1% deter-
gent, e.g. dish washing liquid. Wipe entire
seat sections carefully to avoid leaving
visible lines. Leave the seat to dry after-
wards. Cleaning results depend on the
type of dirt and how long it has been
there.
R genuine leather covers carefully with a
damp cloth, then wipe the covers down
with a dry cloth. Make sure that the
leather does not become soaked. Other-
wise, the leather could become rough or
cracked. Only use leather care agents
that have been tested and approved by
Mercedes-Benz. You can obtain these
from a qualified specialist workshop.
i Please keep in mind that:
R leather covers are a natural product and,
as such, are subject to a natural aging process. Leather may react differently,
e.g. increased wrinkling, to certain envi-
ronmental influences (such as high
humidity or intense heat).
R regular care is essential to make sure that
the appearance and comfort of the covers
are retained over time.
To clean genuine leather covers: X Remove any dust, crumbs etc. If necessary,
carefully vacuum-clean the seat covers.
X Carefully wipe the leather seat covers with a
damp cloth.
X Wipe over again with a dry cloth.
Make sure that the leather does not become
soaked, especially perforated parts.
X Then treat the leather seats with a leather
care foam.
Only use leather care agents that have been
tested and approved by Mercedes-Benz.
Observe the manufacturer's instructions.
Cleaning the seat belts G
WARNING
Seat belts can become severely weakened if
bleached or dyed. This could cause the seat
belts to tear or fail, for instance, in the event
of an accident. This poses an increased risk
of injury or fatal injury.
Never bleach or dye the seat belts.
! Do not clean the seat belts using chemical
cleaning agents. Do not dry the seat belts
by heating at temperatures above
176 ‡
(80 †) or in direct sunlight.
Remove any stains or dirt immediately. This
will avoid residue or damage. X Use clean, lukewarm water and soap solu-
tion.
Cleaning the headliner and carpets X
Headliner: if it is very dirty, use a soft brush
or dry shampoo.
X Carpets: use the carpet and textile cleaning
agents recommended and approved by
Mercedes-Benz. Care
269
Maintenance and care Z
Page 272 of 320
Useful information
This Operator's Manual describes all models
as well as standard and optional equipment of
your vehicle that were available at the time of
going to print. Country-specific variations are
possible. Note that your vehicle may not be
equipped with all of the described functions.
This also applies to systems and functions rel-
evant to safety.
Read the information on qualified specialist
workshops (Y page
32).Where will I find...?
Vehicle tool kit
General notes Depending on the equipment version of the
vehicle, the vehicle tool kit is:
R in the seat base of the left front seat
R in the rear compartment stowage compart-
ment
R in the tool holder in the cargo compartment
Apart from some country-specific variants,
vehicles without a spare wheel are not equip-
ped with tire-changing tools. If your vehicle is
equipped with tire-changing tools, these are in
the vehicle tool kit. If the vehicle tool kit is
stowed in the driver's seat base, the jack is in
a separate holder in the cargo compartment
on the right-hand side of the vehicle next to
the tailgate/rear-end door
(Y page 272).
Some tools for changing a wheel are specific
to the vehicle. For more information on which
tools are required and approved to perform a
wheel change on your vehicle, consult a quali-
fied specialist workshop.
Necessary tire-changing tools can include, for
example:
R Jack
R Lug wrench
R Ratchet wrench
i The jack has a maximum weight of 7.5 kg
depending on the vehicle's equipment.
The maximum payload of the jack can be
found on the sticker on the jack itself. The jack is maintenance-free. In the event of
a malfunction, please contact a qualified
specialist workshop.
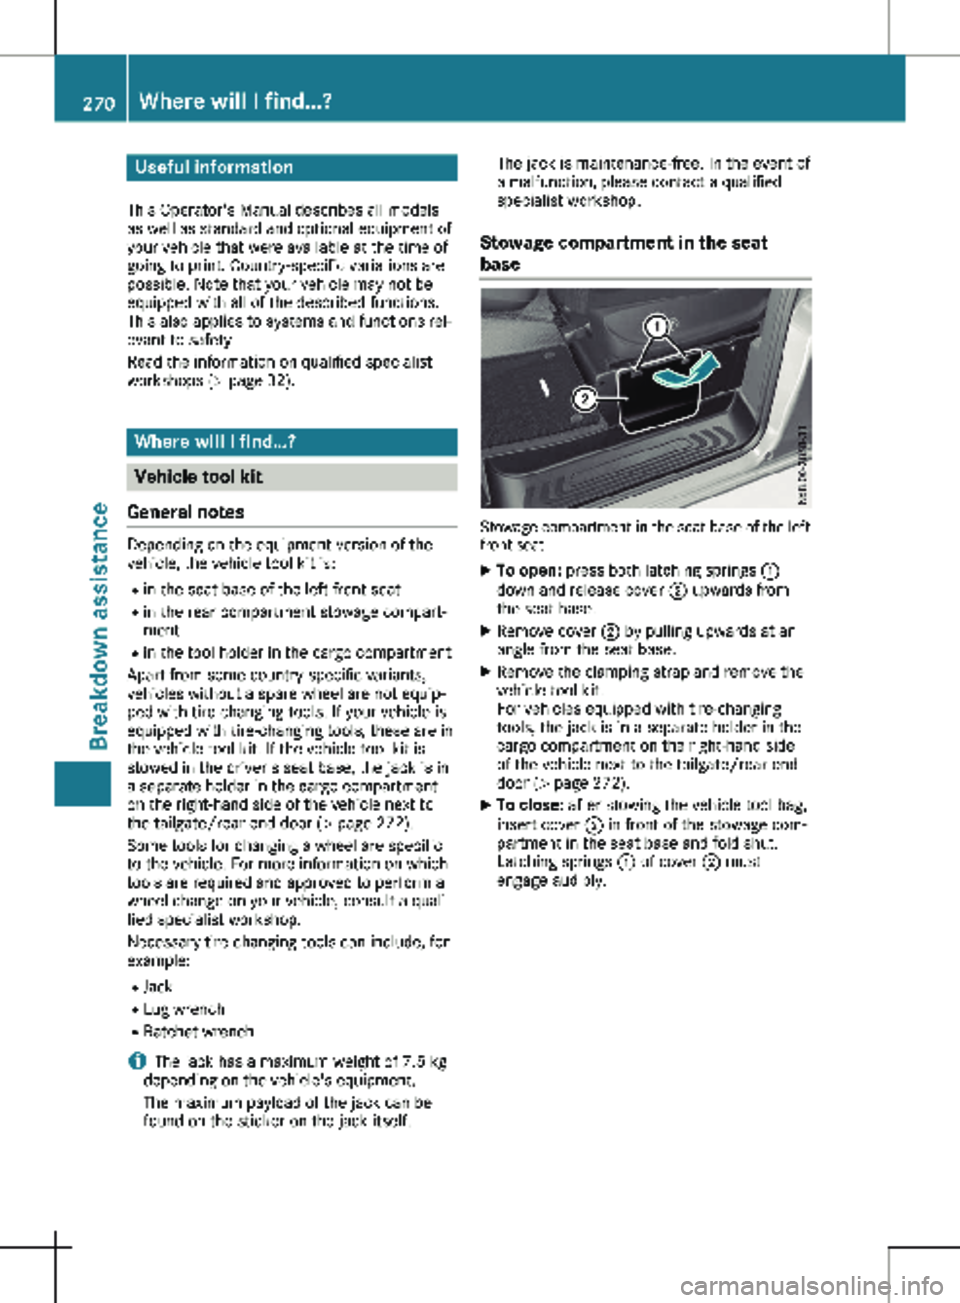
Stowage compartment in the seat
base Stowage compartment in the seat base of the left
front seat
X To open: press both latching springs :
down and release cover ; upwards from
the seat base.
X Remove cover ; by pulling upwards at an
angle from the seat base.
X Remove the clamping strap and remove the
vehicle tool kit.
For vehicles equipped with tire-changing
tools, the jack is in a separate holder in the
cargo compartment on the right-hand side
of the vehicle next to the tailgate/rear-end
door (Y page
272).
X To close: after stowing the vehicle tool bag,
insert cover ; in front of the stowage com-
partment in the seat base and fold shut.
Latching springs : of cover ; must
engage audibly. 270
Where will I find...?
Breakdown assistance
Page 273 of 320
Stowage compartment in the rear
compartment
Opening/closing the stowage compart-
ment
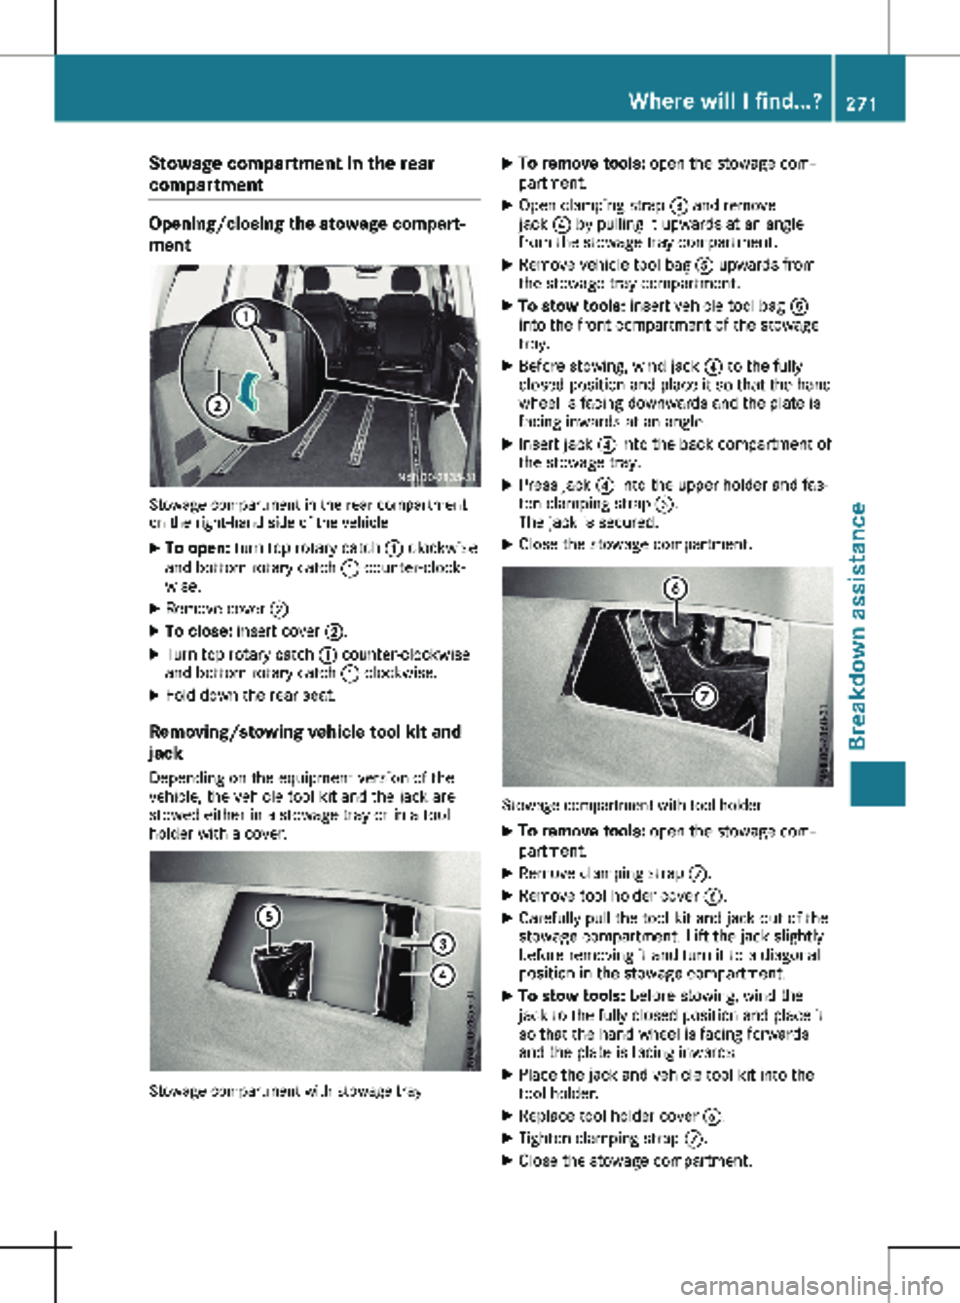
Stowage compartment in the rear compartment
on the right-hand side of the vehicle
X To open: turn top rotary catch : clockwise
and bottom rotary catch : counter-clock-
wise.
X Remove cover ;.
X To close: insert cover ;.
X Turn top rotary catch : counter-clockwise
and bottom rotary catch : clockwise.
X Fold down the rear seat.
Removing/stowing vehicle tool kit and
jack
Depending on the equipment version of the
vehicle, the vehicle tool kit and the jack are
stowed either in a stowage tray or in a tool
holder with a cover. Stowage compartment with stowage tray X
To remove tools: open the stowage com-
partment.
X Open clamping strap = and remove
jack ? by pulling it upwards at an angle
from the stowage tray compartment.
X Remove vehicle tool bag A upwards from
the stowage tray compartment.
X To stow tools: insert vehicle tool bag A
into the front compartment of the stowage
tray.
X Before stowing, wind jack ? to the fully
closed position and place it so that the hand
wheel is facing downwards and the plate is
facing inwards at an angle.
X Insert jack ? into the back compartment of
the stowage tray.
X Press jack ? into the upper holder and fas-
ten clamping strap =.
The jack is secured.
X Close the stowage compartment. Stowage compartment with tool holder
X To remove tools: open the stowage com-
partment.
X Remove clamping strap C.
X Remove tool holder cover B.
X Carefully pull the tool kit and jack out of the
stowage compartment. Lift the jack slightly
before removing it and turn it to a diagonal
position in the stowage compartment.
X To stow tools: before stowing, wind the
jack to the fully closed position and place it
so that the hand wheel is facing forwards
and the plate is facing inwards.
X Place the jack and vehicle tool kit into the
tool holder.
X Replace tool holder cover B.
X Tighten clamping strap C.
X Close the stowage compartment. Where will I find...?
271Breakdown assistance
Page 274 of 320
Stowage space in the cargo compart-
ment
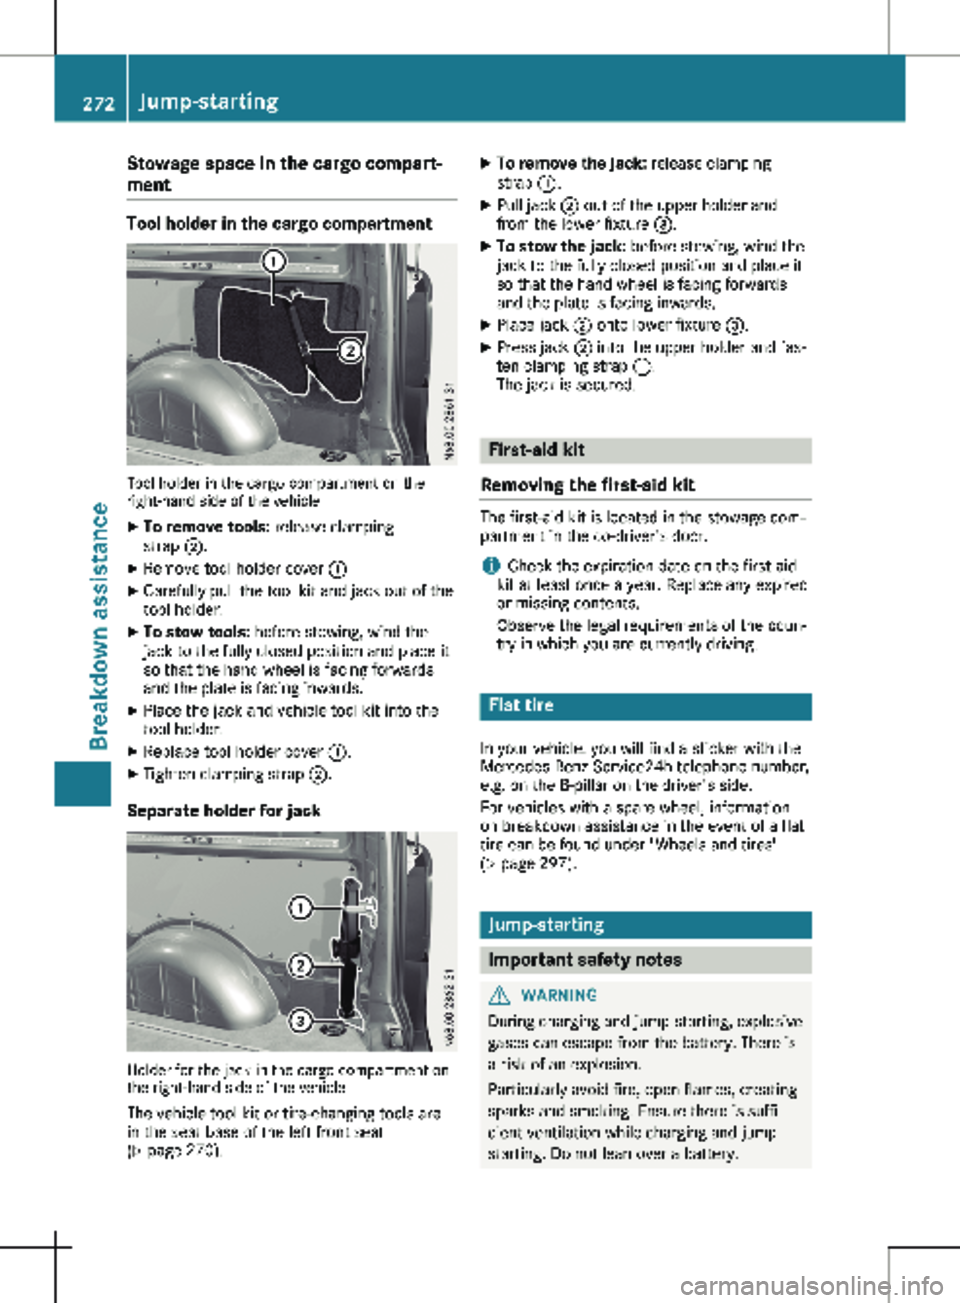
Tool holder in the cargo compartment
Tool holder in the cargo compartment on the
right-hand side of the vehicle
X To remove tools: release clamping
strap ;.
X Remove tool holder cover :
X Carefully pull the tool kit and jack out of the
tool holder.
X To stow tools: before stowing, wind the
jack to the fully closed position and place it
so that the hand wheel is facing forwards
and the plate is facing inwards.
X Place the jack and vehicle tool kit into the
tool holder.
X Replace tool holder cover :.
X Tighten clamping strap ;.
Separate holder for jack Holder for the jack in the cargo compartment on
the right-hand side of the vehicle
The vehicle tool kit or tire-changing tools are
in the seat base of the left front seat
(Y page
270). X
To remove the jack: release clamping
strap :.
X Pull jack ; out of the upper holder and
from the lower fixture =.
X To stow the jack: before stowing, wind the
jack to the fully closed position and place it
so that the hand wheel is facing forwards
and the plate is facing inwards.
X Place jack ; onto lower fixture =.
X Press jack ; into the upper holder and fas-
ten clamping strap :.
The jack is secured. First-aid kit
Removing the first-aid kit The first-aid kit is located in the stowage com-
partment in the co-driver's door.
i Check the expiration date on the first-aid
kit at least once a year. Replace any expired
or missing contents.
Observe the legal requirements of the coun-
try in which you are currently driving. Flat tire
In your vehicle, you will find a sticker with the
Mercedes-Benz Service24h telephone number,
e.g. on the B-pillar on the driver's side.
For vehicles with a spare wheel, information
on breakdown assistance in the event of a flat
tire can be found under "Wheels and tires"
( Y page
297). Jump-starting
Important safety notes
G
WARNING
During charging and jump-starting, explosive
gases can escape from the battery. There is
a risk of an explosion.
Particularly avoid fire, open flames, creating
sparks and smoking. Ensure there is suffi-
cient ventilation while charging and jump-
starting. Do not lean over a battery. 272
Jump-starting
Breakdown assistance
Page 275 of 320
G
WARNING
Battery acid is caustic. There is a risk of
injury.
Avoid contact with skin, eyes or clothing. Do
not inhale any battery gases. Do not lean
over the battery. Keep children away from
batteries. Wash away battery acid immedi-
ately with plenty of clean water and seek
medical attention. G
WARNING
A discharged battery can freeze at tempera-
tures below freezing point. When jump-start-
ing the vehicle or charging the battery,
gases can escape from the battery. There is
a risk of an explosion.
Allow the frozen battery to thaw out before
charging it or jump-starting.
! Vehicles with a gasoline engine:
avoid
repeated and lengthy starting attempts. Oth-
erwise, the catalytic converter could be
damaged by non-combusted fuel.
If the indicator and warning lamps in the
instrument cluster do not light up at low tem-
peratures, the discharged battery may have
frozen. In this case you may neither charge the
battery nor jump-start the vehicle. The service
life of a thawed battery may be shorter. Start-
up behavior may deteriorate, in particular at
low temperatures. Have the thawed battery
checked at a qualified specialist workshop.
Do not use a rapid charging device to start the
vehicle. If your vehicle's battery is discharged,
the engine can be jump-started from another
vehicle or from a donor battery using jumper
cables. For this purpose, the vehicle has a
jump-starting connection point in the engine
compartment.
When jump-starting, observe the following
points:
R The battery is not accessible in all vehicles.
If the other vehicle's battery is not accessi-
ble, jump-start the vehicle using a donor
battery or a jump-starting device.
R You may only jump-start the vehicle when
the engine and exhaust system are cold.
R Do not start the engine if the battery is fro-
zen. Let the battery thaw first. R
Jump-starting may only be performed from
batteries with a nominal voltage of 12 V.
R Only use jumper cables that have a suffi-
cient cross-section and insulated terminal
clamps.
R If the battery is fully discharged, attach the
battery of another vehicle for a few minutes
before attempting to start. This charges the
empty battery a little.
R Make sure that the two vehicles do not
touch.
Make sure that:
R The jumper cables are not damaged.
R Bare parts of the terminal clamps do not
come into contact with other metal parts
while the jumper cables are connected to
the battery.
R The jumper cables cannot come into contact
with parts such as the V-belt pulley or the
fan. These parts move when the engine is
started and while it is running.
Jumper cables and further information regard-
ing jump starting can be obtained at any quali-
fied specialist workshop. Before connecting the jumper cables
X Apply the parking brake.
X Shift the transmission to position j.
X Switch off all electrical consumers, e.g.
audio equipment, blower.
X Turn the key to position u in the ignition
lock and remove it .
X Open the hood (Y page 251). Connecting the jumper cable Jump-starting
273
Breakdown assistance Z
Page 276 of 320
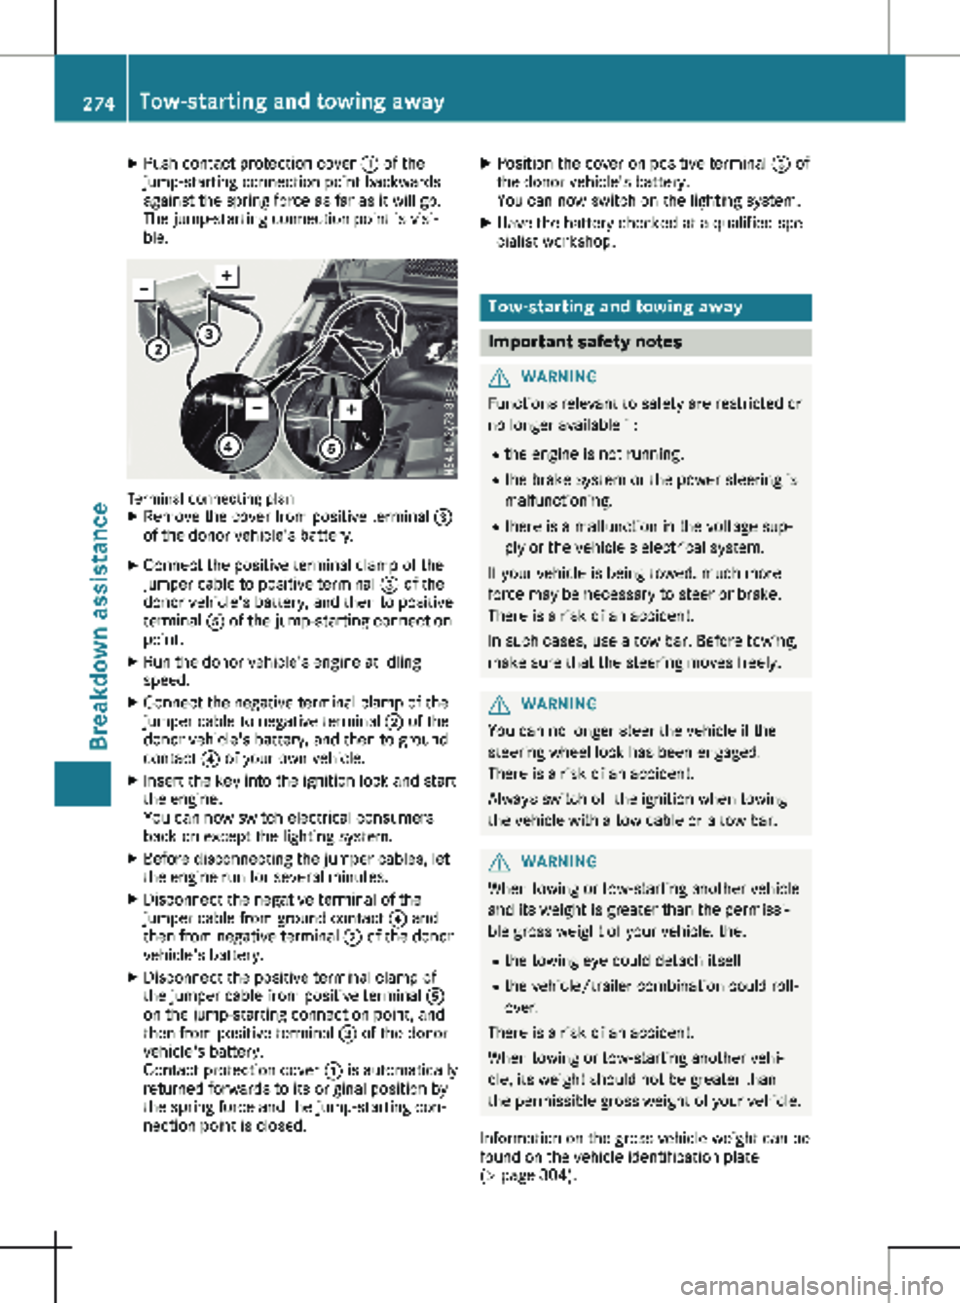
X
Push contact protection cover : of the
jump-starting connection point backwards
against the spring force as far as it will go.
The jump-starting connection point is visi-
ble. Terminal connecting plan
X Remove the cover from positive terminal =
of the donor vehicle's battery.
X Connect the positive terminal clamp of the
jumper cable to positive terminal = of the
donor vehicle's battery, and then to positive
terminal A of the jump-starting connection
point.
X Run the donor vehicle's engine at idling
speed.
X Connect the negative terminal clamp of the
jumper cable to negative terminal ; of the
donor vehicle's battery, and then to ground
contact ? of your own vehicle.
X Insert the key into the ignition lock and start
the engine.
You can now switch electrical consumers
back on except the lighting system.
X Before disconnecting the jumper cables, let
the engine run for several minutes.
X Disconnect the negative terminal of the
jumper cable from ground contact ? and
then from negative terminal ; of the donor
vehicle's battery.
X Disconnect the positive terminal clamp of
the jumper cable from positive terminal A
on the jump-starting connection point, and
then from positive terminal = of the donor
vehicle's battery.
Contact protection cover : is automatically
returned forwards to its original position by
the spring force and the jump-starting con-
nection point is closed. X
Position the cover on positive terminal = of
the donor vehicle's battery.
You can now switch on the lighting system.
X Have the battery checked at a qualified spe-
cialist workshop. Tow-starting and towing away
Important safety notes
G
WARNING
Functions relevant to safety are restricted or
no longer available if:
R the engine is not running.
R the brake system or the power steering is
malfunctioning.
R there is a malfunction in the voltage sup-
ply or the vehicle's electrical system.
If your vehicle is being towed, much more
force may be necessary to steer or brake.
There is a risk of an accident.
In such cases, use a tow bar. Before towing,
make sure that the steering moves freely. G
WARNING
You can no longer steer the vehicle if the
steering wheel lock has been engaged.
There is a risk of an accident.
Always switch off the ignition when towing
the vehicle with a tow cable or a tow bar. G
WARNING
When towing or tow-starting another vehicle
and its weight is greater than the permissi-
ble gross weight of your vehicle, the:
R the towing eye could detach itself
R the vehicle/trailer combination could roll-
over.
There is a risk of an accident.
When towing or tow-starting another vehi-
cle, its weight should not be greater than
the permissible gross weight of your vehicle.
Information on the gross vehicle weight can be
found on the vehicle identification plate
(Y page
304).274
Tow-starting and towing away
Breakdown assistance
Page 277 of 320
!
Secure the tow rope or tow bar to the tow-
ing eye or trailer tow hitch only. Otherwise,
the vehicle could become damaged.
! Do not use the towing eye for recovery,
this could damage the vehicle. If in doubt,
recover the vehicle with a crane.
! Drive slowly and smoothly when towing.
Excessive tractive power could otherwise
damage the vehicles.
! Shift the automatic transmission to posi-
tion i and do not open the driver's or front
passenger's door during towing. The auto-
matic transmission may otherwise shift to
position j, which could damage the trans-
mission.
! You may tow the vehicle for a maximum
distance of 30 miles (50 kilometers). A tow-
ing speed of
30 mph (50 km/h) must not be
exceeded.
For towing distances over 30 miles
(50 kilometers), the entire vehicle must be
raised and transported.
When towing away, you must observe the legal
requirements for the country in which you are
currently driving.
It is better to have the vehicle transported
than to have it towed.
Have the vehicle transported on a transporter
or trailer if it has transmission damage.
The automatic transmission must be in posi-
tion i when the vehicle is being towed away.
If the automatic transmission cannot be shif-
ted to position i, have the vehicle transpor-
ted on a transporter or trailer.
The battery must be connected and charged.
Otherwise, you:
R cannot turn the key to position 2 in the
ignition lock.
R cannot shift the transmission to position i.
Before the vehicle is towed, switch off the
automatic locking feature (Y page 76). You could otherwise lock yourself out of the vehi-
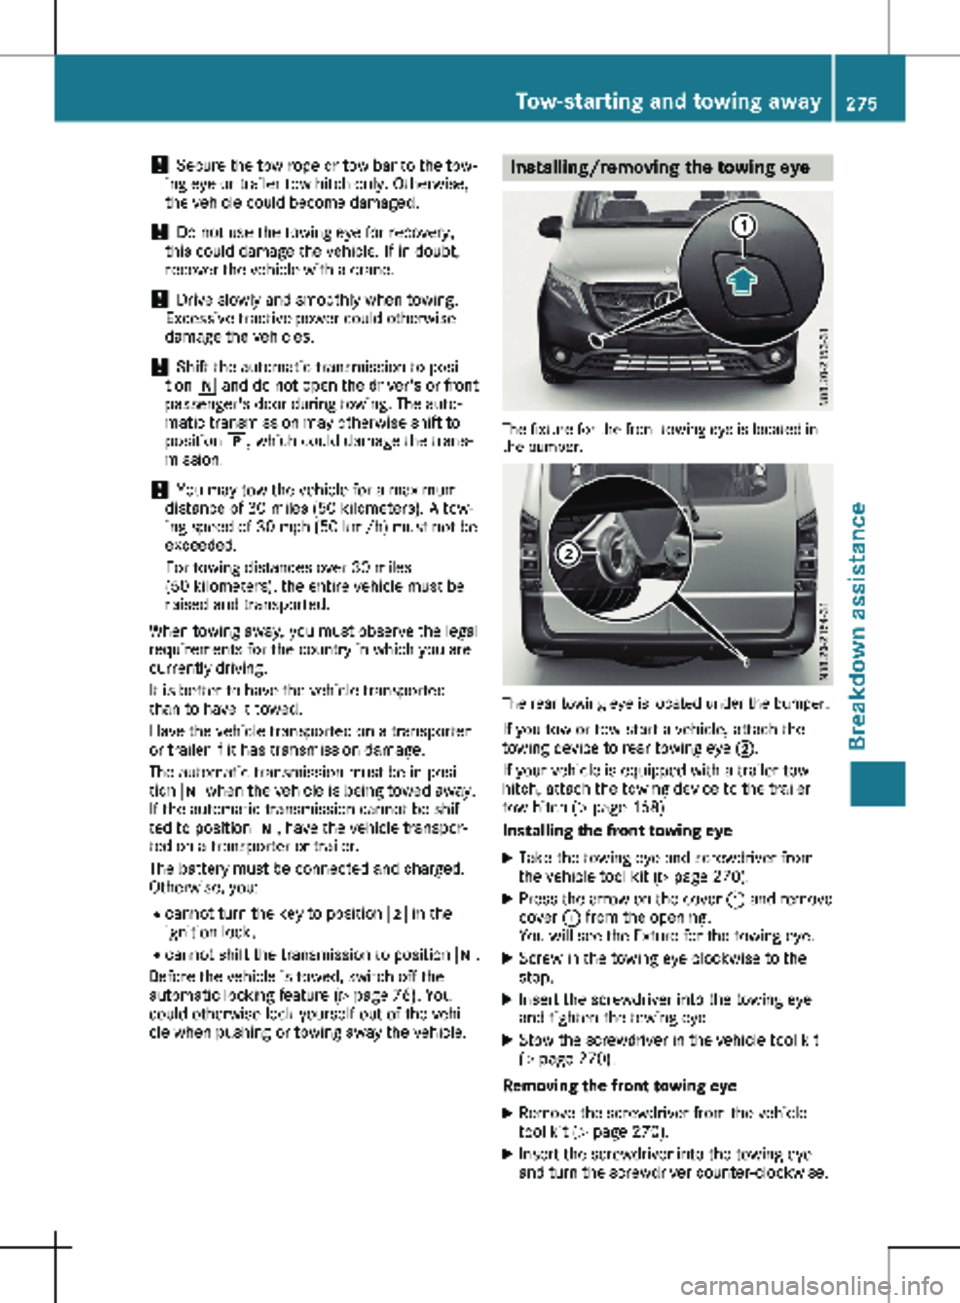
cle when pushing or towing away the vehicle. Installing/removing the towing eye
The fixture for the front towing eye is located in
the bumper. The rear towing eye is located under the bumper.
If you tow or tow-start a vehicle, attach the
towing device to rear towing eye
;.
If your vehicle is equipped with a trailer tow
hitch, attach the towing device to the trailer
tow hitch (Y page
168).
Installing the front towing eye
X Take the towing eye and screwdriver from
the vehicle tool kit (Y page
270).
X Press the arrow on the cover : and remove
cover : from the opening.
You will see the fixture for the towing eye.
X Screw in the towing eye clockwise to the
stop.
X Insert the screwdriver into the towing eye
and tighten the towing eye.
X Stow the screwdriver in the vehicle tool kit
(Y page
270).
Removing the front towing eye
X Remove the screwdriver from the vehicle
tool kit
(Y page 270).
X Insert the screwdriver into the towing eye
and turn the screwdriver counter-clockwise. Tow-starting and towing away
275
Breakdown assistance Z
Page 278 of 320
X
Unscrew the towing eye.
X Insert cover : with the lug at the top and
press it in at the bottom until it engages.
X Stow the towing eye and the screwdriver
with the vehicle tool kit (Y page
270).Towing with the rear axle raised
! Vehicles with automatic transmission must
not be towed with the rear axle raised. The
vehicle/trailer combination may otherwise
swerve or even roll over.
! The ignition must be switched off if the
vehicle is being towed with the front or rear
axle raised. Otherwise, ESP ®
may intervene
and damage the brake system.
X Switch on the hazard warning lamps
(Y page
101).
X Turn the front wheels to the straight-ahead
position.
X Release the parking brake.
X If necessary, turn the key in the ignition lock
to position g and remove the key from the
ignition lock.
X Take the key with you when leaving the vehi-
cle.
X Do not exceed the towing speed of 30 mph
(50 km/h
).
Please observe the important safety instruc-
tions when towing your vehicle with the rear
axle raised
(Y page 274). Towing the vehicle with both axles
on the ground
Important safety notes G
WARNING
You can no longer steer the vehicle if the
steering wheel lock has been engaged.
There is a risk of an accident.
Always switch off the ignition when towing
the vehicle with a tow cable or a tow bar.
! Do not exceed the towing speed of
30 mph
(50 km/h). You could otherwise
damage the transmission. Please observe the important safety notes
before towing your vehicle
(Y page 274).
Towing vehicles with automatic trans-
mission X
Turn the key to position 2 in the ignition
lock.
X Depress the brake pedal and keep it
depressed.
X Shift the automatic transmission to position
i.
X Leave the key in position 2 in the ignition
lock.
X Switch on the hazard warning lamps
(Y page
101).
X Release the parking brake.
X Release the brake pedal.
X Do not exceed the towing speed of 30 mph
(50 km/h
). Recovering a vehicle that is stuck
! When recovering a vehicle that has
become stuck, pull it as smoothly and
evenly as possible. If the tractive power is
too high, the vehicles could be damaged.
If the drive wheels get trapped on loose or
muddy ground, recover the vehicle with the
utmost care. This is especially the case if the
vehicle is laden.
Never attempt to recover a vehicle with a
trailer attached.
Pull out the vehicle backwards, if possible,
using the tracks it made when it became
stuck. Transporting the vehicle
! You may only secure the vehicle by the
wheels, not by parts of the vehicle such as
axle or steering components. Otherwise, the
vehicle could be damaged.
The towing eye or trailer tow hitch can be used
to pull the vehicle onto a trailer or transporter
if you wish to transport it. 276
Tow-starting and towing away
Breakdown assistance
Page 279 of 320
X
Turn the key to position 2 in the ignition
lock.
X Shift the transmission to position i.
X Release the parking brake.
If the vehicle is loaded: X Shift the transmission to position j.
X Turn the key to position u in the ignition
lock and remove it.
X Make sure the parking brake is applied.
X Lash down the vehicle. Tow-starting (emergency engine
starting)
General notes !
Vehicles with automatic transmission must
not be tow-started. You could otherwise
damage the automatic transmission.
You can find information on jump-starting
under "Jump-starting“
(Y page 272).Electrical fuses
The fuse allocation chart and important safety
information on the fuses can be found in the
"Fuse allocation chart" supplement. Electrical fuses
277
Breakdown assistance Z
Page 280 of 320
Useful information
This Operator's Manual describes all models
as well as standard and optional equipment of
your vehicle that were available at the time of
going to print. Country-specific variations are
possible. Note that your vehicle may not be
equipped with all of the described functions.
This also applies to systems and functions rel-
evant to safety.
Read the information on qualified specialist
workshops (Y page
32).Important safety notes
G
Warning
A flat tire severely impairs the driving, steer-
ing and braking characteristics of the vehi-
cle. There is a risk of an accident.
do not drive with a flat tire. Immediately
replace the flat tire with your spare wheel,
or consult a qualified specialist workshop. G
WARNING
If you install wheels and tires with incorrect
dimensions, the service brake or wheel sus-
pension components may be damaged.
There is a risk of an accident.
Always replace wheels and tires with ones
that comply with the specifications of the
original part.
When replacing wheels, pay attention to the:
R Designation
R Model
When replacing tires, pay attention to the:
R Designation
R Manufacturer
R Model
Accessories that are not approved for your
vehicle by Mercedes-Benz or are not being
used correctly can impair operating safety. Before purchasing and using non-approved
accessories, visit a qualified specialist work-
shop and inquire about the following points:
R
suitability
R legal stipulations
R factory recommendations
Information on the dimensions and types of
wheels and tires for your vehicle can be found
under "Wheel and tire combinations"
( Y page
301).
Information on your vehicle's tire pressures
can be found in the following locations:
R in the Tire and Loading Information placard
on the B-pillar, driver's side
R in the tire pressure table inside the fuel filler
flap ( Y page 282)
R under "Tire pressure tables" (Y page 289)
R under "Tire pressure" (Y page 282)
Modifications to the brake system or wheels
are not permitted. The use of spacers or brake
dust shields is not permitted. This invalidates
the general operating permit for the vehicle.
Further information on wheels and tires can be
obtained at any qualified specialist workshop. Operation
Information for a journey
If the vehicle is heavily laden, check the tire
pressures, and correct them, if necessary
( Y page
282).
While driving, pay attention to vibrations,
noises and unusual handling characteristics,
e.g. pulling to one side. This may indicate that
the wheels or tires are damaged. If you sus-
pect that a tire is defective, reduce your speed
immediately. Stop the vehicle as soon as pos-
sible to check the wheels and tires for dam-
age. Hidden tire damage could also be causing
the unusual handling characteristics. If you
find no signs of damage, have the tires and
wheels checked at a qualified specialist work-
shop.
When parking your vehicle, make sure that the
tires do not get deformed by the curb or other
obstacles. If it is necessary to drive over curbs,
speed humps or similar elevations, try to do so
slowly and not at a sharp angle. Otherwise, the
tires, particularly the sidewalls, can get dam-
aged. 278
Operation
Wheels and tires