MERCEDES-BENZ SPRINTER 2005 Service Repair Manual
Manufacturer: MERCEDES-BENZ, Model Year: 2005, Model line: SPRINTER, Model: MERCEDES-BENZ SPRINTER 2005Pages: 1232, PDF Size: 39.23 MB
Page 771 of 1232
(10) Position piston of #1 cylinder to ignition TDC.
(11) Install camshafts and check basic position
(Refer to 9 - ENGINE/CYLINDER HEAD/CAM-
SHAFT(S) - INSTALLATION).
(12) Install top guide rail (Refer to 9 - ENGINE/
CYLINDER HEAD - INSTALLATION).
(13) Install front cover at cylinder head (Refer to 9
- ENGINE/CYLINDER HEAD - INSTALLATION).
(14) Install timing chain tensioner with new gas-
ket (Refer to 9 - ENGINE/VALVE TIMING/TIMING
BELT/CHAIN AND SPROCKETS - INSTALLATION)
(15) Install cylinder head cover (Refer to 9 -
ENGINE/CYLINDER HEAD/CYLINDER HEAD
COVER(S) - INSTALLATION).
(16) Install glow plugs (Refer to 8 - ELECTRICAL/
IGNITION CONTROL/GLOW PLUG - INSTALLA-
TION).
WARNING: SERVICE VEHICLES IN A WELL VENTI-
LATED AREA AND AVOID IGNITION SORCES. RISK
OF INJURY TO SKIN AND EYES FROM FUEL JET
FLOWING OUT.
(17) Install injectors (Refer to 14 - FUEL SYS-
TEM/FUEL INJECTION/FUEL INJECTOR -
INSTALLATION).
(18) Reconnect negative battery cable.
WARNING: USE EXTREME CAUTION WHEN THE
ENGINE IS OPERATING. DO NOT STAND IN ADIRECT LINE WITH THE FAN. DO NOT PUT YOUR
HANDS NEAR THE PULLEYS, BELTS OR FAN. DO
NOT WEAR LOOSE CLOTHING.
(19) Start the engine and inspect for leaks.Care
must be taken to observe the fuel system warning
(Refer to 14 - FUEL SYSTEM - WARNING)
(20) Install engine cover (Refer to 9 - ENGINE
COVER - INSTALLATION).
INSTALLATION - VALVES
WARNING: Valves must be kept in their original
positions in cylinder head. Failure to do so will
result in engine damage.
NOTE: Inspect all valves, springs and retainers for
wear or damage. Replace as necessary.
(1) Install valves in their original position in the
cylinder head.
(2) Install lower valve spring retainer.
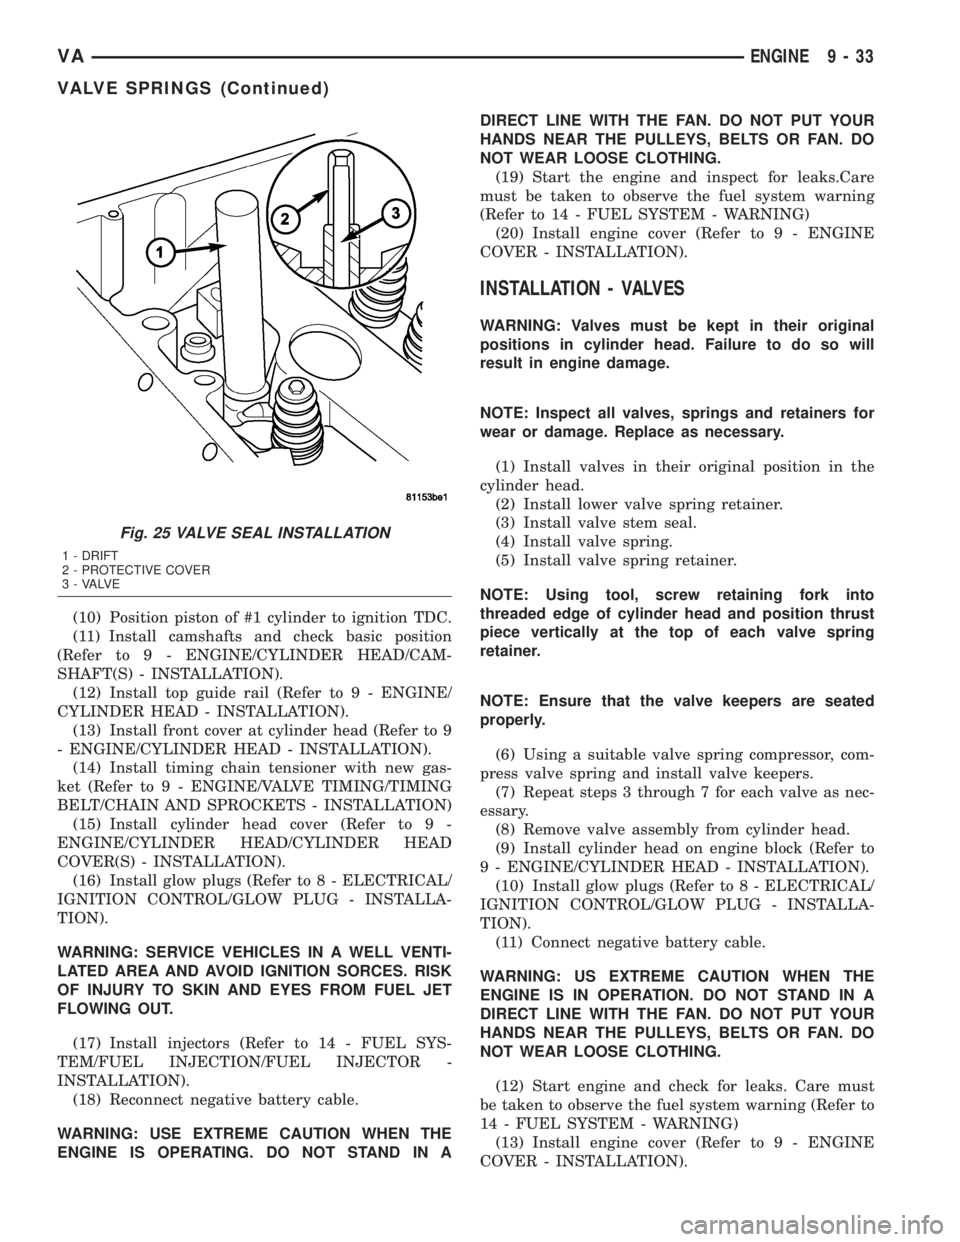
(3) Install valve stem seal.
(4) Install valve spring.
(5) Install valve spring retainer.
NOTE: Using tool, screw retaining fork into
threaded edge of cylinder head and position thrust
piece vertically at the top of each valve spring
retainer.
NOTE: Ensure that the valve keepers are seated
properly.
(6) Using a suitable valve spring compressor, com-
press valve spring and install valve keepers.
(7) Repeat steps 3 through 7 for each valve as nec-
essary.
(8) Remove valve assembly from cylinder head.
(9) Install cylinder head on engine block (Refer to
9 - ENGINE/CYLINDER HEAD - INSTALLATION).
(10) Install glow plugs (Refer to 8 - ELECTRICAL/
IGNITION CONTROL/GLOW PLUG - INSTALLA-
TION).
(11) Connect negative battery cable.
WARNING: US EXTREME CAUTION WHEN THE
ENGINE IS IN OPERATION. DO NOT STAND IN A
DIRECT LINE WITH THE FAN. DO NOT PUT YOUR
HANDS NEAR THE PULLEYS, BELTS OR FAN. DO
NOT WEAR LOOSE CLOTHING.
(12) Start engine and check for leaks. Care must
be taken to observe the fuel system warning (Refer to
14 - FUEL SYSTEM - WARNING)
(13) Install engine cover (Refer to 9 - ENGINE
COVER - INSTALLATION).
Fig. 25 VALVE SEAL INSTALLATION
1 - DRIFT
2 - PROTECTIVE COVER
3 - VALVE
VAENGINE 9 - 33
VALVE SPRINGS (Continued)
Page 772 of 1232
ENGINE BLOCK
STANDARD PROCEDURE
STANDARD PROCEDURE - REPLACING ENGINE
CORE AND OIL GALLERY PLUGS
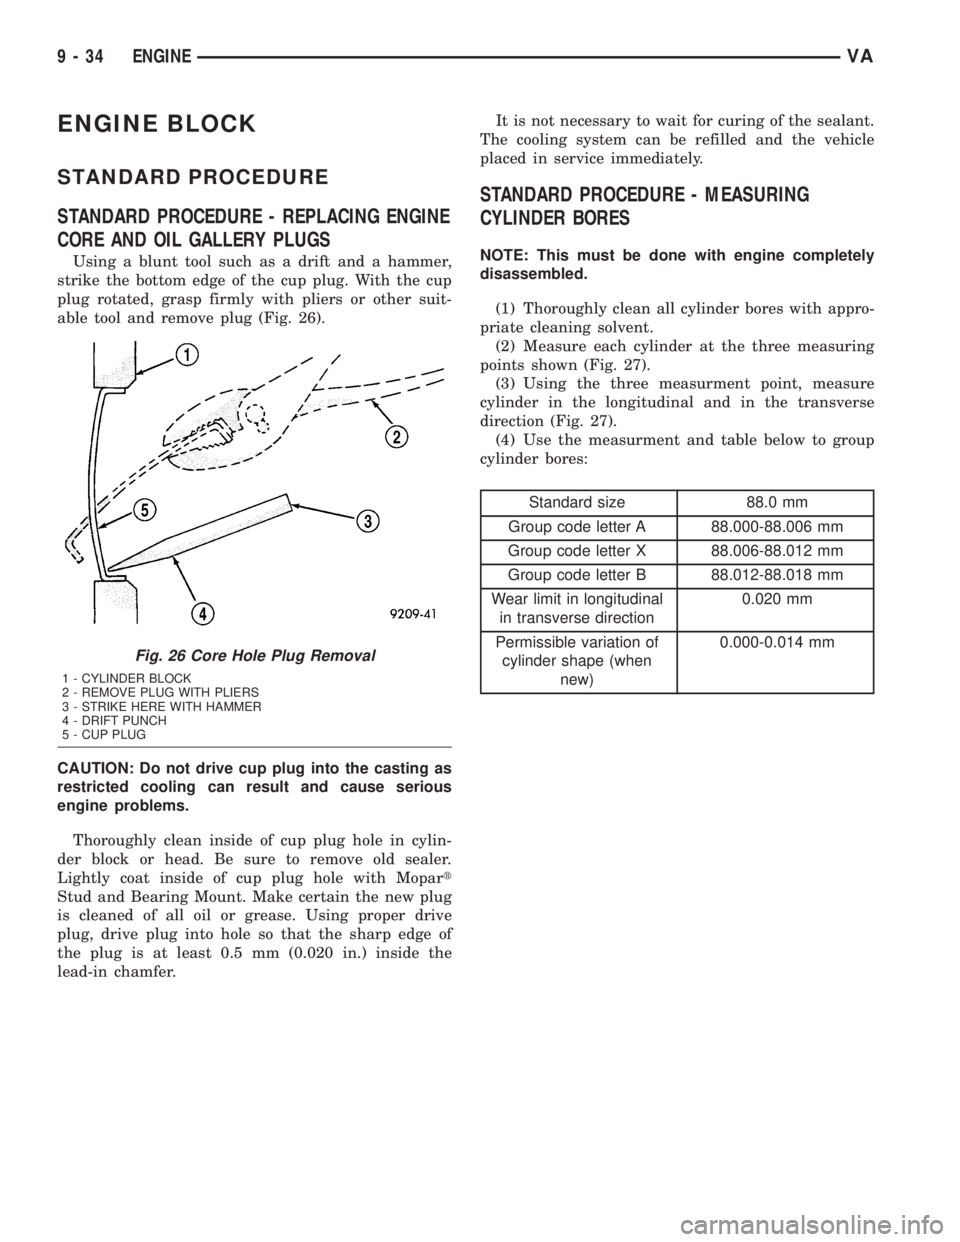
Using a blunt tool such as a drift and a hammer,
strike the bottom edge of the cup plug. With the cup
plug rotated, grasp firmly with pliers or other suit-
able tool and remove plug (Fig. 26).
CAUTION: Do not drive cup plug into the casting as
restricted cooling can result and cause serious
engine problems.
Thoroughly clean inside of cup plug hole in cylin-
der block or head. Be sure to remove old sealer.
Lightly coat inside of cup plug hole with Mopart
Stud and Bearing Mount. Make certain the new plug
is cleaned of all oil or grease. Using proper drive
plug, drive plug into hole so that the sharp edge of
the plug is at least 0.5 mm (0.020 in.) inside the
lead-in chamfer.It is not necessary to wait for curing of the sealant.
The cooling system can be refilled and the vehicle
placed in service immediately.
STANDARD PROCEDURE - MEASURING
CYLINDER BORES
NOTE: This must be done with engine completely
disassembled.
(1) Thoroughly clean all cylinder bores with appro-
priate cleaning solvent.
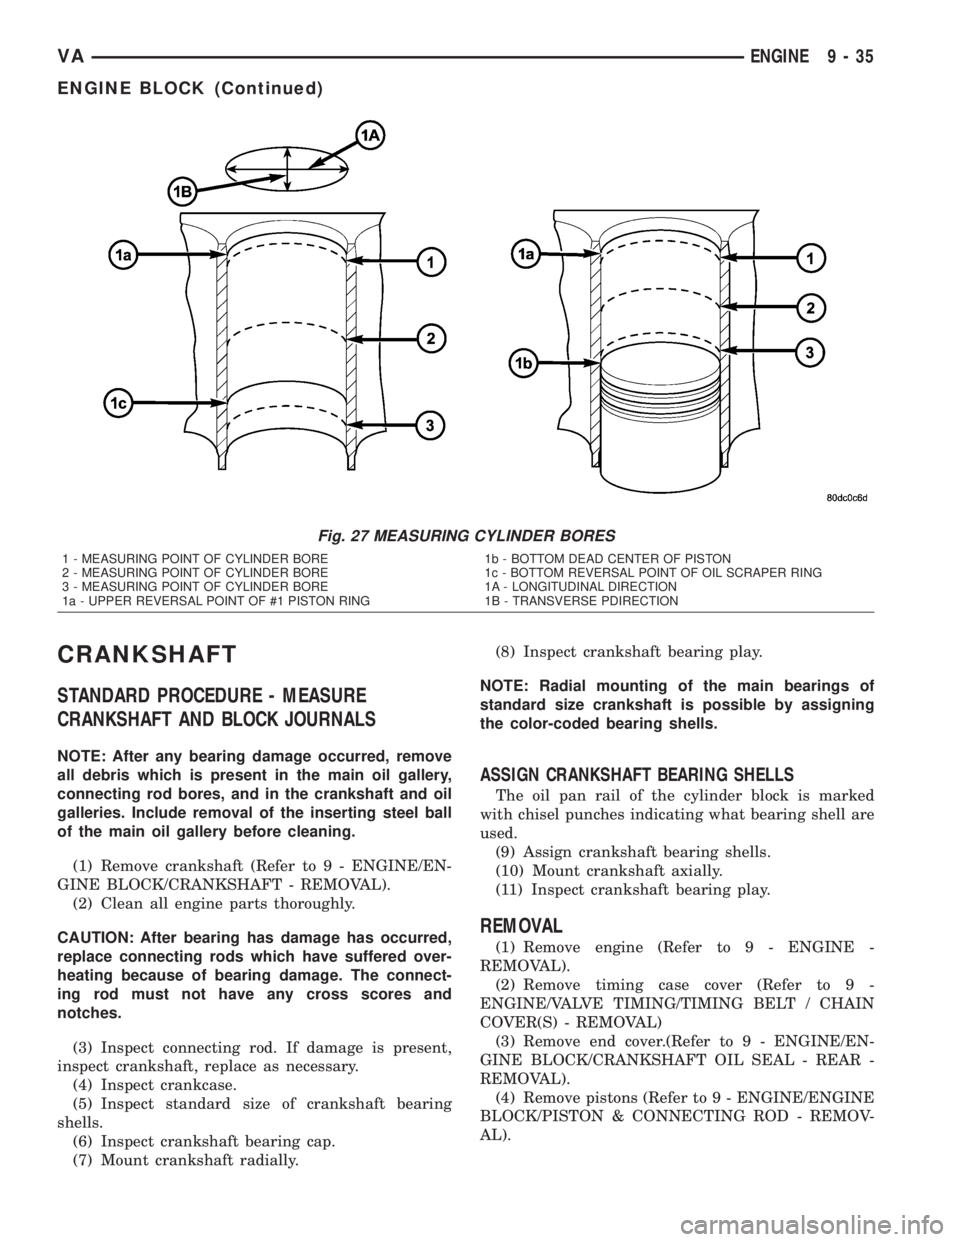
(2) Measure each cylinder at the three measuring
points shown (Fig. 27).
(3) Using the three measurment point, measure
cylinder in the longitudinal and in the transverse
direction (Fig. 27).
(4) Use the measurment and table below to group
cylinder bores:
Standard size 88.0 mm
Group code letter A 88.000-88.006 mm
Group code letter X 88.006-88.012 mm
Group code letter B 88.012-88.018 mm
Wear limit in longitudinal
in transverse direction0.020 mm
Permissible variation of
cylinder shape (when
new)0.000-0.014 mm
Fig. 26 Core Hole Plug Removal
1 - CYLINDER BLOCK
2 - REMOVE PLUG WITH PLIERS
3 - STRIKE HERE WITH HAMMER
4 - DRIFT PUNCH
5 - CUP PLUG
9 - 34 ENGINEVA
Page 773 of 1232
CRANKSHAFT
STANDARD PROCEDURE - MEASURE
CRANKSHAFT AND BLOCK JOURNALS
NOTE: After any bearing damage occurred, remove
all debris which is present in the main oil gallery,
connecting rod bores, and in the crankshaft and oil
galleries. Include removal of the inserting steel ball
of the main oil gallery before cleaning.
(1) Remove crankshaft (Refer to 9 - ENGINE/EN-
GINE BLOCK/CRANKSHAFT - REMOVAL).
(2) Clean all engine parts thoroughly.
CAUTION: After bearing has damage has occurred,
replace connecting rods which have suffered over-
heating because of bearing damage. The connect-
ing rod must not have any cross scores and
notches.
(3) Inspect connecting rod. If damage is present,
inspect crankshaft, replace as necessary.
(4) Inspect crankcase.
(5) Inspect standard size of crankshaft bearing
shells.
(6) Inspect crankshaft bearing cap.
(7) Mount crankshaft radially.(8) Inspect crankshaft bearing play.
NOTE: Radial mounting of the main bearings of
standard size crankshaft is possible by assigning
the color-coded bearing shells.
ASSIGN CRANKSHAFT BEARING SHELLS
The oil pan rail of the cylinder block is marked
with chisel punches indicating what bearing shell are
used.
(9) Assign crankshaft bearing shells.
(10) Mount crankshaft axially.
(11) Inspect crankshaft bearing play.
REMOVAL
(1) Remove engine (Refer to 9 - ENGINE -
REMOVAL).
(2) Remove timing case cover (Refer to 9 -
ENGINE/VALVE TIMING/TIMING BELT / CHAIN
COVER(S) - REMOVAL)
(3) Remove end cover.(Refer to 9 - ENGINE/EN-
GINE BLOCK/CRANKSHAFT OIL SEAL - REAR -
REMOVAL).
(4) Remove pistons (Refer to 9 - ENGINE/ENGINE
BLOCK/PISTON & CONNECTING ROD - REMOV-
AL).
Fig. 27 MEASURING CYLINDER BORES
1 - MEASURING POINT OF CYLINDER BORE
2 - MEASURING POINT OF CYLINDER BORE
3 - MEASURING POINT OF CYLINDER BORE
1a - UPPER REVERSAL POINT OF #1 PISTON RING1b - BOTTOM DEAD CENTER OF PISTON
1c - BOTTOM REVERSAL POINT OF OIL SCRAPER RING
1A - LONGITUDINAL DIRECTION
1B - TRANSVERSE PDIRECTION
VAENGINE 9 - 35
ENGINE BLOCK (Continued)
Page 774 of 1232
CAUTION: The crankshaft bearing caps are num-
bered consecutively, beginning with the first crank-
shaft bearing cap at the front of the engine.
Attention must be paid to the way crankshaft bear-
ing caps fit.
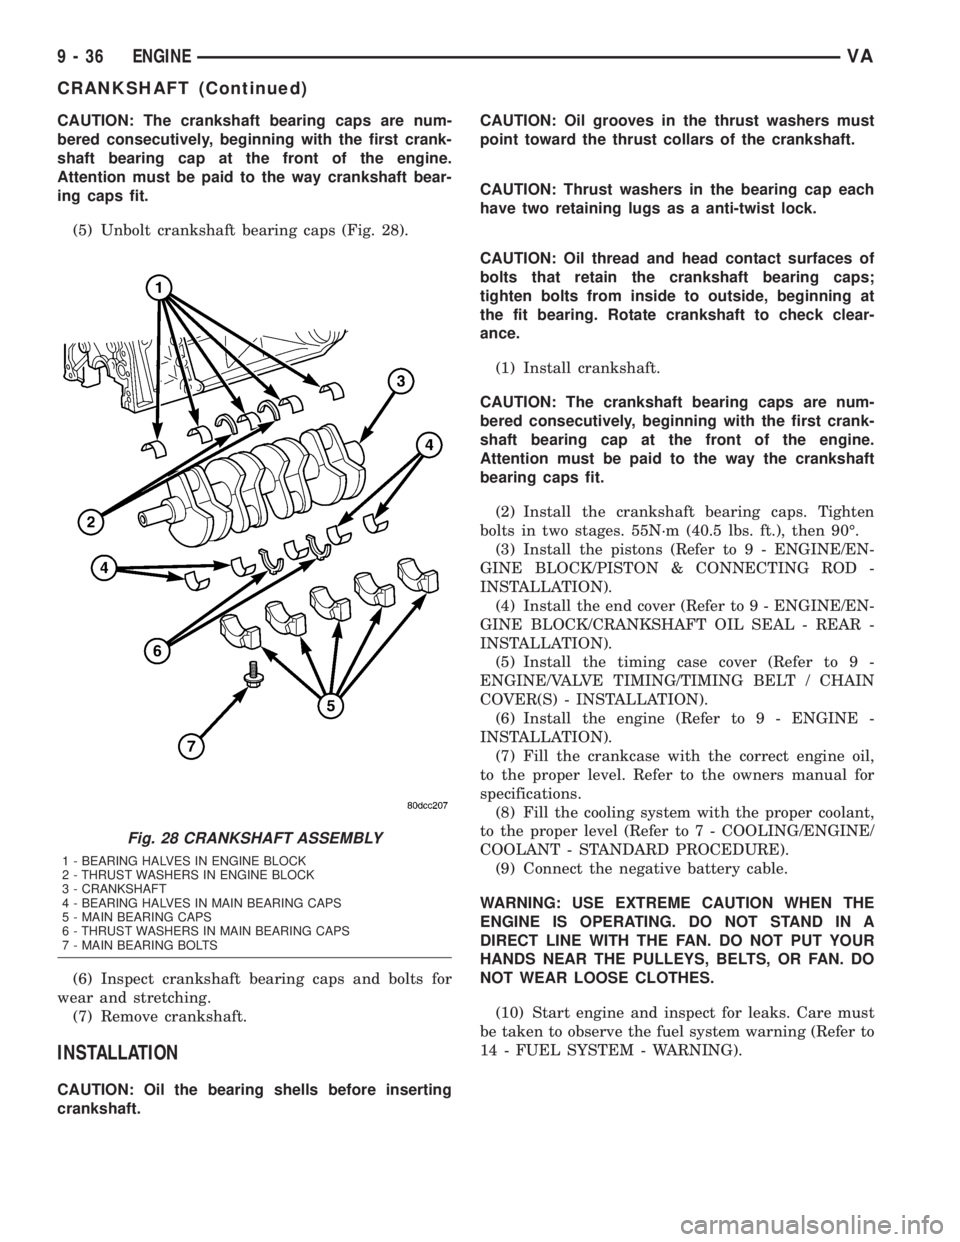
(5) Unbolt crankshaft bearing caps (Fig. 28).
(6) Inspect crankshaft bearing caps and bolts for
wear and stretching.
(7) Remove crankshaft.
INSTALLATION
CAUTION: Oil the bearing shells before inserting
crankshaft.CAUTION: Oil grooves in the thrust washers must
point toward the thrust collars of the crankshaft.
CAUTION: Thrust washers in the bearing cap each
have two retaining lugs as a anti-twist lock.
CAUTION: Oil thread and head contact surfaces of
bolts that retain the crankshaft bearing caps;
tighten bolts from inside to outside, beginning at
the fit bearing. Rotate crankshaft to check clear-
ance.
(1) Install crankshaft.
CAUTION: The crankshaft bearing caps are num-
bered consecutively, beginning with the first crank-
shaft bearing cap at the front of the engine.
Attention must be paid to the way the crankshaft
bearing caps fit.
(2) Install the crankshaft bearing caps. Tighten
bolts in two stages. 55N´m (40.5 lbs. ft.), then 90É.
(3) Install the pistons (Refer to 9 - ENGINE/EN-
GINE BLOCK/PISTON & CONNECTING ROD -
INSTALLATION).
(4) Install the end cover (Refer to 9 - ENGINE/EN-
GINE BLOCK/CRANKSHAFT OIL SEAL - REAR -
INSTALLATION).
(5) Install the timing case cover (Refer to 9 -
ENGINE/VALVE TIMING/TIMING BELT / CHAIN
COVER(S) - INSTALLATION).
(6) Install the engine (Refer to 9 - ENGINE -
INSTALLATION).
(7) Fill the crankcase with the correct engine oil,
to the proper level. Refer to the owners manual for
specifications.
(8) Fill the cooling system with the proper coolant,
to the proper level (Refer to 7 - COOLING/ENGINE/
COOLANT - STANDARD PROCEDURE).
(9) Connect the negative battery cable.
WARNING: USE EXTREME CAUTION WHEN THE
ENGINE IS OPERATING. DO NOT STAND IN A
DIRECT LINE WITH THE FAN. DO NOT PUT YOUR
HANDS NEAR THE PULLEYS, BELTS, OR FAN. DO
NOT WEAR LOOSE CLOTHES.
(10) Start engine and inspect for leaks. Care must
be taken to observe the fuel system warning (Refer to
14 - FUEL SYSTEM - WARNING).
Fig. 28 CRANKSHAFT ASSEMBLY
1 - BEARING HALVES IN ENGINE BLOCK
2 - THRUST WASHERS IN ENGINE BLOCK
3 - CRANKSHAFT
4 - BEARING HALVES IN MAIN BEARING CAPS
5 - MAIN BEARING CAPS
6 - THRUST WASHERS IN MAIN BEARING CAPS
7 - MAIN BEARING BOLTS
9 - 36 ENGINEVA
CRANKSHAFT (Continued)
Page 775 of 1232
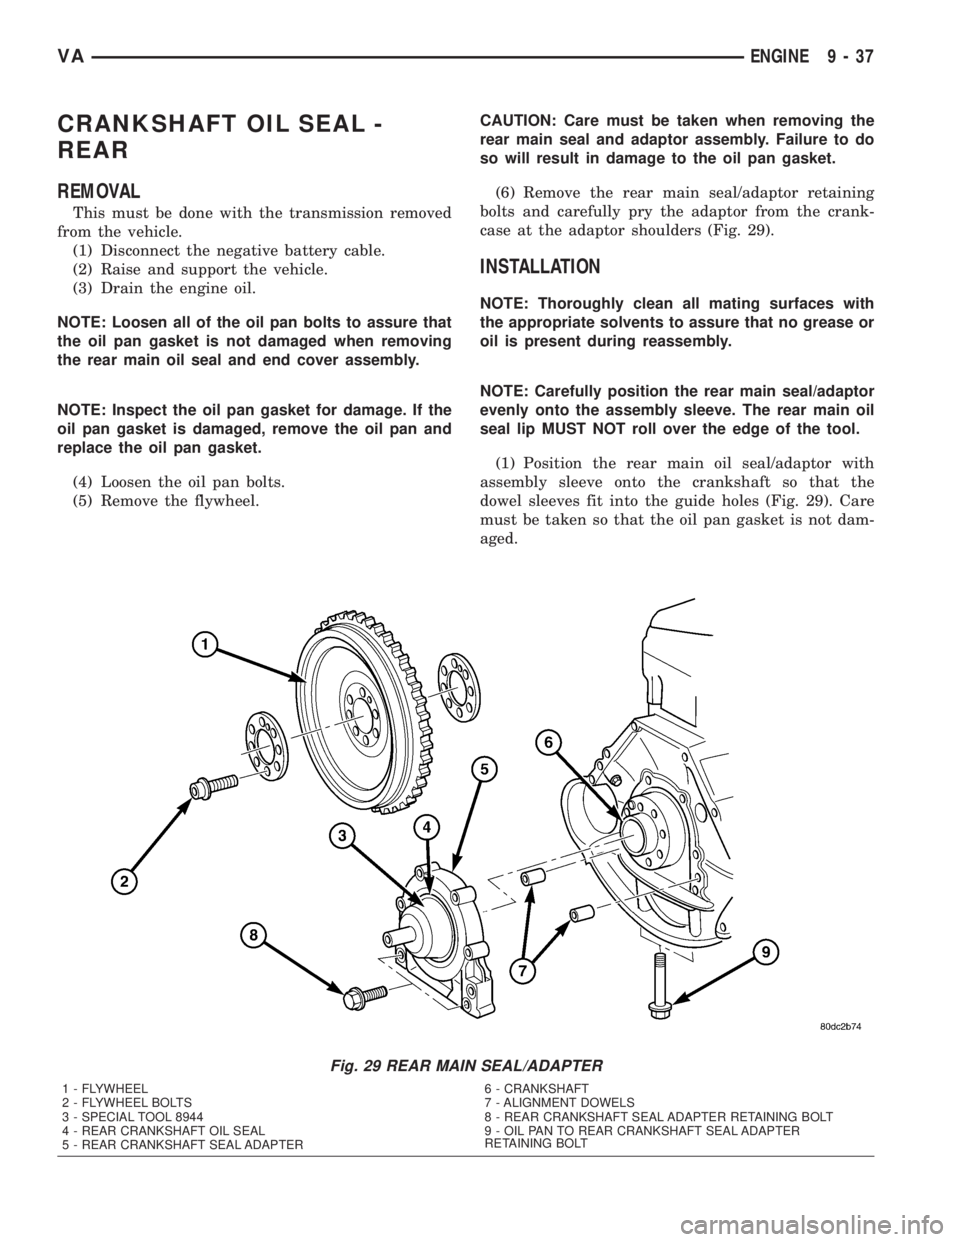
CRANKSHAFT OIL SEAL -
REAR
REMOVAL
This must be done with the transmission removed
from the vehicle.
(1) Disconnect the negative battery cable.
(2) Raise and support the vehicle.
(3) Drain the engine oil.
NOTE: Loosen all of the oil pan bolts to assure that
the oil pan gasket is not damaged when removing
the rear main oil seal and end cover assembly.
NOTE: Inspect the oil pan gasket for damage. If the
oil pan gasket is damaged, remove the oil pan and
replace the oil pan gasket.
(4) Loosen the oil pan bolts.
(5) Remove the flywheel.CAUTION: Care must be taken when removing the
rear main seal and adaptor assembly. Failure to do
so will result in damage to the oil pan gasket.
(6) Remove the rear main seal/adaptor retaining
bolts and carefully pry the adaptor from the crank-
case at the adaptor shoulders (Fig. 29).
INSTALLATION
NOTE: Thoroughly clean all mating surfaces with
the appropriate solvents to assure that no grease or
oil is present during reassembly.
NOTE: Carefully position the rear main seal/adaptor
evenly onto the assembly sleeve. The rear main oil
seal lip MUST NOT roll over the edge of the tool.
(1) Position the rear main oil seal/adaptor with
assembly sleeve onto the crankshaft so that the
dowel sleeves fit into the guide holes (Fig. 29). Care
must be taken so that the oil pan gasket is not dam-
aged.
Fig. 29 REAR MAIN SEAL/ADAPTER
1 - FLYWHEEL
2 - FLYWHEEL BOLTS
3 - SPECIAL TOOL 8944
4 - REAR CRANKSHAFT OIL SEAL
5 - REAR CRANKSHAFT SEAL ADAPTER6 - CRANKSHAFT
7 - ALIGNMENT DOWELS
8 - REAR CRANKSHAFT SEAL ADAPTER RETAINING BOLT
9 - OIL PAN TO REAR CRANKSHAFT SEAL ADAPTER
RETAINING BOLT
VAENGINE 9 - 37
Page 776 of 1232
(2) Install the rear main seal/adaptor to crankcase
bolts and tighten to 9´Nm (80 lbs.in) (Fig. 29).
(3) Tighten the M6 oil pan bolts to 9N´m (80 lbs
in) and the M8 bolts to 20 N´m (15 lbs ft).
(4) Install the fly wheel and tighten bolts in two
stages (Fig. 29). 45N´m (33 lbs. ft.) then 90É.
(5) Install the oil pan drain plug and tighten to
25N´m (18 lbs ft).
(6) Lower the vehicle.
(7) Fill the crankcase with the correct engine oil,
to the proper level. Refer to owners manual for spec-
ifications.
(8) Connect the negative battery cable.
WARNING: USE EXTREME CAUTION WHEN THE
ENGINE IS OPERATING. DO NOT PUT YOUR
HANDS NEAR THE PULLEYS, BELTS OR FAN. DO
NOT WEAR LOOSE CLOTHES.
(9) Start the engine and inspect for leaks.
CRANKSHAFT OIL SEAL -
FRONT
REMOVAL
(1) Disconnect the negative battery cable.
(2) Remove the accessory drive belt.
(3) Install the retaining lock for the crankshaft/
ring gear.
NOTE: If the hub of the belt pulley/vibration damper
is tight, use a puller to remove it. Do Not tilt the
puller. The groves of the puller MUST mesh fully
into the slots of the belt pulley.
NOTE: Inspect the running surface of the belt pulley
for wear.
(4) Remove the belt pully/vibration damper.
CAUTION: Care must be taken to prevent severe
damage to the crankshaft and mounting whole for
the front crankshaft seal.
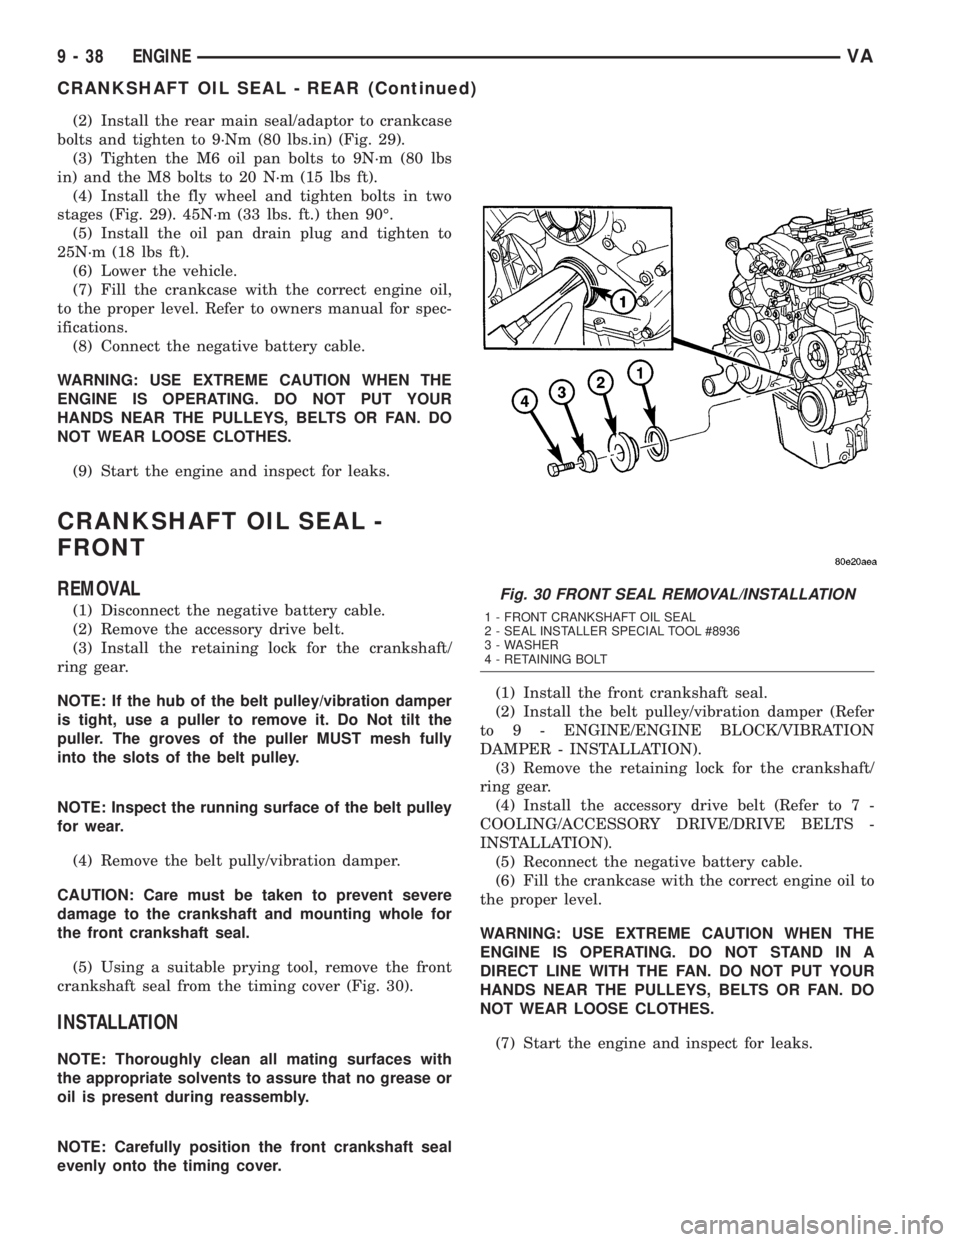
(5) Using a suitable prying tool, remove the front
crankshaft seal from the timing cover (Fig. 30).
INSTALLATION
NOTE: Thoroughly clean all mating surfaces with
the appropriate solvents to assure that no grease or
oil is present during reassembly.
NOTE: Carefully position the front crankshaft seal
evenly onto the timing cover.(1) Install the front crankshaft seal.
(2) Install the belt pulley/vibration damper (Refer
to 9 - ENGINE/ENGINE BLOCK/VIBRATION
DAMPER - INSTALLATION).
(3) Remove the retaining lock for the crankshaft/
ring gear.
(4) Install the accessory drive belt (Refer to 7 -
COOLING/ACCESSORY DRIVE/DRIVE BELTS -
INSTALLATION).
(5) Reconnect the negative battery cable.
(6) Fill the crankcase with the correct engine oil to
the proper level.
WARNING: USE EXTREME CAUTION WHEN THE
ENGINE IS OPERATING. DO NOT STAND IN A
DIRECT LINE WITH THE FAN. DO NOT PUT YOUR
HANDS NEAR THE PULLEYS, BELTS OR FAN. DO
NOT WEAR LOOSE CLOTHES.
(7) Start the engine and inspect for leaks.
Fig. 30 FRONT SEAL REMOVAL/INSTALLATION
1 - FRONT CRANKSHAFT OIL SEAL
2 - SEAL INSTALLER SPECIAL TOOL #8936
3 - WASHER
4 - RETAINING BOLT
9 - 38 ENGINEVA
CRANKSHAFT OIL SEAL - REAR (Continued)
Page 777 of 1232
FLYWHEEL
REMOVAL
(1) Remove transmission (Refer to 21 - TRANS-
MISSION/TRANSAXLE/AUTOMATIC - W5J400 -
REMOVAL).
NOTE: M6x90 bolts must be used with retaining
lock to prevent damage to rear end cover.
(2) Install retaining lock for crankshaft/starter
ring gear.
NOTE: Flywheel does not need balancing or should
it be interchanged.
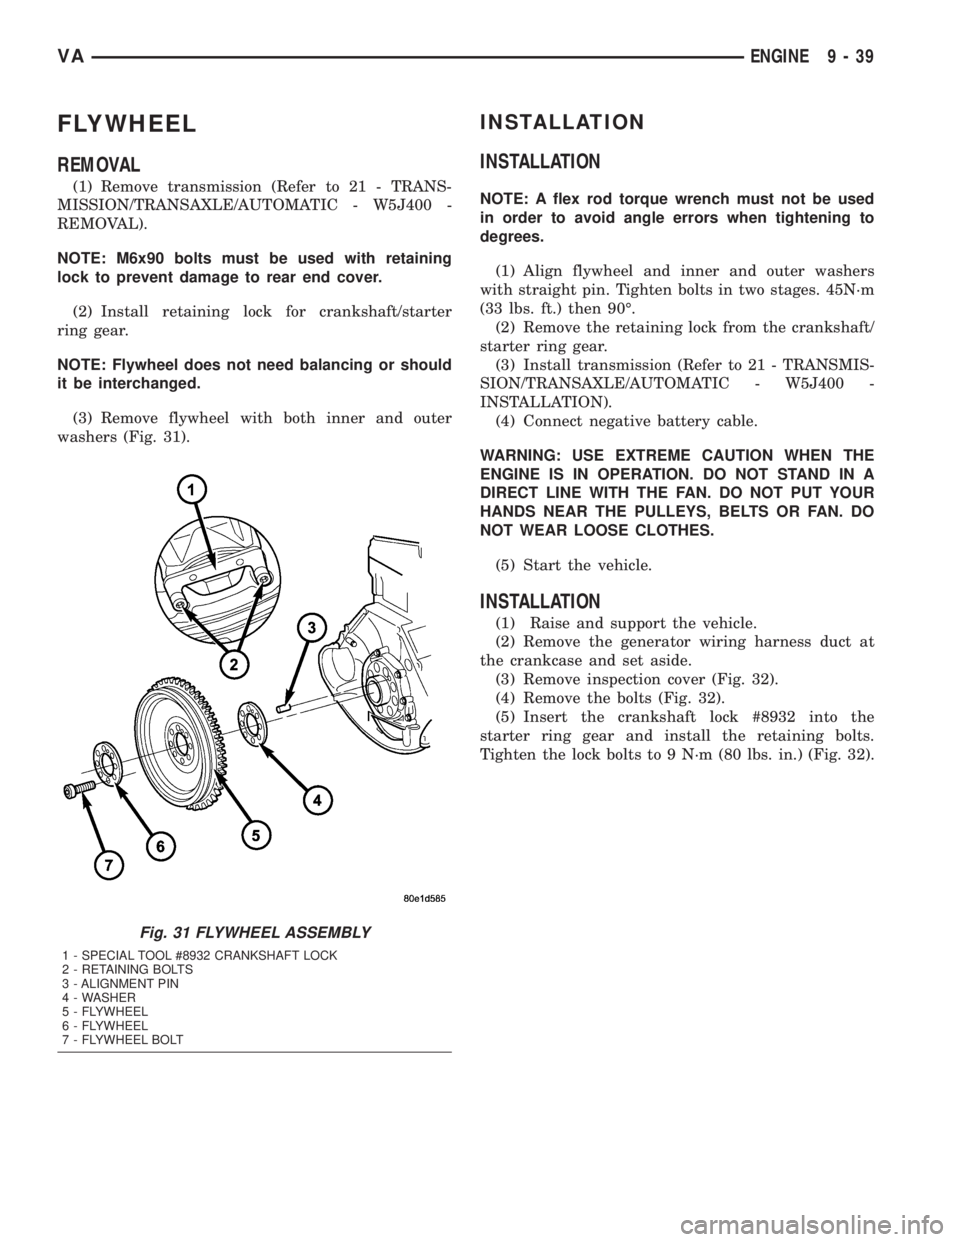
(3) Remove flywheel with both inner and outer
washers (Fig. 31).
INSTALLATION
INSTALLATION
NOTE: A flex rod torque wrench must not be used
in order to avoid angle errors when tightening to
degrees.
(1) Align flywheel and inner and outer washers
with straight pin. Tighten bolts in two stages. 45N´m
(33 lbs. ft.) then 90É.
(2) Remove the retaining lock from the crankshaft/
starter ring gear.
(3) Install transmission (Refer to 21 - TRANSMIS-
SION/TRANSAXLE/AUTOMATIC - W5J400 -
INSTALLATION).
(4) Connect negative battery cable.
WARNING: USE EXTREME CAUTION WHEN THE
ENGINE IS IN OPERATION. DO NOT STAND IN A
DIRECT LINE WITH THE FAN. DO NOT PUT YOUR
HANDS NEAR THE PULLEYS, BELTS OR FAN. DO
NOT WEAR LOOSE CLOTHES.
(5) Start the vehicle.
INSTALLATION
(1) Raise and support the vehicle.
(2) Remove the generator wiring harness duct at
the crankcase and set aside.
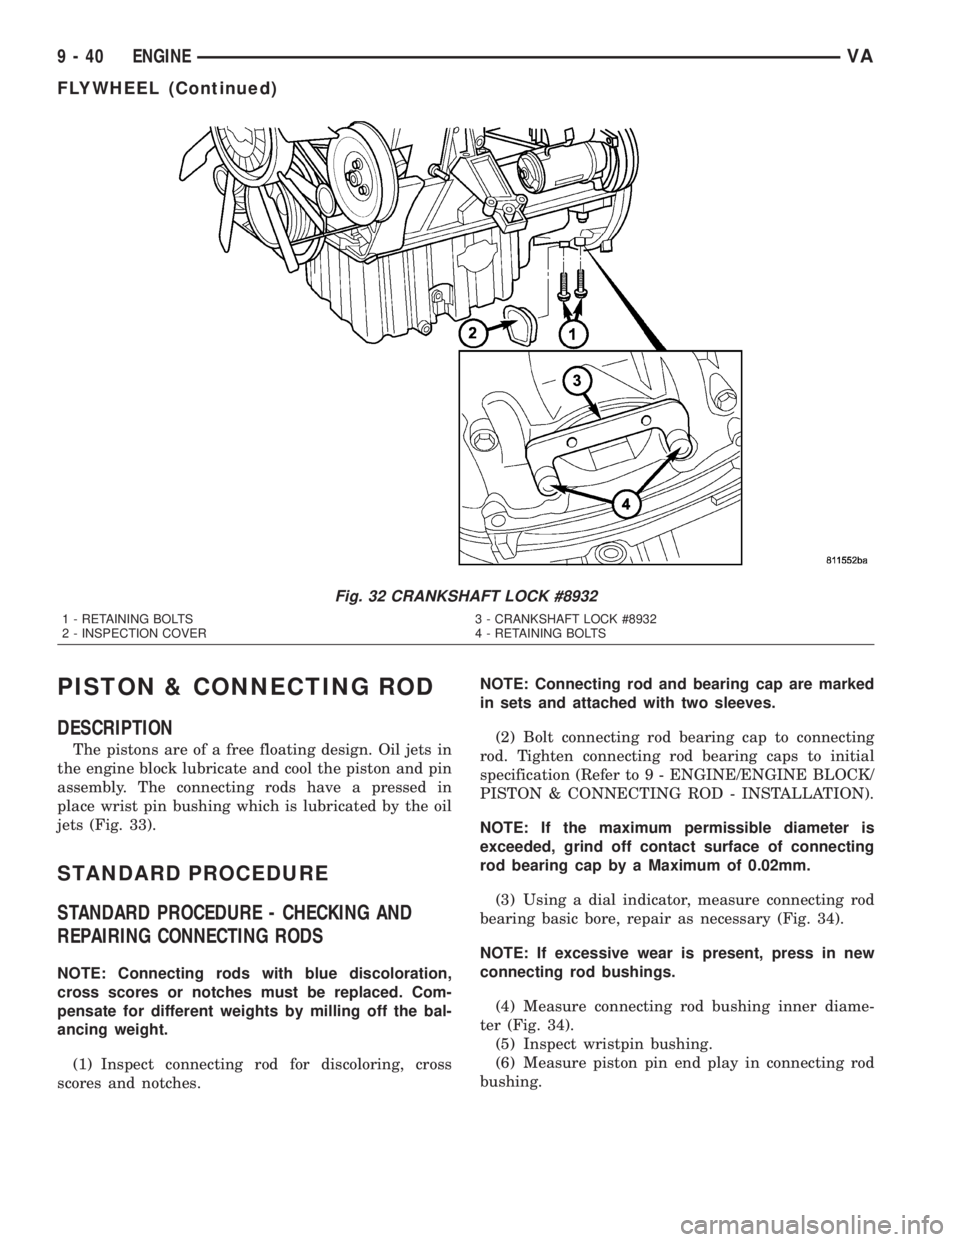
(3) Remove inspection cover (Fig. 32).
(4) Remove the bolts (Fig. 32).
(5) Insert the crankshaft lock #8932 into the
starter ring gear and install the retaining bolts.
Tighten the lock bolts to 9 N´m (80 lbs. in.) (Fig. 32).
Fig. 31 FLYWHEEL ASSEMBLY
1 - SPECIAL TOOL #8932 CRANKSHAFT LOCK
2 - RETAINING BOLTS
3 - ALIGNMENT PIN
4 - WASHER
5 - FLYWHEEL
6 - FLYWHEEL
7 - FLYWHEEL BOLT
VAENGINE 9 - 39
Page 778 of 1232
PISTON & CONNECTING ROD
DESCRIPTION
The pistons are of a free floating design. Oil jets in
the engine block lubricate and cool the piston and pin
assembly. The connecting rods have a pressed in
place wrist pin bushing which is lubricated by the oil
jets (Fig. 33).
STANDARD PROCEDURE
STANDARD PROCEDURE - CHECKING AND
REPAIRING CONNECTING RODS
NOTE: Connecting rods with blue discoloration,
cross scores or notches must be replaced. Com-
pensate for different weights by milling off the bal-
ancing weight.
(1) Inspect connecting rod for discoloring, cross
scores and notches.NOTE: Connecting rod and bearing cap are marked
in sets and attached with two sleeves.
(2) Bolt connecting rod bearing cap to connecting
rod. Tighten connecting rod bearing caps to initial
specification (Refer to 9 - ENGINE/ENGINE BLOCK/
PISTON & CONNECTING ROD - INSTALLATION).
NOTE: If the maximum permissible diameter is
exceeded, grind off contact surface of connecting
rod bearing cap by a Maximum of 0.02mm.
(3) Using a dial indicator, measure connecting rod
bearing basic bore, repair as necessary (Fig. 34).
NOTE: If excessive wear is present, press in new
connecting rod bushings.
(4) Measure connecting rod bushing inner diame-
ter (Fig. 34).
(5) Inspect wristpin bushing.
(6) Measure piston pin end play in connecting rod
bushing.
Fig. 32 CRANKSHAFT LOCK #8932
1 - RETAINING BOLTS 3 - CRANKSHAFT LOCK #8932
2 - INSPECTION COVER 4 - RETAINING BOLTS
9 - 40 ENGINEVA
FLYWHEEL (Continued)
Page 779 of 1232
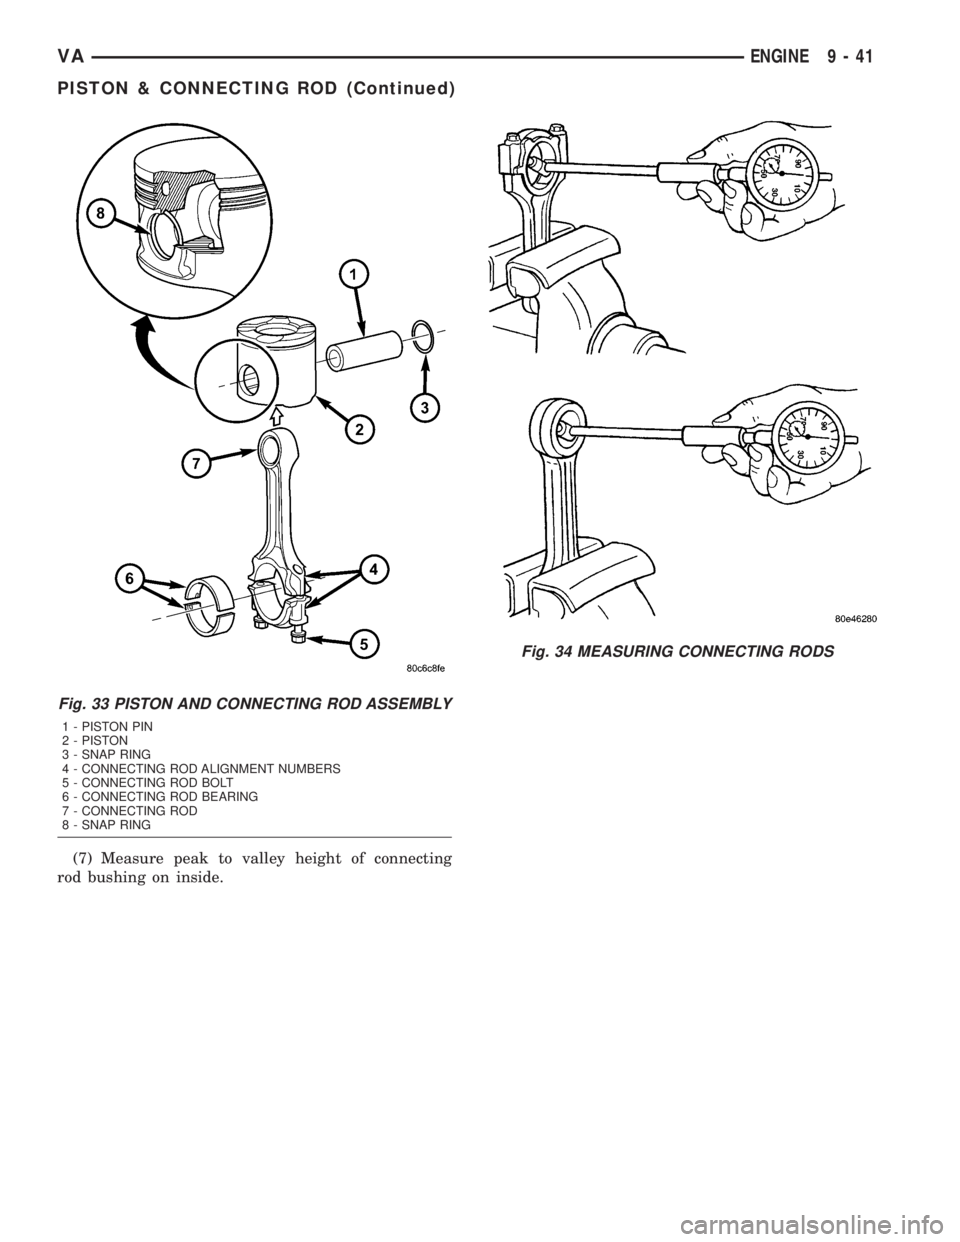
(7) Measure peak to valley height of connecting
rod bushing on inside.
Fig. 33 PISTON AND CONNECTING ROD ASSEMBLY
1 - PISTON PIN
2 - PISTON
3 - SNAP RING
4 - CONNECTING ROD ALIGNMENT NUMBERS
5 - CONNECTING ROD BOLT
6 - CONNECTING ROD BEARING
7 - CONNECTING ROD
8 - SNAP RING
Fig. 34 MEASURING CONNECTING RODS
VAENGINE 9 - 41
PISTON & CONNECTING ROD (Continued)
Page 780 of 1232
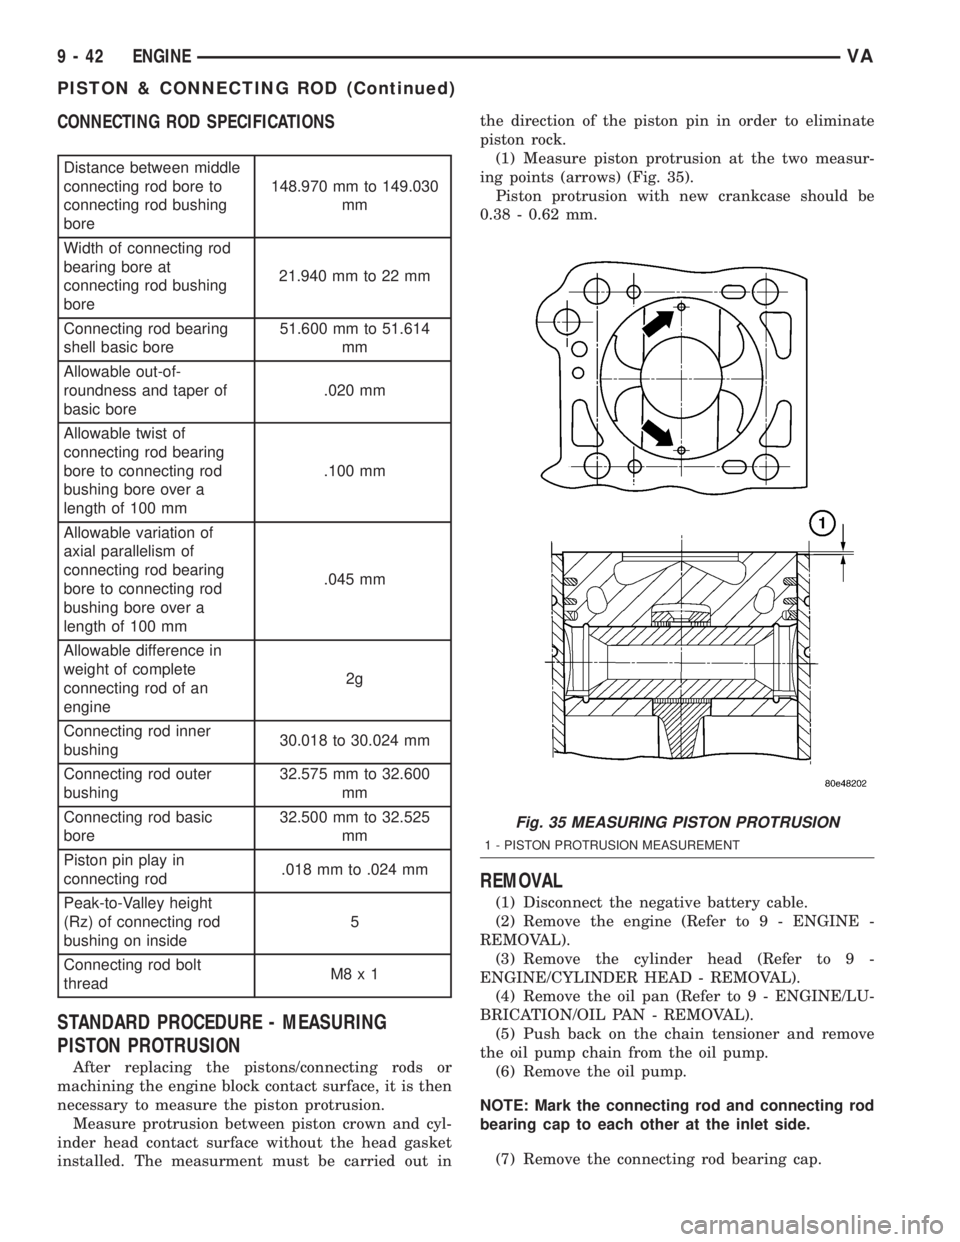
CONNECTING ROD SPECIFICATIONS
Distance between middle
connecting rod bore to
connecting rod bushing
bore148.970 mm to 149.030
mm
Width of connecting rod
bearing bore at
connecting rod bushing
bore21.940 mm to 22 mm
Connecting rod bearing
shell basic bore51.600 mm to 51.614
mm
Allowable out-of-
roundness and taper of
basic bore.020 mm
Allowable twist of
connecting rod bearing
bore to connecting rod
bushing bore over a
length of 100 mm.100 mm
Allowable variation of
axial parallelism of
connecting rod bearing
bore to connecting rod
bushing bore over a
length of 100 mm.045 mm
Allowable difference in
weight of complete
connecting rod of an
engine2g
Connecting rod inner
bushing30.018 to 30.024 mm
Connecting rod outer
bushing32.575 mm to 32.600
mm
Connecting rod basic
bore32.500 mm to 32.525
mm
Piston pin play in
connecting rod.018 mm to .024 mm
Peak-to-Valley height
(Rz) of connecting rod
bushing on inside5
Connecting rod bolt
threadM8x1
STANDARD PROCEDURE - MEASURING
PISTON PROTRUSION
After replacing the pistons/connecting rods or
machining the engine block contact surface, it is then
necessary to measure the piston protrusion.
Measure protrusion between piston crown and cyl-
inder head contact surface without the head gasket
installed. The measurment must be carried out inthe direction of the piston pin in order to eliminate
piston rock.
(1) Measure piston protrusion at the two measur-
ing points (arrows) (Fig. 35).
Piston protrusion with new crankcase should be
0.38 - 0.62 mm.
REMOVAL
(1) Disconnect the negative battery cable.
(2) Remove the engine (Refer to 9 - ENGINE -
REMOVAL).
(3) Remove the cylinder head (Refer to 9 -
ENGINE/CYLINDER HEAD - REMOVAL).
(4) Remove the oil pan (Refer to 9 - ENGINE/LU-
BRICATION/OIL PAN - REMOVAL).
(5) Push back on the chain tensioner and remove
the oil pump chain from the oil pump.
(6) Remove the oil pump.
NOTE: Mark the connecting rod and connecting rod
bearing cap to each other at the inlet side.
(7) Remove the connecting rod bearing cap.
Fig. 35 MEASURING PISTON PROTRUSION
1 - PISTON PROTRUSION MEASUREMENT
9 - 42 ENGINEVA
PISTON & CONNECTING ROD (Continued)