MITSUBISHI 3000GT 1991 Service Manual
Manufacturer: MITSUBISHI, Model Year: 1991, Model line: 3000GT, Model: MITSUBISHI 3000GT 1991Pages: 1146, PDF Size: 76.68 MB
Page 501 of 1146
AUTOMATIC TRANSAXLE - Service Adjustment Procedures23-49
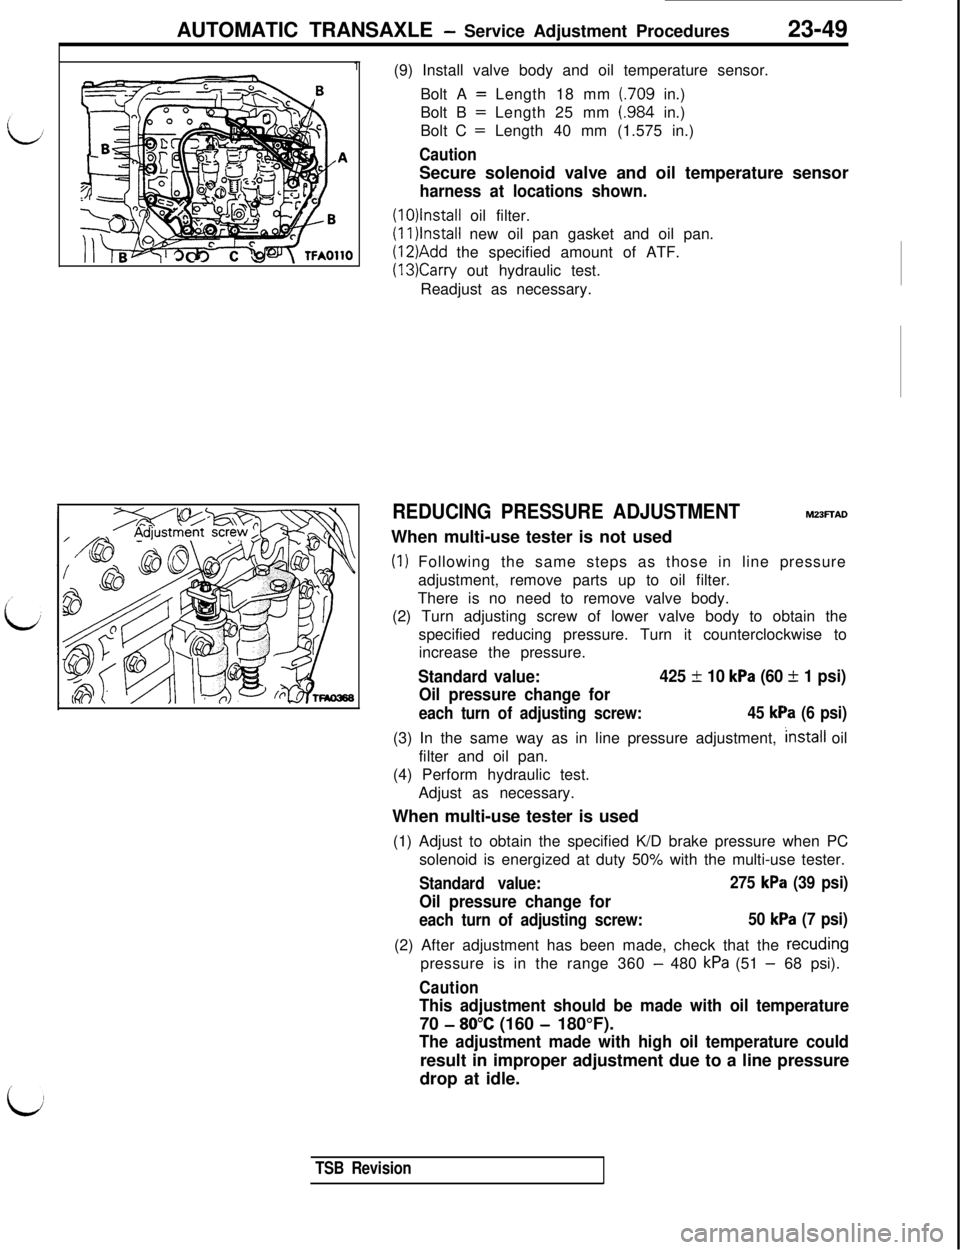
1(9) Install valve body and oil temperature sensor.
Bolt A
= Length 18 mm (.709 in.)
Bolt B
= Length 25 mm (.984 in.)
Bolt C
= Length 40 mm (1.575 in.)
CautionSecure solenoid valve and oil temperature sensor
harness at locations shown.
(1O)lnstall oil filter.(1l)lnstall new oil pan gasket and oil pan.
(12)Add the specified amount of ATF.
(13)Carry out hydraulic test.
Readjust as necessary.
REDUCING PRESSURE ADJUSTMENTh323FfADWhen multi-use tester is not used
(1) Following the same steps as those in line pressure
adjustment, remove parts up to oil filter.
There is no need to remove valve body.
(2) Turn adjusting screw of lower valve body to obtain the
specified reducing pressure. Turn it counterclockwise to
increase the pressure.
Standard value:425 f 10 kPa (60 f 1 psi)
Oil pressure change for
each turn of adjusting screw:45 kPa (6 psi)(3) In the same way as in line pressure adjustment,
/nstall oil
filter and oil pan.
(4) Perform hydraulic test.
Adjust as necessary.
When multi-use tester is used
(1) Adjust to obtain the specified K/D brake pressure when PC
solenoid is energized at duty 50% with the multi-use tester.
Standard value:275 kPa (39 psi)
Oil pressure change for
each turn of adjusting screw:50 kPa (7 psi)(2) After adjustment has been made, check that the recuding
pressure is in the range 360
- 480 kPa (51 - 68 psi).
Caution
This adjustment should be made with oil temperature70
- 80°C (160 - 180°F).
The adjustment made with high oil temperature couldresult in improper adjustment due to a line pressure
drop at idle.
TSB Revision
Page 502 of 1146
23-50AUTOMATIC TRANSAXLE - service AdiustmentProcedures
09FO117
m09FOO19
L Pushbuttonv09FOO61
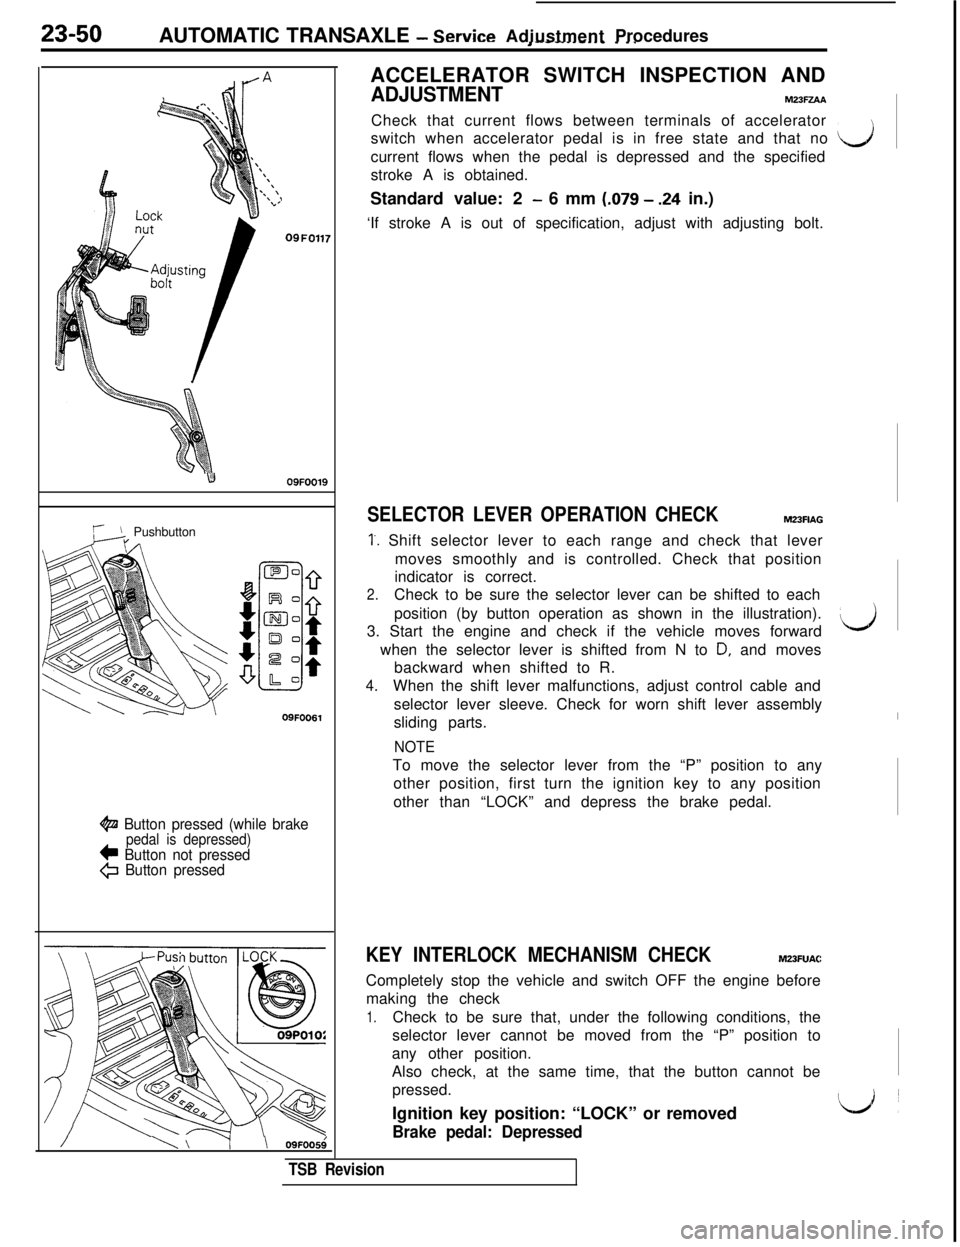
@ Button pressed (while brakepedal is depressed)c Button not pressed@ Button pressed
/\ \\ OSFODdACCELERATOR SWITCH INSPECTION AND
ADJUSTMENTM23FZAACheck that current flows between terminals of accelerator
switch when accelerator pedal is in free state and that no
dcurrent flows when the pedal is depressed and the specified
stroke A is obtained.
Standard value: 2
- 6 mm (.079 - .24 in.)
‘If stroke A is out of specification, adjust with adjusting bolt.
SELECTOR LEVER OPERATION CHECKM23FIAG
1.. Shift selector lever to each range and check that lever
moves smoothly and is controlled. Check that position
indicator is correct.
2.Check to be sure the selector lever can be shifted to each
position (by button operation as shown in the illustration).
3. Start the engine and check if the vehicle moves forward
dwhen the selector lever is shifted from N to
D, and moves
backward when shifted to R.
4.When the shift lever malfunctions, adjust control cable and
selector lever sleeve. Check for worn shift lever assembly
sliding parts.
I
NOTETo move the selector lever from the “P” position to any
other position, first turn the ignition key to any position
other than “LOCK” and depress the brake pedal.
KEY INTERLOCK MECHANISM CHECKM23FlJACCompletely stop the vehicle and switch OFF the engine before
making the check
1.Check to be sure that, under the following conditions, the
selector lever cannot be moved from the “P” position to
any other position.
Also check, at the same time, that the button cannot be
pressed.
Ignition key position: “LOCK” or removed
Brake pedal: Depressed
TSB Revision
Page 503 of 1146
AUTOMATIC TRANSAXLE - Service Adiustment Procedures23-51
D9N007SPush button
II
2.Check to be sure that, under the following conditions, the
selector lever can be moved from the “P” position to any
other position.
Press the button a few times and check to be sure that the
selector lever moves smoothly.
Ignition key position: “ACC”
Brake pedal: Depressed
Button
: Pressed
3.Check to be sure that, at all positions of the selector lever
(other than “P”), the ignition key cannot be turned to the
“LOCK” position.
Check to be sure that the ignition key smoothly turns to the
“LOCK” position when the selector lever is then set to the
“P” position and the button is released.
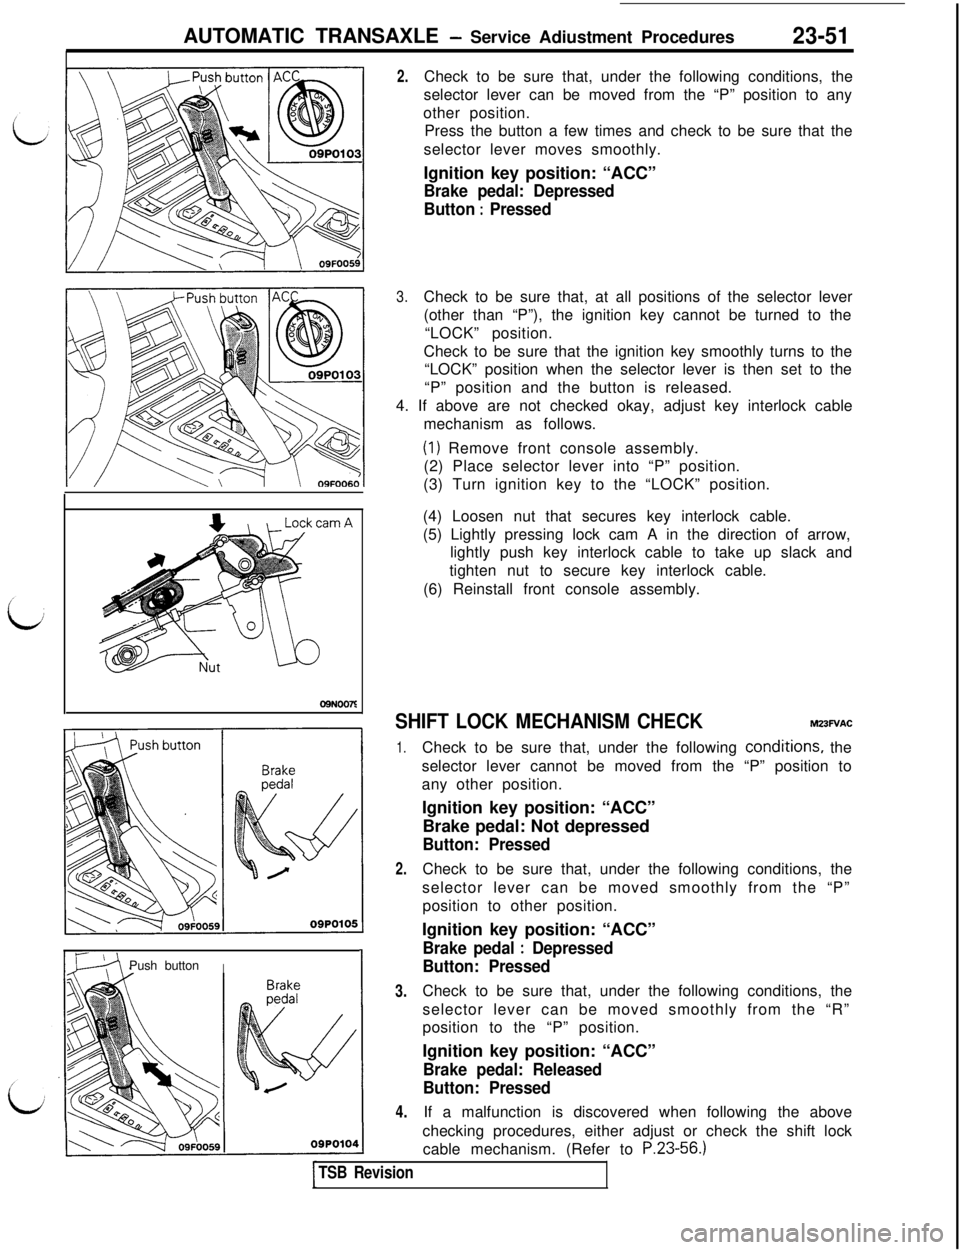
4. If above are not checked okay, adjust key interlock cable
mechanism as follows.
(1) Remove front console assembly.
(2) Place selector lever into “P” position.
(3) Turn ignition key to the “LOCK” position.
(4) Loosen nut that secures key interlock cable.
(5) Lightly pressing lock cam A in the direction of arrow,
lightly push key interlock cable to take up slack and
tighten nut to secure key interlock cable.
(6) Reinstall front console assembly.
SHIFT LOCK MECHANISM CHECKMZ3FVAC
1.
2.
3.
4.Check to be sure that, under the following
condi,tions, the
selector lever cannot be moved from the “P” position to
any other position.
Ignition key position: “ACC”
Brake pedal: Not depressed
Button: PressedCheck to be sure that, under the following conditions, the
selector lever can be moved smoothly from the “P”
position to other position.
Ignition key position: “ACC”
Brake pedal : Depressed
Button: PressedCheck to be sure that, under the following conditions, the
selector lever can be moved smoothly from the “R”
position to the “P” position.
Ignition key position: “ACC”
Brake pedal: Released
Button: PressedIf a malfunction is discovered when following the above
checking procedures, either adjust or check the shift lock
cable mechanism. (Refer to
P.23-56.)
TSB Revision
Page 504 of 1146
23-52
AUTOMATIC TRANSAXLE - Service Adjustment Procedures
Manual
control leverINHIBITOR SWITCH AND CONTROL CABLE
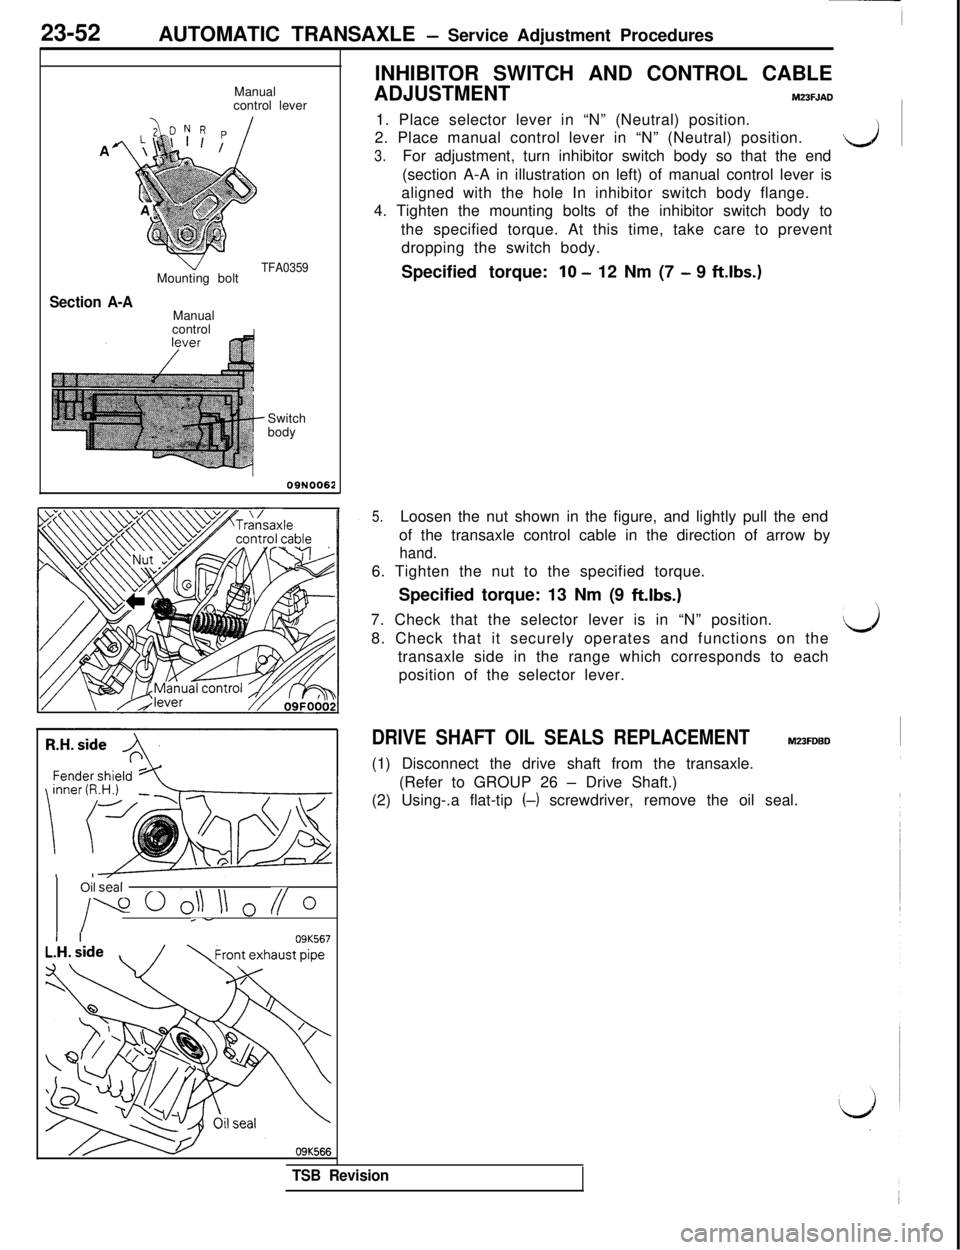
ADJUSTMENTM23FJADI1. Place selector lever in “N” (Neutral) position.
2. Place manual control lever in “N” (Neutral) position.
d3.For adjustment, turn inhibitor switch body so that the end
(section A-A in illustration on left) of manual control lever is
aligned with the hole In inhibitor switch body flange.
4. Tighten the mounting bolts of the inhibitor switch body to
the specified torque. At this time, take care to prevent
dropping the switch body.
TFA0359Mounting bolt
Section A-AManual
control
ISwitch
body
09N0062Oil
skal
1
v0 o\l II 0 // 0*-
I I09K567
09K566Specified torque:
10 - 12 Nm (7 - 9 ftlbs.)
5.Loosen the nut shown in the figure, and lightly pull the end
of the transaxle control cable in the direction of arrow by
hand.6. Tighten the nut to the specified torque.
Specified torque: 13 Nm (9
ftlbs.)7. Check that the selector lever is in “N” position.
8. Check that it securely operates and functions on the
transaxle side in the range which corresponds to each
position of the selector lever.
d
DRIVE SHAFT OIL SEALS REPLACEMENTM23FLN3D(1) Disconnect the drive shaft from the transaxle.
(Refer to GROUP 26
- Drive Shaft.)
(2) Using-.a flat-tip (-) screwdriver, remove the oil seal.
TSB Revision
Page 505 of 1146
AUTOMATIC TRANSAXLE - Service Adjustment Procedures23-53 ~
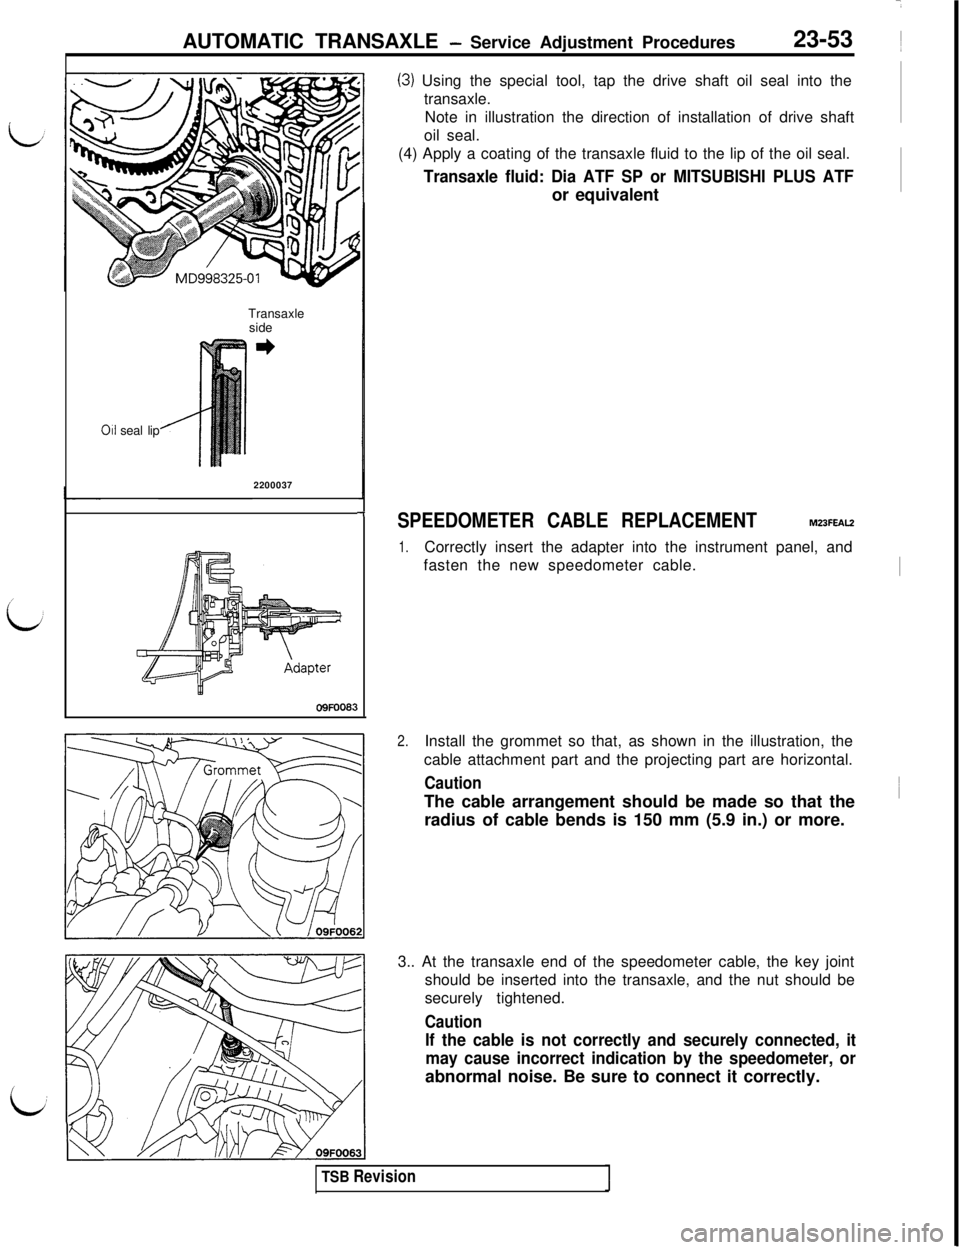
(3) Using the special tool, tap the drive shaft oil seal into the
transaxle.
Note in illustration the direction of installation of drive shaft
oil seal.
(4) Apply a coating of the transaxle fluid to the lip of the oil seal.
Transaxle fluid: Dia ATF SP or MITSUBISHI PLUS ATFor equivalent
Transaxle
side
011 seal lip
2200037
-fSPEEDOMETER CABLE REPLACEMENTM23FEAL2
1.Correctly insert the adapter into the instrument panel, and
fasten the new speedometer cable.
I
OQFOO83
2.Install the grommet so that, as shown in the illustration, the
cable attachment part and the projecting part are horizontal.
Caution1
The cable arrangement should be made so that the
’radius of cable bends is 150 mm (5.9 in.) or more.
3.. At the transaxle end of the speedometer cable, the key joint
should be inserted into the transaxle, and the nut should be
securely tightened.
Caution
If the cable is not correctly and securely connected, it
may cause incorrect indication by the speedometer, orabnormal noise. Be sure to connect it correctly.
TSB Revision
Page 506 of 1146
23-54AUTOMATIC TRANSAXLE - Transaxle Control.
TRANSAXLE CONTROLM231A- _
REMOVAL AND INSTALLATION\
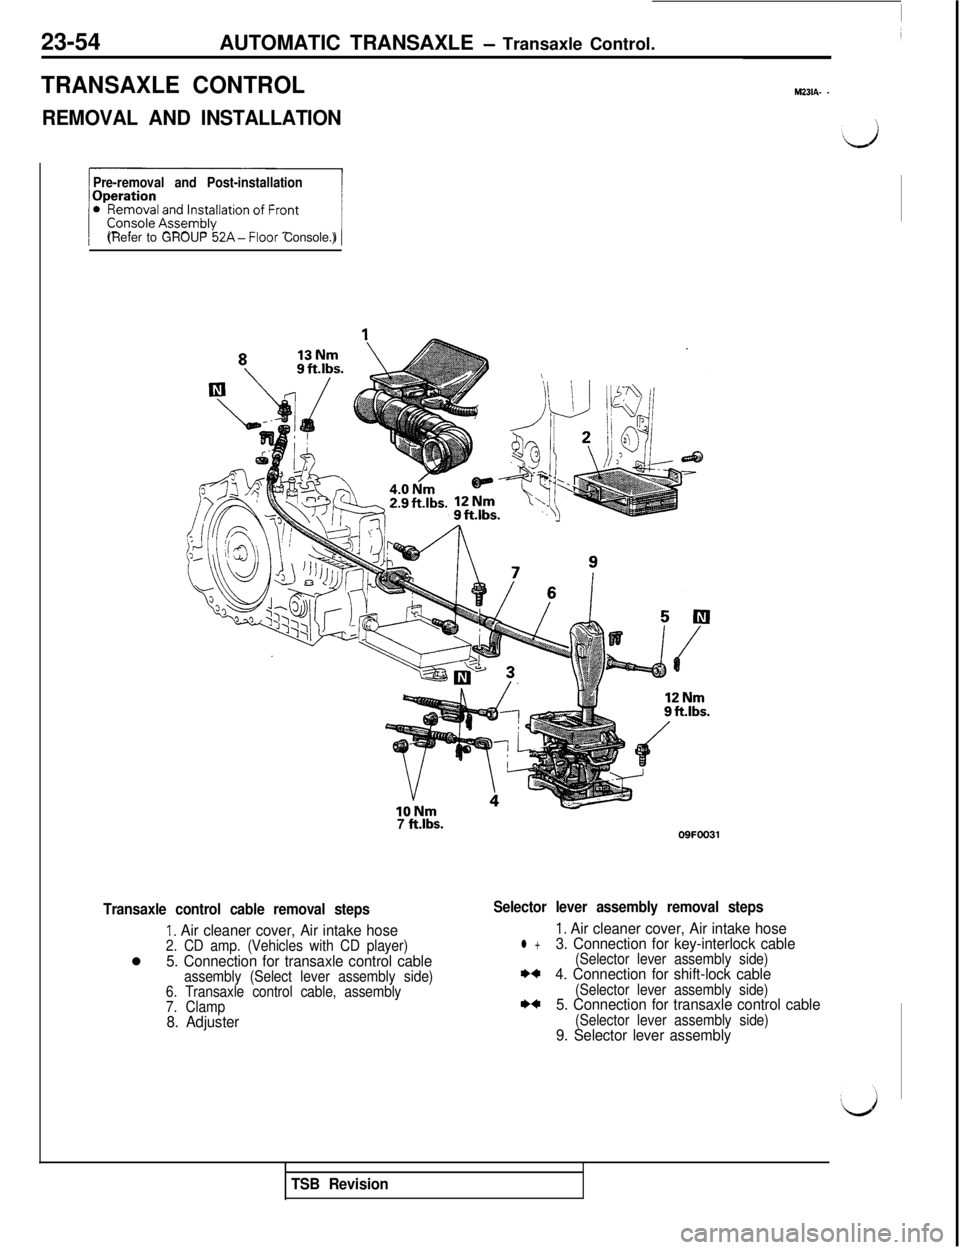
Pre-removal and Post-installation(Refer to GROUP
52A-Floor Console.)
7 ft.lbs.
Transaxle control cable removal steps
1. Air cleaner cover, Air intake hose2. CD amp. (Vehicles with CD player)l5. Connection for transaxle control cableassembly (Select lever assembly side)
6. Transaxle control cable, assembly
7. Clamp
8. Adjuster09FOO31
Selector lever assembly removal steps
1. Air cleaner cover, Air intake hosel +3. Connection for key-interlock cable(Selector lever assembly side)*+4. Connection for shift-lock cable(Selector lever assembly side)I)+5. Connection for transaxle control cable(Selector lever assembly side)9. Selector lever assembly
TSB Revision
Page 507 of 1146
AUTOMATIC TRANSAXLE - Transaxle Control
23-55
V’
1112 Nm9 ft.lbs.
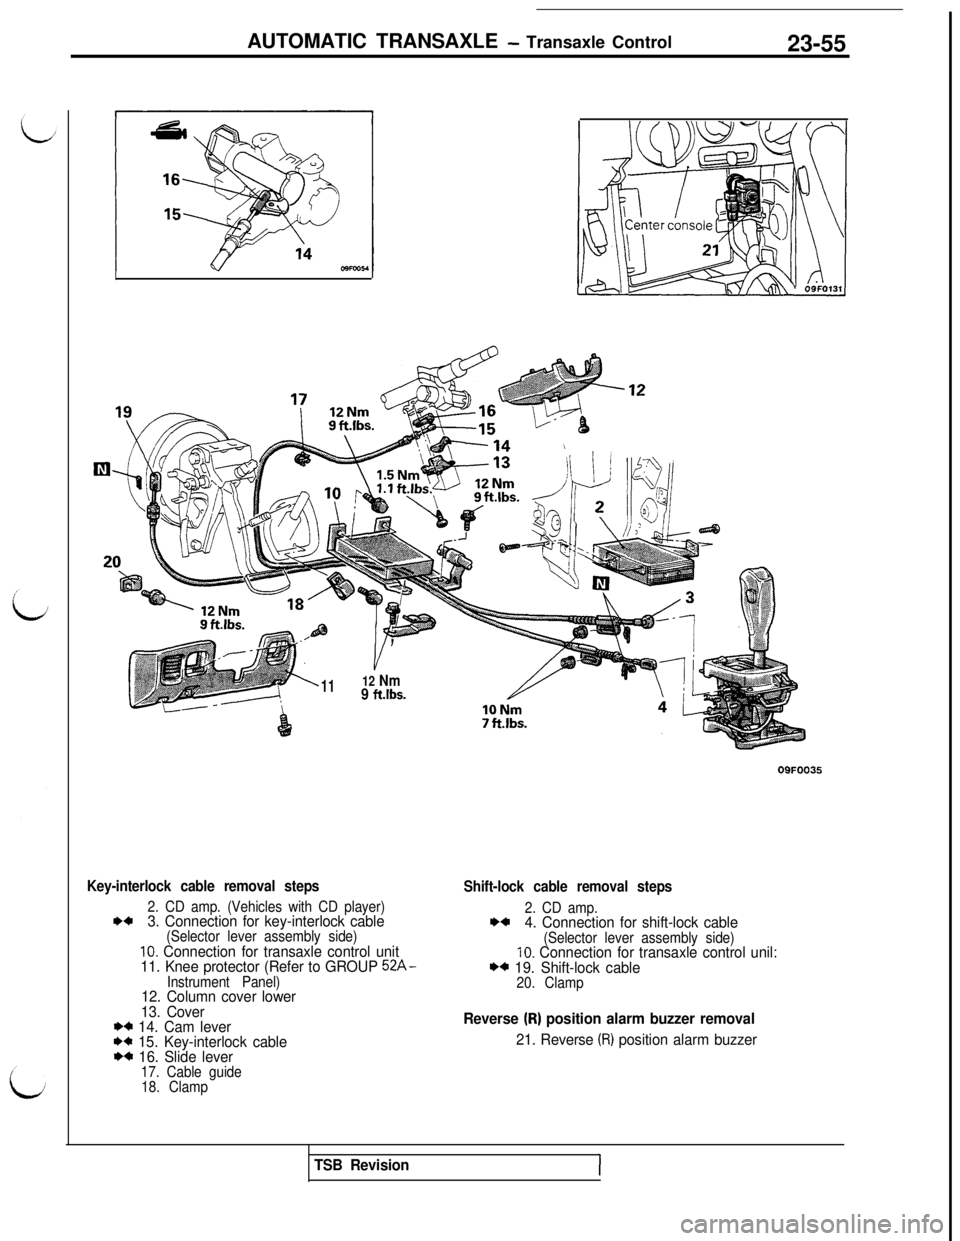
Key-interlock cable removal steps
2. CD amp. (Vehicles with CD player)I)+3. Connection for key-interlock cable(Selector lever assembly side)10. Connection for transaxle control unit
11. Knee protector (Refer to GROUP 52A-
Instrument Panel)12. Column cover lower
13. Cover
*C 14. Cam lever** 15. Key-interlock cableI)+ 16. Slide lever17. Cable guide
18. ClampOQFOO35
Shift-lock cable removal steps
2. CD amp.**4. Connection for shift-lock cable(Selector lever assembly side)10. Connection for transaxle control unil:*4 19. Shift-lock cable20. Clamp
Reverse (R) position alarm buzzer removal
21. Reverse (R) position alarm buzzer
TSB Revision
Page 508 of 1146
23-56AUTOMATIC TRANSAXLE - Transaxle ControlOQPOOQQ
09FOO5
INSPECTIONM231CAMl Check the control cable for function and for damage.
lCheck the outer cable (key interlock cable, shift lock cable)
’for damage and spring for breakage and tension.~J
lCheck the inner cable (key interlock cable, shift lock cable)
for extension.
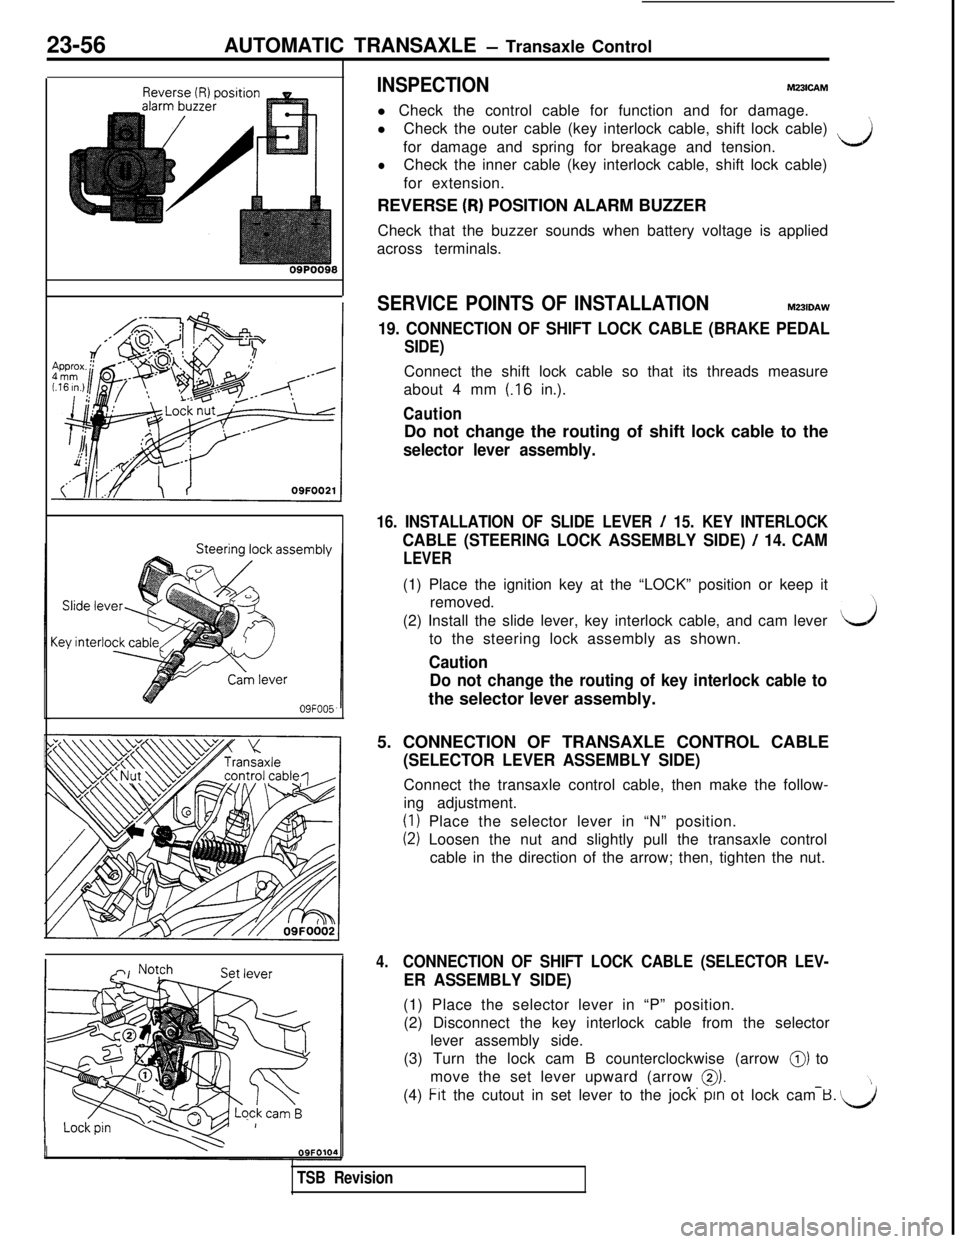
REVERSE
(R) POSITION ALARM BUZZER
Check that the buzzer sounds when battery voltage is applied
across terminals.
SERVICE POINTS OF INSTALLATIONM231DAW
19. CONNECTION OF SHIFT LOCK CABLE (BRAKE PEDAL
SIDE)Connect the shift lock cable so that its threads measure
about 4 mm
(.16 in.).
CautionDo not change the routing of shift lock cable to the
selector lever assembly.
16. INSTALLATION OF SLIDE LEVER / 15. KEY INTERLOCK
CABLE (STEERING LOCK ASSEMBLY SIDE) / 14. CAM
LEVER(1) Place the ignition key at the “LOCK” position or keep it
removed.
(2) Install the slide lever, key interlock cable, and cam lever
to the steering lock assembly as shown.
Caution
Do not change the routing of key interlock cable tothe selector lever assembly.
5. CONNECTION OF TRANSAXLE CONTROL CABLE
(SELECTOR LEVER ASSEMBLY SIDE)Connect the transaxle control cable, then make the follow-
ing adjustment.
(1) Place the selector lever in “N” position.
(2) Loosen the nut and slightly pull the transaxle control
cable in the direction of the arrow; then, tighten the nut.
4.CONNECTION OF SHIFT LOCK CABLE (SELECTOR LEV-
ER ASSEMBLY SIDE)(1) Place the selector lever in “P” position.
(2) Disconnect the key interlock cable from the selector
lever assembly side.
(3) Turn the lock cam B counterclockwise (arrow
0) to
move the set lever upward (arrow
0)._.-(4) Frt the cutout in set lever to the jock pm ot lock cam B. u
TSB Revision
Page 509 of 1146
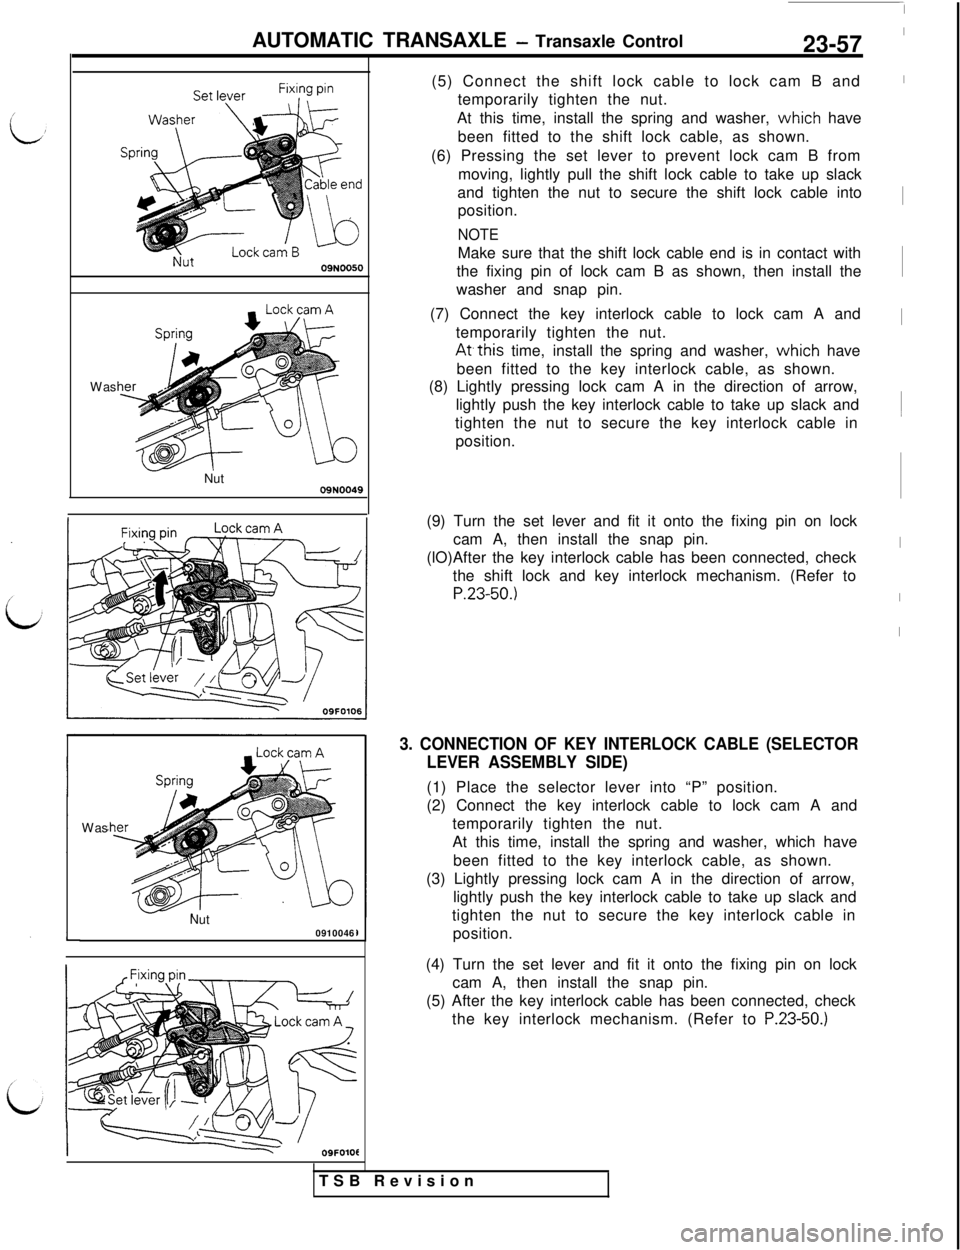
AUTOMATIC TRANSAXLE - Transaxle Control23-57
09N0050Was
Nut
09N0049Was
Nut
0910046
I
-09FOlOt(5) Connect the shift lock cable to lock cam B and
temporarily tighten the nut.
At this time, install the spring and washer,
vvhich have
been fitted to the shift lock cable, as shown.
(6) Pressing the set lever to prevent lock cam B from
moving, lightly pull the shift lock cable to take up slack
and tighten the nut to secure the shift lock cable into
position.
NOTEMake sure that the shift lock cable end is in contact with
the fixing pin of lock cam B as shown, then install the
washer and snap pin.
(7) Connect the key interlock cable to lock cam A and
temporarily tighten the nut.
At,this time, install the spring and washer, vvhich have
been fitted to the key interlock cable, as shown.
(8) Lightly pressing lock cam A in the direction of arrow,
lightly push the key interlock cable to take up slack and
tighten the nut to secure the key interlock cable in
position.
(9) Turn the set lever and fit it onto the fixing pin on lock
cam A, then install the snap pin.
(lO)After the key interlock cable has been connected, check
the shift lock and key interlock mechanism. (Refer to
P.23-50.)
3. CONNECTION OF KEY INTERLOCK CABLE (SELECTOR
LEVER ASSEMBLY SIDE)(1) Place the selector lever into “P” position.
(2) Connect the key interlock cable to lock cam A and
temporarily tighten the nut.
At this time, install the spring and washer, which have
been fitted to the key interlock cable, as shown.
(3) Lightly pressing lock cam A in the direction of arrow,
lightly push the key interlock cable to take up slack and
tighten the nut to secure the key interlock cable in
position.
(4) Turn the set lever and fit it onto the fixing pin on lock
cam A, then install the snap pin.
(5) After the key interlock cable has been connected, check
the key interlock mechanism. (Refer to
P.23-50.)TSB Revision
-1
I
I
I~
I~
I
I
I
Page 510 of 1146
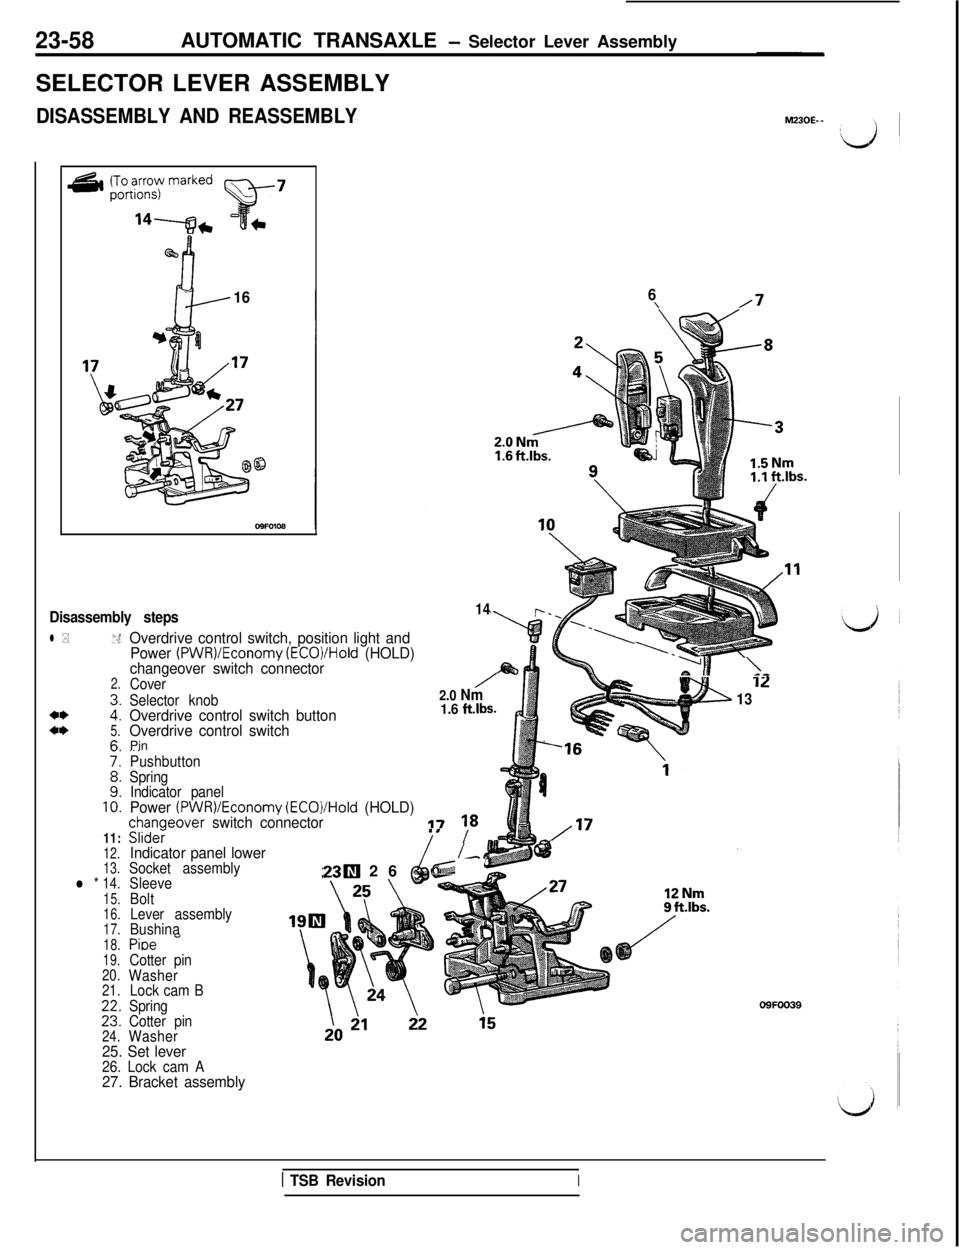
23-58AUTOMATIC TRANSAXLE - Selector Lever Assembly
SELECTOR LEVER ASSEMBLY
DISASSEMBLY AND REASSEMBLY
@b
h-
16
Disassembly steps
l *1.
2.
**i:a*5.
76:
::10.11:
12.
13.
l * 14.15.
16.
17.
18.
19.
20.
21.
224.
6\/7
14
Overdrive control switch, position light and
Power (PWRVEconomy (ECO)/Hold (HOLD)\.GLg
changeover switch connectorCover/>I \-
Selector knob2.0 Nm
Overdrive control switch button1.6 ftlbs.
13
Overdrive control switchPin..,Pushbutton
Spring
Indicator panel
Power (PWRVEconomy (ECOVHold (HOLD)chanaeover switch connector17 18SliderIndicator panel lowerSocket assembly
Sleeve
Bolt
Lever assembly
BushinaI
23W 26fi& -’
Pioe ”Cotter pin
Washer
Lock cam B
Spring
Cotter pin
Washer
25. Set lever26. Lock cam A27. Bracket assembly09FOO39
1 TSB RevisionI