ESP MITSUBISHI ECLIPSE 1991 Owner's Guide
[x] Cancel search | Manufacturer: MITSUBISHI, Model Year: 1991, Model line: ECLIPSE, Model: MITSUBISHI ECLIPSE 1991Pages: 1216, PDF Size: 67.42 MB
Page 620 of 1216
L
)il spri
12A0049
REAR SUSPENSION
SERVICE POINTS OF REASSEMBLYNl7QPA2
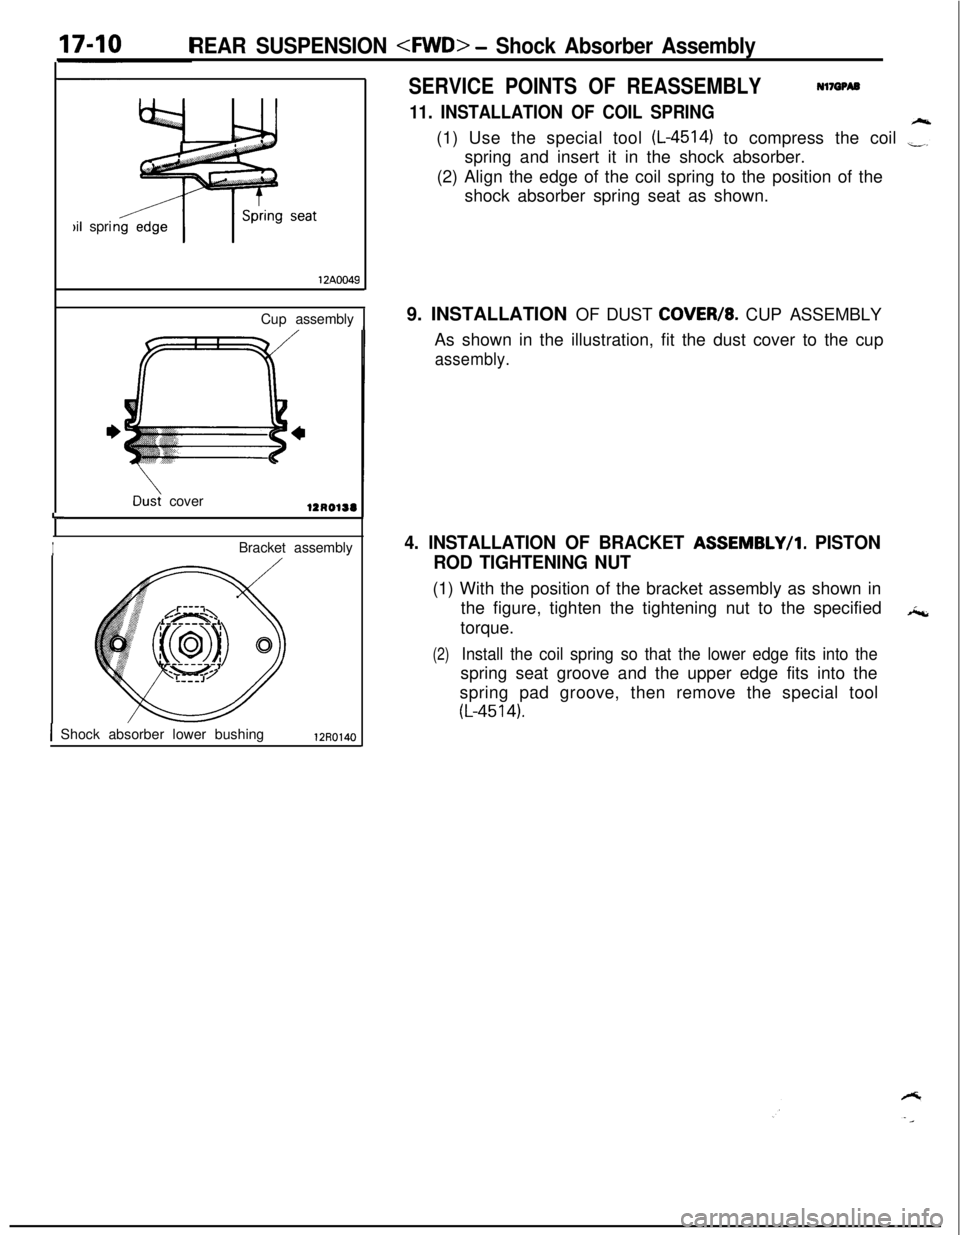
11. INSTALLATION OF COIL SPRING(1) Use the special tool
(L-4514) to compress the coil ,“3”spring and insert it in the shock absorber.
(2) Align the edge of the coil spring to the position of the
shock absorber spring seat as shown.
Cup assembly
1
Dd cover
IBracket assembly
1 Shock absorber lower bushing12R01409. INSTALLATION OF DUST
COVEW8. CUP ASSEMBLY
As shown in the illustration, fit the dust cover to the cup
assembly.
4. INSTALLATION OF BRACKET ASSEMBLY/l. PISTON
ROD TIGHTENING NUT(1) With the position of the bracket assembly as shown in
the figure, tighten the tightening nut to the specified*c,
torque.
(2)Install the coil spring so that the lower edge fits into thespring seat groove and the upper edge fits into the
spring pad groove, then remove the special tool
(L-4514).
Page 659 of 1216
STEERING - Service Adjustment Procedures < Power Steering >194113AO29313AO290
STEERING WHEEL CENTERINGNlSFIYAFCenter the steering wheel in the same way as the manual
steering. (Refer to P.19-8.1
STATIONARY STEERING EFFORT CHECKNlSFFAI
1. With the vehicle stopped on a flat, paved surface, turn the
steering wheel to the straight ahead position.
2. Start the engine and set it to 1,000 + 100 rpm.
Caution
After checking the engine rpm., there must be a return to
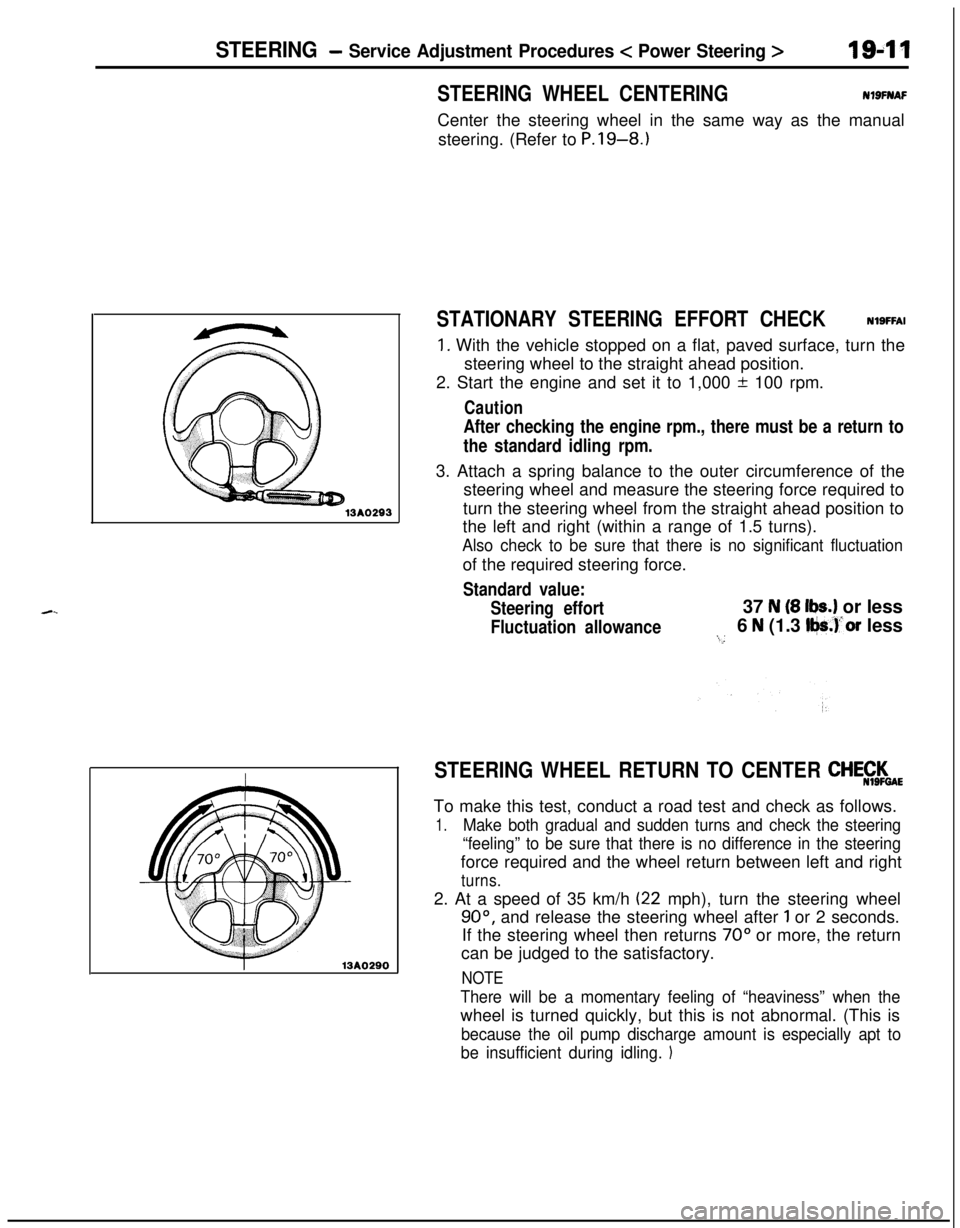
the standard idling rpm.3. Attach a spring balance to the outer circumference of the
steering wheel and measure the steering force required to
turn the steering wheel from the straight ahead position to
the left and right (within a range of 1.5 turns).
Also check to be sure that there is no significant fluctuationof the required steering force.
Standard value:
Steering effort37
N (8 lbs.) or less
Fluctuation allowance6 N (1.3 Iljs.)‘or less:...
STEERING WHEEL RETURN TO CENTER CHE$$$aETo make this test, conduct a road test and check as follows.
1.Make both gradual and sudden turns and check the steering
“feeling” to be sure that there is no difference in the steeringforce required and the wheel return between left and right
turns.2. At a speed of 35 km/h
(22 mph), turn the steering wheel
90°, and release the steering wheel after 1 or 2 seconds.
If the steering wheel then returns
70” or more, the return
can be judged to the satisfactory.
NOTE
There will be a momentary feeling of “heaviness” when thewheel is turned quickly, but this is not abnormal. (This is
because the oil pump discharge amount is especially apt to
be insufficient during idling.
1
Page 691 of 1216
STEERING - Power Steering Oil Pump
Terminal assembly
13K753Mark
A,B or C-43Mark
A,B or C
13G0151
/Connector13K752
Suction-ring
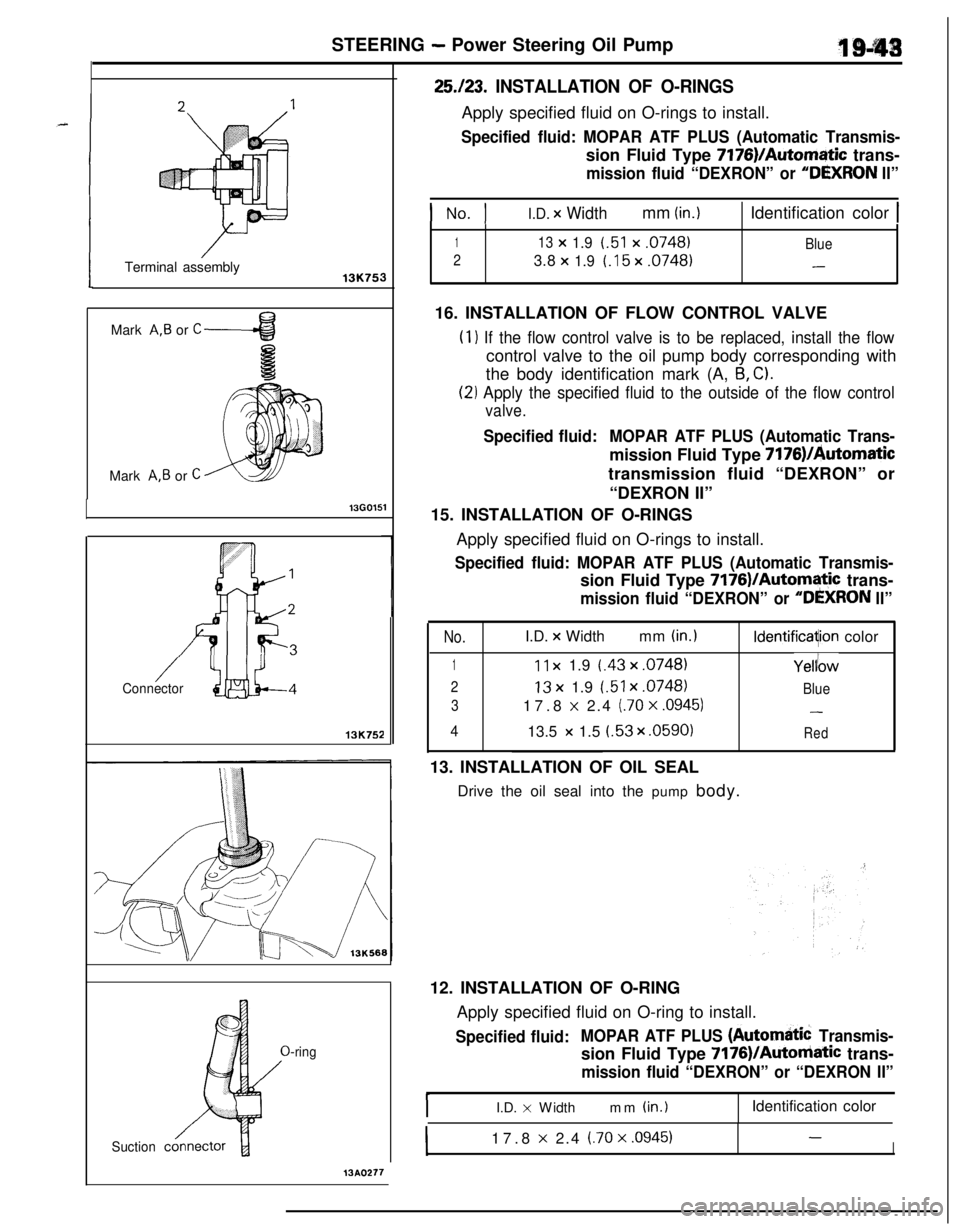
25.123. INSTALLATION OF O-RINGSApply specified fluid on O-rings to install.
Specified fluid: MOPAR ATF PLUS (Automatic Transmis-sion Fluid Type 7176)/Automatic trans-
mission fluid “DEXRON” or “DGXRON II”
I No. II.D. x Widthmm (in.)1 Identification color 1
113x1.9t.51x.0748)Blue
23.8
x1.9l.15x.0748)-16. INSTALLATION OF FLOW CONTROL VALVE
(1) If the flow control valve is to be replaced, install the flowcontrol valve to the oil pump body corresponding with
the body identification mark (A,
6, C).
(2) Apply the specified fluid to the outside of the flow control
valve.
Specified fluid:MOPAR ATF PLUS (Automatic Trans-mission Fluid Type
7176)/htomatictransmission fluid “DEXRON” or
“DEXRON II”
15. INSTALLATION OF O-RINGS
Apply specified fluid on O-rings to install.
Specified fluid: MOPAR ATF PLUS (Automatic Transmis-sion Fluid Type 7176)/Automatic trans-
mission fluid “DEXRON” or “DlkXRON II”
No.I.D. x Widthmm (in.)
1I 1 x 1.9 t.43 x .0748)
213x 1.9 l.51 x .0748)
317.8 x 2.4 j.70 X .0945)
413.5 x 1.5 t.53 x .0590)
ldentificaqion color
Yelllow
Blue
-
Red13. INSTALLATION OF OIL SEAL
Drive the oil seal into the pump body.
12. INSTALLATION OF O-RING
Apply specified fluid on O-ring to install.
Specified fluid:MOPAR ATF PLUS (Automatib Transmis-sion Fluid Type 7176)/Autoniatic trans-
mission fluid “DEXRON” or “DEXRON II”I.D.
x Widthmm (in.)Identification color
I17.8 x 2.4 (.70 x .0945)-I
13A0277
Page 695 of 1216
TRANSAXLE ’
MANUAL AND AUTOMATICCONTENTS
;-AUTOMATICTRANSAXLE
.....................................................137ANNULUS GEAR AND TRANSFER DRIVE GEAR SET (F4A22)..........315ANNULUS GEAR AND TRANSFER DRIVE GEAR SET(F4A33.W4A33)...........................................................................................317CENTERDIFFERENTIAL(W4A33).............................................................329DIFFERENTIAL............................................................................................319ENDCLUTCHASSEMBLY.........................................................................309EXTENSIONHOUSINGASSEMBLY(W4A33).........................................337FRONTCLUTCHASSEMBLY....................................................................302FRONTOUTPUTSHAFT(W4A33)...........................................................332GENERALINFORMATION.........................................................................137KICKDOWNSERVO....................................................................................322LOW-REVERSEBRAKE..............................................................................323OILPUMP...................................................................................................299PLANETARYGEARSET............................................................................311PLANETARYGEARSET............................................................................313REARCLUTCHASSEMBLY(F4A22)........................................................304REARCLUTCHASSEMBLY(FQA33sW4A33)............................................307SERVICEADJUSTMENTPROCEDURES..................................................Drive
Shaft,OilSealsReplacement....................................................;;;
InhibitorSwtchAdjustment................................................................21 1KeyInterlockMechanismCheck.....................................................KrckdownServoAdjustment..................................zii..............................
LinePressureAdjustment...................................................................213
ReducingPressureAdjustment.........................................................214Selector Lever Operation Check........................................................210ShiftLockMechanismCheck...............................................................21 1SpeedometerCableReplacement.........................................................Throttle-posltipn Sensor Adjustment.................................................z2:
TransaxleFluIdLevelInspectIon......................................................209
TransaxleFluidReplacement.............................................................209
SPECIALTOOLS.........................................................................................SPECIFICATIONS........................................................................................;“5”9
GeneralSpeclficatlons..................................................................1%Lubricants..................................................................................Sealants and Adhesives..............................................................izi
Serwce Speclflcatlons..................................................159...............Spacer andSnapRing.,.,.............................................................Spacer Set..................................................................1::Torque Speclflcatlons...........................................166Valve Body Spring Identification Chart.....................
.................160
SPEEDOMETERGEARASSEMBLY..........................................................TRANSAXLEASSEMBLY(WA22)............................................................zTRANSAXLE
ASSEMBLY(F4A33.W4A33)................................................TRANSAXLECONTROL.............................................................................;;;TRANSAXLE
OILCOOLER........................................................................TRANSFER..................................................................................................fg
TRANSFERASSEMBLY.............................................................................333TRANSFERCASEADAPTERSUBASSEMBLY(W4A33).......................339TRANSFER CASE SUB ASSEMBLY (W4A33)341TRANSFER SHAFT (F4A33)TROUBLESHOOTING..................................................................................................................................................................................................f;;VALVE
BODY.............................................................................................324
MANUAL TRANSAXLE
5TH-SPEEDSYNCHRONIZERASSEMBLY...............................................42GENERALINFORMATION.........................................................................2.-.INPUTfj,-,A,TASSEMBLY
INTERMEDIATE GEAR ASSEMBLY..........................................................56OUTPUT
SHAFT ASSEMBLY....................................................................61SERVICEADJUSTMENTPROCEDURES..................................................DriveShaftOilSealsReplacement......................................................;;Speedometer Cable Replacement.........................................................
Transaxle Oil Level
InspectIon..............................................................‘liTransaxle Oil Replacement....................................................................
I3
SHIFTLEVERASSEMBLY.........................................................................SHIFTRAILSANDFORKS........................................................................g
SPECIALTOOLS.........................................................................................SPECIFICATIONS........................................................................................1:
General Specifications5Lubricants..........................................................................................................................................................................10Sealants and Adhesives
Service Specifications
....................................................................................................................................................1:Snap Ring (for Adjustment) and Spacer...............................................
Torque Specifications.............................................................................
i
SPEEDOMETERGEARASSEMBLY..........................................................TRANS&G.E................................................................................................zTRANSAXLEA!jSEMBLY
TROUBLESHOOTING..................................................................................12
MANUAL TRANSAXLE
CENTERDIFFERENTIAL.............................................................................103CLUTCHHOUSINGASSEMBLY...............................................................DRIVE BEVEL GEAR ASSEMBLY;g
...... .......................................................DRIVENBEVELGEARASSEMBLY...................................a......................EXTENSIONHOUSINGASSEMBLY.........................................................;g
5Tf.jSPEEDSYNCHRONIZERASSEMBLY...............................................101
FRONTDlFFERENTlAL...............................................................................106
FRONTOUTPUTSHAFTASSEMBLY......................................................106
GENERALI~~~~MATN)N...............................................................,.,.......66INPUTSHAFTASSEMBLY........................................................................l~ER,“,EDlATEGEARASSMBLY..........................................................;;i
SERVICEADJUSTMENTPROCEDURES..................................................Drive Shaft Oil Seals Replacement......................................................;;Speedometer Cable Replacement.........................................................
Transaxle
Ojl Level lnspectlon..............................................................;l
Transaxle 011 R~pb33ment....................................................................79Transfer
OilSealReplacement.............................................................80
SHIFTLEVERASSEMBLY.........................................................................SHIFTRAILASSEMBLY............................................................................,z
SPECIALTOOLS.........................................................................................76
SPECIFICATIONS........................................................................................6g
GeneralSpecifications...........................................................................6g
Lubricants...............................................................................................75
SealantsandAdhesives........................................................................76
ServiceSpecifications............................................................................6gSnap Ring (for Adjustment) and Spacer...............................................7 o
TorqueSpecifications.............................................................................74
SPEEDOMETERGEARASSEMBLY..........................................................TRANSAXLE................................................................................................1:TRANSAXLEASSEMBLY...........................................................................86TRANSAXLE
CONTROL
.............................................................................TRANSFER...............................................................................................
g.._TRANSFERA!333lBLY.............................................................................,24
TRANSFERCASEADAPTERSUBASSEMBLY.......................................131TRANSFERCASESUBASSEMBLY.........................................................TR,,UBLES,,OO,,NG..................................................................................1;;
Page 741 of 1216
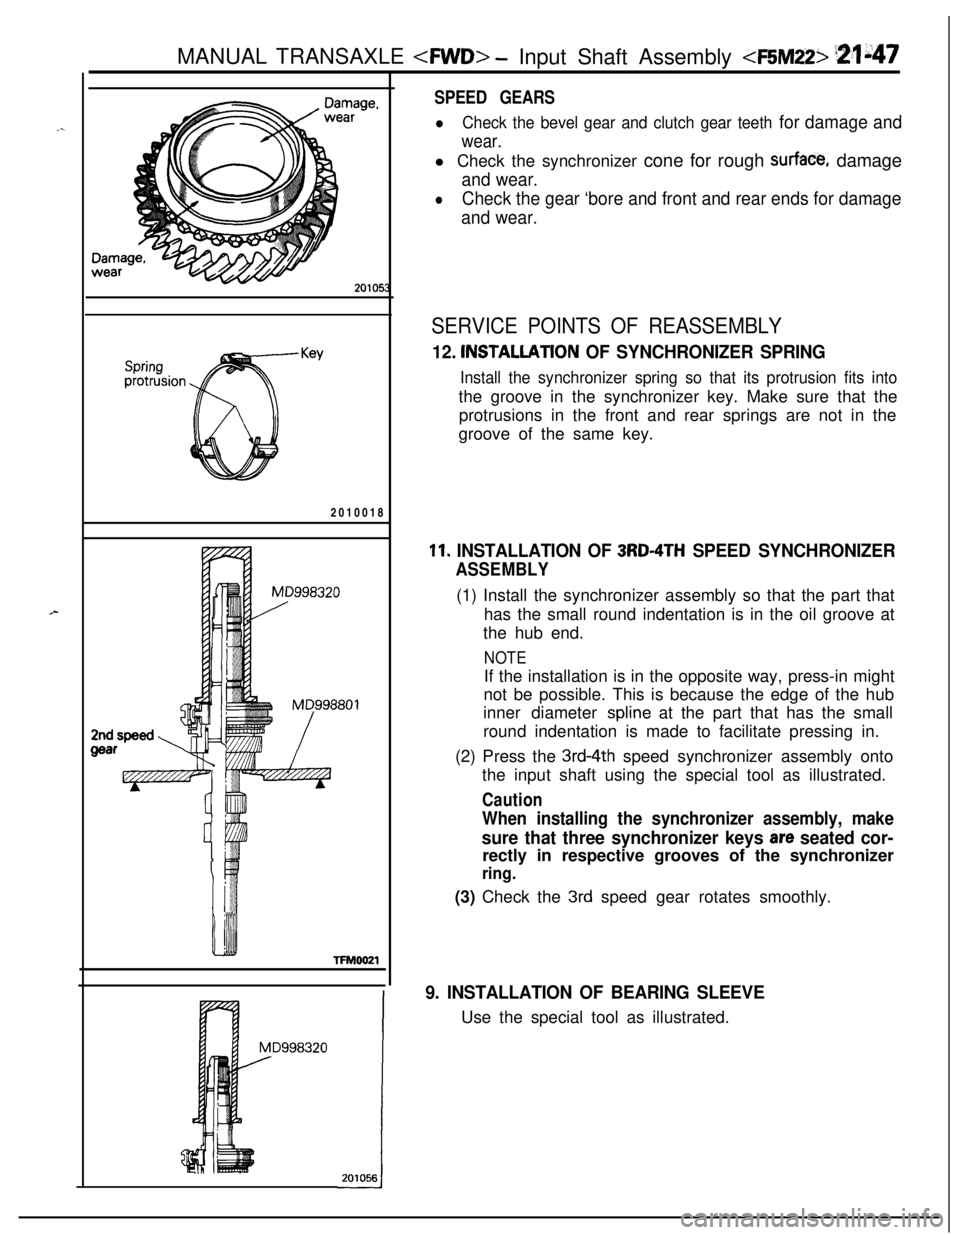
MANUAL TRANSAXLE
Springprotrusion2010018TFM0021
MD998320/
SPEED GEARS
lCheck the bevel gear and clutch gear teeth for damage and
wear.l Check the synchronizer cone for rough
surface, damage
and wear.
lCheck the gear ‘bore and front and rear ends for damage
and wear.
SERVICE POINTS OF REASSEMBLY
12. INSTALLATlON OF SYNCHRONIZER SPRING
Install the synchronizer spring so that its protrusion fits intothe groove in the synchronizer key. Make sure that the
protrusions in the front and rear springs are not in the
groove of the same key.
11. INSTALLATION OF 3RD-4TH SPEED SYNCHRONIZER
ASSEMBLY(1) Install the synchronizer assembly so that the part that
has the small round indentation is in the oil groove at
the hub end.
NOTEIf the installation is in the opposite way, press-in might
not be possible. This is because the edge of the hub
inner diameter
spline at the part that has the small
round indentation is made to facilitate pressing in.
(2) Press the
3rd-4th speed synchronizer assembly onto
the input shaft using the special tool as illustrated.
Caution
When installing the synchronizer assembly, make
sure that three synchronizer keys are seated cor-rectly in respective grooves of the synchronizer
ring.(3) Check the
3rd speed gear rotates smoothly.
9. INSTALLATION OF BEARING SLEEVEUse the special tool as illustrated.
Page 747 of 1216
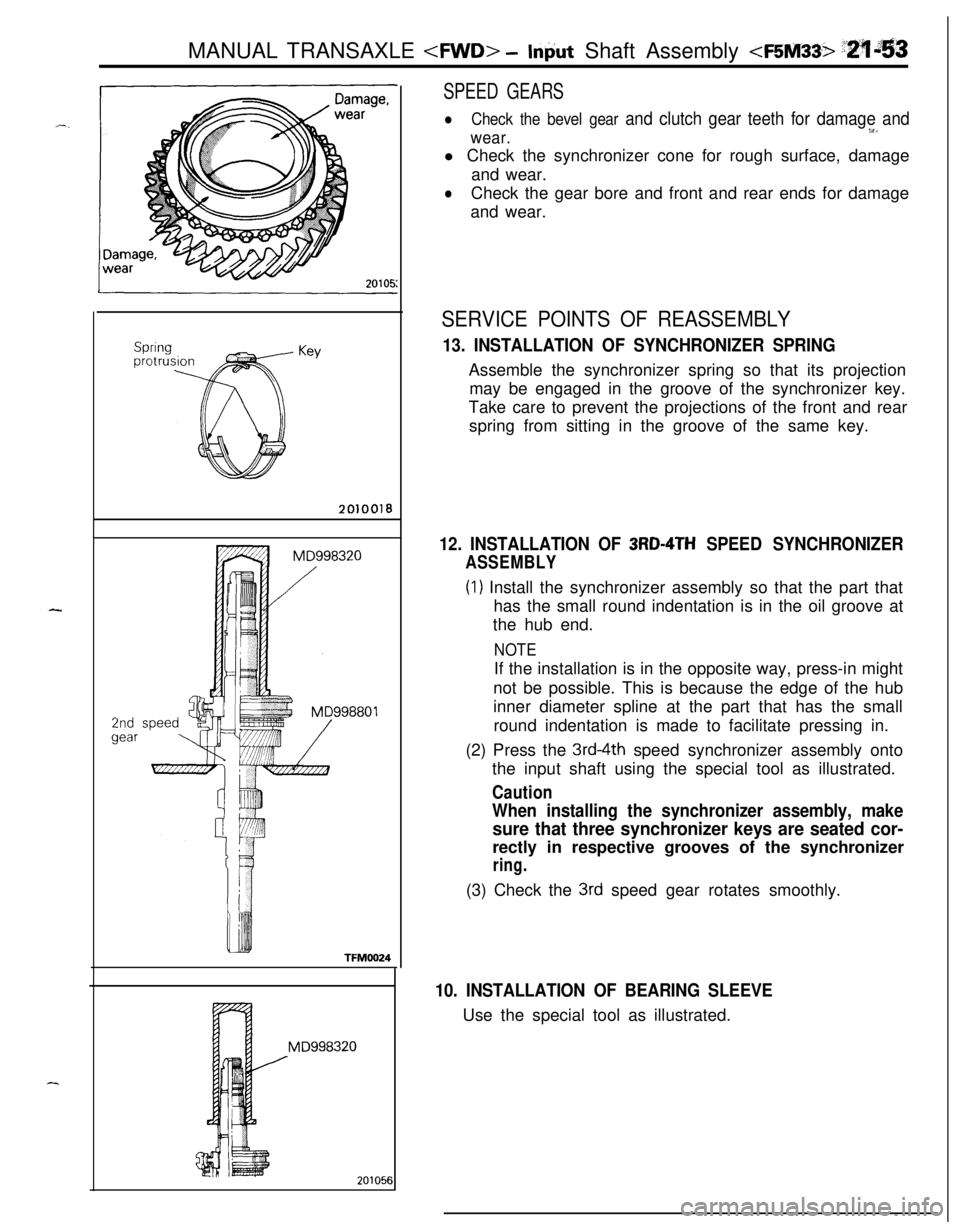
MANUAL TRANSAXLE
2010018
2ndgearTFM0024
MD998320
20105f
SPEED GEARS
lCheck the bevel gear and clutch gear teeth for damage andw.wear.l Check the synchronizer cone for rough surface, damage
and wear.
lCheck the gear bore and front and rear ends for damage
and wear.
SERVICE POINTS OF REASSEMBLY
13. INSTALLATION OF SYNCHRONIZER SPRINGAssemble the synchronizer spring so that its projection
may be engaged in the groove of the synchronizer key.
Take care to prevent the projections of the front and rear
spring from sitting in the groove of the same key.
12. INSTALLATION OF 3RD-4TH SPEED SYNCHRONIZER
ASSEMBLY
(1) Install the synchronizer assembly so that the part that
has the small round indentation is in the oil groove at
the hub end.
NOTEIf the installation is in the opposite way, press-in might
not be possible. This is because the edge of the hub
inner diameter spline at the part that has the small
round indentation is made to facilitate pressing in.
(2) Press the
3rd-4th speed synchronizer assembly onto
the input shaft using the special tool as illustrated.
Caution
When installing the synchronizer assembly, make
sure that three synchronizer keys are seated cor-rectly in respective grooves of the synchronizer
ring.(3) Check the
3rd speed gear rotates smoothly.
10. INSTALLATION OF BEARING SLEEVEUse the special tool as illustrated.
j
Page 748 of 1216
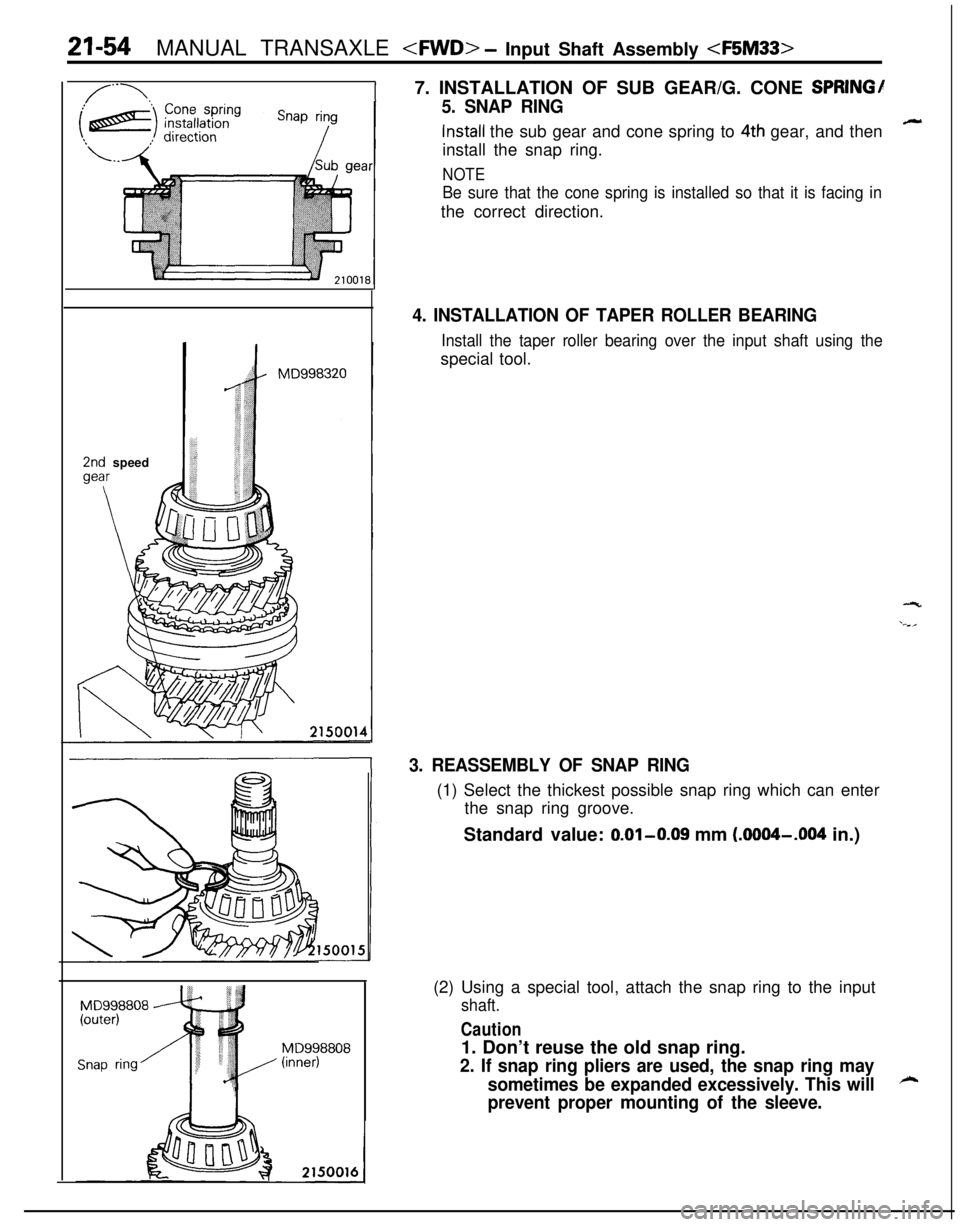
21-54MANUAL TRANSAXLE
2nd speed
MD998808(inner)7. INSTALLATION OF SUB GEAR/G. CONE
SPRINGI
5. SNAP RING
install the sub gear and cone spring to 4th gear, and then-install the snap ring.
NOTE
Be sure that the cone spring is installed so that it is facing inthe correct direction.
4. INSTALLATION OF TAPER ROLLER BEARING
Install the taper roller bearing over the input shaft using thespecial tool.
3. REASSEMBLY OF SNAP RING(1) Select the thickest possible snap ring which can enter
the snap ring groove.
Standard value: 0.01-0.09 mm
(.0004--004 in.)
(2) Using a special tool, attach the snap ring to the input
shaft.
Caution1. Don’t reuse the old snap ring.
2. If snap ring pliers are used, the snap ring may
sometimes be expanded excessively. This will
h
prevent proper mounting of the sleeve.
Page 754 of 1216
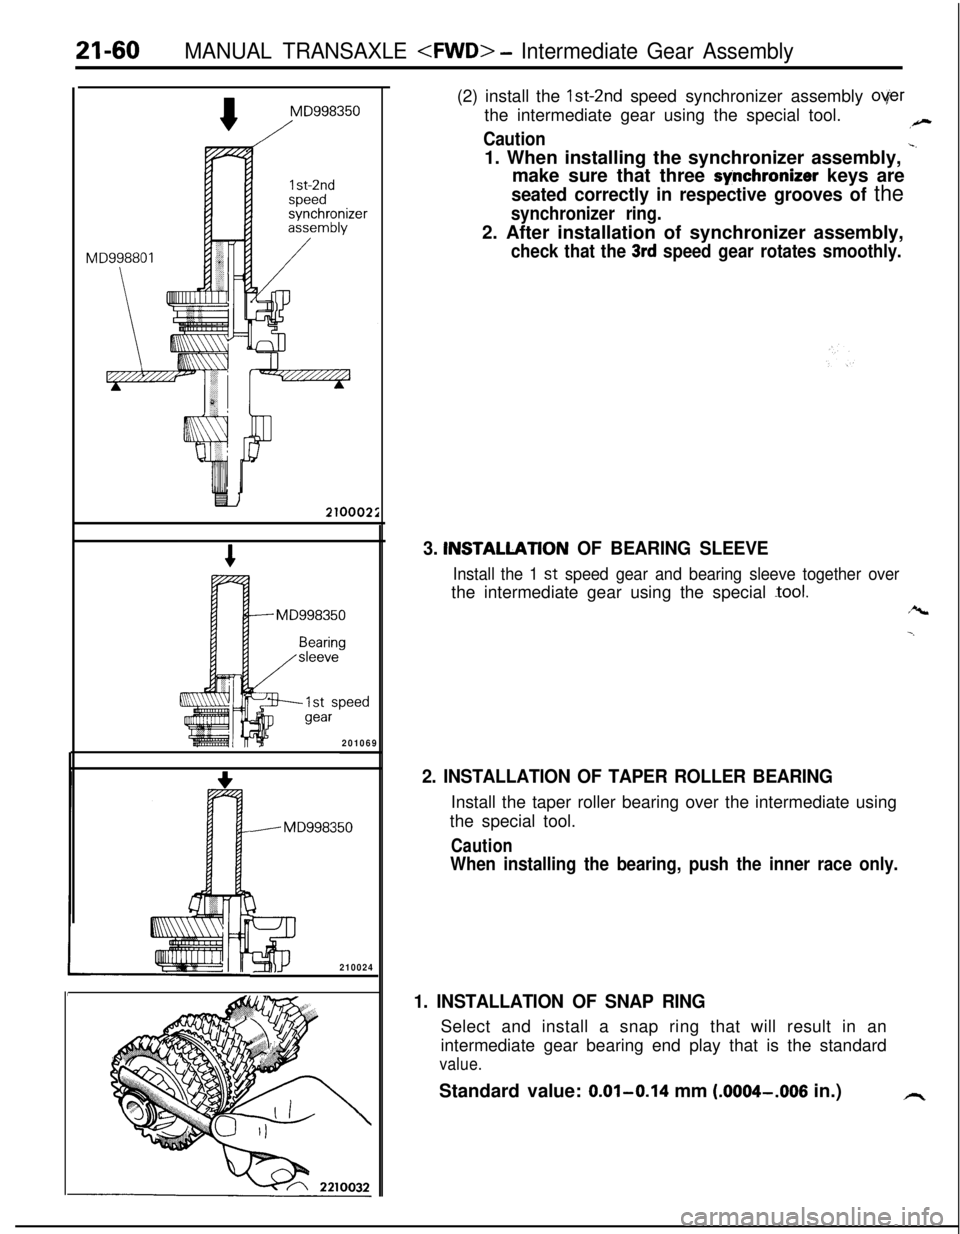
21-60MANUAL TRANSAXLE
MD998350
/
1 st-2ndspeedsynchronizerassembly
201069
. MD998350
I
3210024(2) install the Ist-2nd speed synchronizer assembly
overthe intermediate gear using the special tool.
,-
Caution1. When installing the synchronizer assembly,
-‘make sure that three
synchronizer keys are
seated correctly in respective grooves of the
synchronizer ring.2. After installation of synchronizer assembly,
check that the 3rd speed gear rotates smoothly.
3. INSTALLATlON OF BEARING SLEEVE
Install the 1 st speed gear and bearing sleeve together overthe intermediate gear using the special
-tool.
r%
-.
2. INSTALLATION OF TAPER ROLLER BEARINGInstall the taper roller bearing over the intermediate using
the special tool.
Caution
When installing the bearing, push the inner race only.
1. INSTALLATION OF SNAP RINGSelect and install a snap ring that will result in an
intermediate gear bearing end play that is the standard
value.Standard value: 0.01-0.14 mm
(.0004-.OOS in.)h
Page 763 of 1216
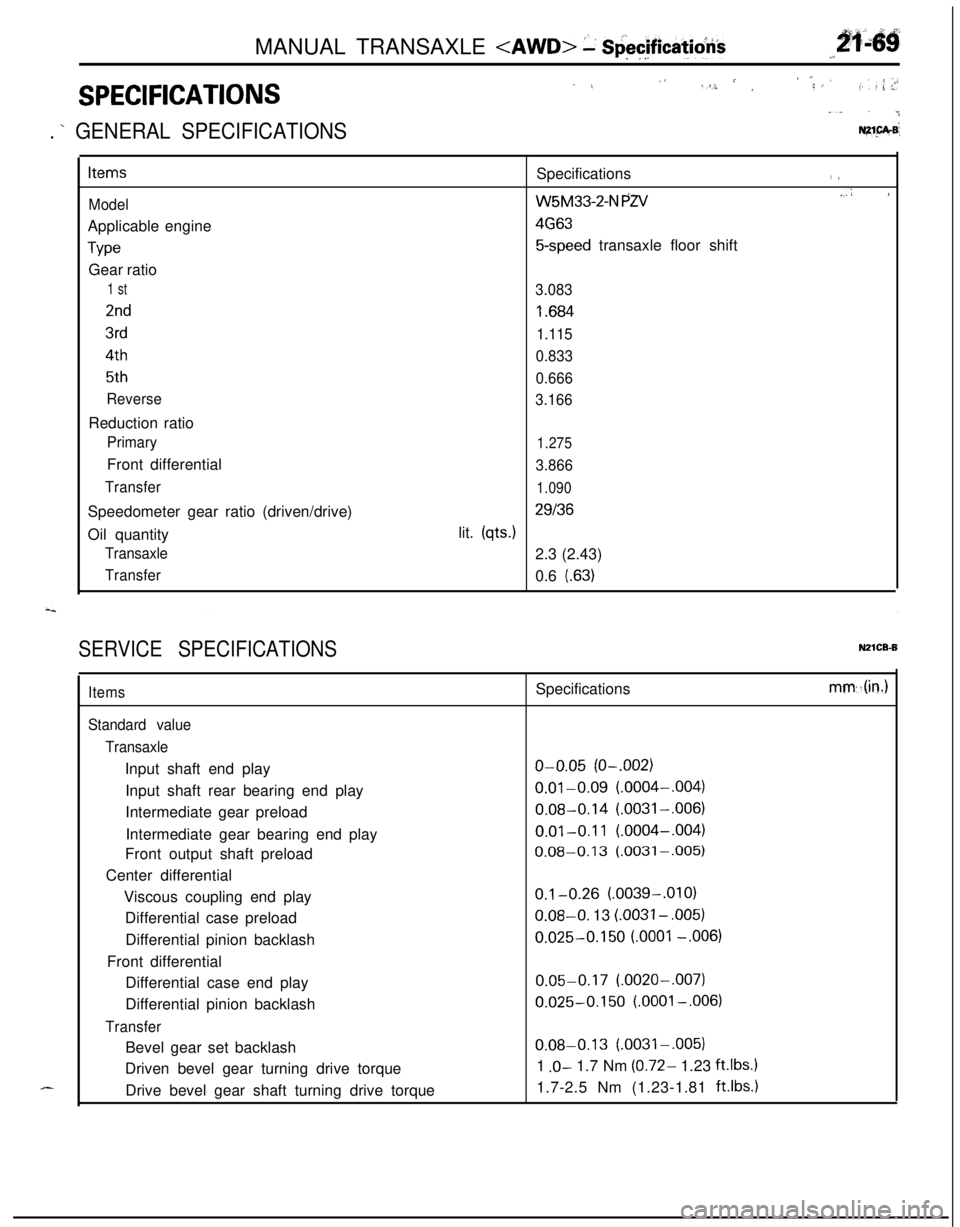
MANUAL TRANSAXLE
2f.46g
\ ,...,
,,, .,
SPECIFICATIONS
1 L,‘S. / ,‘; ,< ’,f. : ,: ; .>r
“. . ..&
. ’ GENERAL SPECIFICATIONSNZ1.pA.B’
Items
ModelApplicable engine
TypeGear ratio
1 st
2nd
3rd
4th
5th
ReverseReduction ratio
PrimaryFront differential
TransferSpeedometer gear ratio (driven/drive)
Oil quantity
Transaxle
TransferSpecifications
(I
W5M33-2-N PZV.,A I
4G63
5-speed transaxle floor shift
3.083
I .684
1.115
0.833
0.666
3.166
1.275
3.866
1.090
29136lit.
(qts.)2.3 (2.43)
0.6
l.63)
SERVICE SPECIFICATIONSN21CB-B
d-...
Items
Standard value
TransaxleInput shaft end play
Input shaft rear bearing end play
Intermediate gear preload
Intermediate gear bearing end play
Front output shaft preload
Center differential
Viscous coupling end play
Differential case preload
Differential pinion backlash
Front differential
Differential case end play
Differential pinion backlash
TransferBevel gear set backlash
Driven bevel gear turning drive torque
Drive bevel gear shaft turning drive torqueSpecifications
o-0.05 (O-.002)
0.01-0.09 (.0004-,004)
0.08-0.14 (.0031-,006)
0.01-0.11 (.0004-,004)
0.08-0.13 (.0031-,005)
0.1-0.26 (.0039-.OlO)0.08-O. 13
LOO31 - ,005)
0.025-0.150 LOO01 -.006)
0.05-0.17 (.0020-,007)
0.025-0.150 (.OOOl-,006)
0.08-0.13 (.0031-.005)
1
.O- 1.7 Nm (0.72- 1.23 ft.lbs.11.7-2.5 Nm (1.23-1.81
ft.lbs.1
mm,.(in.)
Page 808 of 1216
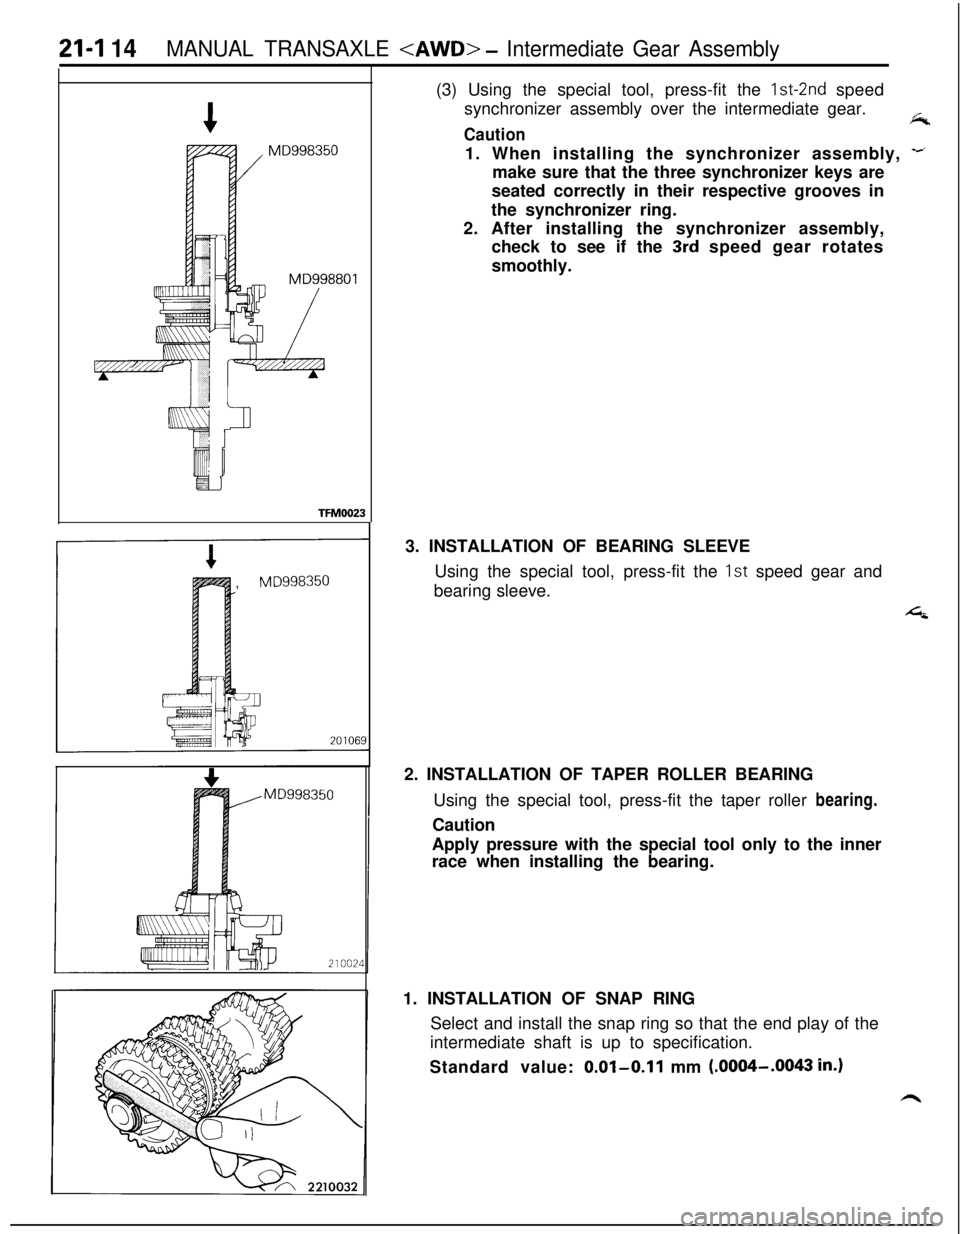
21-I 14MANUAL TRANSAXLE
synchronizer assembly over the intermediate gear.
fkCaution1. When installing the synchronizer assembly,
-imake sure that the three synchronizer keys are
seated correctly in their respective grooves in
the synchronizer ring.
2. After installing the synchronizer assembly,
check to see if the
3rd speed gear rotates
smoothly.
TFM0023,
MD9983503. INSTALLATION OF BEARING SLEEVE
Using the special tool, press-fit the 1st speed gear and
bearing sleeve.
42. INSTALLATION OF TAPER ROLLER BEARING
Using the special tool, press-fit the taper roller bearing.
Caution
Apply pressure with the special tool only to the inner
race when installing the bearing.
1. INSTALLATION OF SNAP RING
Select and install the snap ring so that the end play of the
intermediate shaft is up to specification.
Standard value:
0.01-0.11 mm (.0004-.OO43 in.)