brake sensor MITSUBISHI ECLIPSE 1991 Service Manual
[x] Cancel search | Manufacturer: MITSUBISHI, Model Year: 1991, Model line: ECLIPSE, Model: MITSUBISHI ECLIPSE 1991Pages: 1216, PDF Size: 67.42 MB
Page 57 of 1216
FRONT SUSPENSION - service Adjustment Procedures/Hub and Knuckle2-9
3.For each half turn of the left and right tie rods, the toe-in willbe adjusted by 6 mm
(24 in.).
4. After making the adjustments, use a turning radius gauge
to confirm that the steering wheel turning angle is within
the standard value range. (Refer to GROUP 19-Service
Adjustment Procedures.)
WHEEL BEARING ADJUSTMENTN02FCM
Bearing preload is pre-set to the specified value by design andtherefore can not be adjusted.
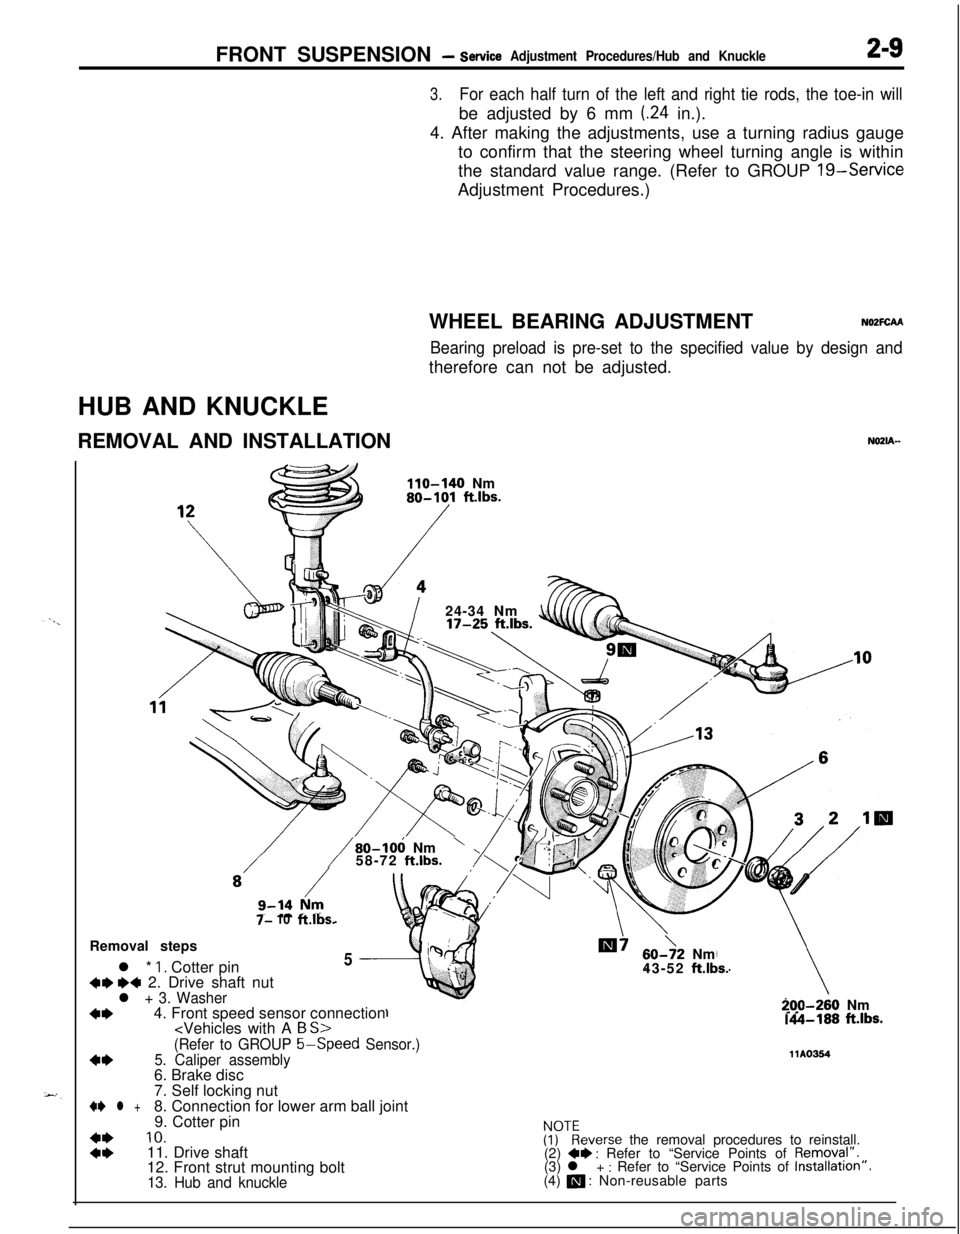
HUB AND KNUCKLE
REMOVAL AND INSTALLATION
NOZIA-
110-140 Nm80-101 ft.lbs.
/24-34 Nm
7- 10ft.lbs.
/80-106 Nm’58-72 ft.lbs.Removal steps
l *
1. Cotter pin5
+w ~~ 2. Drive shaft nutl + 3. Washer
+I)4. Front speed sensor connection
60->2 Nm
43-52 ft.lbs.
-70-260 Nm.A-188 ft.lbs.
(Refer to GROUP 5-Speed
Sensor.)
4*5. Caliper assembly11Ams46. Brake disc
7. Self locking nut
+e l +8. Connection for lower arm ball joint
9. Cotter pin
::
10.ivkeverse the removal procedures to reinstall.
11. Drive shaft
(2) +* : Refer to “Service Points of Removql”.
12. Front strut mounting bolt(3) l + : Refer to “Service Points of Installation”.
13. Hub and knuckle(4) a : Non-reusable parts
Page 58 of 1216
z-10FRONT SUSPENSION - Hub and Knuckle
SERVICE POINTS OF REMOVAL
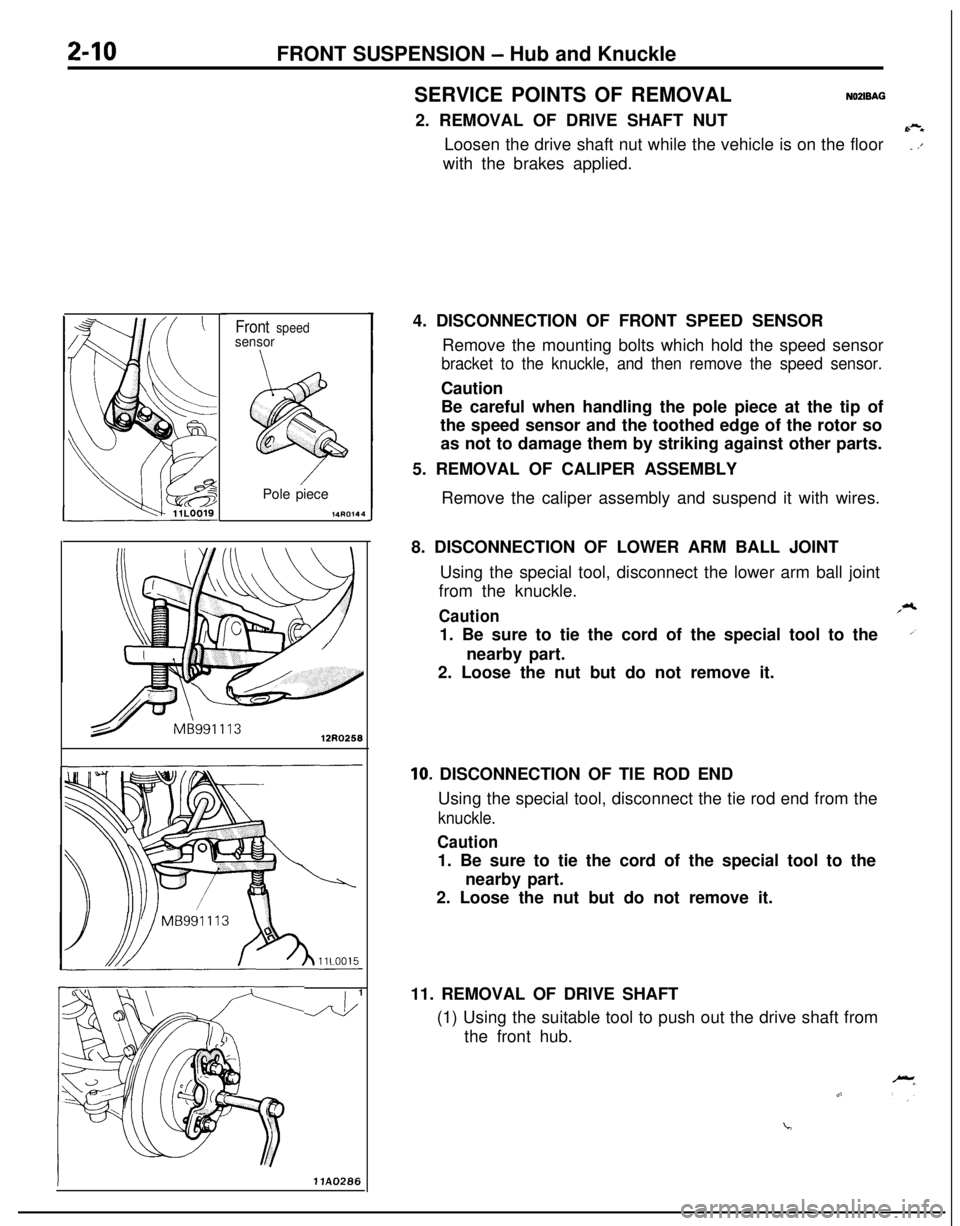
NOZIBAG2. REMOVAL OF DRIVE SHAFT NUT
6-eLoosen the drive shaft nut while the vehicle is on the floor
_ ,’with the brakes applied.
Front speedsensorPole piece
,4mx‘l4
J&14. DISCONNECTION OF FRONT SPEED SENSOR
Remove the mounting bolts which hold the speed sensor
bracket to the knuckle, and then remove the speed sensor.Caution
Be careful when handling the pole piece at the tip of
the speed sensor and the toothed edge of the rotor so
as not to damage them by striking against other parts.
5. REMOVAL OF CALIPER ASSEMBLY
Remove the caliper assembly and suspend it with wires.
8. DISCONNECTION OF LOWER ARM BALL JOINT
Using the special tool, disconnect the lower arm ball joint
from the knuckle.
Caution,*1. Be sure to tie the cord of the special tool to the
1nearby part.
2. Loose the nut but do not remove it.
IO. DISCONNECTION OF TIE ROD END
Using the special tool, disconnect the tie rod end from the
knuckle.
Caution1. Be sure to tie the cord of the special tool to the
nearby part.
2. Loose the nut but do not remove it.
11. REMOVAL OF DRIVE SHAFT
(1) Using the suitable tool to push out the drive shaft from
the front hub.
Page 77 of 1216
FRONT SUSPENSION - Strut Assembly
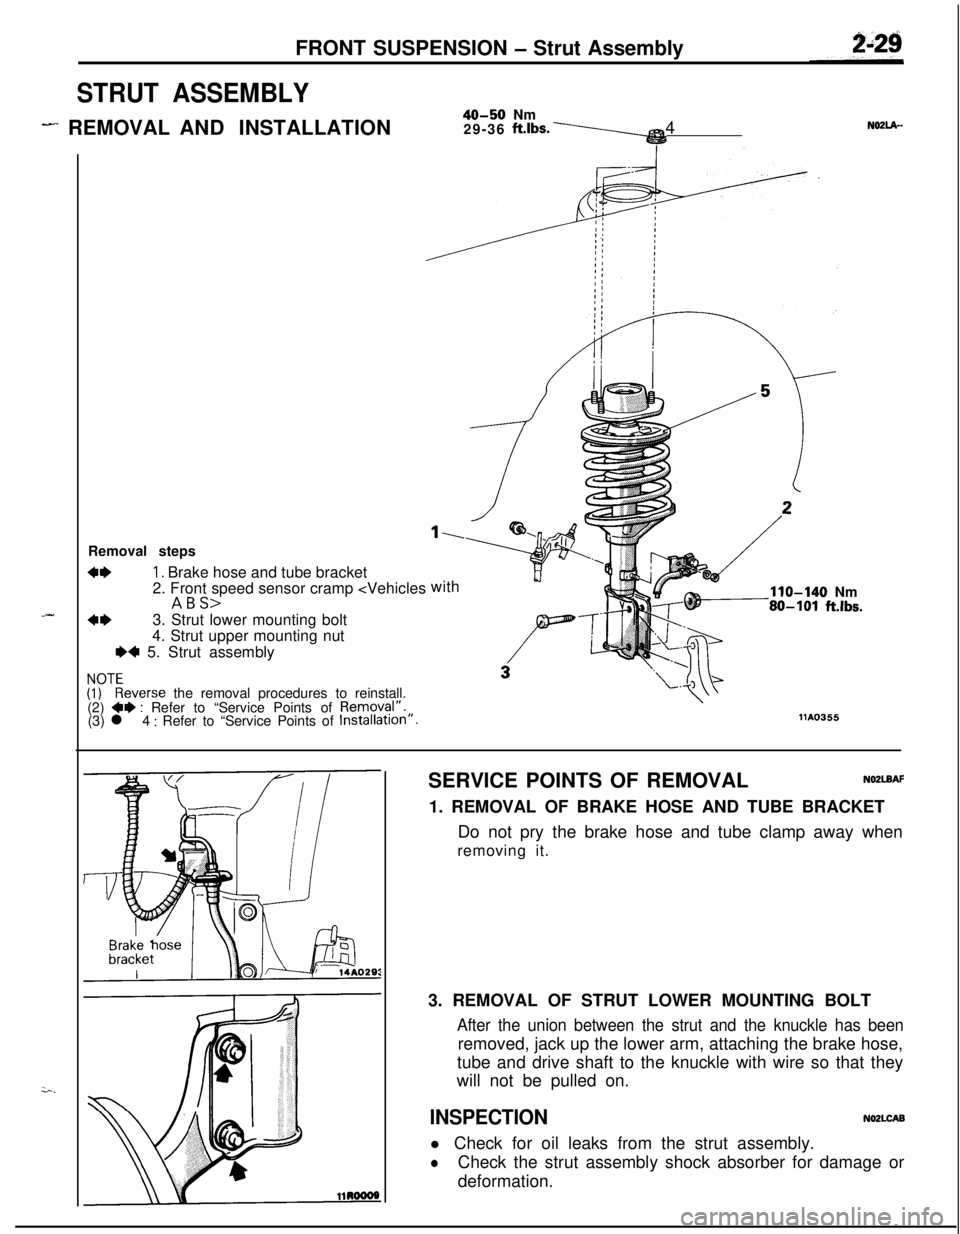
STRUT ASSEMBLY
- REMOVAL AND INSTALLATION40-50 Nm
29-36 ft.lbs.\4N02lA-
.-Removal steps
4*1. Brake hose and tube bracket
2. Front speed sensor cramp
4*3. Strut lower mounting bolt
4. Strut upper mounting nut
e+ 5. Strut assembly
!rEeverse the removal procedures to reinstall.
(2) **: Refer to “Service Points of Removal”.
(3) l 4 : Refer to “Service Points of Installation”.
1.with
110-140 Nm80-101 ft.lbs.
1110355SERVICE POINTS OF REMOVAL
NO2LBAF1. REMOVAL OF BRAKE HOSE AND TUBE BRACKET
Do not pry the brake hose and tube clamp away when
removing it.
3. REMOVAL OF STRUT LOWER MOUNTING BOLT
After the union between the strut and the knuckle has beenremoved, jack up the lower arm, attaching the brake hose,
tube and drive shaft to the knuckle with wire so that they
will not be pulled on.
INSPECTIONNO2LCABl Check for oil leaks from the strut assembly.
lCheck the strut assembly shock absorber for damage or
deformation.
Page 105 of 1216
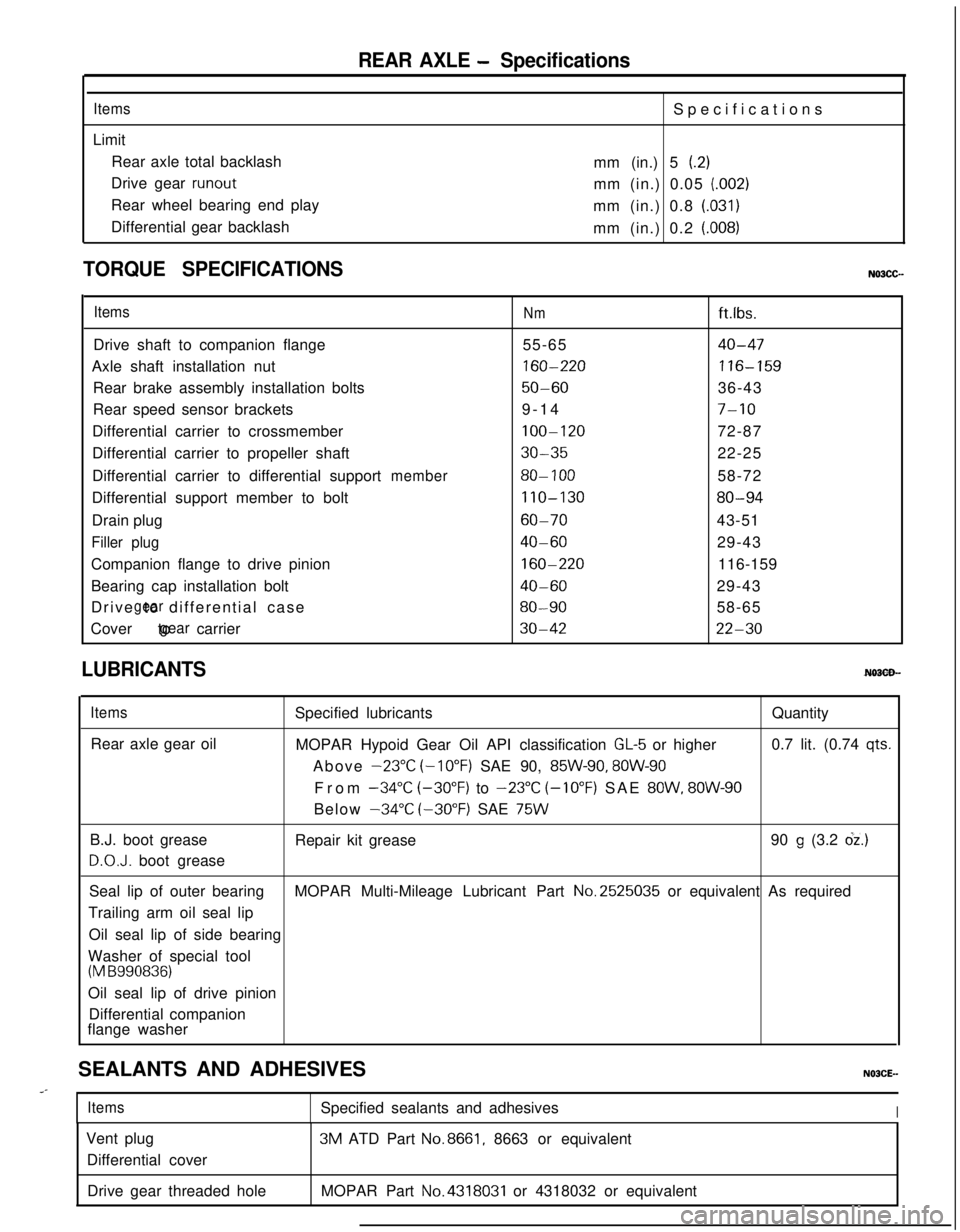
REAR AXLE - Specifications
ItemsLimit
Rear axle total backlash
Drive gear
runoutRear wheel bearing end play
Differential gear backlashSpecifications
mm (in.) 5
(.2)mm (in.) 0.05
(.002)mm (in.) 0.8
(.031)mm (in.) 0.2
(.008)
TORQUE SPECIFICATIONS
ItemsNmft.lbs.
Drive shaft to companion flange55-65
40-47Axle shaft installation nut
160-220116-159Rear brake assembly installation bolts
50-6036-43
Rear speed sensor brackets9-14
7-10Differential carrier to crossmember
100-12072-87
Differential carrier to propeller shaft
30-3522-25
Differential carrier to differential support
member80- 10058-72
Differential support member to bolt
110-13080-94Drain plug
60-7043-51
Filler plug40-6029-43
Companion flange to drive pinion
160-220116-159
Bearing cap installation bolt
40-6029-43
Drive to differential case
gear80-9058-65
Cover to carrier
gear30-4222-30
LUBRICANTS
ItemsRear axle gear oilSpecified lubricantsQuantity
MOPAR Hypoid Gear Oil API classification
GL-5 or higher0.7 lit. (0.74 qts.Above
-23°C (-10°F) SAE 90, 85W-90, 8OW-90From
-34°C (-30°F) to -23°C (-10°F) SAE 8OW, 8OW-90Below
-34°C (-30°F) SAE 75WB.J. boot grease
D.O.J. boot greaseRepair kit grease90
g (3.2 dz.)Seal lip of outer bearingMOPAR Multi-Mileage Lubricant Part No.2525035 or equivalent As required
Trailing arm oil seal lip
Oil seal lip of side bearing
Washer of special tool
(M B990836)Oil seal lip of drive pinion
Differential companion
flange washer
SEALANTS AND ADHESIVES
..-
ItemsSpecified sealants and adhesivesIVent plug
Differential cover3M ATD Part
No.8661, 8663 or equivalent
Drive gear threaded holeMOPAR Part
No.4318031 or 4318032 or equivalent
Page 112 of 1216
3-10REAR AXLE - Axle Shaft
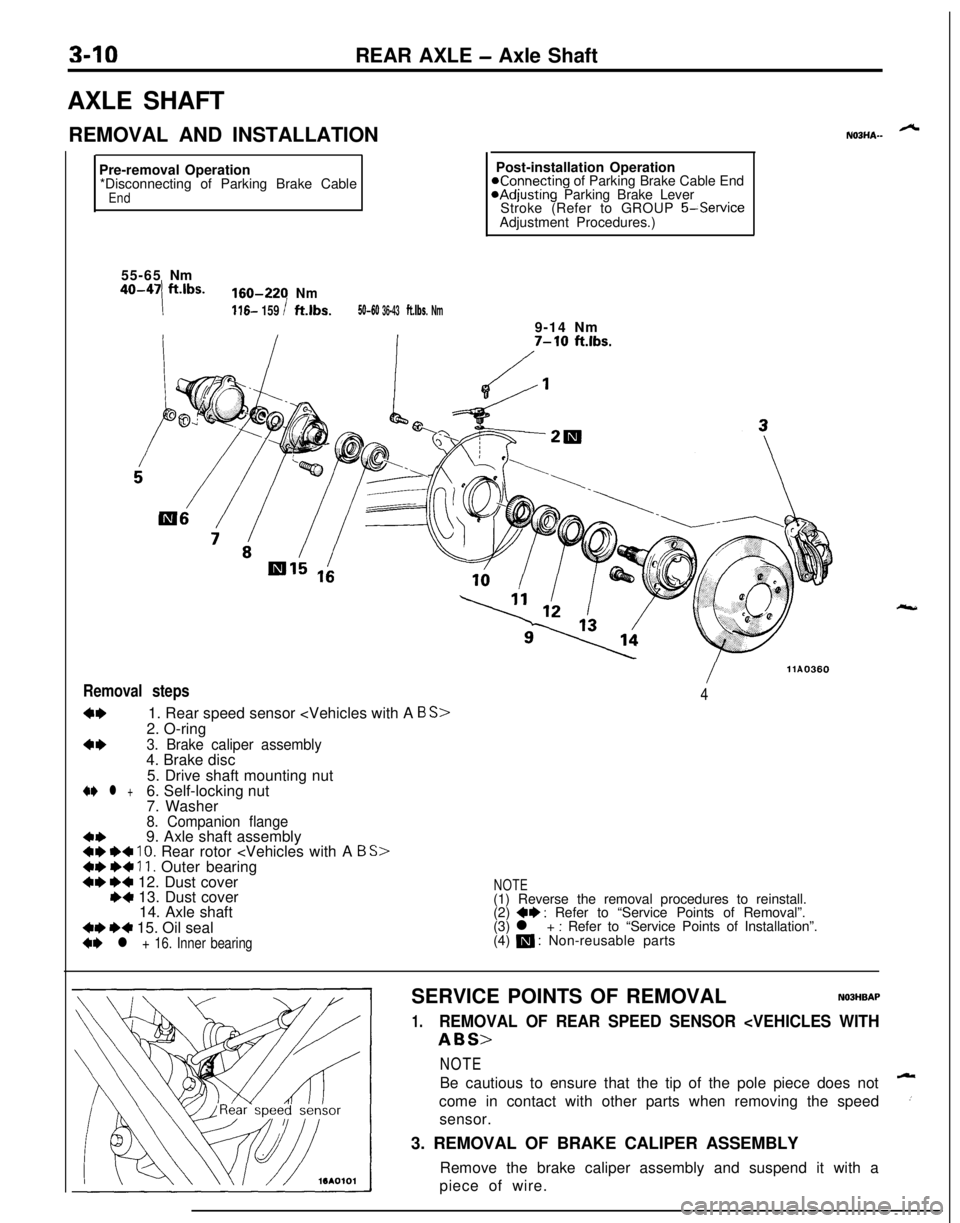
AXLE SHAFT
REMOVAL AND INSTALLATION
Pre-removal Operation
*Disconnecting of Parking Brake Cable
End9-14 Nm
7-W ft.lbs.55-65Nm
40-47ft.lbs.160-220Nm
!116- 159 Ift.lbs.50-60 36-43ft.lbs. Nm
Removal steps
4*1. Rear speed sensor
c*3. Brake caliper assembly4. Brake disc
/llA03604
5. Drive shaft mounting nut
+e l +6. Self-locking nut
7. Washer
8. Companion flange
c+9. Axle shaft assembly4I) +4 10. Rear rotor
14. Axle shaft
4* +4 15. Oil seal+e l + 16. Inner bearing
NOTE(1) Reverse the removal procedures to reinstall.
(2)
*I) : Refer to “Service Points of Removal”.
(3) l + : Refer to “Service Points of Installation”.
(4) m : Non-reusable parts
ALNOBHA-Post-installation Operation
Konnecting of Parking Brake Cable EndaAdjusting Parking Brake Lever
Stroke (Refer to GROUP
5-ServiceAdjustment Procedures.)
SERVICE POINTS OF REMOVAL
NOBHBAP
1.REMOVAL OF REAR SPEED SENSOR
Be cautious to ensure that the tip of the pole piece does not
Acome in contact with other parts when removing the speed
csensor.
3. REMOVAL OF BRAKE CALIPER ASSEMBLY
Remove the brake caliper assembly and suspend it with a
piece of wire.
Page 141 of 1216
BRAKES
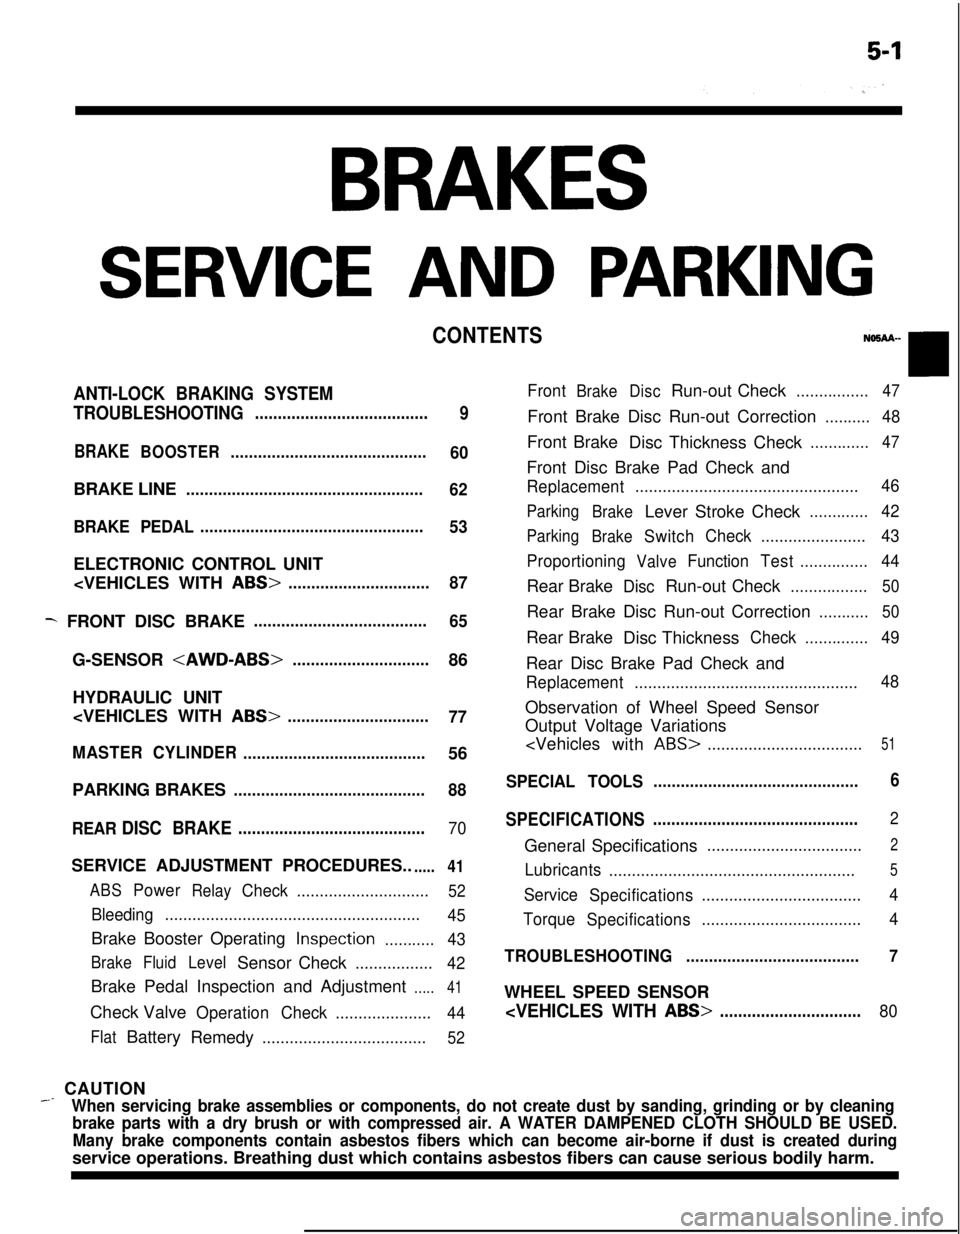
SERVICE AND PARKING
CONTENTS
ANTI-LOCK BRAKING SYSTEM
TROUBLESHOOTING
......................................
9
BRAKEBOOSTER...........................................
60BRAKE LINE
....................................................
62
BRAKE PEDAL.................................................
53ELECTRONIC CONTROL UNIT
- FRONT DISC BRAKE......................................
65G-SENSOR
HYDRAULIC UNIT
77
MASTERCYLINDER
........................................56
PARKING BRAKES
..........................................88
REAR
DISC BRAKE.........................................70SERVICE ADJUSTMENT PROCEDURES..
.....41
ABSPowerRelayCheck.............................52
Bleeding........................................................
45Brake Booster Operating
Inspection...........43
BrakeFluidLevelSensor Check.................
42Brake Pedal Inspection and Adjustment
.....41Check Valve
OperationCheck.....................
44
FlatBattery
Remedy....................................52
FrontBrakeDiscRun-out Check................47Front Brake Disc Run-out Correction
..........48Front Brake
Disc Thickness Check
.............47Front Disc Brake Pad Check and
Replacement.................................................46
Parking
BrakeLever Stroke Check.............42
Parking
BrakeSwitchCheck.......................43
Proportioning
ValveFunctionTest...............44Rear Brake
DiscRun-out Check.................50Rear Brake Disc Run-out Correction
...........50Rear Brake
Disc Thickness
Check..............49Rear Disc Brake Pad Check and
Replacement.................................................48Observation of Wheel Speed Sensor
Output Voltage Variations
ABS>..................................51
SPECIAL TOOLS.............................................6
SPECIFICATIONS.............................................
2General Specifications
..................................2
Lubricants
......................................................5
Service
Specifications...................................4
Torque
Specifications...................................4
TROUBLESHOOTING......................................7WHEEL SPEED SENSOR
_ CAUTION
When servicing brake assemblies or components, do not create dust by sanding, grinding or by cleaning
brake parts with a dry brush or with compressed air. A WATER DAMPENED CLOTH SHOULD BE USED.
Many brake components contain asbestos fibers which can become air-borne if dust is created duringservice operations. Breathing dust which contains asbestos fibers can cause serious bodily harm.
Page 142 of 1216
5-2BRAKES - SDecifications
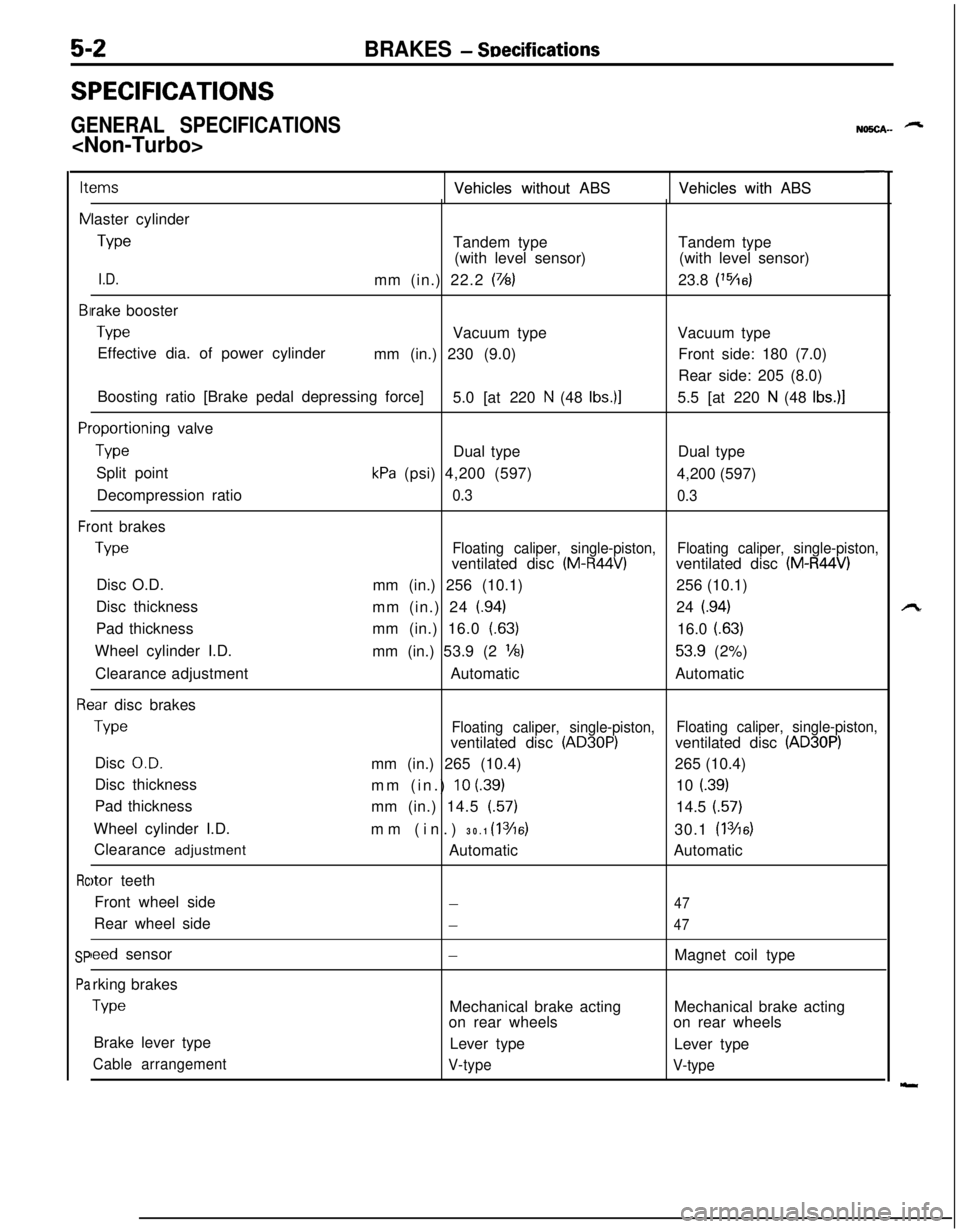
SPECIFICATIONS
GENERAL SPECIFICATIONS
NO!iCA-- -
ItemsItems
NNVehicles without ABS Vehicles without ABSVehicles with ABS Vehicles with ABS
BIBI
PlPl
Fr Frlaster cylinder
TypeTandem typeTandem type
(with level sensor)(with level sensor)
I.D.mm (in.) 22.2 (7/8)23.8 (‘%6)rake booster
TypeVacuum typeVacuum type
Effective dia. of power cylinder
mm (in.) 230 (9.0)Front side: 180 (7.0)
Rear side: 205 (8.0)
Boosting ratio [Brake pedal depressing force]
5.0 [at 220
N (48 Ibs.)]5.5 [at 220 N (48 Ibs.)]
.oportioning valve
TypeDual typeDual type
Split point
kPa (psi) 4,200 (597)
4,200 (597)
Decompression ratio
0.3
0.3ont brakes
TypeFloating caliper, single-piston,ventilated disc (M-R44V)Floating caliper, single-piston,ventilated disc (M-R44V)Disc O.D.
mm (in.) 256 (10.1)256 (10.1)
Disc thickness
mm (in.) 24
(.94)24 (.94)Pad thicknessmm (in.) 16.0 (63)
16.0
(.63)Wheel cylinder I.D.
mm (in.) 53.9 (2
l/8)53.9 (2%)
Clearance adjustmentAutomaticAutomatic
3ar disc brakes
TypeFloating caliper, single-piston,Floating caliper, single-piston,ventilated disc (AD30P)ventilated disc (AD30P)Disc
O.D.mm (in.) 265 (10.4)265 (10.4)
Disc thickness
mm (in.)
10 (39)10 i.39)Pad thickness
mm (in.) 14.5 (57)
14.5 (57)
Wheel cylinder I.D.
mm (in.) 30.1
(1 3/16)30.1 (1 346)Clearance adjustment
AutomaticAutomatic
)tor teeth
Front wheel side
-47Rear wheel side
-47
leed sensor-Magnet coil type
rking brakes
TypeMechanical brake actingMechanical brake acting
on rear wheelson rear wheels
Brake lever type
Lever type
Lever type
Cable arrangement
V-type
V-type
Rc Rc
SP SP
Pa Pa
Page 143 of 1216
BRAKES - Specifications5-3
ItemsFWDAWDMaster cylinder
TypeTandem type
(with level sensor)Tandem type
(with level sensor)
I.D.mm (in.) 23.8 (‘%a)25.4 (1)Brake booster
TypeVacuum type
Vacuum type
Effective dia. of power cylinder
mm (in.) Front side: 180 (7.0)
Front side: 180 (7.0)
Rear side: 205 (8.0)
Rear side: 205 (8.0)
Boosting ratio [Brake pedal depressing force]
5.5 [at 220
N (48 Ibs.)]5.5 [at 220 N (48 Ibs.)]Proportioning valve
TypeDual typeDual type
Split point
kPa (psi) 4,200 (597)
3,700 (526)
Decompression ratio
0.30.3Front brakes
TypeFloating caliper, single-piston,Floating caliper, single-piston,ventilated disc (M-R44V)ventilated disc (M-R46V)Disc O.D.
mm (in.) 256 (10.1)256 (10.1)
Disc thickness
mm (in.) 24
(.94)24 (.94)Pad thickness
mm (in.) 16.0
(.63)16.0 (.63)Wheel cylinder I.D.
mm (in.)
53.9 (2 ‘16)60.3 (23%3)Clearance adjustment
AutomaticAutomatic
Rear disc brakes
TypeFloating caliper, single-piston,Floating caliper, single-piston,ventilated disc (AD30P)ventilated disc (AD35P)Disc
O.D.mm (in.) 265 (10.4)265 (10.4)Disc thicknessmm (in.) 10
(.39)10 f.39)Pad thicknessmm (in.) 14.5
(.57)14.5 (.57)Wheel cylinder I.D.mm (in.) 30.1 (1
3/16)34.9 (1 3h)Clearance adjustmentAutomaticAutomatic
qotor teeth*
Front wheel side
4747Rear wheel side
4747
speed sensor*Magnet coil typeMagnet coil type‘arking brakes
TypeMechanical brake actingMechanical brake acting
on rear wheelson rear wheels
Brake lever typeLever typeLever type
Cable arrangementV-typeV-type
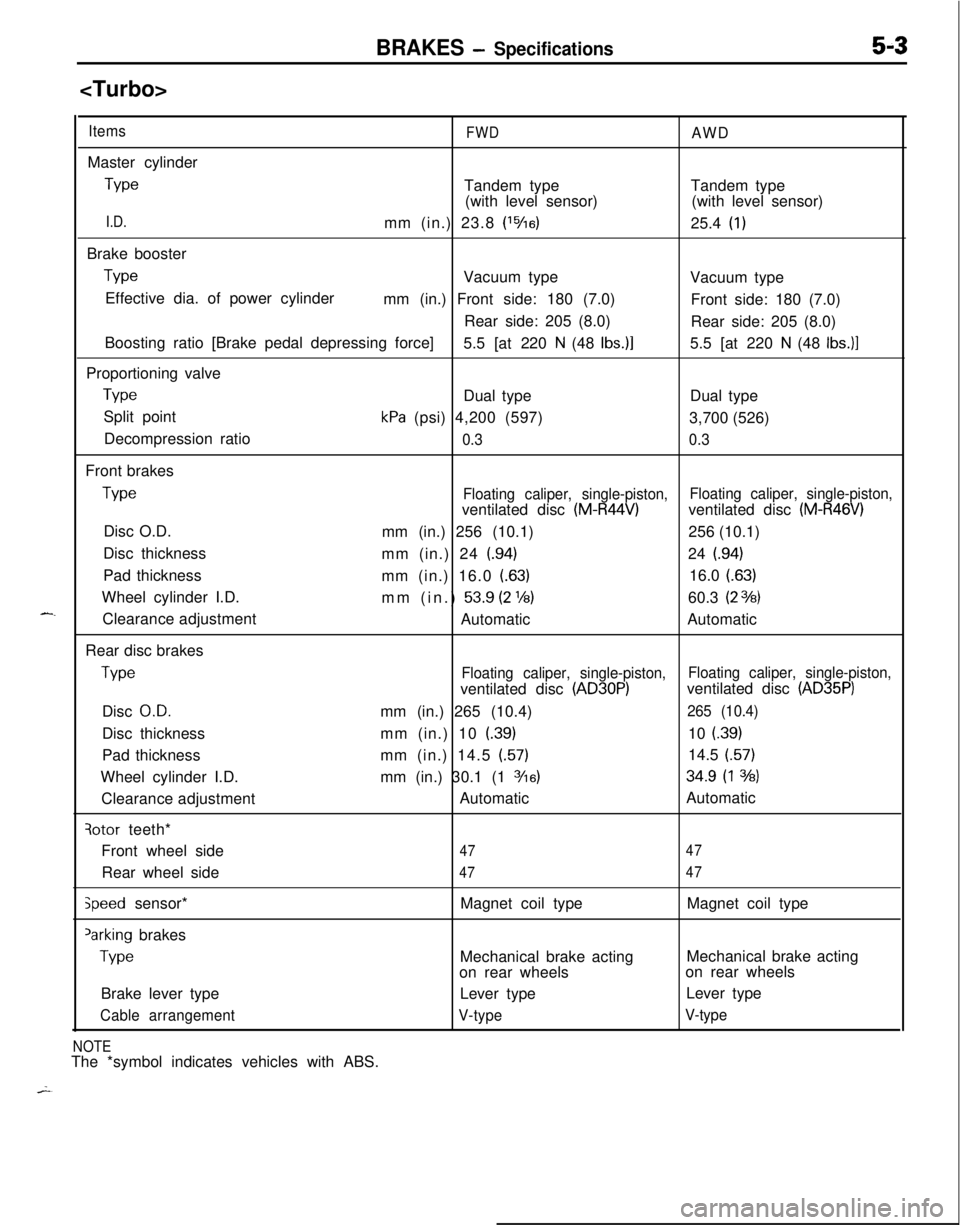
NOTEThe *symbol indicates vehicles with ABS.
Page 144 of 1216
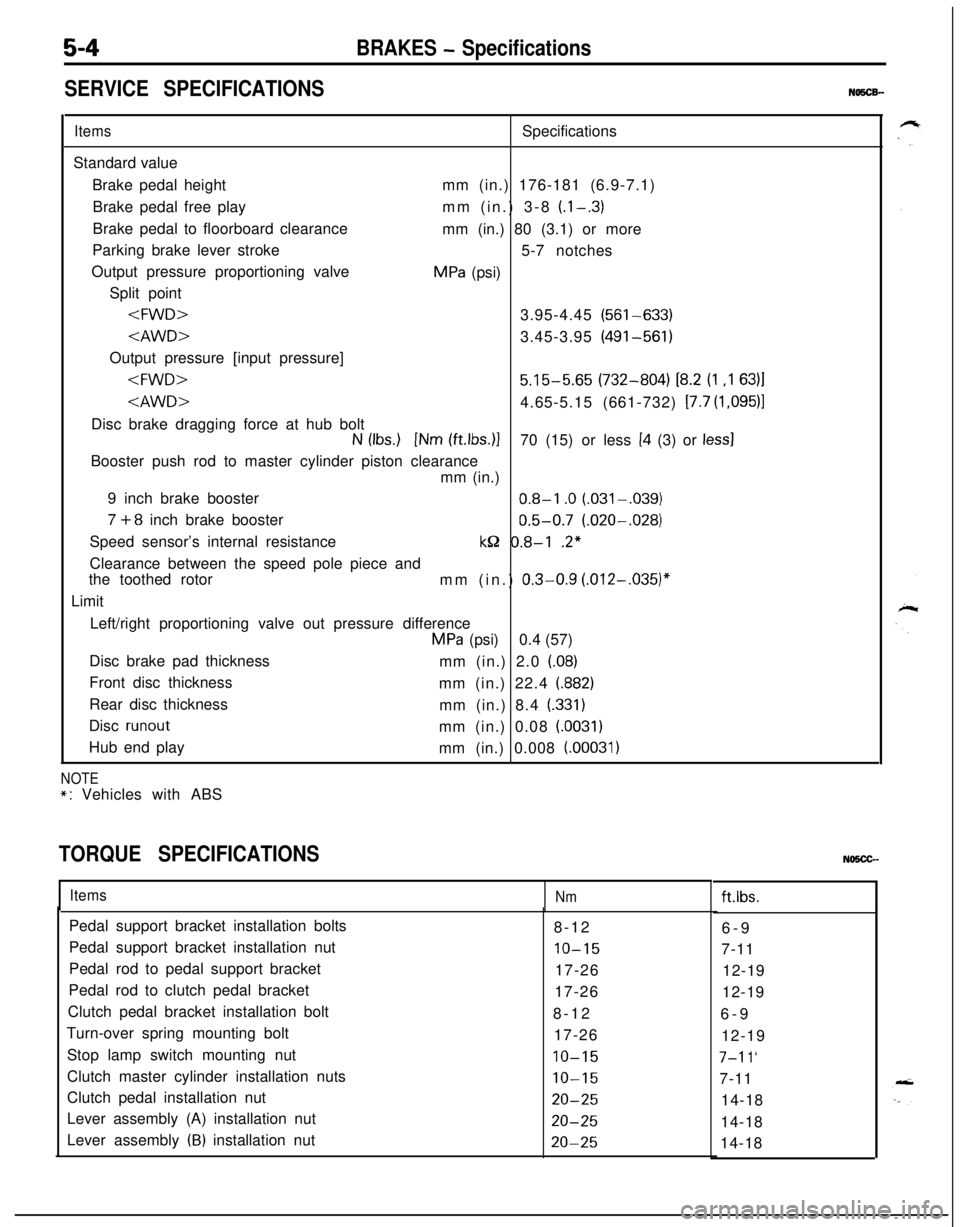
5-4BRAKES - Specifications
SERVICE SPECIFICATIONS
NO5CB-
ItemsSpecifications
Standard value
Brake pedal heightmm (in.) 176-181 (6.9-7.1)
Brake pedal free playmm (in.) 3-8
(l-.3)Brake pedal to floorboard clearance
mm (in.) 80 (3.1) or more
Parking brake lever stroke
5-7 notches
Output pressure proportioning valve
MPa (psi)
Split point
Output pressure [input pressure]
N (Ibs.) [Nm (ftlbs.)]70 (15) or less [4 (3) or less1Booster push rod to master cylinder piston clearance
mm (in.)
9 inch brake booster
0.8-l .O (.031-,039)
7
+8 inch brake booster0.5-0.7 (.020-.028)
Speed sensor’s internal resistance
kQ 0.8-l .2*
Clearance between the speed pole piece and
the toothed rotor
mm (in.)
0.3-0.9 (.012-,035)”Limit
Left/right proportioning valve out pressure difference
MPa (psi)0.4 (57)
Disc brake pad thickness
mm (in.) 2.0 (08)
Front disc thickness
mm (in.) 22.4 (882)
Rear disc thickness
mm (in.) 8.4
(.331)Disc
runoutmm (in.) 0.08 (.0031)Hub end play
mm (in.) 0.008
(.00031)
NOTE
*: Vehicles with ABS
TORQUE SPECIFICATIONS
ItemsNmft.lbs.
Pedal support bracket installation bolts
8-12
6-9
Pedal support bracket installation nut
IO-157-11
Pedal rod to pedal support bracket
17-26
12-19
Pedal rod to clutch pedal bracket
17-26
12-19
Clutch pedal bracket installation bolt
8-12
6-9
Turn-over spring mounting bolt
17-26
12-19
Stop lamp switch mounting nut
IO-157-l 1‘Clutch master cylinder installation nuts
10-157-11
Clutch pedal installation nut
20-2514-18
Lever assembly (A) installation nut
20-2514-18
Lever assembly
(B) installation nut20-2514-18
Page 145 of 1216
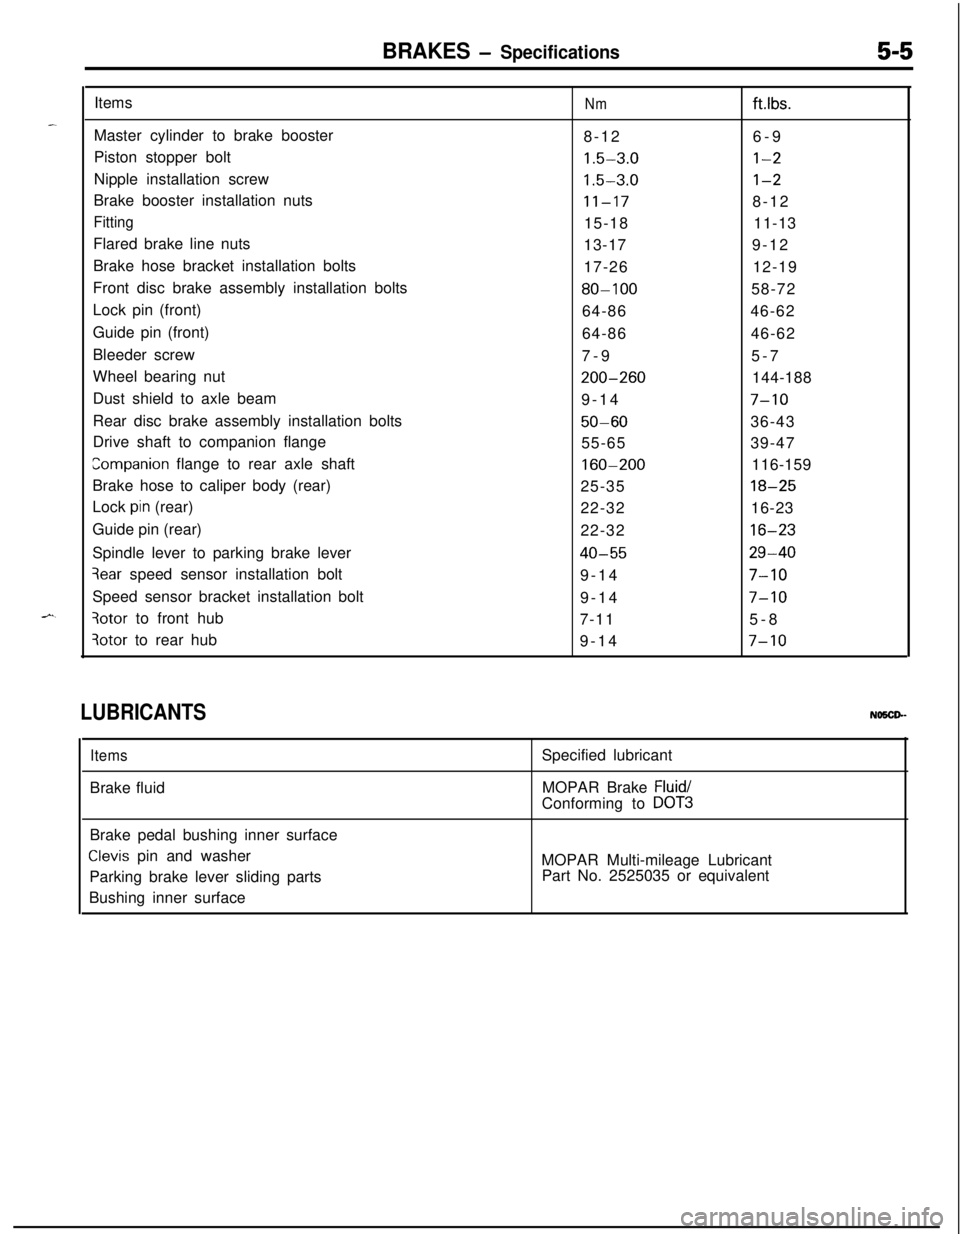
BRAKES - Specifications5-5Items
Nmftlbs.Master cylinder to brake booster
8-126-9
Piston stopper bolt
1.5-3.0l-2Nipple installation screw
1.5-3.0l-2Brake booster installation nuts
11-178-12
Fitting15-1811-13
Flared brake line nuts
13-179-12
Brake hose bracket installation bolts
17-2612-19
Front disc brake assembly installation bolts
80-10058-72
Lock pin (front)
64-8646-62
Guide pin (front)
64-8646-62
Bleeder screw
7-95-7
Wheel bearing nut
200-260144-188
Dust shield to axle beam
9-14
7-10Rear disc brake assembly installation bolts
50-6036-43
Drive shaft to companion flange
55-6539-47
companion flange to rear axle shaft160-200116-159
Brake hose to caliper body (rear)
25-35
18-25Lock
pin (rear)
22-3216-23
Guide pin (rear)
22-32
16-23Spindle lever to parking brake lever
40-5529-40
3ear speed sensor installation bolt
9-147-10Speed sensor bracket installation bolt
9-14
7-10
3otor to front hub
7-115-8
3otor to rear hub
9-147-10
LUBRICANTSNO5CP-
ItemsBrake fluidSpecified lubricant
MOPAR Brake
Fluid/Conforming to
DOT3Brake pedal bushing inner surface
Clevis pin and washer
Parking brake lever sliding parts
Bushing inner surfaceMOPAR Multi-mileage Lubricant
Part No. 2525035 or equivalent