MITSUBISHI ENDEAVOR 2004 Service Repair Manual
ENDEAVOR 2004
MITSUBISHI
MITSUBISHI
https://www.carmanualsonline.info/img/19/57105/w960_57105-0.png
MITSUBISHI ENDEAVOR 2004 Service Repair Manual
Trending: headrest, accessory belt, reset, relay, turn off alarm, Battery terminals, Oxygen sensor
Page 1471 of 3870
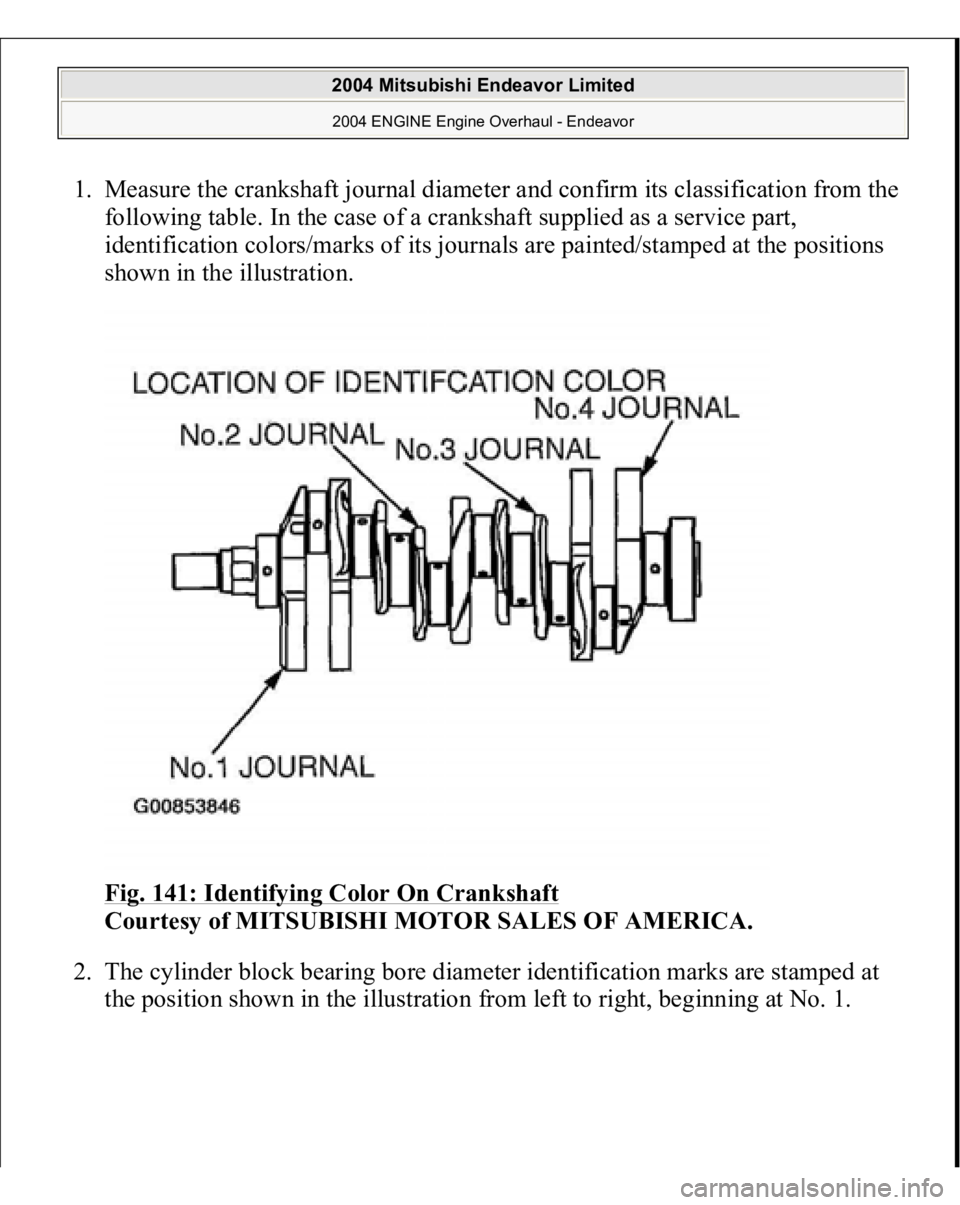
1. Measure the crankshaft journal diameter and confirm its classification from the
following table. In the case of a crankshaft supplied as a service part,
identification colors/marks of its journals are painted/stamped at the positions
shown in the illustration.
Fig. 141: Identifying Color On Crankshaft
Courtesy of MITSUBISHI MOTOR SALES OF AMERICA.
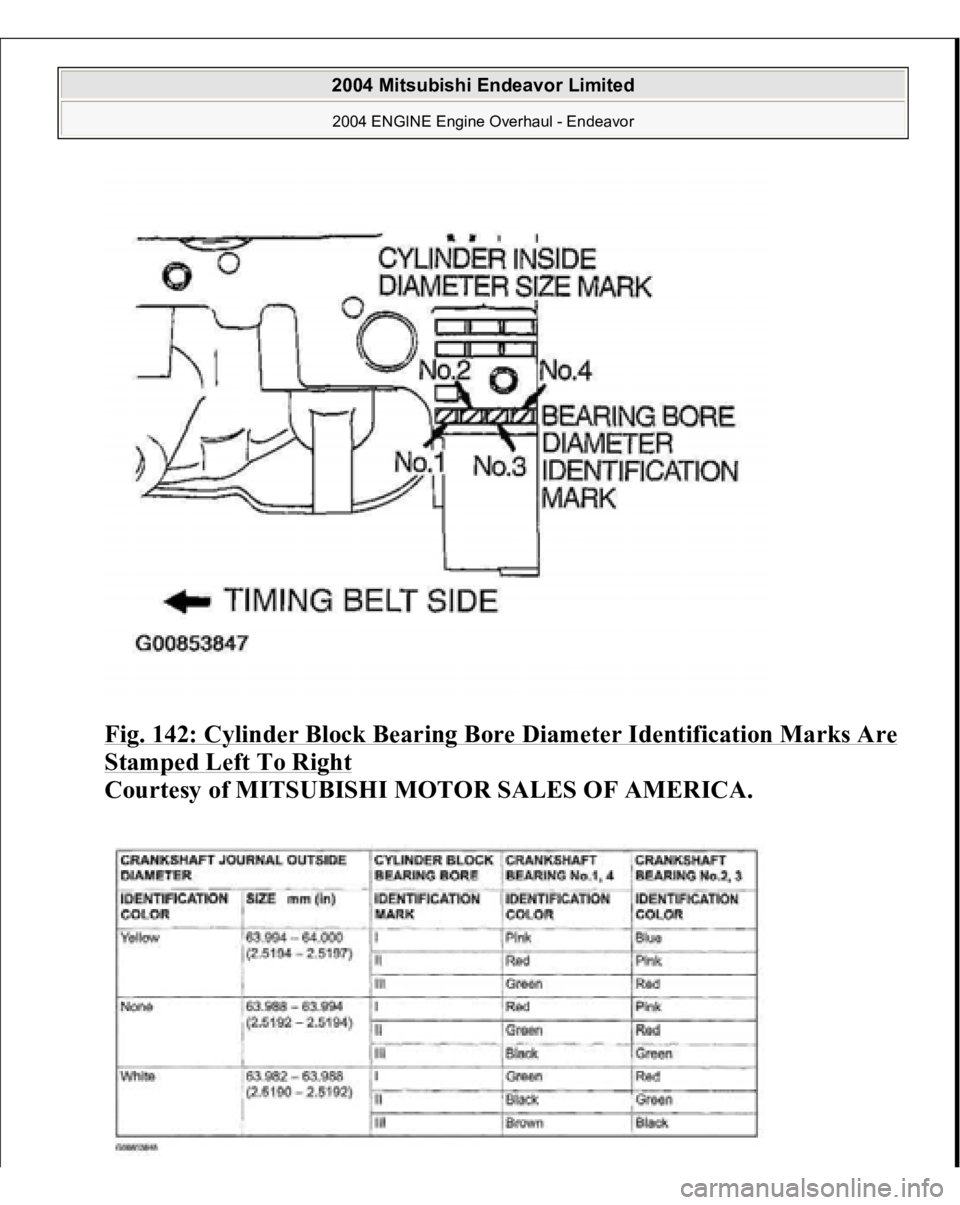
2. The cylinder block bearing bore diameter identification marks are stamped at
the
position shown in the illustration from left to ri
ght, be
ginnin
g at No. 1.
2004 Mitsubishi Endeavor Limited 2004 ENGINE Engine Overhaul - Endeavor
Page 1472 of 3870
Fig. 142: Cylinder Block Bearing Bore Diameter Identification Marks Are Stamped Left To Right
Courtesy of MITSUBISHI MOTOR SALES OF AMERICA.
2004 Mitsubishi Endeavor Limited 2004 ENGINE Engine Overhaul - Endeavor
Page 1473 of 3870
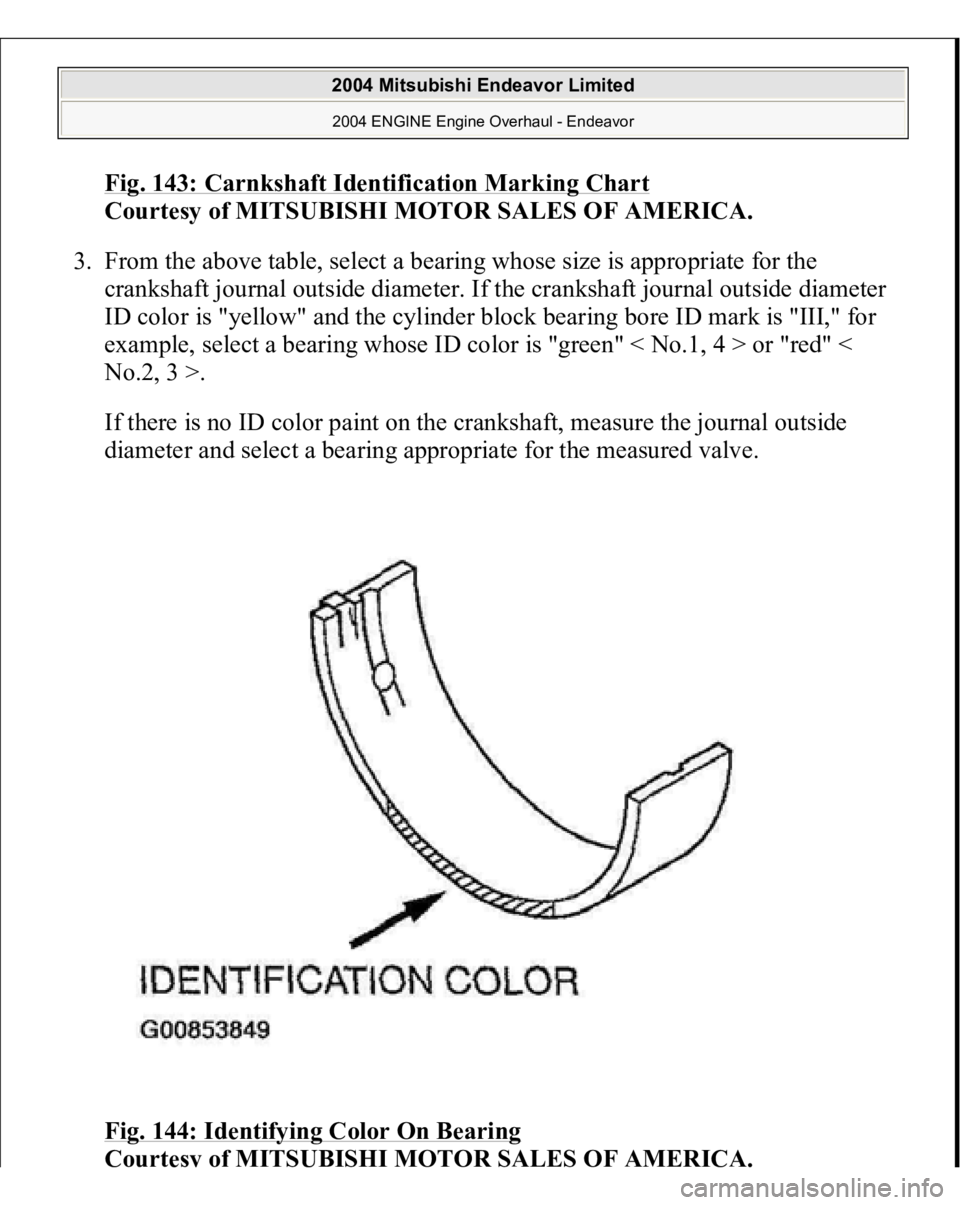
Fig. 143: Carnkshaft Identification Marking Char
t
Courtesy of MITSUBISHI MOTOR SALES OF AMERICA.
3. From the above table, select a bearing whose size is appropriate for the
crankshaft journal outside diameter. If the crankshaft journal outside diameter
ID color is "yellow" and the cylinder block bearing bore ID mark is "III," for
example, select a bearing whose ID color is "green" < No.1, 4 > or "red" <
No.2, 3 >.
If there is no ID color paint on the crankshaft, measure the journal outside
diameter and select a bearing appropriate for the measured valve.
Fig. 144: Identifying Color On Bearing
Courtes
y of MITSUBISHI MOTOR SALES OF AMERICA
.
2004 Mitsubishi Endeavor Limited 2004 ENGINE Engine Overhaul - Endeavor
Page 1474 of 3870
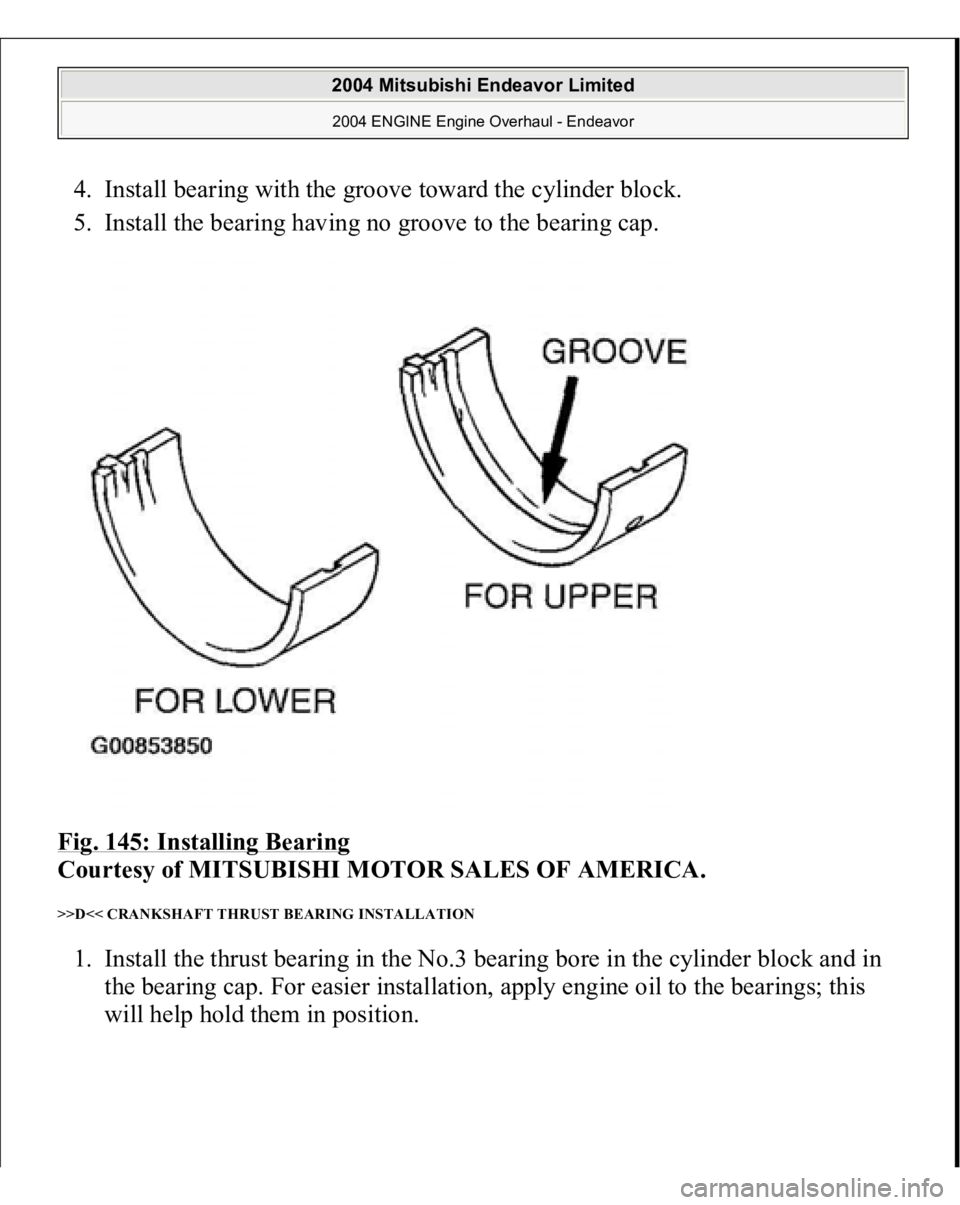
4. Install bearing with the groove toward the cylinder block.
5. Install the bearing having no groove to the bearing cap.
Fig. 145: Installing Bearing
Courtesy of MITSUBISHI MOTOR SALES OF AMERICA.
>>D<< CRANKSHAFT THRUST BEARING INSTALLATION 1. Install the thrust bearing in the No.3 bearing bore in the cylinder block and in
the bearing cap. For easier installation, apply engine oil to the bearings; this
will hel
p hold them in
position.
2004 Mitsubishi Endeavor Limited 2004 ENGINE Engine Overhaul - Endeavor
Page 1475 of 3870
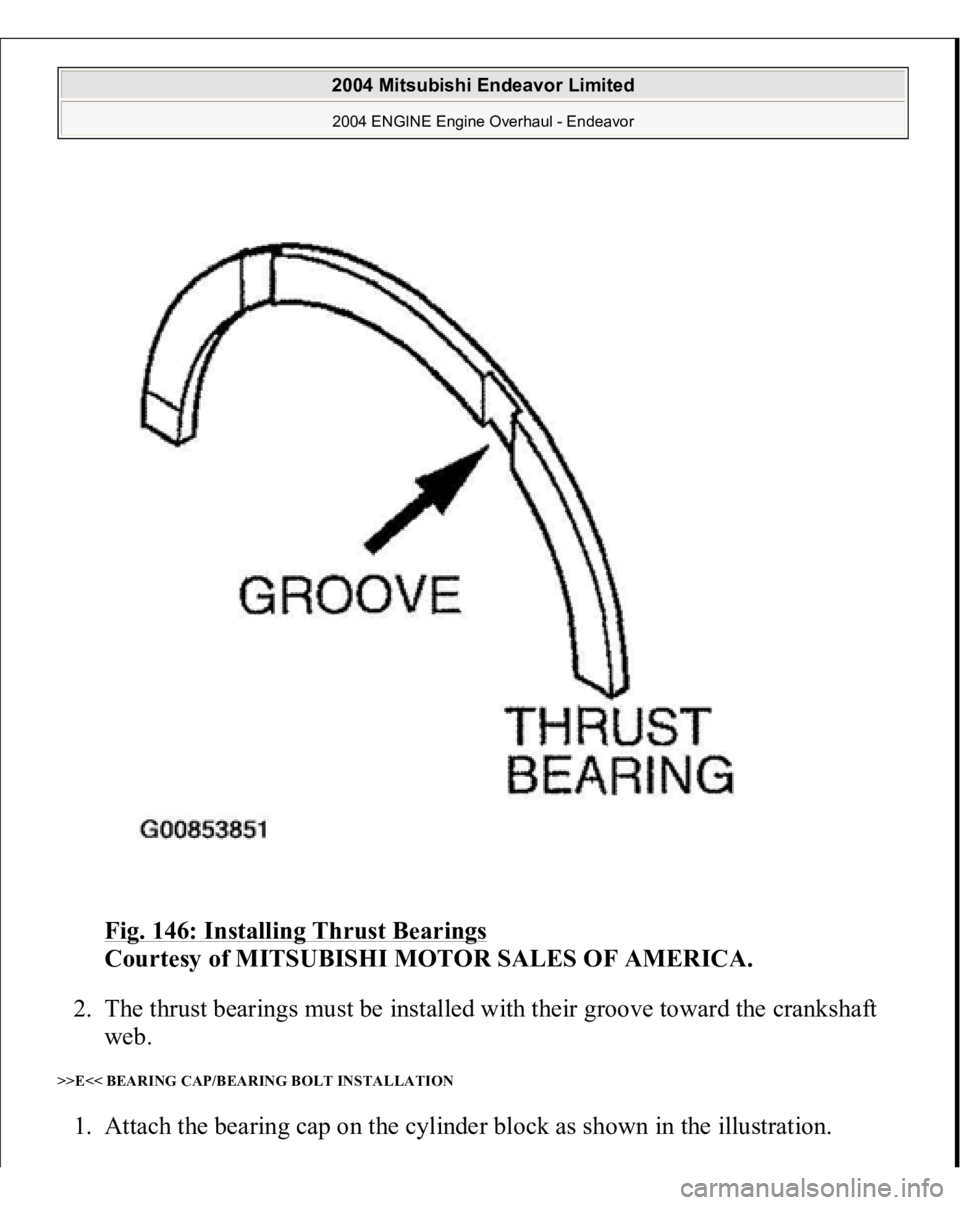
Fig. 146: Installing Thrust Bearings
Courtesy of MITSUBISHI MOTOR SALES OF AMERICA.
2. The thrust bearings must be installed with their groove toward the crankshaft
web.
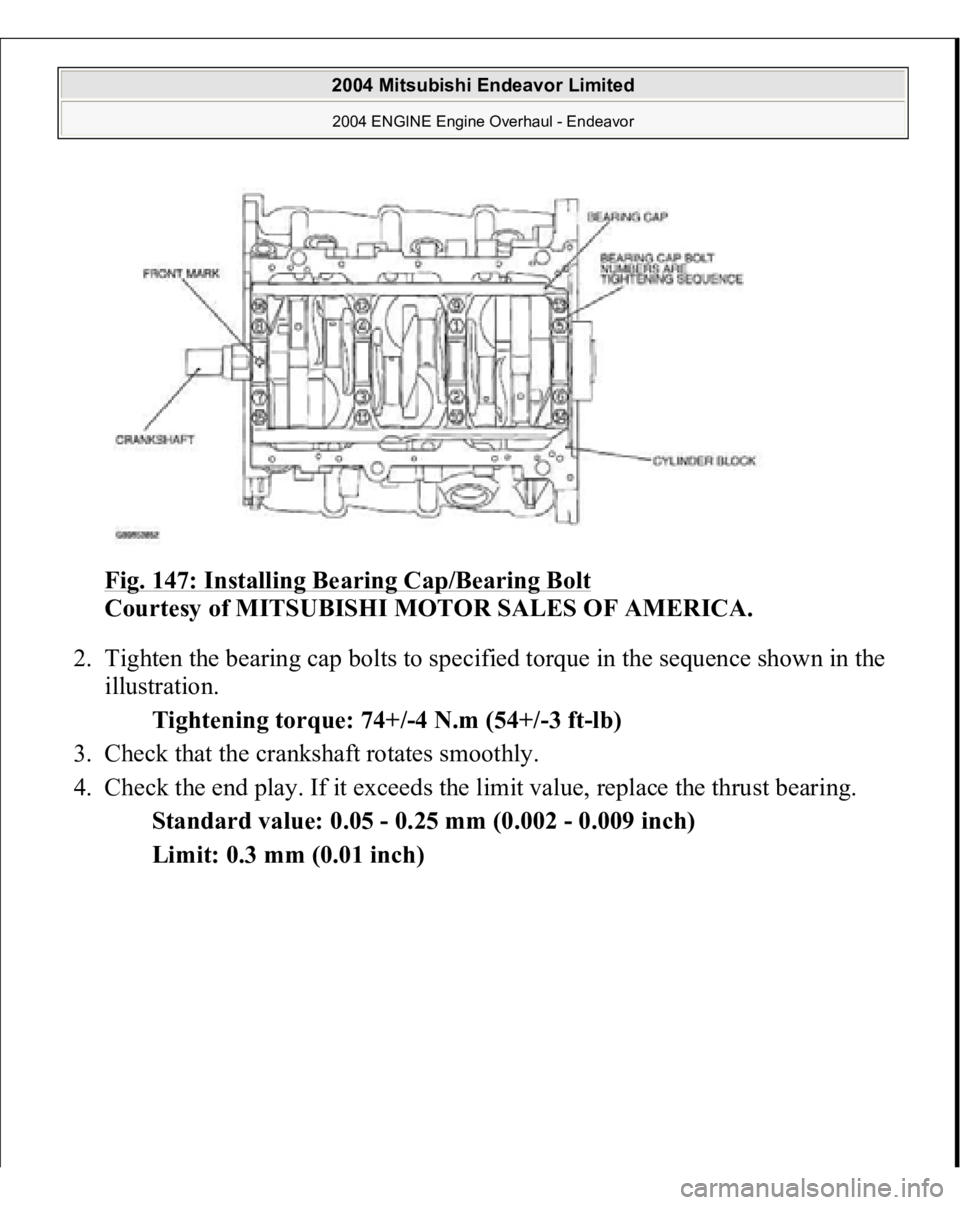
>>E<< BEARING CAP/BEARING BOLT INSTALLATION 1. Attach the bearing cap on the cylinder block as shown in the illustration.
2004 Mitsubishi Endeavor Limited 2004 ENGINE Engine Overhaul - Endeavor
Page 1476 of 3870
Fig. 147: Installing Bearing Cap/Bearing Bolt
Courtesy of MITSUBISHI MOTOR SALES OF AMERICA.
2. Tighten the bearing cap bolts to specified torque in the sequence shown in the
illustration.
Tightening torque: 74+/-4 N.m (54+/-3 ft-lb)
3. Check that the crankshaft rotates smoothly.
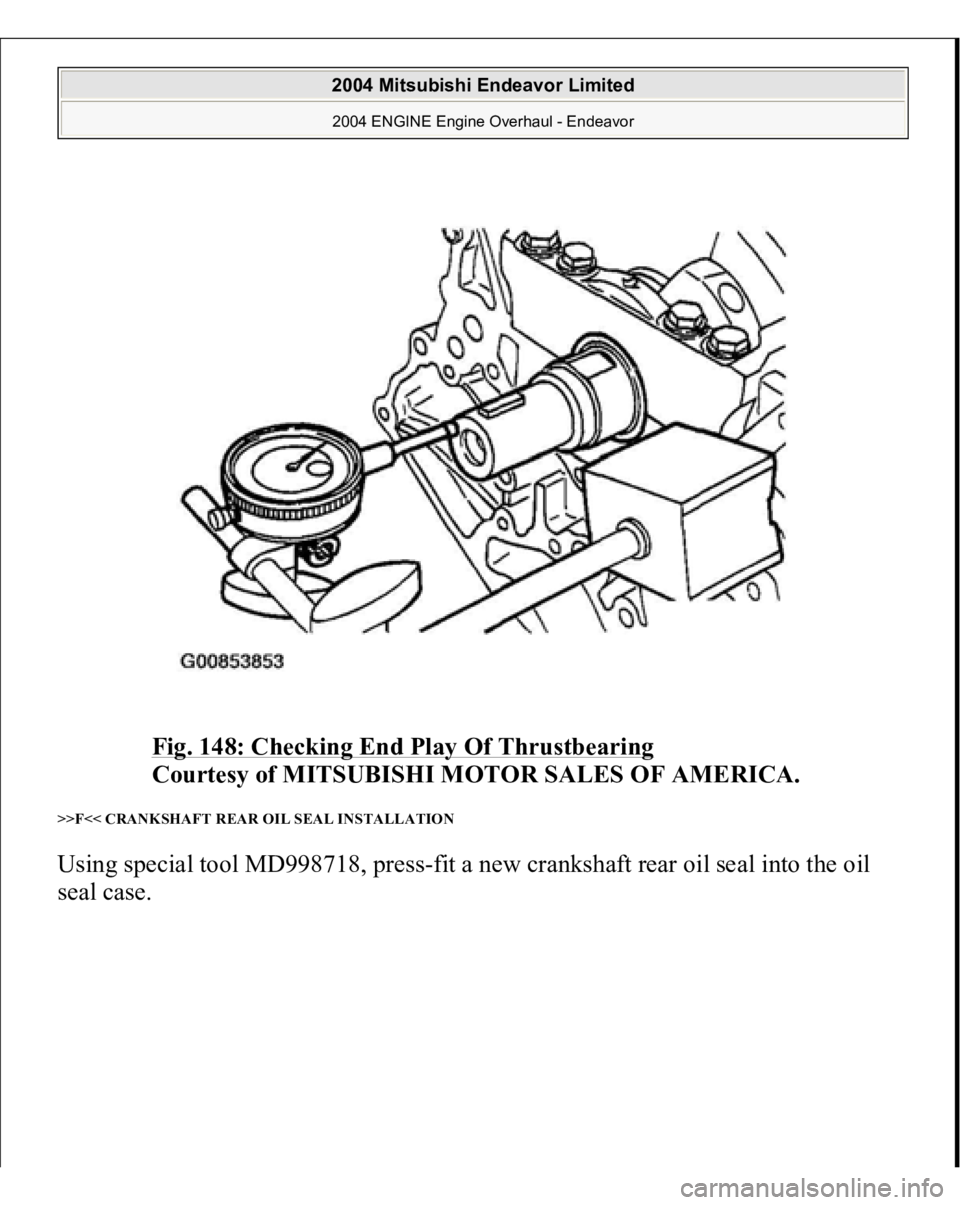
4. Check the end play. If it exceeds the limit value, replace the thrust bearing.
Standard value: 0.05 - 0.25 mm (0.002 - 0.009 inch)
Limit: 0.3 mm (0.01 inch)
2004 Mitsubishi Endeavor Limited 2004 ENGINE Engine Overhaul - Endeavor
Page 1477 of 3870
Fig. 148: Checking End Play Of Thrustbearing
Courtesy of MITSUBISHI MOTOR SALES OF AMERICA.
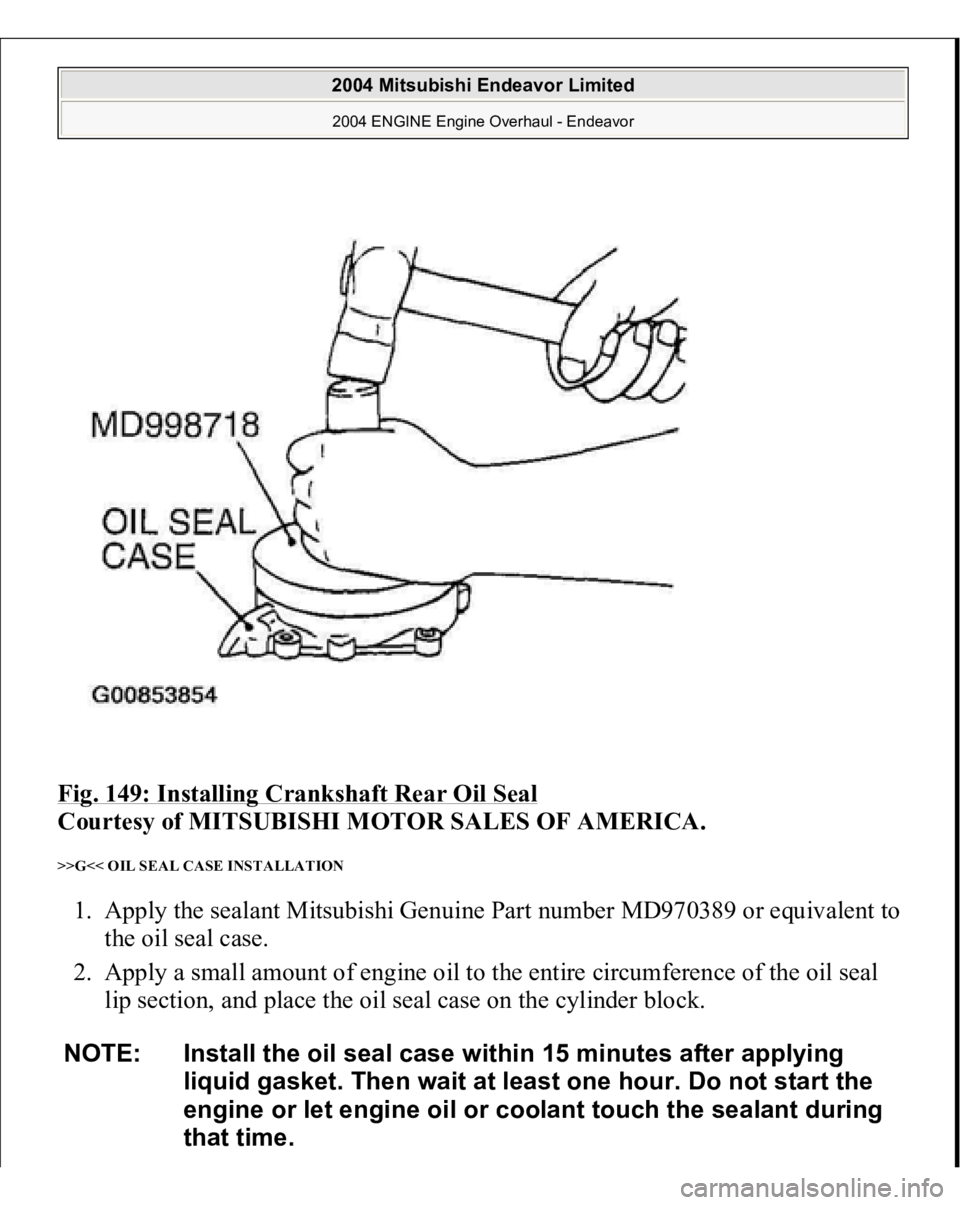
>>F<< CRANKSHAFT REAR OIL SEAL INSTALLATION Using special tool MD998718, press-fit a new crankshaft rear oil seal into the oil
seal case.
2004 Mitsubishi Endeavor Limited 2004 ENGINE Engine Overhaul - Endeavor
Page 1478 of 3870
Fig. 149: Installing Crankshaft Rear Oil Seal
Courtesy of MITSUBISHI MOTOR SALES OF AMERICA.
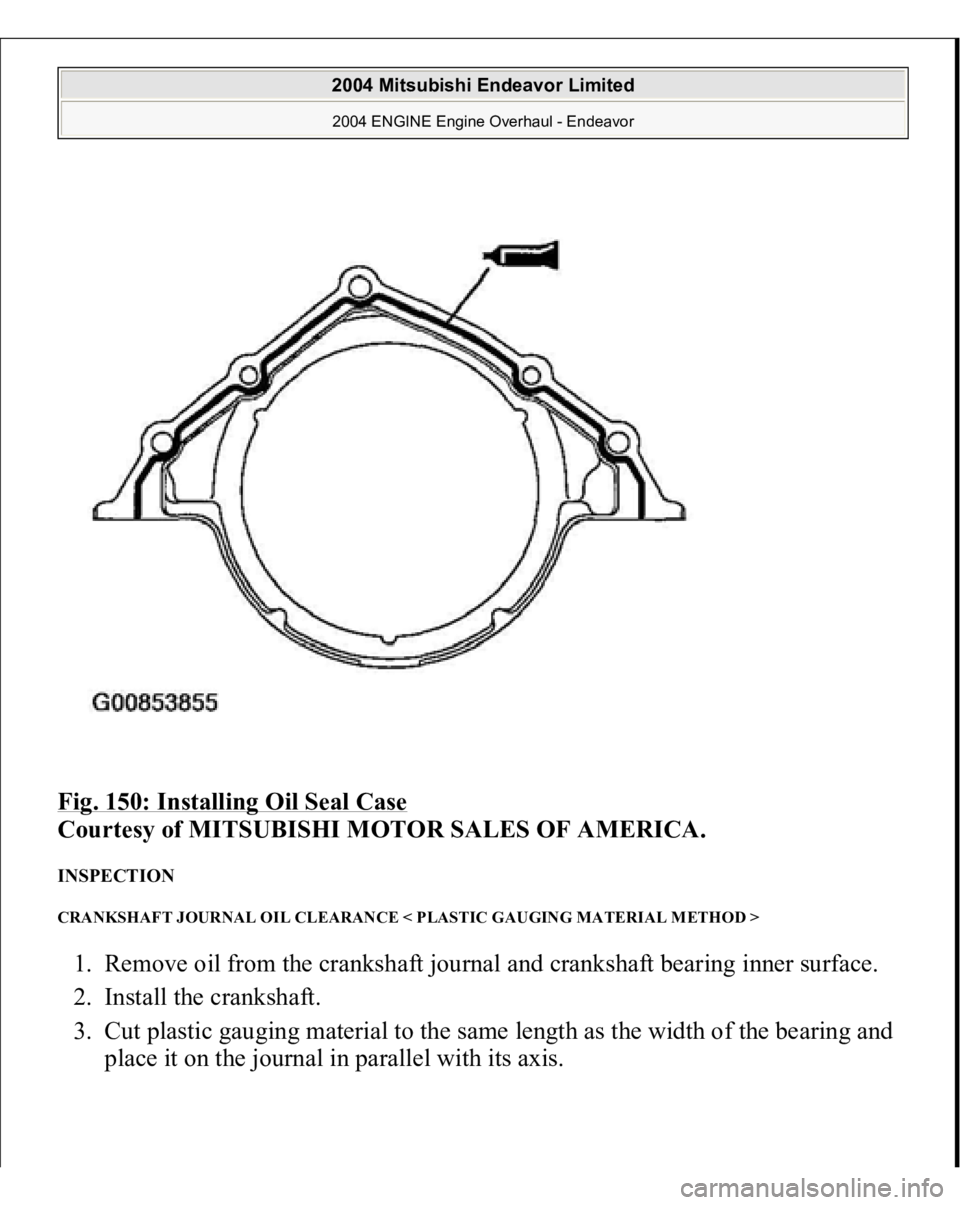
>>G<< OIL SEAL CASE INSTALLATION 1. Apply the sealant Mitsubishi Genuine Part number MD970389 or equivalent to
the oil seal case.
2. Apply a small amount of engine oil to the entire circumference of the oil seal
lip section, and place the oil seal case on the cylinder block. NOTE: Install the oil seal case within 15 minutes after applying
liquid gasket. Then wait at least one hour. Do not start the
engine or let engine oil or coolant touch the sealant during
that time.
2004 Mitsubishi Endeavor Limited 2004 ENGINE Engine Overhaul - Endeavor
Page 1479 of 3870
Fig. 150: Installing Oil Seal Case
Courtesy of MITSUBISHI MOTOR SALES OF AMERICA.
INSPECTION CRANKSHAFT JOURNAL OIL CLEARANCE < PLASTIC GAUGING MATERIAL METHOD > 1. Remove oil from the crankshaft journal and crankshaft bearing inner surface.
2. Install the crankshaft.
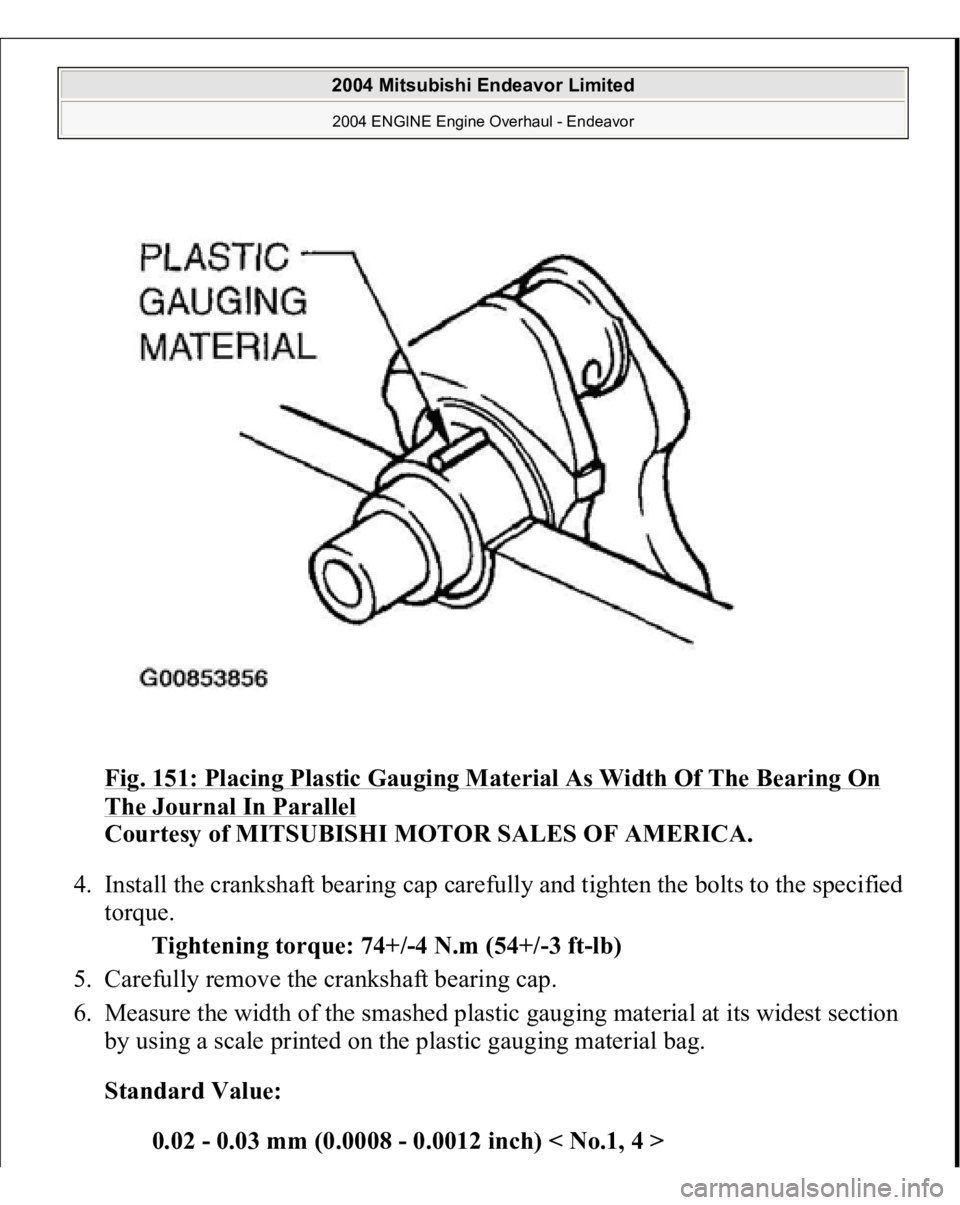
3. Cut plastic gauging material to the same length as the width of the bearing and
place it on the
journal in
parallel with its axis.
2004 Mitsubishi Endeavor Limited 2004 ENGINE Engine Overhaul - Endeavor
Page 1480 of 3870
Fig. 151: Placing Plastic Gauging Material As Width Of The Bearing On The Journal In Parallel
Courtesy of MITSUBISHI MOTOR SALES OF AMERICA.
4. Install the crankshaft bearing cap carefully and tighten the bolts to the specified
torque.
Tightening torque: 74+/-4 N.m (54+/-3 ft-lb)
5. Carefully remove the crankshaft bearing cap.
6. Measure the width of the smashed plastic gauging material at its widest section
by using a scale printed on the plastic gauging material bag.
Standard Value:
0.02 - 0.03 mm (0.0008 - 0.0012 inch) < No.1, 4 >
2004 Mitsubishi Endeavor Limited 2004 ENGINE Engine Overhaul - Endeavor
Trending: wheel bolts, fuel, drain bolt, control module, oil, automatic transmission, adding oil
