MITSUBISHI L200 2015 Owner's Manual (in English)
Manufacturer: MITSUBISHI, Model Year: 2015, Model line: L200, Model: MITSUBISHI L200 2015Pages: 418, PDF Size: 25.8 MB
Page 371 of 418
Position lamps
E01003700833
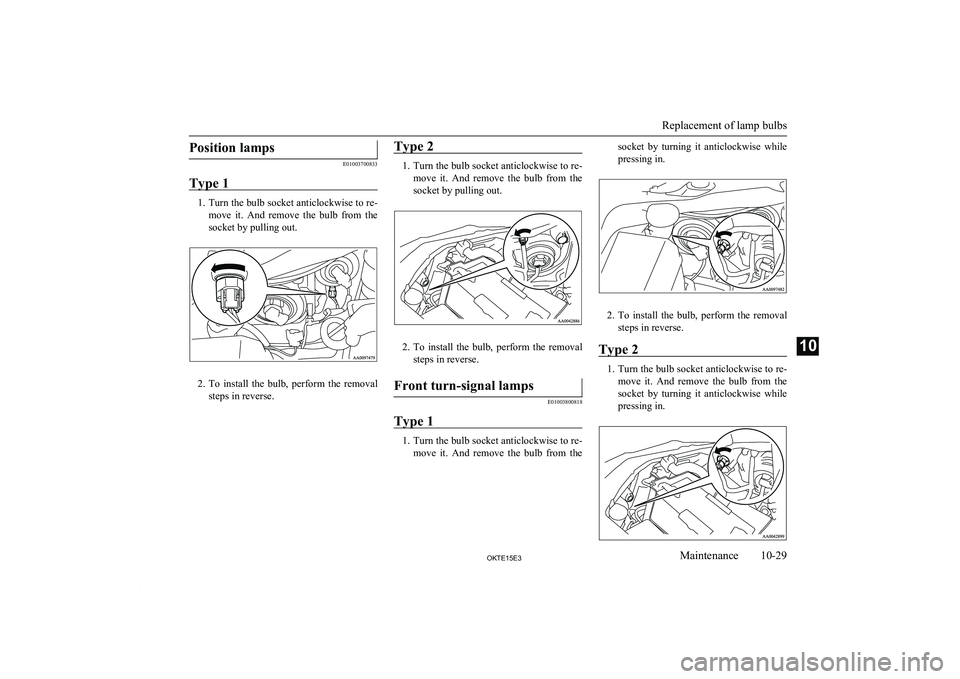
Type 1
1. Turn the bulb socket anticlockwise to re-
move it. And remove the bulb from the
socket by pulling out.
2. To install the bulb, perform the removal
steps in reverse.
Type 2
1. Turn the bulb socket anticlockwise to re-
move it. And remove the bulb from the
socket by pulling out.
2. To install the bulb, perform the removal
steps in reverse.
Front turn-signal lamps
E01003800818
Type 1
1. Turn the bulb socket anticlockwise to re-
move it. And remove the bulb from the
socket by turning it anticlockwise while
pressing in.
2. To install the bulb, perform the removal
steps in reverse.
Type 2
1. Turn the bulb socket anticlockwise to re-
move it. And remove the bulb from the
socket by turning it anticlockwise while pressing in.
Replacement of lamp bulbs
10-29OKTE15E3Maintenance10
Page 372 of 418
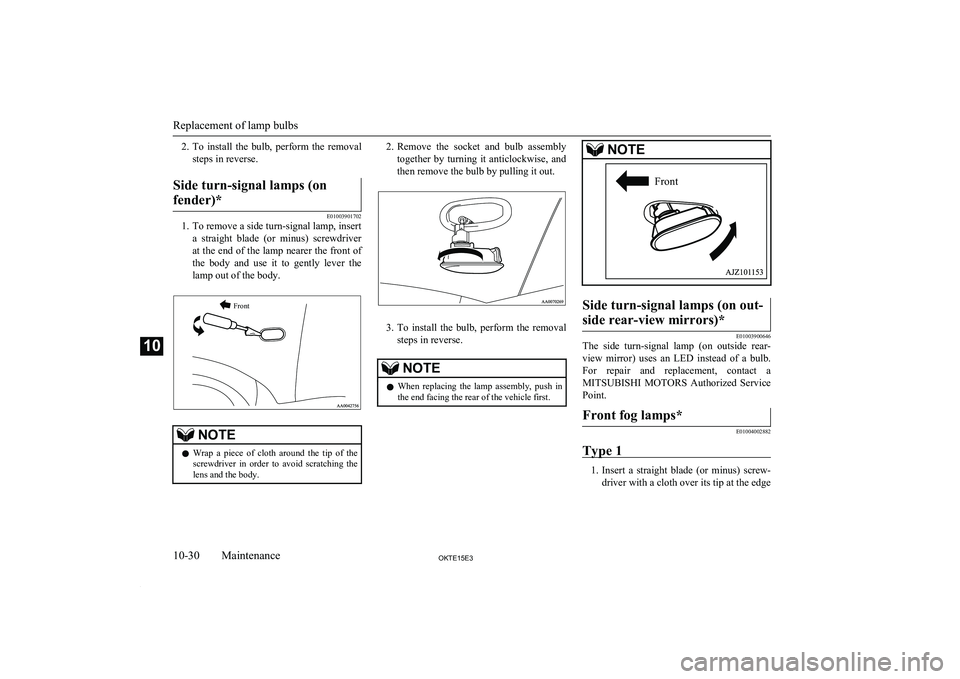
2.To install the bulb, perform the removal
steps in reverse.Side turn-signal lamps (on
fender)*
E01003901702
1. To remove a side turn-signal lamp, insert a straight blade (or minus) screwdriverat the end of the lamp nearer the front of
the body and use it to gently lever the lamp out of the body.
Front
NOTEl Wrap a piece of cloth around the tip of the
screwdriver in order to avoid scratching the
lens and the body.2. Remove the socket and bulb assembly
together by turning it anticlockwise, and then remove the bulb by pulling it out.
3. To install the bulb, perform the removal
steps in reverse.
NOTEl When replacing the lamp assembly, push in
the end facing the rear of the vehicle first.NOTESide turn-signal lamps (on out-
side rear-view mirrors)*
E01003900646
The side turn-signal lamp (on outside rear-
view mirror) uses an LED instead of a bulb. For repair and replacement, contact a MITSUBISHI MOTORS Authorized Service
Point.
Front fog lamps*
E01004002882
Type 1
1. Insert a straight blade (or minus) screw-
driver with a cloth over its tip at the edge
Replacement of lamp bulbs
10-30OKTE15E3Maintenance10 Front
Page 373 of 418
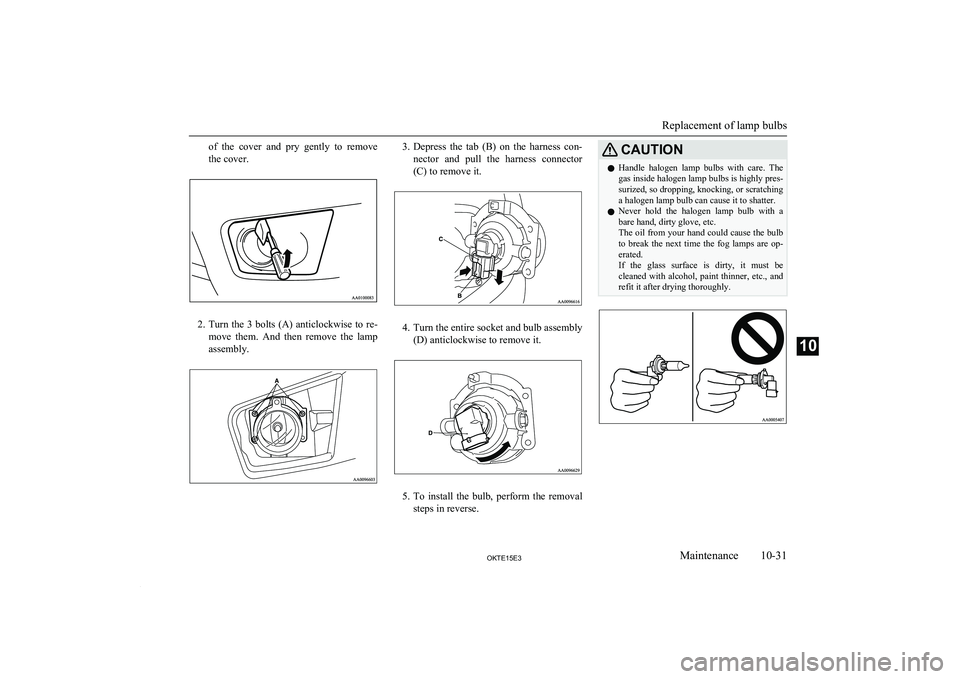
of the cover and pry gently to remove
the cover.
2. Turn the 3 bolts (A) anticlockwise to re-
move them. And then remove the lamp assembly.
3. Depress the tab (B) on the harness con-
nector and pull the harness connector
(C) to remove it.
4. Turn the entire socket and bulb assembly
(D) anticlockwise to remove it.
5. To install the bulb, perform the removal
steps in reverse.
CAUTIONl Handle halogen lamp bulbs with care. The
gas inside halogen lamp bulbs is highly pres-
surized, so dropping, knocking, or scratching
a halogen lamp bulb can cause it to shatter.
l Never hold the halogen lamp bulb with a
bare hand, dirty glove, etc.
The oil from your hand could cause the bulb to break the next time the fog lamps are op- erated.
If the glass surface is dirty, it must be
cleaned with alcohol, paint thinner, etc., and refit it after drying thoroughly.
Replacement of lamp bulbs
10-31OKTE15E3Maintenance10
Page 374 of 418
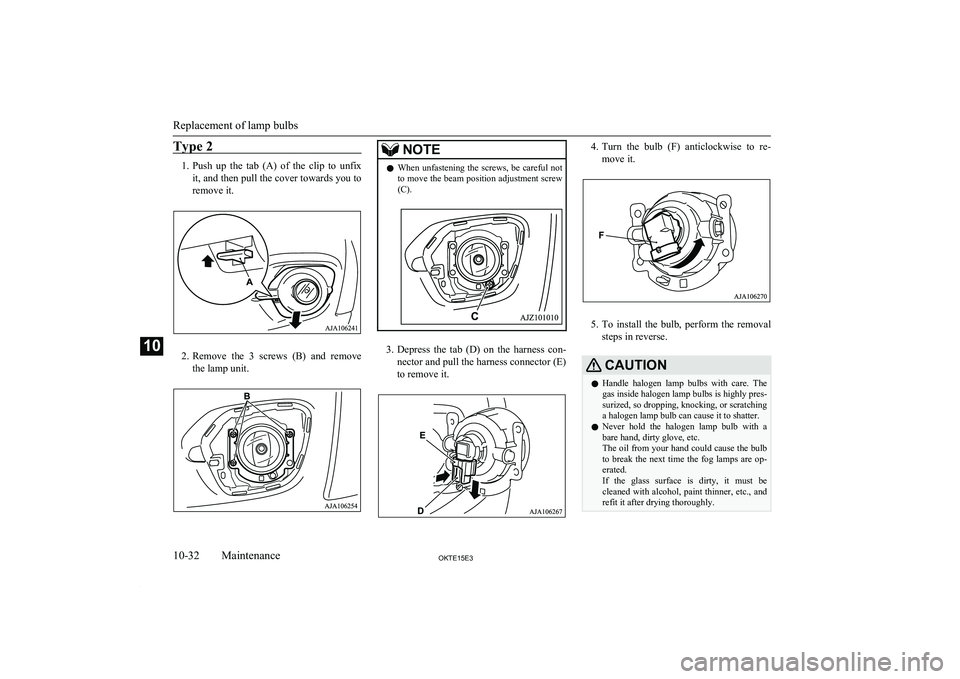
Type 2
1.Push up the tab (A) of the clip to unfix
it, and then pull the cover towards you to
remove it.
2. Remove the 3 screws (B) and remove
the lamp unit.
NOTEl When unfastening the screws, be careful not
to move the beam position adjustment screw
(C).
3. Depress the tab (D) on the harness con-
nector and pull the harness connector (E)
to remove it.
4. Turn the bulb (F) anticlockwise to re-
move it.
5. To install the bulb, perform the removal
steps in reverse.
CAUTIONl Handle halogen lamp bulbs with care. The
gas inside halogen lamp bulbs is highly pres- surized, so dropping, knocking, or scratching
a halogen lamp bulb can cause it to shatter.
l Never hold the halogen lamp bulb with a
bare hand, dirty glove, etc.
The oil from your hand could cause the bulb to break the next time the fog lamps are op-
erated.
If the glass surface is dirty, it must be cleaned with alcohol, paint thinner, etc., andrefit it after drying thoroughly.
Replacement of lamp bulbs
10-32OKTE15E3Maintenance10
Page 375 of 418
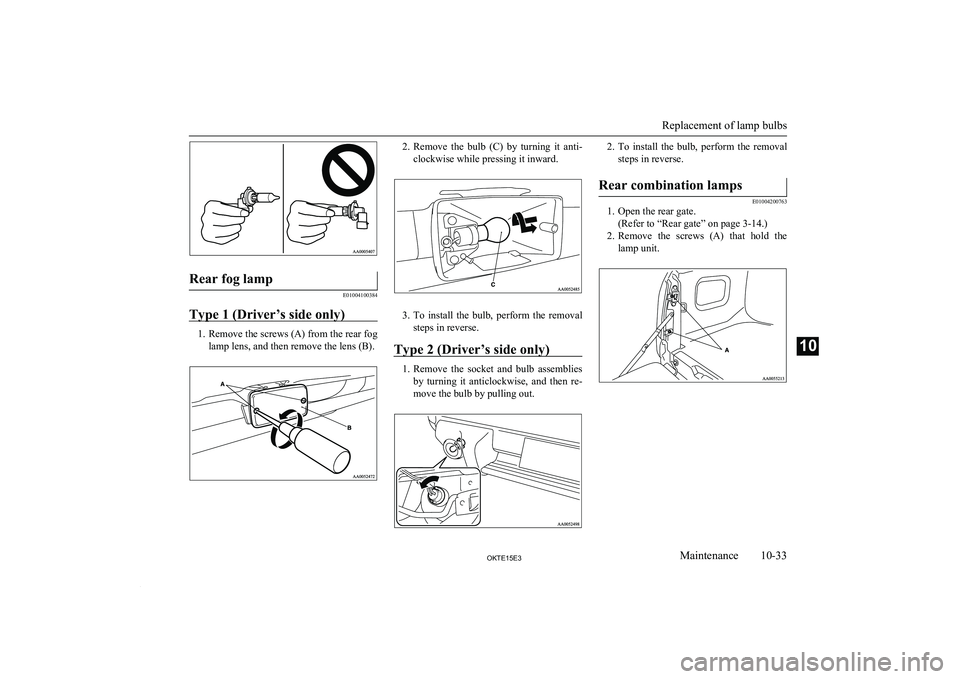
Rear fog lamp
E01004100384
Type 1 (Driver’s side only)
1. Remove the screws (A) from the rear foglamp lens, and then remove the lens (B).
2.Remove the bulb (C) by turning it anti-
clockwise while pressing it inward.
3. To install the bulb, perform the removal
steps in reverse.
Type 2 (Driver’s side only)
1. Remove the socket and bulb assemblies
by turning it anticlockwise, and then re- move the bulb by pulling out.
2. To install the bulb, perform the removal
steps in reverse.Rear combination lamps
E01004200763
1. Open the rear gate. (Refer to “Rear gate” on page 3-14.)
2. Remove the screws (A) that hold the
lamp unit.
Replacement of lamp bulbs
10-33OKTE15E3Maintenance10
Page 376 of 418
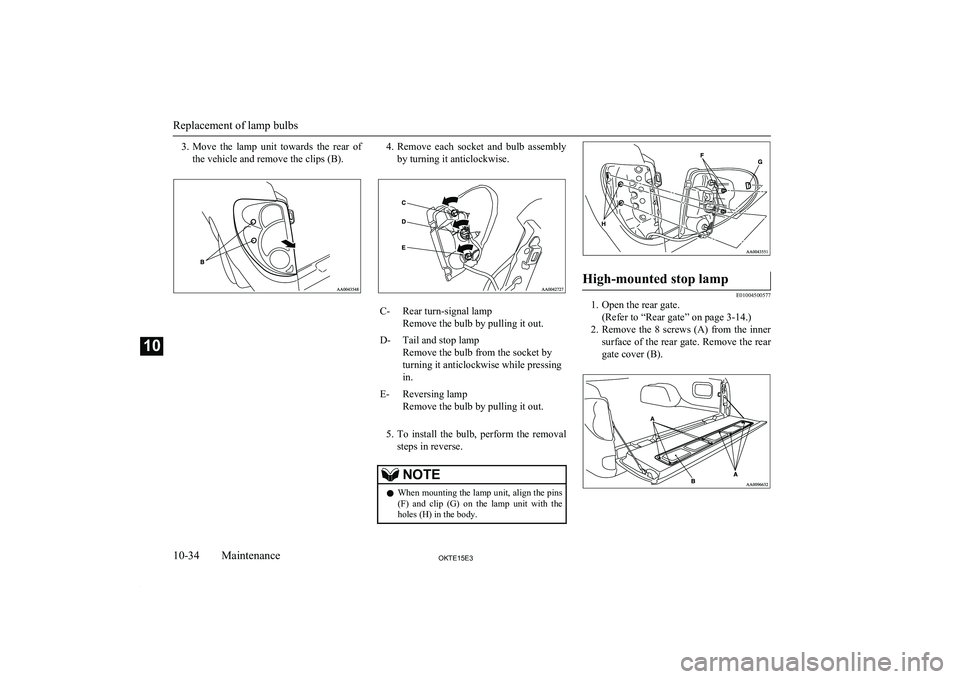
3.Move the lamp unit towards the rear of
the vehicle and remove the clips (B).4. Remove each socket and bulb assembly
by turning it anticlockwise.C-Rear turn-signal lamp
Remove the bulb by pulling it out.D-Tail and stop lamp
Remove the bulb from the socket by
turning it anticlockwise while pressing
in.E-Reversing lamp
Remove the bulb by pulling it out.
5. To install the bulb, perform the removal
steps in reverse.
NOTEl When mounting the lamp unit, align the pins
(F) and clip (G) on the lamp unit with the
holes (H) in the body.High-mounted stop lamp
E01004500577
1. Open the rear gate.
(Refer to “Rear gate” on page 3-14.)
2. Remove the 8 screws (A) from the inner
surface of the rear gate. Remove the rear
gate cover (B).
Replacement of lamp bulbs
10-34OKTE15E3Maintenance10
Page 377 of 418
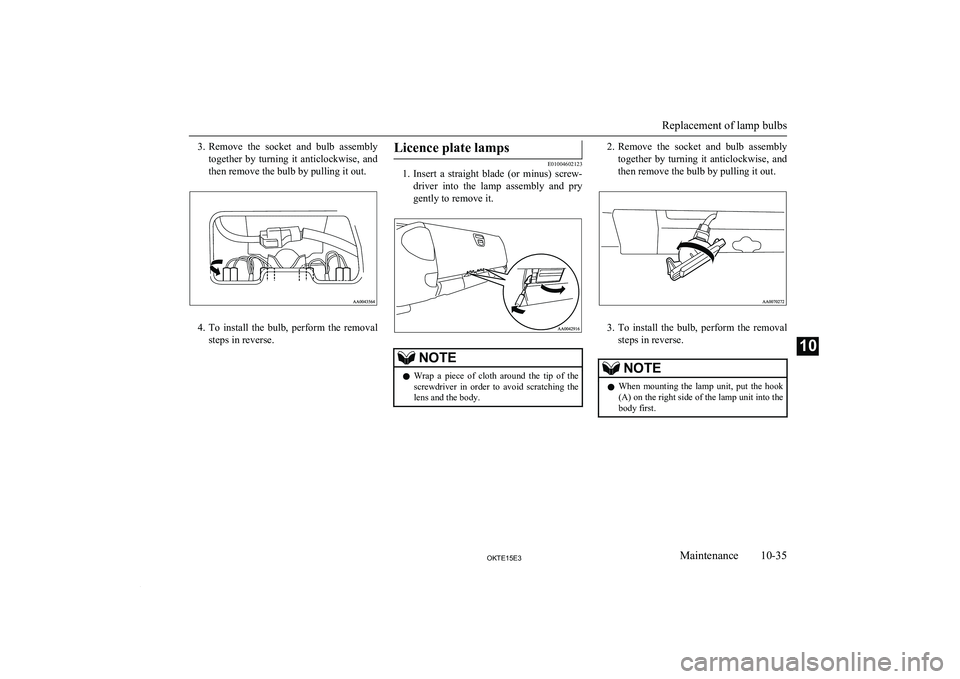
3.Remove the socket and bulb assembly
together by turning it anticlockwise, and then remove the bulb by pulling it out.
4. To install the bulb, perform the removal
steps in reverse.
Licence plate lamps
E01004602123
1. Insert a straight blade (or minus) screw-
driver into the lamp assembly and pry
gently to remove it.
NOTEl Wrap a piece of cloth around the tip of the
screwdriver in order to avoid scratching the
lens and the body.2. Remove the socket and bulb assembly
together by turning it anticlockwise, and then remove the bulb by pulling it out.
3. To install the bulb, perform the removal
steps in reverse.
NOTEl When mounting the lamp unit, put the hook
(A) on the right side of the lamp unit into thebody first.
Replacement of lamp bulbs
10-35OKTE15E3Maintenance10
Page 378 of 418
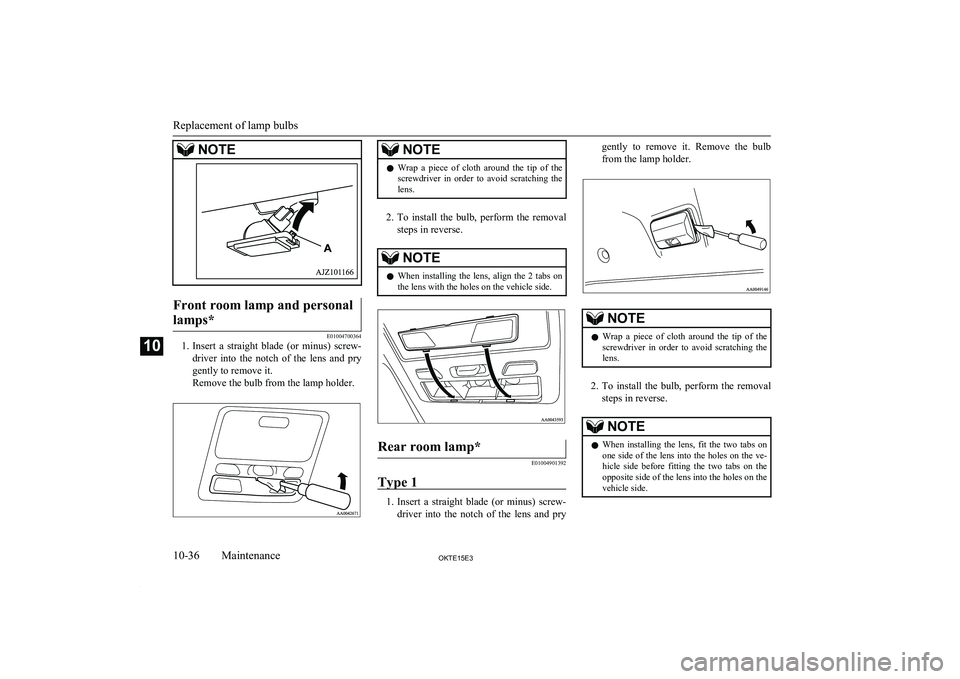
NOTEFront room lamp and personallamps*
E01004700364
1. Insert a straight blade (or minus) screw-
driver into the notch of the lens and pry gently to remove it.
Remove the bulb from the lamp holder.
NOTEl Wrap a piece of cloth around the tip of the
screwdriver in order to avoid scratching the
lens.
2. To install the bulb, perform the removal
steps in reverse.
NOTEl When installing the lens, align the 2 tabs on
the lens with the holes on the vehicle side.Rear room lamp*
E01004901392
Type 1
1. Insert a straight blade (or minus) screw-
driver into the notch of the lens and pry
gently to remove it. Remove the bulb
from the lamp holder.NOTEl Wrap a piece of cloth around the tip of the
screwdriver in order to avoid scratching the
lens.
2. To install the bulb, perform the removal
steps in reverse.
NOTEl When installing the lens, fit the two tabs on
one side of the lens into the holes on the ve-hicle side before fitting the two tabs on the opposite side of the lens into the holes on the
vehicle side.
Replacement of lamp bulbs
10-36OKTE15E3Maintenance10
Page 379 of 418
NOTE
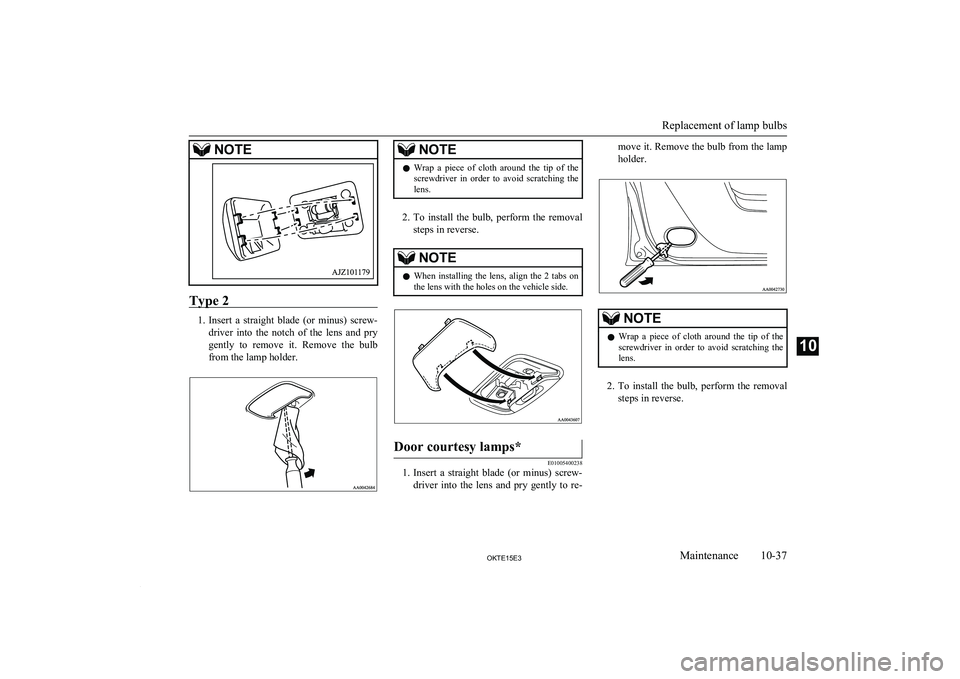
Type 2
1.Insert a straight blade (or minus) screw-
driver into the notch of the lens and pry gently to remove it. Remove the bulb
from the lamp holder.
NOTEl Wrap a piece of cloth around the tip of the
screwdriver in order to avoid scratching the
lens.
2. To install the bulb, perform the removal
steps in reverse.
NOTEl When installing the lens, align the 2 tabs on
the lens with the holes on the vehicle side.Door courtesy lamps*
E01005400238
1. Insert a straight blade (or minus) screw-
driver into the lens and pry gently to re-
move it. Remove the bulb from the lamp
holder.NOTEl Wrap a piece of cloth around the tip of the
screwdriver in order to avoid scratching the
lens.
2. To install the bulb, perform the removal
steps in reverse.
Replacement of lamp bulbs
10-37OKTE15E3Maintenance10
Page 380 of 418
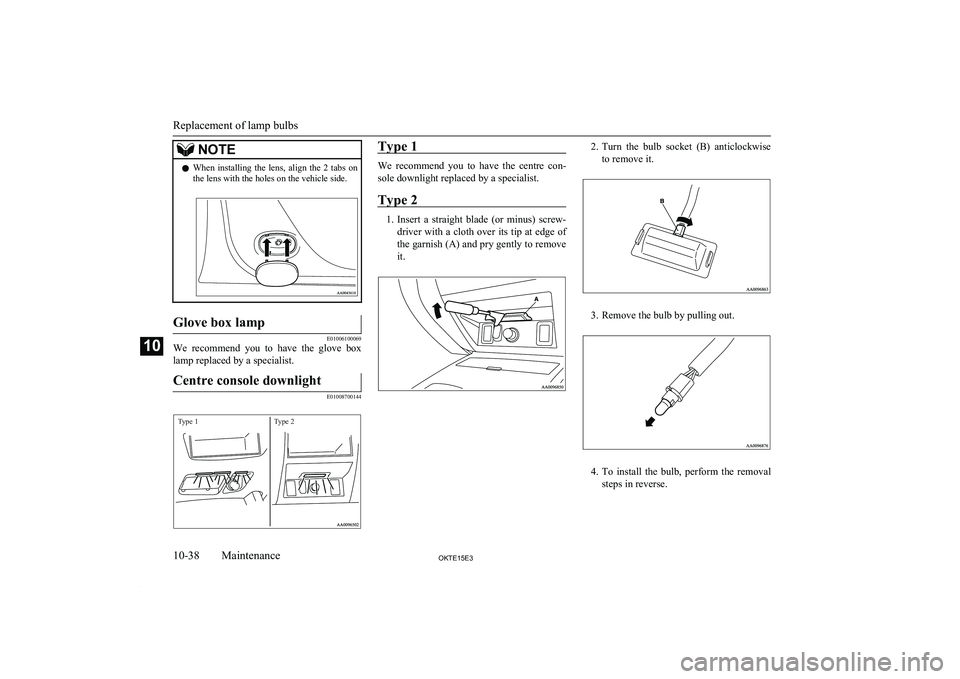
NOTElWhen installing the lens, align the 2 tabs on
the lens with the holes on the vehicle side.Glove box lamp
E01006100069
We recommend you to have the glove box
lamp replaced by a specialist.
Centre console downlight
E01008700144
Type 1Type 2Type 1
We recommend you to have the centre con-
sole downlight replaced by a specialist.
Type 2
1. Insert a straight blade (or minus) screw-
driver with a cloth over its tip at edge of
the garnish (A) and pry gently to remove it.
2. Turn the bulb socket (B) anticlockwise
to remove it.
3. Remove the bulb by pulling out.
4. To install the bulb, perform the removal
steps in reverse.
Replacement of lamp bulbs
10-38OKTE15E3Maintenance10