MITSUBISHI MONTERO 1987 1.G Workshop Manual
Manufacturer: MITSUBISHI, Model Year: 1987, Model line: MONTERO, Model: MITSUBISHI MONTERO 1987 1.GPages: 284, PDF Size: 14.74 MB
Page 171 of 284
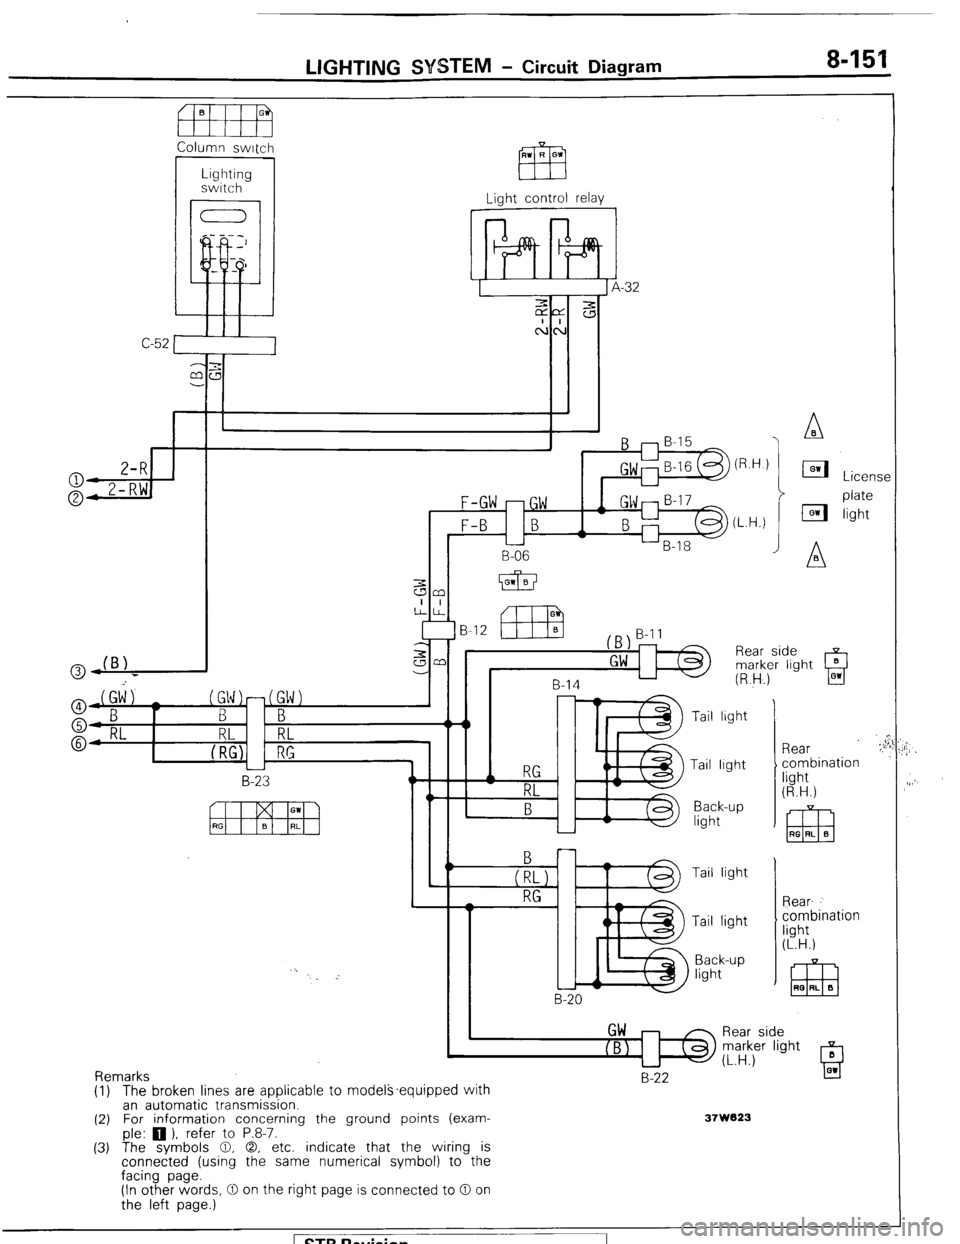
LIGHTING SYSTEM - Circuit Diagram 8-154
Column switch
C-52 Light control relay
1
-32
J
F-GW -GW
F-B B
L
B-06
B-12
B-14
L-l5 B-20 Tail light
Tail lrght
Back-up
light
Tail light
Tail light
Back-up
light Rear
combination
light
(R.H.)
Rear
combination
light
(L.H.)
Rear side
marker light
(L.H.)
Remarks
(1) (2)
(3) The broken lines are applicable to models~equipped with
an automatic transmission.
For information concerning the ground points (exam-
ple: 0 ). refer to P.8-7. B-22
37W823
The symbols 0, 0, etc. indicate that the wiring is
connected (using the same numerical symbol) to the
facing page.
(In other words, 0 on the right page is connected to 0 on
the left page.)
) STB Revision
Page 172 of 284
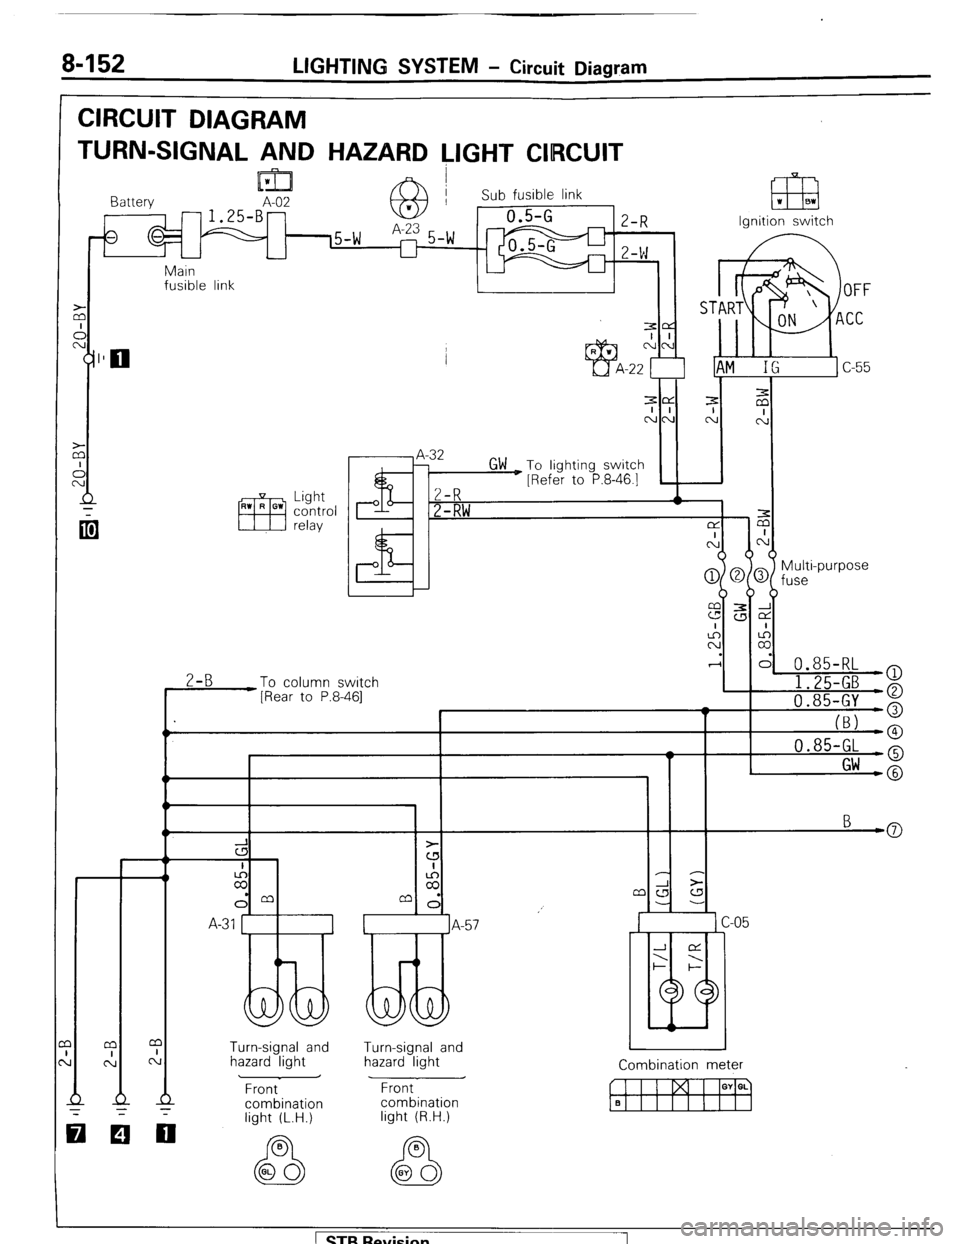
8-152 LIGHTING SYSTEM - Circuit Diagram
CIRCUIT DIAGRAM
TURN-SIGNAL AND HAZARD LIGHT CIIRCUIT
lml I Battery A-02 -1.25-B- 63 Sub fusible link 1 m 1 BI
Ignition switch
Main
fusible link
I 1
.I
-
z
I I I ’ I
Multi-purpose
fuse
0.85-RL
2-B
To column switch
[Rear to P.8-461 I 1.25-GB )
a
I 'I 0.85-GY o
I_
(BJ -0 0.85-GL -o
I Gw -@
3
cs
I
z
dm
A-31 1
Turn-signal and
hazard light Turn-signal and
hazard light
Front
combination Combination meter
w I I I GY a. q Front
combination
light (R.H.)
000
light (L.H.)
1 STB Revision 1
Page 173 of 284
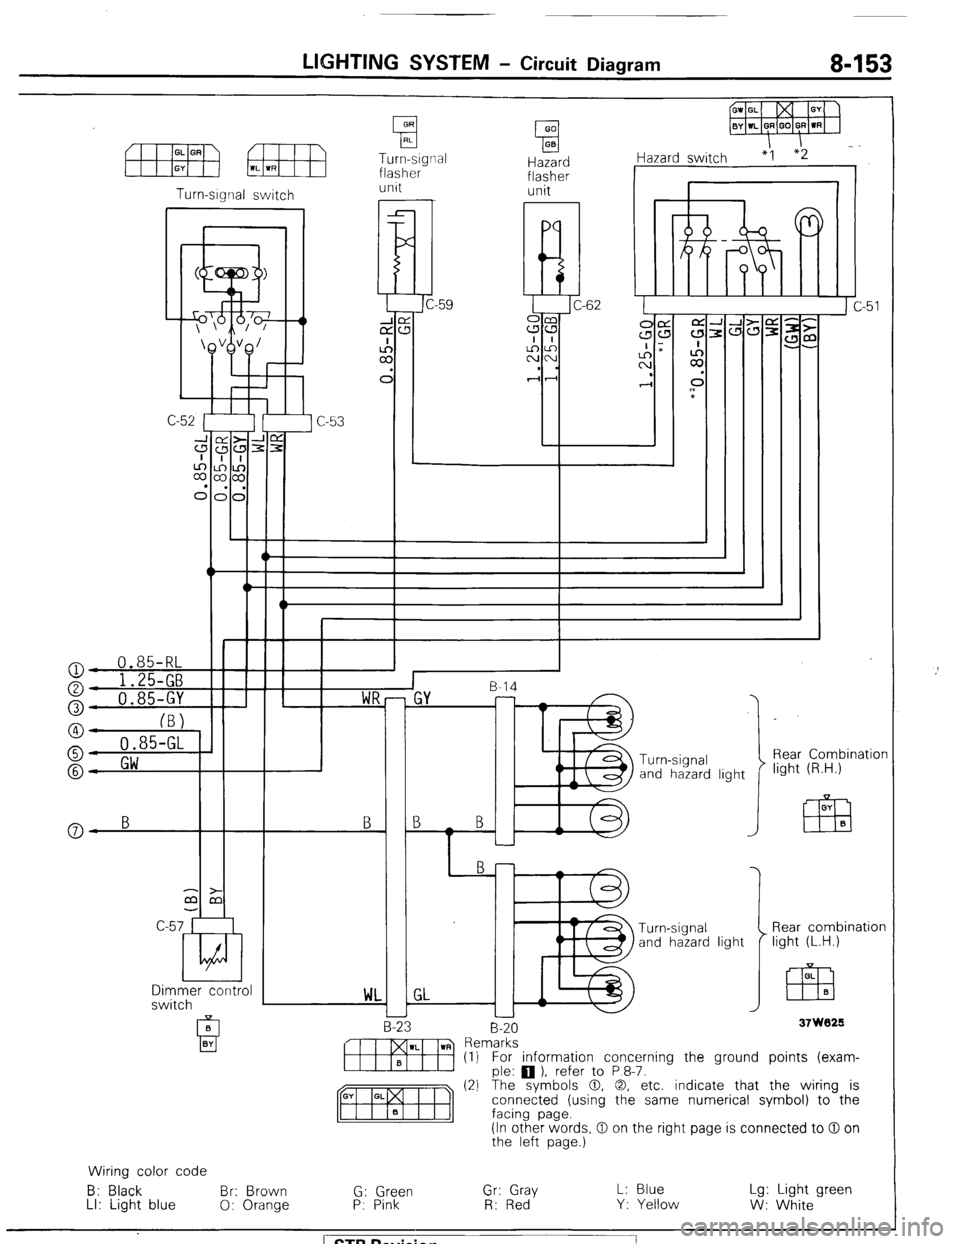
LIGHTING SYSTEM - Circuit Diagram 8-153
Turn-signal
flasher Hazard
flasher I iazard switch “1
unit unit
I r Turn-srgnal switch
I
l!d C-62
a
I
::
C
-W‘\*1W++ n
c
I
::
C
n
*
‘\&VB/
I v-l--c 0.85-RL
o- 1 ')r r-
Rear Combination
light (R.H.) Turn -signal
and hazard light B
Y-
a- B B
Dimmer control
switch Rear combination
light (L.H.) OL
EZB B
WL
37W029 B-20
-
m Rern~:~s~ ) refer to P 8-7. (1) For information concerning the ground points (exam-
(2) The symbols 0. 0, etc. indicate that the wiring is
connected (using the same numerical symbol) to the
(In other words, 0 on the right page is connected to 0 on
the left page.)
Wiring color code
B: Black Br: Brown
G: Green Gr: Gray L: Blue Lg: Light green
LI: Light blue
0: Orange P: Pink
R: Red Y: Yellow
W: White ) STB Revision
Page 174 of 284
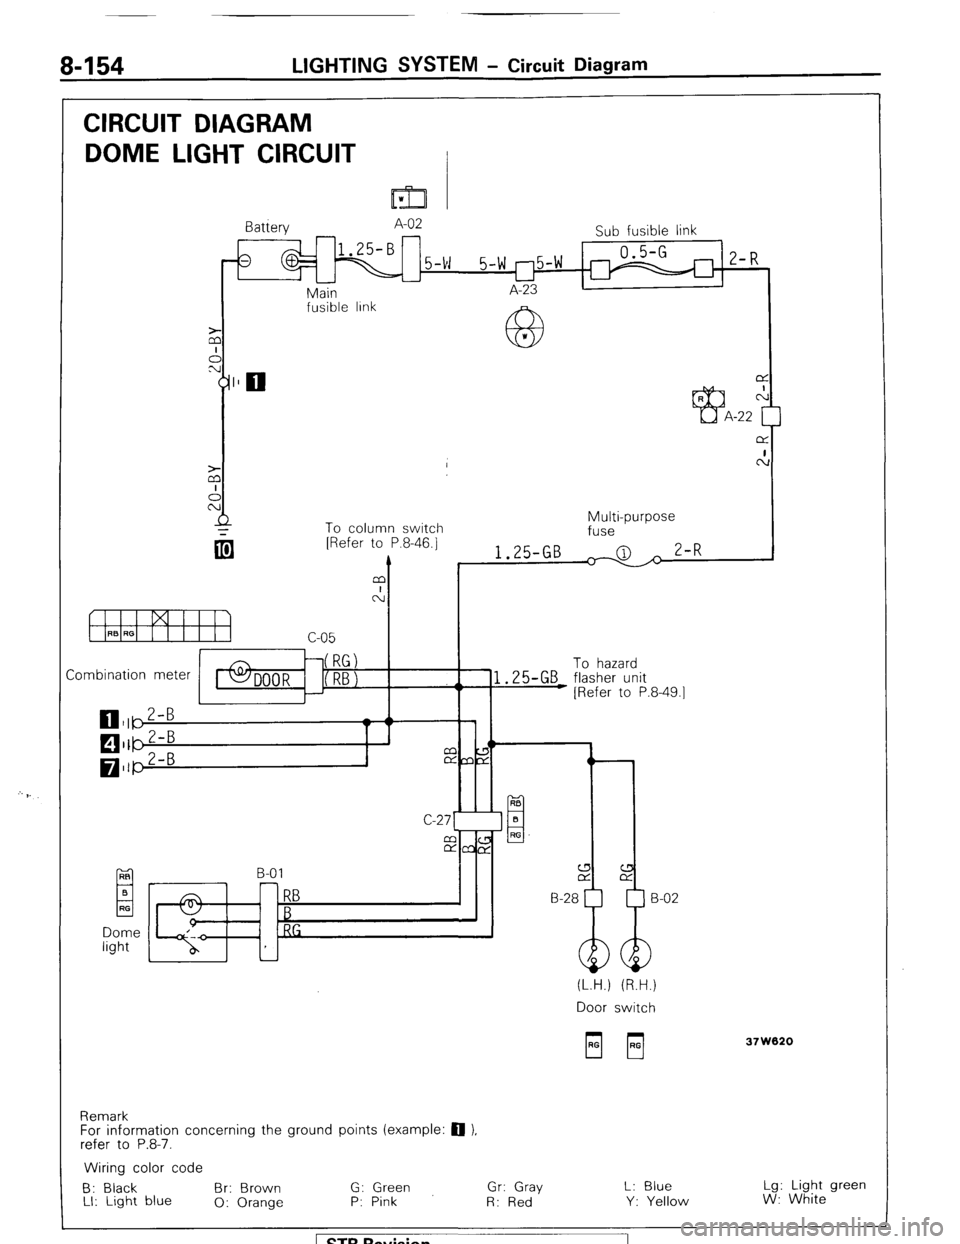
8-154 LIGHTING SYSTEM - Circuit Diagram
CIRCUIT DIAGRAM
DOME LIGHT CIRCUIT
I=32 v
Battery A-02
Sub fusible link
1
0.5-G
5-w 5-w r-l5-w 1 2-R
u
Main I A-23 I
I
fusible IInk
63 *
L
To column switch
Combination meter To hazard
EL B-01 RB
El B
RF
RB H-28
B
RG
(L.H.) (R.H.)
Door switch
Remark
For information concerning the ground points (example: 0 ),
refer to P.8-7. 37W020
Wiring color code
B: Black Br: Brown G: Green Gr: Gray L: Blue Lg: Light green
LI: Light blue
0: Orange P: Pink
R: Red Y: Yellow W: White
1 STB Revision
Page 175 of 284
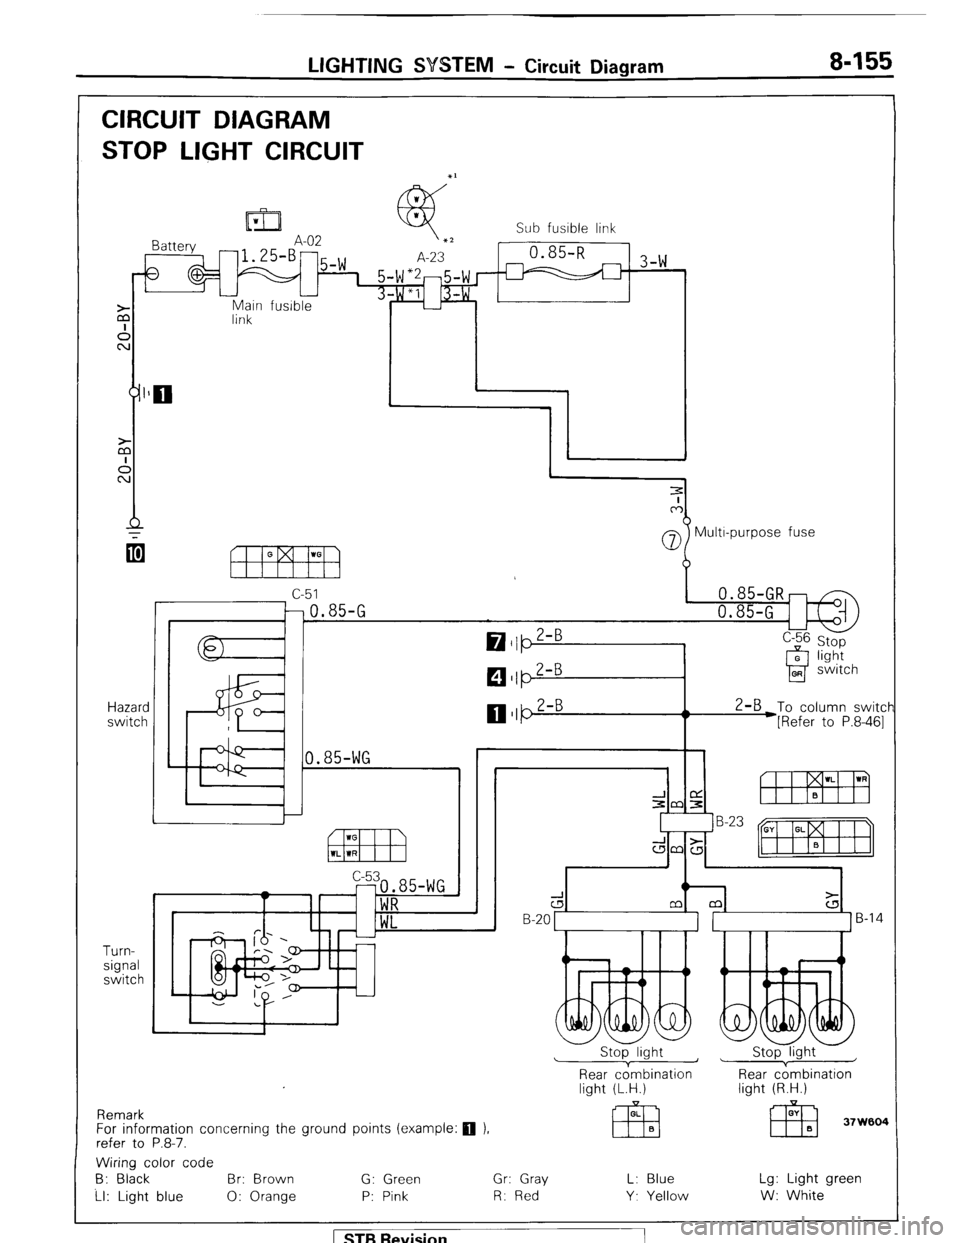
LIGHTING SYSTEM - Circuit Diagram 8-155
CIRCUIT DIAGRAM
STOP LIGHT CIRCUIT
Main fusible
link
Hazard
switch
Turn-
signal
switch Sub fusible link
-1 3-w
07 Multr-purpose fuse
c-51
-0.85-G
0.85-WG 2-B
To column switcf
*[Refer to P.8-461
Remark
For information concerning the ground points (example:
q ).
refer to P.8-7.
d B-20 1 ]B-14
Stop light ~
1 Stop light
Rear cdmbination
light (L.H.) Rear c;mbination
light (R.H.)
Wiring color code
B: Black Br: Brown G: Green Gr: Gray L: Blue Lg: Light green
Ll: Light blue 0: Orange P: Pink R: Red Y. Yellow W: White
1 STB Revision
Page 176 of 284
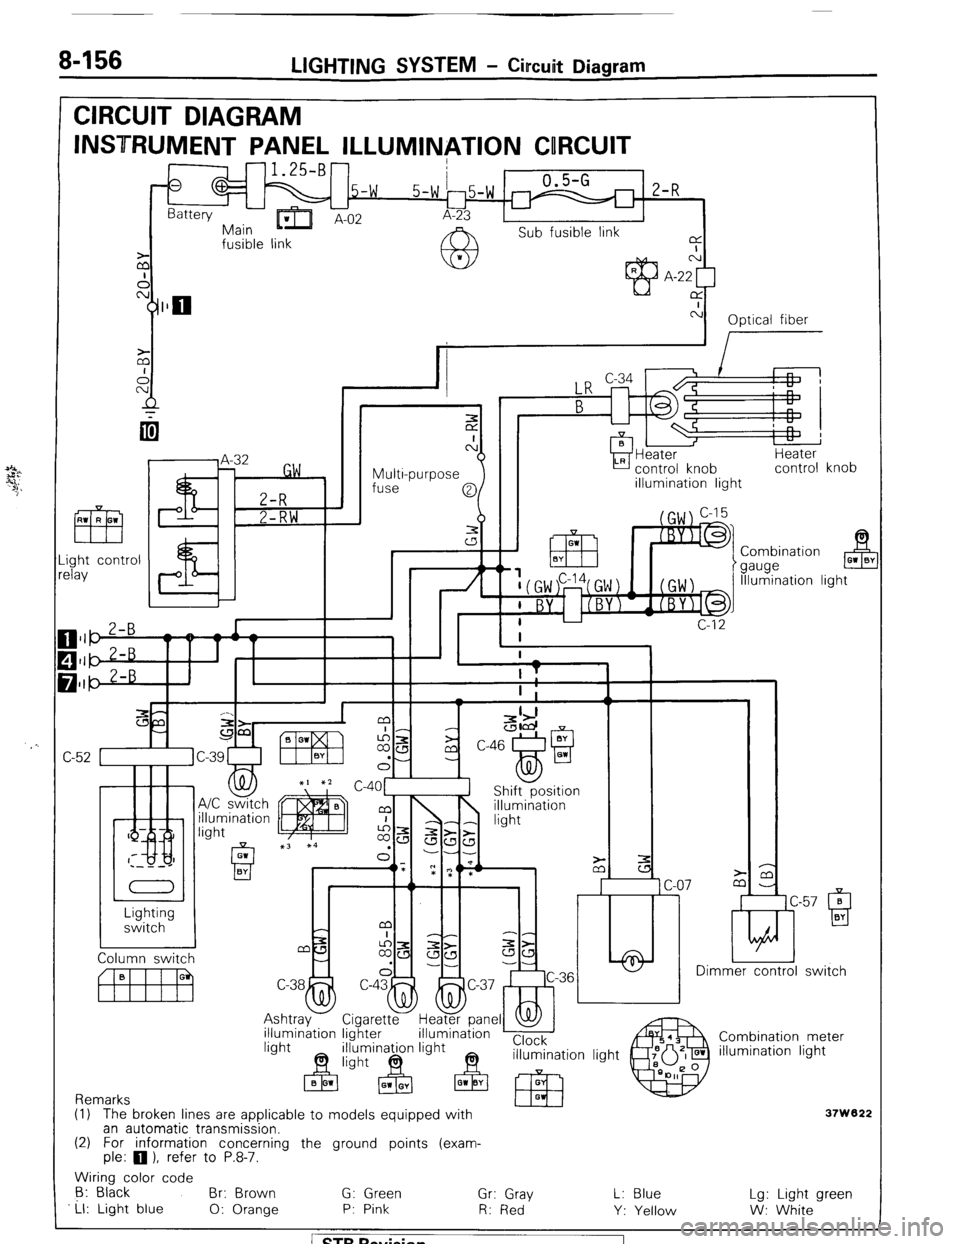
8-156 LIGHTING SYSTEM - Circuit Diagram
CIRCUIT DIAGRAM
INSTRUMENT PANEL ILLUMINATION CORCUIT
-1.25-B-
0
.5-w 0.5-G
2-R
Battery
-Err
5-w 15-w r
Main ’ A-02 A-23
Sub fusible link
fusible link a
I
z N
A A-22 [
cy]llo CY
c-i
Optical fiber
I
Multi-purpose
fuse Heater
control knob
illumination light Heater
control knob
ght control
lay Combination
gauge B 01 0’
Illumination light
/ n
c
C
-
c-57 0 ti
Q BY Lighting
switch
Dimmer control switch
rel
Combination meter
illumination light illumination lighter
Remarks
(1) The broken lines are applicable to models eouipped with
37W822 an automatic transmission.
(2) For information concerning the ground points (exam-
ple: 0 1, refer to P.8-7.
Wiring color code
6: Black
Br: Brown G: Green
Ll: Light blue Gr: Gray
0: Orange P: Pink
R: Red L: Blue
Y: Yellow Lg: Light green
W: White 1 ST6 Revision
Page 177 of 284
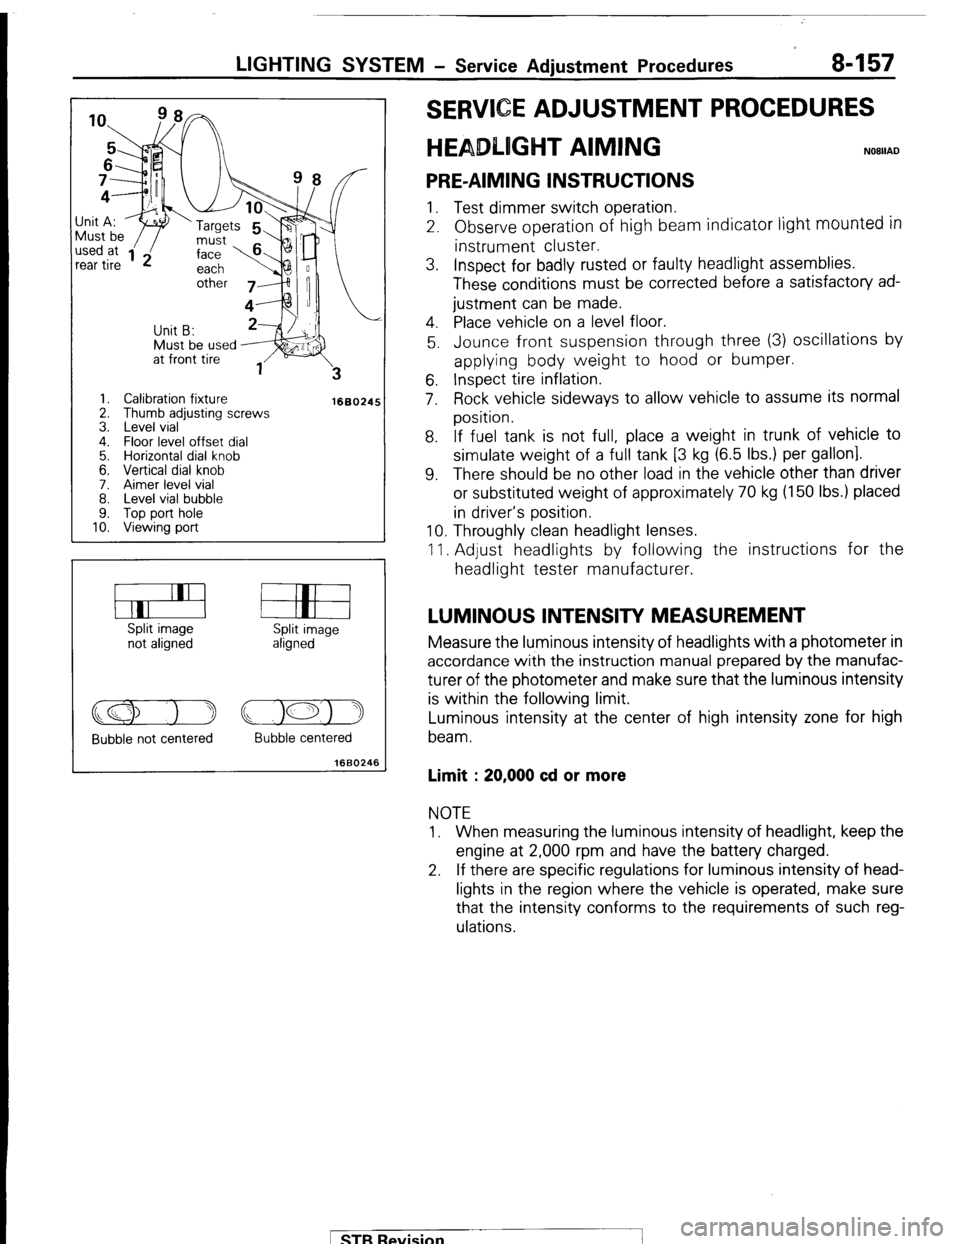
LIGHTING SYSTEM - Service Adjustment Procedures 8-157
Must be used J;it A:
I ‘w ‘Targets
1. Calibration fixture
2. Thumb adjusting screws
3. Level vial
4. Floor level offset dial
5. Horizontal dial knob
6. Vertical dial knob
7. Aimer level vial
8. Level vial bubble
9. Top port hole
10. Viewing port
1660245
Split image
not aligned Split image
aligned
Bubble not centered Bubble centered
1660246
E ADJUSTMENT PROCEDURES
T AIMING
PRE-AIMING INSTRUCTIONS 1. Test dimmer switch operation.
2. Observe operation of high beam indicator light
mounted in instrument cluster.
3. Inspect for badly rusted or faulty headlight assemblies.
These conditions must be corrected before a satisfactory ad-
justment can be made.
4. Place vehicle on a level floor.
5. Jounce front suspension through three (3) oscillations by
applying body weight to hood or bumper.
6. Inspect tire inflation.
7. Rock vehicle sideways to allow vehicle to assume its normal
position.
8. If fuel tank is not full, place a weight in trunk of vehicle to
simulate weight of a full tank [3 kg (6.5 Ibs.) per gallon].
9. There should be no other load in the vehicle other than driver
or substituted weight of approximately 70 kg (150 Ibs.) placed
in driver’s position.
10. Throughly clean headlight lenses.
11. Adjust headlights by following the instructions for the
headlight tester manufacturer.
LUMINOUS INTENSITY MEASUREMENT Measure the luminous intensity of headlights with a photometer in
accordance with the instruction manual prepared by the manufac-
turer of the photometer and make sure that the luminous intensity
is within the following limit.
Luminous intensity at the center of high intensity zone for high
beam.
Limit : 20,000 cd or more NOTE
1. When measuring the luminous intensity of headlight, keep the
engine at 2,000 rpm and have the battery charged.
2. If there are specific regulations for luminous intensity of head-
lights in the region where the vehicle is operated, make sure
that the intensity conforms to the requirements of such reg-
ulations.
pTB Revision
Page 178 of 284
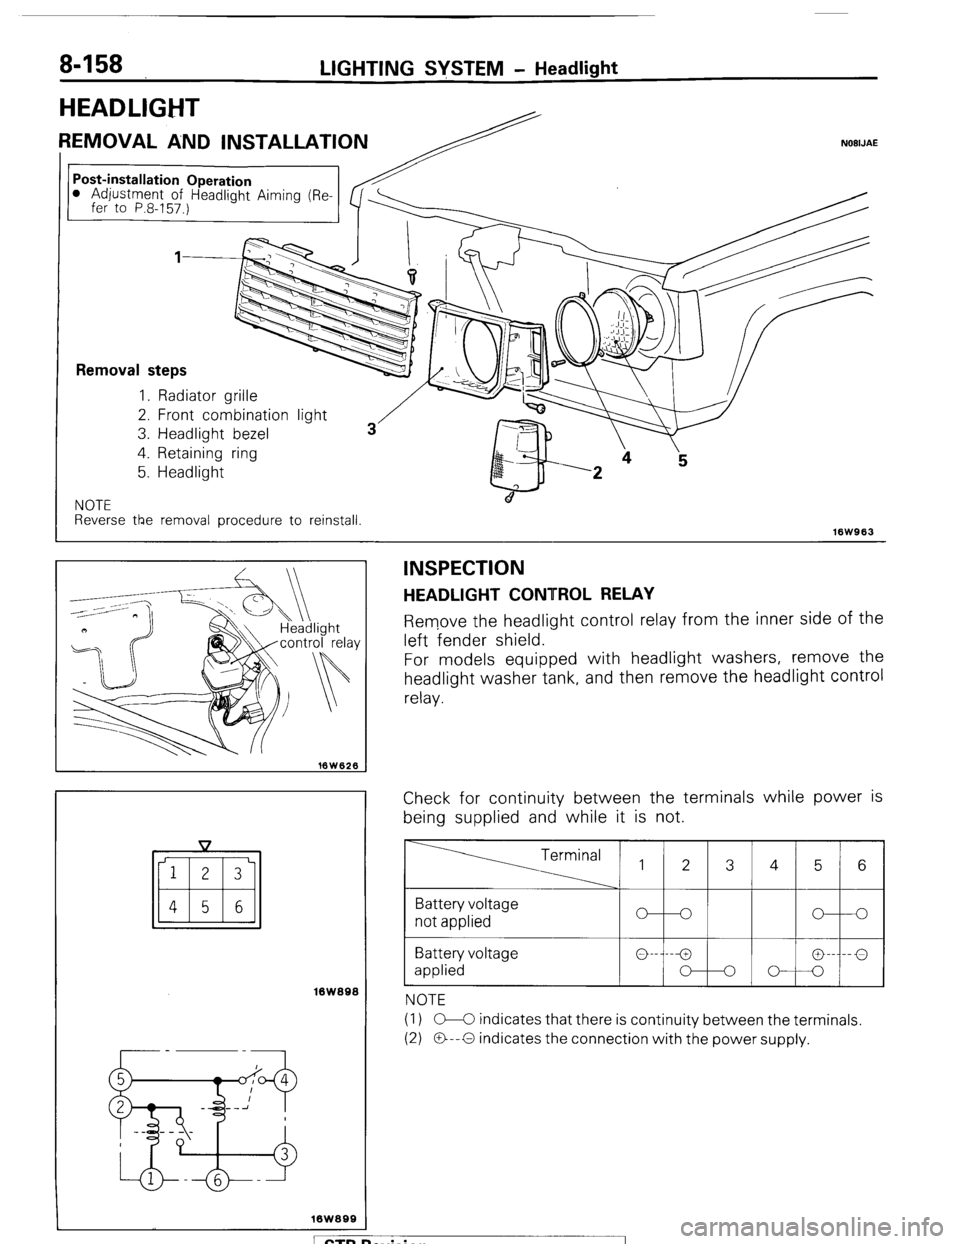
8-158 LIGHTING SYSTEM - Headlight
Post-installation Operation l Adjustment of Headliaht Aimina (
HEADLIGHT
REMOVAL AND INSTALLATION NOBIJAE
( fer to P.8-157.) Removal steps
1. Radiator grille
2. Front combinatior
3. Headlight bezel
4. Retaining ring
5. Headlight
I light
NOTE
Reverse the removal procedure to reinstall.
16W963
iswasa
INSPECTION
HEADLIGHT CONTROL RELAY
Remove the headlight control relay from the inner side of the
left fender shield.
For models equipped with headlight washers, remove the
headlight washer tank, and then remove the headlight control
relay.
Check for continuity between the terminals while power is
being supplied and while it is not. Terminal 1 2 3 4 5 6
Battery voltage
not applied
Battery voltage
applied
NOTE
(I 1 C-C indicates that there is continuity between the terminals.
(2) O--O indicates the connection with the power supply.
ewision I
Page 179 of 284
LIGHTING SYSTEM - Column Switch 8-159
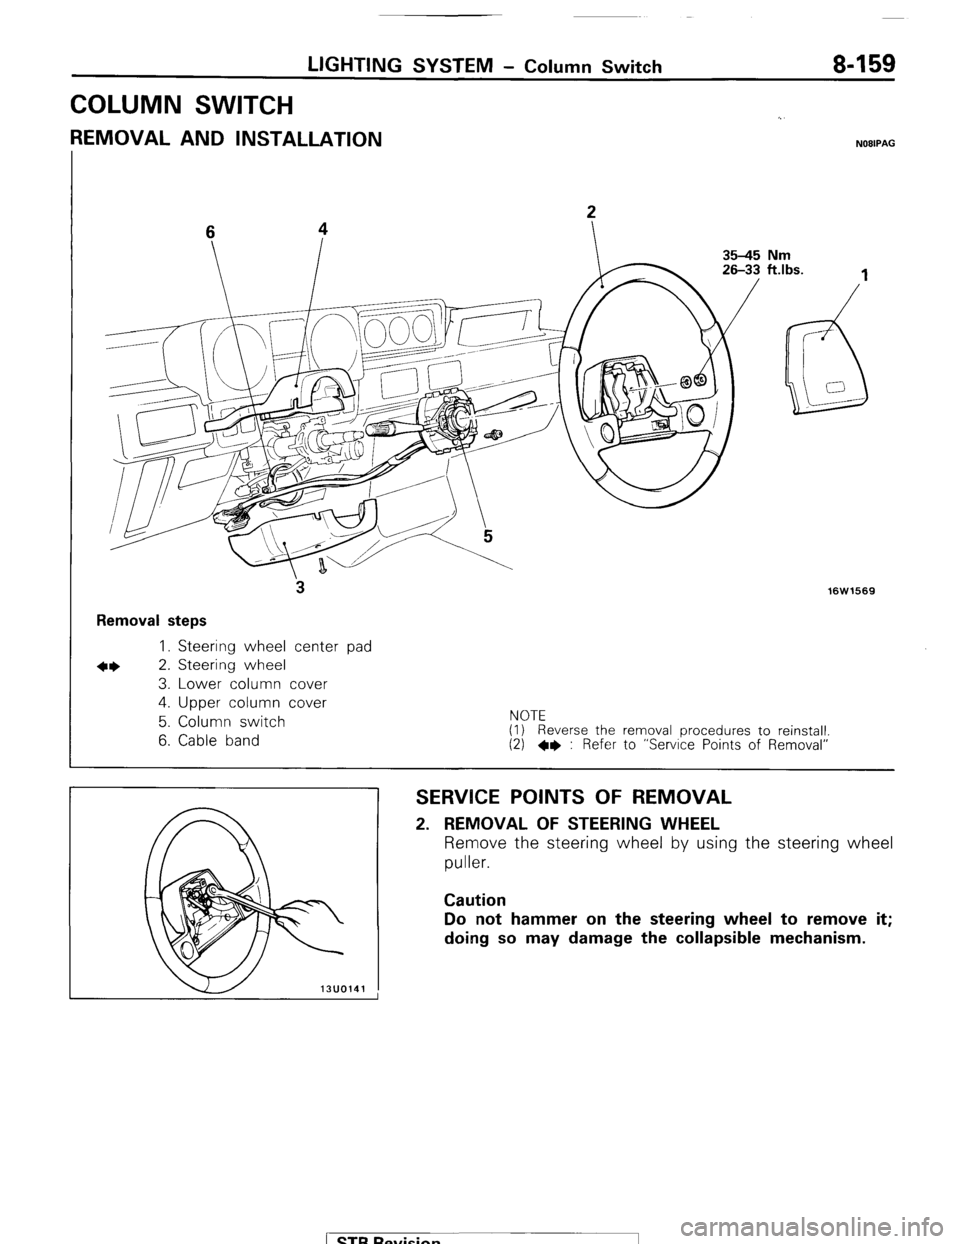
COLUMN SWITCH
REMOVAL AND INSTALLATION NOBIPAG
3
Removal steps
I. Steering wheel center pad
*I) 2. Steering wheel
3. Lower column cover
4. Upper column cover
hlnTC
16W1569
5. Column switch
6. Cable band I\I”IC (I) Reverse the removal procedures to reinstall.
(2) l * : Refer to “Service Points of Removal”
SERVICE POINTS OF REMOVAL 2. REMOVAL OF STEERING WHEEL
Remove the steering wheel by using the steering wheel
puller. Caution
Do not hammer on the steering wheel to remove it;
doing so may damage the collapsible mechanism.
) STB Revision
Page 180 of 284
LIGHTING SYSTEM - Column Switch
16W1530
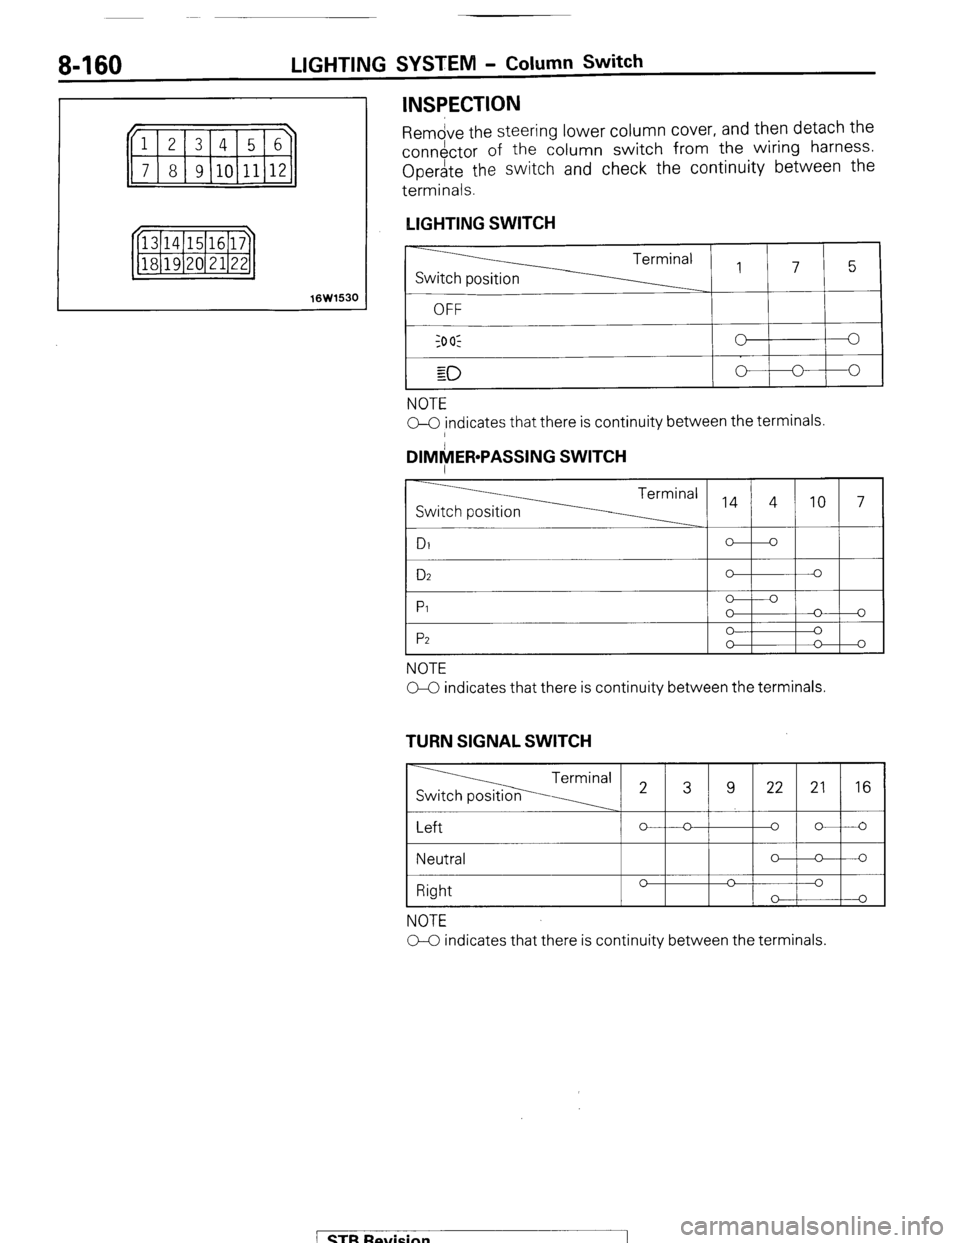
INSPECTION
Rem&e the steering lower column cover, and then detach the
conn&tor of the column switch from the wiring harness.
Operate the switch and check the continuity between the
terminals.
LIGHTING SWITCH
IO
NOTE
GO indicates that there is continuity between the terminals.
DIM$ER*PASSING SWITCH i
Switch position Terminal 14 4 .,O 7
D2
1-1 I
Pl
I P2
NOTE GC indicates that there is continuity between the terminals.
TURN SIGNAL SWITCH
Termina’ Switch positi&?- 2 3 9
22 21 16
Left
0 n 0 o-----o
NOTE
0-C indicates that there is continuity between the terminals.
/ STB Revision -7