MITSUBISHI SHOGUN 2003 (in English) Owner's Guide
Manufacturer: MITSUBISHI, Model Year: 2003, Model line: SHOGUN, Model: MITSUBISHI SHOGUN 2003Pages: 392, PDF Size: 14.34 MB
Page 31 of 392
F19A085A
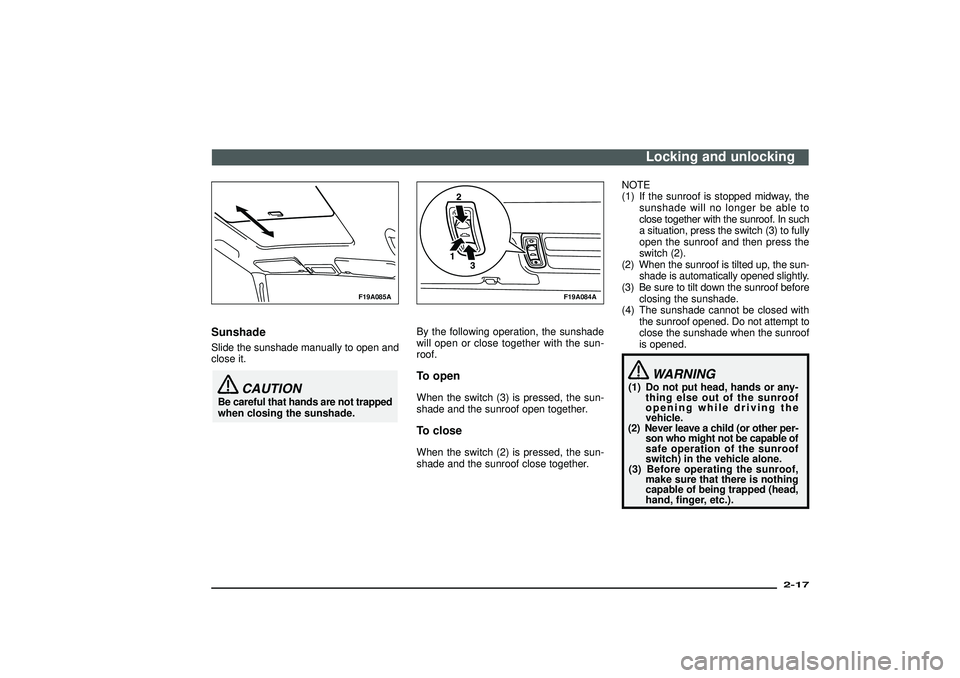
SunshadeSlide the sunshade manually to open and
close it.
CAUTION
Be careful that hands are not trapped
when closing the sunshade.
F19A084A
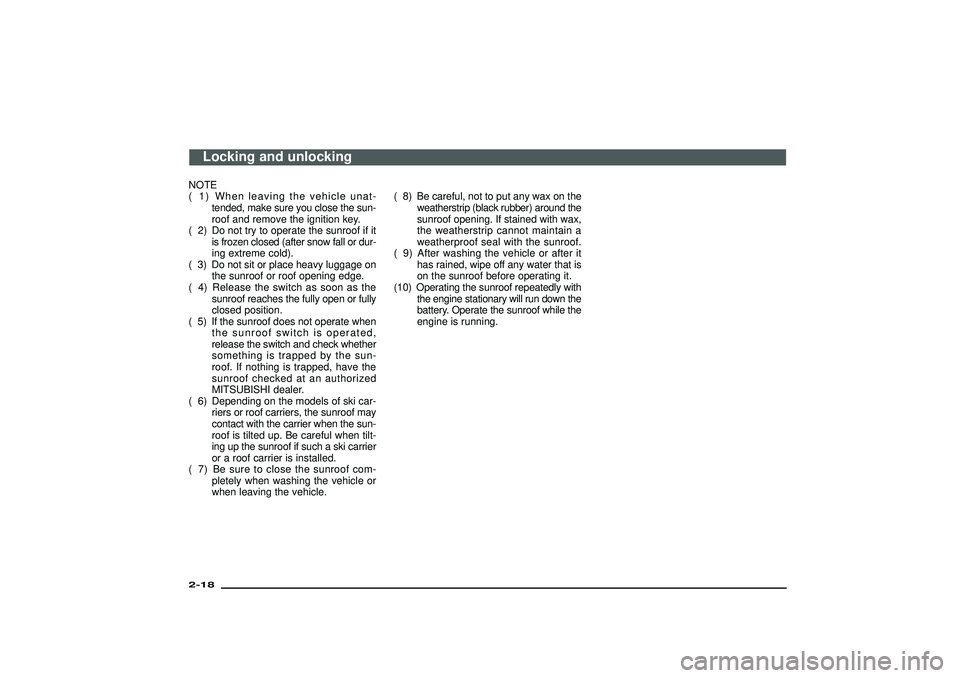
By the following operation, the sunshade
will open or close together with the sun-
roof.To openWhen the switch (3) is pressed, the sun-
shade and the sunroof open together.To closeWhen the switch (2) is pressed, the sun-
shade and the sunroof close together.NOTE
(1) If the sunroof is stopped midway, the
sunshade will no longer be able to
close together with the sunroof. In such
a situation, press the switch (3) to fully
open the sunroof and then press the
switch (2).
(2) When the sunroof is tilted up, the sun-
shade is automatically opened slightly.
(3) Be sure to tilt down the sunroof before
closing the sunshade.
(4) The sunshade cannot be closed with
the sunroof opened. Do not attempt to
close the sunshade when the sunroof
is opened.
WARNING
(1) Do not put head, hands or any-
thing else out of the sunroof
opening while driving the
vehicle.
(2) Never leave a child (or other per-
son who might not be capable of
safe operation of the sunroof
switch) in the vehicle alone.
(3) Before operating the sunroof,
make sure that there is nothing
capable of being trapped (head,
hand, finger, etc.).
Locking and unlocking
2-17
Div:
Out put date:
Page 32 of 392
NOTE
( 1) When leaving the vehicle unat-
tended, make sure you close the sun-
roof and remove the ignition key.
( 2) Do not try to operate the sunroof if it
is frozen closed (after snow fall or dur-
ing extreme cold).
( 3) Do not sit or place heavy luggage on
the sunroof or roof opening edge.
( 4) Release the switch as soon as the
sunroof reaches the fully open or fully
closed position.
( 5) If the sunroof does not operate when
the sunroof switch is operated,
release the switch and check whether
something is trapped by the sun-
roof. If nothing is trapped, have the
sunroof checked at an authorized
MITSUBISHI dealer.
( 6) Depending on the models of ski car-
riers or roof carriers, the sunroof may
contact with the carrier when the sun-
roof is tilted up. Be careful when tilt-
ing up the sunroof if such a ski carrier
or a roof carrier is installed.
( 7) Be sure to close the sunroof com-
pletely when washing the vehicle or
when leaving the vehicle.( 8) Be careful, not to put any wax on the
weatherstrip (black rubber) around the
sunroof opening. If stained with wax,
the weatherstrip cannot maintain a
weatherproof seal with the sunroof.
( 9) After washing the vehicle or after it
has rained, wipe off any water that is
on the sunroof before operating it.
(10) Operating the sunroof repeatedly with
the engine stationary will run down the
battery. Operate the sunroof while the
engine is running.
Locking and unlocking
2-18Div:
Out put date:
Page 33 of 392
Seat and seat belts
Seat arrangement.......................................... 3- 3
Seat adjustment ............................................ 3- 5
Front seat....................................................... 3- 6
Rear seat (3-door models)/
Second seat (5-door models) ................... 3-12
Armrest .......................................................... 3-13
Third seat (5-door models) .......................... 3-14
Making a luggage area ................................. 3-14
Making a flat seat .......................................... 3-26
Head restraints ............................................. 3-28
Seat belts ....................................................... 3-30
Child restraint................................................ 3-33
Pregnant women restraint............................ 3-41
Seat belt inspection ...................................... 3-41
Supplemental restraint system
(SRS)-air bag ............................................. 3-42
Div:
Out put date:
Page 34 of 392
G52E058DEA99AOIb
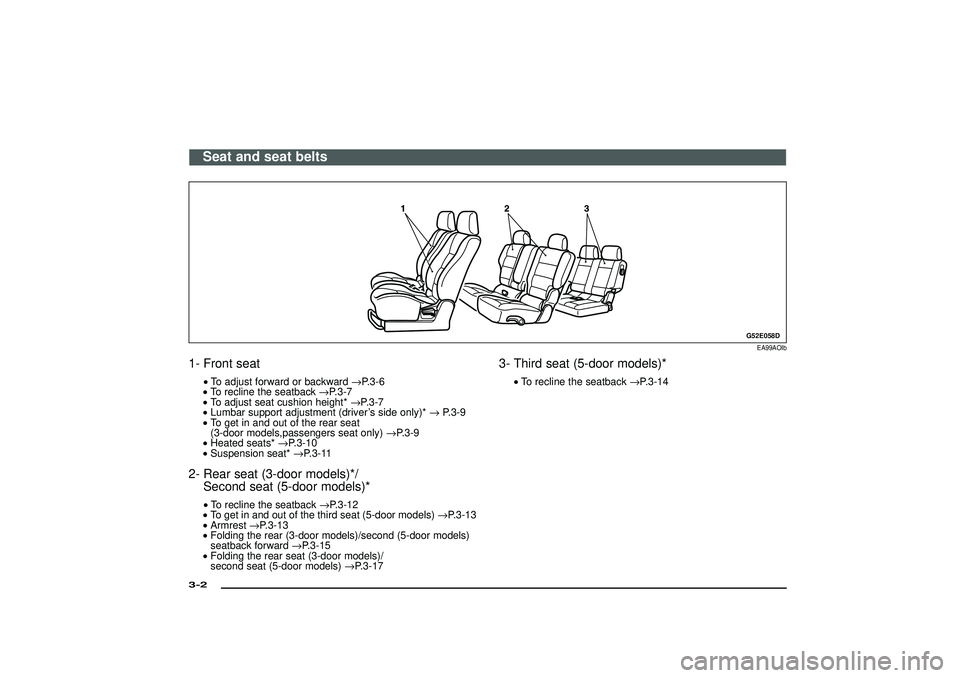
1- Front seat
•To adjust forward or backward→P.3-6
•To recline the seatback→P.3-7
•To adjust seat cushion height*→P.3-7
•Lumbar support adjustment (driver’s side only)*→P.3-9
•To get in and out of the rear seat
(3-door models,passengers seat only)→P.3-9
•Heated seats*→P.3-10
•Suspension seat*→P.3-11
2- Rear seat (3-door models)*/
Second seat (5-door models)*
•To recline the seatback→P.3-12
•To get in and out of the third seat (5-door models)→P.3-13
•Armrest→P.3-13
•Folding the rear (3-door models)/second (5-door models)
seatback forward→P.3-15
•Folding the rear seat (3-door models)/
second seat (5-door models)→P.3-17
3- Third seat (5-door models)*
•To recline the seatback→P.3-14
Seat and seat belts
3-2Div:
Out put date:
Page 35 of 392
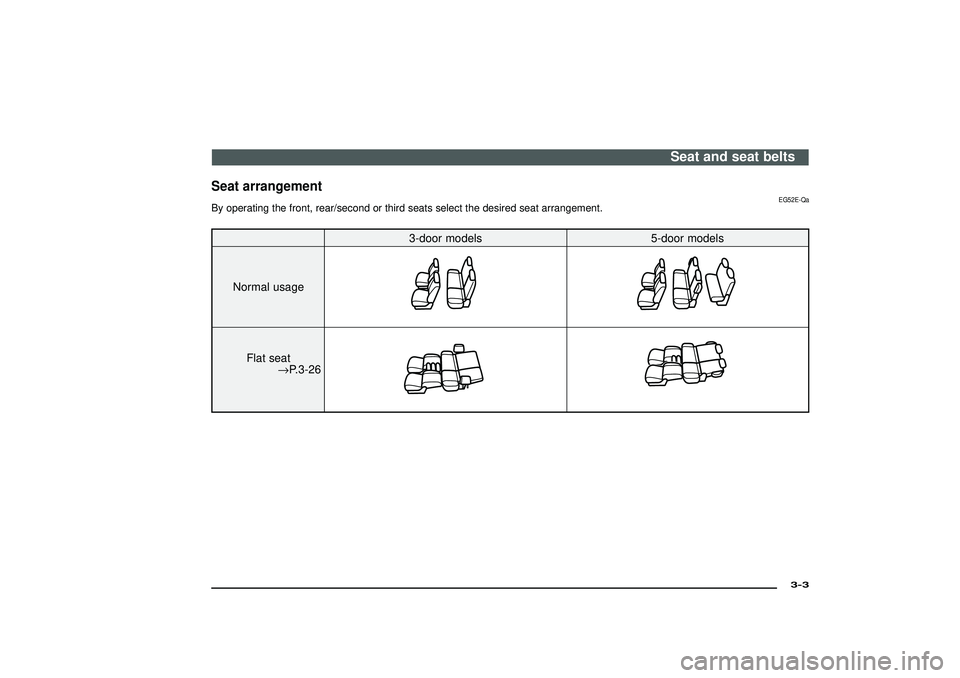
Seat arrangement
EG52E-Qa
By operating the front, rear/second or third seats select the desired seat arrangement.
3-door models 5-door models
Normal usage
Flat seat
→P.3-26
Seat and seat belts
3-3
Div:
Out put date:
Page 36 of 392
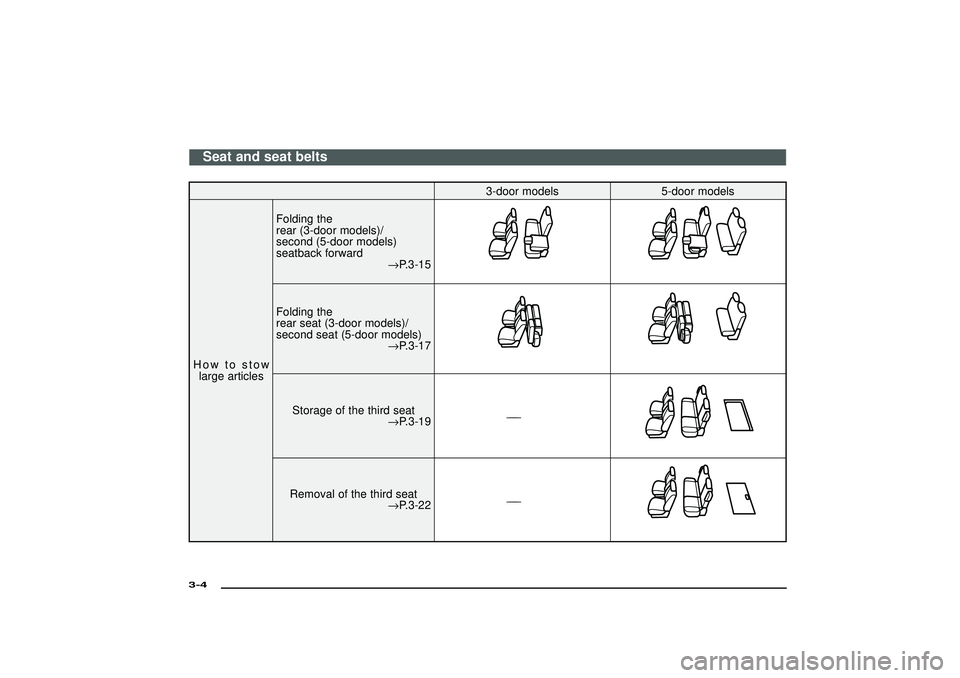
3-door models 5-door models
How to stow
large articlesFolding the
rear (3-door models)/
second (5-door models)
seatback forward
→P.3-15
Folding the
rear seat (3-door models)/
second seat (5-door models)
→P.3-17
Storage of the third seat
→P.3-19
————
Removal of the third seat
→P.3-22
————
Seat and seat belts
3-4Div:
Out put date:
Page 37 of 392
Seat adjustment
EG21A-Ud
Adjust the driver’s seat so that you are
comfortable and that you can reach the
pedals, steering wheel, switches etc. while
retaining a clear field of vision.
WARNING
(1) If required, always adjust the
seating before the vehicle is in
motion. After adjustments are
made, ensure the seating is
locked in position by attempt-
ing to move the seat and seat-
back forward and rearward
without using the adjusting
mechanism.
WARNING
(2) It is extremely dangerous to ride
in the luggage area (inside or
outside) of a vehicle. Also, the
luggage area and rear seats
should never be used as a play
area by children. In a collision,
people or children riding unre-
strained in these areas are more
likely to be seriously injured or
killed.
Do not allow people or children
to ride in any area of your
vehicle that is not equipped with
seats and seat belts, and make
sure that everyone travelling in
your vehicle is in a seat and
wearing a seat belt, or in the
case of a child is strapped in a
child restraint.
In the interest of their safety,
children should not be allowed
to adjust the seats.
WARNING
(3) To minimize the risk of per-
sonal injury in the event of a col-
lision or sudden braking, the
seatbacks should always be in
the almost upright position while
the vehicle is in motion. The pro-
tection provided by the seat
belts may be reduced signifi-
cantly when the seatback is
reclined. There is greater risk
that the passenger will slide
under the seat belt, resulting in
serious injury, when the seat-
back is reclined.
Seat and seat belts
3-5
Div:
Out put date:
Page 38 of 392
CAUTION
(1) Make sure that the seat is
adjusted by an adult.
If it is adjusted by a child, an
unexpected accident might
occur.
(2) Do not place a cushion or the
like between your back and the
seatback while driving. The
effectiveness of the head
restraints will be reduced in the
event of an accident.
(3) When sliding or reclining the
seat rearward, pay careful atten-
tion to the rear seat passen-
gers.
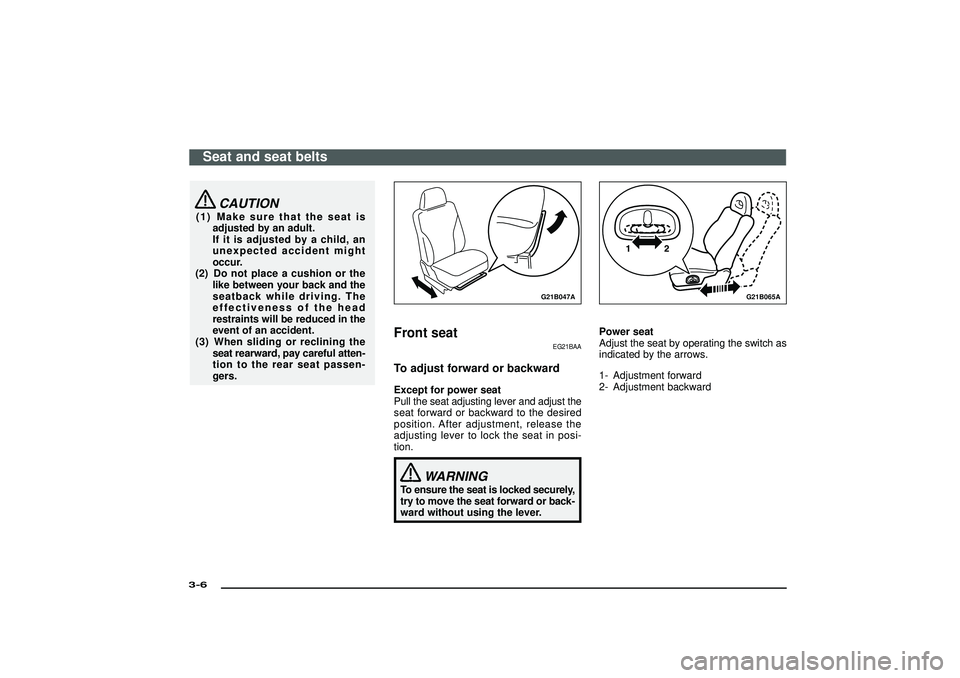
G21B047A
Front seat
EG21BAA
To adjust forward or backwardExcept for power seat
Pull the seat adjusting lever and adjust the
seat forward or backward to the desired
position. After adjustment, release the
adjusting lever to lock the seat in posi-
tion.
WARNING
To ensure the seat is locked securely,
try to move the seat forward or back-
ward without using the lever.
G21B065A
Power seat
Adjust the seat by operating the switch as
indicated by the arrows.
1- Adjustment forward
2- Adjustment backward
Seat and seat belts
3-6Div:
Out put date:
Page 39 of 392
G21C062A
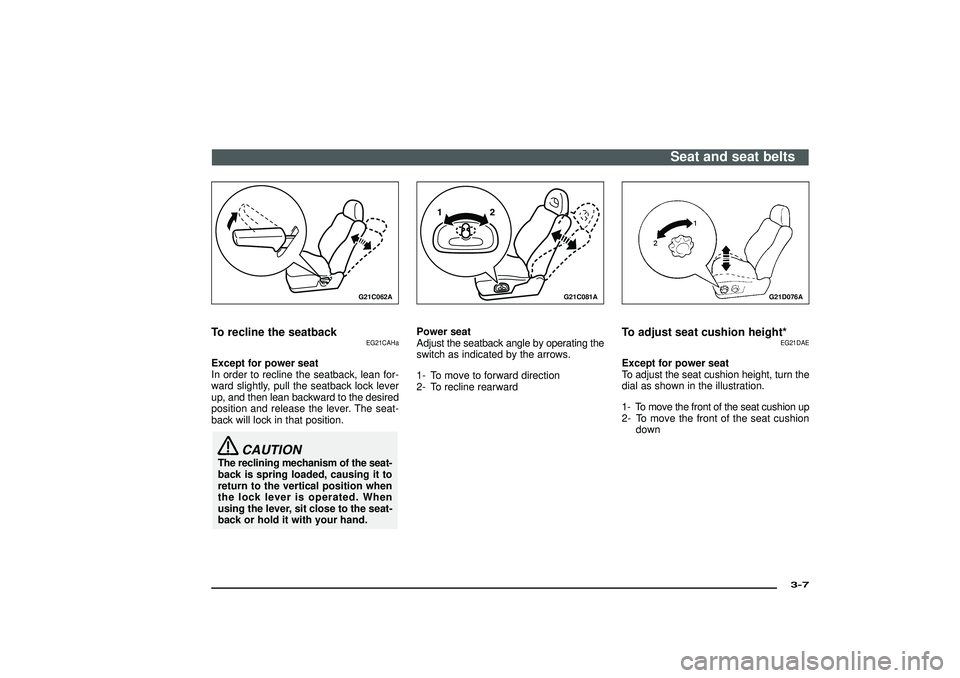
To recline the seatback
EG21CAHa
Except for power seat
In order to recline the seatback, lean for-
ward slightly, pull the seatback lock lever
up, and then lean backward to the desired
position and release the lever. The seat-
back will lock in that position.
CAUTION
The reclining mechanism of the seat-
back is spring loaded, causing it to
return to the vertical position when
the lock lever is operated. When
using the lever, sit close to the seat-
back or hold it with your hand.
G21C081A
Power seat
Adjust the seatback angle by operating the
switch as indicated by the arrows.
1- To move to forward direction
2- To recline rearward
G21D076A
To adjust seat cushion height*
EG21DAE
Except for power seat
To adjust the seat cushion height, turn the
dial as shown in the illustration.
1- To move the front of the seat cushion up
2- To move the front of the seat cushiondown
Seat and seat belts
3-7
Div:
Out put date:
Page 40 of 392
G21D077A
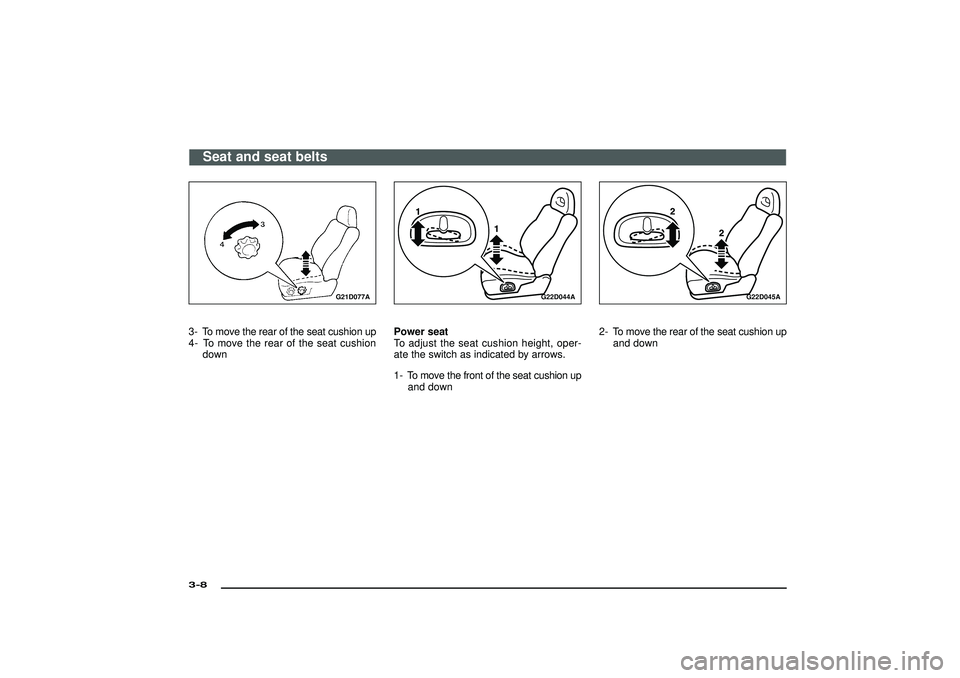
3- To move the rear of the seat cushion up
4- To move the rear of the seat cushion
down
G22D044A
Power seat
To adjust the seat cushion height, oper-
ate the switch as indicated by arrows.
1- To move the front of the seat cushion up
and down
G22D045A
2- To move the rear of the seat cushion up
and down
Seat and seat belts
3-8Div:
Out put date: