MITSUBISHI SHOGUN 2003 (in English) Repair Manual
Manufacturer: MITSUBISHI, Model Year: 2003, Model line: SHOGUN, Model: MITSUBISHI SHOGUN 2003Pages: 392, PDF Size: 14.34 MB
Page 61 of 392
G26A064A
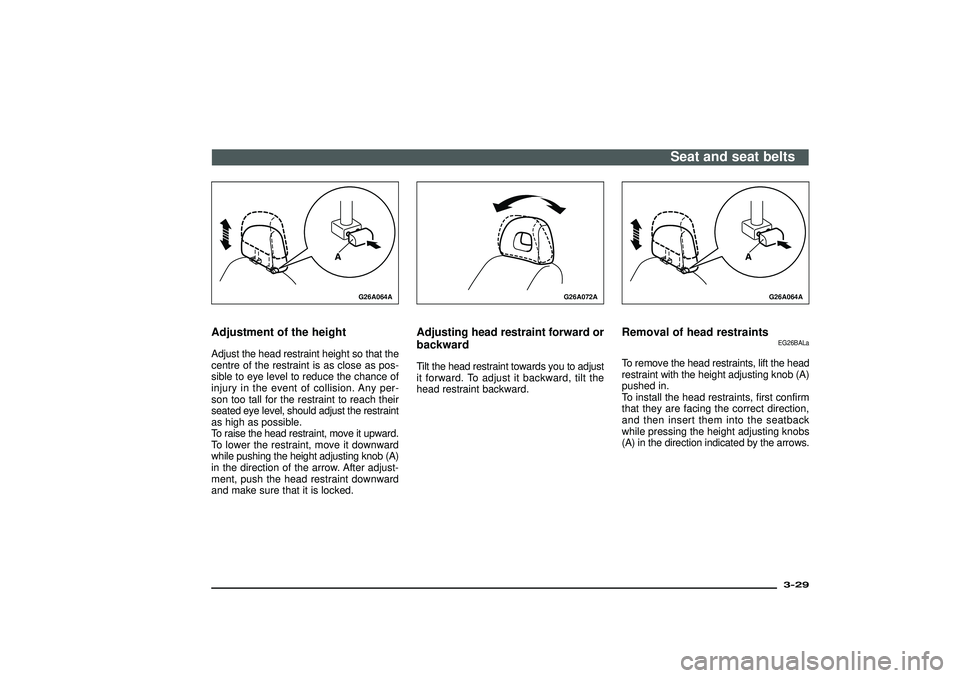
Adjustment of the heightAdjust the head restraint height so that the
centre of the restraint is as close as pos-
sible to eye level to reduce the chance of
injury in the event of collision. Any per-
son too tall for the restraint to reach their
seated eye level, should adjust the restraint
as high as possible.
To raise the head restraint, move it upward.
To lower the restraint, move it downward
while pushing the height adjusting knob (A)
in the direction of the arrow. After adjust-
ment, push the head restraint downward
and make sure that it is locked.
G26A072A
Adjusting head restraint forward or
backwardTilt the head restraint towards you to adjust
it forward. To adjust it backward, tilt the
head restraint backward.
G26A064A
Removal of head restraints
EG26BALa
To remove the head restraints, lift the head
restraint with the height adjusting knob (A)
pushed in.
To install the head restraints, first confirm
that they are facing the correct direction,
and then insert them into the seatback
while pressing the height adjusting knobs
(A) in the direction indicated by the arrows.
Seat and seat belts
3-29
Div:
Out put date:
Page 62 of 392

G26B022A
Confirm that the height adjusting knobs (A)
are correctly adjusted as shown in the illus-
tration, and also lift the head restraints to
ensure that they do not come out of the
seatback.
WARNING
It is dangerous to drive with incor-
rectly adjusted head restraints or
without head restraints installed;
always have them correctly fitted
when using the vehicle. Failure to do
so could cause serious injury if
involved in an accident.
G26B033A
CAUTION
The head restraints for the seats dif-
fer in shape and size. When install-
ing head restraints, make sure the
head restraints are fitted in their
respective seats.
Seat belts
EG28ABMa
To protect you and your passengers in the
event of an accident, it is most important
that the seat belts are worn correctly when
you drive.
The front seat belts have pre-tensioners.
These belts are used the same way as
conventional seat belts.
Refer to“Pre-tensioner seat belt system”on
page 3-56.
WARNING
(1) Never wear the shoulder por-
tion of the seat belt under the
arm or other position which is
incorrect.
(2) One seat belt should be used by
only one person. Doing other-
wise can be dangerous.
(3) The seat belt will provide its
wearer with maximum protec-
tion if the recliner seatback is
placed in fully upright position.
When the seatback is reclined,
there is greater risk that the pas-
senger will slide under the belt,
especially in a forward impact
accident, and may be injured by
the belt or by striking the instru-
ment panel or seatbacks.
Seat and seat belts
3-30Div:
Out put date:
Page 63 of 392
WARNING
(4) Seat belts should always be
worn by every adult who drives
or rides in this vehicle, and by all
children who are large enough
to wear seat belts properly.
(5) Remove any twists when using
the belt.
(6) No modifications or additions
should be made by the user
which will either prevent the seat
belt adjusting devices from oper-
ating to remove slack, or pre-
vent the seat belt assembly from
being adjusted to remove slack.
(7) To reduce risk of serious or fatal
injury in an accident, including
from a deploying driver air bag,
the driver should adjust the driv-
er’s seat to the most rear posi-
tion that still allows good
visibility and good control of the
steering wheel, the brake and
accelerator, and vehicle con-
trols.
G28A089A
WARNING
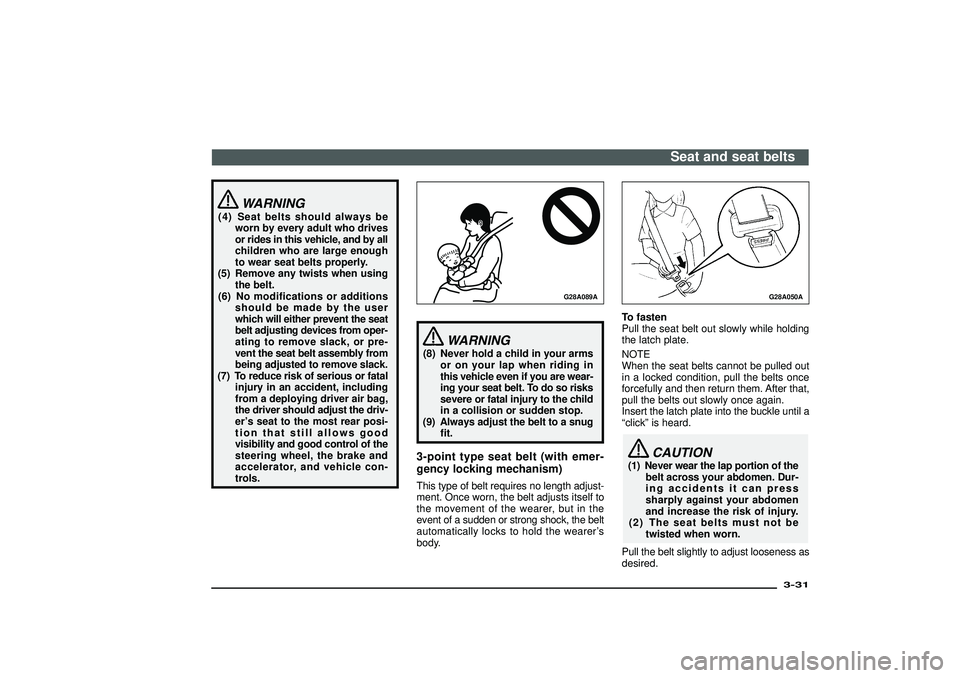
(8) Never hold a child in your arms
or on your lap when riding in
this vehicle even if you are wear-
ing your seat belt. To do so risks
severe or fatal injury to the child
in a collision or sudden stop.
(9) Always adjust the belt to a snug
fit.3-point type seat belt (with emer-
gency locking mechanism)This type of belt requires no length adjust-
ment. Once worn, the belt adjusts itself to
the movement of the wearer, but in the
event of a sudden or strong shock, the belt
automatically locks to hold the wearer’s
body.
G28A050A
To fasten
Pull the seat belt out slowly while holding
the latch plate.
NOTE
When the seat belts cannot be pulled out
in a locked condition, pull the belts once
forcefully and then return them. After that,
pull the belts out slowly once again.
Insert the latch plate into the buckle until a
“click”is heard.
CAUTION
(1) Never wear the lap portion of the
belt across your abdomen. Dur-
ing accidents it can press
sharply against your abdomen
and increase the risk of injury.
(2) The seat belts must not be
twisted when worn.
Pull the belt slightly to adjust looseness as
desired.
Seat and seat belts
3-31
Div:
Out put date:
Page 64 of 392

G28A051A
To unfasten
Hold the latch plate and push the button on
the buckle.
NOTE
As the belt retracts automatically, keep the
latch plate held while retracting so that the
belt stows slowly. Failure to do this could
damage the vehicle.
G08C007A
Adjustable seat belt anchor
(front seats)
EG08C-Ca
The seat belt anchor height can be
adjusted.
Move the seat belt anchor down with the
lock knob (A) depressed. To move the
anchor up, slide it without depressing the
lock knob (A).
CAUTION
When adjusting the seat belt anchor,
set it at a position that is suffi-
ciently high so that the belt will make
full contact with your shoulder but
will not touch your neck.
G28E045A
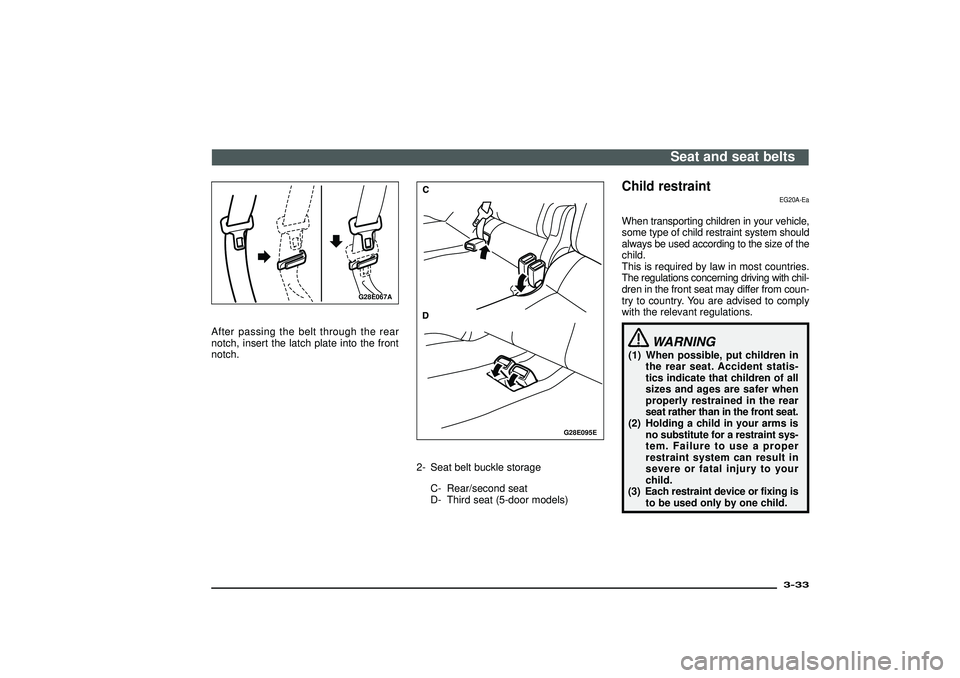
Rear/second, third seat belt storage
EG28EABa
When the seat belt is not in use, store it as
shown in the illustration.
1- Seat belt plate storage
A-Short (3-door) models
B-Long (5-door) models
Seat and seat belts
3-32Div:
Out put date:
Page 65 of 392
G28E067A
After passing the belt through the rear
notch, insert the latch plate into the front
notch.
G28E095E
2- Seat belt buckle storage
C- Rear/second seat
D- Third seat (5-door models)
Child restraint
EG20A-Ea
When transporting children in your vehicle,
some type of child restraint system should
always be used according to the size of the
child.
This is required by law in most countries.
The regulations concerning driving with chil-
dren in the front seat may differ from coun-
try to country. You are advised to comply
with the relevant regulations.
WARNING
(1) When possible, put children in
the rear seat. Accident statis-
tics indicate that children of all
sizes and ages are safer when
properly restrained in the rear
seat rather than in the front seat.
(2) Holding a child in your arms is
no substitute for a restraint sys-
tem. Failure to use a proper
restraint system can result in
severe or fatal injury to your
child.
(3) Each restraint device or fixing is
to be used only by one child.
Seat and seat belts
3-33
Div:
Out put date:
Page 66 of 392
G28G267A
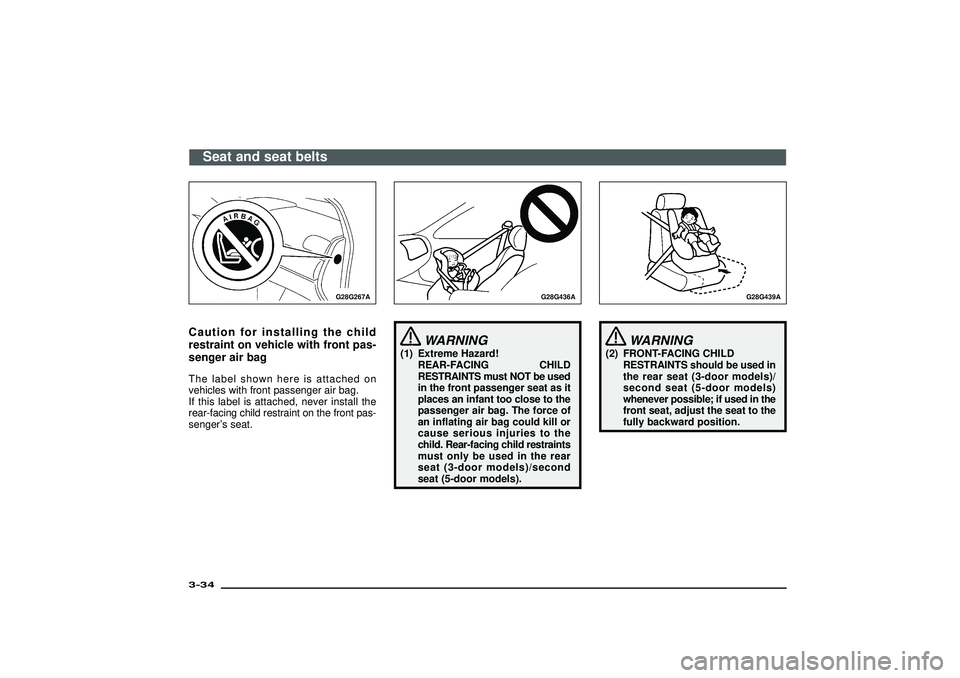
Caution for installing the child
restraint on vehicle with front pas-
senger air bagThe label shown here is attached on
vehicles with front passenger air bag.
If this label is attached, never install the
rear-facing child restraint on the front pas-
senger’s seat.
G28G 436A
WARNING
(1) Extreme Hazard!
REAR-FACING CHILD
RESTRAINTS must NOT be used
in the front passenger seat as it
places an infant too close to the
passenger air bag. The force of
an inflating air bag could kill or
cause serious injuries to the
child. Rear-facing child restraints
must only be used in the rear
seat (3-door models)/second
seat (5-door models).
G28G 439A
WARNING
(2) FRONT-FACING CHILD
RESTRAINTS should be used in
the rear seat (3-door models)/
second seat (5-door models)
whenever possible; if used in the
front seat, adjust the seat to the
fully backward position.
Seat and seat belts
3-34Div:
Out put date:
Page 67 of 392
G28B005A
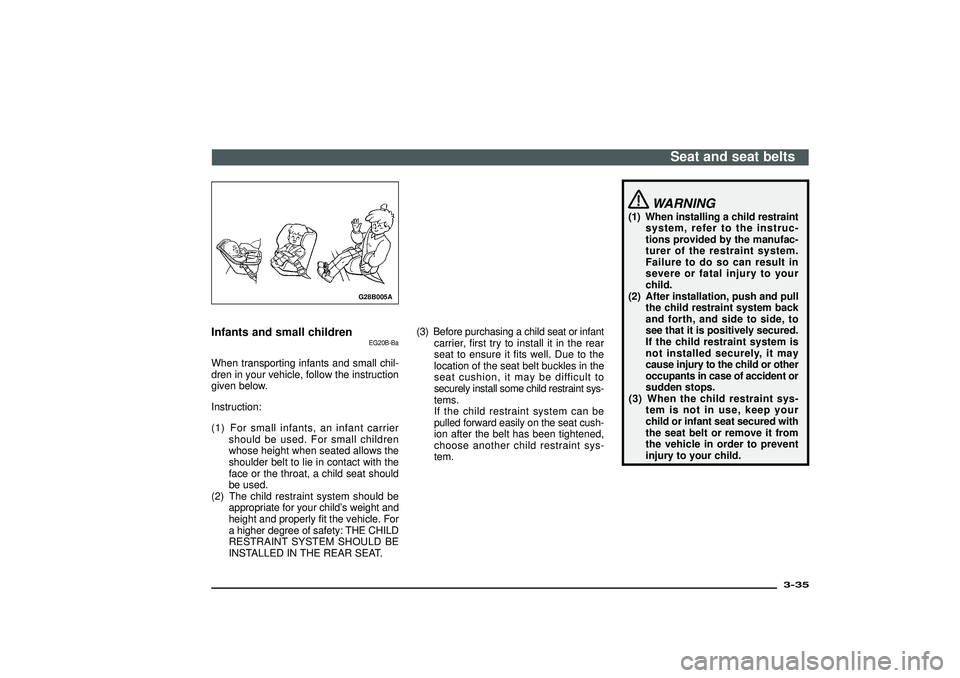
Infants and small children
EG20B-Ba
When transporting infants and small chil-
dren in your vehicle, follow the instruction
given below.
Instruction:
(1) For small infants, an infant carrier
should be used. For small children
whose height when seated allows the
shoulder belt to lie in contact with the
face or the throat, a child seat should
be used.
(2) The child restraint system should be
appropriate for your child’s weight and
height and properly fit the vehicle. For
a higher degree of safety: THE CHILD
RESTRAINT SYSTEM SHOULD BE
INSTALLED IN THE REAR SEAT.(3) Before purchasing a child seat or infant
carrier, first try to install it in the rear
seat to ensure it fits well. Due to the
location of the seat belt buckles in the
seat cushion, it may be difficult to
securely install some child restraint sys-
tems.
If the child restraint system can be
pulled forward easily on the seat cush-
ion after the belt has been tightened,
choose another child restraint sys-
tem.
WARNING
(1) When installing a child restraint
system, refer to the instruc-
tions provided by the manufac-
turer of the restraint system.
Failure to do so can result in
severe or fatal injury to your
child.
(2) After installation, push and pull
the child restraint system back
and forth, and side to side, to
see that it is positively secured.
If the child restraint system is
not installed securely, it may
cause injury to the child or other
occupants in case of accident or
sudden stops.
(3) When the child restraint sys-
tem is not in use, keep your
child or infant seat secured with
the seat belt or remove it from
the vehicle in order to prevent
injury to your child.
Seat and seat belts
3-35
Div:
Out put date:
Page 68 of 392
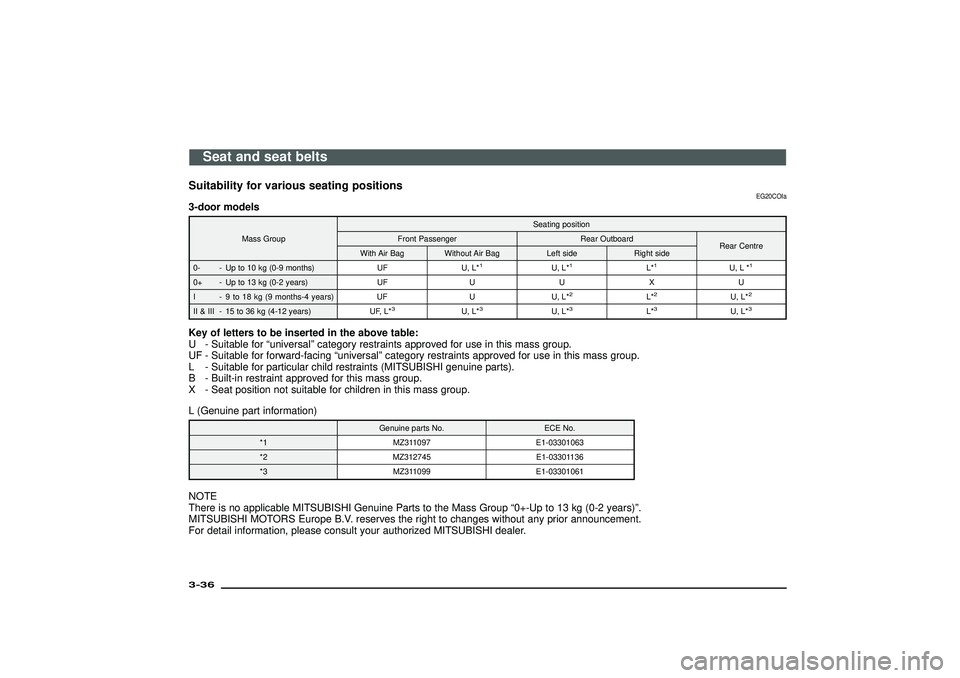
Suitability for various seating positions
EG20COIa
3-door models
Mass GroupSeating position
Front Passenger Rear Outboard Rear Centre
With Air Bag Without Air Bag Left side Right side
0- - Up to 10 kg (0-9 months) UF U, L*
1
U, L*
1
L*1
U, L *
1
0+ - Up to 13 kg (0-2 years) UF U U X U
I - 9 to 18 kg (9 months-4 years) UF U U, L*
2
L*2
U, L*
2
II & III - 15 to 36 kg (4-12 years) UF, L*
3
U, L*
3
U, L*
3
L*3
U, L*
3
Key of letters to be inserted in the above table:
U - Suitable for “universal” category restraints approved for use in this mass group.
UF - Suitable for forward-facing “universal” category restraints approved for use in this mass group.
L - Suitable for particular child restraints (MITSUBISHI genuine parts).
B - Built-in restraint approved for this mass group.
X - Seat position not suitable for children in this mass group.
L (Genuine part information)
Genuine parts No. ECE No.
*1 MZ311097 E1-03301063
*2 MZ312745 E1-03301136
*3 MZ311099 E1-03301061
NOTE
There is no applicable MITSUBISHI Genuine Parts to the Mass Group “0+-Up to 13 kg (0-2 years)”.
MITSUBISH IMO TO R S Europ eB. V. reserve sth e righ tto change swithou tan yprio rannouncement.
For detail information, please consult your authorized MITSUBISHI dealer.
Seat and seat belts
3-36Div:
Out put date:
Page 69 of 392

5-door models
Mass GroupSeating position
Front Passenger Rear OutboardIntermediate Outboard
Intermediate
Centre
With Air Bag Without Air Bag Left side Right side
0- - Up to 10 kg (0-9 months) UF U, L*
1
L*1
U, L*
1
L*1
U, L *
1
0+ - Up to 13 kg (0-2 years) UF U X U X U
I - 9 to 18 kg (9 months-4 years) UF U L*
2
U, L*
2
L*2
U, L *
2
II & III - 15 to 36 kg (4-12 years) UF, L*
3
U, L*
3
L*3
U, L*
3
L*3
U, L*
3
Key of letters to be inserted in the above table:
U - Suitable for “universal” category restraints approved for use in this mass group.
UF - Suitable for forward-facing “universal” category restraints approved for use in this mass group.
L - Suitable for particular child restraints (MITSUBISHI genuine parts).
B - Built-in restraint approved for this mass group.
X - Seat position not suitable for children in this mass group.
L (Genuine part information)
Genuine parts No. ECE No.
*1 MZ311097 E1-03301063
*2 MZ312745 E1-03301136
*3 MZ311099 E1-03301061
NOTE
There is no applicable MITSUBISHI Genuine Parts to the Mass Group “0+-Up to 13 kg (0-2 years)”.
MITSUBISH IMO TO R S Europ eB. V. reserve sth e righ tto change swithou tan yprio rannouncement.
For detail information, please consult your authorized MITSUBISHI dealer.
Seat and seat belts
3-37
Div:
Out put date:
Page 70 of 392
G18C045A
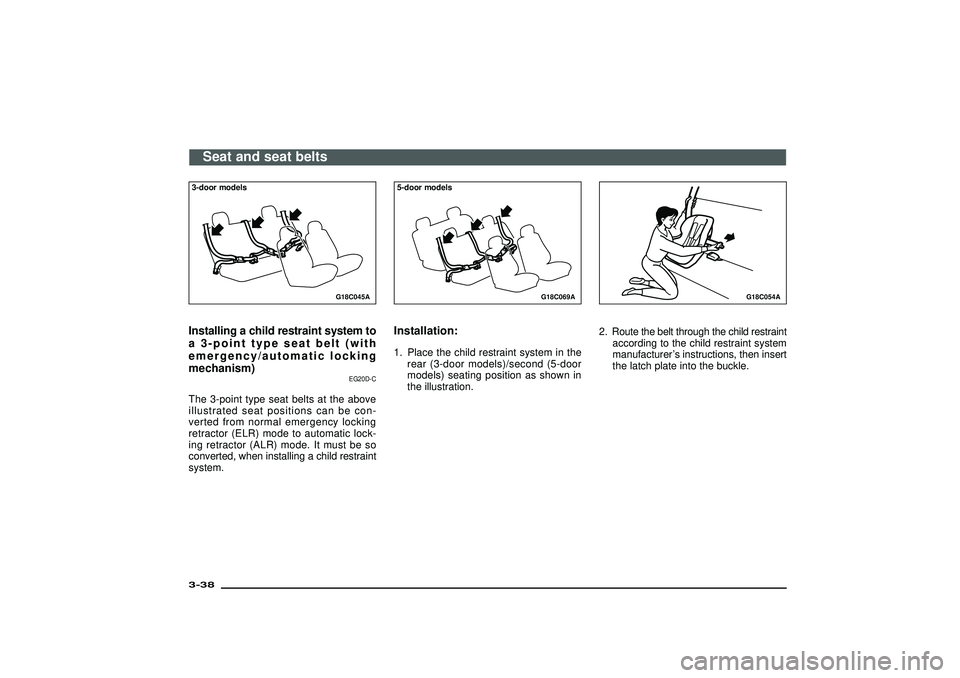
3-door modelsInstalling a child restraint system to
a 3-point type seat belt (with
emergency/automatic locking
mechanism)
EG20D-C
The 3-point type seat belts at the above
illustrated seat positions can be con-
verted from normal emergency locking
retractor (ELR) mode to automatic lock-
ing retractor (ALR) mode. It must be so
converted, when installing a child restraint
system.
G18C069A
5-door modelsInstallation:1. Place the child restraint system in the
rear (3-door models)/second (5-door
models) seating position as shown in
the illustration.
G18C054A
2. Route the belt through the child restraint
according to the child restraint system
manufacturer’s instructions, then insert
the latch plate into the buckle.
Seat and seat belts
3-38Div:
Out put date: