NISSAN ALMERA N16 2003 Electronic Repair Manual
Manufacturer: NISSAN, Model Year: 2003, Model line: ALMERA N16, Model: NISSAN ALMERA N16 2003Pages: 3189, PDF Size: 54.76 MB
Page 251 of 3189
Removal and InstallationNJEM0071CAUTION:
When installing bearings, pistons, or other sliding parts,
lubricate contacting surfaces with new engine oil.
Place removed parts such as bearings and bearing caps
in their proper order and direction.
When installing connecting rod nuts, and main bearing
cap bolts, apply new engine oil to threads and seating
surfaces.
Do not allow any magnetic materials to contact the signal
plate of flywheel.
Do not remove the signal plate at back.
Do not place the signal plate side facing under.
Handle with care so as not to damage the signal plate
[especially four places on protrusions for signal of crank
position sensor (TDC sensor)].
DisassemblyNJEM0072PISTON AND CRANKSHAFTNJEM0072S011. Remove engine. Refer to “ENGINE ASSEMBLY”, “Removal
and Installation”, EM-63.
2. Place engine on a work stand.
a. Remove flywheel.
Hold ring gear with ring gear stopper (KV10105630,
KV10105610). Then, loosen securing bolts with TORX socket
(size: Q8 E20, Commercial Service Tool) and remove them.
As an alternative method, hold the crankshaft pulley with a
pulley holder (SST) to remove the flywheel.
JEM192G
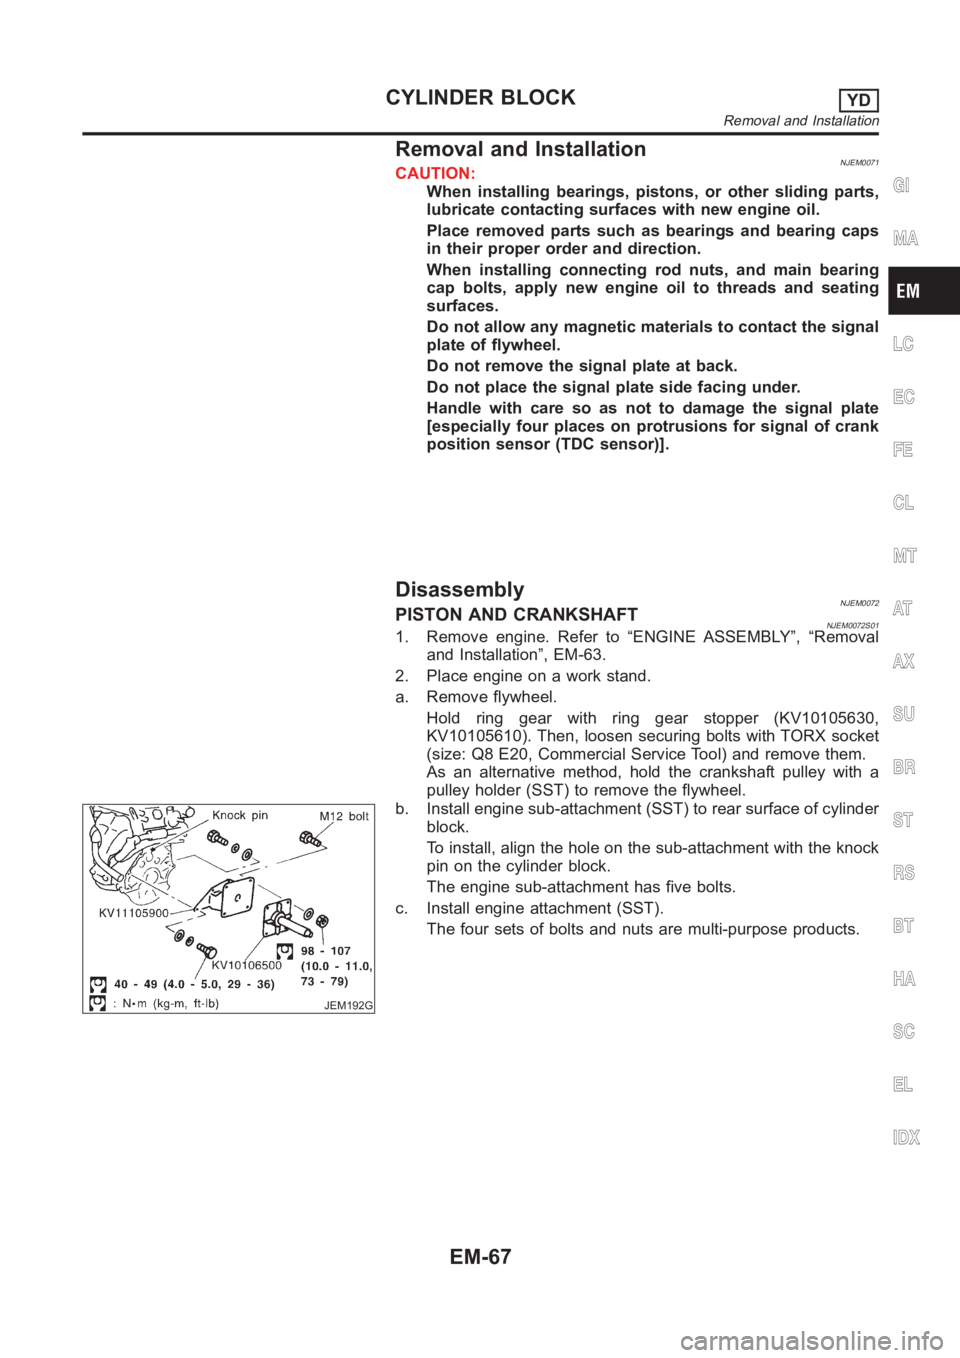
b. Install engine sub-attachment (SST) to rear surface of cylinder
block.
To install, align the hole on the sub-attachment with the knock
pin on the cylinder block.
The engine sub-attachment has five bolts.
c. Install engine attachment (SST).
The four sets of bolts and nuts are multi-purpose products.
GI
MA
LC
EC
FE
CL
MT
AT
AX
SU
BR
ST
RS
BT
HA
SC
EL
IDX
CYLINDER BLOCKYD
Removal and Installation
EM-67
Page 252 of 3189
JEM193G
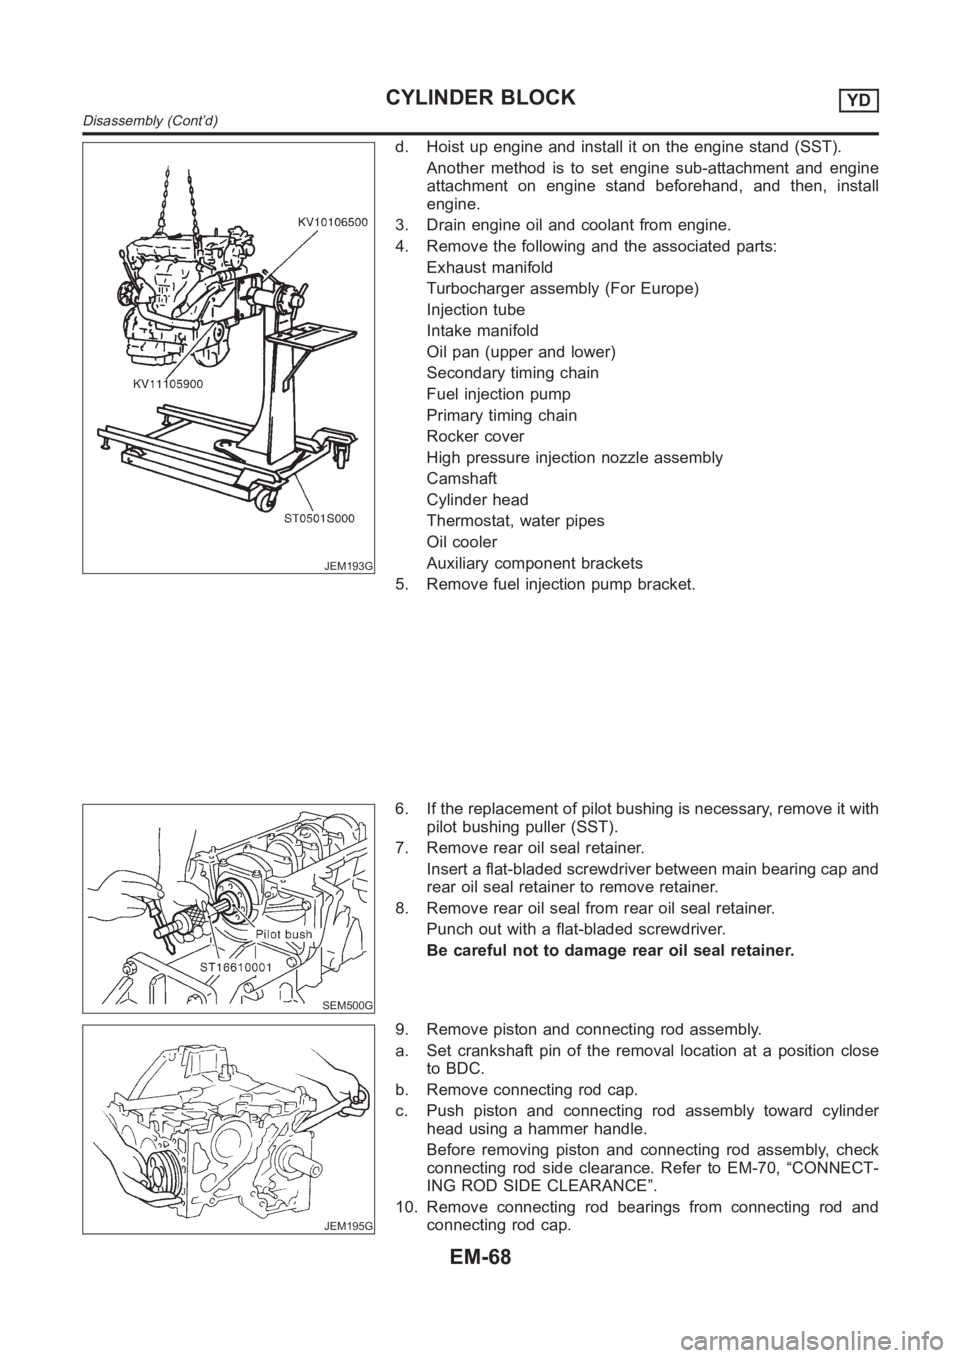
d. Hoist up engine and install it on the engine stand (SST).
Another method is to set engine sub-attachment and engine
attachment on engine stand beforehand, and then, install
engine.
3. Drain engine oil and coolant from engine.
4. Remove the following and the associated parts:
Exhaust manifold
Turbocharger assembly (For Europe)
Injection tube
Intake manifold
Oil pan (upper and lower)
Secondary timing chain
Fuel injection pump
Primary timing chain
Rocker cover
High pressure injection nozzle assembly
Camshaft
Cylinder head
Thermostat, water pipes
Oil cooler
Auxiliary component brackets
5. Remove fuel injection pump bracket.
SEM500G
6. If the replacement of pilot bushing is necessary, remove it with
pilot bushing puller (SST).
7. Remove rear oil seal retainer.
Insert a flat-bladed screwdriver between main bearing cap and
rear oil seal retainer to remove retainer.
8. Remove rear oil seal from rear oil seal retainer.
Punch out with a flat-bladed screwdriver.
Be careful not to damage rear oil seal retainer.
JEM195G
9. Remove piston and connecting rod assembly.
a. Set crankshaft pin of the removal location at a position close
to BDC.
b. Remove connecting rod cap.
c. Push piston and connecting rod assembly toward cylinder
head using a hammer handle.
Before removing piston and connecting rod assembly, check
connecting rod side clearance. Refer to EM-70, “CONNECT-
ING ROD SIDE CLEARANCE”.
10. Remove connecting rod bearings from connecting rod and
connecting rod cap.
CYLINDER BLOCKYD
Disassembly (Cont’d)
EM-68
Page 253 of 3189
Store the removed parts in sets by the cylinder No. to avoid
mixing them up.
JEM196G
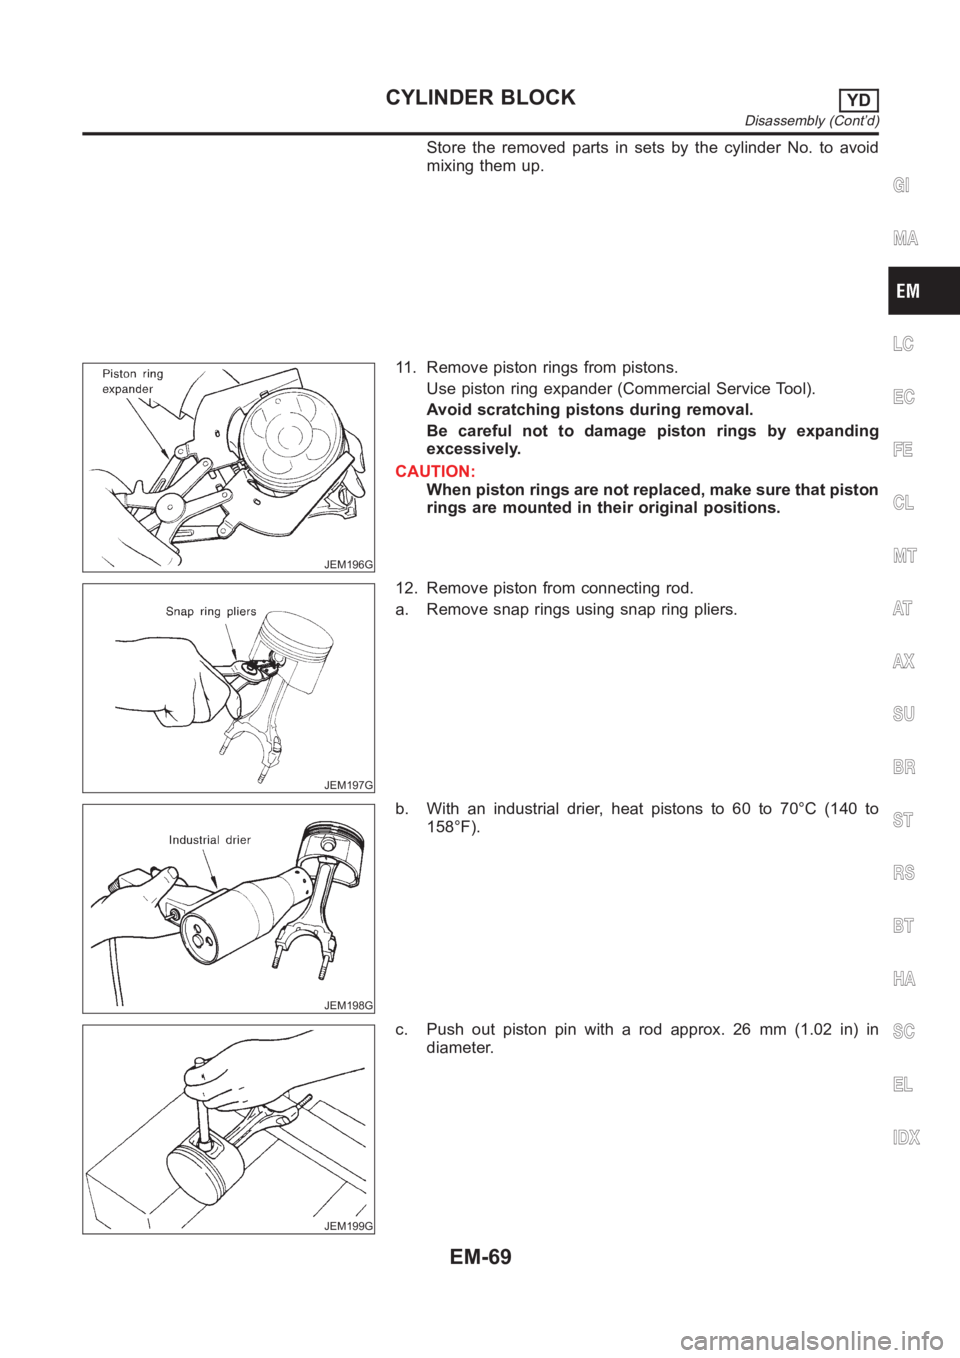
11. Remove piston rings from pistons.
Use piston ring expander (Commercial Service Tool).
Avoid scratching pistons during removal.
Be careful not to damage piston rings by expanding
excessively.
CAUTION:
When piston rings are not replaced, make sure that piston
rings are mounted in their original positions.
JEM197G
12. Remove piston from connecting rod.
a. Remove snap rings using snap ring pliers.
JEM198G
b. With an industrial drier, heat pistons to 60 to 70°C (140 to
158°F).
JEM199G
c. Push out piston pin with a rod approx. 26 mm (1.02 in) in
diameter.
GI
MA
LC
EC
FE
CL
MT
AT
AX
SU
BR
ST
RS
BT
HA
SC
EL
IDX
CYLINDER BLOCKYD
Disassembly (Cont’d)
EM-69
Page 254 of 3189
JEM200G
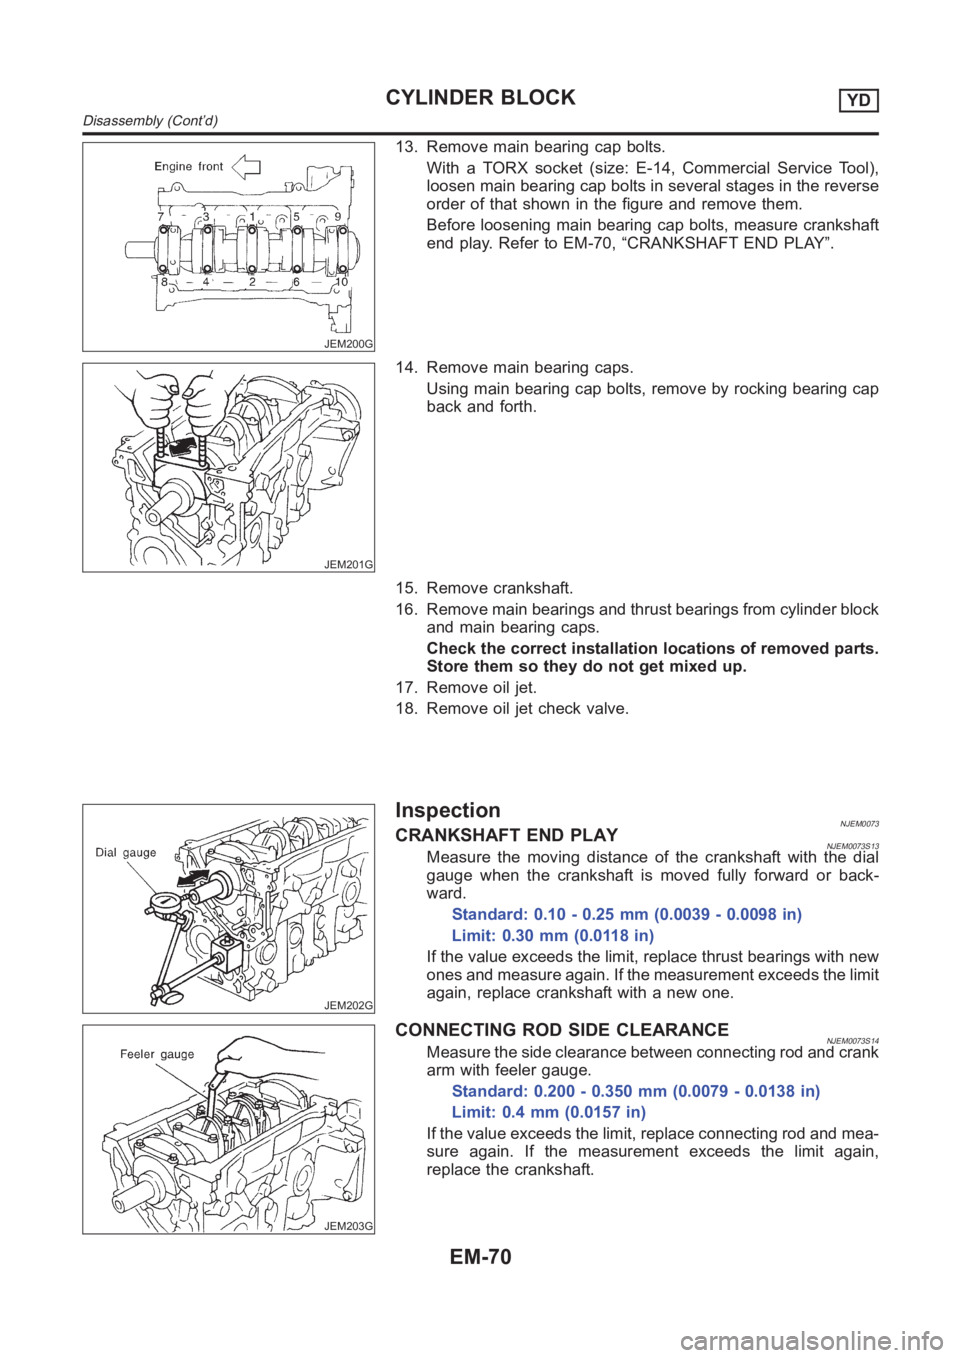
13. Remove main bearing cap bolts.
With a TORX socket (size: E-14, Commercial Service Tool),
loosen main bearing cap bolts in several stages in the reverse
order of that shown in the figure and remove them.
Before loosening main bearing cap bolts, measure crankshaft
end play. Refer to EM-70, “CRANKSHAFT END PLAY”.
JEM201G
14. Remove main bearing caps.
Using main bearing cap bolts, remove by rocking bearing cap
back and forth.
15. Remove crankshaft.
16. Remove main bearings and thrust bearings from cylinder block
and main bearing caps.
Check the correct installation locations of removed parts.
Store them so they do not get mixed up.
17. Remove oil jet.
18. Remove oil jet check valve.
JEM202G
InspectionNJEM0073CRANKSHAFT END PLAYNJEM0073S13Measure the moving distance of the crankshaft with the dial
gauge when the crankshaft is moved fully forward or back-
ward.
Standard: 0.10 - 0.25 mm (0.0039 - 0.0098 in)
Limit: 0.30 mm (0.0118 in)
If the value exceeds the limit, replace thrust bearings with new
ones and measure again. If the measurement exceeds the limit
again, replace crankshaft with a new one.
JEM203G
CONNECTING ROD SIDE CLEARANCENJEM0073S14Measure the side clearance between connecting rod and crank
arm with feeler gauge.
Standard: 0.200 - 0.350 mm (0.0079 - 0.0138 in)
Limit: 0.4 mm (0.0157 in)
If the value exceeds the limit, replace connecting rod and mea-
sure again. If the measurement exceeds the limit again,
replace the crankshaft.
CYLINDER BLOCKYD
Disassembly (Cont’d)
EM-70
Page 255 of 3189
AEM023
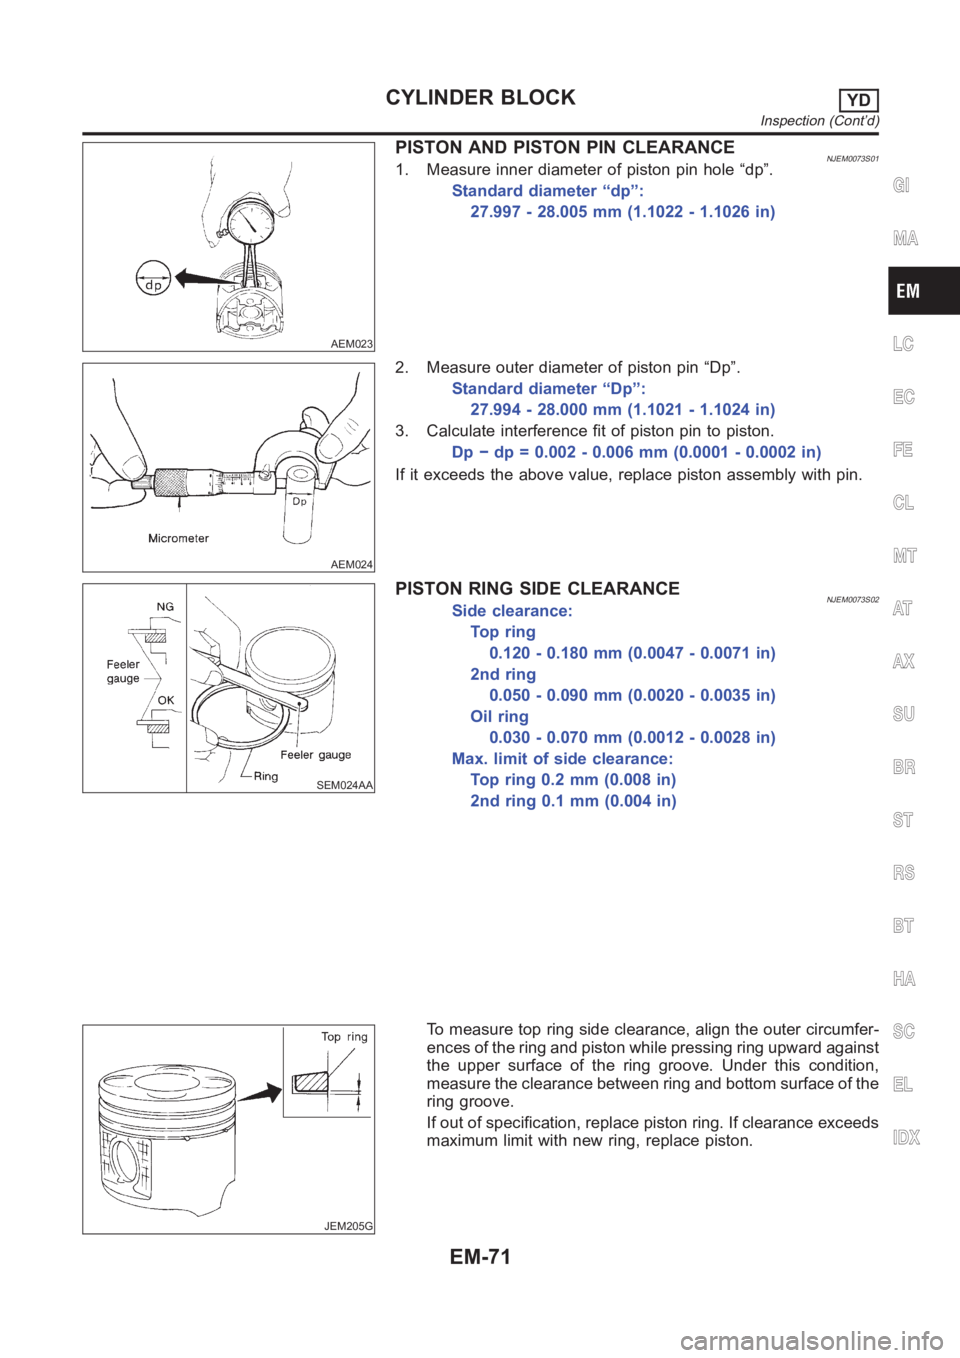
PISTON AND PISTON PIN CLEARANCENJEM0073S011. Measure inner diameter of piston pin hole “dp”.
Standard diameter “dp”:
27.997 - 28.005 mm (1.1022 - 1.1026 in)
AEM024
2. Measure outer diameter of piston pin “Dp”.
Standard diameter “Dp”:
27.994 - 28.000 mm (1.1021 - 1.1024 in)
3. Calculate interference fit of piston pin to piston.
Dp − dp = 0.002 - 0.006 mm (0.0001 - 0.0002 in)
If it exceeds the above value, replace piston assembly with pin.
SEM024AA
PISTON RING SIDE CLEARANCENJEM0073S02Side clearance:
Top ring
0.120 - 0.180 mm (0.0047 - 0.0071 in)
2nd ring
0.050 - 0.090 mm (0.0020 - 0.0035 in)
Oil ring
0.030 - 0.070 mm (0.0012 - 0.0028 in)
Max. limit of side clearance:
Top ring 0.2 mm (0.008 in)
2nd ring 0.1 mm (0.004 in)
JEM205G
To measure top ring side clearance, align the outer circumfer-
ences of the ring and piston while pressing ring upward against
the upper surface of the ring groove. Under this condition,
measure the clearance between ring and bottom surface of the
ring groove.
If out of specification, replace piston ring. If clearance exceeds
maximum limit with new ring, replace piston.
GI
MA
LC
EC
FE
CL
MT
AT
AX
SU
BR
ST
RS
BT
HA
SC
EL
IDX
CYLINDER BLOCKYD
Inspection (Cont’d)
EM-71
Page 256 of 3189
SEM599A
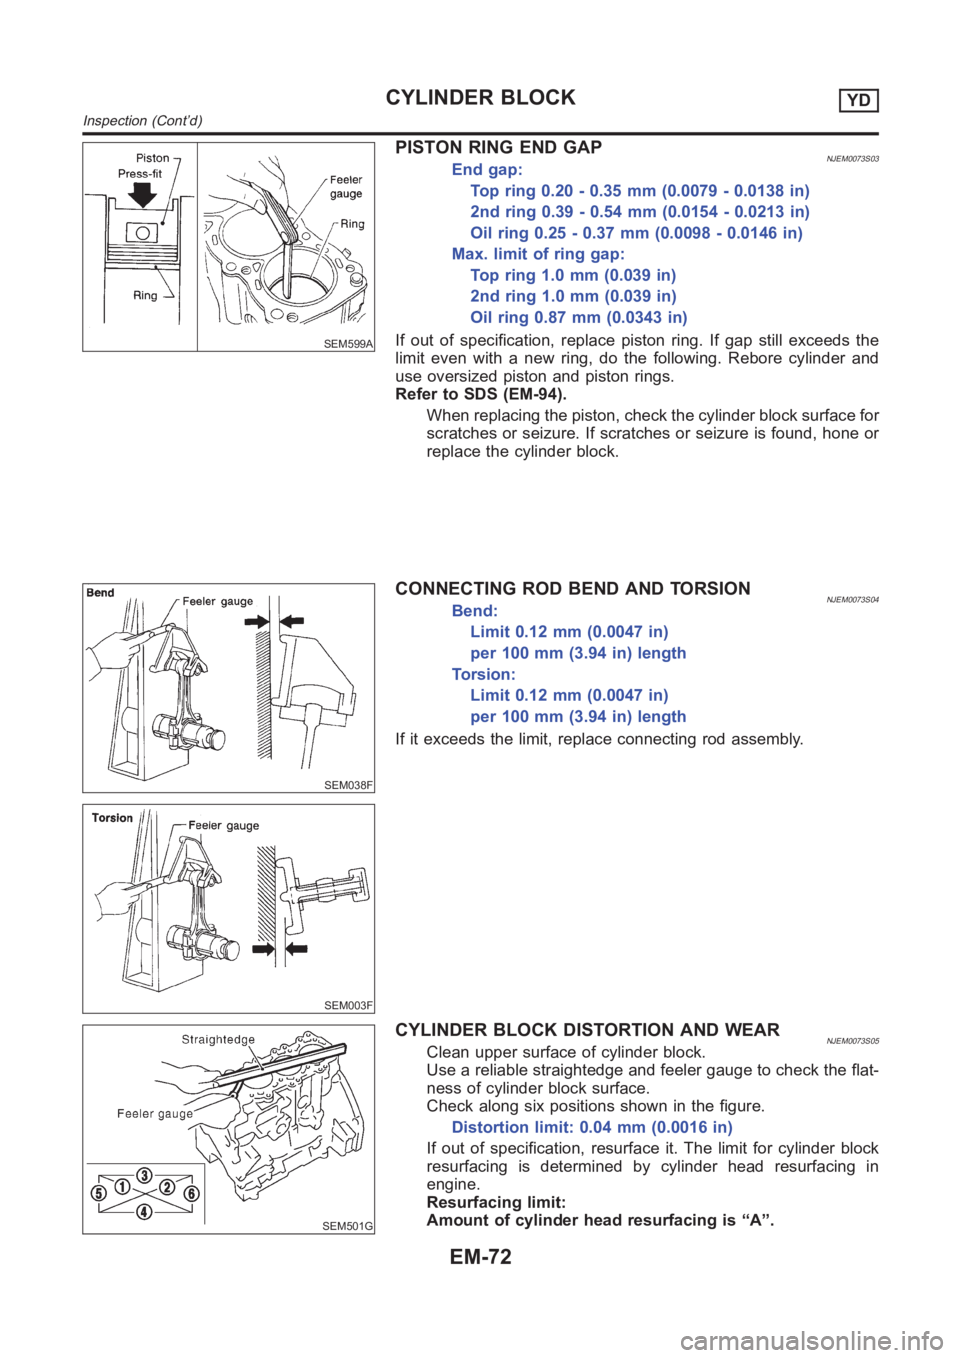
PISTON RING END GAPNJEM0073S03End gap:
Top ring 0.20 - 0.35 mm (0.0079 - 0.0138 in)
2nd ring 0.39 - 0.54 mm (0.0154 - 0.0213 in)
Oil ring 0.25 - 0.37 mm (0.0098 - 0.0146 in)
Max. limit of ring gap:
Top ring 1.0 mm (0.039 in)
2nd ring 1.0 mm (0.039 in)
Oil ring 0.87 mm (0.0343 in)
If out of specification, replace piston ring. If gap still exceeds the
limit even with a new ring, do the following. Rebore cylinder and
use oversized piston and piston rings.
Refer to SDS (EM-94).
When replacing the piston, check the cylinder block surface for
scratches or seizure. If scratches or seizure is found, hone or
replace the cylinder block.
SEM038F
SEM003F
CONNECTING ROD BEND AND TORSIONNJEM0073S04Bend:
Limit 0.12 mm (0.0047 in)
per 100 mm (3.94 in) length
Torsion:
Limit 0.12 mm (0.0047 in)
per 100 mm (3.94 in) length
If it exceeds the limit, replace connecting rod assembly.
SEM501G
CYLINDER BLOCK DISTORTION AND WEARNJEM0073S05Clean upper surface of cylinder block.
Use a reliable straightedge and feeler gauge to check the flat-
ness of cylinder block surface.
Check along six positions shown in the figure.
Distortion limit: 0.04 mm (0.0016 in)
If out of specification, resurface it. The limit for cylinder block
resurfacing is determined by cylinder head resurfacing in
engine.
Resurfacing limit:
Amount of cylinder head resurfacing is “A”.
CYLINDER BLOCKYD
Inspection (Cont’d)
EM-72
Page 257 of 3189
Amount of cylinder block resurfacing is “B”.
The maximum limit is as follows:
A + B = 0.07mm (0.0028 in)
Nominal cylinder block height from crankshaft center:
252.95 - 253.05 mm (9.9586 - 9.9626 in)
If necessary, replace cylinder block.
JEM206G
JEM207G
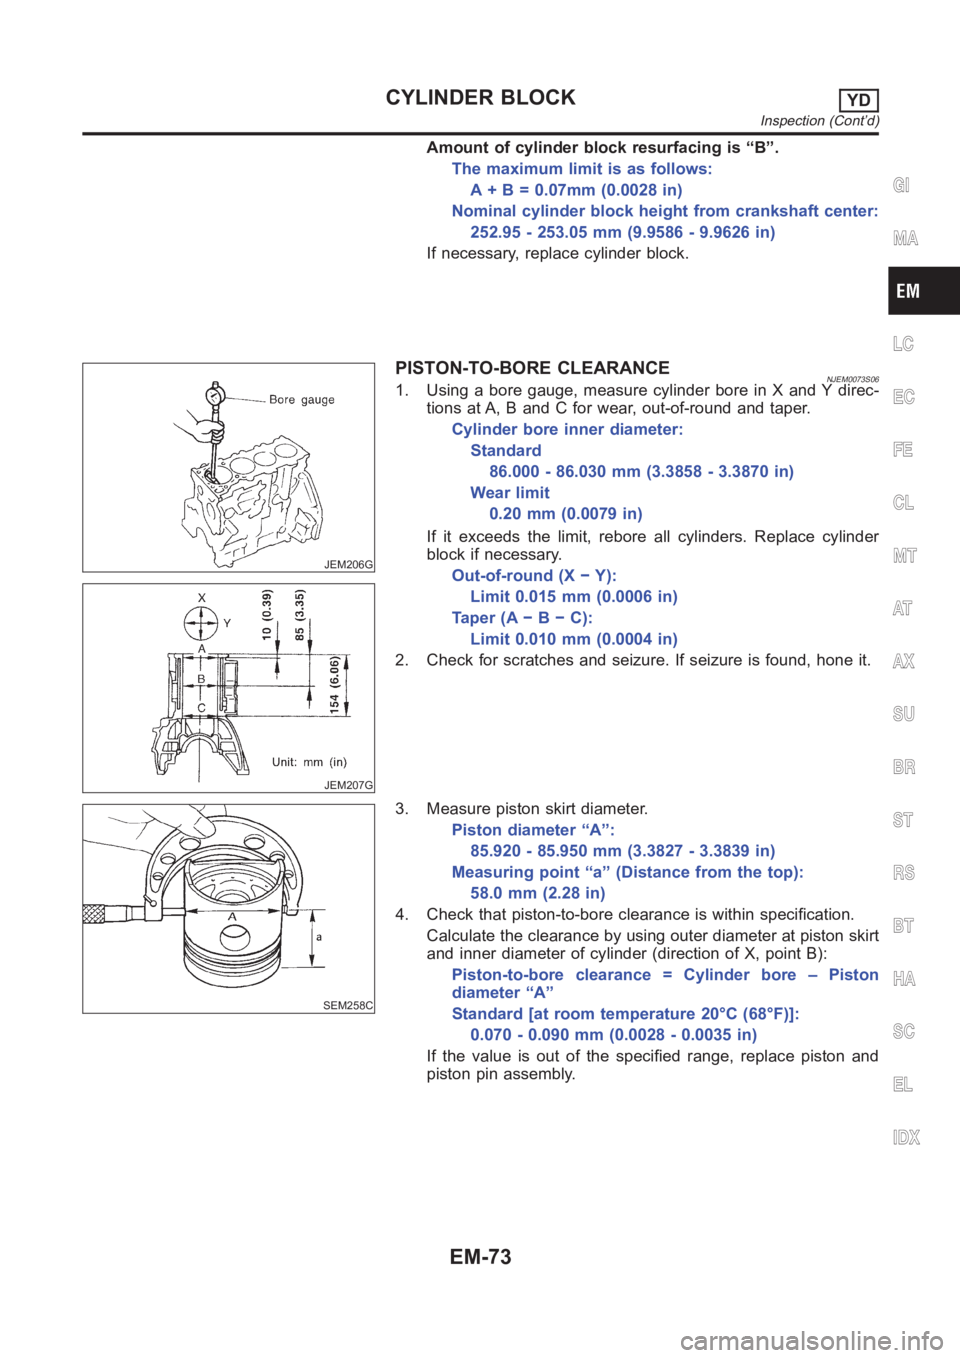
PISTON-TO-BORE CLEARANCENJEM0073S061. Using a bore gauge, measure cylinder bore in X and Y direc-
tions at A, B and C for wear, out-of-round and taper.
Cylinder bore inner diameter:
Standard
86.000 - 86.030 mm (3.3858 - 3.3870 in)
Wear limit
0.20 mm (0.0079 in)
If it exceeds the limit, rebore all cylinders. Replace cylinder
block if necessary.
Out-of-round (X − Y):
Limit 0.015 mm (0.0006 in)
Taper(A−B−C):
Limit 0.010 mm (0.0004 in)
2. Check for scratches and seizure. If seizure is found, hone it.
SEM258C
3. Measure piston skirt diameter.
Piston diameter “A”:
85.920 - 85.950 mm (3.3827 - 3.3839 in)
Measuring point “a” (Distance from the top):
58.0 mm (2.28 in)
4. Check that piston-to-bore clearance is within specification.
Calculate the clearance by using outer diameter at piston skirt
and inner diameter of cylinder (direction of X, point B):
Piston-to-bore clearance = Cylinder bore – Piston
diameter “A”
Standard [at room temperature 20°C (68°F)]:
0.070 - 0.090 mm (0.0028 - 0.0035 in)
If the value is out of the specified range, replace piston and
piston pin assembly.
GI
MA
LC
EC
FE
CL
MT
AT
AX
SU
BR
ST
RS
BT
HA
SC
EL
IDX
CYLINDER BLOCKYD
Inspection (Cont’d)
EM-73
Page 258 of 3189
JEM208G
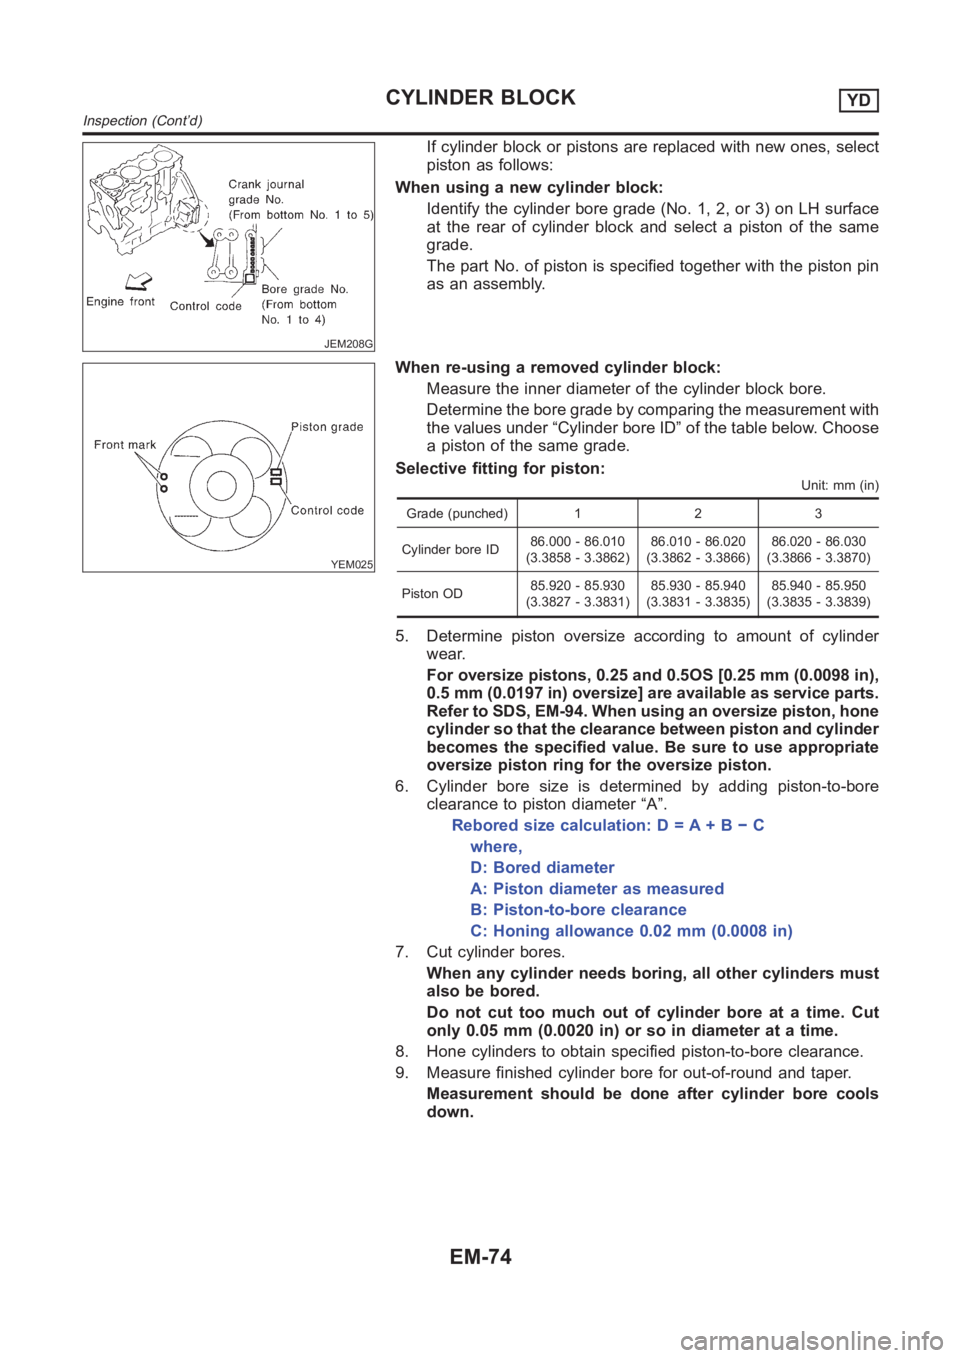
If cylinder block or pistons are replaced with new ones, select
piston as follows:
When using a new cylinder block:
Identify the cylinder bore grade (No. 1, 2, or 3) on LH surface
at the rear of cylinder block and select a piston of the same
grade.
The part No. of piston is specified together with the piston pin
as an assembly.
YEM025
When re-using a removed cylinder block:
Measure the inner diameter of the cylinder block bore.
Determine the bore grade by comparing the measurement with
the values under “Cylinder bore ID” of the table below. Choose
a piston of the same grade.
Selective fitting for piston:
Unit: mm (in)
Grade (punched) 1 2 3
Cylinder bore ID86.000 - 86.010
(3.3858 - 3.3862)86.010 - 86.020
(3.3862 - 3.3866)86.020 - 86.030
(3.3866 - 3.3870)
Piston OD85.920 - 85.930
(3.3827 - 3.3831)85.930 - 85.940
(3.3831 - 3.3835)85.940 - 85.950
(3.3835 - 3.3839)
5. Determine piston oversize according to amount of cylinder
wear.
For oversize pistons, 0.25 and 0.5OS [0.25 mm (0.0098 in),
0.5 mm (0.0197 in) oversize] are available as service parts.
Refer to SDS, EM-94. When using an oversize piston, hone
cylinder so that the clearance between piston and cylinder
becomes the specified value. Be sure to use appropriate
oversize piston ring for the oversize piston.
6. Cylinder bore size is determined by adding piston-to-bore
clearance to piston diameter “A”.
Rebored size calculation: D = A + B − C
where,
D: Bored diameter
A: Piston diameter as measured
B: Piston-to-bore clearance
C: Honing allowance 0.02 mm (0.0008 in)
7. Cut cylinder bores.
When any cylinder needs boring, all other cylinders must
also be bored.
Do not cut too much out of cylinder bore at a time. Cut
only 0.05 mm (0.0020 in) or so in diameter at a time.
8. Hone cylinders to obtain specified piston-to-bore clearance.
9. Measure finished cylinder bore for out-of-round and taper.
Measurement should be done after cylinder bore cools
down.
CYLINDER BLOCKYD
Inspection (Cont’d)
EM-74
Page 259 of 3189
SEM316A
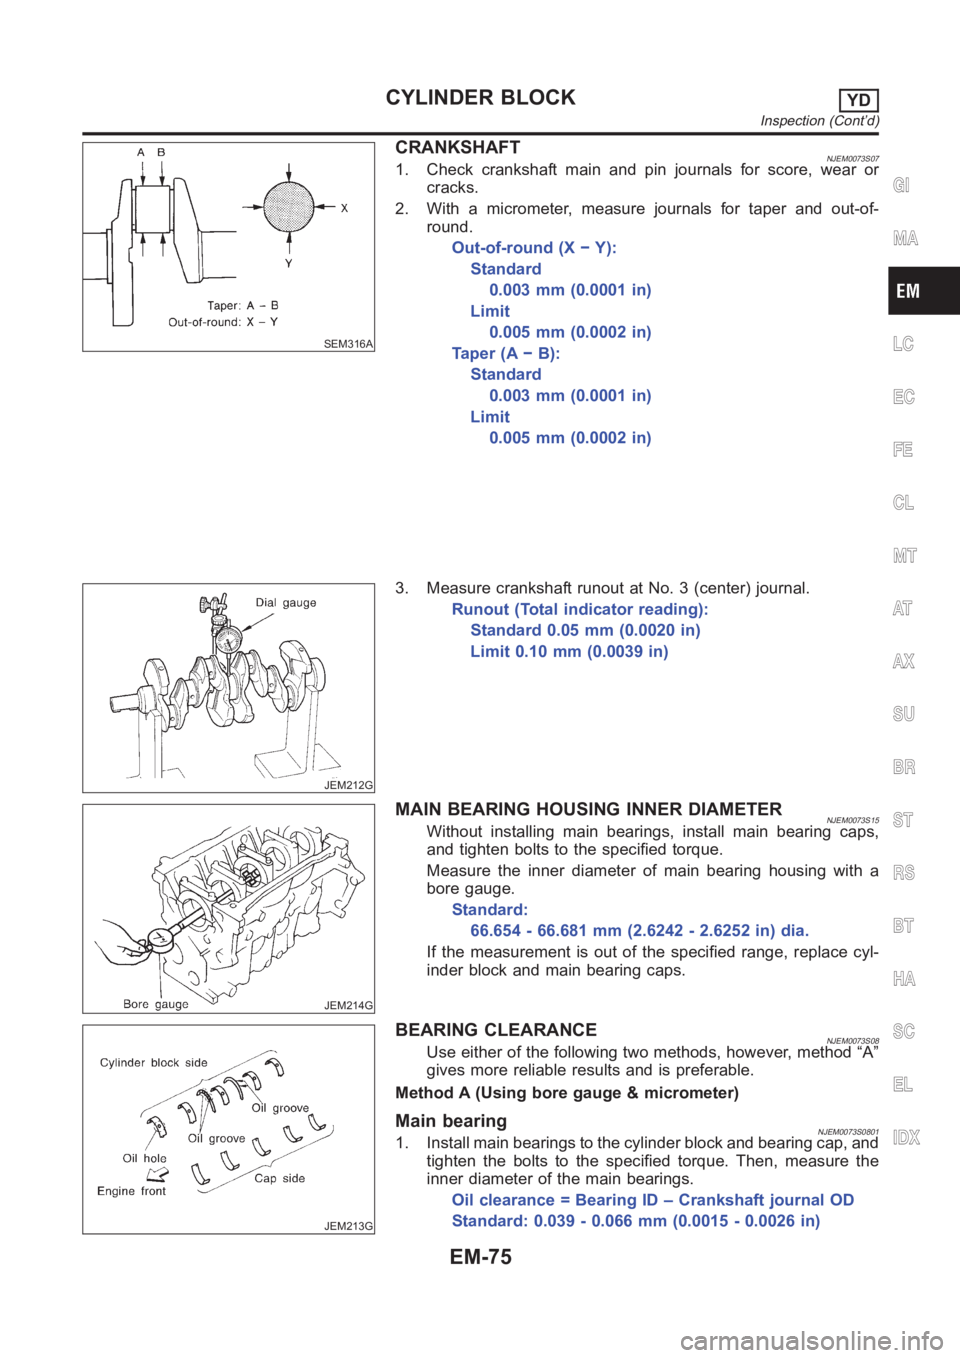
CRANKSHAFTNJEM0073S071. Check crankshaft main and pin journals for score, wear or
cracks.
2. With a micrometer, measure journals for taper and out-of-
round.
Out-of-round (X − Y):
Standard
0.003 mm (0.0001 in)
Limit
0.005 mm (0.0002 in)
Ta p e r ( A − B ) :
Standard
0.003 mm (0.0001 in)
Limit
0.005 mm (0.0002 in)
JEM212G
3. Measure crankshaft runout at No. 3 (center) journal.
Runout (Total indicator reading):
Standard 0.05 mm (0.0020 in)
Limit 0.10 mm (0.0039 in)
JEM214G
MAIN BEARING HOUSING INNER DIAMETERNJEM0073S15Without installing main bearings, install main bearing caps,
and tighten bolts to the specified torque.
Measure the inner diameter of main bearing housing with a
bore gauge.
Standard:
66.654 - 66.681 mm (2.6242 - 2.6252 in) dia.
If the measurement is out of the specified range, replace cyl-
inder block and main bearing caps.
JEM213G
BEARING CLEARANCENJEM0073S08Use either of the following two methods, however, method “A”
gives more reliable results and is preferable.
Method A (Using bore gauge & micrometer)
Main bearingNJEM0073S08011. Install main bearings to the cylinder block and bearing cap, and
tighten the bolts to the specified torque. Then, measure the
inner diameter of the main bearings.
Oil clearance = Bearing ID – Crankshaft journal OD
Standard: 0.039 - 0.066 mm (0.0015 - 0.0026 in)
GI
MA
LC
EC
FE
CL
MT
AT
AX
SU
BR
ST
RS
BT
HA
SC
EL
IDX
CYLINDER BLOCKYD
Inspection (Cont’d)
EM-75
Page 260 of 3189
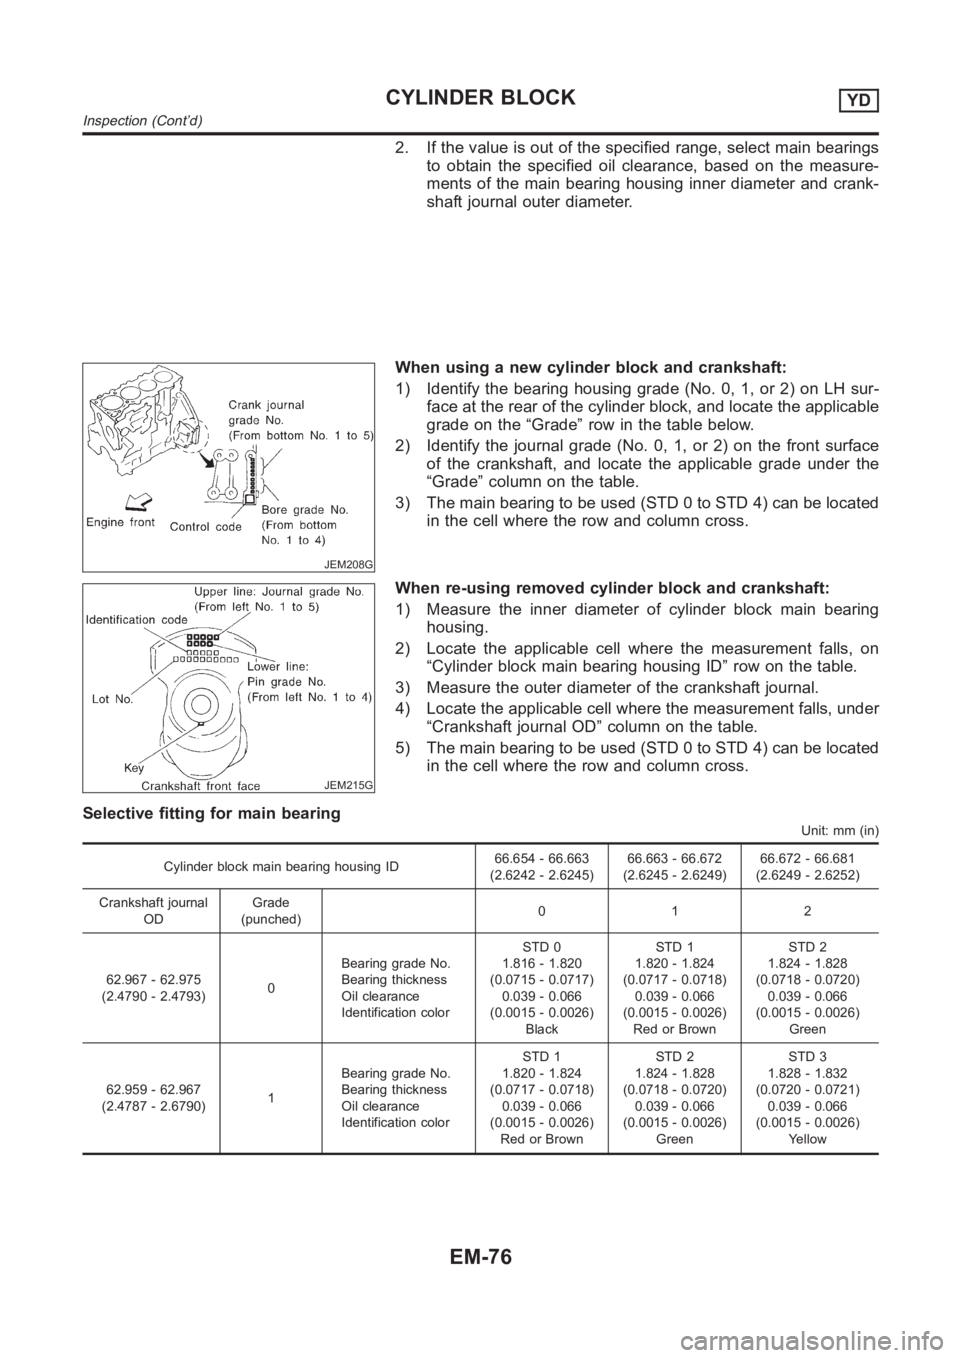
2. If the value is out of the specified range, select main bearings
to obtain the specified oil clearance, based on the measure-
ments of the main bearing housing inner diameter and crank-
shaft journal outer diameter.
JEM208G
When using a new cylinder block and crankshaft:
1) Identify the bearing housing grade (No. 0, 1, or 2) on LH sur-
face at the rear of the cylinder block, and locate the applicable
grade on the “Grade” row in the table below.
2) Identify the journal grade (No. 0, 1, or 2) on the front surface
of the crankshaft, and locate the applicable grade under the
“Grade” column on the table.
3) The main bearing to be used (STD 0 to STD 4) can be located
in the cell where the row and column cross.
JEM215G
When re-using removed cylinder block and crankshaft:
1) Measure the inner diameter of cylinder block main bearing
housing.
2) Locate the applicable cell where the measurement falls, on
“Cylinder block main bearing housing ID” row on the table.
3) Measure the outer diameter of the crankshaft journal.
4) Locate the applicable cell where the measurement falls, under
“Crankshaft journal OD” column on the table.
5) The main bearing to be used (STD 0 to STD 4) can be located
in the cell where the row and column cross.
Selective fitting for main bearing
Unit: mm (in)
Cylinder block main bearing housing ID66.654 - 66.663
(2.6242 - 2.6245)66.663 - 66.672
(2.6245 - 2.6249)66.672 - 66.681
(2.6249 - 2.6252)
Crankshaft journal
ODGrade
(punched)012
62.967 - 62.975
(2.4790 - 2.4793)0Bearing grade No.
Bearing thickness
Oil clearance
Identification colorSTD 0
1.816 - 1.820
(0.0715 - 0.0717)
0.039 - 0.066
(0.0015 - 0.0026)
BlackSTD 1
1.820 - 1.824
(0.0717 - 0.0718)
0.039 - 0.066
(0.0015 - 0.0026)
Red or BrownSTD 2
1.824 - 1.828
(0.0718 - 0.0720)
0.039 - 0.066
(0.0015 - 0.0026)
Green
62.959 - 62.967
(2.4787 - 2.6790)1Bearing grade No.
Bearing thickness
Oil clearance
Identification colorSTD 1
1.820 - 1.824
(0.0717 - 0.0718)
0.039 - 0.066
(0.0015 - 0.0026)
Red or BrownSTD 2
1.824 - 1.828
(0.0718 - 0.0720)
0.039 - 0.066
(0.0015 - 0.0026)
GreenSTD 3
1.828 - 1.832
(0.0720 - 0.0721)
0.039 - 0.066
(0.0015 - 0.0026)
Yellow
CYLINDER BLOCKYD
Inspection (Cont’d)
EM-76