NISSAN ALMERA N16 2003 Electronic Repair Manual
Manufacturer: NISSAN, Model Year: 2003, Model line: ALMERA N16, Model: NISSAN ALMERA N16 2003Pages: 3189, PDF Size: 54.76 MB
Page 3021 of 3189
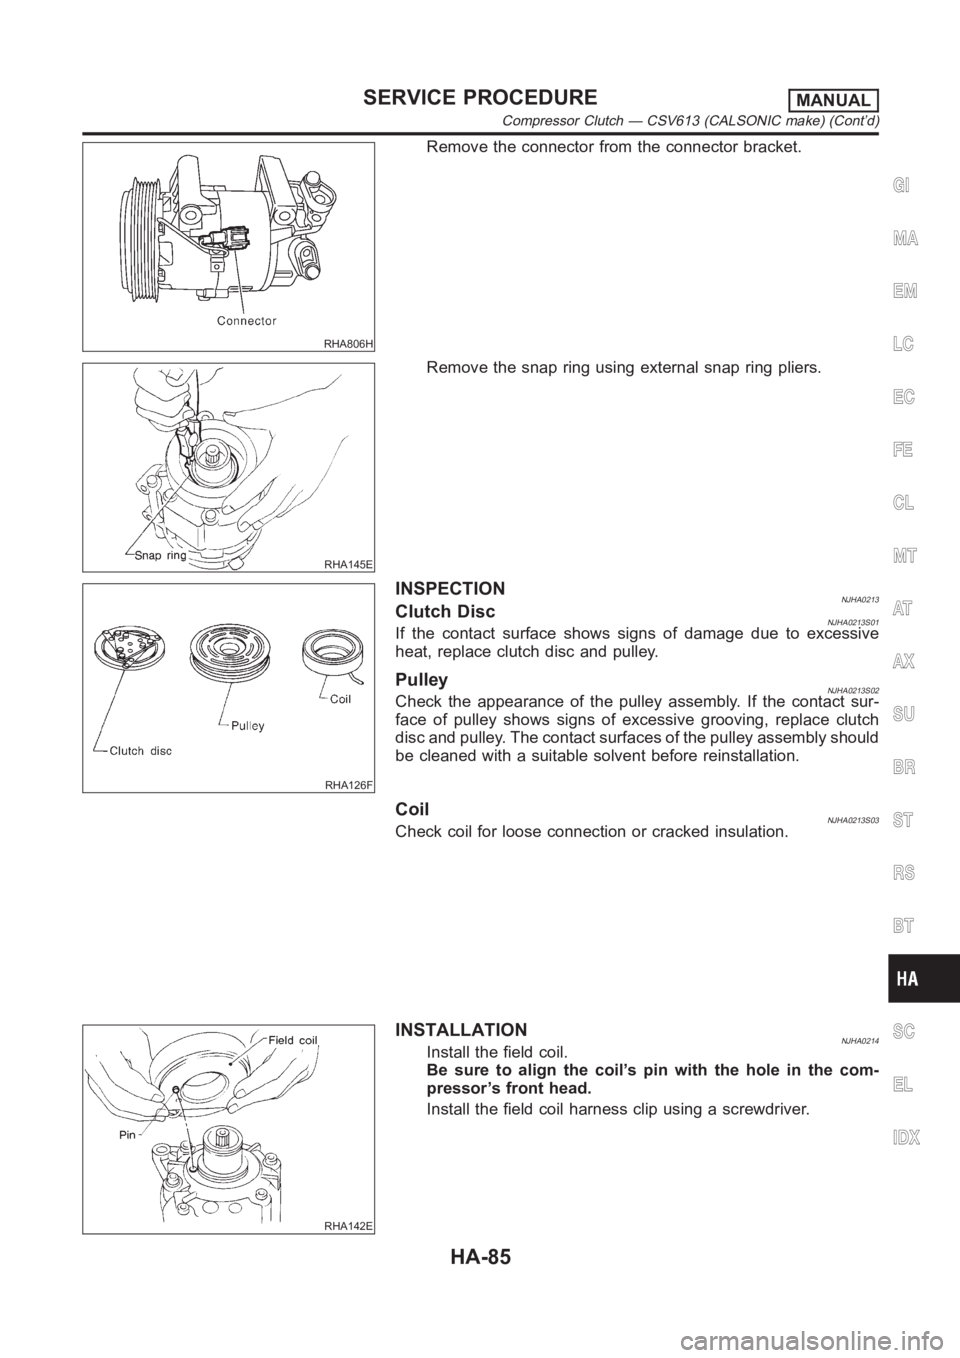
RHA806H
Remove the connector from the connector bracket.
RHA145E
Remove the snap ring using external snap ring pliers.
RHA126F
INSPECTIONNJHA0213Clutch DiscNJHA0213S01If the contact surface shows signs of damage due to excessive
heat, replace clutch disc and pulley.
PulleyNJHA0213S02Check the appearance of the pulley assembly. If the contact sur-
face of pulley shows signs of excessive grooving, replace clutch
disc and pulley. The contact surfaces of the pulley assembly should
be cleaned with a suitable solvent before reinstallation.
CoilNJHA0213S03Check coil for loose connection or cracked insulation.
RHA142E
INSTALLATIONNJHA0214Install the field coil.
Be sure to align the coil’s pin with the hole in the com-
pressor’s front head.
Install the field coil harness clip using a screwdriver.
GI
MA
EM
LC
EC
FE
CL
MT
AT
AX
SU
BR
ST
RS
BT
SC
EL
IDX
SERVICE PROCEDUREMANUAL
Compressor Clutch — CSV613 (CALSONIC make) (Cont’d)
HA-85
Page 3022 of 3189
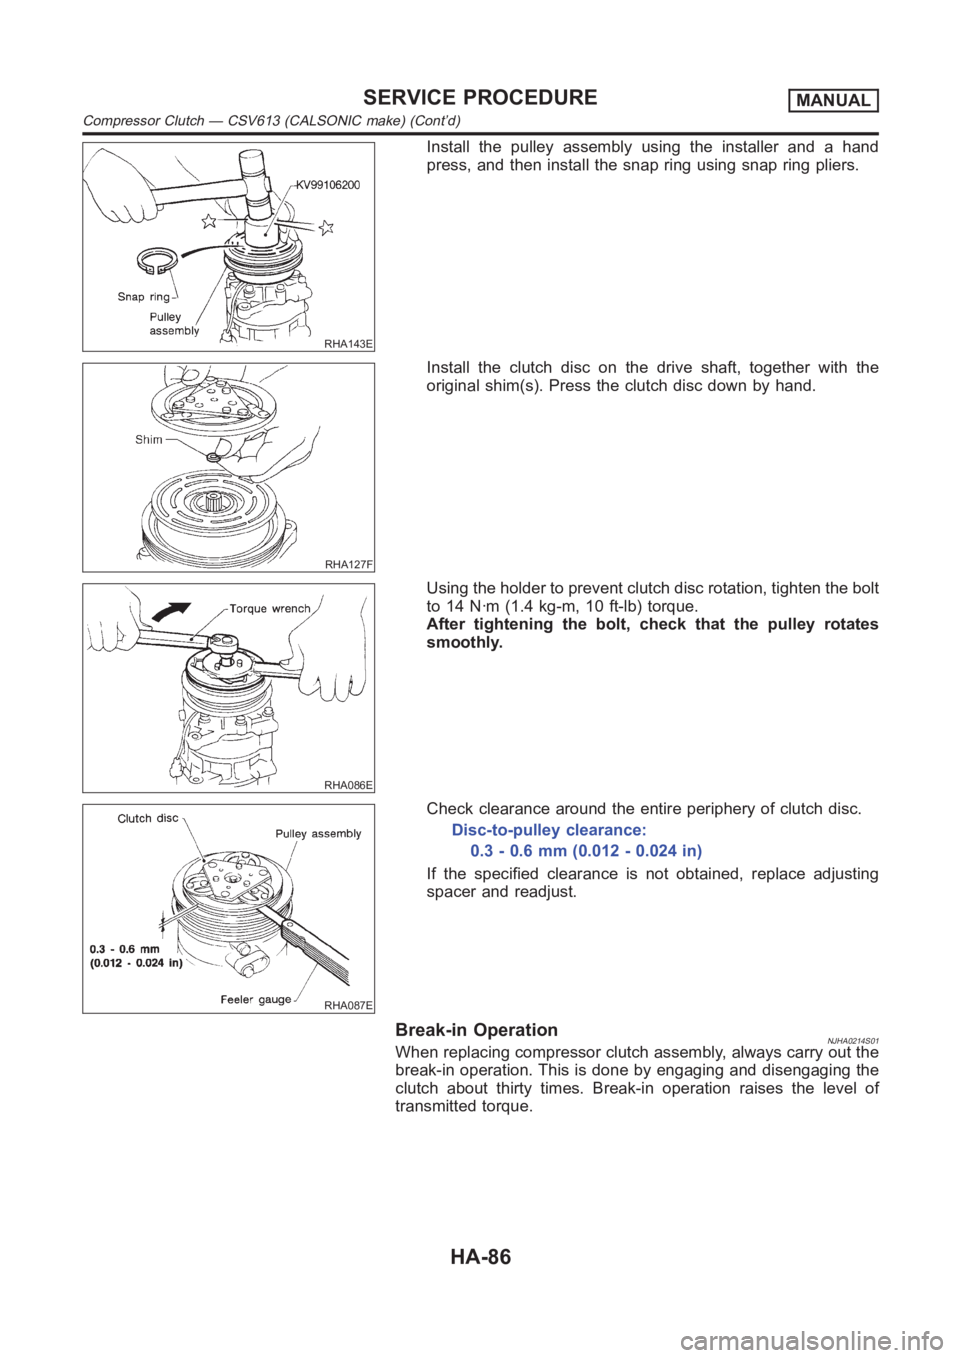
RHA143E
Install the pulley assembly using the installer and a hand
press, and then install the snap ring using snap ring pliers.
RHA127F
Install the clutch disc on the drive shaft, together with the
original shim(s). Press the clutch disc down by hand.
RHA086E
Using the holder to prevent clutch disc rotation, tighten the bolt
to 14 N·m (1.4 kg-m, 10 ft-lb) torque.
After tightening the bolt, check that the pulley rotates
smoothly.
RHA087E
Check clearance around the entire periphery of clutch disc.
Disc-to-pulley clearance:
0.3 - 0.6 mm (0.012 - 0.024 in)
If the specified clearance is not obtained, replace adjusting
spacer and readjust.
Break-in OperationNJHA0214S01When replacing compressor clutch assembly, always carry out the
break-in operation. This is done by engaging and disengaging the
clutch about thirty times. Break-in operation raises the level of
transmitted torque.
SERVICE PROCEDUREMANUAL
Compressor Clutch — CSV613 (CALSONIC make) (Cont’d)
HA-86
Page 3023 of 3189
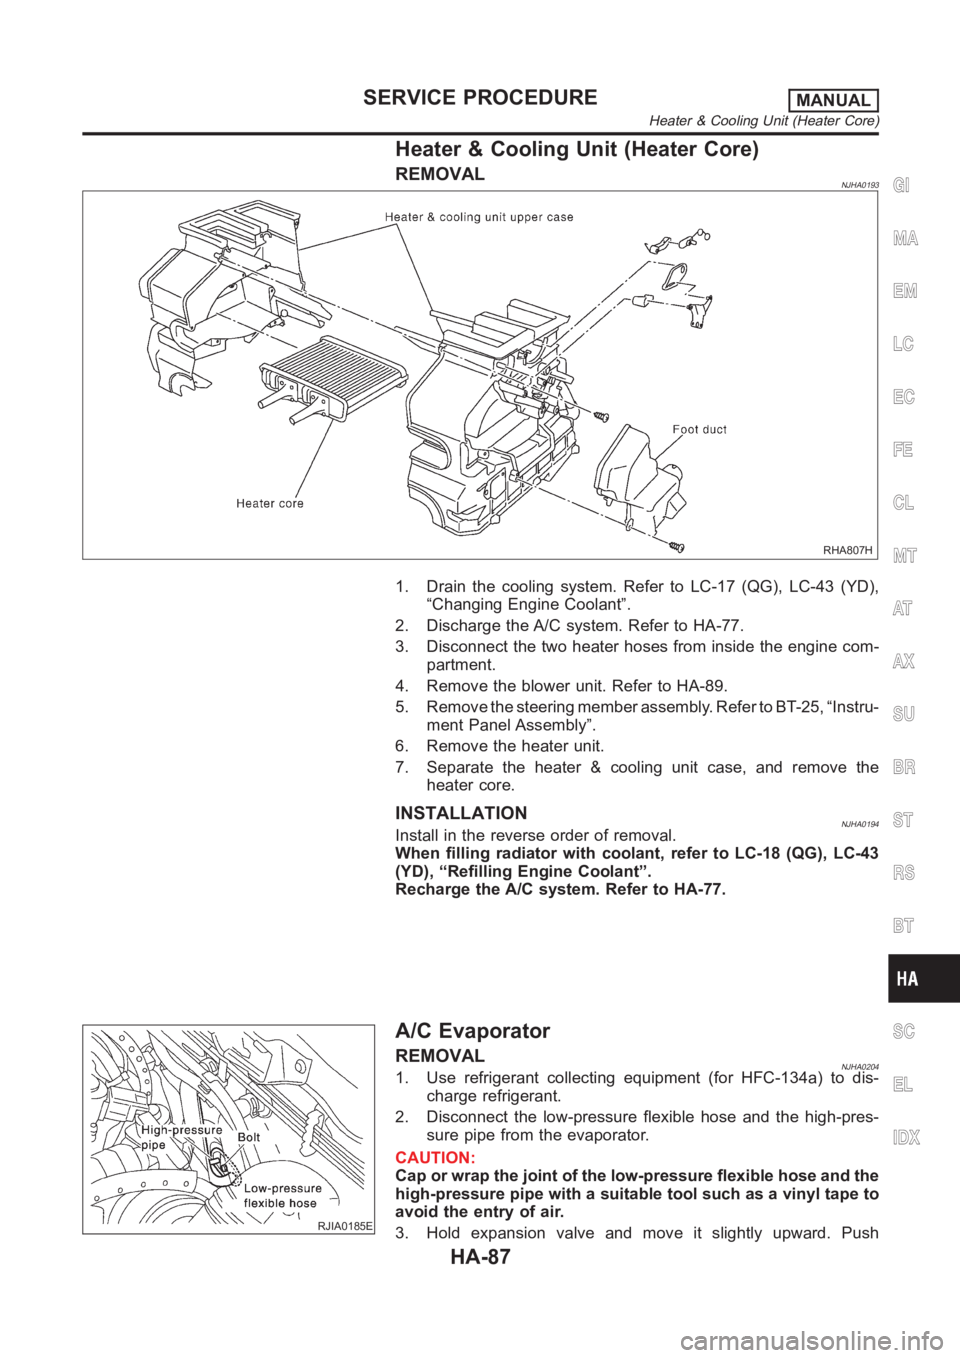
Heater & Cooling Unit (Heater Core)
REMOVALNJHA0193
RHA807H
1. Drain the cooling system. Refer to LC-17 (QG), LC-43 (YD),
“Changing Engine Coolant”.
2. Discharge the A/C system. Refer to HA-77.
3. Disconnect the two heater hoses from inside the engine com-
partment.
4. Remove the blower unit. Refer to HA-89.
5. Remove the steering member assembly. Refer to BT-25, “Instru-
ment Panel Assembly”.
6. Remove the heater unit.
7. Separate the heater & cooling unit case, and remove the
heater core.
INSTALLATIONNJHA0194Install in the reverse order of removal.
When filling radiator with coolant, refer to LC-18 (QG), LC-43
(YD), “Refilling Engine Coolant”.
Recharge the A/C system. Refer to HA-77.
RJIA0185E
A/C Evaporator
REMOVALNJHA02041. Use refrigerant collecting equipment (for HFC-134a) to dis-
charge refrigerant.
2. Disconnect the low-pressure flexible hose and the high-pres-
sure pipe from the evaporator.
CAUTION:
Cap or wrap the joint of the low-pressure flexible hose and the
high-pressure pipe with a suitable tool such as a vinyl tape to
avoid the entry of air.
3. Hold expansion valve and move it slightly upward. Push
GI
MA
EM
LC
EC
FE
CL
MT
AT
AX
SU
BR
ST
RS
BT
SC
EL
IDX
SERVICE PROCEDUREMANUAL
Heater & Cooling Unit (Heater Core)
HA-87
Page 3024 of 3189
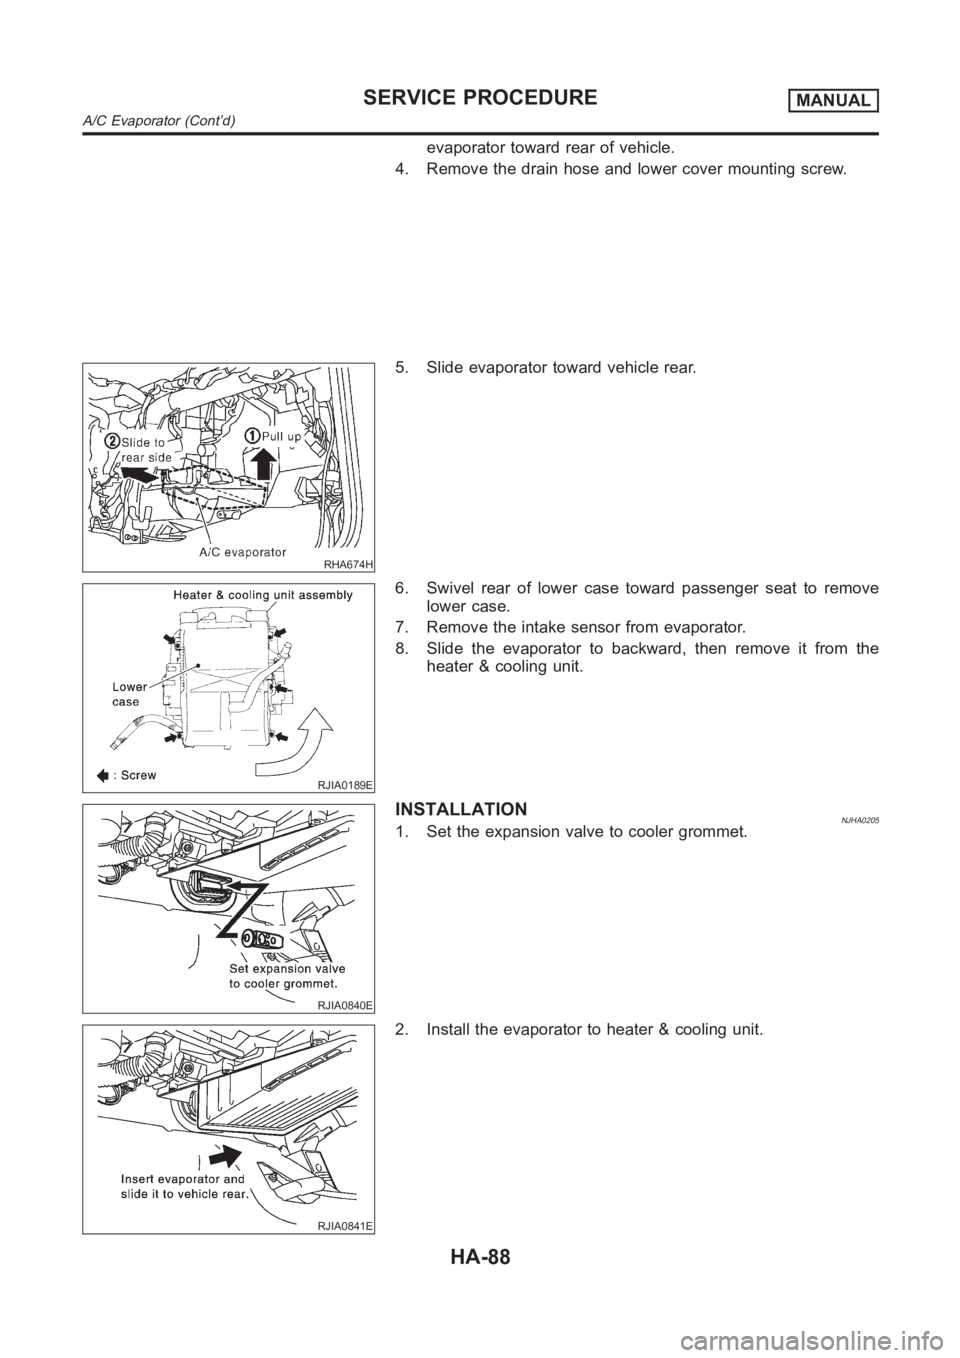
evaporator toward rear of vehicle.
4. Remove the drain hose and lower cover mounting screw.
RHA674H
5. Slide evaporator toward vehicle rear.
RJIA0189E
6. Swivel rear of lower case toward passenger seat to remove
lower case.
7. Remove the intake sensor from evaporator.
8. Slide the evaporator to backward, then remove it from the
heater & cooling unit.
RJIA0840E
INSTALLATIONNJHA02051. Set the expansion valve to cooler grommet.
RJIA0841E
2. Install the evaporator to heater & cooling unit.
SERVICE PROCEDUREMANUAL
A/C Evaporator (Cont’d)
HA-88
Page 3025 of 3189
RJIA0842E
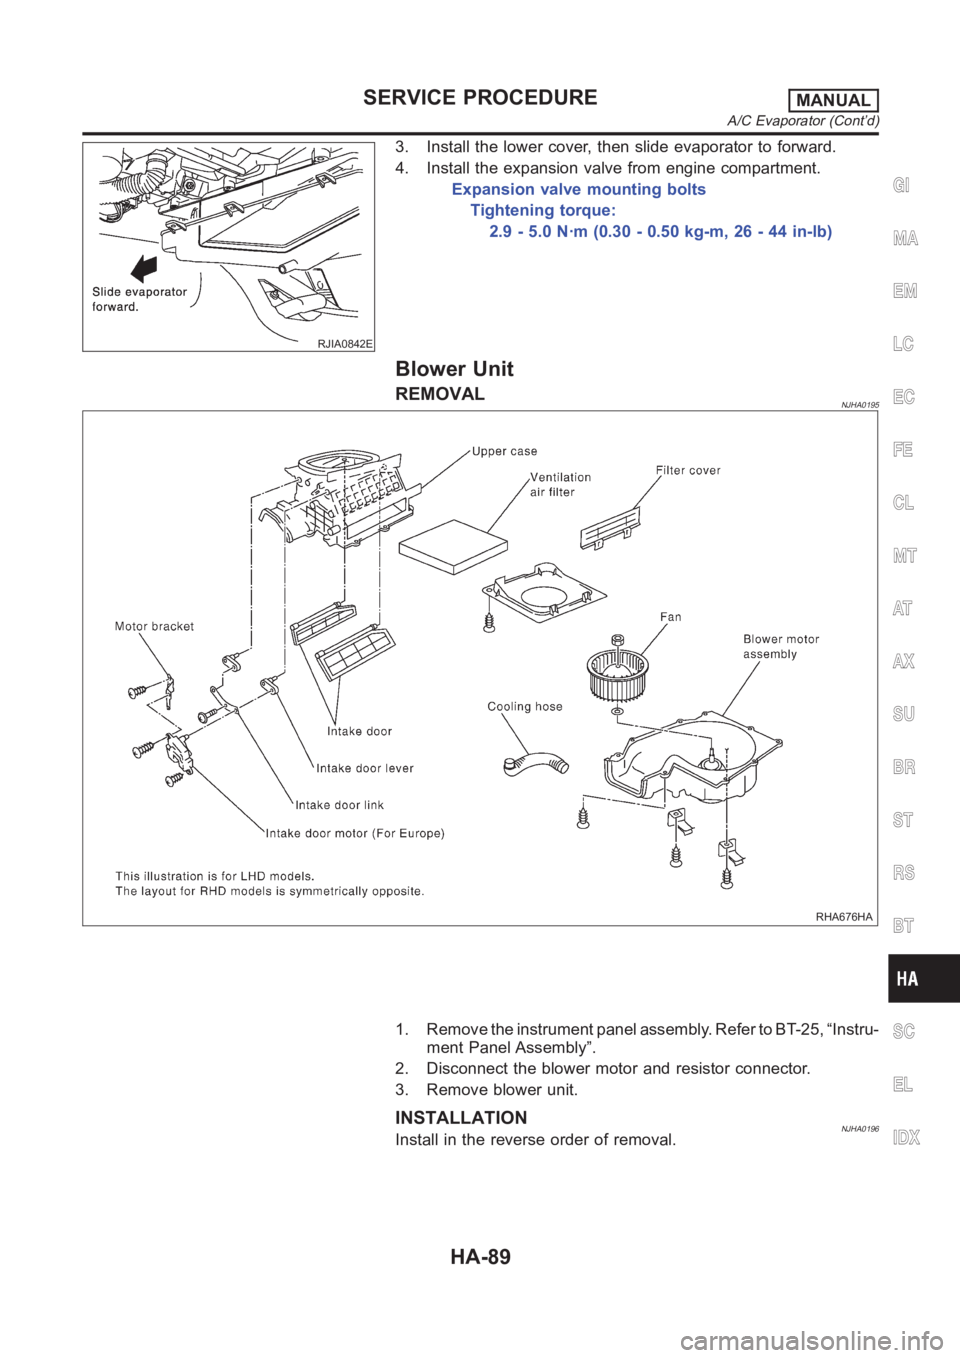
3. Install the lower cover, then slide evaporator to forward.
4. Install the expansion valve from engine compartment.
Expansion valve mounting bolts
Tightening torque:
2.9 - 5.0 N·m (0.30 - 0.50 kg-m, 26 - 44 in-lb)
Blower Unit
REMOVALNJHA0195
RHA676HA
1. Remove the instrument panel assembly. Refer to BT-25, “Instru-
ment Panel Assembly”.
2. Disconnect the blower motor and resistor connector.
3. Remove blower unit.
INSTALLATIONNJHA0196Install in the reverse order of removal.
GI
MA
EM
LC
EC
FE
CL
MT
AT
AX
SU
BR
ST
RS
BT
SC
EL
IDX
SERVICE PROCEDUREMANUAL
A/C Evaporator (Cont’d)
HA-89
Page 3026 of 3189
Refrigerant Lines
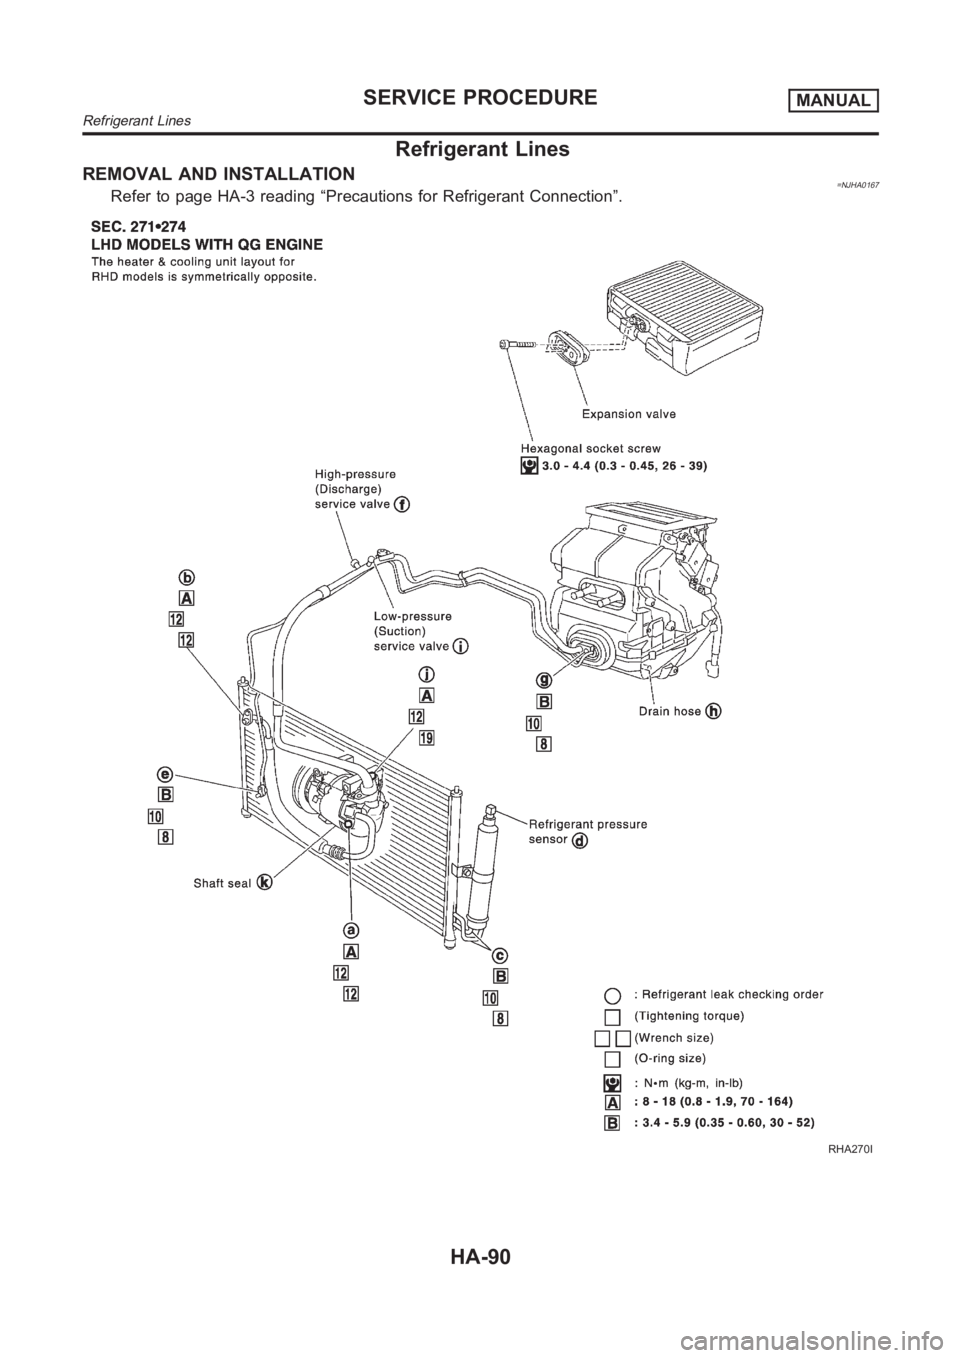
REMOVAL AND INSTALLATION=NJHA0167Refer to page HA-3 reading “Precautions for Refrigerant Connection”.
RHA270I
SERVICE PROCEDUREMANUAL
Refrigerant Lines
HA-90
Page 3027 of 3189
RHA271I
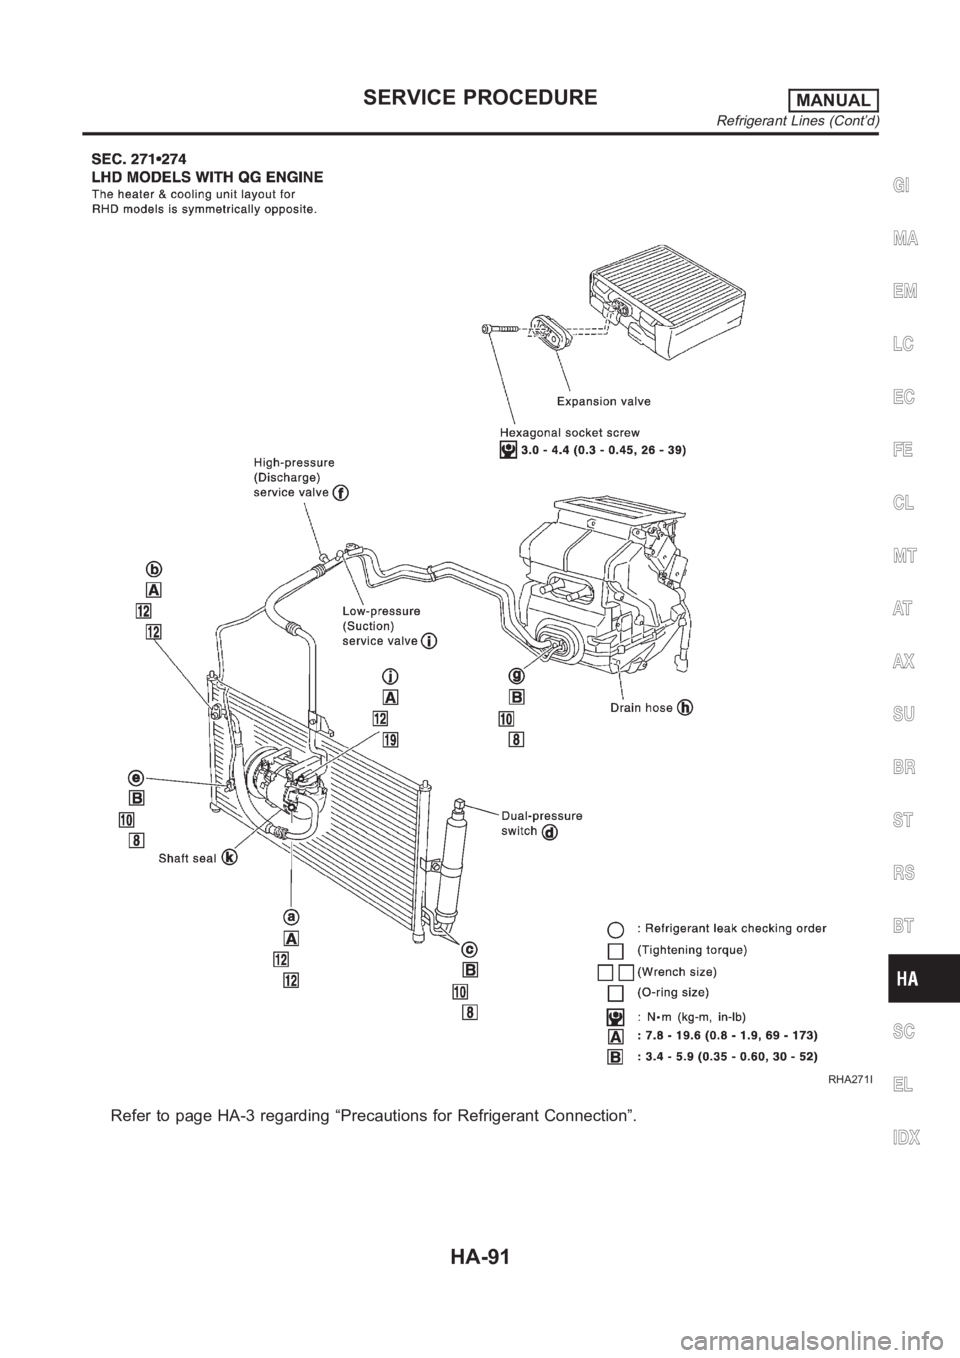
Refer to page HA-3 regarding “Precautions for Refrigerant Connection”.
GI
MA
EM
LC
EC
FE
CL
MT
AT
AX
SU
BR
ST
RS
BT
SC
EL
IDX
SERVICE PROCEDUREMANUAL
Refrigerant Lines (Cont’d)
HA-91
Page 3028 of 3189
CHECKING REFRIGERANT LEAKS=NJHA0168Preliminary CheckNJHA0168S01Perform a visual inspection of all refrigeration parts, fittings, hoses,
and components for signs of A/C lubricant leakage, damage and
corrosion. Take note of the areas with A/C lubricant leakage to
allow extra time in these areas with electronic leak detector.
SHA705EB
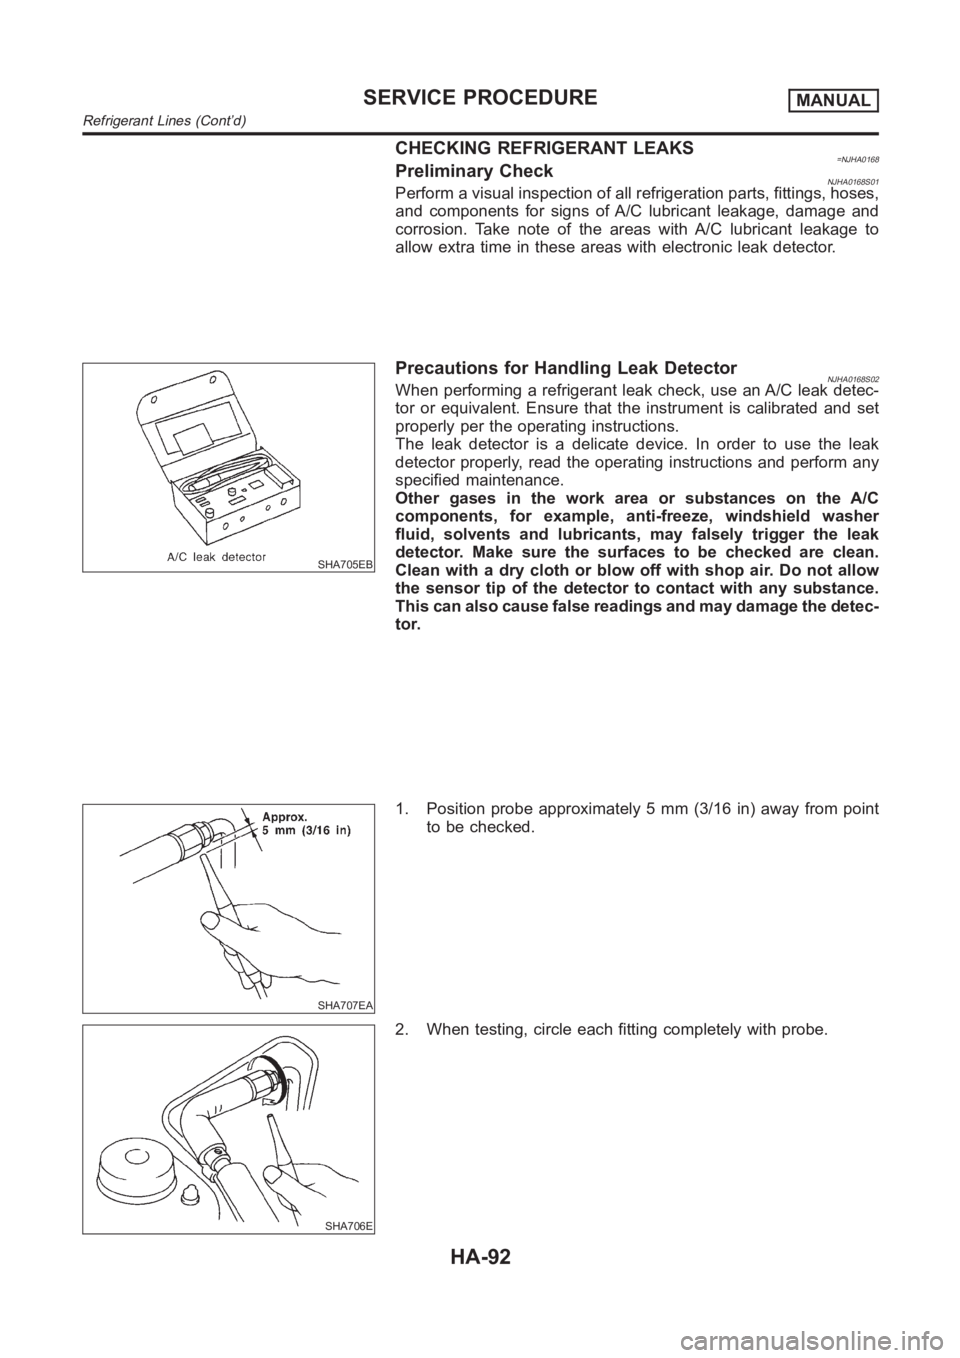
Precautions for Handling Leak DetectorNJHA0168S02When performing a refrigerant leak check, use an A/C leak detec-
tor or equivalent. Ensure that the instrument is calibrated and set
properly per the operating instructions.
The leak detector is a delicate device. In order to use the leak
detector properly, read the operating instructions and perform any
specified maintenance.
Other gases in the work area or substances on the A/C
components, for example, anti-freeze, windshield washer
fluid, solvents and lubricants, may falsely trigger the leak
detector. Make sure the surfaces to be checked are clean.
Clean with a dry cloth or blow off with shop air. Do not allow
the sensor tip of the detector to contact with any substance.
This can also cause false readings and may damage the detec-
tor.
SHA707EA
1. Position probe approximately 5 mm (3/16 in) away from point
to be checked.
SHA706E
2. When testing, circle each fitting completely with probe.
SERVICE PROCEDUREMANUAL
Refrigerant Lines (Cont’d)
HA-92
Page 3029 of 3189
SHA708EA
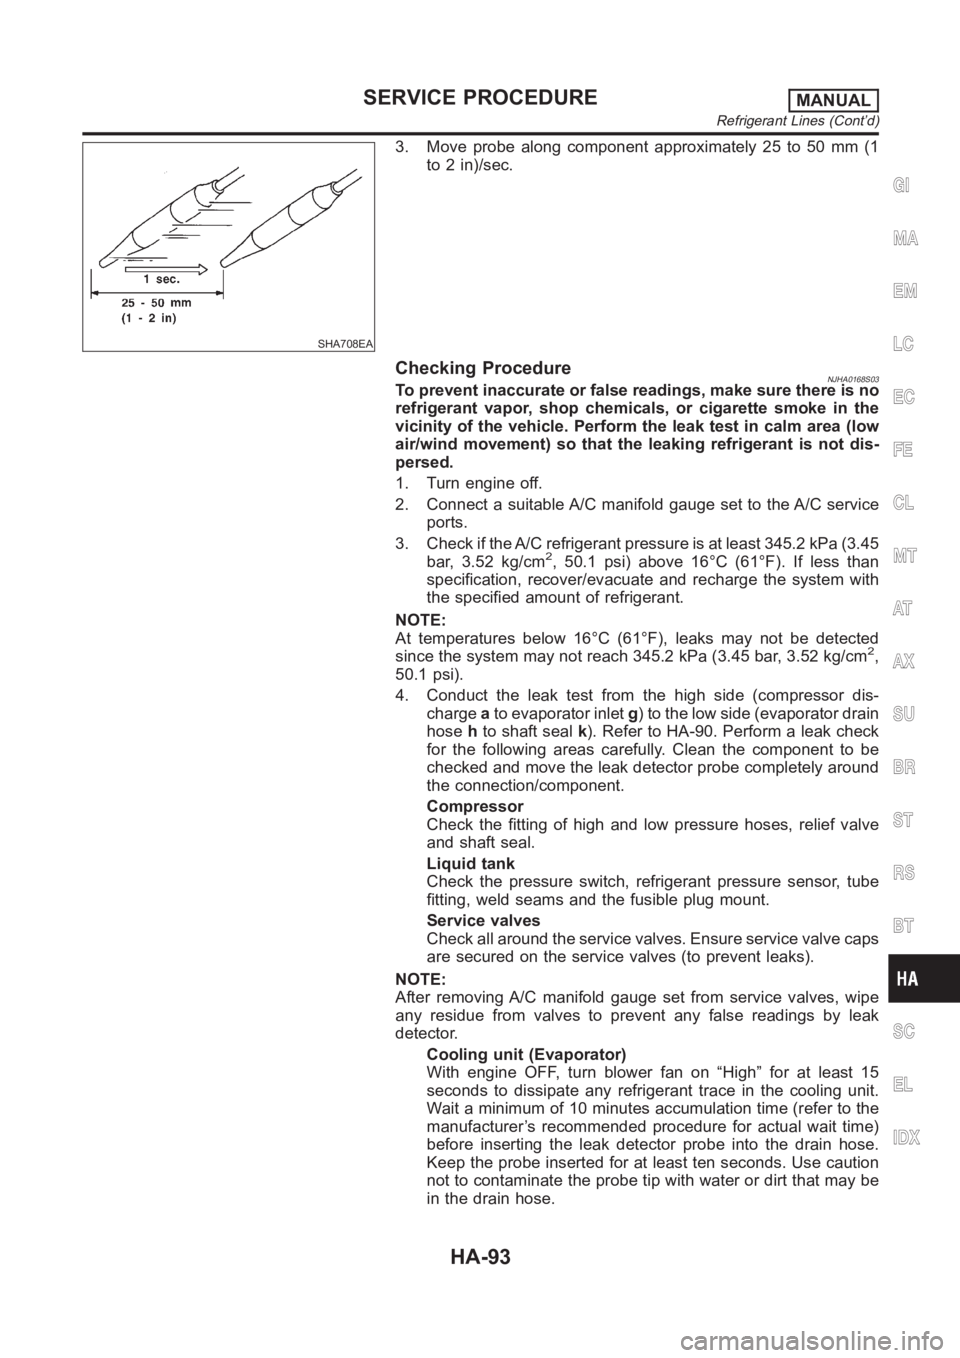
3. Move probe along component approximately 25 to 50 mm (1
to 2 in)/sec.
Checking ProcedureNJHA0168S03To prevent inaccurate or false readings, make sure there is no
refrigerant vapor, shop chemicals, or cigarette smoke in the
vicinity of the vehicle. Perform the leak test in calm area (low
air/wind movement) so that the leaking refrigerant is not dis-
persed.
1. Turn engine off.
2. Connect a suitable A/C manifold gauge set to the A/C service
ports.
3. Check if the A/C refrigerant pressure is at least 345.2 kPa (3.45
bar, 3.52 kg/cm
2, 50.1 psi) above 16°C (61°F). If less than
specification, recover/evacuate and recharge the system with
the specified amount of refrigerant.
NOTE:
At temperatures below 16°C (61°F), leaks may not be detected
since the system may not reach 345.2 kPa (3.45 bar, 3.52 kg/cm
2,
50.1 psi).
4. Conduct the leak test from the high side (compressor dis-
chargeato evaporator inletg) to the low side (evaporator drain
hosehto shaft sealk). Refer to HA-90. Perform a leak check
for the following areas carefully. Clean the component to be
checked and move the leak detector probe completely around
the connection/component.
Compressor
Check the fitting of high and low pressure hoses, relief valve
and shaft seal.
Liquid tank
Check the pressure switch, refrigerant pressure sensor, tube
fitting, weld seams and the fusible plug mount.
Service valves
Check all around the service valves. Ensure service valve caps
are secured on the service valves (to prevent leaks).
NOTE:
After removing A/C manifold gauge set from service valves, wipe
any residue from valves to prevent any false readings by leak
detector.
Cooling unit (Evaporator)
With engine OFF, turn blower fan on “High” for at least 15
seconds to dissipate any refrigerant trace in the cooling unit.
Wait a minimum of 10 minutes accumulation time (refer to the
manufacturer’s recommended procedure for actual wait time)
before inserting the leak detector probe into the drain hose.
Keep the probe inserted for at least ten seconds. Use caution
not to contaminate the probe tip with water or dirt that may be
in the drain hose.
GI
MA
EM
LC
EC
FE
CL
MT
AT
AX
SU
BR
ST
RS
BT
SC
EL
IDX
SERVICE PROCEDUREMANUAL
Refrigerant Lines (Cont’d)
HA-93
Page 3030 of 3189
5. If a leak detector detects a leak, verify at least once by blow-
ing compressed air into area of suspected leak, then repeat
check as outlined above.
6. Do not stop when one leak is found. Continue to check for
additional leaks at all system components.
If no leaks are found, perform steps 7 - 10.
7. Start engine.
8. Set the heater A/C control as follows:
1) A/C switch ON.
2) Face mode
3) Recirculation position
4) Max cold temperature
5) Fan speed high
9. Run engine at 1,500 rpm for at least 2 minutes.
10. Turn engine off and perform leak check again following steps
4 through 6 above.
SHA839E
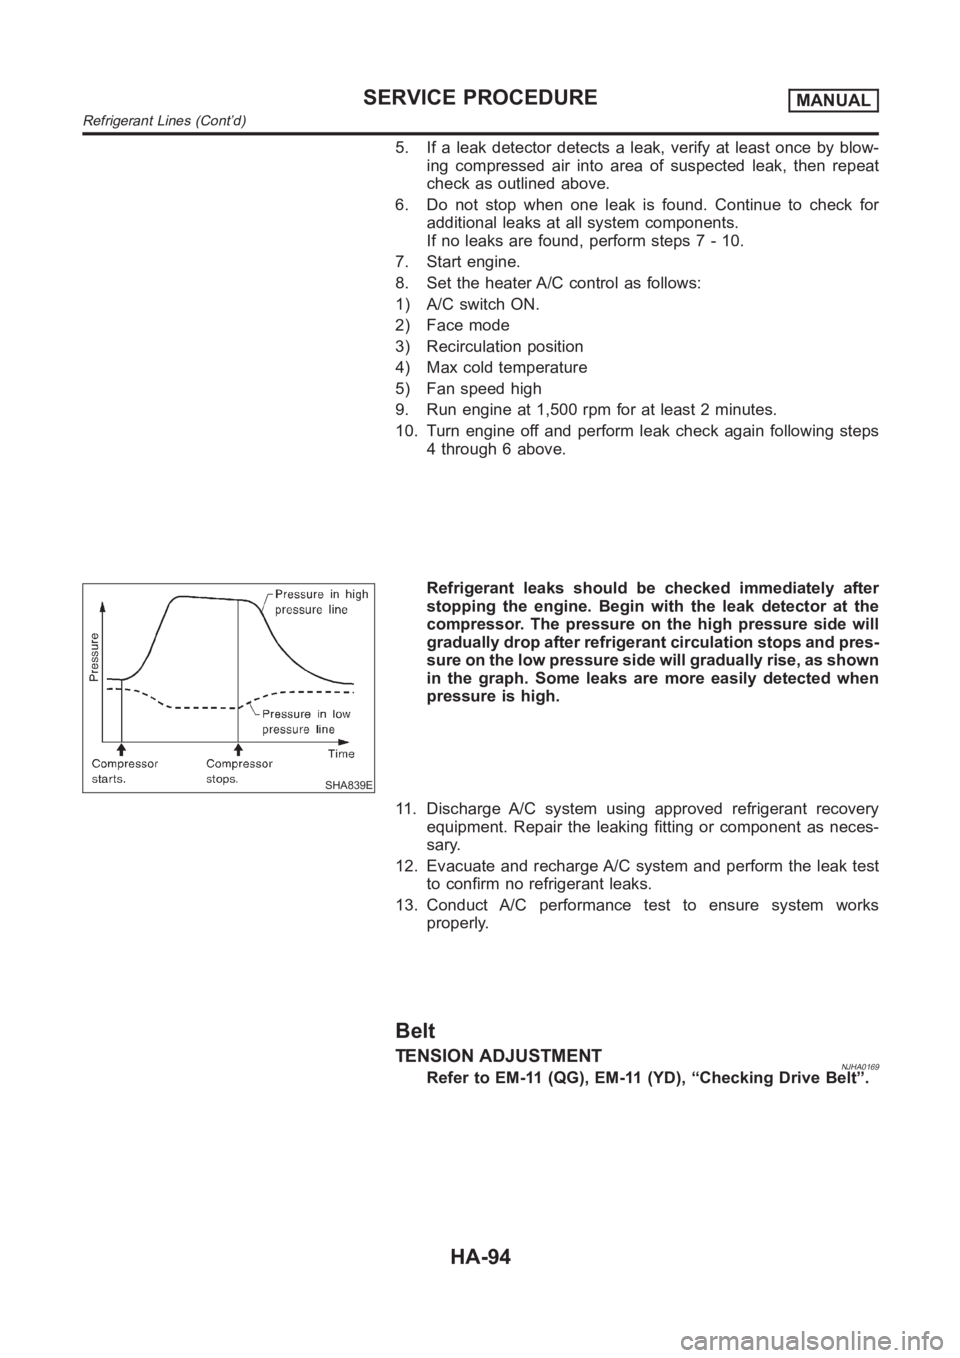
Refrigerant leaks should be checked immediately after
stopping the engine. Begin with the leak detector at the
compressor. The pressure on the high pressure side will
gradually drop after refrigerant circulation stops and pres-
sure on the low pressure side will gradually rise, as shown
in the graph. Some leaks are more easily detected when
pressure is high.
11. Discharge A/C system using approved refrigerant recovery
equipment. Repair the leaking fitting or component as neces-
sary.
12. Evacuate and recharge A/C system and perform the leak test
to confirm no refrigerant leaks.
13. Conduct A/C performance test to ensure system works
properly.
Belt
TENSION ADJUSTMENTNJHA0169Refer to EM-11 (QG), EM-11 (YD), “Checking Drive Belt”.
SERVICE PROCEDUREMANUAL
Refrigerant Lines (Cont’d)
HA-94