NISSAN ALMERA N16 2003 Electronic Repair Manual
Manufacturer: NISSAN, Model Year: 2003, Model line: ALMERA N16, Model: NISSAN ALMERA N16 2003Pages: 3189, PDF Size: 54.76 MB
Page 3061 of 3189
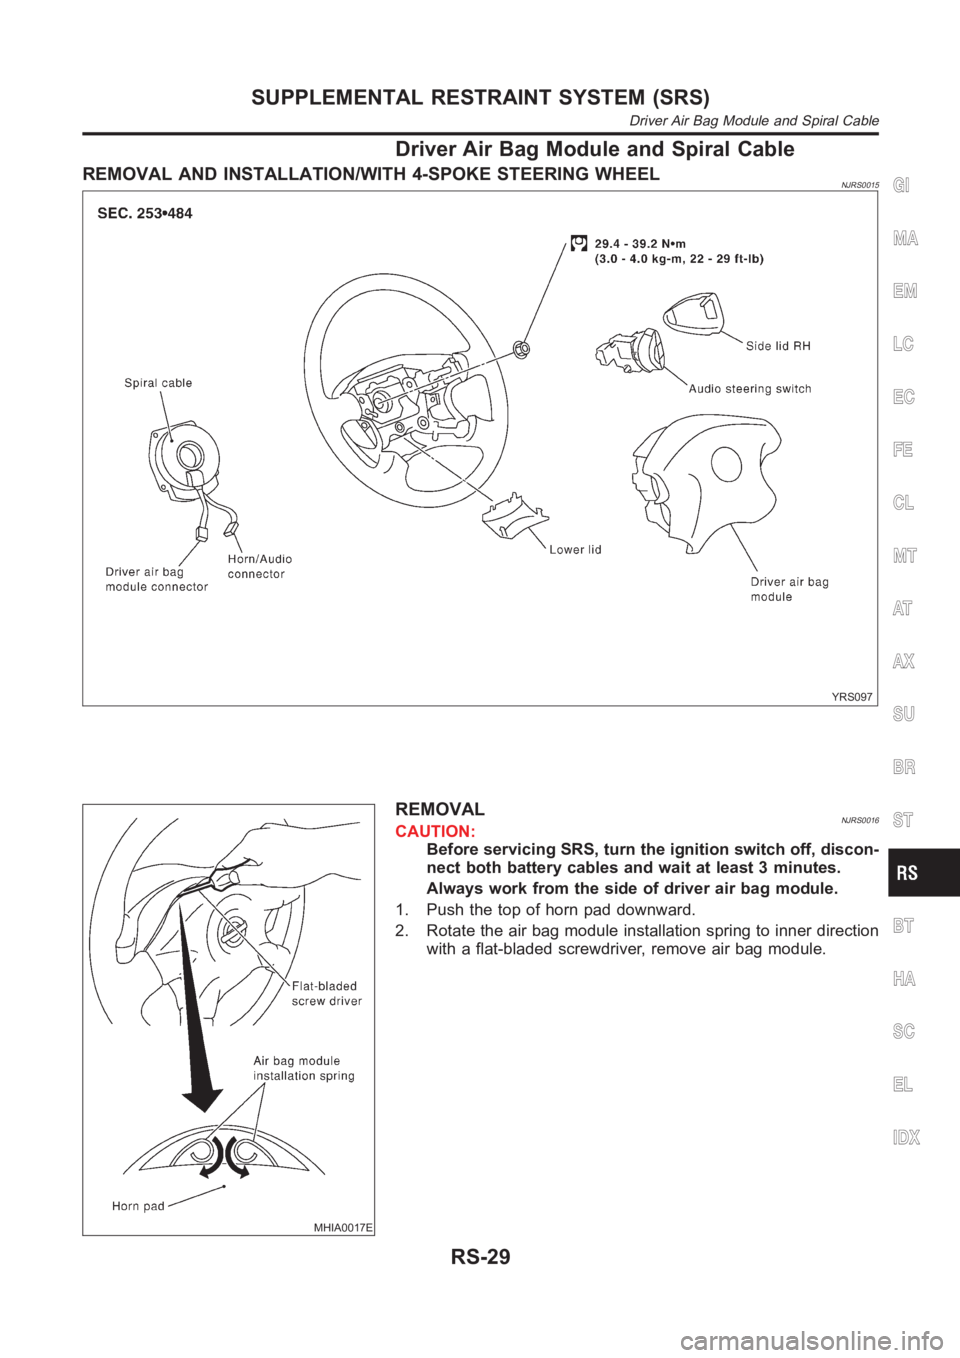
Driver Air Bag Module and Spiral Cable
REMOVAL AND INSTALLATION/WITH 4-SPOKE STEERING WHEELNJRS0015
YRS097
MHIA0017E
REMOVALNJRS0016CAUTION:
Before servicing SRS, turn the ignition switch off, discon-
nect both battery cables and wait at least 3 minutes.
Always work from the side of driver air bag module.
1. Push the top of horn pad downward.
2. Rotate the air bag module installation spring to inner direction
with a flat-bladed screwdriver, remove air bag module.
GI
MA
EM
LC
EC
FE
CL
MT
AT
AX
SU
BR
ST
BT
HA
SC
EL
IDX
SUPPLEMENTAL RESTRAINT SYSTEM (SRS)
Driver Air Bag Module and Spiral Cable
RS-29
Page 3062 of 3189
SHIA0239E
SRS443
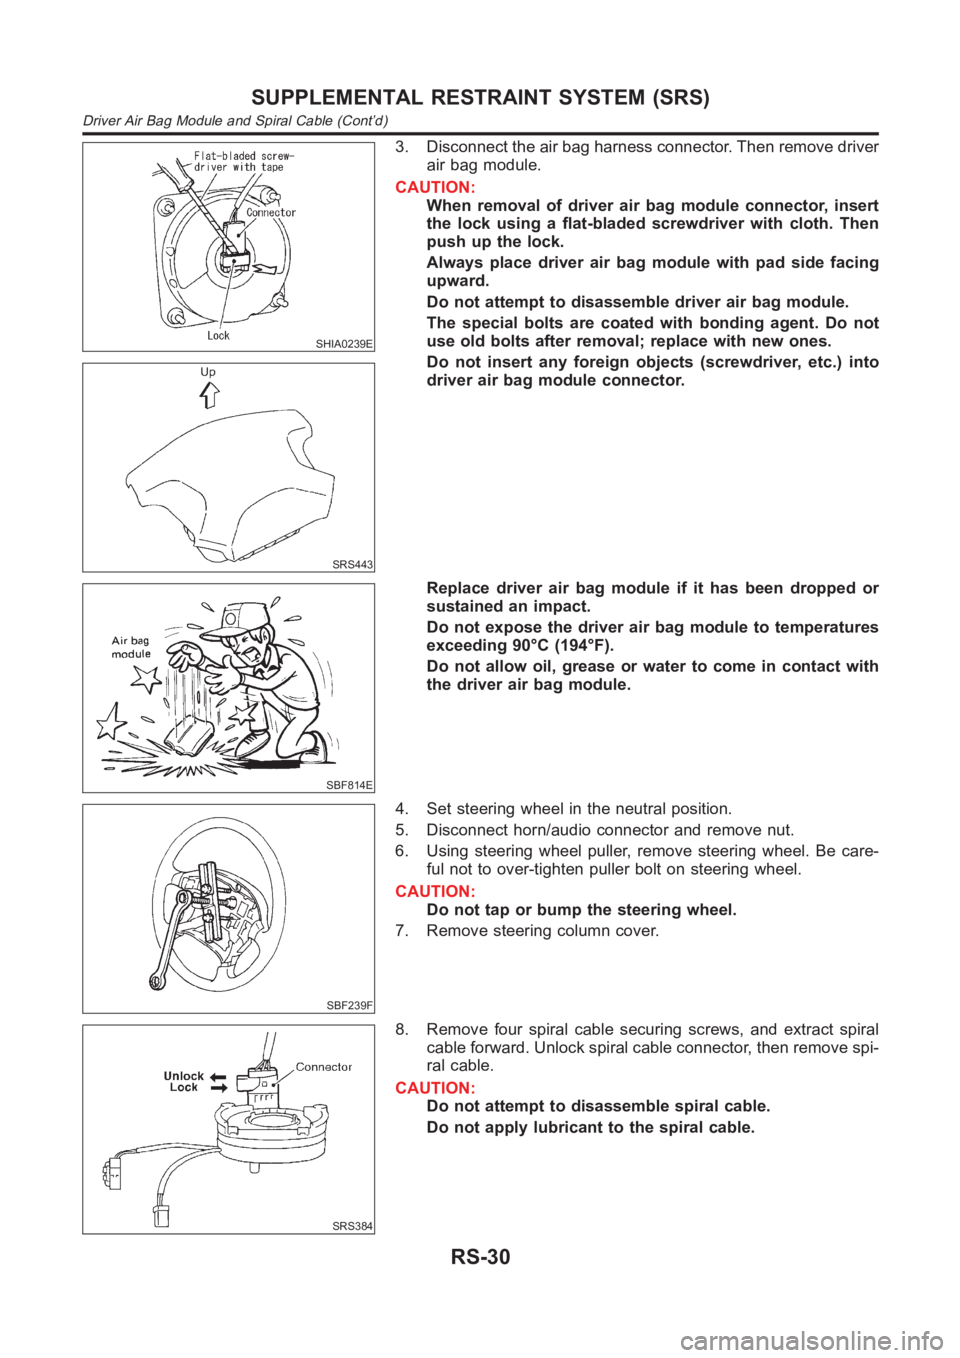
3. Disconnect the air bag harness connector. Then remove driver
air bag module.
CAUTION:
When removal of driver air bag module connector, insert
the lock using a flat-bladed screwdriver with cloth. Then
push up the lock.
Always place driver air bag module with pad side facing
upward.
Do not attempt to disassemble driver air bag module.
The special bolts are coated with bonding agent. Do not
use old bolts after removal; replace with new ones.
Do not insert any foreign objects (screwdriver, etc.) into
driver air bag module connector.
SBF814E
Replace driver air bag module if it has been dropped or
sustained an impact.
Do not expose the driver air bag module to temperatures
exceeding 90°C (194°F).
Do not allow oil, grease or water to come in contact with
the driver air bag module.
SBF239F
4. Set steering wheel in the neutral position.
5. Disconnect horn/audio connector and remove nut.
6. Using steering wheel puller, remove steering wheel. Be care-
ful not to over-tighten puller bolt on steering wheel.
CAUTION:
Do not tap or bump the steering wheel.
7. Remove steering column cover.
SRS384
8. Remove four spiral cable securing screws, and extract spiral
cable forward. Unlock spiral cable connector, then remove spi-
ral cable.
CAUTION:
Do not attempt to disassemble spiral cable.
Do not apply lubricant to the spiral cable.
SUPPLEMENTAL RESTRAINT SYSTEM (SRS)
Driver Air Bag Module and Spiral Cable (Cont’d)
RS-30
Page 3063 of 3189
NRS121
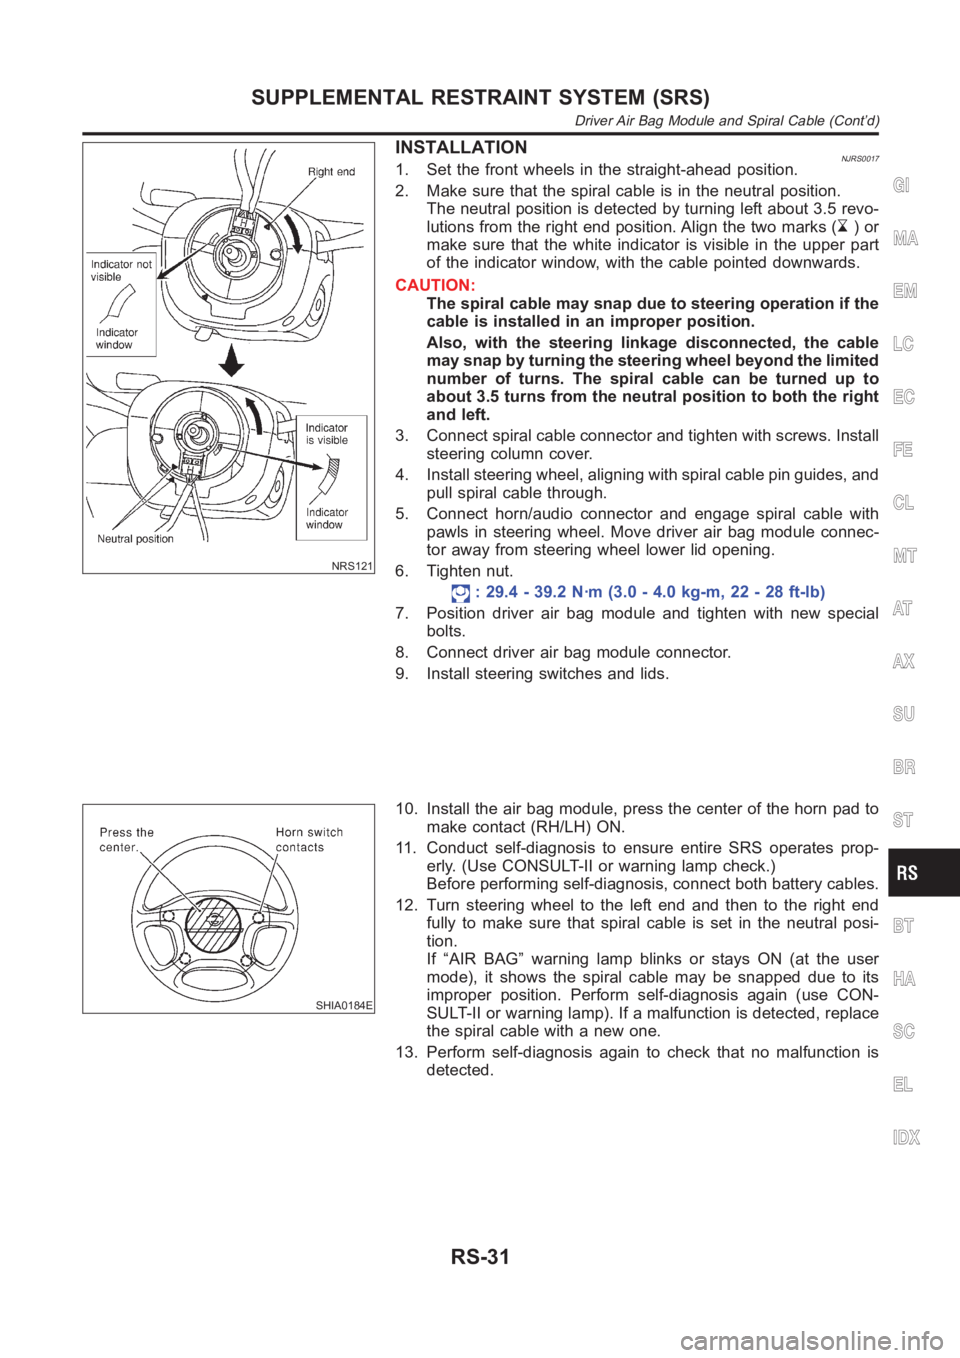
INSTALLATIONNJRS00171. Set the front wheels in the straight-ahead position.
2. Make sure that the spiral cable is in the neutral position.
The neutral position is detected by turning left about 3.5 revo-
lutions from the right end position. Align the two marks (
)or
make sure that the white indicator is visible in the upper part
of the indicator window, with the cable pointed downwards.
CAUTION:
The spiral cable may snap due to steering operation if the
cable is installed in an improper position.
Also, with the steering linkage disconnected, the cable
may snap by turning the steering wheel beyond the limited
number of turns. The spiral cable can be turned up to
about 3.5 turns from the neutral position to both the right
and left.
3. Connect spiral cable connector and tighten with screws. Install
steering column cover.
4. Install steering wheel, aligning with spiral cable pin guides, and
pull spiral cable through.
5. Connect horn/audio connector and engage spiral cable with
pawls in steering wheel. Move driver air bag module connec-
tor away from steering wheel lower lid opening.
6. Tighten nut.
: 29.4 - 39.2 N·m (3.0 - 4.0 kg-m, 22 - 28 ft-lb)
7. Position driver air bag module and tighten with new special
bolts.
8. Connect driver air bag module connector.
9. Install steering switches and lids.
SHIA0184E
10. Install the air bag module, press the center of the horn pad to
make contact (RH/LH) ON.
11. Conduct self-diagnosis to ensure entire SRS operates prop-
erly. (Use CONSULT-II or warning lamp check.)
Before performing self-diagnosis, connect both battery cables.
12. Turn steering wheel to the left end and then to the right end
fully to make sure that spiral cable is set in the neutral posi-
tion.
If “AIR BAG” warning lamp blinks or stays ON (at the user
mode), it shows the spiral cable may be snapped due to its
improper position. Perform self-diagnosis again (use CON-
SULT-II or warning lamp). If a malfunction is detected, replace
the spiral cable with a new one.
13. Perform self-diagnosis again to check that no malfunction is
detected.
GI
MA
EM
LC
EC
FE
CL
MT
AT
AX
SU
BR
ST
BT
HA
SC
EL
IDX
SUPPLEMENTAL RESTRAINT SYSTEM (SRS)
Driver Air Bag Module and Spiral Cable (Cont’d)
RS-31
Page 3064 of 3189
SRS824
Front Passenger Air Bag Module
REMOVALNJRS0018CAUTION:
Before servicing SRS, turn the ignition switch off, discon-
nect both battery cables and wait for at least 3 minutes.
Always work from the side of or under front passenger air
bag module.
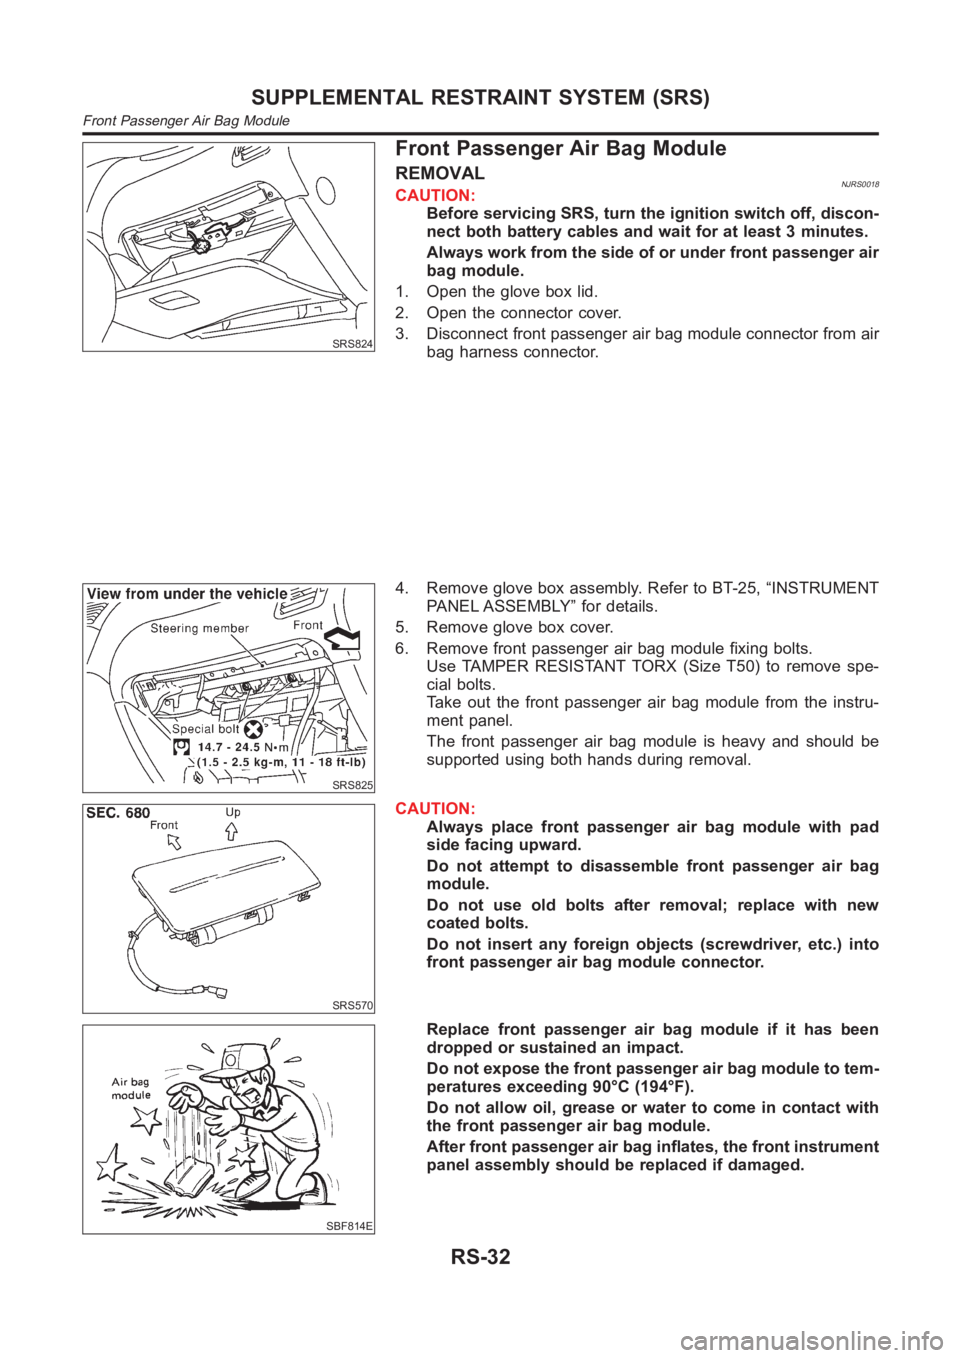
1. Open the glove box lid.
2. Open the connector cover.
3. Disconnect front passenger air bag module connector from air
bag harness connector.
SRS825
4. Remove glove box assembly. Refer to BT-25, “INSTRUMENT
PANEL ASSEMBLY” for details.
5. Remove glove box cover.
6. Remove front passenger air bag module fixing bolts.
Use TAMPER RESISTANT TORX (Size T50) to remove spe-
cial bolts.
Take out the front passenger air bag module from the instru-
ment panel.
The front passenger air bag module is heavy and should be
supported using both hands during removal.
SRS570
CAUTION:
Always place front passenger air bag module with pad
side facing upward.
Do not attempt to disassemble front passenger air bag
module.
Do not use old bolts after removal; replace with new
coated bolts.
Do not insert any foreign objects (screwdriver, etc.) into
front passenger air bag module connector.
SBF814E
Replace front passenger air bag module if it has been
dropped or sustained an impact.
Do not expose the front passenger air bag module to tem-
peratures exceeding 90°C (194°F).
Do not allow oil, grease or water to come in contact with
the front passenger air bag module.
After front passenger air bag inflates, the front instrument
panel assembly should be replaced if damaged.
SUPPLEMENTAL RESTRAINT SYSTEM (SRS)
Front Passenger Air Bag Module
RS-32
Page 3065 of 3189
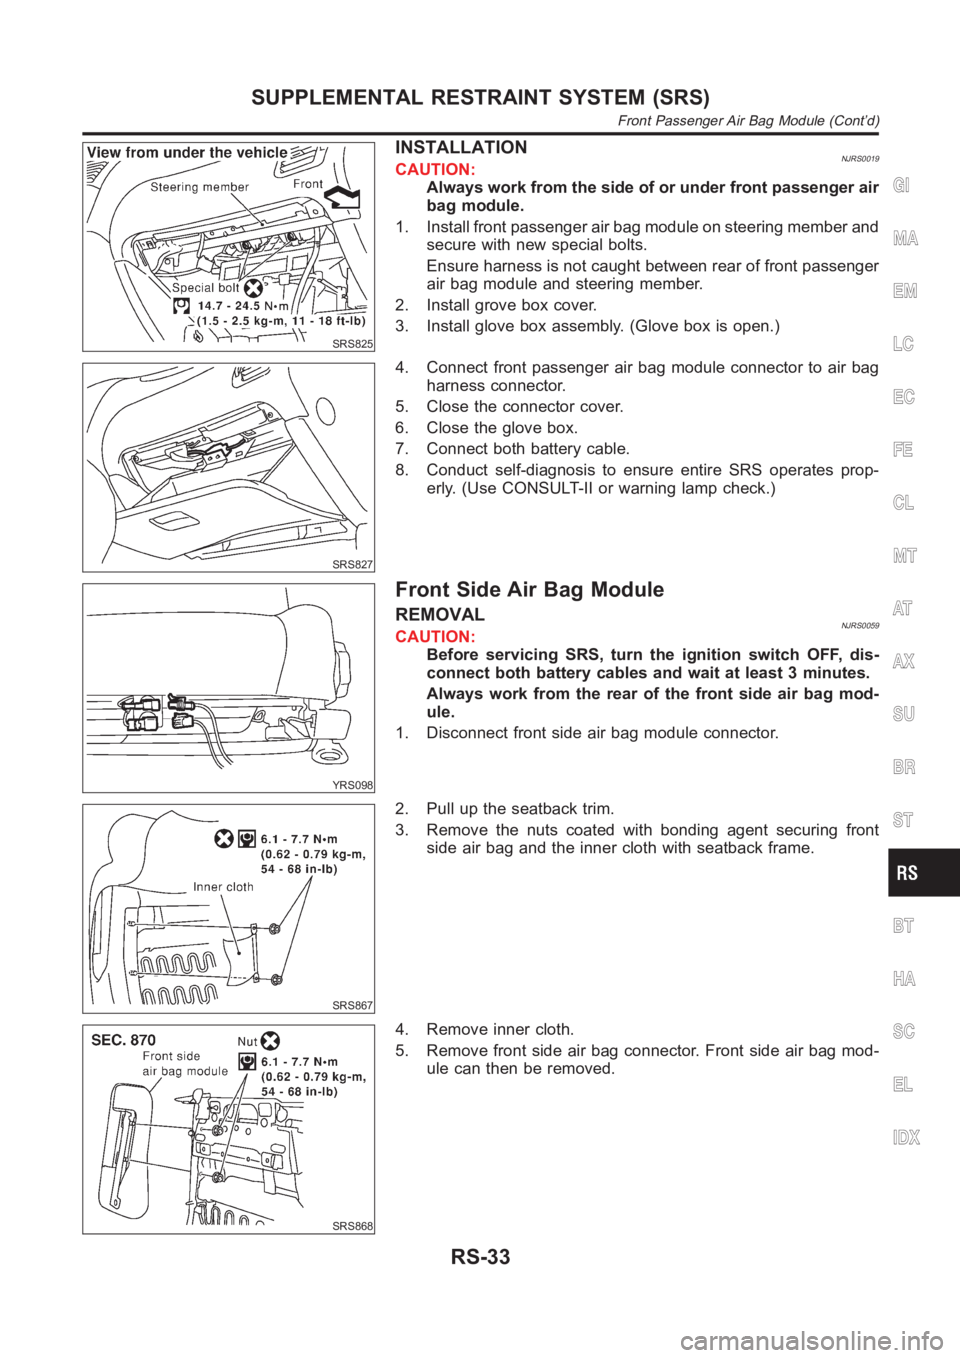
SRS825
INSTALLATIONNJRS0019CAUTION:
Always work from the side of or under front passenger air
bag module.
1. Install front passenger air bag module on steering member and
secure with new special bolts.
Ensure harness is not caught between rear of front passenger
air bag module and steering member.
2. Install grove box cover.
3. Install glove box assembly. (Glove box is open.)
SRS827
4. Connect front passenger air bag module connector to air bag
harness connector.
5. Close the connector cover.
6. Close the glove box.
7. Connect both battery cable.
8. Conduct self-diagnosis to ensure entire SRS operates prop-
erly. (Use CONSULT-II or warning lamp check.)
YRS098
Front Side Air Bag Module
REMOVALNJRS0059CAUTION:
Before servicing SRS, turn the ignition switch OFF, dis-
connect both battery cables and wait at least 3 minutes.
Always work from the rear of the front side air bag mod-
ule.
1. Disconnect front side air bag module connector.
SRS867
2. Pull up the seatback trim.
3. Remove the nuts coated with bonding agent securing front
side air bag and the inner cloth with seatback frame.
SRS868
4. Remove inner cloth.
5. Remove front side air bag connector. Front side air bag mod-
ule can then be removed.
GI
MA
EM
LC
EC
FE
CL
MT
AT
AX
SU
BR
ST
BT
HA
SC
EL
IDX
SUPPLEMENTAL RESTRAINT SYSTEM (SRS)
Front Passenger Air Bag Module (Cont’d)
RS-33
Page 3066 of 3189
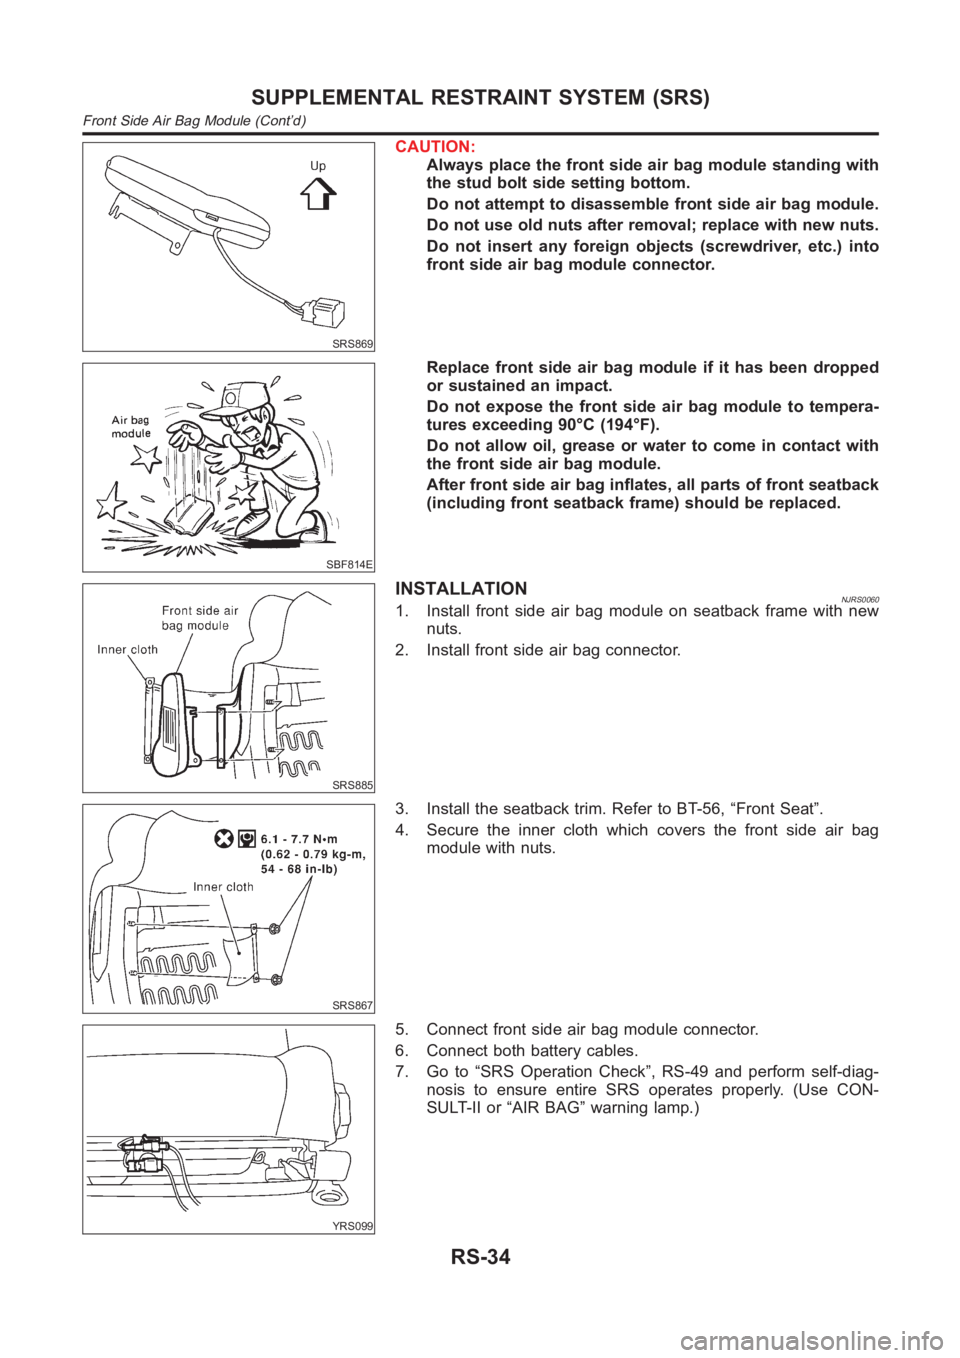
SRS869
CAUTION:
Always place the front side air bag module standing with
the stud bolt side setting bottom.
Do not attempt to disassemble front side air bag module.
Do not use old nuts after removal; replace with new nuts.
Do not insert any foreign objects (screwdriver, etc.) into
front side air bag module connector.
SBF814E
Replace front side air bag module if it has been dropped
or sustained an impact.
Do not expose the front side air bag module to tempera-
tures exceeding 90°C (194°F).
Do not allow oil, grease or water to come in contact with
the front side air bag module.
After front side air bag inflates, all parts of front seatback
(including front seatback frame) should be replaced.
SRS885
INSTALLATIONNJRS00601. Install front side air bag module on seatback frame with new
nuts.
2. Install front side air bag connector.
SRS867
3. Install the seatback trim. Refer to BT-56, “Front Seat”.
4. Secure the inner cloth which covers the front side air bag
module with nuts.
YRS099
5. Connect front side air bag module connector.
6. Connect both battery cables.
7. Go to “SRS Operation Check”, RS-49 and perform self-diag-
nosis to ensure entire SRS operates properly. (Use CON-
SULT-II or “AIR BAG” warning lamp.)
SUPPLEMENTAL RESTRAINT SYSTEM (SRS)
Front Side Air Bag Module (Cont’d)
RS-34
Page 3067 of 3189
Disposal of Air Bag Module and Seat Belt Pre-
tensioner
NJRS0022Before disposing of air bag module and seat belt pre-tensioner,
or vehicles equipped with such systems, deploy the systems.
If such systems have already been deployed due to an
accident, dispose of them as indicated in “DISPOSING OF AIR
BAG MODULE AND SEAT BELT PRE-TENSIONER” (RS-40).
When deploying the air bag module and seat belt pre-
tensioner, always use the Special Service Tool; Deployment
tool KV99106400.
When deploying the air bag module and seat belt pre-
tensioner, stand at least 5 m (16 ft) away from the deployment
component.
When deploying air bag module and seat belt pre-tensioner, a
fairly loud noise is made, followed by smoke being released.
The smoke is not poisonous, however, be careful not to inhale
smoke since it irritates the throat and can cause choking.
Always activate one air bag module at a time.
Due to heat, leave air bag module unattended for more than
30 minutes after deployment. Also leave seat belt pre-ten-
sioner unattended for move than 10 minutes after deployment.
Be sure to wear gloves when handling a deployed air bag
module and seat belt pre-tensioner.
Never apply water to the deployed air bag module and seat
belt pre-tensioner.
Wash your hands clean after finishing work.
Place the vehicle outdoors with an open space of at least 6 m
(20 ft) on all sides when deploying air bag module and seat belt
pre-tensioner while mounted in vehicle.
Use a voltmeter to make sure the vehicle battery is fully
charged.
Do not dispose of the air bag module and seat belt pre-ten-
sioner un-deployed.
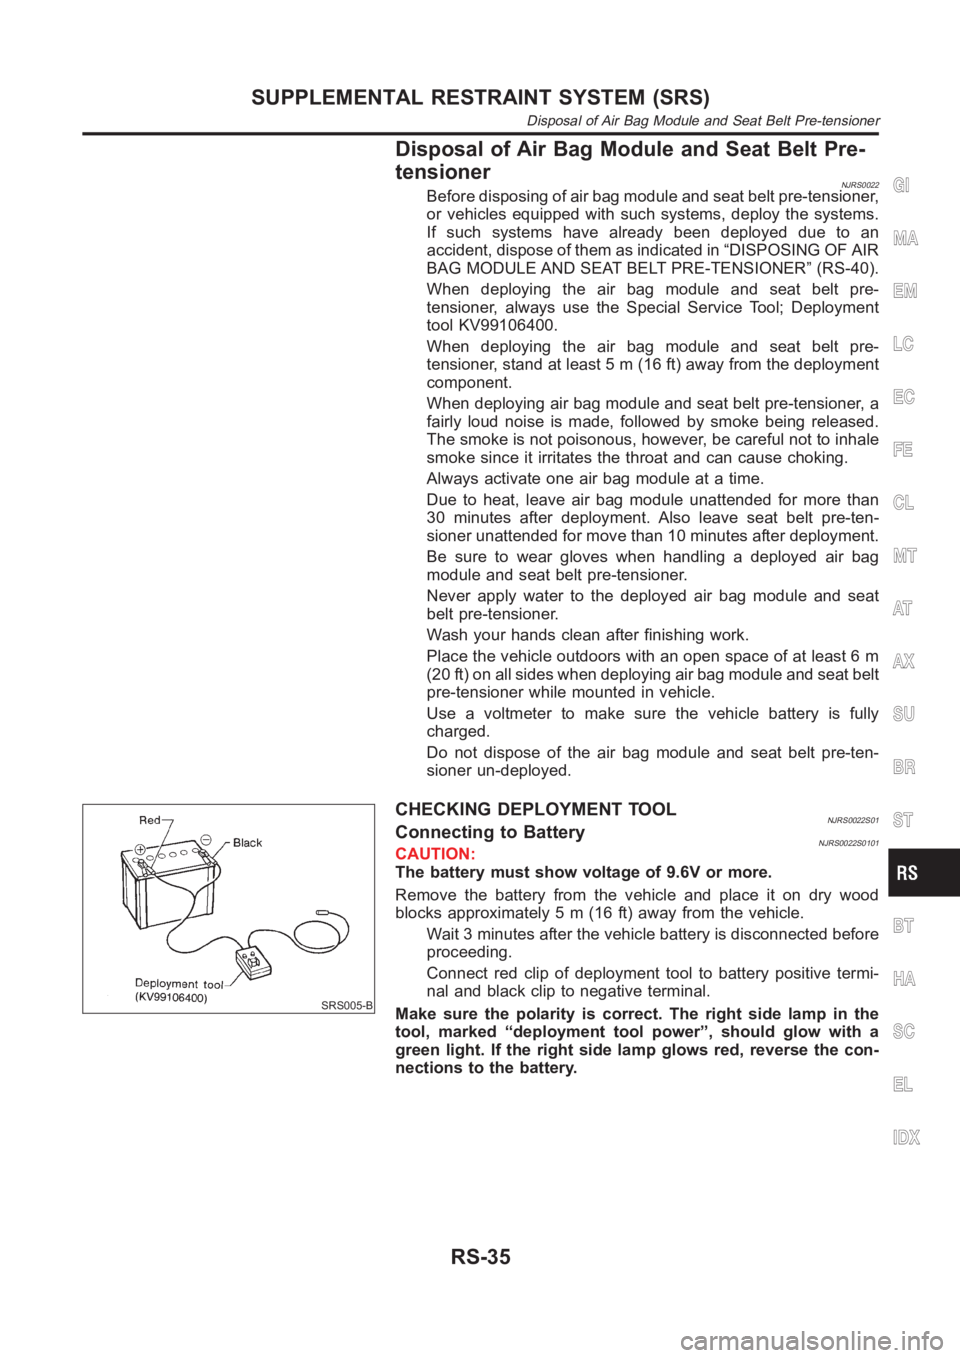
SRS005-B
CHECKING DEPLOYMENT TOOLNJRS0022S01Connecting to BatteryNJRS0022S0101CAUTION:
The battery must show voltage of 9.6V or more.
Remove the battery from the vehicle and place it on dry wood
blocks approximately 5 m (16 ft) away from the vehicle.
Wait 3 minutes after the vehicle battery is disconnected before
proceeding.
Connect red clip of deployment tool to battery positive termi-
nal and black clip to negative terminal.
Make sure the polarity is correct. The right side lamp in the
tool, marked “deployment tool power”, should glow with a
green light. If the right side lamp glows red, reverse the con-
nections to the battery.
GI
MA
EM
LC
EC
FE
CL
MT
AT
AX
SU
BR
ST
BT
HA
SC
EL
IDX
SUPPLEMENTAL RESTRAINT SYSTEM (SRS)
Disposal of Air Bag Module and Seat Belt Pre-tensioner
RS-35
Page 3068 of 3189
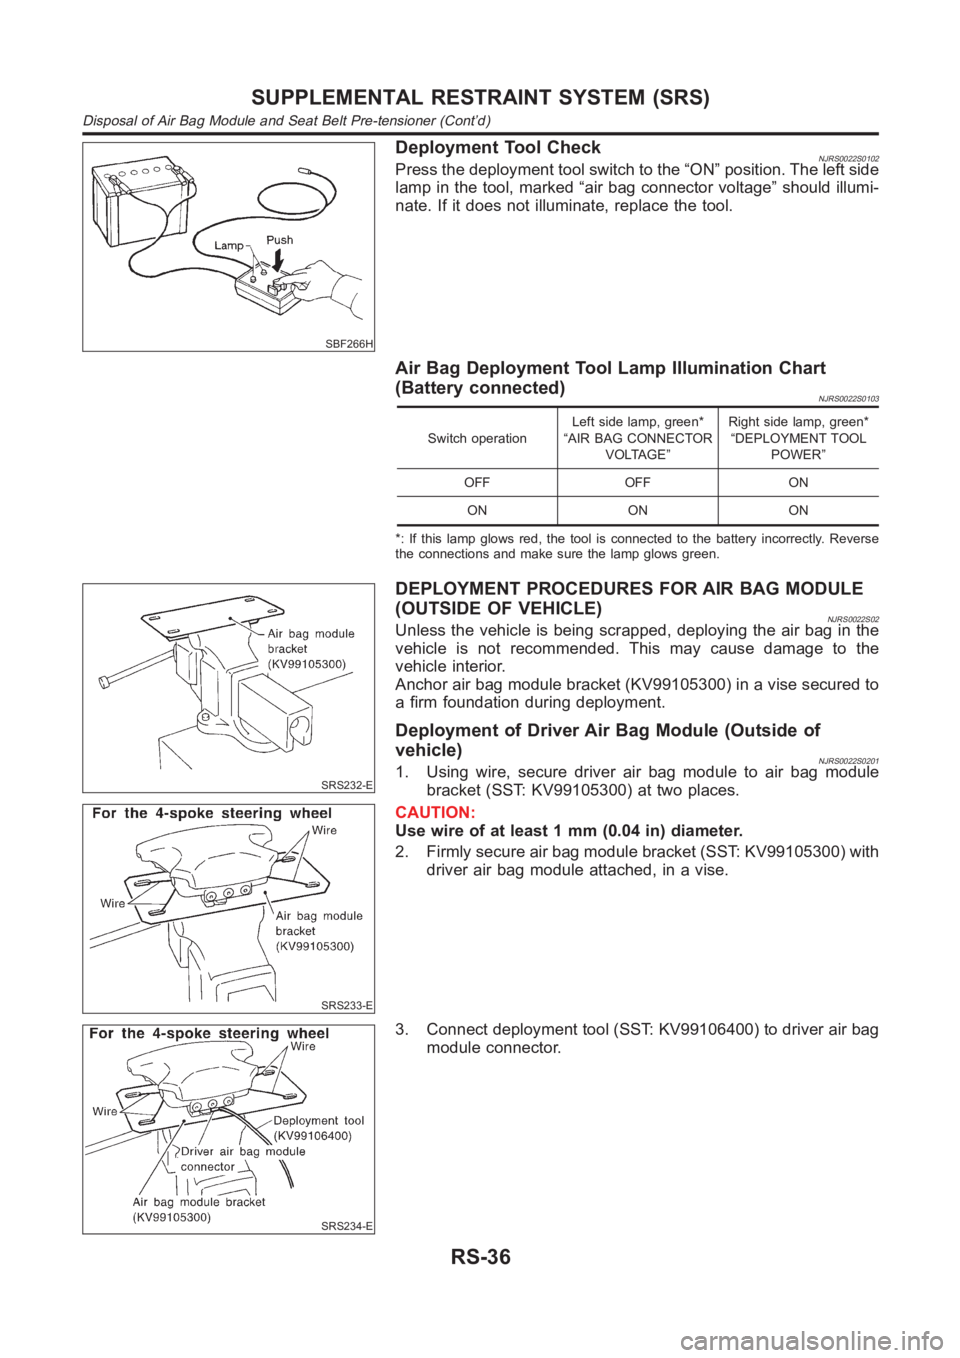
SBF266H
Deployment Tool CheckNJRS0022S0102Press the deployment tool switch to the “ON” position. The left side
lamp in the tool, marked “air bag connector voltage” should illumi-
nate. If it does not illuminate, replace the tool.
Air Bag Deployment Tool Lamp Illumination Chart
(Battery connected)
NJRS0022S0103
Switch operationLeft side lamp, green*
“AIR BAG CONNECTOR
VOLTAGE”Right side lamp, green*
“DEPLOYMENT TOOL
POWER”
OFF OFF ON
ON ON ON
*: If this lamp glows red, the tool is connected to the battery incorrectly.Reverse
the connections and make sure the lamp glows green.
SRS232-E
SRS233-E
DEPLOYMENT PROCEDURES FOR AIR BAG MODULE
(OUTSIDE OF VEHICLE)
NJRS0022S02Unless the vehicle is being scrapped, deploying the air bag in the
vehicle is not recommended. This may cause damage to the
vehicle interior.
Anchor air bag module bracket (KV99105300) in a vise secured to
a firm foundation during deployment.
Deployment of Driver Air Bag Module (Outside of
vehicle)
NJRS0022S02011. Using wire, secure driver air bag module to air bag module
bracket (SST: KV99105300) at two places.
CAUTION:
Use wire of at least 1 mm (0.04 in) diameter.
2. Firmly secure air bag module bracket (SST: KV99105300) with
driver air bag module attached, in a vise.
SRS234-E
3. Connect deployment tool (SST: KV99106400) to driver air bag
module connector.
SUPPLEMENTAL RESTRAINT SYSTEM (SRS)
Disposal of Air Bag Module and Seat Belt Pre-tensioner (Cont’d)
RS-36
Page 3069 of 3189
SRS020-A
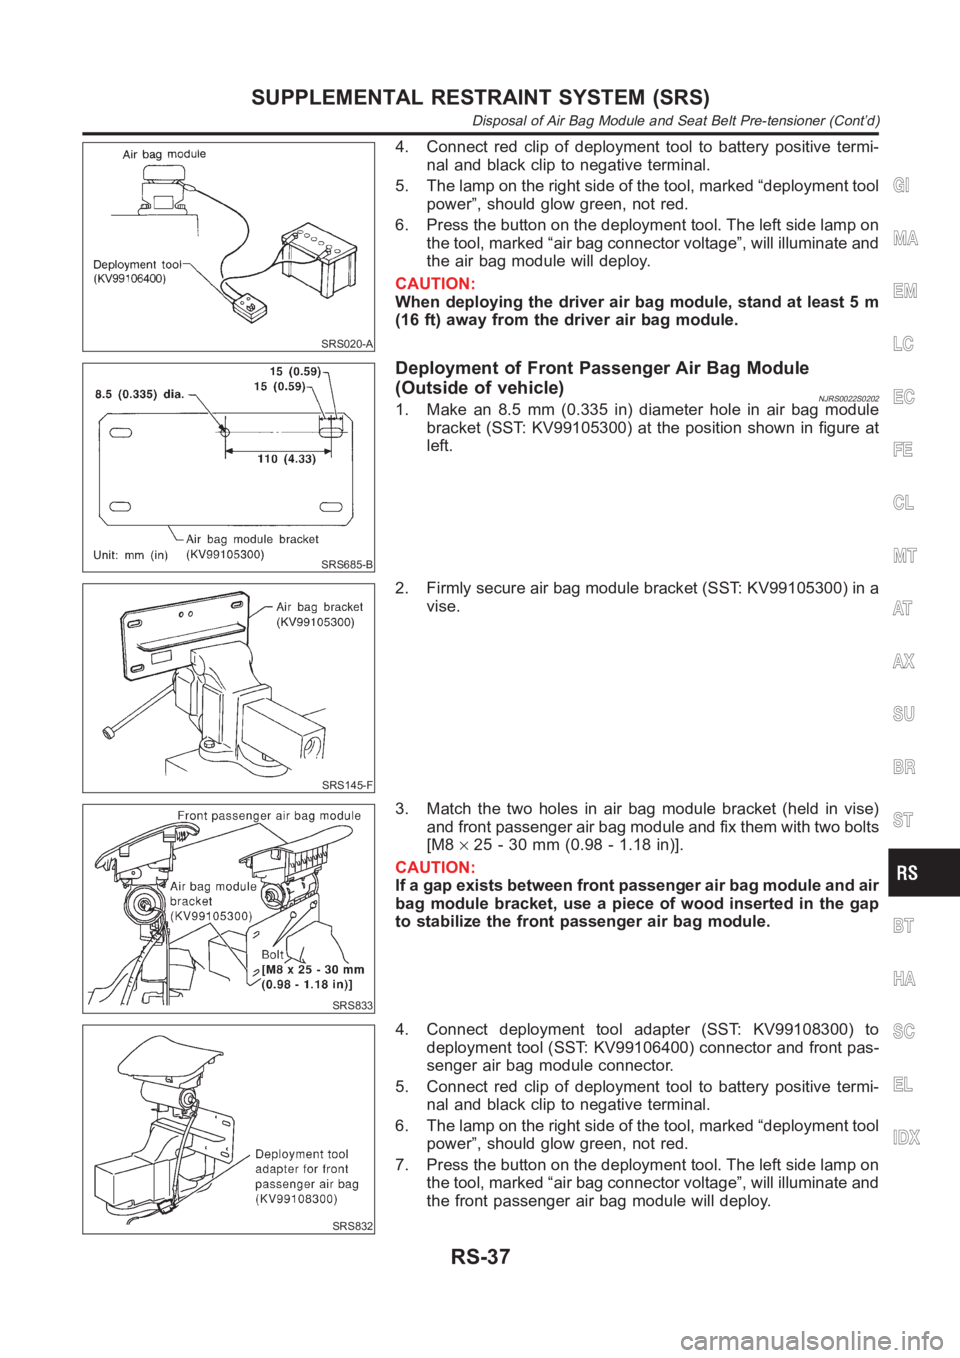
4. Connect red clip of deployment tool to battery positive termi-
nal and black clip to negative terminal.
5. The lamp on the right side of the tool, marked “deployment tool
power”, should glow green, not red.
6. Press the button on the deployment tool. The left side lamp on
the tool, marked “air bag connector voltage”, will illuminate and
the air bag module will deploy.
CAUTION:
When deploying the driver air bag module, stand at least 5 m
(16 ft) away from the driver air bag module.
SRS685-B
Deployment of Front Passenger Air Bag Module
(Outside of vehicle)
NJRS0022S02021. Make an 8.5 mm (0.335 in) diameter hole in air bag module
bracket (SST: KV99105300) at the position shown in figure at
left.
SRS145-F
2. Firmly secure air bag module bracket (SST: KV99105300) in a
vise.
SRS833
3. Match the two holes in air bag module bracket (held in vise)
and front passenger air bag module and fix them with two bolts
[M8×25-30mm(0.98-1.18in)].
CAUTION:
If a gap exists between front passenger air bag module and air
bag module bracket, use a piece of wood inserted in the gap
to stabilize the front passenger air bag module.
SRS832
4. Connect deployment tool adapter (SST: KV99108300) to
deployment tool (SST: KV99106400) connector and front pas-
senger air bag module connector.
5. Connect red clip of deployment tool to battery positive termi-
nal and black clip to negative terminal.
6. The lamp on the right side of the tool, marked “deployment tool
power”, should glow green, not red.
7. Press the button on the deployment tool. The left side lamp on
the tool, marked “air bag connector voltage”, will illuminate and
the front passenger air bag module will deploy.
GI
MA
EM
LC
EC
FE
CL
MT
AT
AX
SU
BR
ST
BT
HA
SC
EL
IDX
SUPPLEMENTAL RESTRAINT SYSTEM (SRS)
Disposal of Air Bag Module and Seat Belt Pre-tensioner (Cont’d)
RS-37
Page 3070 of 3189
SRS020-A
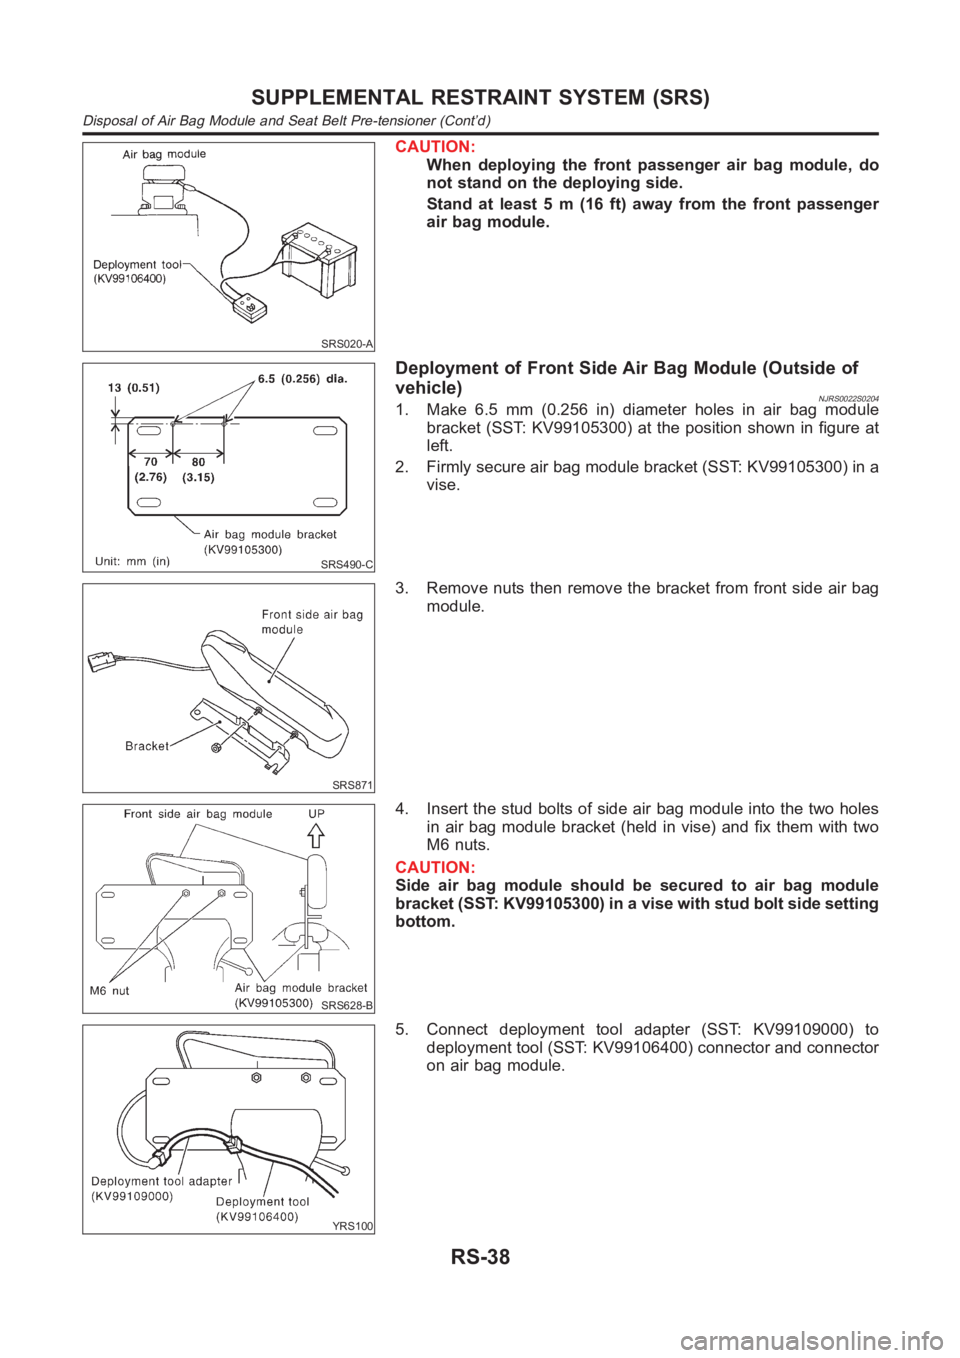
CAUTION:
When deploying the front passenger air bag module, do
not stand on the deploying side.
Stand at least 5 m (16 ft) away from the front passenger
air bag module.
SRS490-C
Deployment of Front Side Air Bag Module (Outside of
vehicle)
NJRS0022S02041. Make 6.5 mm (0.256 in) diameter holes in air bag module
bracket (SST: KV99105300) at the position shown in figure at
left.
2. Firmly secure air bag module bracket (SST: KV99105300) in a
vise.
SRS871
3. Remove nuts then remove the bracket from front side air bag
module.
SRS628-B
4. Insert the stud bolts of side air bag module into the two holes
in air bag module bracket (held in vise) and fix them with two
M6 nuts.
CAUTION:
Side air bag module should be secured to air bag module
bracket (SST: KV99105300) in a vise with stud bolt side setting
bottom.
YRS100
5. Connect deployment tool adapter (SST: KV99109000) to
deployment tool (SST: KV99106400) connector and connector
on air bag module.
SUPPLEMENTAL RESTRAINT SYSTEM (SRS)
Disposal of Air Bag Module and Seat Belt Pre-tensioner (Cont’d)
RS-38