NISSAN LATIO 2009 Service Repair Manual
Manufacturer: NISSAN, Model Year: 2009, Model line: LATIO, Model: NISSAN LATIO 2009Pages: 4331, PDF Size: 58.04 MB
Page 3161 of 4331
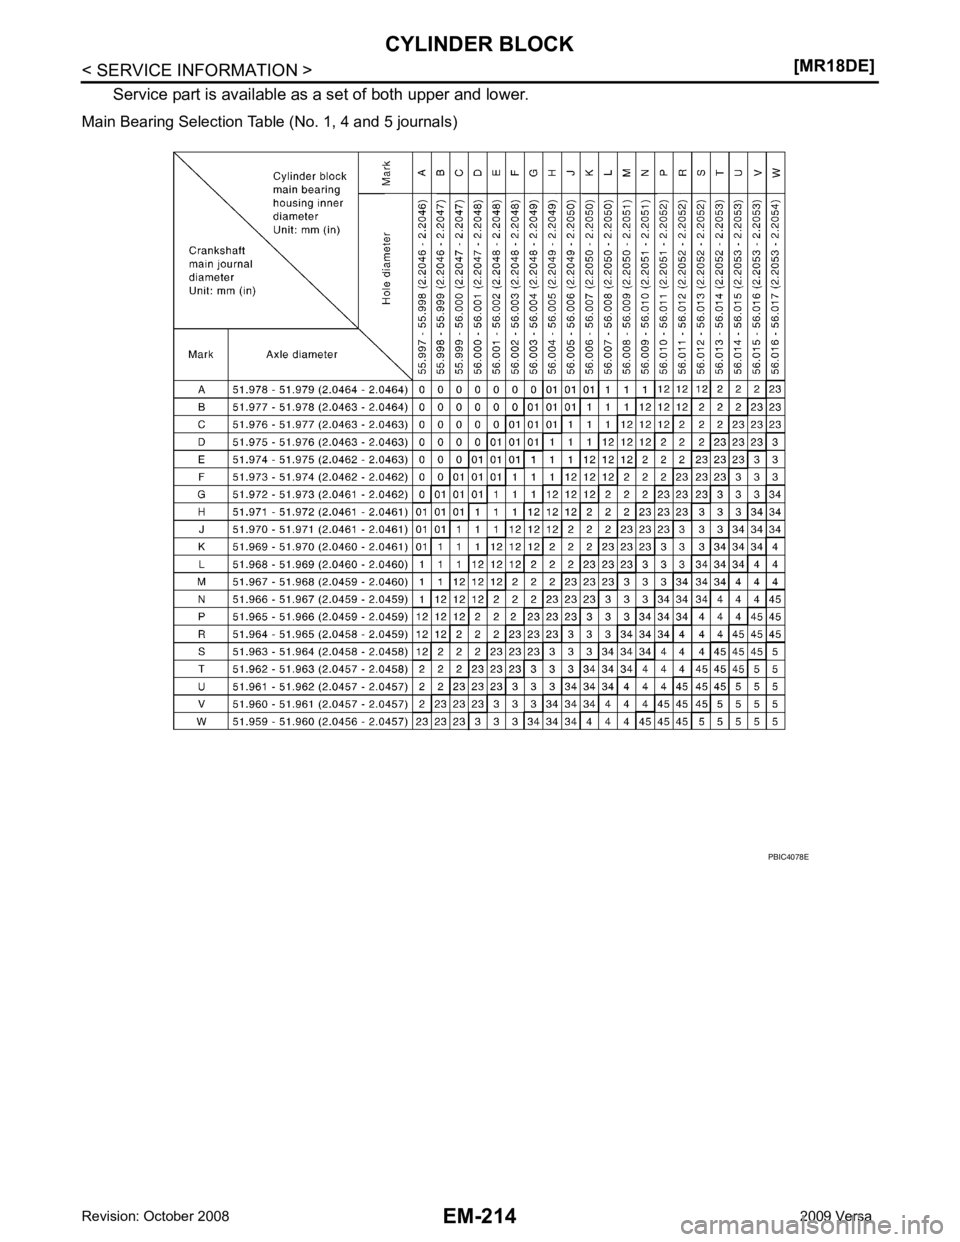
Page 3162 of 4331
EM
NP
O
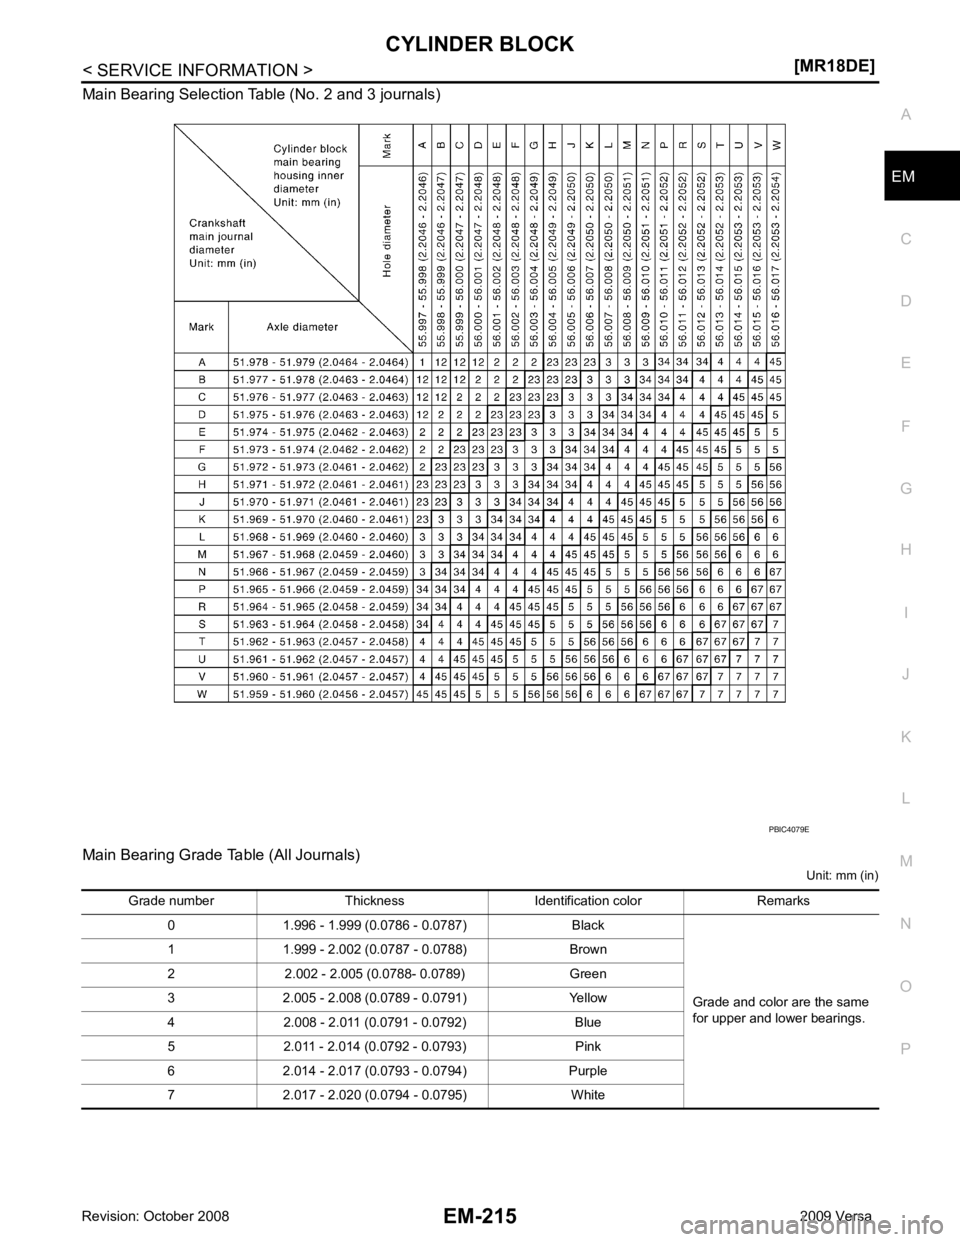
Main Bearing Selection Table (No. 2 and 3 journals)
Main Bearing Grade Table (All Journals) Unit: mm (in)
Page 3163 of 4331
![NISSAN LATIO 2009 Service Repair Manual EM-216< SERVICE INFORMATION >
[MR18DE]
CYLINDER BLOCK
Use Undersize Bearing Usage Guide
• When the specified main bearing oil clearance is not obtained with standard size main bearings, use under- s NISSAN LATIO 2009 Service Repair Manual EM-216< SERVICE INFORMATION >
[MR18DE]
CYLINDER BLOCK
Use Undersize Bearing Usage Guide
• When the specified main bearing oil clearance is not obtained with standard size main bearings, use under- s](/img/5/57359/w960_57359-3162.png)
EM-216< SERVICE INFORMATION >
[MR18DE]
CYLINDER BLOCK
Use Undersize Bearing Usage Guide
• When the specified main bearing oil clearance is not obtained with standard size main bearings, use under- size (US) bearing.
• When using undersize (US) bearing, measure the main bearing inner diameter with bearing installed, and
grind main journal so that the main bearing oil clearance satisfies the standard.
CAUTION:
In grinding crankshaft main jour nal to use undersize bearings,
keep the fillet R [1.5 - 1.7 mm (0.059 - 0.067 in)] (A).
Bearing undersize table Unit: mm (in)
Inspection After Disassembly INFOID:0000000004307161
CRANKSHAFT END PLAY
• Measure the clearance between thrust bearings and crankshaft arm when crankshaft is moved fully forward or backward with a dial
indicator (A).
• If the measured value exceeds the limit, replace thrust bearings, and measure again. If it still exc eeds the limit, replace crankshaft
also.
CONNECTING ROD SIDE CLEARANCE 01
UPR 1.996 - 1.999 (0.0786 - 0.0787) Black
Grade and color are different
between upper and lower bear-
ings.
LWR 1.999 - 2.002 (0.0787 - 0.0788) Brown
12 UPR 1.999 - 2.002 (0.0787 - 0.0788) Brown
LWR 2.002 - 2.005 (0.0788 - 0.0789) Green
23 UPR 2.002 - 2.005 (0.0788- 0.0789) Green
LWR 2.005 - 2.008 (0.0789 - 0.0791) Yellow
34 UPR 2.005 - 2.008 (0.0789 - 0.0791) Yellow
LWR 2.008 - 2.011 (0.0791 - 0.0792) Blue
45 UPR 2.008 - 2.011 (0.0791 - 0.0792) Blue
LWR 2.011 - 2.014 (0.0792 - 0.0793) Pink
56 UPR 2.011 - 2.014 (0.0792 - 0.0793) Pink
LWR 2.014 - 2.017 (0.0793 - 0.0794) Purple
67 UPR 2.014 - 2.017 (0.0793 - 0.0794) Purple
LWR 2.017 - 2.020 (0.0794 - 0.0795) White
Grade number Thickness Identification color Remarks PBIC3263J
Size Thickness
US 0.25 (0.0098) 2.126 - 2.134 (0.0837 - 0.0840) Standard : 0.10 - 0.26 mm (0.0039 - 0.0102 in)
Limit : 0.30 mm (0.012 in) PBIC3252J
Page 3164 of 4331
EM
NP
O
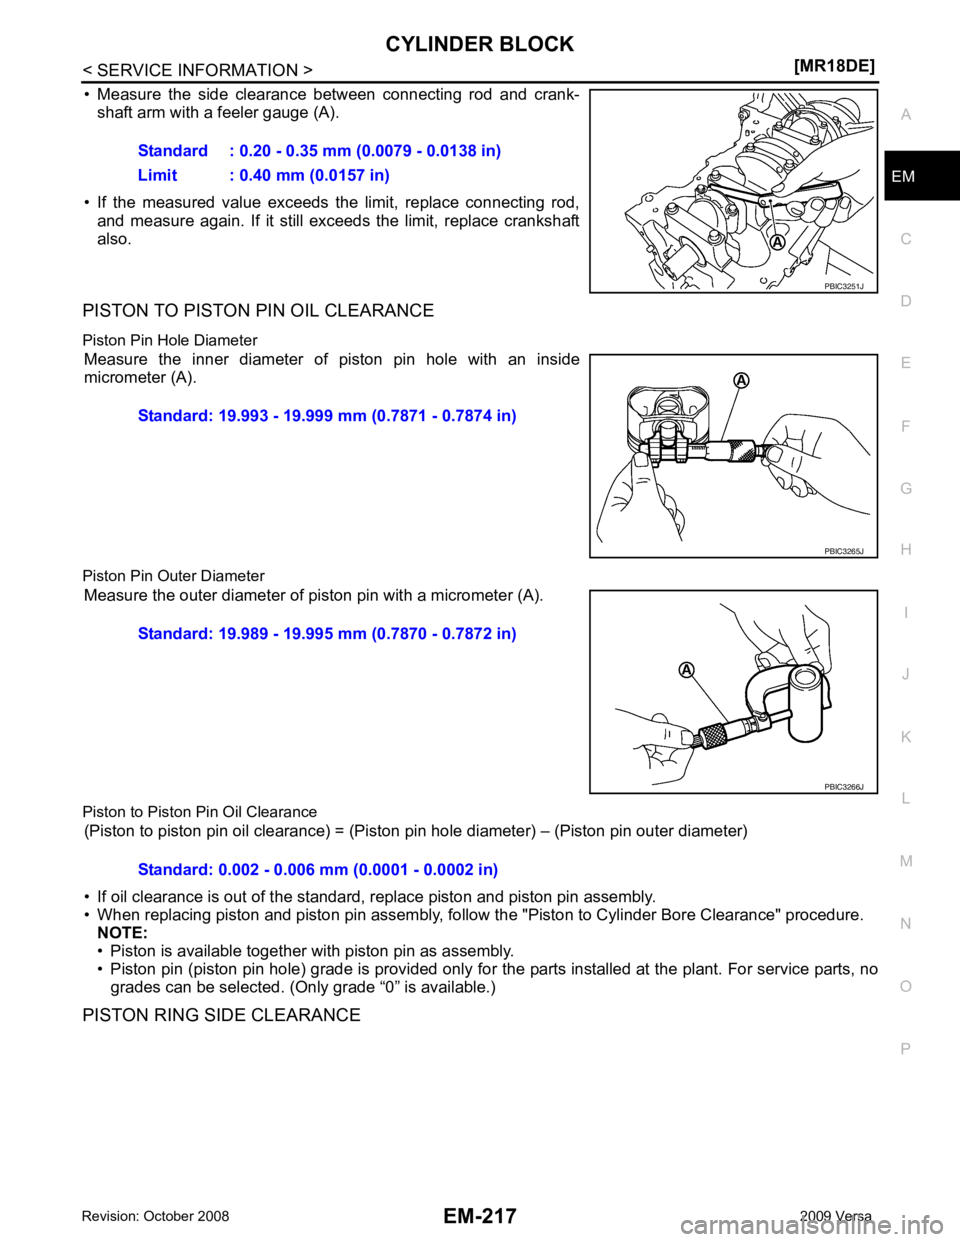
• Measure the side clearance between connecting rod and crank-
shaft arm with a feeler gauge (A).
• If the measured value exceeds the limit, replace connecting rod, and measure again. If it still exceeds the limit, replace crankshaft
also.
PISTON TO PISTON PIN OIL CLEARANCE
Piston Pin Hole Diameter Measure the inner diameter of piston pin hole with an inside
micrometer (A).
Piston Pin Outer Diameter Measure the outer diameter of piston pin with a micrometer (A).
Piston to Piston Pin Oil Clearance (Piston to piston pin oil clearance) = (Piston pi n hole diameter) – (Piston pin outer diameter)
• If oil clearance is out of the standard, replace piston and piston pin assembly.
• When replacing piston and piston pin assembly, follow the "Piston to Cylinder Bore Clearance" procedure.
NOTE:
• Piston is available together with piston pin as assembly.
• Piston pin (piston pin hole) grade is provided only for the parts installed at the plant. For service parts, no grades can be selected. (Only grade “0” is available.)
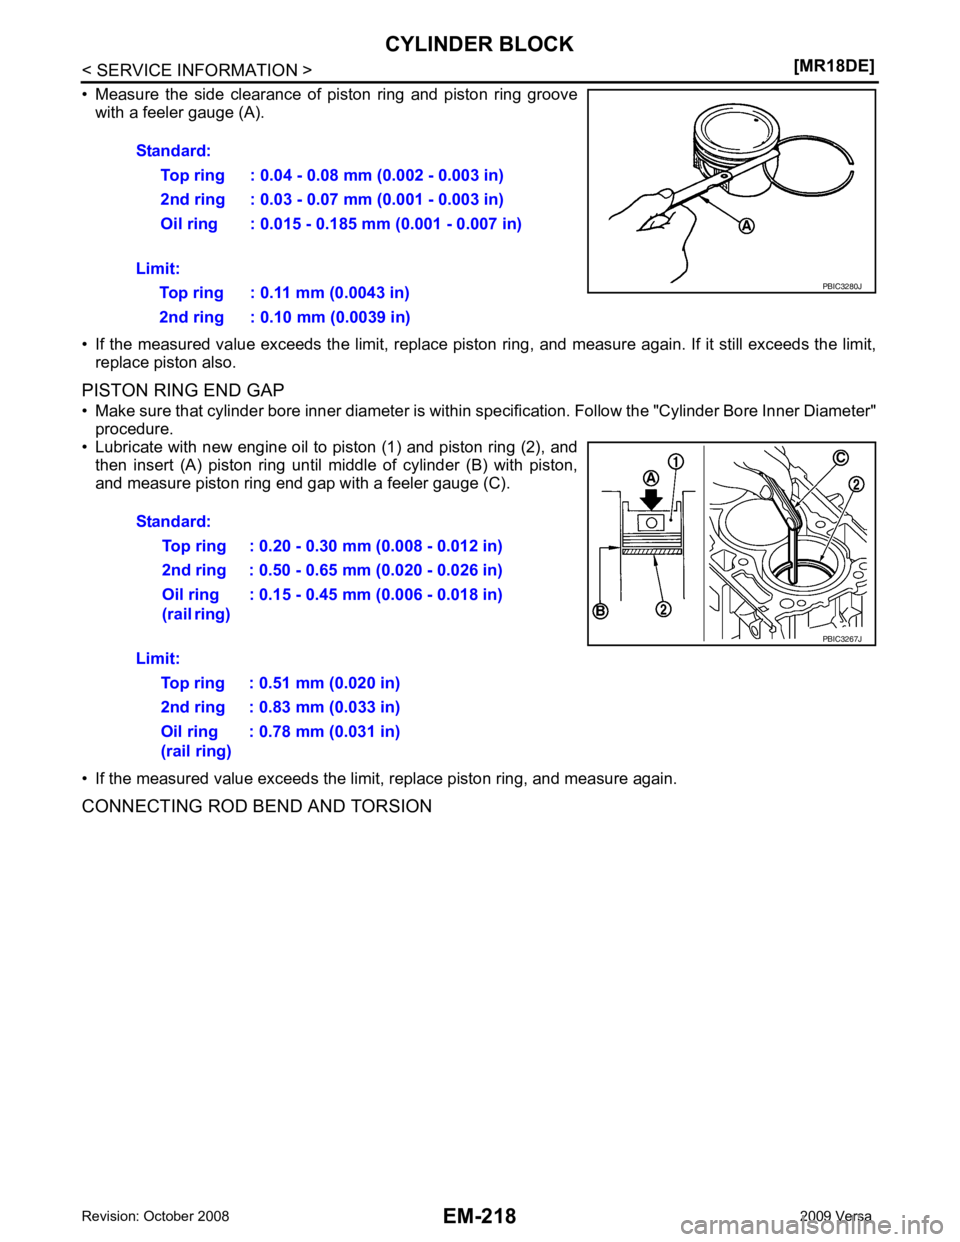
PISTON RING SIDE CLEARANCE Standard : 0.20 - 0.35 mm (0.0079 - 0.0138 in)
Limit : 0.40 mm (0.0157 in)
Page 3165 of 4331
Page 3166 of 4331
EM
NP
O
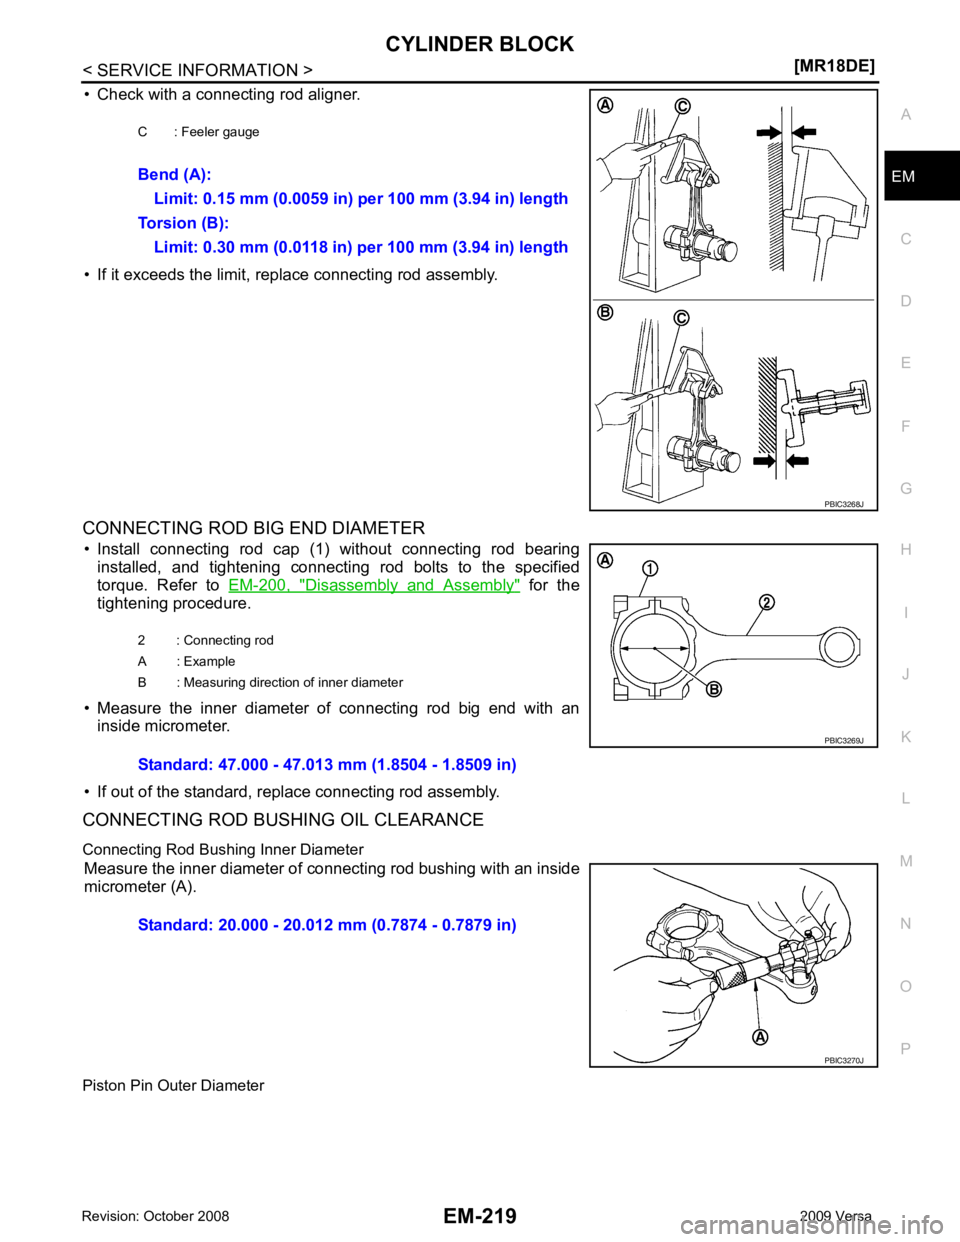
• Check with a connecting rod aligner.
• If it exceeds the limit, replace connecting rod assembly.
CONNECTING ROD BIG END DIAMETER • Install connecting rod cap (1) without connecting rod bearing installed, and tightening connecting rod bolts to the specified
torque. Refer to EM-200, " Disassembly and Assembly " for the
tightening procedure.
• Measure the inner diameter of connecting rod big end with an inside micrometer.
• If out of the standard, replace connecting rod assembly.
CONNECTING ROD BUSHING OIL CLEARANCE
Connecting Rod Bush ing Inner Diameter
Measure the inner diameter of connecting rod bushing with an inside
micrometer (A).
Piston Pin Outer Diameter C : Feeler gauge
Bend (A): Limit: 0.15 mm (0.0059 in) per 100 mm (3.94 in) length
Torsion (B): Limit: 0.30 mm (0.0118 in) per 100 mm (3.94 in) length
Page 3167 of 4331
![NISSAN LATIO 2009 Service Repair Manual Disassembly and Assembly " for the tightening procedure.
• Measure the inner diameter of main bearing housing with a bore gauge.
• Measure the position shown [5 mm (0.20 in)] backward from mai NISSAN LATIO 2009 Service Repair Manual Disassembly and Assembly " for the tightening procedure.
• Measure the inner diameter of main bearing housing with a bore gauge.
• Measure the position shown [5 mm (0.20 in)] backward from mai](/img/5/57359/w960_57359-3166.png)
Disassembly and Assembly " for the tightening procedure.
• Measure the inner diameter of main bearing housing with a bore gauge.
• Measure the position shown [5 mm (0.20 in)] backward from main
bearing housing front side in the 2 directions as shown. The
smaller one is the measured value.
• If out of the standard, replace cylinder block and main bearing caps assembly.
NOTE: Standard: 19.989 - 19.995 mm (0.7870 - 0.7872 in)
Page 3168 of 4331
EM
NP
O
Main bearing caps cannot be replaced as a single part
, because it is machined together with cylinder block.
PISTON TO CYLINDER BORE CLEARANCE
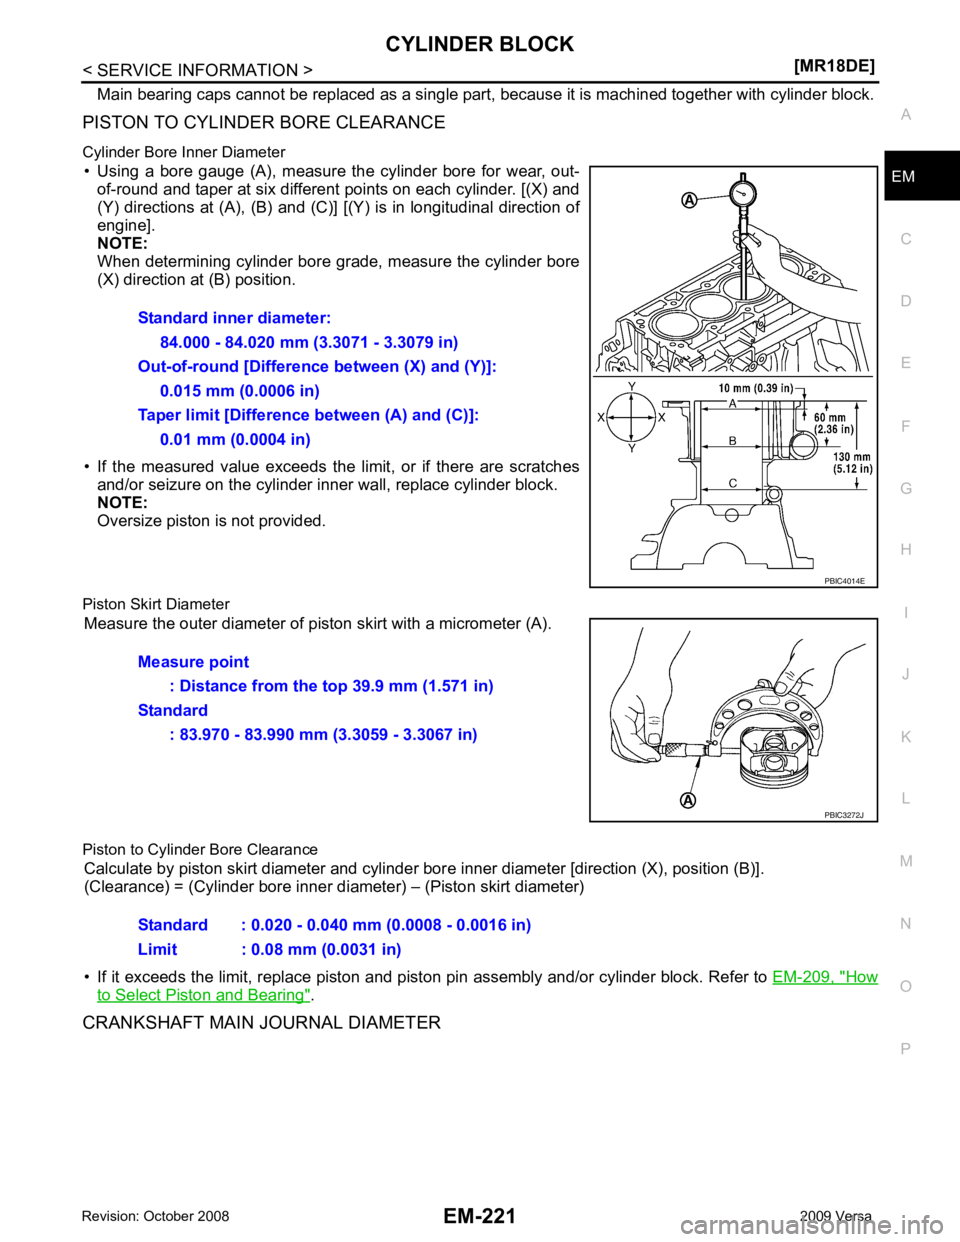
Cylinder Bore Inner Diameter
• Using a bore gauge (A), measure the cylinder bore for wear, out- of-round and taper at six different points on each cylinder. [(X) and
(Y) directions at (A), (B) and (C)] [(Y) is in longitudinal direction of
engine].
NOTE:
When determining cylinder bore grade, measure the cylinder bore
(X) direction at (B) position.
• If the measured value exceeds the limit, or if there are scratches and/or seizure on the cylinder inner wall, replace cylinder block.
NOTE:
Oversize piston is not provided.
Piston Skirt Diameter Measure the outer diameter of pi ston skirt with a micrometer (A).
Piston to Cylinder Bore Clearance Calculate by piston skirt diameter and cylinder bor e inner diameter [direction (X), position (B)].
(Clearance) = (Cylinder bore inner di ameter) – (Piston skirt diameter)
• If it exceeds the limit, replace piston and pist on pin assembly and/or cylinder block. Refer to EM-209, " How
to Select Piston and Bearing " .
CRANKSHAFT MAIN JOURNAL DIAMETER Standard inner diameter:
84.000 - 84.020 mm (3.3071 - 3.3079 in)
Out-of-round [Differen ce between (X) and (Y)]:
0.015 mm (0.0006 in)
Taper limit [Difference between (A) and (C)]:
0.01 mm (0.0004 in)
Page 3169 of 4331
![NISSAN LATIO 2009 Service Repair Manual EM-222< SERVICE INFORMATION >
[MR18DE]
CYLINDER BLOCK
• Measure the outer diameter of crankshaft main journals with a
micrometer (A).
• If out of the standard, measure the main b NISSAN LATIO 2009 Service Repair Manual EM-222< SERVICE INFORMATION >
[MR18DE]
CYLINDER BLOCK
• Measure the outer diameter of crankshaft main journals with a
micrometer (A).
• If out of the standard, measure the main b](/img/5/57359/w960_57359-3168.png)
EM-222< SERVICE INFORMATION >
[MR18DE]
CYLINDER BLOCK
• Measure the outer diameter of crankshaft main journals with a
micrometer (A).
• If out of the standard, measure the main bearing oil clearance. Then use undersize bearing. Follow the "MAIN BEARING OIL
CLEARANCE" procedure.
CRANKSHAFT PIN JOURNAL DIAMETER
• Measure the outer diameter of crankshaft pin journal with a micrometer.
• If out of the standard, measure the connecting rod bear ing oil clearance. Then use undersize bearing. Follow
the "CONNECTING ROD BEARIN G OIL CLEARANCE" procedure.
OUT-OF-ROUND AND TAPER OF CRANKSHAFT
• Measure the dimensions at four different points as shown on each main journal and pin journal with a micrometer.
• Out-of-round is indicated by the difference in dimensions between (X) and (Y) at (A) and (B).
• Taper is indicated by the difference in dimension between (A) and
(B) at (X) and (Y).
• If the measured value exceeds the lim it, correct or replace crankshaft.
• If corrected, measure the bearing oil clearance of t he corrected main journal and/or pin journal. Then select
main bearing and/or connecting rod bearing. Follow the "MAIN BEARING OIL CLEARANCE" and/or "CON-
NECTING ROD BEARING OIL CLEARANCE" procedures.
CRANKSHAFT RUNOUT
• Place a V-block on a precise flat table to support the journals on the both end of the crankshaft.
• Place a dial indicator (A) straight up on the No. 3 journal.
• While rotating crankshaft, read t he movement of the pointer on the
dial indicator. (Total indicator reading)
• If it exceeds the limit, replace crankshaft.
CONNECTING ROD BEARING OIL CLEARANCE
Method by Calculation Standard: 51.959 - 51.979 mm (2.0456 - 2.0464 in) dia. PBIC3457J
Standard: 43.953 - 43.971 mm (1.7304-1.7311 in) dia.
Limit: Out-of-round [Difference between (X) and (Y)] : 0.0035 mm (0.0001 in)
Taper [Difference between (A) and (B)] : 0.0035 mm (0.0001 in) PBIC3459J
Standard : 0.05 mm (0.0020 in)
Limit : 0.10 mm (0.0040 in) PBIC3458J
Page 3170 of 4331
EM
NP
O
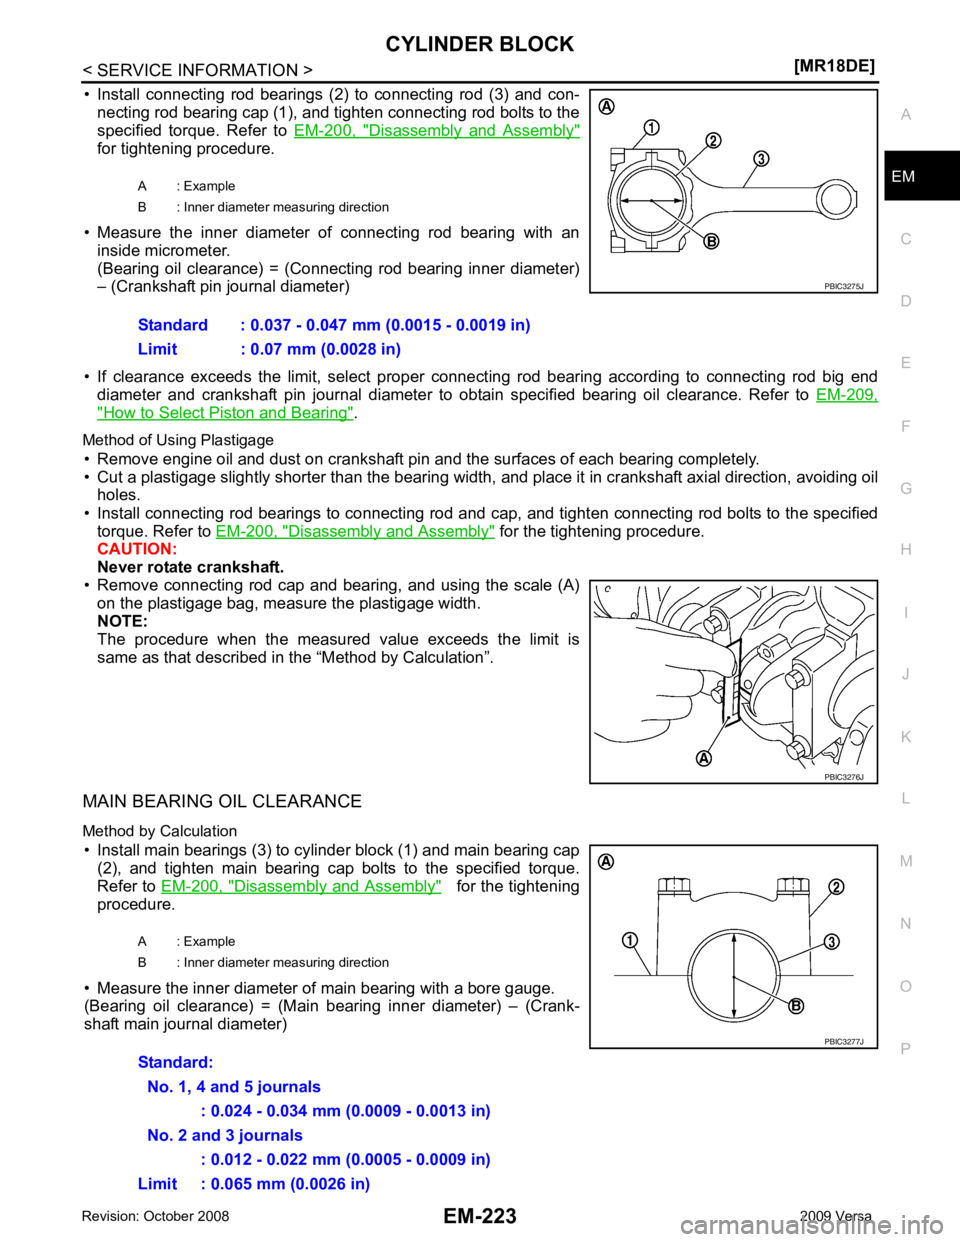
• Install connecting rod bearings (2) to connecting rod (3) and con-
necting rod bearing cap (1), and tighten connecting rod bolts to the
specified torque. Refer to EM-200, " Disassembly and Assembly "
for tightening procedure.
• Measure the inner diameter of connecting rod bearing with an inside micrometer.
(Bearing oil clearance) = (Connecting rod bearing inner diameter)
– (Crankshaft pin journal diameter)
• If clearance exceeds the limit, select proper c onnecting rod bearing according to connecting rod big end
diameter and crankshaft pin journal diameter to obtain specified bearing oil clearance. Refer to EM-209," How to Select Piston and Bearing " .
Method of Using Plastigage • Remove engine oil and dust on crankshaft pin and the surfaces of each bearing completely.
• Cut a plastigage slightly shorter than the bearing width, and place it in crankshaft axial direction, avoiding oil
holes.
• Install connecting rod bearings to connecting rod and c ap, and tighten connecting rod bolts to the specified
torque. Refer to EM-200, " Disassembly and Assembly " for the tightening procedure.
CAUTION:
Never rotate crankshaft.
• Remove connecting rod cap and bearing, and using the scale (A) on the plastigage bag, measure the plastigage width.
NOTE:
The procedure when the measured value exceeds the limit is
same as that described in the “Method by Calculation”.
MAIN BEARING OIL CLEARANCE
Method by Calculation • Install main bearings (3) to cylinder block (1) and main bearing cap (2), and tighten main bearing cap bolts to the specified torque.
Refer to EM-200, " Disassembly and Assembly " for the tightening
procedure.
• Measure the inner diameter of main bearing with a bore gauge.
(Bearing oil clearance) = (Main bearing inner diameter) – (Crank-
shaft main journal diameter) A : Example
B : Inner diameter measuring direction
Standard : 0.037 - 0.047 mm (0.0015 - 0.0019 in)
Limit : 0.07 mm (0.0028 in)