NISSAN NAVARA 2005 Repair Workshop Manual
Manufacturer: NISSAN, Model Year: 2005, Model line: NAVARA, Model: NISSAN NAVARA 2005Pages: 3171, PDF Size: 49.59 MB
Page 2331 of 3171
MT-14
SHIFT CONTROL
lInstall shift knob according to the following.
–Apply cement to threads of control lever assembly.
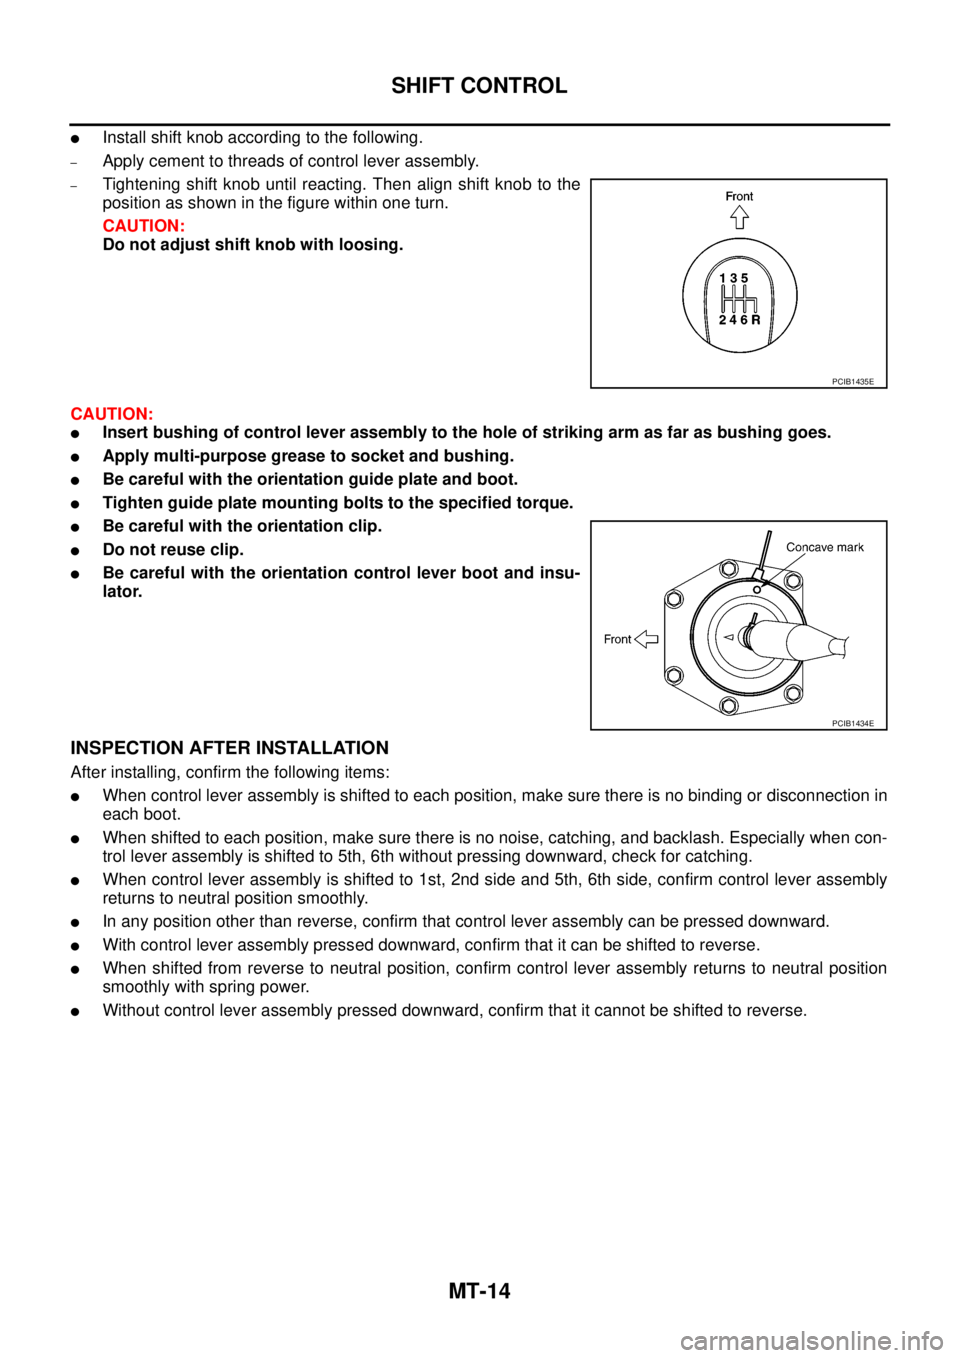
–Tightening shift knob until reacting. Then align shift knob to the
position as shown in the figure within one turn.
CAUTION:
Do not adjust shift knob with loosing.
CAUTION:
lInsert bushing of control lever assembly to the hole of striking arm as far as bushing goes.
lApply multi-purpose grease to socket and bushing.
lBe careful with the orientation guide plate and boot.
lTighten guide plate mounting bolts to the specified torque.
lBe careful with the orientation clip.
lDo not reuse clip.
lBe careful with the orientation control lever boot and insu-
lator.
INSPECTION AFTER INSTALLATION
After installing, confirm the following items:
lWhen control lever assembly is shifted to each position, make sure there is no binding or disconnection in
each boot.
lWhen shifted to each position, make sure there is no noise, catching, and backlash. Especially when con-
trol lever assembly is shifted to 5th, 6th without pressing downward, check for catching.
lWhen control lever assembly is shifted to 1st, 2nd side and 5th, 6th side, confirm control lever assembly
returns to neutral position smoothly.
lIn any position other than reverse, confirm that control lever assembly can be pressed downward.
lWith control lever assembly pressed downward, confirm that it can be shifted to reverse.
lWhen shifted from reverse to neutral position, confirm control lever assembly returns to neutral position
smoothly with spring power.
lWithout control lever assembly pressed downward, confirm that it cannot be shifted to reverse.
PCIB1435E
PCIB1434E
Page 2332 of 3171
AIR BREATHER HOSE
MT-15
D
E
F
G
H
I
J
K
L
MA
B
MT
AIR BREATHER HOSEPFP:31098
Removal and InstallationECS00ID8
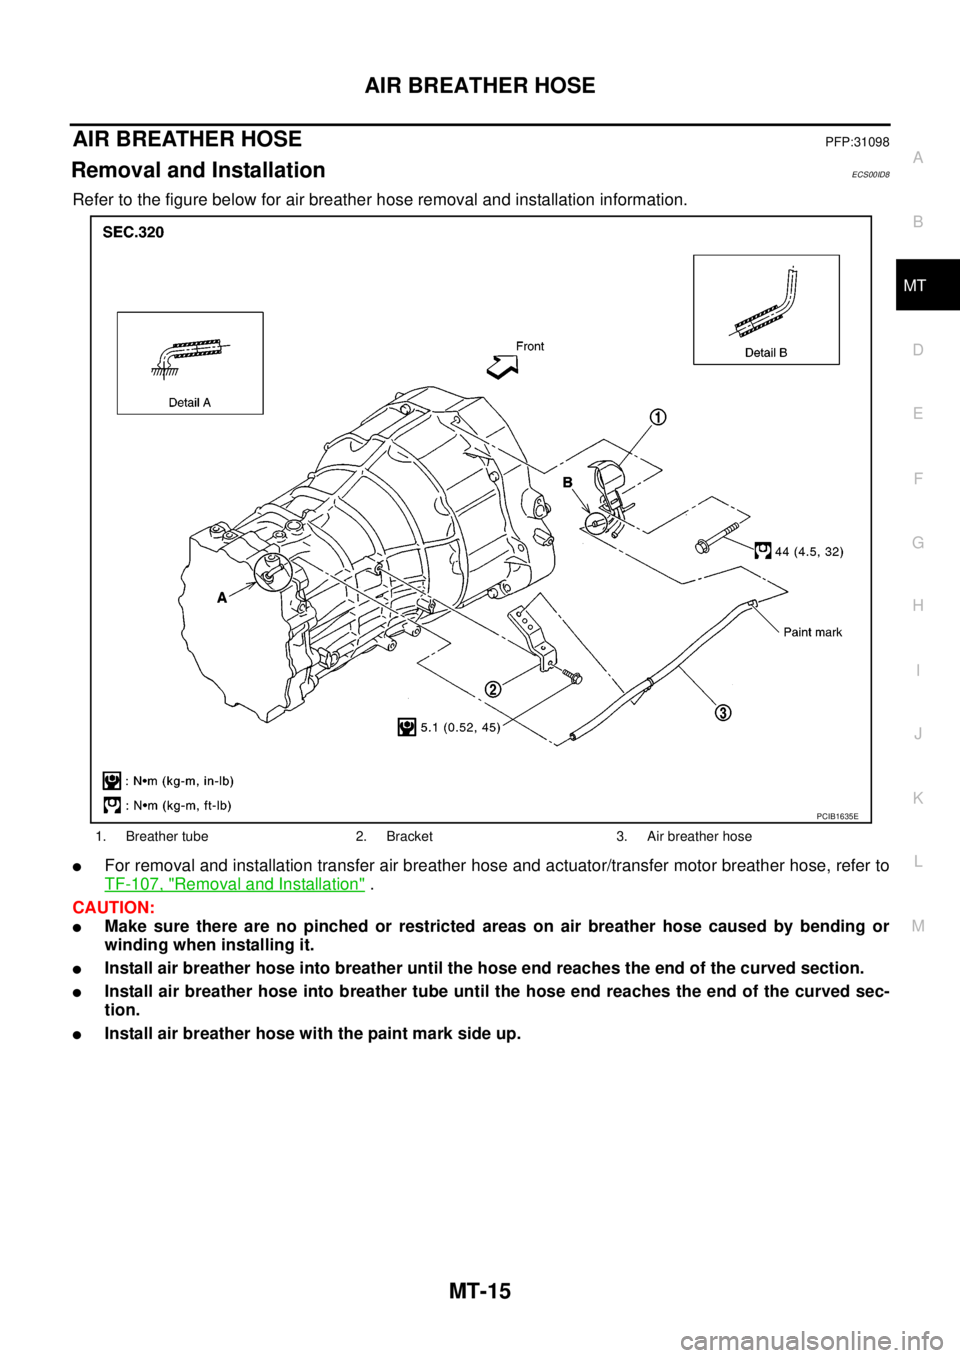
Refer to the figure below for air breather hose removal and installation information.
lFor removal and installation transfer air breather hose and actuator/transfer motor breather hose, refer to
TF-107, "
Removal and Installation".
CAUTION:
lMake sure there are no pinched or restricted areas on air breather hose caused by bending or
winding when installing it.
lInstall air breather hose into breather until the hose end reaches the end of the curved section.
lInstall air breather hose into breather tube until the hose end reaches the end of the curved sec-
tion.
lInstall air breather hose with the paint mark side up.
1. Breather tube 2. Bracket 3. Air breather hose
PCIB1635E
Page 2333 of 3171
MT-16
TRANSMISSION ASSEMBLY
TRANSMISSION ASSEMBLY
PFP:32010
Removal and Installation from VehicleECS00ID9
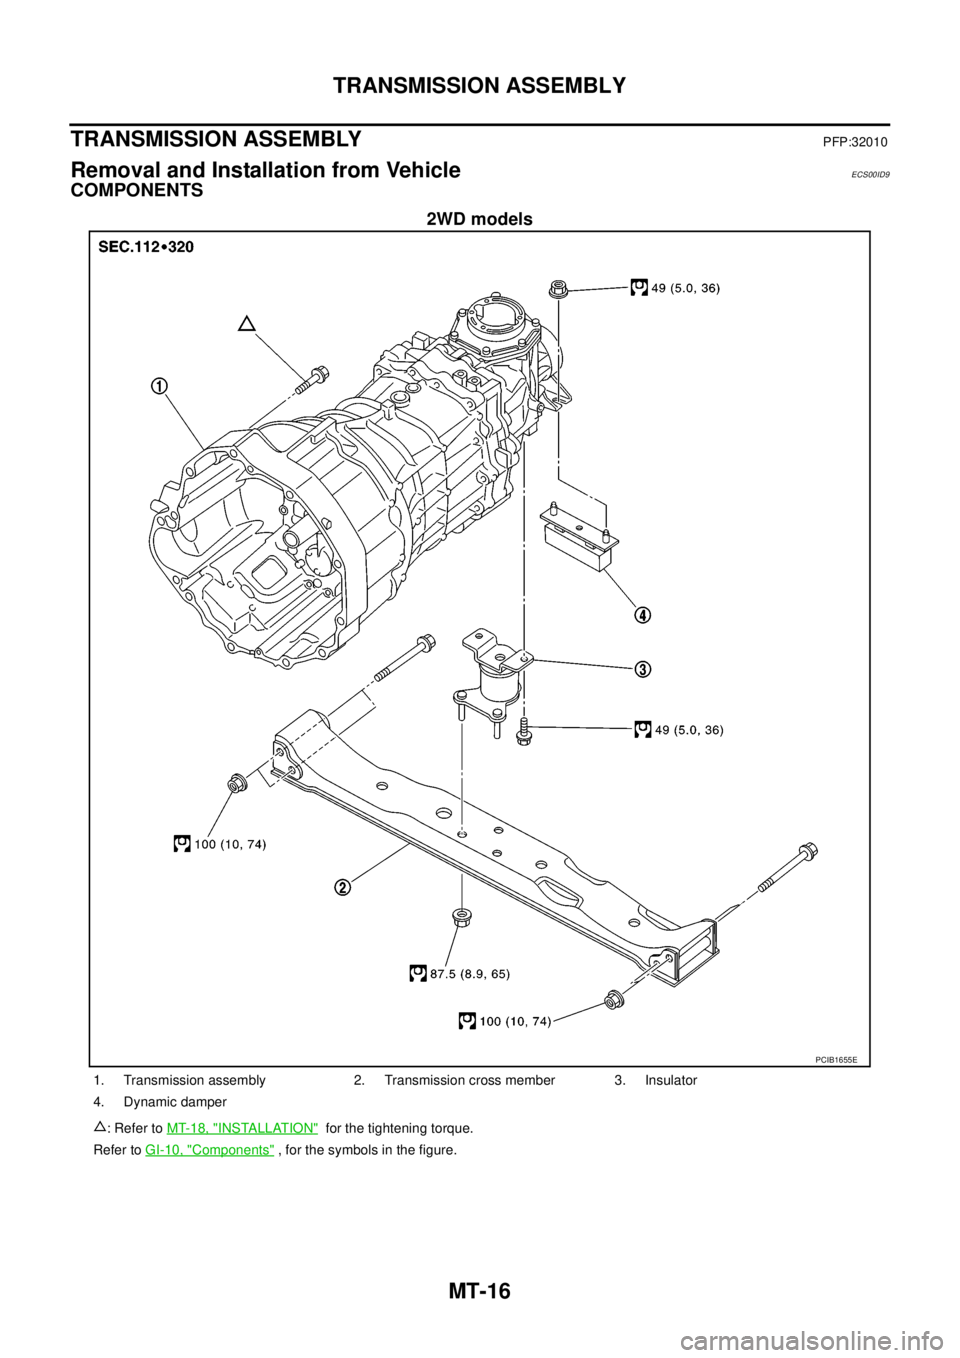
COMPONENTS
2WD models
PCIB1655E
1. Transmission assembly 2. Transmission cross member 3. Insulator
4. Dynamic damper
: Refer toMT-18, "
INSTALLATION"for the tightening torque.
Refer toGI-10, "
Components", for the symbols in the figure.
Page 2334 of 3171
TRANSMISSION ASSEMBLY
MT-17
D
E
F
G
H
I
J
K
L
MA
B
MT
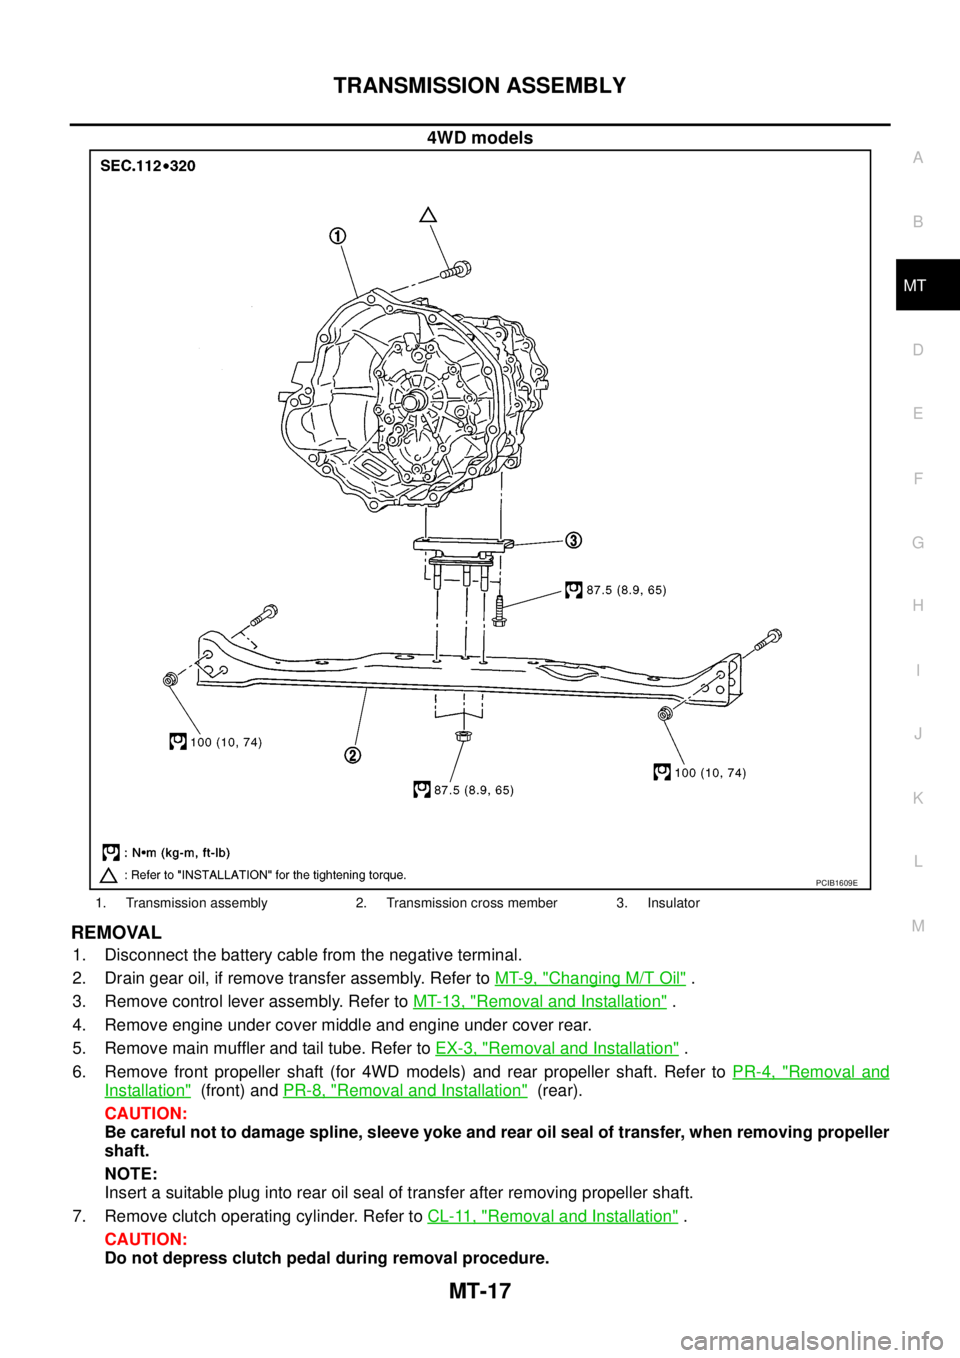
4WD models
REMOVAL
1. Disconnect the battery cable from the negative terminal.
2. Drain gear oil, if remove transfer assembly. Refer toMT-9, "
Changing M/T Oil".
3. Remove control lever assembly. Refer toMT-13, "
Removal and Installation".
4. Remove engine under cover middle and engine under cover rear.
5. Remove main muffler and tail tube. Refer toEX-3, "
Removal and Installation".
6. Remove front propeller shaft (for 4WD models) and rear propeller shaft. Refer toPR-4, "
Removal and
Installation"(front) andPR-8, "Removal and Installation"(rear).
CAUTION:
Be careful not to damage spline, sleeve yoke and rear oil seal of transfer, when removing propeller
shaft.
NOTE:
Insert a suitable plug into rear oil seal of transfer after removing propeller shaft.
7. Remove clutch operating cylinder. Refer toCL-11, "
Removal and Installation".
CAUTION:
Do not depress clutch pedal during removal procedure.
PCIB1609E
1. Transmission assembly 2. Transmission cross member 3. Insulator
Page 2335 of 3171
MT-18
TRANSMISSION ASSEMBLY
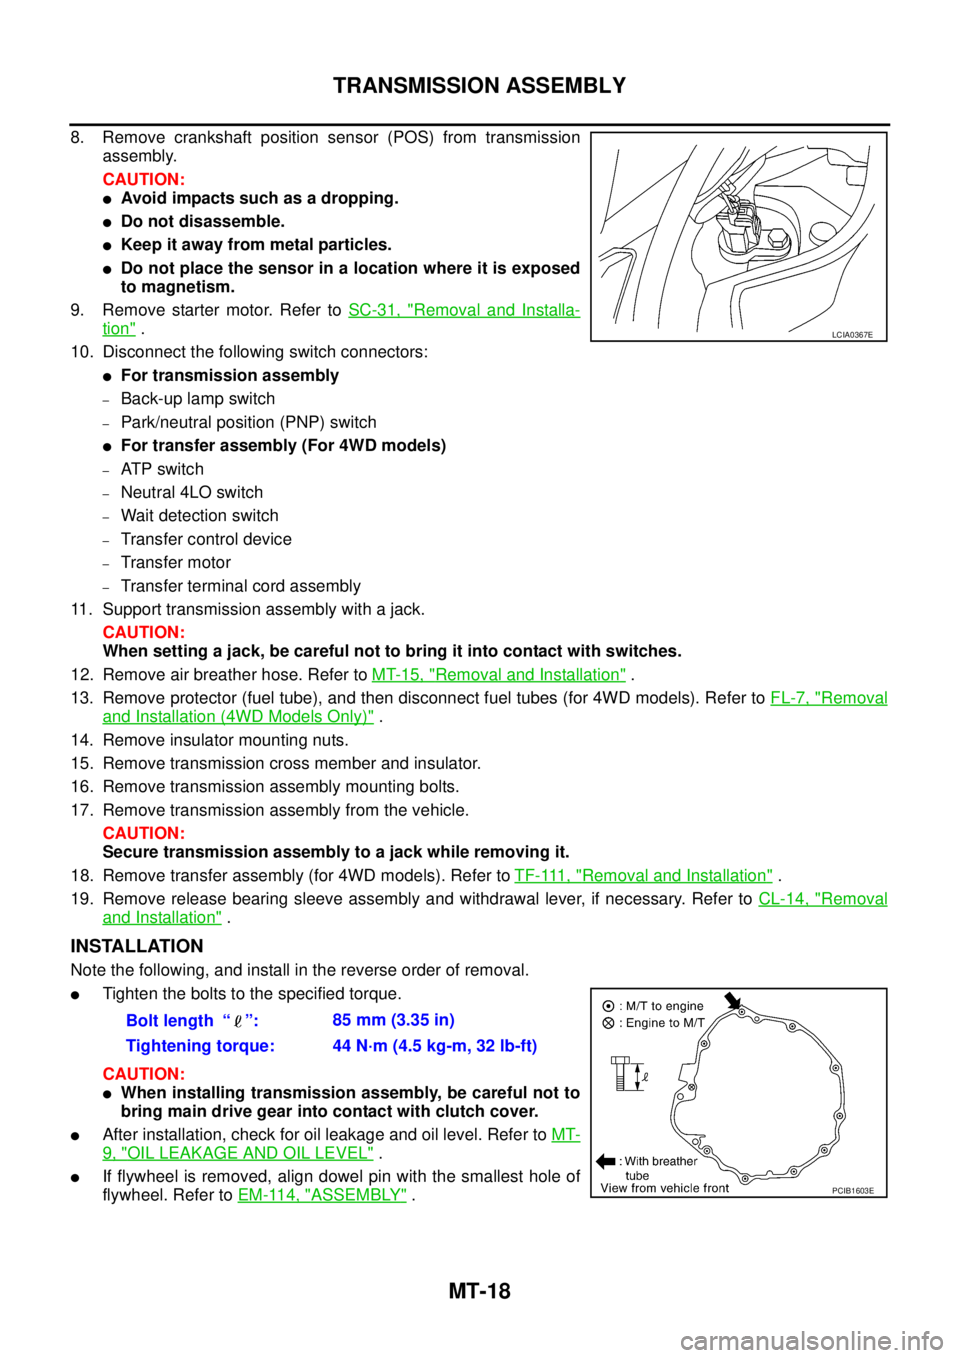
8. Remove crankshaft position sensor (POS) from transmission
assembly.
CAUTION:
lAvoid impacts such as a dropping.
lDo not disassemble.
lKeep it away from metal particles.
lDo not place the sensor in a location where it is exposed
to magnetism.
9. Remove starter motor. Refer toSC-31, "
Removal and Installa-
tion".
10. Disconnect the following switch connectors:
lFor transmission assembly
–Back-up lamp switch
–Park/neutral position (PNP) switch
lFor transfer assembly (For 4WD models)
–AT P s w i t c h
–Neutral 4LO switch
–Wait detection switch
–Transfer control device
–Transfer motor
–Transfer terminal cord assembly
11. Support transmission assembly with a jack.
CAUTION:
When setting a jack, be careful not to bring it into contact with switches.
12. Remove air breather hose. Refer toMT-15, "
Removal and Installation".
13. Remove protector (fuel tube), and then disconnect fuel tubes (for 4WD models). Refer toFL-7, "
Removal
and Installation (4WD Models Only)".
14. Remove insulator mounting nuts.
15. Remove transmission cross member and insulator.
16. Remove transmission assembly mounting bolts.
17. Remove transmission assembly from the vehicle.
CAUTION:
Secure transmission assembly to a jack while removing it.
18. Remove transfer assembly (for 4WD models). Refer toTF-111, "
Removal and Installation".
19. Remove release bearing sleeve assembly and withdrawal lever, if necessary. Refer toCL-14, "
Removal
and Installation".
INSTALLATION
Note the following, and install in the reverse order of removal.
lTighten the bolts to the specified torque.
CAUTION:
lWhen installing transmission assembly, be careful not to
bring main drive gear into contact with clutch cover.
lAfter installation, check for oil leakage and oil level. Refer toMT-
9, "OIL LEAKAGE AND OIL LEVEL".
lIf flywheel is removed, align dowel pin with the smallest hole of
flywheel. Refer toEM-114, "
ASSEMBLY".
LCIA0367E
Bolt length “ ”:85 mm (3.35 in)
Tightening torque: 44 N·m (4.5 kg-m, 32 lb-ft)
PCIB1603E
Page 2336 of 3171
TRANSMISSION ASSEMBLY
MT-19
D
E
F
G
H
I
J
K
L
MA
B
MT
Disassembly and AssemblyECS00IDA
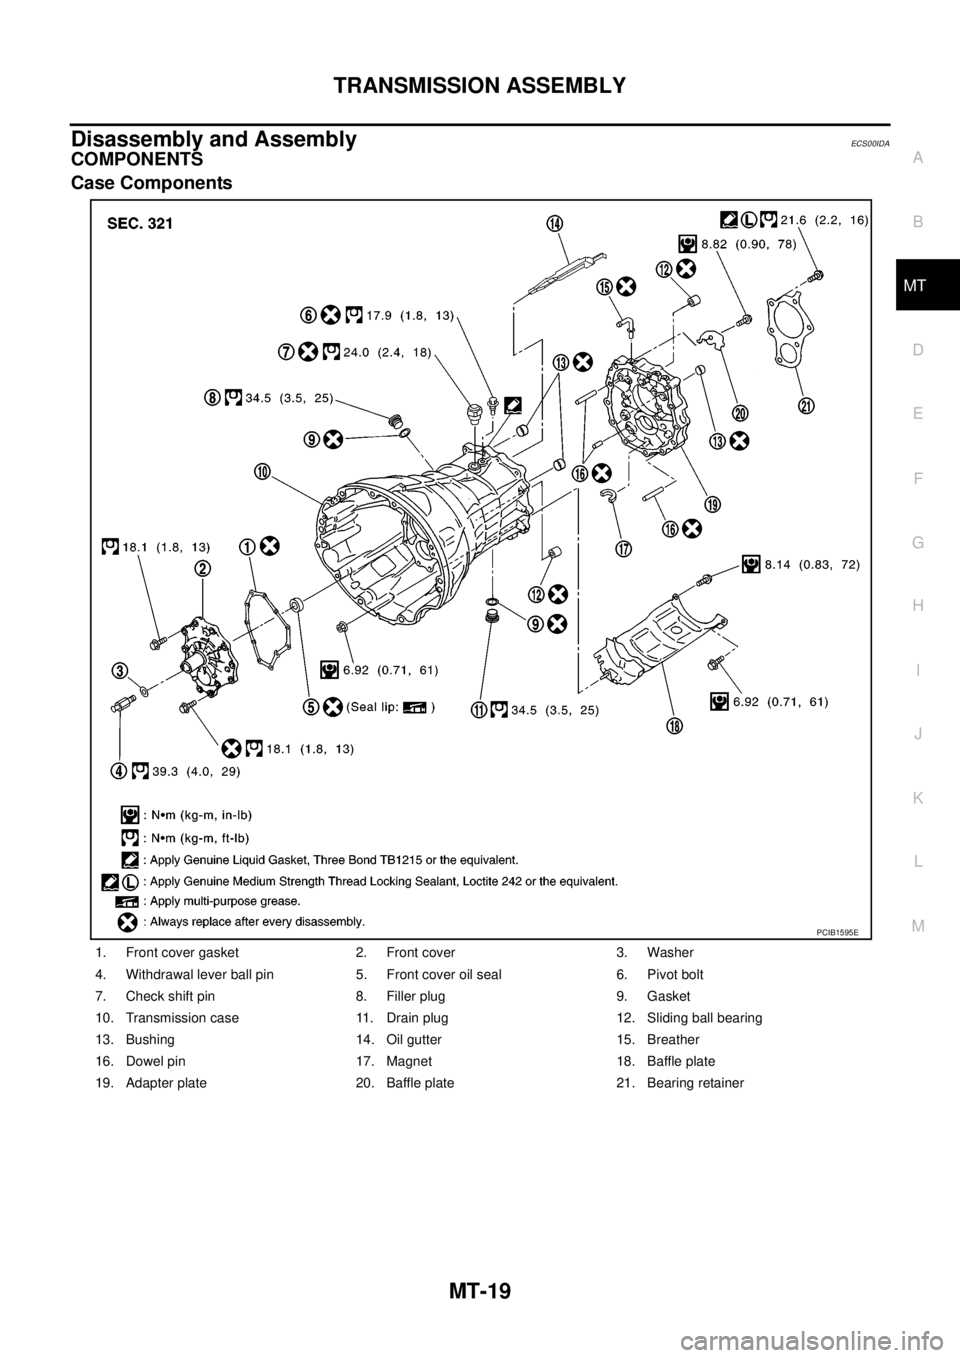
COMPONENTS
Case Components
1. Front cover gasket 2. Front cover 3. Washer
4. Withdrawal lever ball pin 5. Front cover oil seal 6. Pivot bolt
7. Check shift pin 8. Filler plug 9. Gasket
10. Transmission case 11. Drain plug 12. Sliding ball bearing
13. Bushing 14. Oil gutter 15. Breather
16. Dowel pin 17. Magnet 18. Baffle plate
19. Adapter plate 20. Baffle plate 21. Bearing retainer
PCIB1595E
Page 2337 of 3171
MT-20
TRANSMISSION ASSEMBLY
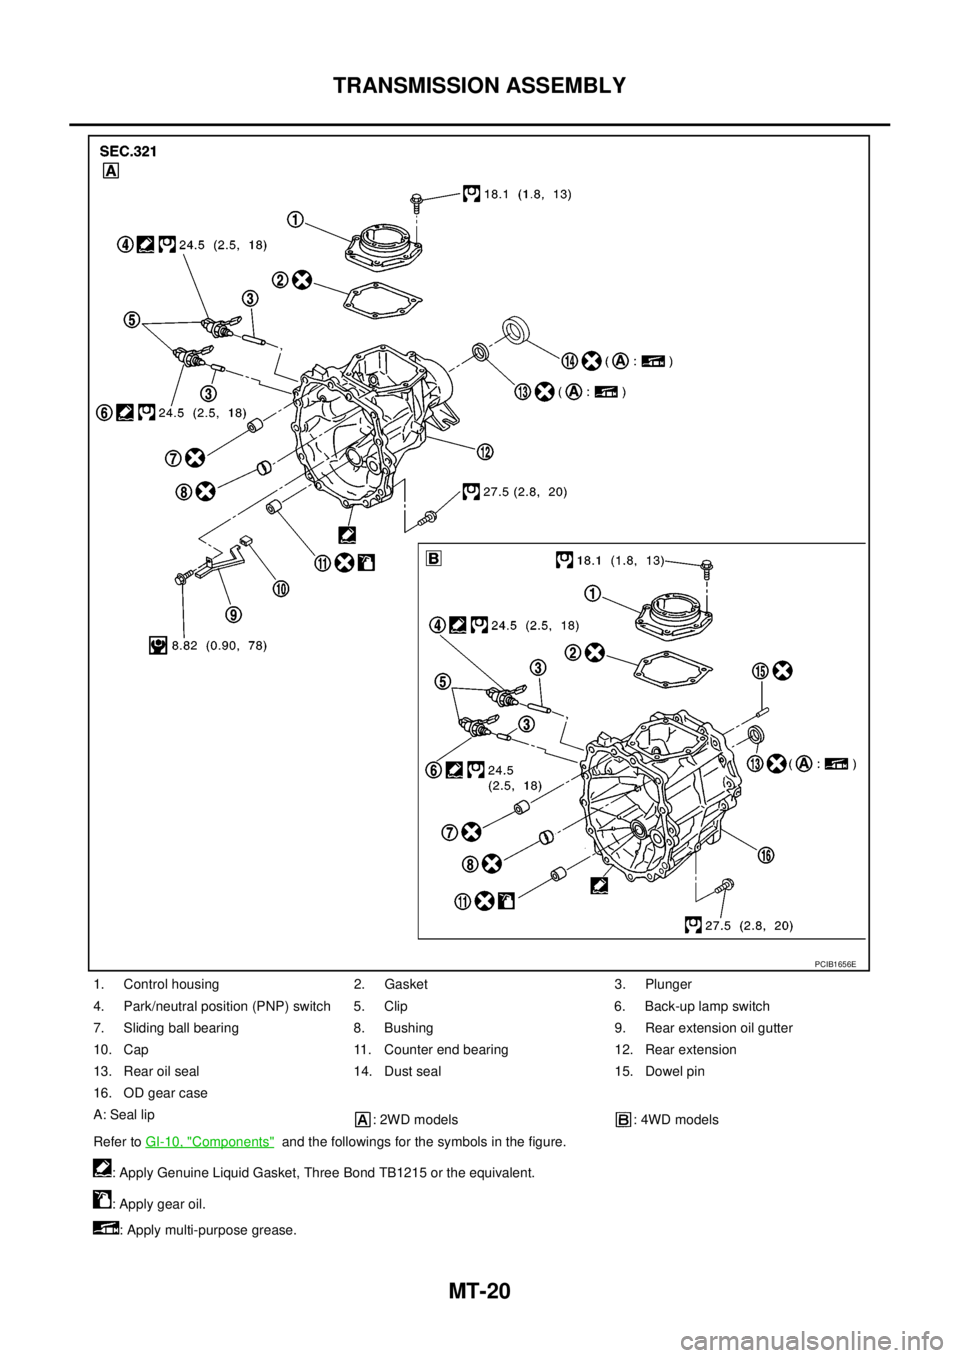
1. Control housing 2. Gasket 3. Plunger
4. Park/neutral position (PNP) switch 5. Clip 6. Back-up lamp switch
7. Sliding ball bearing 8. Bushing 9. Rear extension oil gutter
10. Cap 11. Counter end bearing 12. Rear extension
13. Rear oil seal 14. Dust seal 15. Dowel pin
16. OD gear case
A: Seal lip
: 2WD models : 4WD models
Refer toGI-10, "
Components"and the followings for the symbols in the figure.
: Apply Genuine Liquid Gasket, Three Bond TB1215 or the equivalent.
: Apply gear oil.
: Apply multi-purpose grease.
PCIB1656E
Page 2338 of 3171
TRANSMISSION ASSEMBLY
MT-21
D
E
F
G
H
I
J
K
L
MA
B
MT
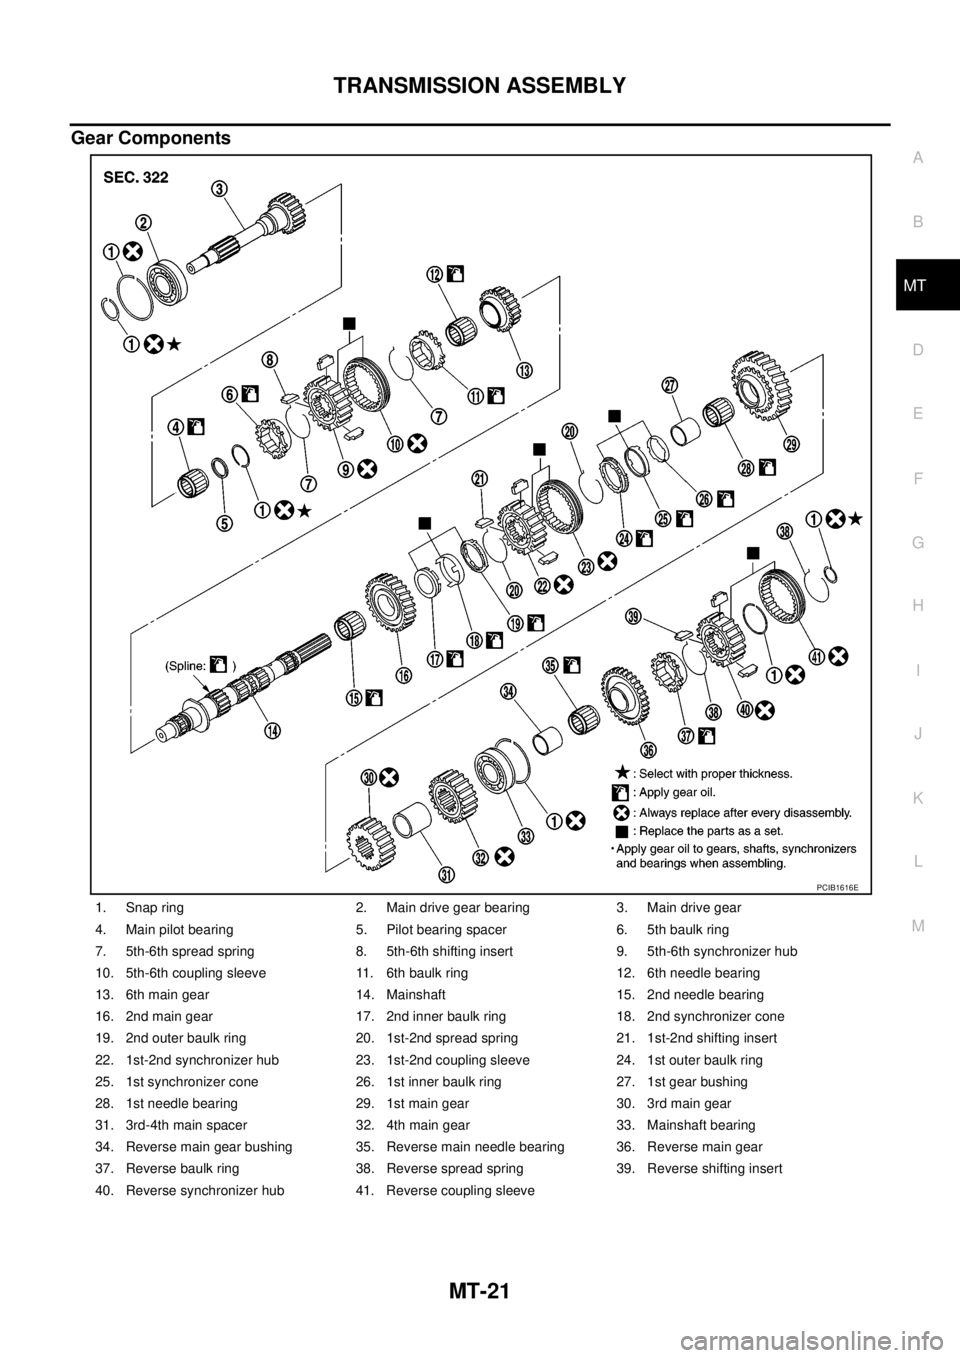
Gear Components
1. Snap ring 2. Main drive gear bearing 3. Main drive gear
4. Main pilot bearing 5. Pilot bearing spacer 6. 5th baulk ring
7. 5th-6th spread spring 8. 5th-6th shifting insert 9. 5th-6th synchronizer hub
10. 5th-6th coupling sleeve 11. 6th baulk ring 12. 6th needle bearing
13. 6th main gear 14. Mainshaft 15. 2nd needle bearing
16. 2nd main gear 17. 2nd inner baulk ring 18. 2nd synchronizer cone
19. 2nd outer baulk ring 20. 1st-2nd spread spring 21. 1st-2nd shifting insert
22. 1st-2nd synchronizer hub 23. 1st-2nd coupling sleeve 24. 1st outer baulk ring
25. 1st synchronizer cone 26. 1st inner baulk ring 27. 1st gear bushing
28. 1st needle bearing 29. 1st main gear 30. 3rd main gear
31. 3rd-4th main spacer 32. 4th main gear 33. Mainshaft bearing
34. Reverse main gear bushing 35. Reverse main needle bearing 36. Reverse main gear
37. Reverse baulk ring 38. Reverse spread spring 39. Reverse shifting insert
40. Reverse synchronizer hub 41. Reverse coupling sleeve
PCIB1616E
Page 2339 of 3171
MT-22
TRANSMISSION ASSEMBLY
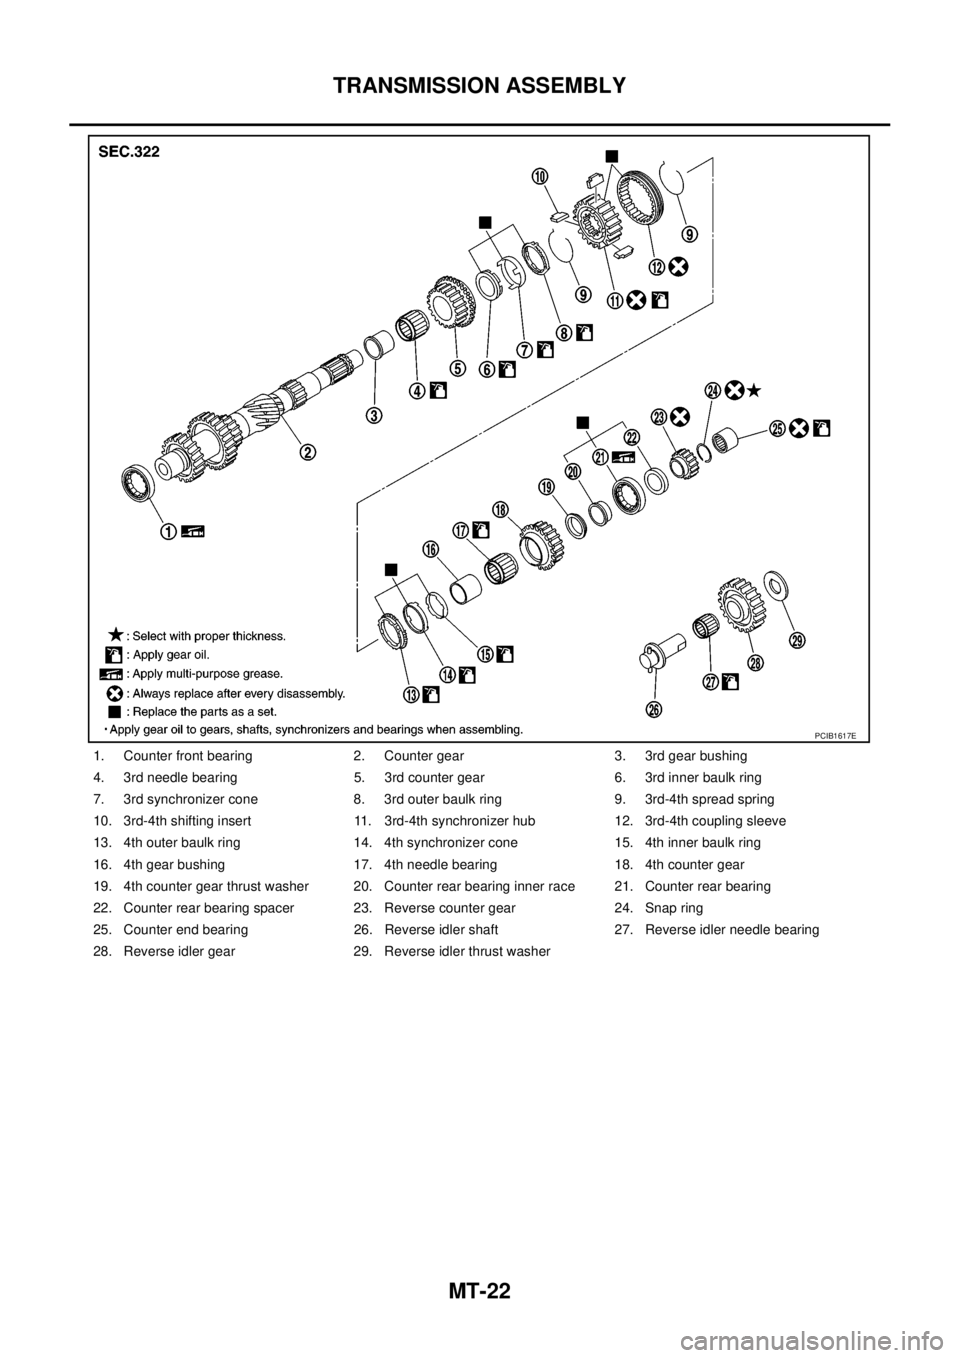
1. Counter front bearing 2. Counter gear 3. 3rd gear bushing
4. 3rd needle bearing 5. 3rd counter gear 6. 3rd inner baulk ring
7. 3rd synchronizer cone 8. 3rd outer baulk ring 9. 3rd-4th spread spring
10. 3rd-4th shifting insert 11. 3rd-4th synchronizer hub 12. 3rd-4th coupling sleeve
13. 4th outer baulk ring 14. 4th synchronizer cone 15. 4th inner baulk ring
16. 4th gear bushing 17. 4th needle bearing 18. 4th counter gear
19. 4th counter gear thrust washer 20. Counter rear bearing inner race 21. Counter rear bearing
22. Counter rear bearing spacer 23. Reverse counter gear 24. Snap ring
25. Counter end bearing 26. Reverse idler shaft 27. Reverse idler needle bearing
28. Reverse idler gear 29. Reverse idler thrust washer
PCIB1617E
Page 2340 of 3171
TRANSMISSION ASSEMBLY
MT-23
D
E
F
G
H
I
J
K
L
MA
B
MT
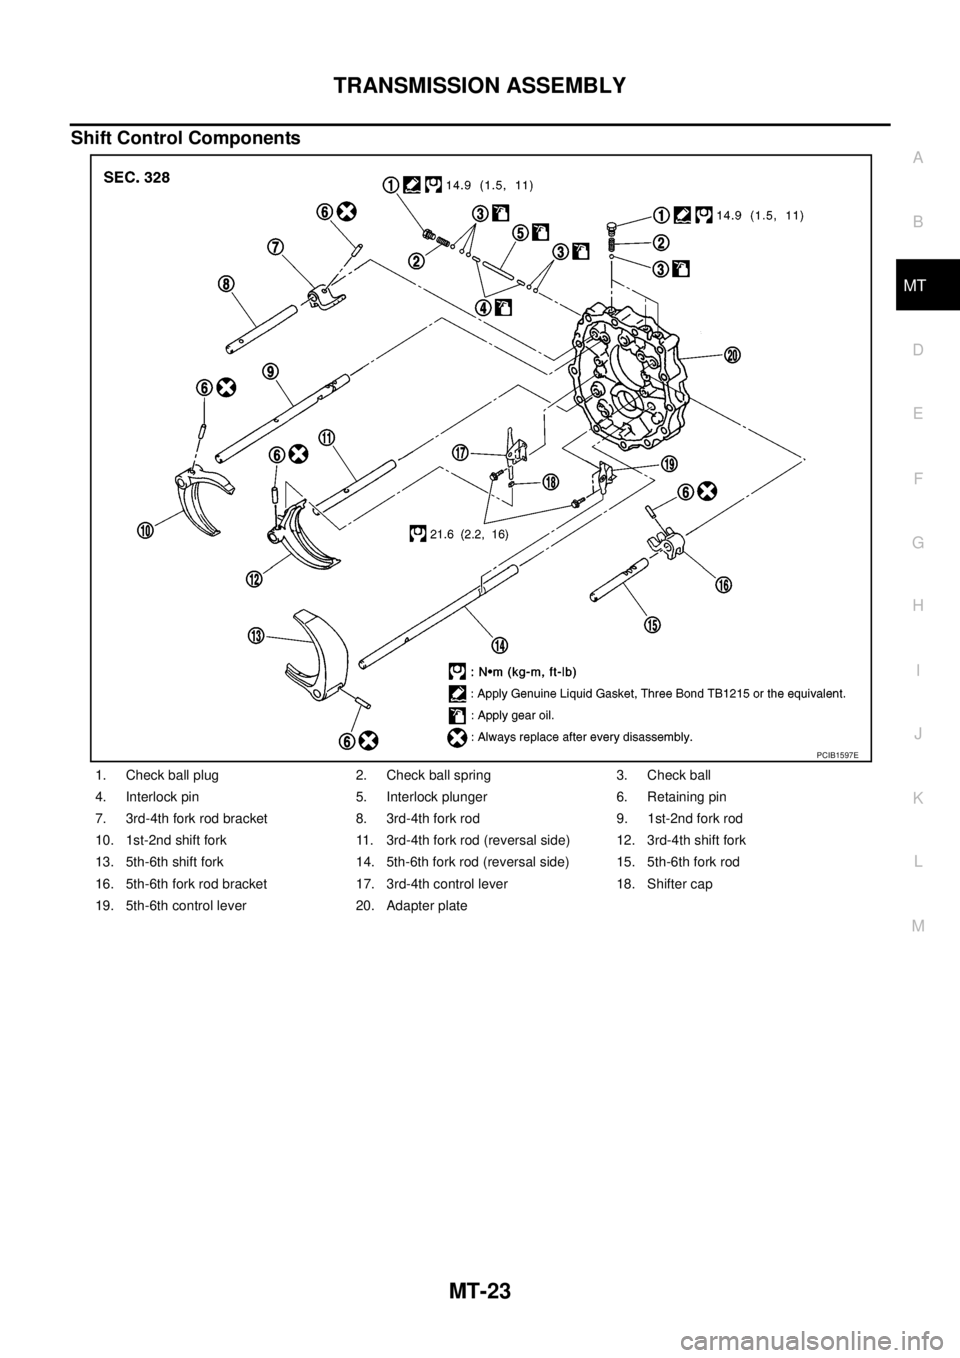
Shift Control Components
1. Check ball plug 2. Check ball spring 3. Check ball
4. Interlock pin 5. Interlock plunger 6. Retaining pin
7. 3rd-4th fork rod bracket 8. 3rd-4th fork rod 9. 1st-2nd fork rod
10. 1st-2nd shift fork 11. 3rd-4th fork rod (reversal side) 12. 3rd-4th shift fork
13. 5th-6th shift fork 14. 5th-6th fork rod (reversal side) 15. 5th-6th fork rod
16. 5th-6th fork rod bracket 17. 3rd-4th control lever 18. Shifter cap
19. 5th-6th control lever 20. Adapter plate
PCIB1597E