NISSAN NAVARA 2005 Repair Workshop Manual
NAVARA 2005
NISSAN
NISSAN
https://www.carmanualsonline.info/img/5/57362/w960_57362-0.png
NISSAN NAVARA 2005 Repair Workshop Manual
Trending: start stop button, remove seats, air conditioning, oil, display, MPG, lights
Page 281 of 3171
DISASSEMBLY
AT-273
D
E
F
G
H
I
J
K
L
MA
B
AT
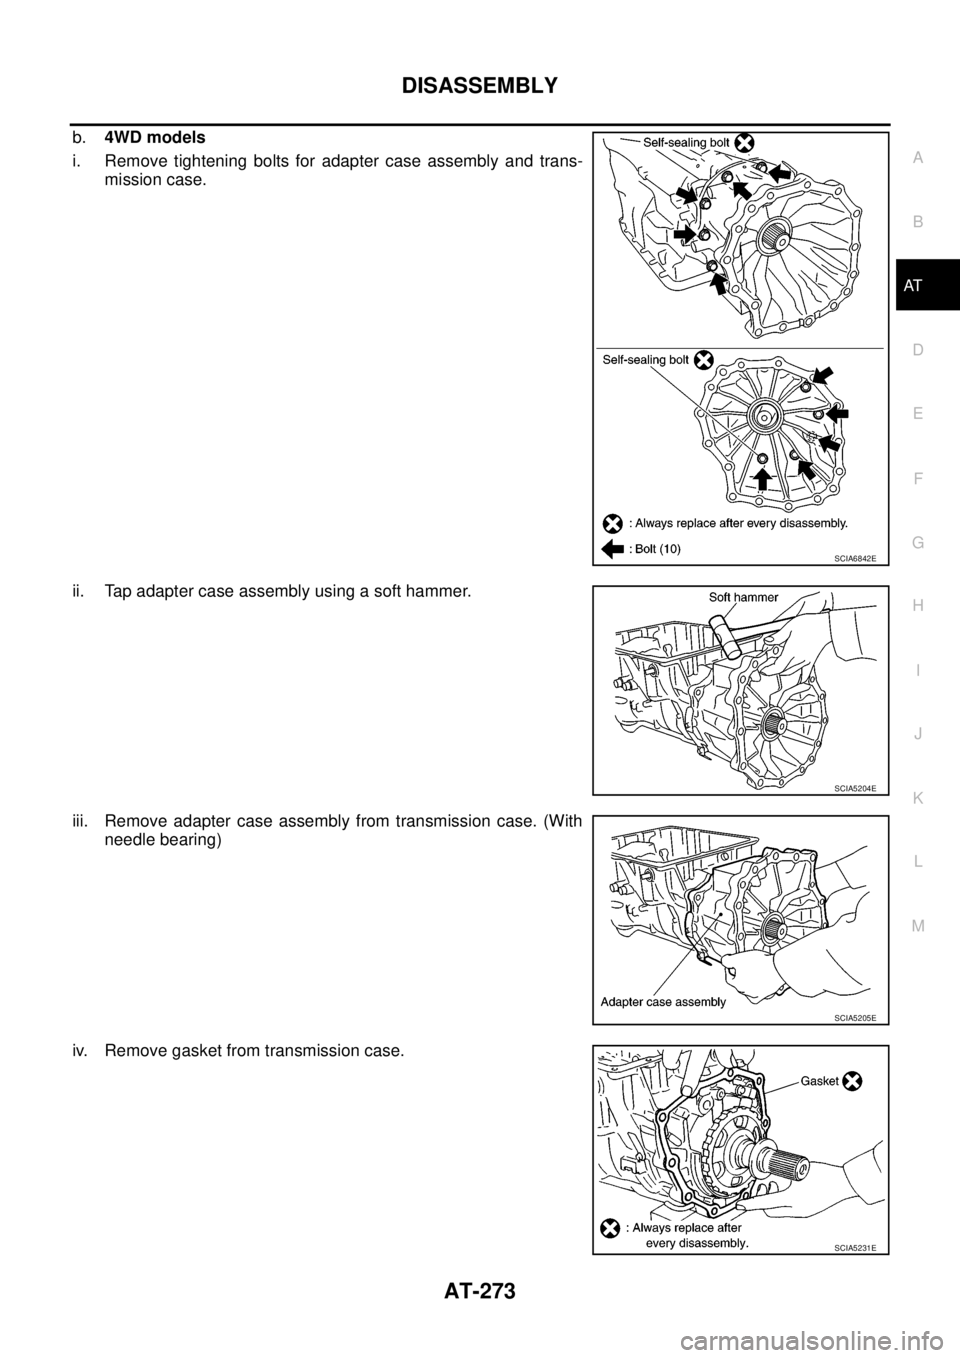
b.4WD models
i. Remove tightening bolts for adapter case assembly and trans-
mission case.
ii. Tap adapter case assembly using a soft hammer.
iii. Remove adapter case assembly from transmission case. (With
needle bearing)
iv. Remove gasket from transmission case.
SCIA6842E
SCIA5204E
SCIA5205E
SCIA5231E
Page 282 of 3171
AT-274
DISASSEMBLY
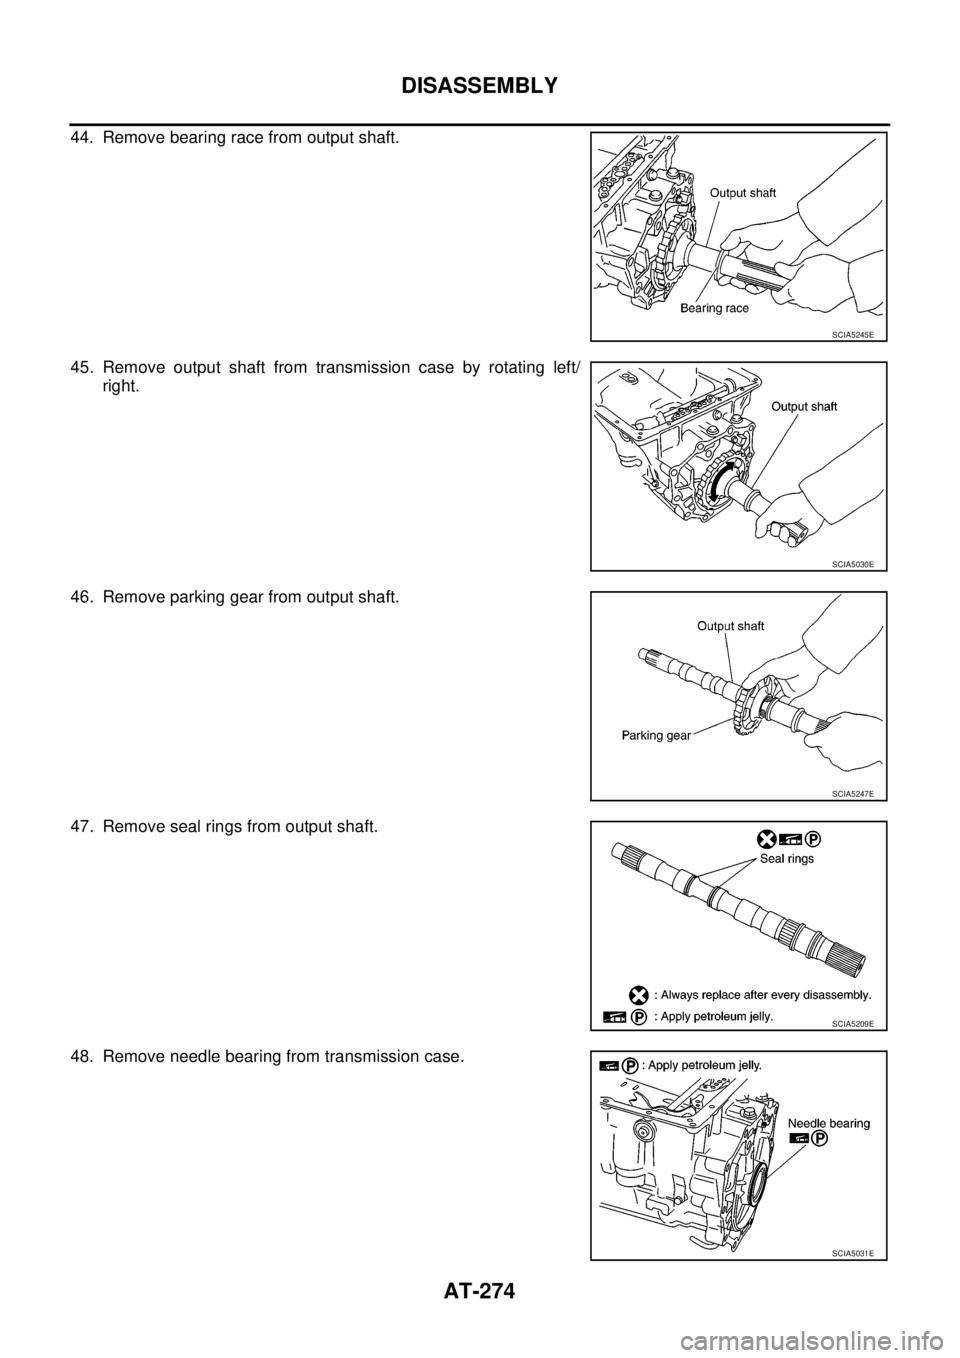
44. Remove bearing race from output shaft.
45. Remove output shaft from transmission case by rotating left/
right.
46. Remove parking gear from output shaft.
47. Remove seal rings from output shaft.
48. Remove needle bearing from transmission case.
SCIA5245E
SCIA5030E
SCIA5247E
SCIA5209E
SCIA5031E
Page 283 of 3171
DISASSEMBLY
AT-275
D
E
F
G
H
I
J
K
L
MA
B
AT
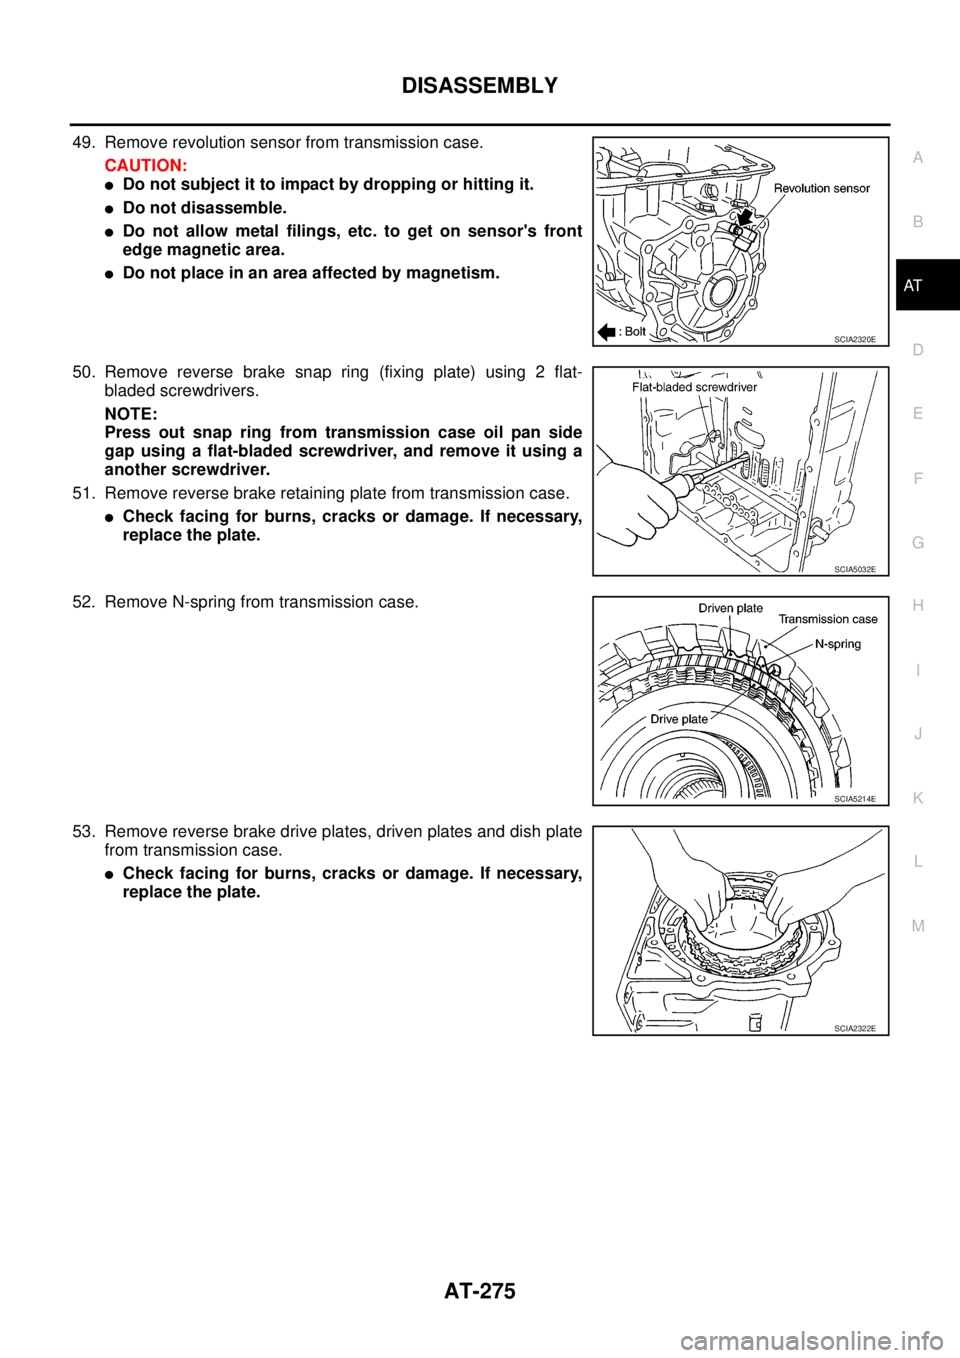
49. Remove revolution sensor from transmission case.
CAUTION:
lDo not subject it to impact by dropping or hitting it.
lDo not disassemble.
lDo not allow metal filings, etc. to get on sensor's front
edge magnetic area.
lDo not place in an area affected by magnetism.
50. Remove reverse brake snap ring (fixing plate) using 2 flat-
bladed screwdrivers.
NOTE:
Press out snap ring from transmission case oil pan side
gap using a flat-bladed screwdriver, and remove it using a
another screwdriver.
51. Remove reverse brake retaining plate from transmission case.
lCheck facing for burns, cracks or damage. If necessary,
replace the plate.
52. Remove N-spring from transmission case.
53. Remove reverse brake drive plates, driven plates and dish plate
from transmission case.
lCheck facing for burns, cracks or damage. If necessary,
replace the plate.
SCIA2320E
SCIA5032E
SCIA5214E
SCIA2322E
Page 284 of 3171
AT-276
DISASSEMBLY
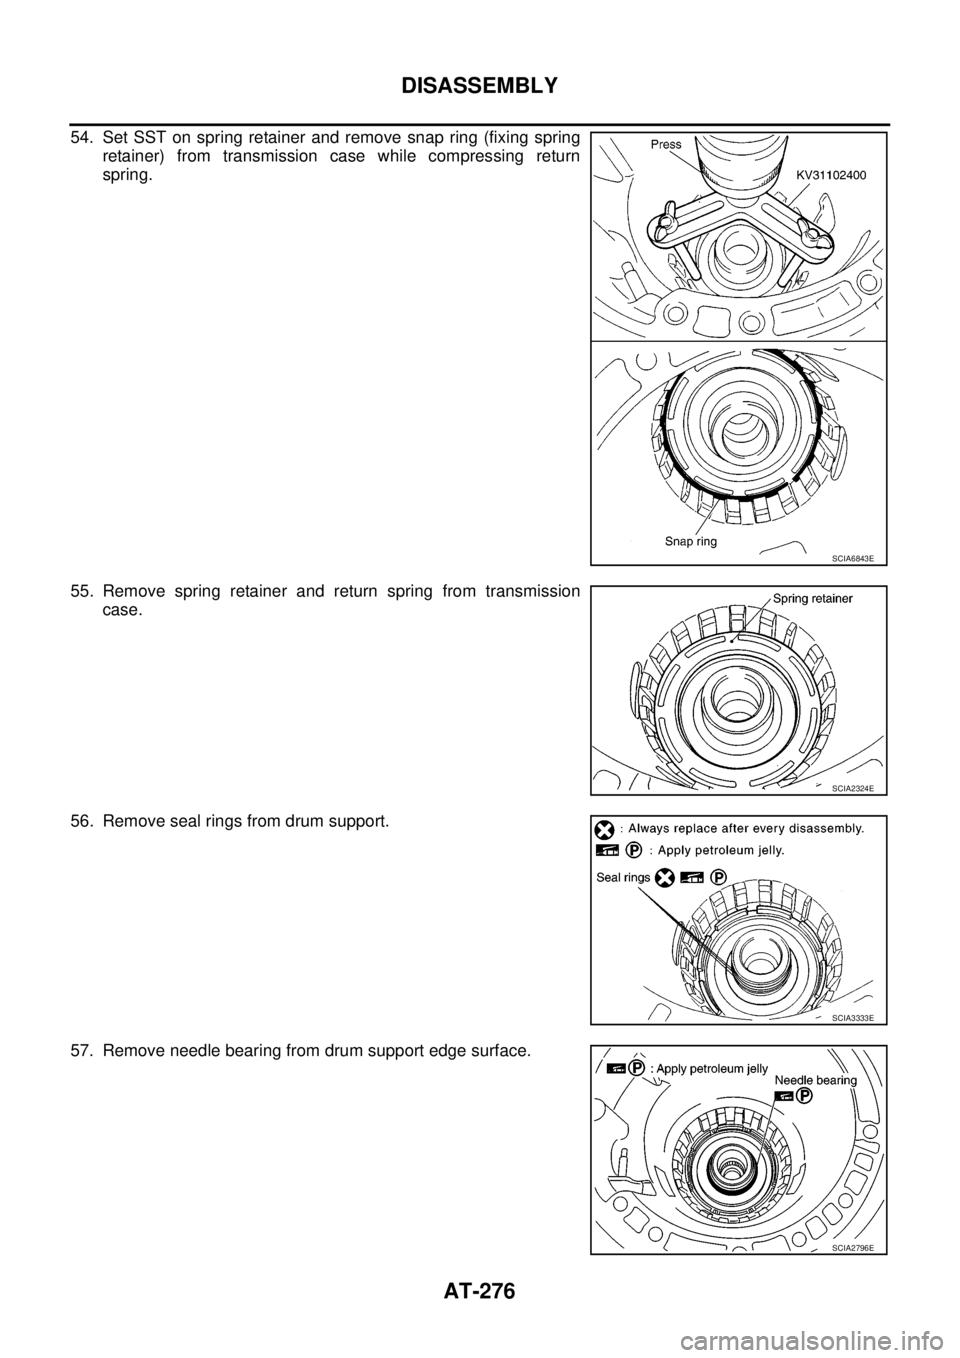
54. Set SST on spring retainer and remove snap ring (fixing spring
retainer) from transmission case while compressing return
spring.
55. Remove spring retainer and return spring from transmission
case.
56. Remove seal rings from drum support.
57. Remove needle bearing from drum support edge surface.
SCIA6843E
SCIA2324E
SCIA3333E
SCIA2796E
Page 285 of 3171
DISASSEMBLY
AT-277
D
E
F
G
H
I
J
K
L
MA
B
AT
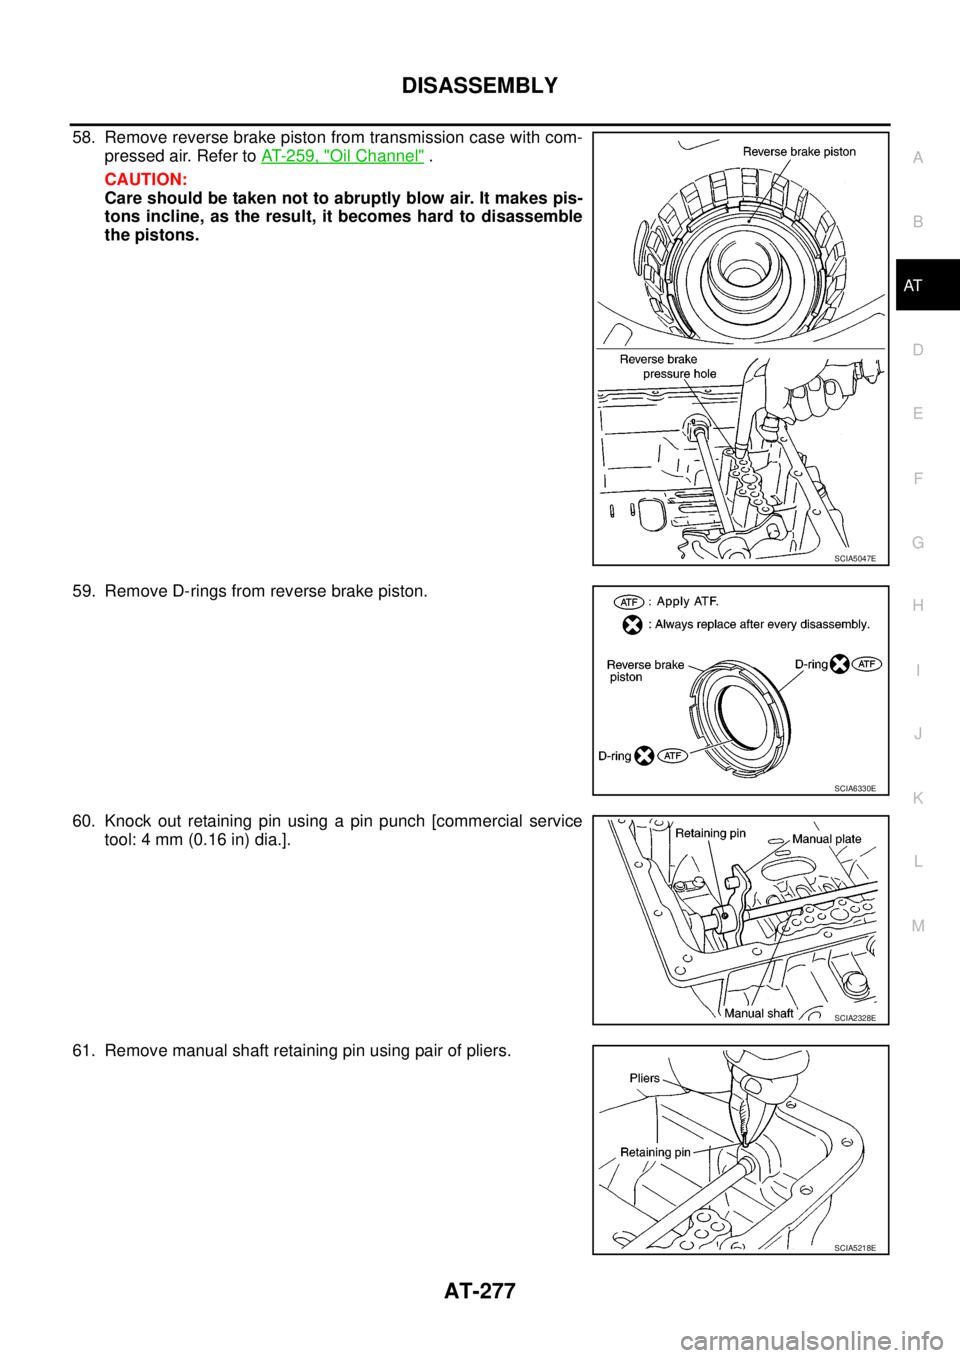
58. Removereversebrakepistonfromtransmissioncasewithcom-
pressed air. Refer toAT- 2 5 9 , "
Oil Channel".
CAUTION:
Care should be taken not to abruptly blow air. It makes pis-
tons incline, as the result, it becomes hard to disassemble
the pistons.
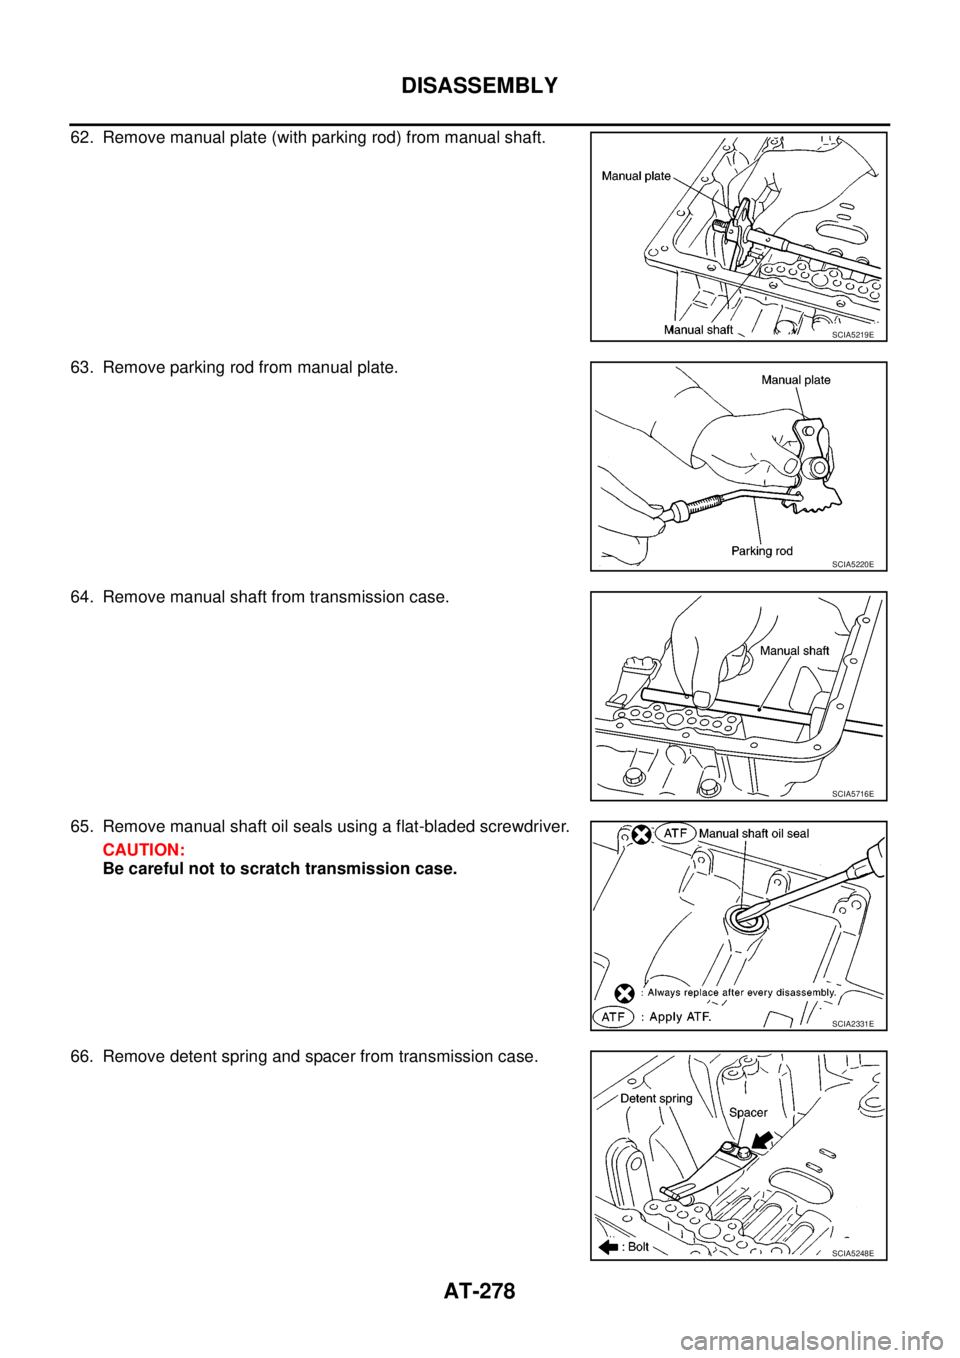
59. Remove D-rings from reverse brake piston.
60. Knock out retaining pin using a pin punch [commercial service
tool: 4 mm (0.16 in) dia.].
61. Remove manual shaft retaining pin using pair of pliers.
SCIA5047E
SCIA6330E
SCIA2328E
SCIA5218E
Page 286 of 3171
AT-278
DISASSEMBLY
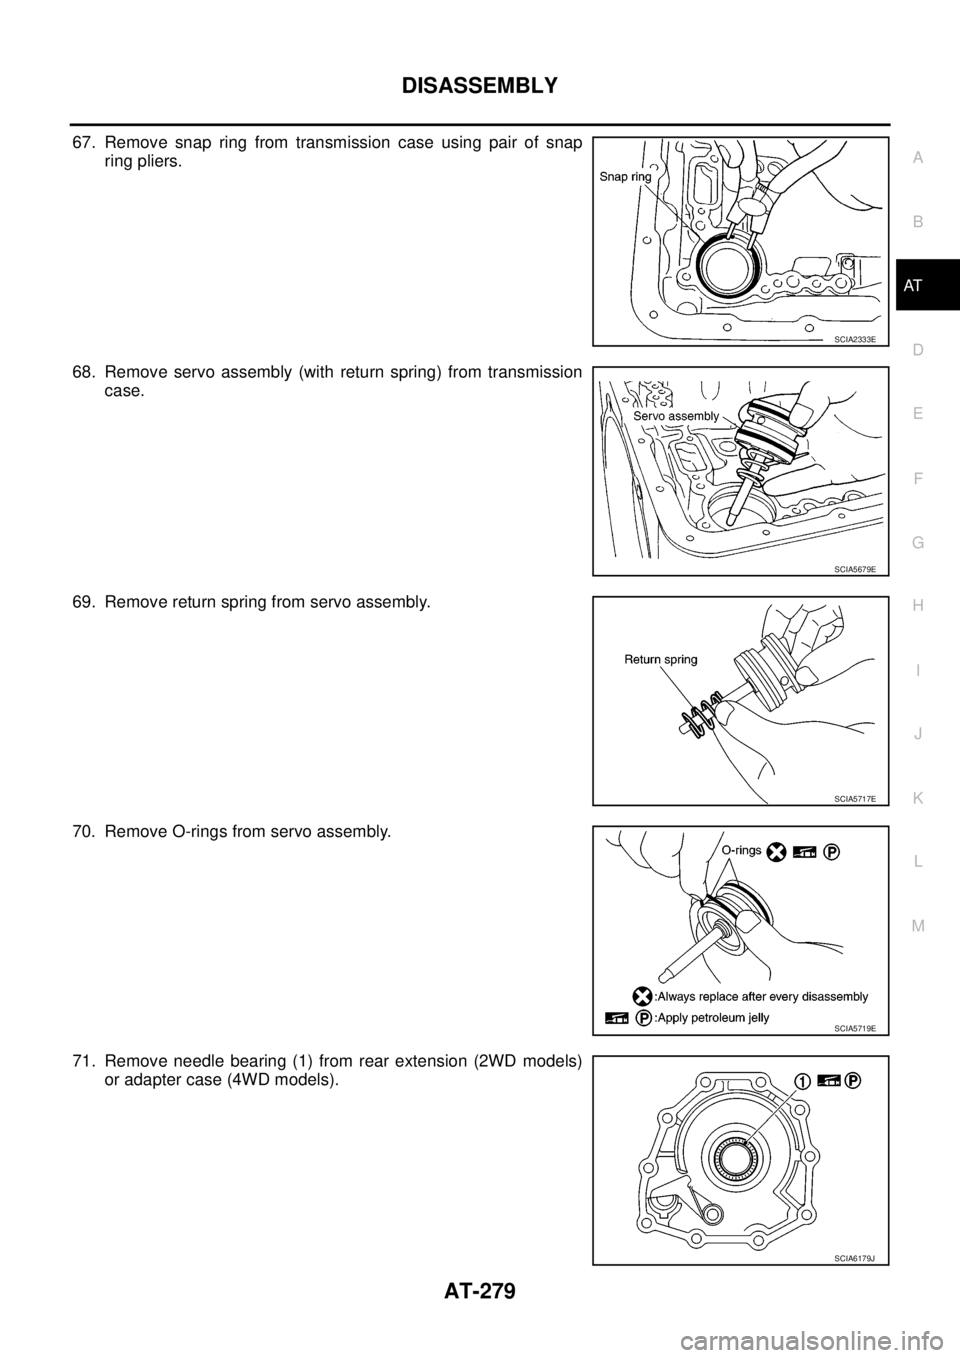
62. Remove manual plate (with parking rod) from manual shaft.
63. Remove parking rod from manual plate.
64. Remove manual shaft from transmission case.
65. Remove manual shaft oil seals using a flat-bladed screwdriver.
CAUTION:
Be careful not to scratch transmission case.
66. Remove detent spring and spacer from transmission case.
SCIA5219E
SCIA5220E
SCIA5716E
SCIA2331E
SCIA5248E
Page 287 of 3171
DISASSEMBLY
AT-279
D
E
F
G
H
I
J
K
L
MA
B
AT
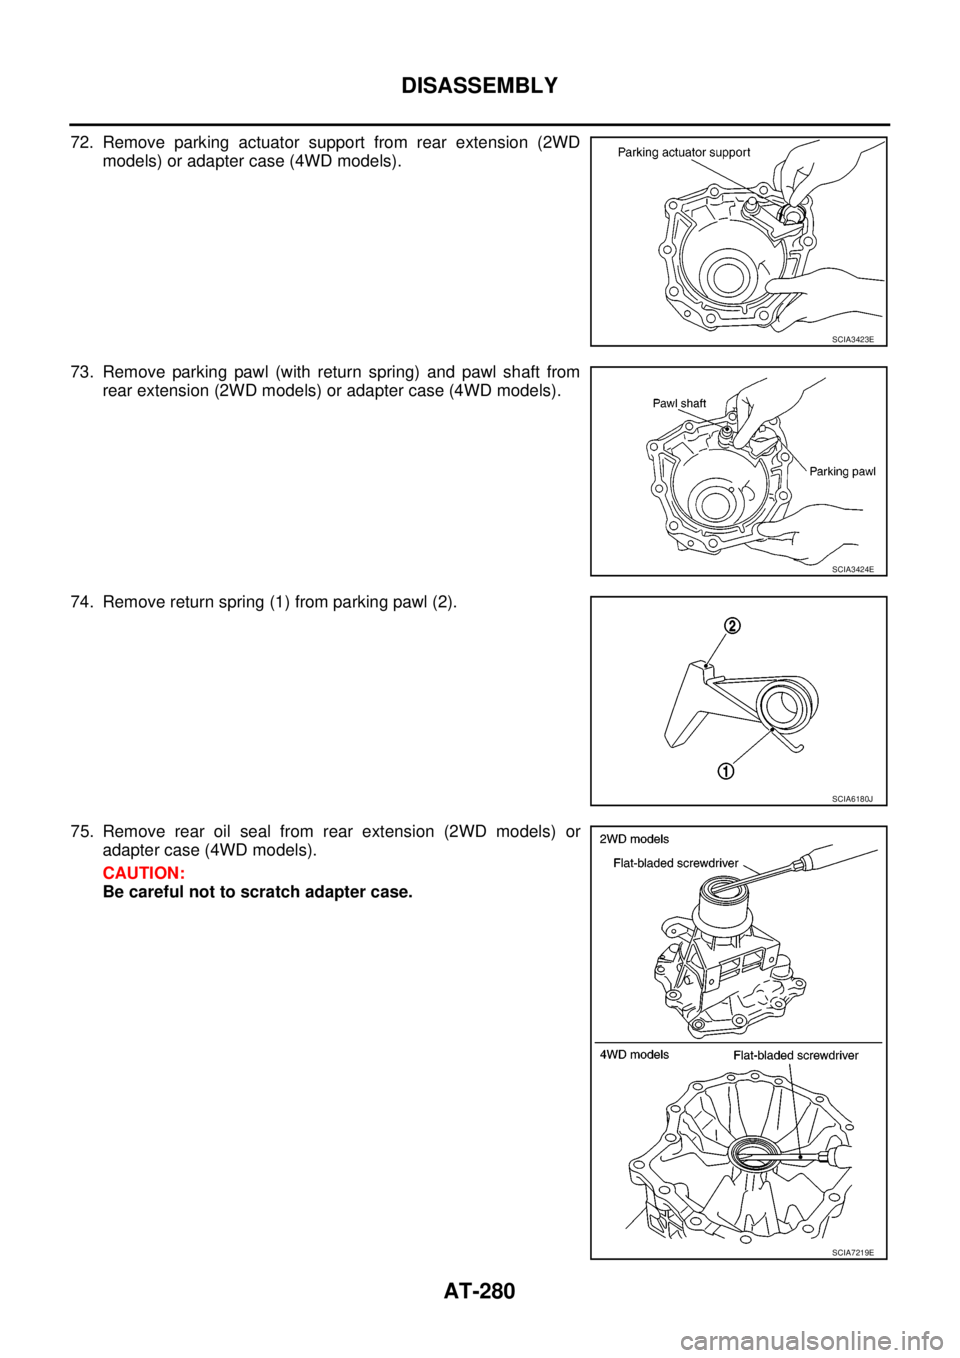
67. Remove snap ring from transmission case using pair of snap
ring pliers.
68. Remove servo assembly (with return spring) from transmission
case.
69. Remove return spring from servo assembly.
70. Remove O-rings from servo assembly.
71. Remove needle bearing (1) from rear extension (2WD models)
or adapter case (4WD models).
SCIA2333E
SCIA5679E
SCIA5717E
SCIA5719E
SCIA6179J
Page 288 of 3171
AT-280
DISASSEMBLY
72. Remove parking actuator support from rear extension (2WD
models) or adapter case (4WD models).
73. Remove parking pawl (with return spring) and pawl shaft from
rear extension (2WD models) or adapter case (4WD models).
74. Remove return spring (1) from parking pawl (2).
75. Remove rear oil seal from rear extension (2WD models) or
adapter case (4WD models).
CAUTION:
Be careful not to scratch adapter case.
SCIA3423E
SCIA3424E
SCIA6180J
SCIA7219E
Page 289 of 3171
REPAIR FOR COMPONENT PARTS
AT-281
D
E
F
G
H
I
J
K
L
MA
B
AT
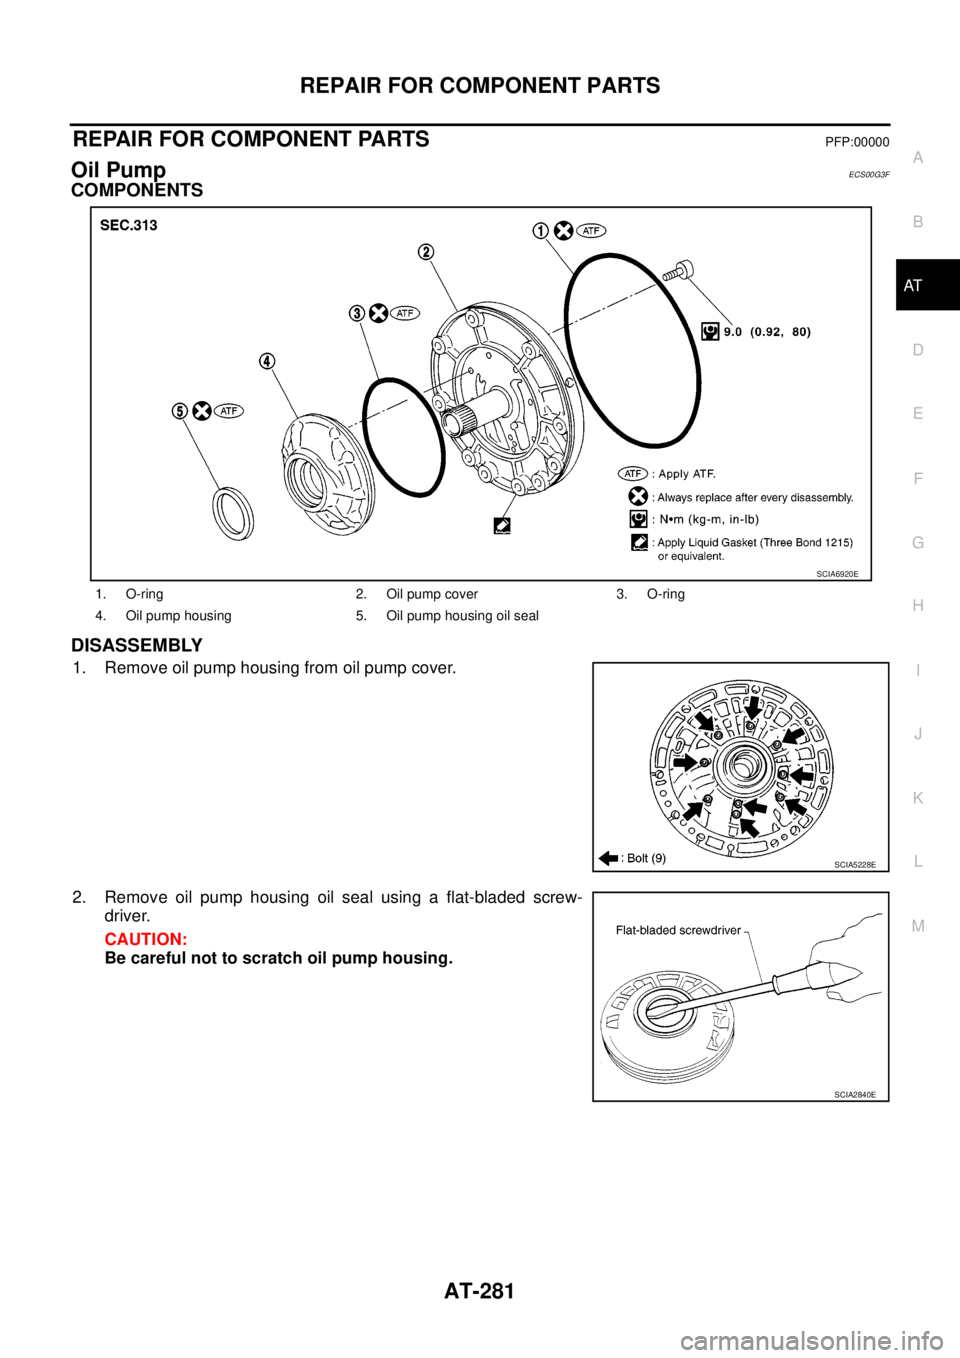
REPAIR FOR COMPONENT PARTSPFP:00000
Oil PumpECS00G3F
COMPONENTS
DISASSEMBLY
1. Remove oil pump housing from oil pump cover.
2. Remove oil pump housing oil seal using a flat-bladed screw-
driver.
CAUTION:
Be careful not to scratch oil pump housing.
1. O-ring 2. Oil pump cover 3. O-ring
4. Oil pump housing 5. Oil pump housing oil seal
SCIA6920E
SCIA5228E
SCIA2840E
Page 290 of 3171
AT-282
REPAIR FOR COMPONENT PARTS
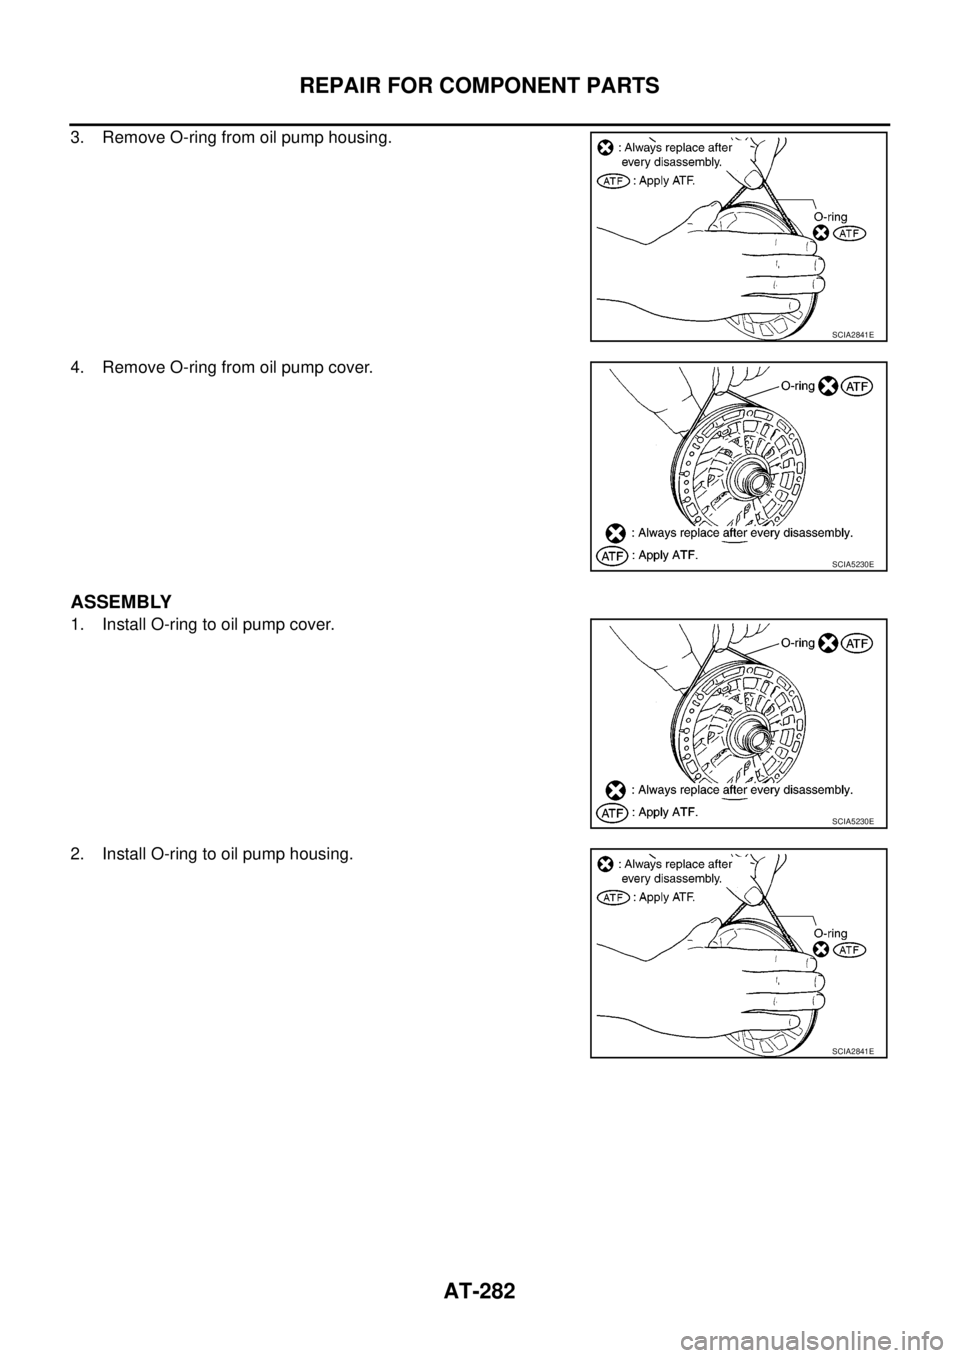
3. Remove O-ring from oil pump housing.
4. Remove O-ring from oil pump cover.
ASSEMBLY
1. Install O-ring to oil pump cover.
2. Install O-ring to oil pump housing.
SCIA2841E
SCIA5230E
SCIA5230E
SCIA2841E
Trending: interior lights, turn signal, tow bar, height adjustment, wheel bolts, cruise control, FL-
