NISSAN PATROL 2000 Electronic Repair Manual
Manufacturer: NISSAN, Model Year: 2000, Model line: PATROL, Model: NISSAN PATROL 2000Pages: 1033, PDF Size: 30.71 MB
Page 791 of 1033
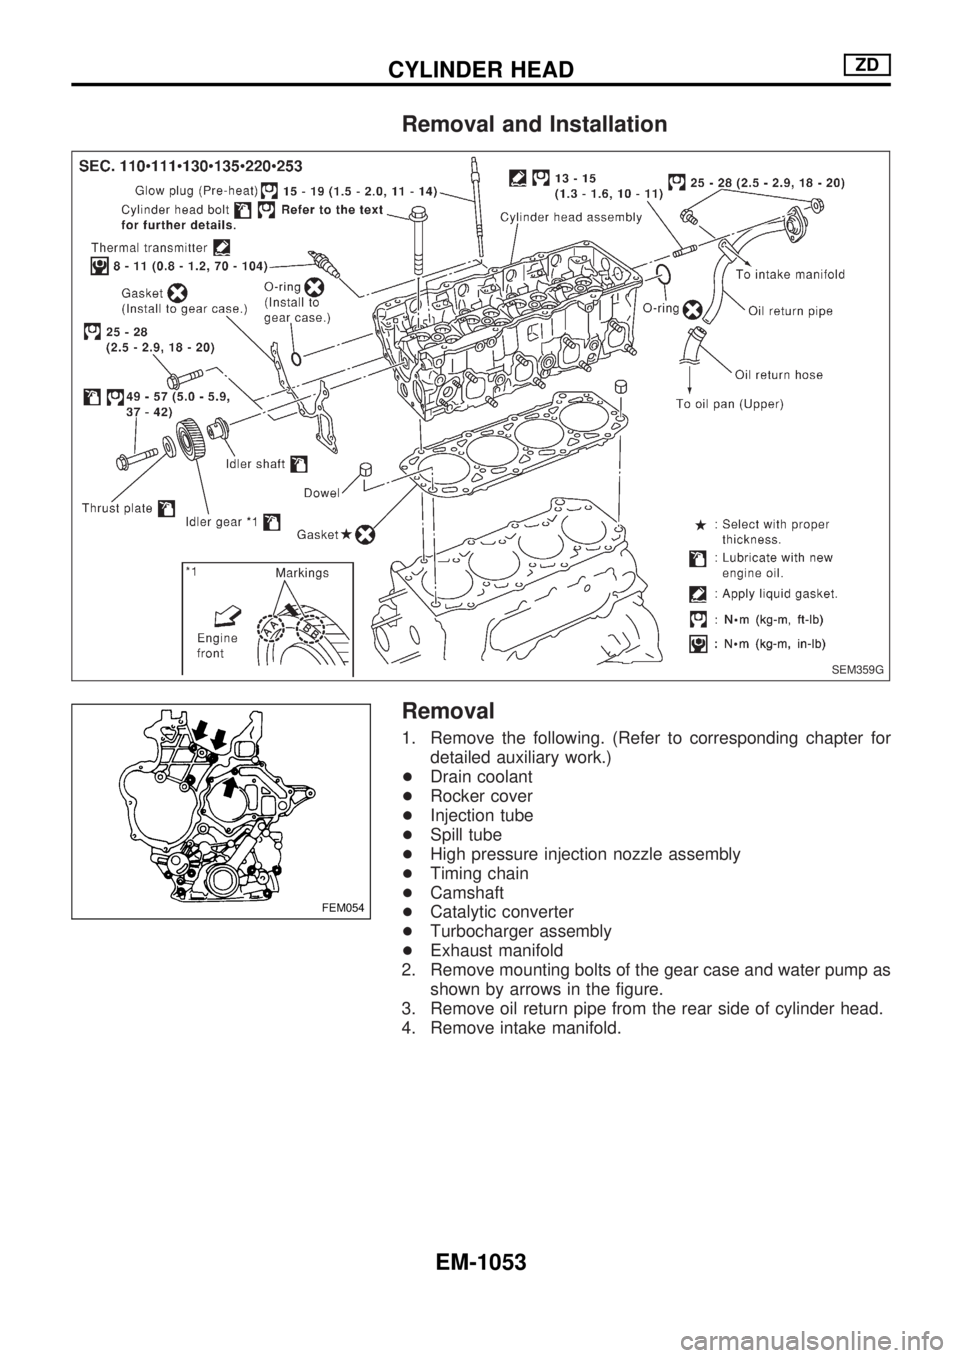
Removal and Installation
Removal
1. Remove the following. (Refer to corresponding chapter for
detailed auxiliary work.)
+Drain coolant
+Rocker cover
+Injection tube
+Spill tube
+High pressure injection nozzle assembly
+Timing chain
+Camshaft
+Catalytic converter
+Turbocharger assembly
+Exhaust manifold
2. Remove mounting bolts of the gear case and water pump as
shown by arrows in the figure.
3. Remove oil return pipe from the rear side of cylinder head.
4. Remove intake manifold.
SEM359G
FEM054
CYLINDER HEADZD
EM-1053
Page 792 of 1033
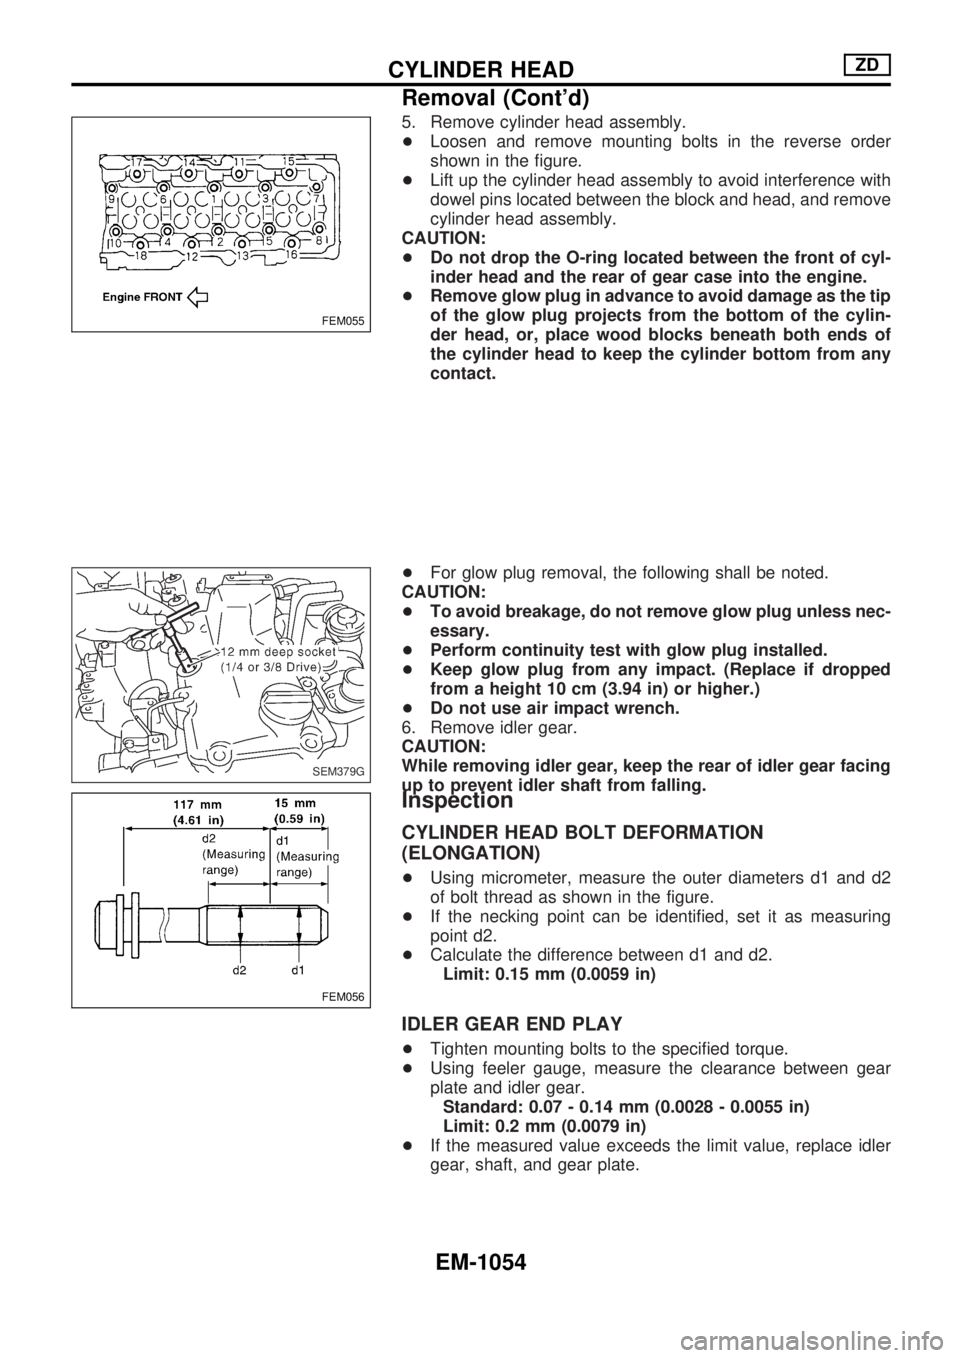
5. Remove cylinder head assembly.
+Loosen and remove mounting bolts in the reverse order
shown in the figure.
+Lift up the cylinder head assembly to avoid interference with
dowel pins located between the block and head, and remove
cylinder head assembly.
CAUTION:
+Do not drop the O-ring located between the front of cyl-
inder head and the rear of gear case into the engine.
+Remove glow plug in advance to avoid damage as the tip
of the glow plug projects from the bottom of the cylin-
der head, or, place wood blocks beneath both ends of
the cylinder head to keep the cylinder bottom from any
contact.
+For glow plug removal, the following shall be noted.
CAUTION:
+To avoid breakage, do not remove glow plug unless nec-
essary.
+Perform continuity test with glow plug installed.
+Keep glow plug from any impact. (Replace if dropped
from a height 10 cm (3.94 in) or higher.)
+Do not use air impact wrench.
6. Remove idler gear.
CAUTION:
While removing idler gear, keep the rear of idler gear facing
up to prevent idler shaft from falling.
Inspection
CYLINDER HEAD BOLT DEFORMATION
(ELONGATION)
+Using micrometer, measure the outer diameters d1 and d2
of bolt thread as shown in the figure.
+If the necking point can be identified, set it as measuring
point d2.
+Calculate the difference between d1 and d2.
Limit: 0.15 mm (0.0059 in)
IDLER GEAR END PLAY
+Tighten mounting bolts to the specified torque.
+Using feeler gauge, measure the clearance between gear
plate and idler gear.
Standard: 0.07 - 0.14 mm (0.0028 - 0.0055 in)
Limit: 0.2 mm (0.0079 in)
+If the measured value exceeds the limit value, replace idler
gear, shaft, and gear plate.
FEM055
SEM379G
FEM056
CYLINDER HEADZD
Removal (Cont'd)
EM-1054
Page 793 of 1033
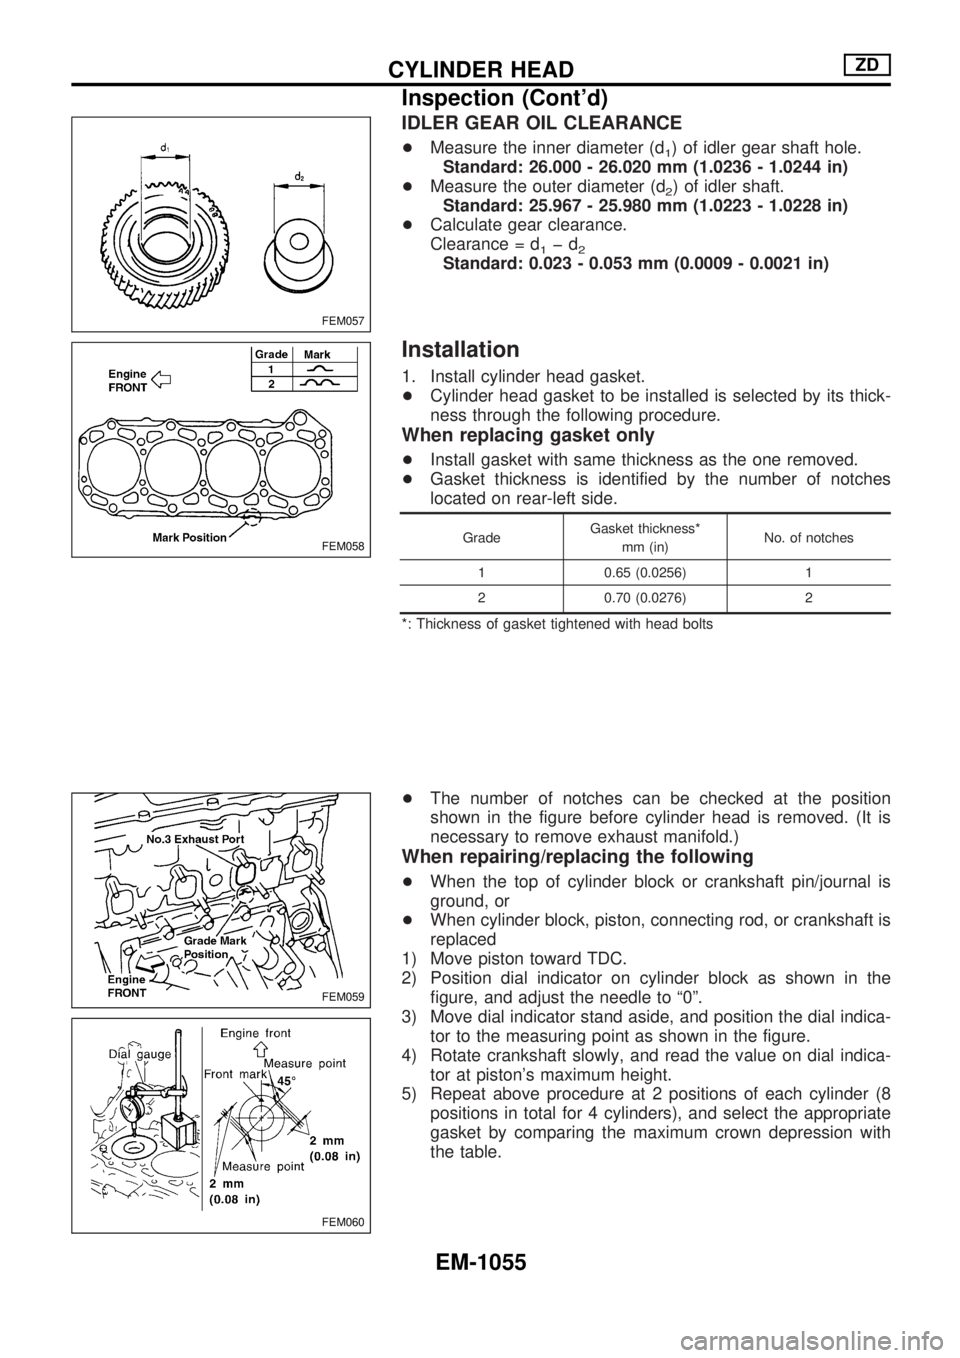
IDLER GEAR OIL CLEARANCE
+Measure the inner diameter (d1) of idler gear shaft hole.
Standard: 26.000 - 26.020 mm (1.0236 - 1.0244 in)
+Measure the outer diameter (d
2) of idler shaft.
Standard: 25.967 - 25.980 mm (1.0223 - 1.0228 in)
+Calculate gear clearance.
Clearance = d
1þd2Standard: 0.023 - 0.053 mm (0.0009 - 0.0021 in)
Installation
1. Install cylinder head gasket.
+Cylinder head gasket to be installed is selected by its thick-
ness through the following procedure.
When replacing gasket only
+Install gasket with same thickness as the one removed.
+Gasket thickness is identified by the number of notches
located on rear-left side.
GradeGasket thickness*
mm (in)No. of notches
1 0.65 (0.0256) 1
2 0.70 (0.0276) 2
*: Thickness of gasket tightened with head bolts
+The number of notches can be checked at the position
shown in the figure before cylinder head is removed. (It is
necessary to remove exhaust manifold.)
When repairing/replacing the following
+When the top of cylinder block or crankshaft pin/journal is
ground, or
+When cylinder block, piston, connecting rod, or crankshaft is
replaced
1) Move piston toward TDC.
2) Position dial indicator on cylinder block as shown in the
figure, and adjust the needle to ª0º.
3) Move dial indicator stand aside, and position the dial indica-
tor to the measuring point as shown in the figure.
4) Rotate crankshaft slowly, and read the value on dial indica-
tor at piston's maximum height.
5) Repeat above procedure at 2 positions of each cylinder (8
positions in total for 4 cylinders), and select the appropriate
gasket by comparing the maximum crown depression with
the table.
FEM057
FEM058
FEM059
FEM060
CYLINDER HEADZD
Inspection (Cont'd)
EM-1055
Page 794 of 1033
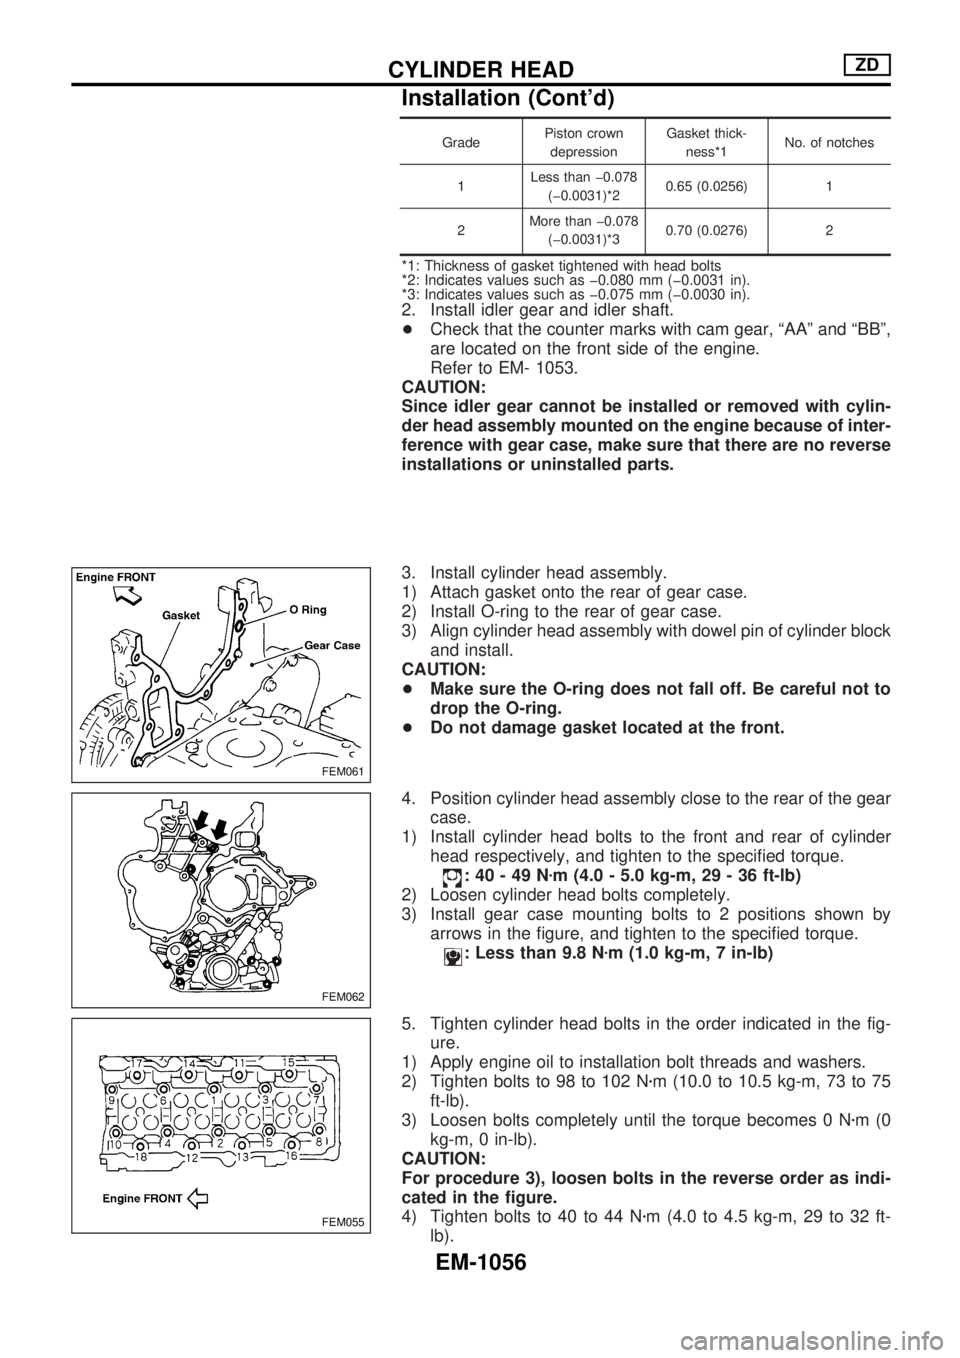
GradePiston crown
depressionGasket thick-
ness*1No. of notches
1Less than þ0.078
(þ0.0031)*20.65 (0.0256) 1
2More than þ0.078
(þ0.0031)*30.70 (0.0276) 2
*1: Thickness of gasket tightened with head bolts
*2: Indicates values such as þ0.080 mm (þ0.0031 in).
*3: Indicates values such as þ0.075 mm (þ0.0030 in).
2. Install idler gear and idler shaft.
+Check that the counter marks with cam gear, ªAAº and ªBBº,
are located on the front side of the engine.
Refer to EM- 1053.
CAUTION:
Since idler gear cannot be installed or removed with cylin-
der head assembly mounted on the engine because of inter-
ference with gear case, make sure that there are no reverse
installations or uninstalled parts.
3. Install cylinder head assembly.
1) Attach gasket onto the rear of gear case.
2) Install O-ring to the rear of gear case.
3) Align cylinder head assembly with dowel pin of cylinder block
and install.
CAUTION:
+Make sure the O-ring does not fall off. Be careful not to
drop the O-ring.
+Do not damage gasket located at the front.
4. Position cylinder head assembly close to the rear of the gear
case.
1) Install cylinder head bolts to the front and rear of cylinder
head respectively, and tighten to the specified torque.
:40-49Nzm (4.0 - 5.0 kg-m, 29 - 36 ft-lb)
2) Loosen cylinder head bolts completely.
3) Install gear case mounting bolts to 2 positions shown by
arrows in the figure, and tighten to the specified torque.
: Less than 9.8 Nzm (1.0 kg-m, 7 in-lb)
5. Tighten cylinder head bolts in the order indicated in the fig-
ure.
1) Apply engine oil to installation bolt threads and washers.
2) Tighten bolts to 98 to 102 Nzm (10.0 to 10.5 kg-m, 73 to 75
ft-lb).
3) Loosen bolts completely until the torque becomes 0 Nzm(0
kg-m, 0 in-lb).
CAUTION:
For procedure 3), loosen bolts in the reverse order as indi-
cated in the figure.
4) Tighten bolts to 40 to 44 Nzm (4.0 to 4.5 kg-m, 29 to 32 ft-
lb).
FEM061
FEM062
FEM055
CYLINDER HEADZD
Installation (Cont'd)
EM-1056
Page 795 of 1033
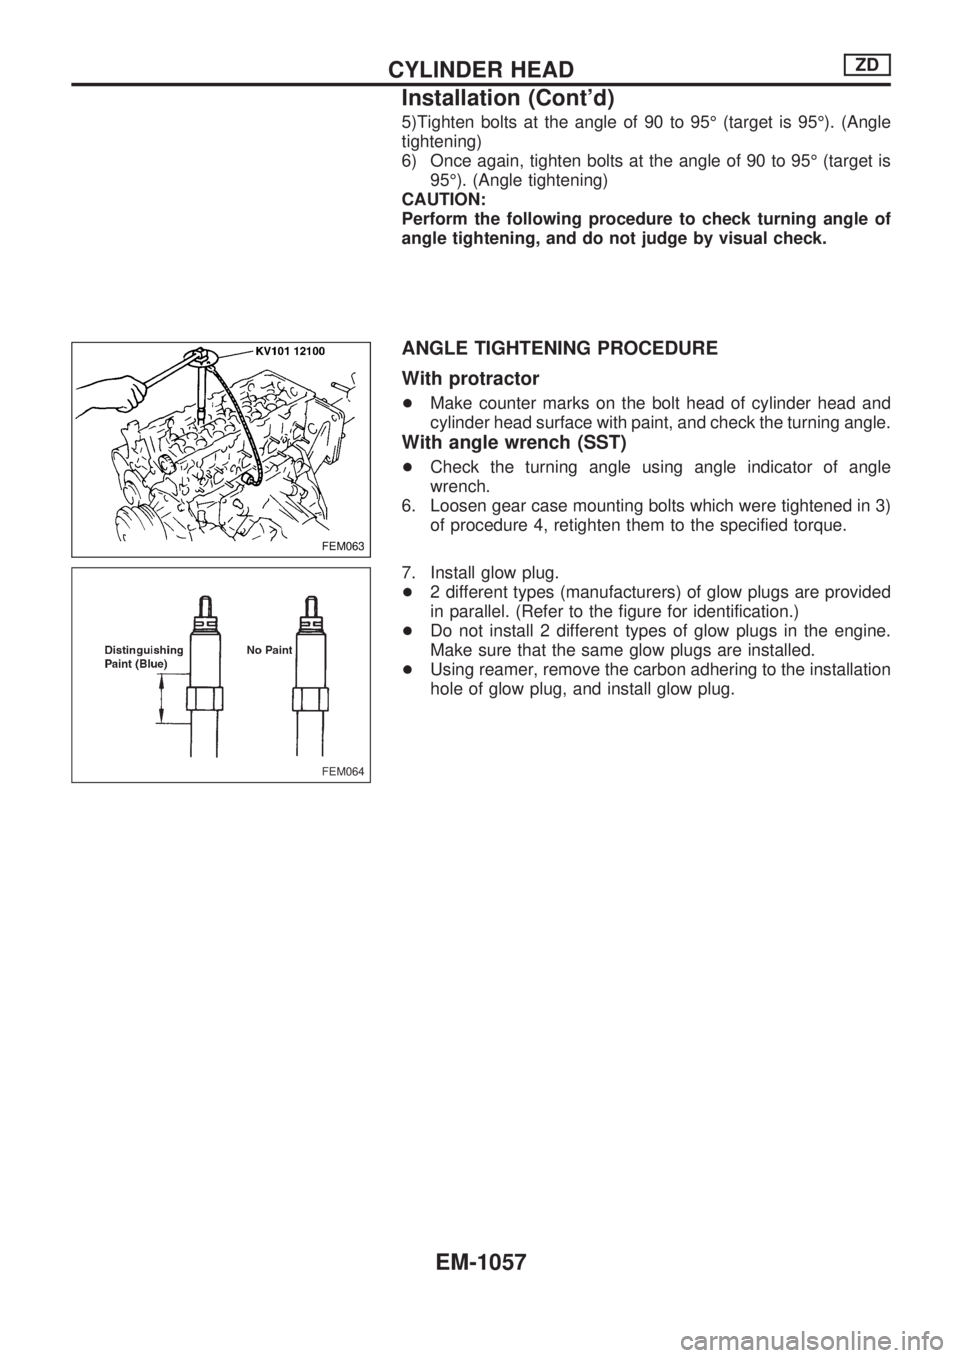
5)Tighten bolts at the angle of 90 to 95É (target is 95É). (Angle
tightening)
6) Once again, tighten bolts at the angle of 90 to 95É (target is
95É). (Angle tightening)
CAUTION:
Perform the following procedure to check turning angle of
angle tightening, and do not judge by visual check.
ANGLE TIGHTENING PROCEDURE
With protractor
+Make counter marks on the bolt head of cylinder head and
cylinder head surface with paint, and check the turning angle.
With angle wrench (SST)
+Check the turning angle using angle indicator of angle
wrench.
6. Loosen gear case mounting bolts which were tightened in 3)
of procedure 4, retighten them to the specified torque.
7. Install glow plug.
+2 different types (manufacturers) of glow plugs are provided
in parallel. (Refer to the figure for identification.)
+Do not install 2 different types of glow plugs in the engine.
Make sure that the same glow plugs are installed.
+Using reamer, remove the carbon adhering to the installation
hole of glow plug, and install glow plug.
FEM063
FEM064
CYLINDER HEADZD
Installation (Cont'd)
EM-1057
Page 796 of 1033
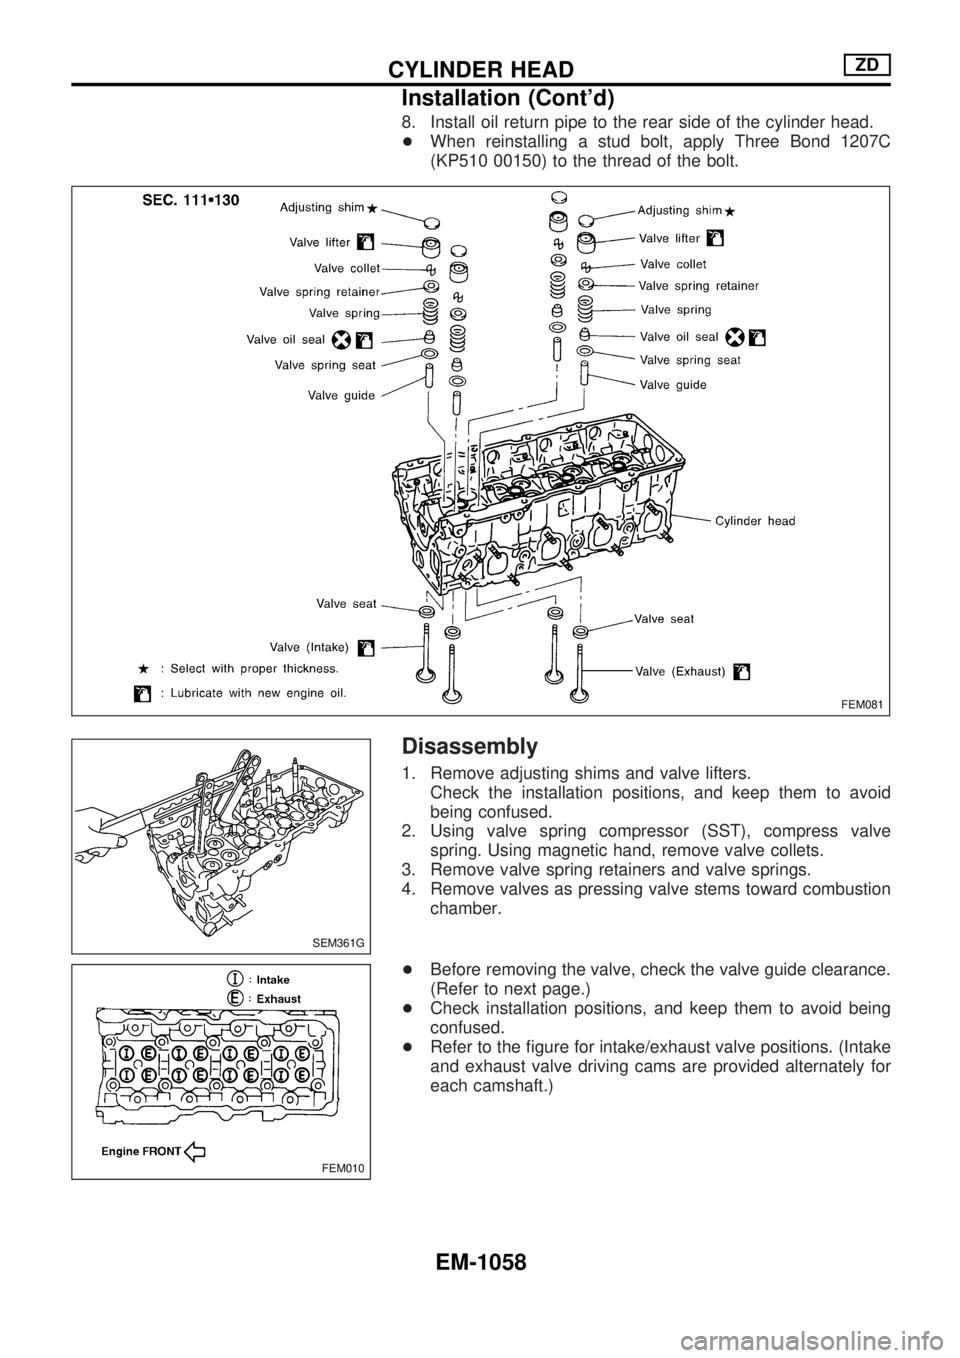
8. Install oil return pipe to the rear side of the cylinder head.
+When reinstalling a stud bolt, apply Three Bond 1207C
(KP510 00150) to the thread of the bolt.
Disassembly
1. Remove adjusting shims and valve lifters.
Check the installation positions, and keep them to avoid
being confused.
2. Using valve spring compressor (SST), compress valve
spring. Using magnetic hand, remove valve collets.
3. Remove valve spring retainers and valve springs.
4. Remove valves as pressing valve stems toward combustion
chamber.
+Before removing the valve, check the valve guide clearance.
(Refer to next page.)
+Check installation positions, and keep them to avoid being
confused.
+Refer to the figure for intake/exhaust valve positions. (Intake
and exhaust valve driving cams are provided alternately for
each camshaft.)
FEM081
SEM361G
FEM010
CYLINDER HEADZD
Installation (Cont'd)
EM-1058
Page 797 of 1033
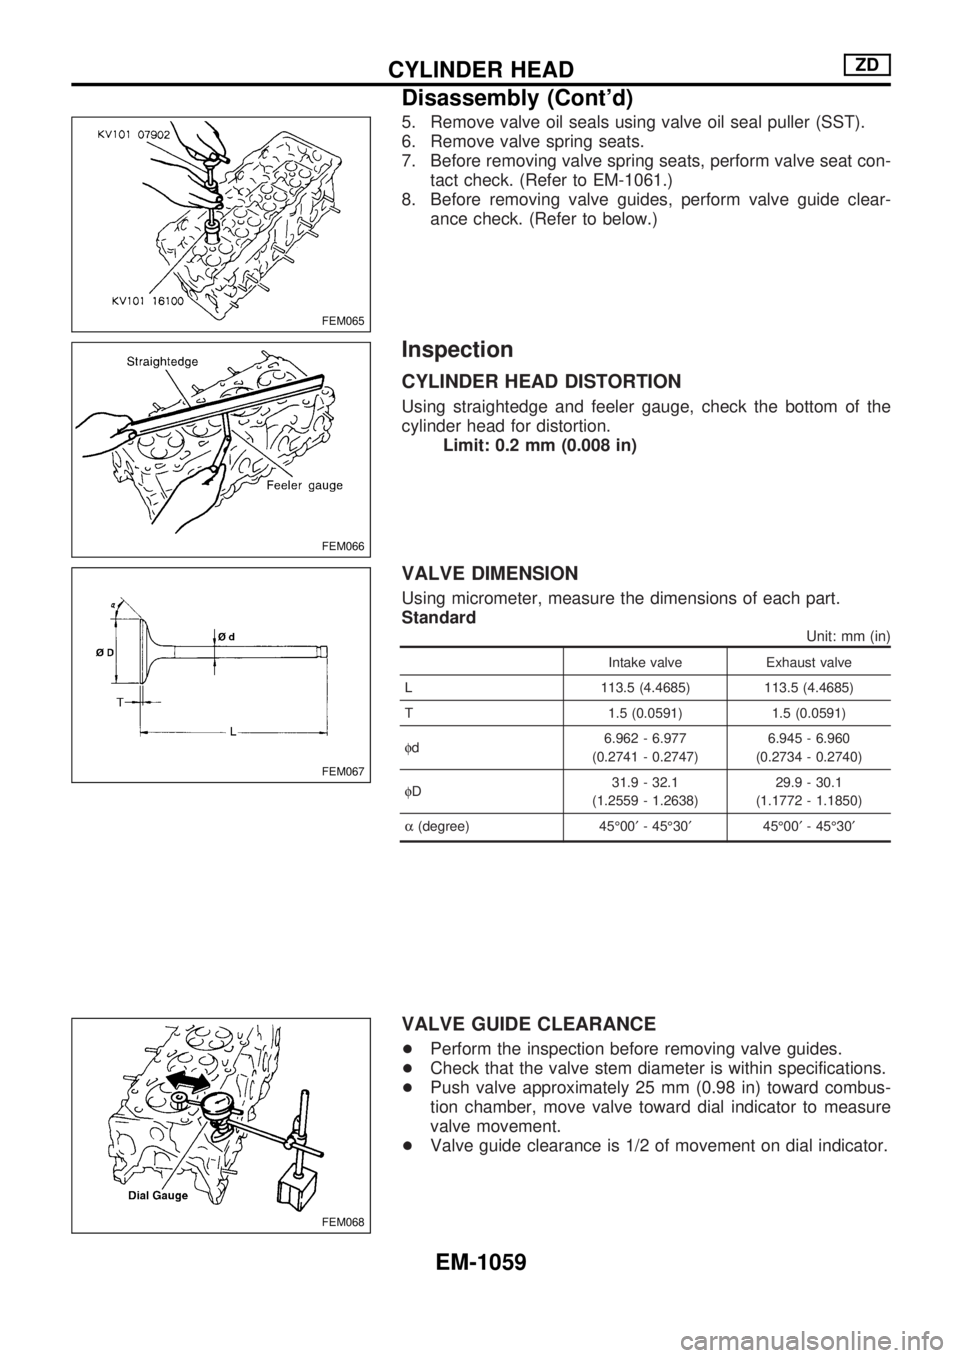
5. Remove valve oil seals using valve oil seal puller (SST).
6. Remove valve spring seats.
7. Before removing valve spring seats, perform valve seat con-
tact check. (Refer to EM-1061.)
8. Before removing valve guides, perform valve guide clear-
ance check. (Refer to below.)
Inspection
CYLINDER HEAD DISTORTION
Using straightedge and feeler gauge, check the bottom of the
cylinder head for distortion.
Limit: 0.2 mm (0.008 in)
VALVE DIMENSION
Using micrometer, measure the dimensions of each part.
Standard
Unit: mm (in)
Intake valve Exhaust valve
L 113.5 (4.4685) 113.5 (4.4685)
T 1.5 (0.0591) 1.5 (0.0591)
fd6.962 - 6.977
(0.2741 - 0.2747)6.945 - 6.960
(0.2734 - 0.2740)
fD31.9 - 32.1
(1.2559 - 1.2638)29.9 - 30.1
(1.1772 - 1.1850)
a(degree) 45É00¢- 45É30¢45É00¢- 45É30¢
VALVE GUIDE CLEARANCE
+Perform the inspection before removing valve guides.
+Check that the valve stem diameter is within specifications.
+Push valve approximately 25 mm (0.98 in) toward combus-
tion chamber, move valve toward dial indicator to measure
valve movement.
+Valve guide clearance is 1/2 of movement on dial indicator.
FEM065
FEM066
FEM067
FEM068
CYLINDER HEADZD
Disassembly (Cont'd)
EM-1059
Page 798 of 1033
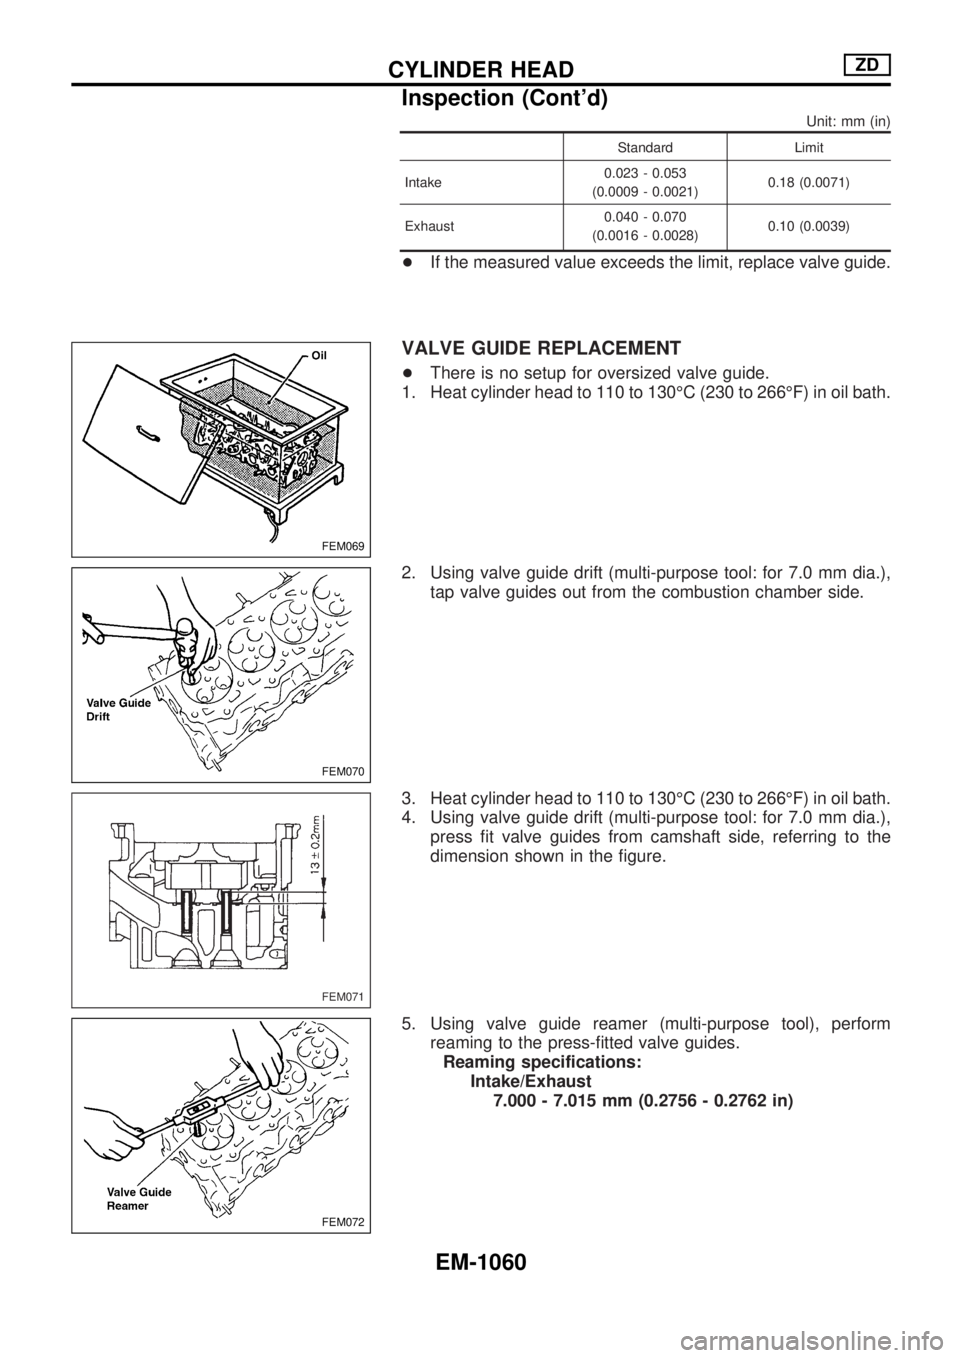
Unit: mm (in)
Standard Limit
Intake0.023 - 0.053
(0.0009 - 0.0021)0.18 (0.0071)
Exhaust0.040 - 0.070
(0.0016 - 0.0028)0.10 (0.0039)
+If the measured value exceeds the limit, replace valve guide.
VALVE GUIDE REPLACEMENT
+There is no setup for oversized valve guide.
1. Heat cylinder head to 110 to 130ÉC (230 to 266ÉF) in oil bath.
2. Using valve guide drift (multi-purpose tool: for 7.0 mm dia.),
tap valve guides out from the combustion chamber side.
3. Heat cylinder head to 110 to 130ÉC (230 to 266ÉF) in oil bath.
4. Using valve guide drift (multi-purpose tool: for 7.0 mm dia.),
press fit valve guides from camshaft side, referring to the
dimension shown in the figure.
5. Using valve guide reamer (multi-purpose tool), perform
reaming to the press-fitted valve guides.
Reaming specifications:
Intake/Exhaust
7.000 - 7.015 mm (0.2756 - 0.2762 in)
FEM069
FEM070
FEM071
FEM072
CYLINDER HEADZD
Inspection (Cont'd)
EM-1060
Page 799 of 1033
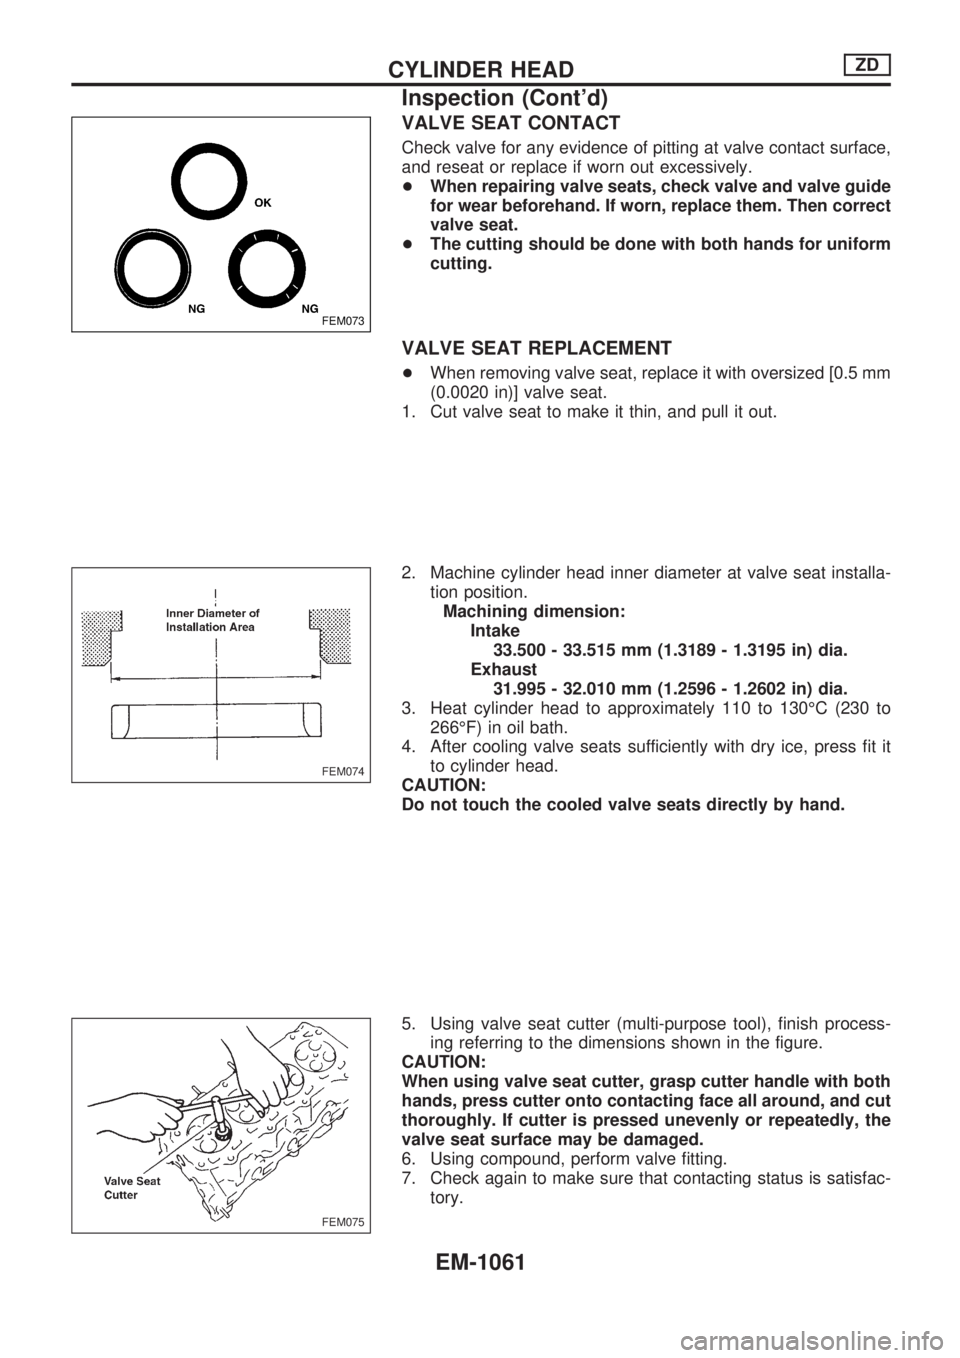
VALVE SEAT CONTACT
Check valve for any evidence of pitting at valve contact surface,
and reseat or replace if worn out excessively.
+When repairing valve seats, check valve and valve guide
for wear beforehand. If worn, replace them. Then correct
valve seat.
+The cutting should be done with both hands for uniform
cutting.
VALVE SEAT REPLACEMENT
+When removing valve seat, replace it with oversized [0.5 mm
(0.0020 in)] valve seat.
1. Cut valve seat to make it thin, and pull it out.
2. Machine cylinder head inner diameter at valve seat installa-
tion position.
Machining dimension:
Intake
33.500 - 33.515 mm (1.3189 - 1.3195 in) dia.
Exhaust
31.995 - 32.010 mm (1.2596 - 1.2602 in) dia.
3. Heat cylinder head to approximately 110 to 130ÉC (230 to
266ÉF) in oil bath.
4. After cooling valve seats sufficiently with dry ice, press fit it
to cylinder head.
CAUTION:
Do not touch the cooled valve seats directly by hand.
5. Using valve seat cutter (multi-purpose tool), finish process-
ing referring to the dimensions shown in the figure.
CAUTION:
When using valve seat cutter, grasp cutter handle with both
hands, press cutter onto contacting face all around, and cut
thoroughly. If cutter is pressed unevenly or repeatedly, the
valve seat surface may be damaged.
6. Using compound, perform valve fitting.
7. Check again to make sure that contacting status is satisfac-
tory.
FEM073
FEM074
FEM075
CYLINDER HEADZD
Inspection (Cont'd)
EM-1061
Page 800 of 1033
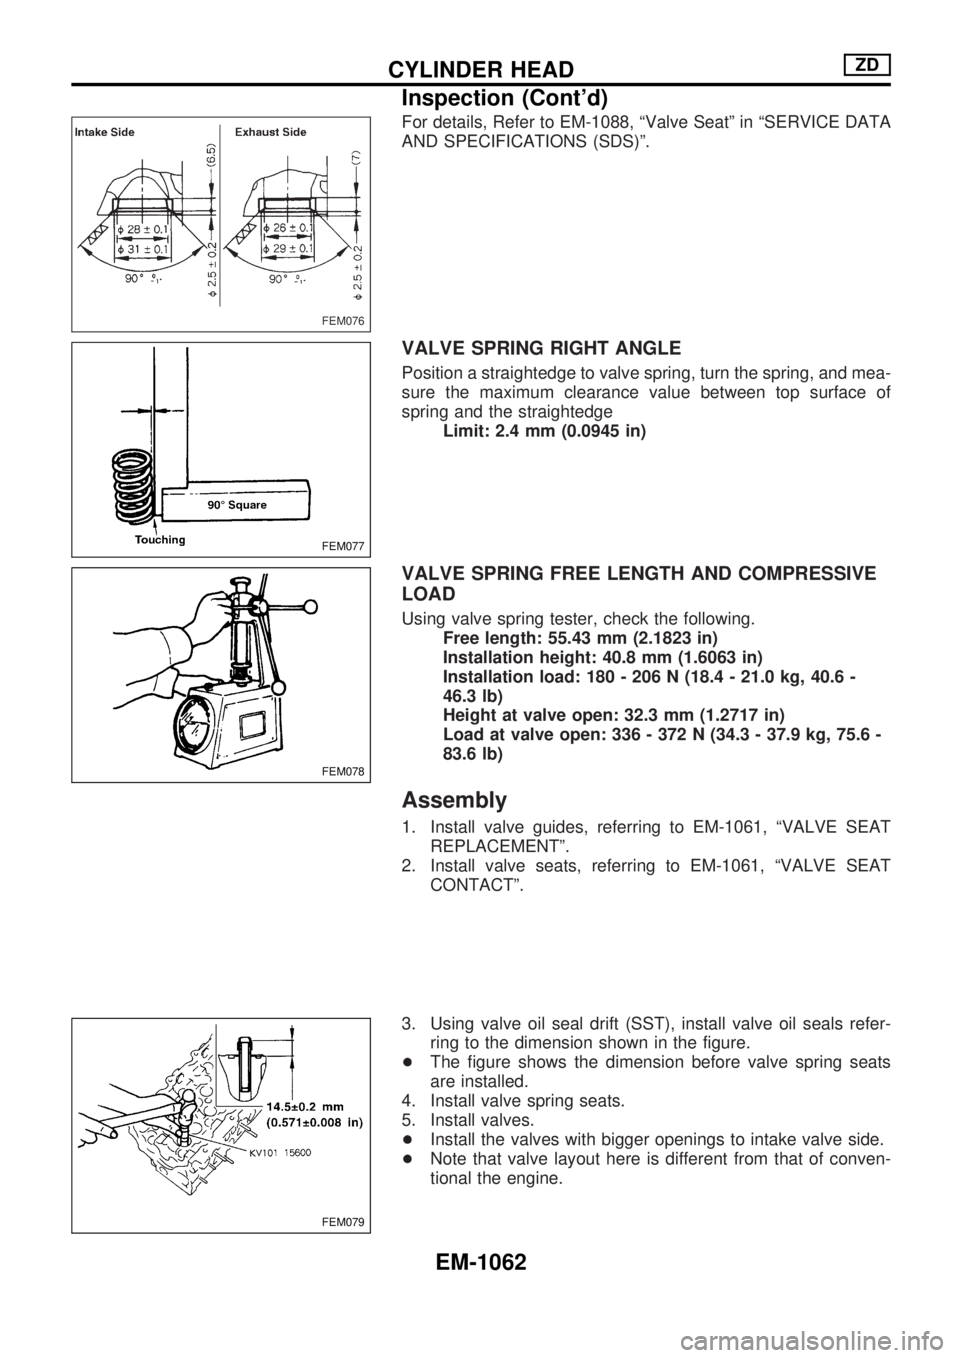
For details, Refer to EM-1088, ªValve Seatº in ªSERVICE DATA
AND SPECIFICATIONS (SDS)º.
VALVE SPRING RIGHT ANGLE
Position a straightedge to valve spring, turn the spring, and mea-
sure the maximum clearance value between top surface of
spring and the straightedge
Limit: 2.4 mm (0.0945 in)
VALVE SPRING FREE LENGTH AND COMPRESSIVE
LOAD
Using valve spring tester, check the following.
Free length: 55.43 mm (2.1823 in)
Installation height: 40.8 mm (1.6063 in)
Installation load: 180 - 206 N (18.4 - 21.0 kg, 40.6 -
46.3 lb)
Height at valve open: 32.3 mm (1.2717 in)
Load at valve open: 336 - 372 N (34.3 - 37.9 kg, 75.6 -
83.6 lb)
Assembly
1. Install valve guides, referring to EM-1061, ªVALVE SEAT
REPLACEMENTº.
2. Install valve seats, referring to EM-1061, ªVALVE SEAT
CONTACTº.
3. Using valve oil seal drift (SST), install valve oil seals refer-
ring to the dimension shown in the figure.
+The figure shows the dimension before valve spring seats
are installed.
4. Install valve spring seats.
5. Install valves.
+Install the valves with bigger openings to intake valve side.
+Note that valve layout here is different from that of conven-
tional the engine.
FEM076
FEM077
FEM078
FEM079
CYLINDER HEADZD
Inspection (Cont'd)
EM-1062