NISSAN PATROL 2000 Electronic Repair Manual
Manufacturer: NISSAN, Model Year: 2000, Model line: PATROL, Model: NISSAN PATROL 2000Pages: 1033, PDF Size: 30.71 MB
Page 941 of 1033
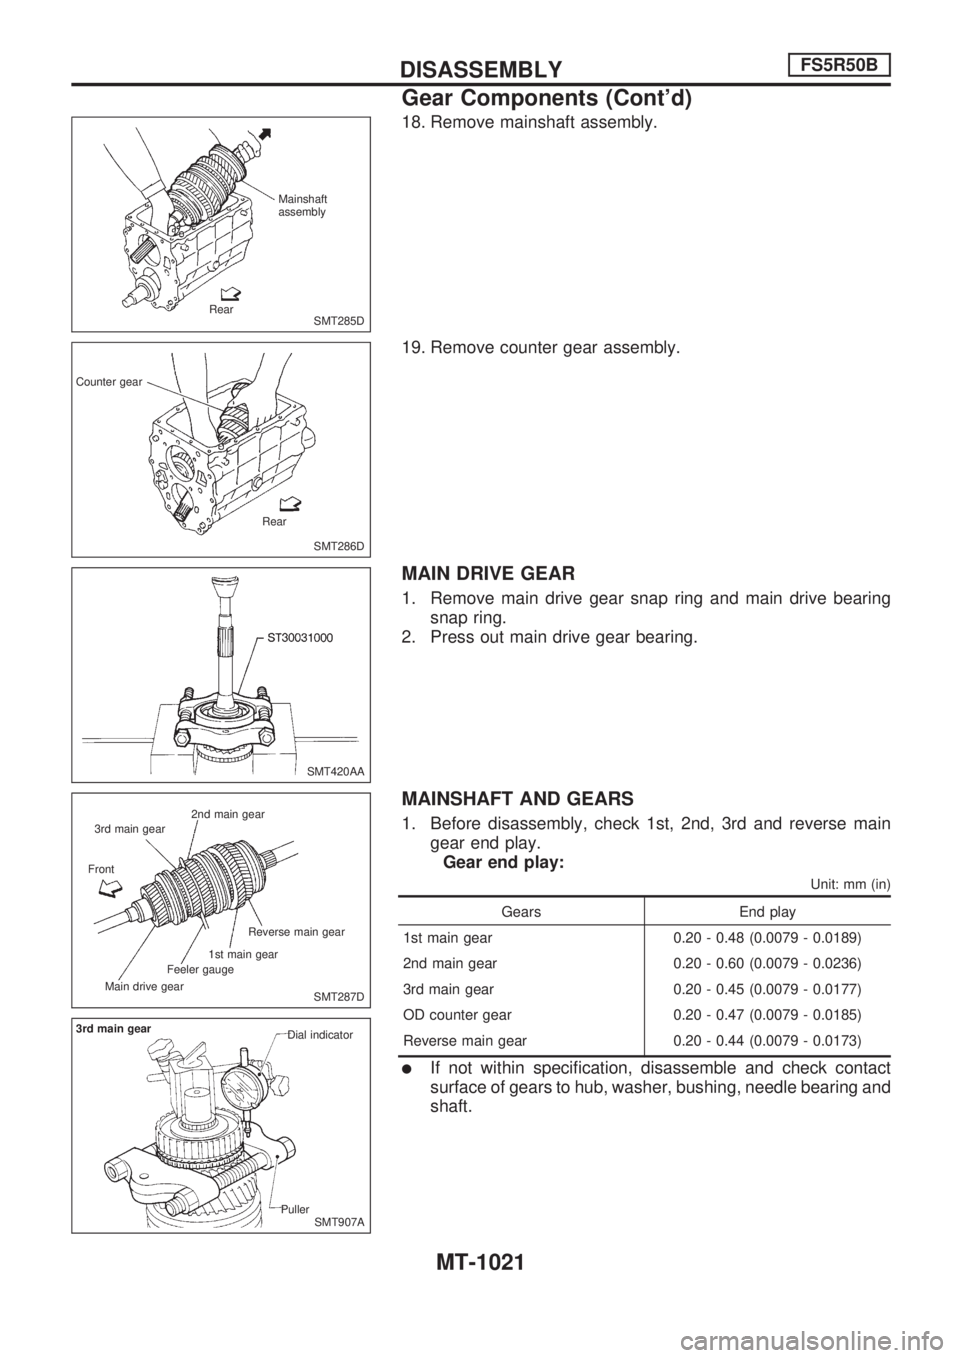
18. Remove mainshaft assembly.
19. Remove counter gear assembly.
MAIN DRIVE GEAR
1. Remove main drive gear snap ring and main drive bearing
snap ring.
2. Press out main drive gear bearing.
MAINSHAFT AND GEARS
1. Before disassembly, check 1st, 2nd, 3rd and reverse main
gear end play.
Gear end play:
Unit: mm (in)
Gears End play
1st main gear 0.20 - 0.48 (0.0079 - 0.0189)
2nd main gear 0.20 - 0.60 (0.0079 - 0.0236)
3rd main gear 0.20 - 0.45 (0.0079 - 0.0177)
OD counter gear 0.20 - 0.47 (0.0079 - 0.0185)
Reverse main gear 0.20 - 0.44 (0.0079 - 0.0173)
lIf not within specification, disassemble and check contact
surface of gears to hub, washer, bushing, needle bearing and
shaft.
SMT285D Mainshaft
assembly
Rear
SMT286D Counter gear
Rear
SMT420AA
SMT287D 2nd main gear
3rd main gear
Front
Main drive gearFeeler gauge1st main gearReverse main gear
SMT907A 3rd main gear
Dial indicator
Puller
DISASSEMBLYFS5R50B
Gear Components (Cont'd)
MT-1021
Page 942 of 1033
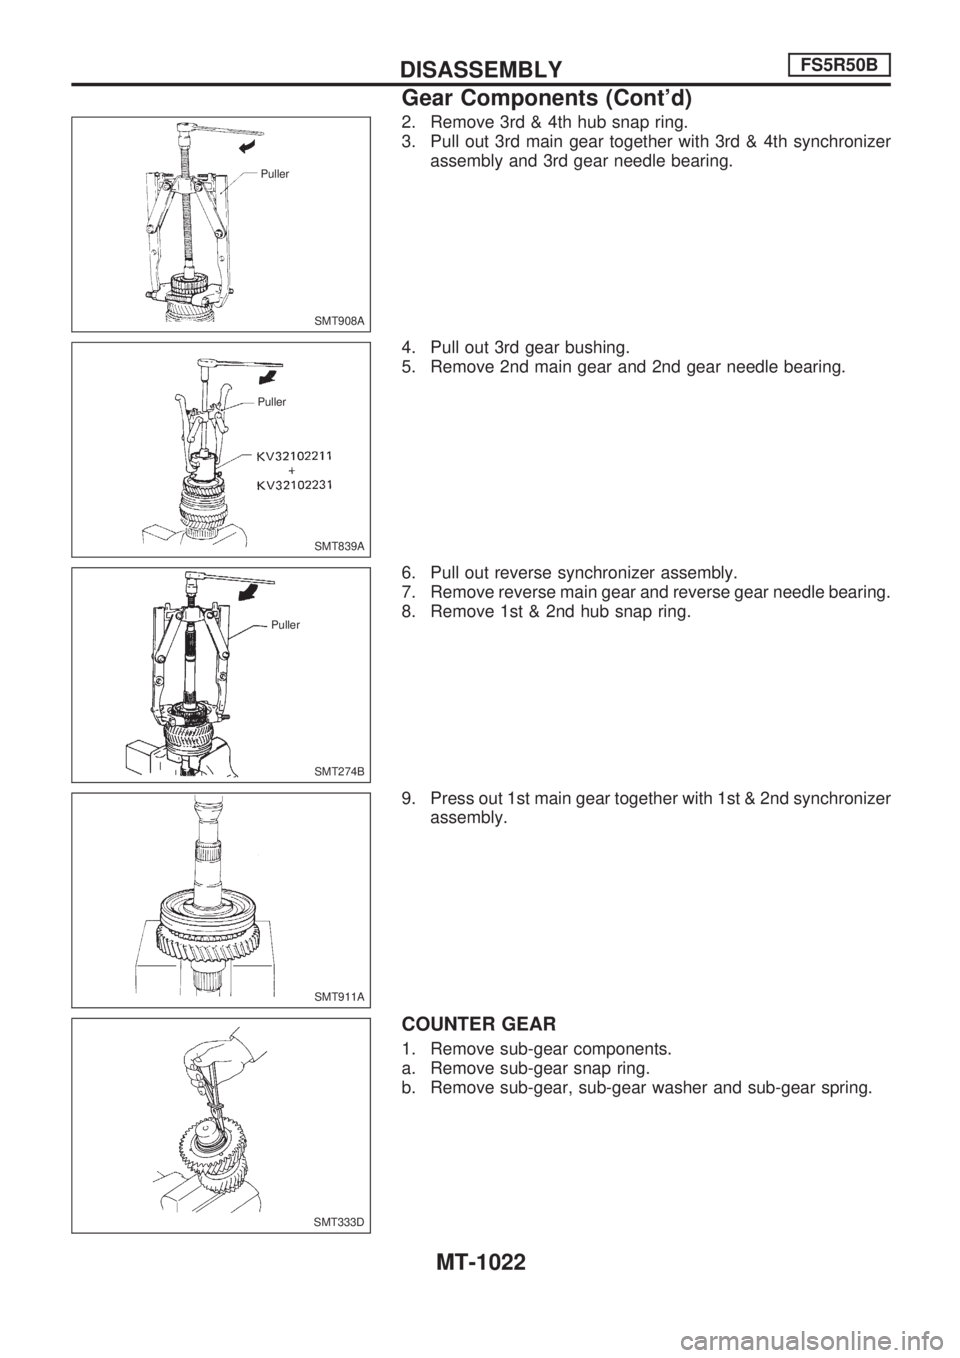
2. Remove 3rd & 4th hub snap ring.
3. Pull out 3rd main gear together with 3rd & 4th synchronizer
assembly and 3rd gear needle bearing.
4. Pull out 3rd gear bushing.
5. Remove 2nd main gear and 2nd gear needle bearing.
6. Pull out reverse synchronizer assembly.
7. Remove reverse main gear and reverse gear needle bearing.
8. Remove 1st & 2nd hub snap ring.
9. Press out 1st main gear together with 1st & 2nd synchronizer
assembly.
COUNTER GEAR
1. Remove sub-gear components.
a. Remove sub-gear snap ring.
b. Remove sub-gear, sub-gear washer and sub-gear spring.
SMT908A Puller
SMT839A Puller
SMT274B Puller
SMT911A
SMT333D
DISASSEMBLYFS5R50B
Gear Components (Cont'd)
MT-1022
Page 943 of 1033
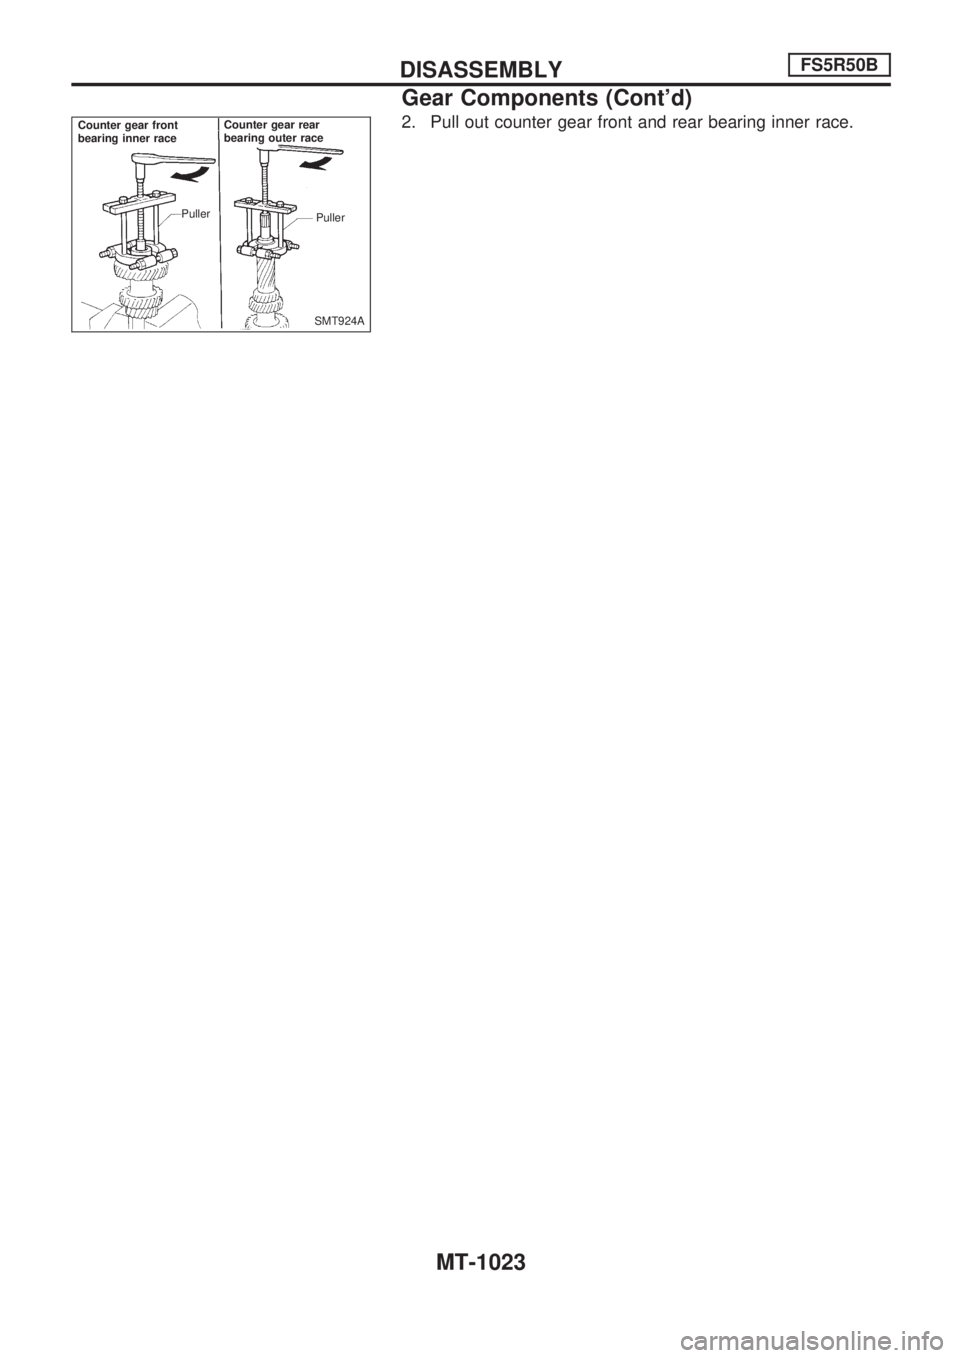
2. Pull out counter gear front and rear bearing inner race.
SMT924A Counter gear front
bearing inner raceCounter gear rear
bearing outer race
Puller
Puller
DISASSEMBLYFS5R50B
Gear Components (Cont'd)
MT-1023
Page 944 of 1033
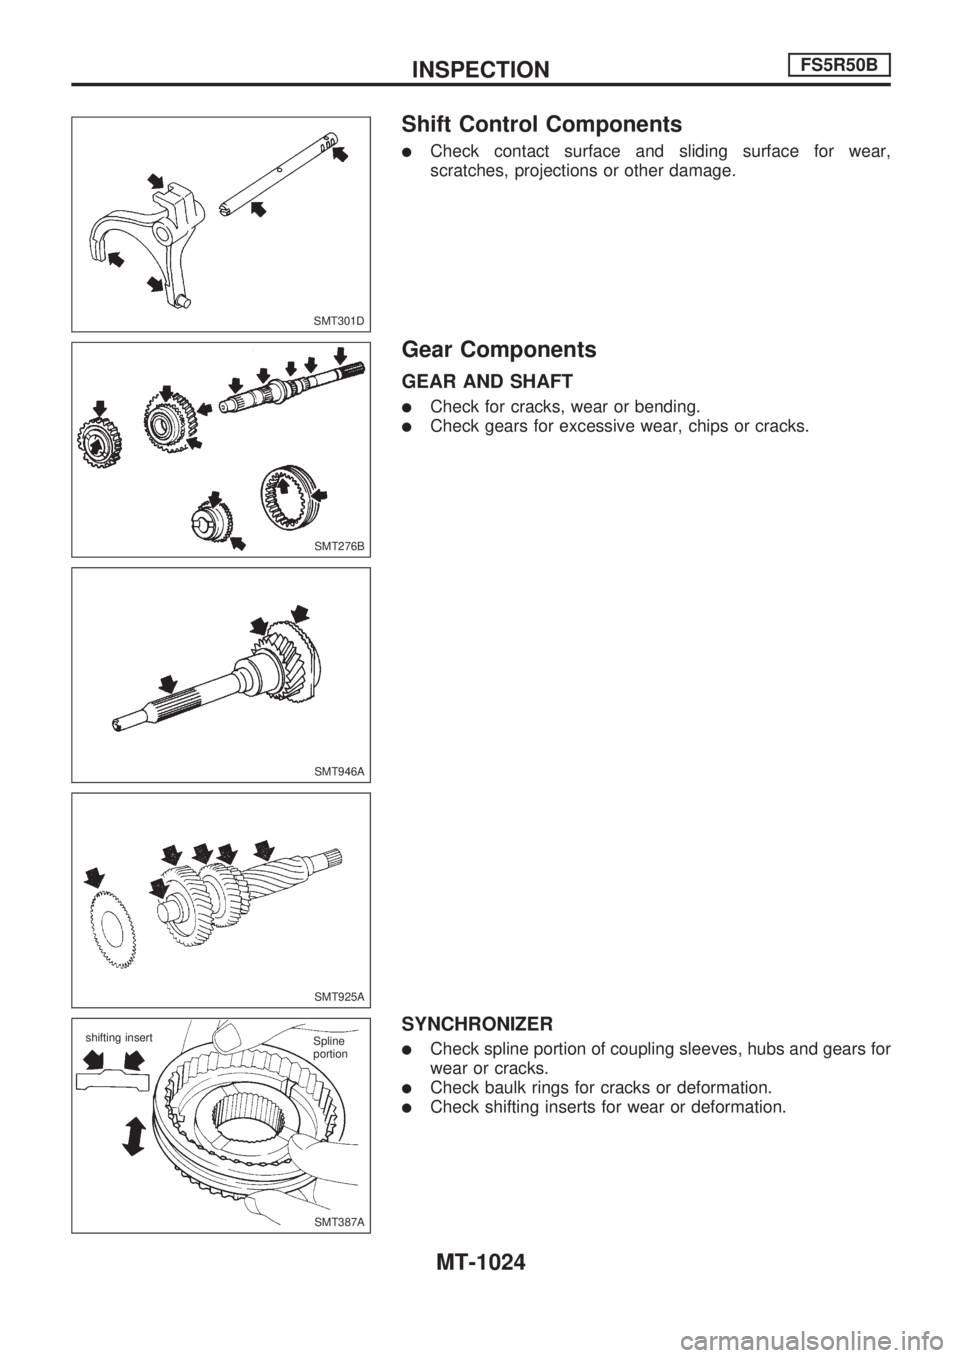
Shift Control Components
lCheck contact surface and sliding surface for wear,
scratches, projections or other damage.
Gear Components
GEAR AND SHAFT
lCheck for cracks, wear or bending.
lCheck gears for excessive wear, chips or cracks.
SYNCHRONIZER
lCheck spline portion of coupling sleeves, hubs and gears for
wear or cracks.
lCheck baulk rings for cracks or deformation.
lCheck shifting inserts for wear or deformation.
SMT301D
SMT276B
SMT946A
SMT925A
SMT387A shifting insert
Spline
portion
INSPECTIONFS5R50B
MT-1024
Page 945 of 1033
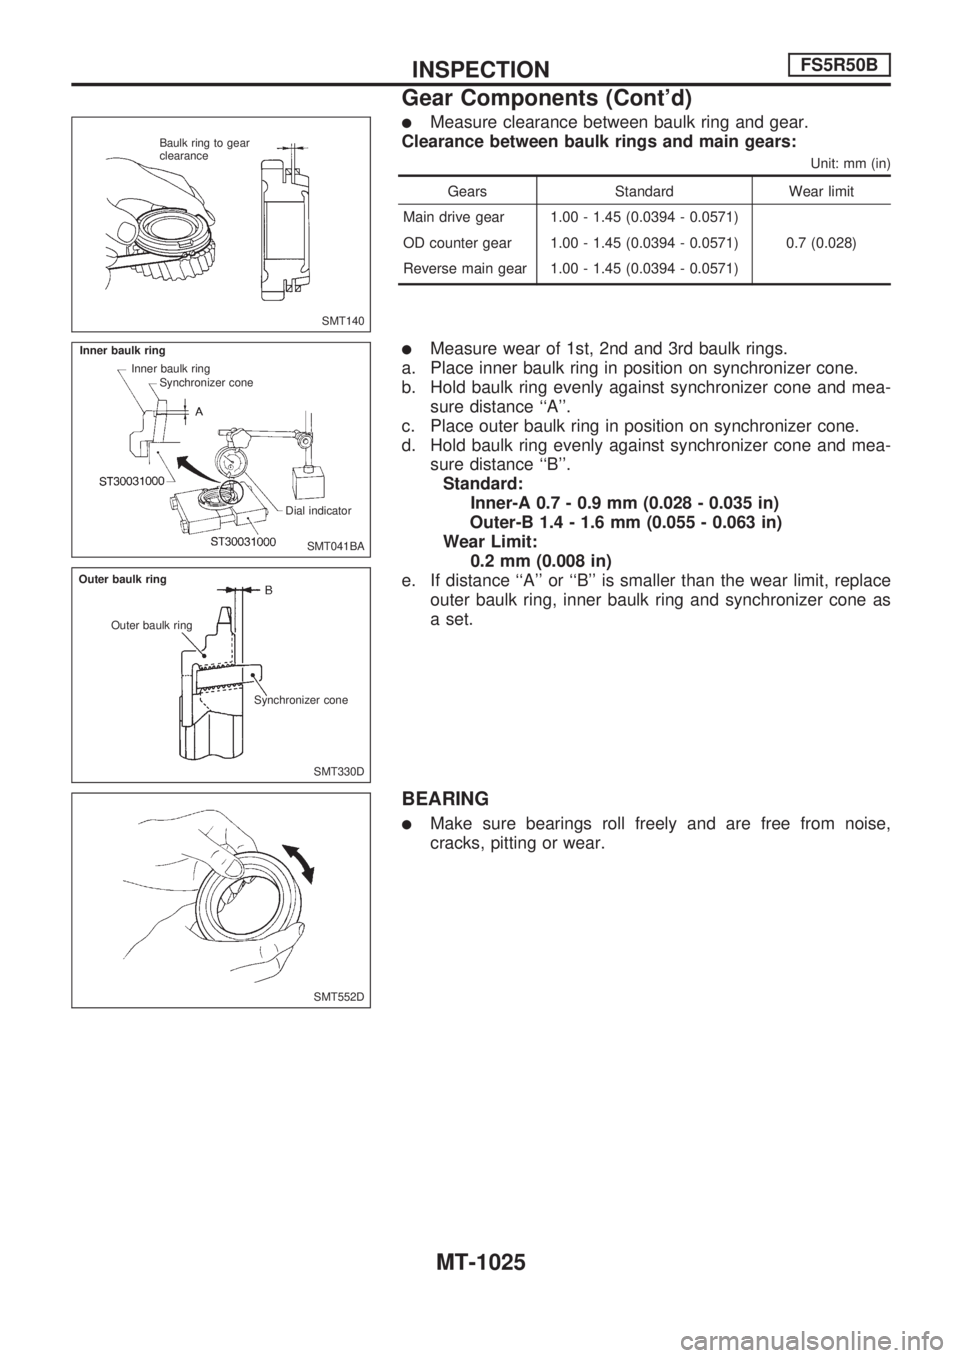
lMeasure clearance between baulk ring and gear.
Clearance between baulk rings and main gears:
Unit: mm (in)
Gears Standard Wear limit
Main drive gear 1.00 - 1.45 (0.0394 - 0.0571)
0.7 (0.028) OD counter gear 1.00 - 1.45 (0.0394 - 0.0571)
Reverse main gear 1.00 - 1.45 (0.0394 - 0.0571)
lMeasure wear of 1st, 2nd and 3rd baulk rings.
a. Place inner baulk ring in position on synchronizer cone.
b. Hold baulk ring evenly against synchronizer cone and mea-
sure distance ``A''.
c. Place outer baulk ring in position on synchronizer cone.
d. Hold baulk ring evenly against synchronizer cone and mea-
sure distance ``B''.
Standard:
Inner-A 0.7 - 0.9 mm (0.028 - 0.035 in)
Outer-B 1.4 - 1.6 mm (0.055 - 0.063 in)
Wear Limit:
0.2 mm (0.008 in)
e. If distance ``A'' or ``B'' is smaller than the wear limit, replace
outer baulk ring, inner baulk ring and synchronizer cone as
a set.
BEARING
lMake sure bearings roll freely and are free from noise,
cracks, pitting or wear.
SMT140 Baulk ring to gear
clearance
SMT041BA Inner baulk ring
Inner baulk ring
Synchronizer cone
Dial indicator
SMT330D Outer baulk ring
Outer baulk ring
Synchronizer cone
SMT552D
INSPECTIONFS5R50B
Gear Components (Cont'd)
MT-1025
Page 946 of 1033
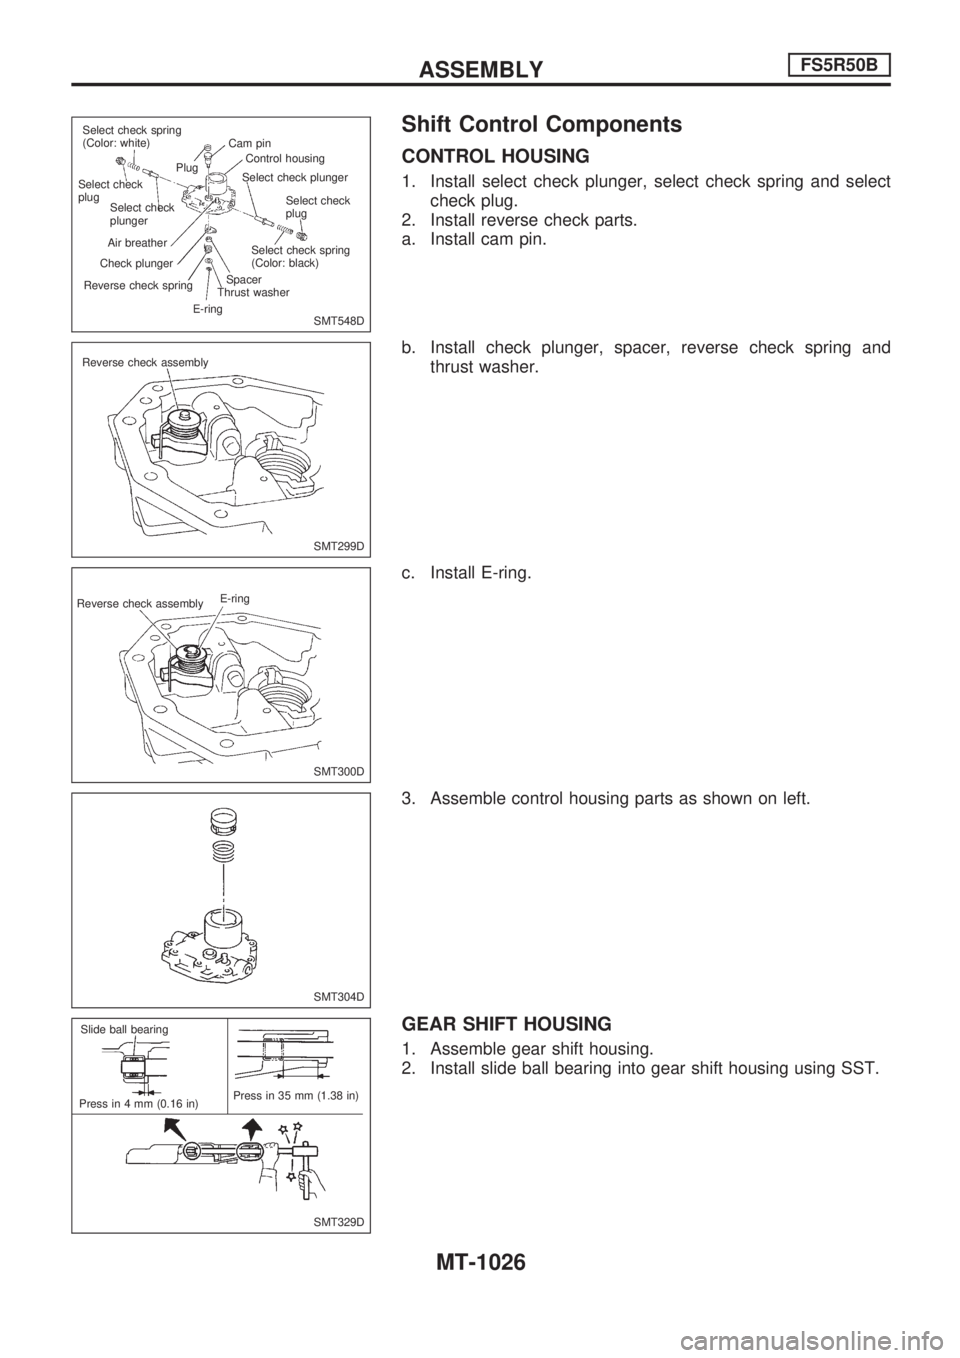
Shift Control Components
CONTROL HOUSING
1. Install select check plunger, select check spring and select
check plug.
2. Install reverse check parts.
a. Install cam pin.
b. Install check plunger, spacer, reverse check spring and
thrust washer.
c. Install E-ring.
3. Assemble control housing parts as shown on left.
GEAR SHIFT HOUSING
1. Assemble gear shift housing.
2. Install slide ball bearing into gear shift housing using SST.
SMT548D Select check spring
(Color: white)
Select check
plug
Select check
plunger
Air breather
Check plunger
Reverse check spring
E-ringThrust washerSpacerSelect check spring
(Color: black)Select check
plug Select check plungerControl housing Cam pin
Plug
SMT299D Reverse check assembly
SMT300D Reverse check assemblyE-ring
SMT304D
SMT329D Slide ball bearing
Press in 4 mm (0.16 in)Press in 35 mm (1.38 in)
ASSEMBLYFS5R50B
MT-1026
Page 947 of 1033
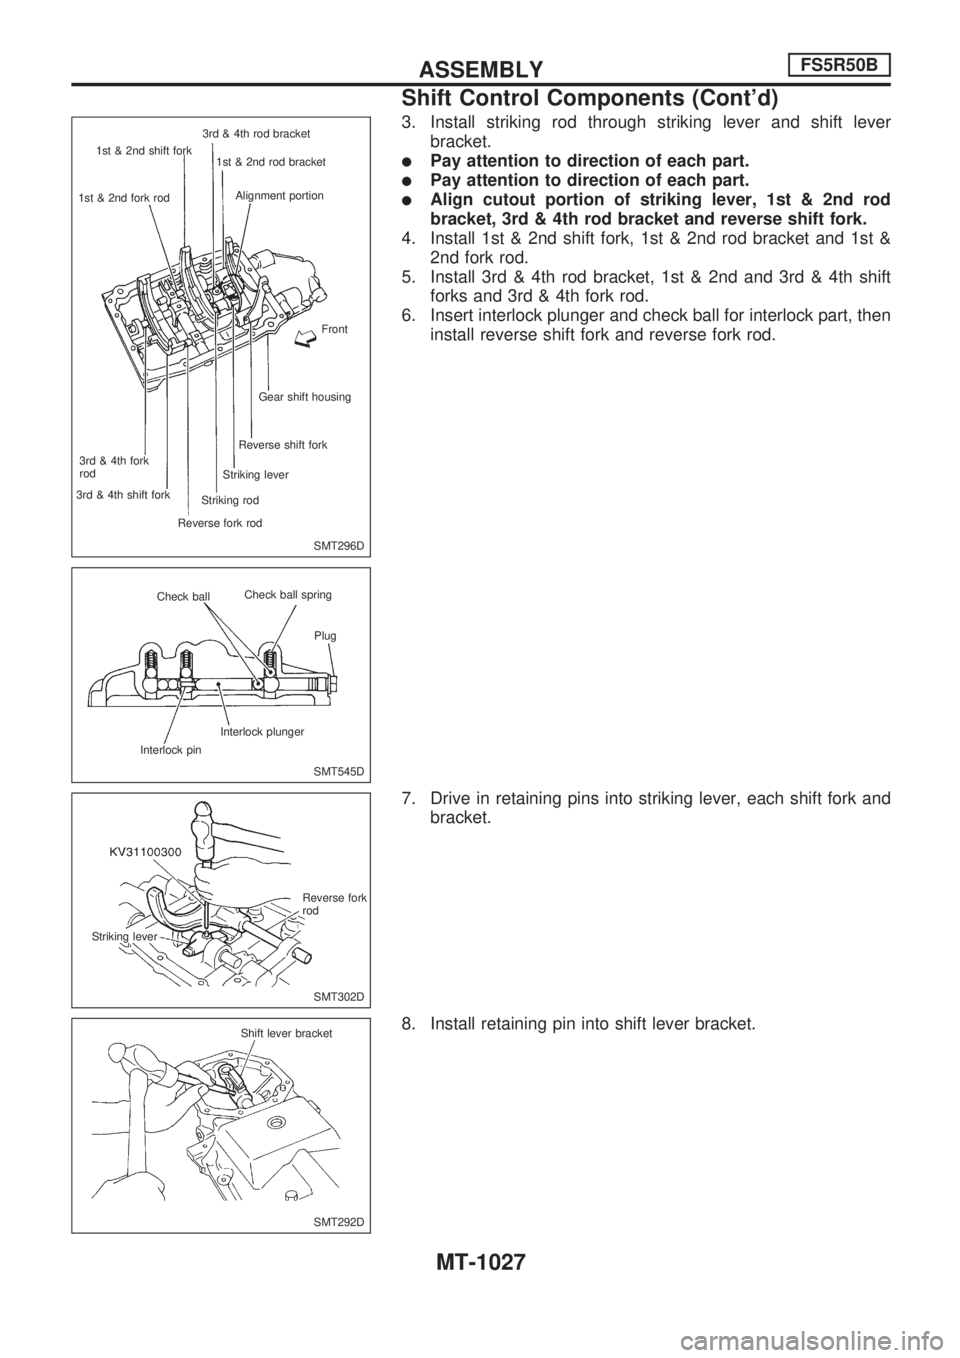
3. Install striking rod through striking lever and shift lever
bracket.
lPay attention to direction of each part.
lPay attention to direction of each part.
lAlign cutout portion of striking lever, 1st & 2nd rod
bracket, 3rd & 4th rod bracket and reverse shift fork.
4. Install 1st & 2nd shift fork, 1st & 2nd rod bracket and 1st &
2nd fork rod.
5. Install 3rd & 4th rod bracket, 1st & 2nd and 3rd & 4th shift
forks and 3rd & 4th fork rod.
6. Insert interlock plunger and check ball for interlock part, then
install reverse shift fork and reverse fork rod.
7. Drive in retaining pins into striking lever, each shift fork and
bracket.
8. Install retaining pin into shift lever bracket.
SMT296D 1st & 2nd fork rod1st & 2nd shift fork3rd & 4th rod bracket
1st & 2nd rod bracket
Alignment portion
Front
Gear shift housing
Reverse shift fork
Striking lever
Striking rod
Reverse fork rod 3rd & 4th shift fork3rd & 4th fork
rod
SMT545D Interlock plungerPlug
Interlock pinCheck ballCheck ball spring
SMT302D Striking leverReverse fork
rod
SMT292D Shift lever bracket
ASSEMBLYFS5R50B
Shift Control Components (Cont'd)
MT-1027
Page 948 of 1033
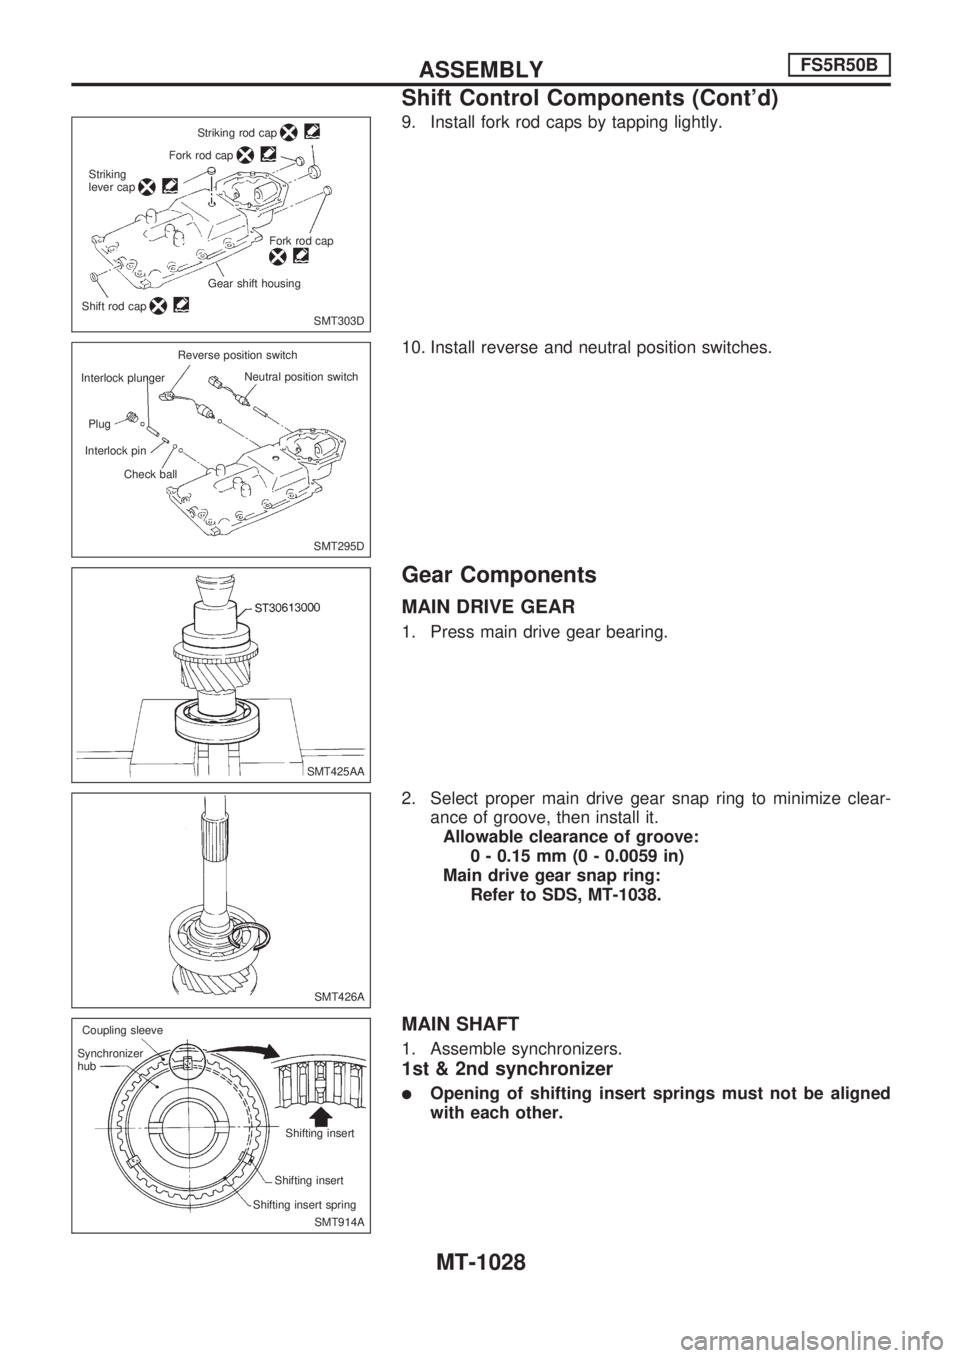
9. Install fork rod caps by tapping lightly.
10. Install reverse and neutral position switches.
Gear Components
MAIN DRIVE GEAR
1. Press main drive gear bearing.
2. Select proper main drive gear snap ring to minimize clear-
ance of groove, then install it.
Allowable clearance of groove:
0 - 0.15 mm (0 - 0.0059 in)
Main drive gear snap ring:
Refer to SDS, MT-1038.
MAIN SHAFT
1. Assemble synchronizers.
1st & 2nd synchronizer
lOpening of shifting insert springs must not be aligned
with each other.
SMT303D Striking rod cap
Fork rod cap
Striking
lever cap
Fork rod cap
Gear shift housing
Shift rod cap
SMT295D Interlock plunger
Plug
Interlock pin
Check ballNeutral position switch Reverse position switch
SMT425AA
SMT426A
SMT914A Synchronizer
hubCoupling sleeve
Shifting insert
Shifting insert
Shifting insert spring
ASSEMBLYFS5R50B
Shift Control Components (Cont'd)
MT-1028
Page 949 of 1033
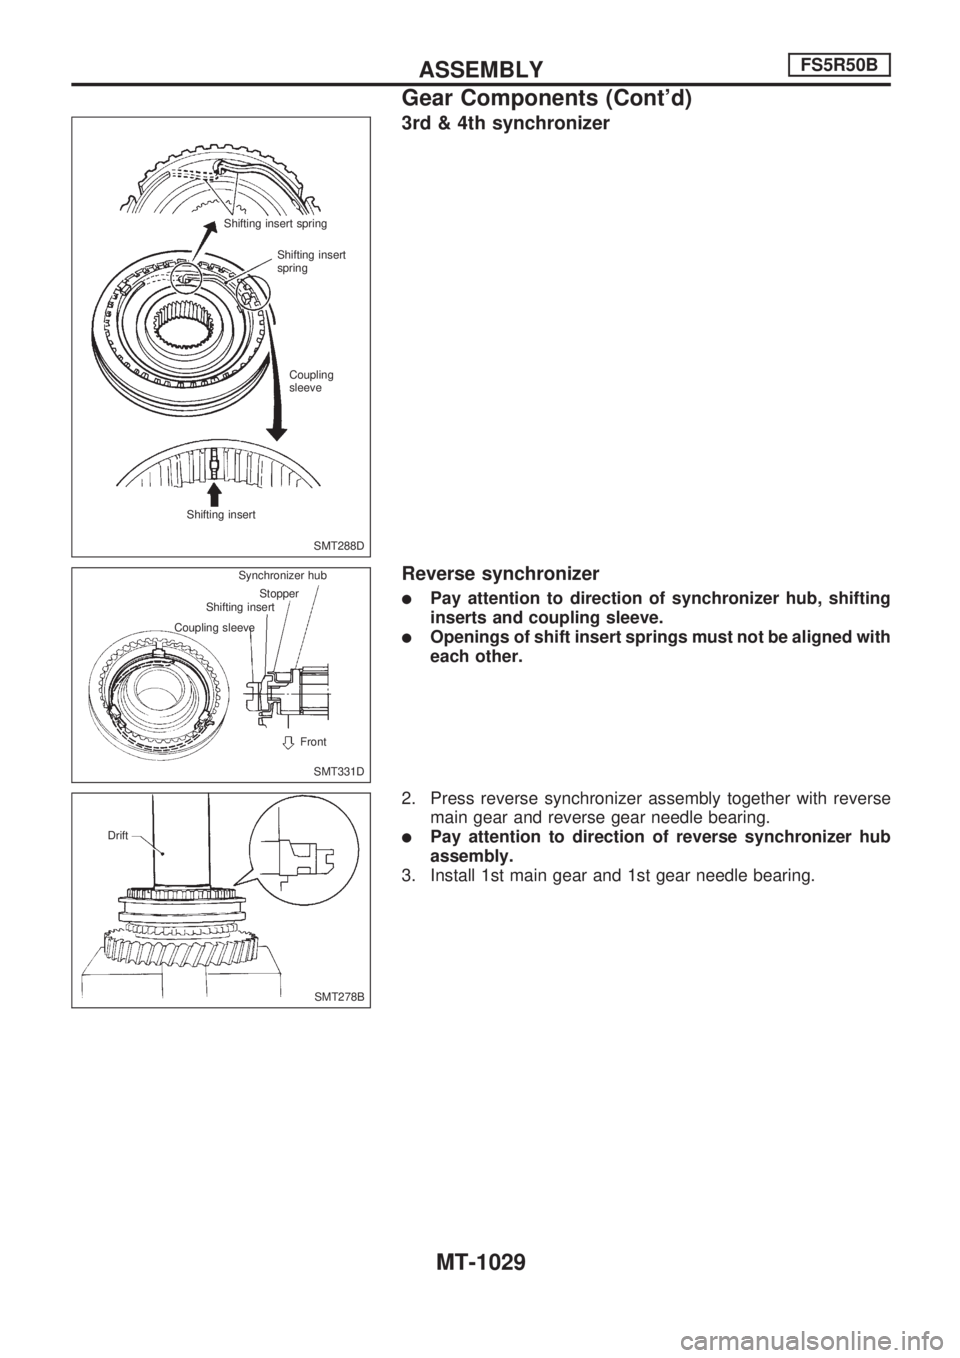
3rd & 4th synchronizer
Reverse synchronizer
lPay attention to direction of synchronizer hub, shifting
inserts and coupling sleeve.
lOpenings of shift insert springs must not be aligned with
each other.
2. Press reverse synchronizer assembly together with reverse
main gear and reverse gear needle bearing.
lPay attention to direction of reverse synchronizer hub
assembly.
3. Install 1st main gear and 1st gear needle bearing.
SMT288D Shifting insert spring
Shifting insert
spring
Coupling
sleeve
Shifting insert
SMT331D Synchronizer hub
Stopper
Shifting insert
Coupling sleeve
Front
SMT278B Drift
ASSEMBLYFS5R50B
Gear Components (Cont'd)
MT-1029
Page 950 of 1033
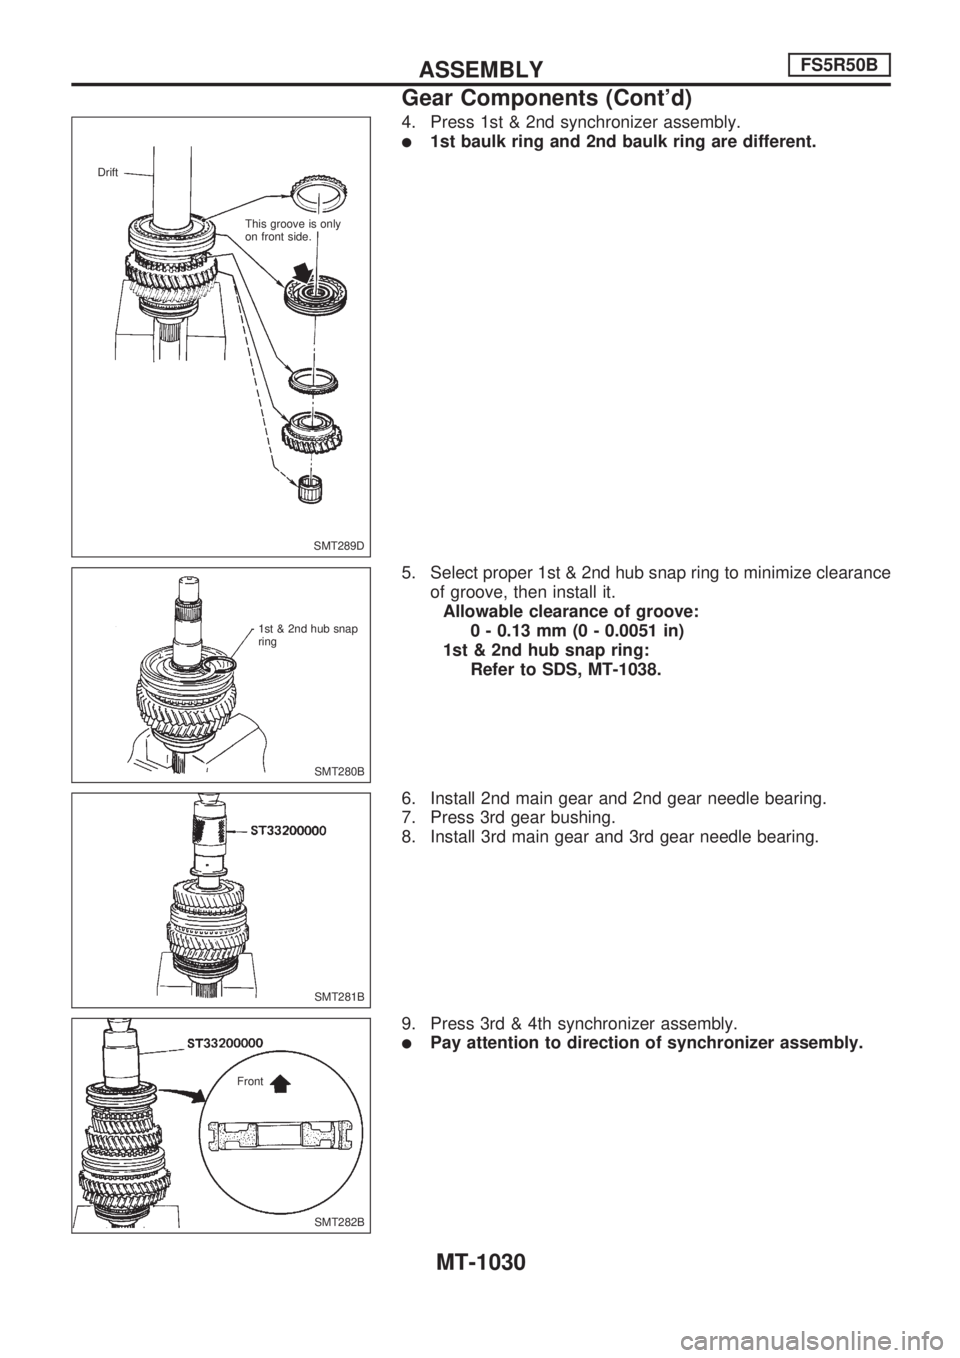
4. Press 1st & 2nd synchronizer assembly.
l1st baulk ring and 2nd baulk ring are different.
5. Select proper 1st & 2nd hub snap ring to minimize clearance
of groove, then install it.
Allowable clearance of groove:
0 - 0.13 mm (0 - 0.0051 in)
1st & 2nd hub snap ring:
Refer to SDS, MT-1038.
6. Install 2nd main gear and 2nd gear needle bearing.
7. Press 3rd gear bushing.
8. Install 3rd main gear and 3rd gear needle bearing.
9. Press 3rd & 4th synchronizer assembly.
lPay attention to direction of synchronizer assembly.
SMT289D Drift
This groove is only
on front side.
SMT280B 1st & 2nd hub snap
ring
SMT281B
SMT282B Front
ASSEMBLYFS5R50B
Gear Components (Cont'd)
MT-1030