NISSAN PICK-UP 1998 Repair Manual
Manufacturer: NISSAN, Model Year: 1998, Model line: PICK-UP, Model: NISSAN PICK-UP 1998Pages: 1659, PDF Size: 53.39 MB
Page 1141 of 1659
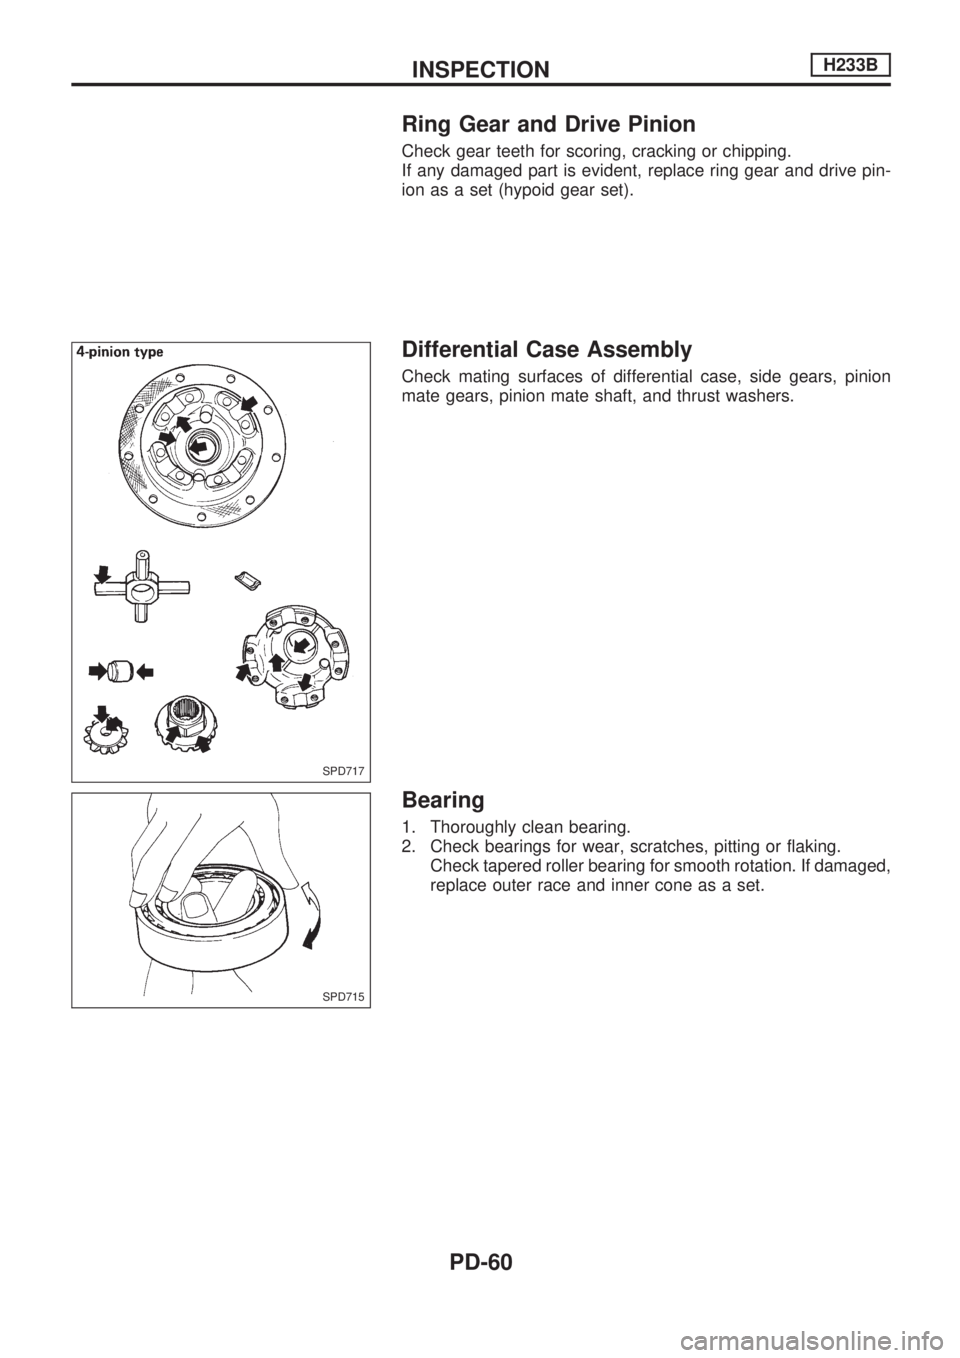
Ring Gear and Drive Pinion
Check gear teeth for scoring, cracking or chipping.
If any damaged part is evident, replace ring gear and drive pin-
ion as a set (hypoid gear set).
Differential Case Assembly
Check mating surfaces of differential case, side gears, pinion
mate gears, pinion mate shaft, and thrust washers.
Bearing
1. Thoroughly clean bearing.
2. Check bearings for wear, scratches, pitting or flaking.
Check tapered roller bearing for smooth rotation. If damaged,
replace outer race and inner cone as a set.
SPD717
SPD715
INSPECTIONH233B
PD-60
Page 1142 of 1659
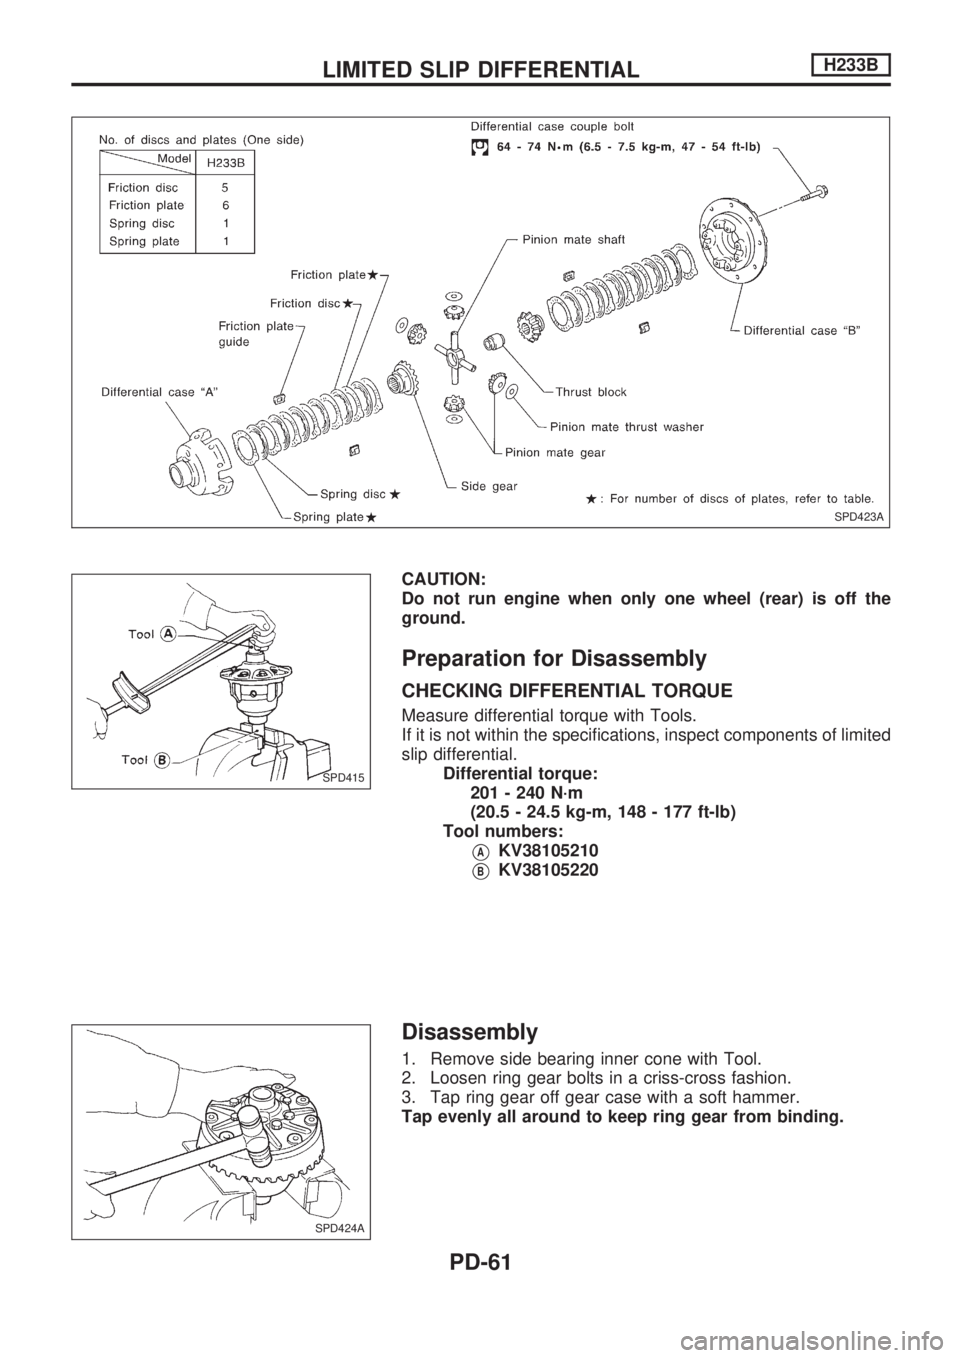
CAUTION:
Do not run engine when only one wheel (rear) is off the
ground.
Preparation for Disassembly
CHECKING DIFFERENTIAL TORQUE
Measure differential torque with Tools.
If it is not within the specifications, inspect components of limited
slip differential.
Differential torque:
201 - 240 N´m
(20.5 - 24.5 kg-m, 148 - 177 ft-lb)
Tool numbers:
VAKV38105210
VBKV38105220
Disassembly
1. Remove side bearing inner cone with Tool.
2. Loosen ring gear bolts in a criss-cross fashion.
3. Tap ring gear off gear case with a soft hammer.
Tap evenly all around to keep ring gear from binding.
SPD423A
SPD415
SPD424A
LIMITED SLIP DIFFERENTIALH233B
PD-61
Page 1143 of 1659
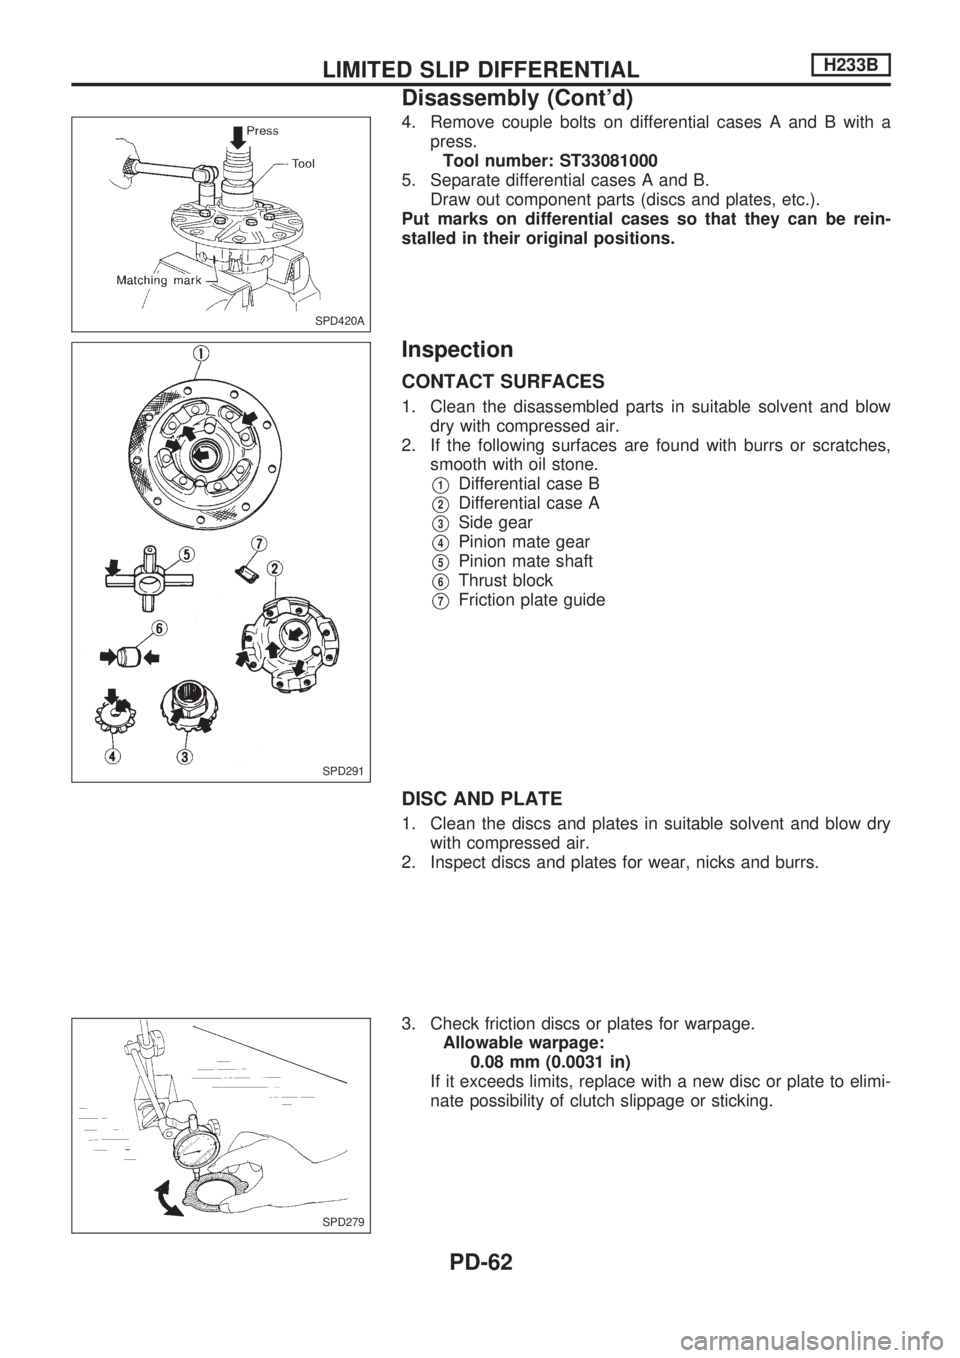
4. Remove couple bolts on differential cases A and B with a
press.
Tool number: ST33081000
5. Separate differential cases A and B.
Draw out component parts (discs and plates, etc.).
Put marks on differential cases so that they can be rein-
stalled in their original positions.
Inspection
CONTACT SURFACES
1. Clean the disassembled parts in suitable solvent and blow
dry with compressed air.
2. If the following surfaces are found with burrs or scratches,
smooth with oil stone.
V1Differential case B
V2Differential case A
V3Side gear
V4Pinion mate gear
V5Pinion mate shaft
V6Thrust block
V7Friction plate guide
DISC AND PLATE
1. Clean the discs and plates in suitable solvent and blow dry
with compressed air.
2. Inspect discs and plates for wear, nicks and burrs.
3. Check friction discs or plates for warpage.
Allowable warpage:
0.08 mm (0.0031 in)
If it exceeds limits, replace with a new disc or plate to elimi-
nate possibility of clutch slippage or sticking.
SPD420A
SPD291
SPD279
LIMITED SLIP DIFFERENTIALH233B
Disassembly (Cont'd)
PD-62
Page 1144 of 1659
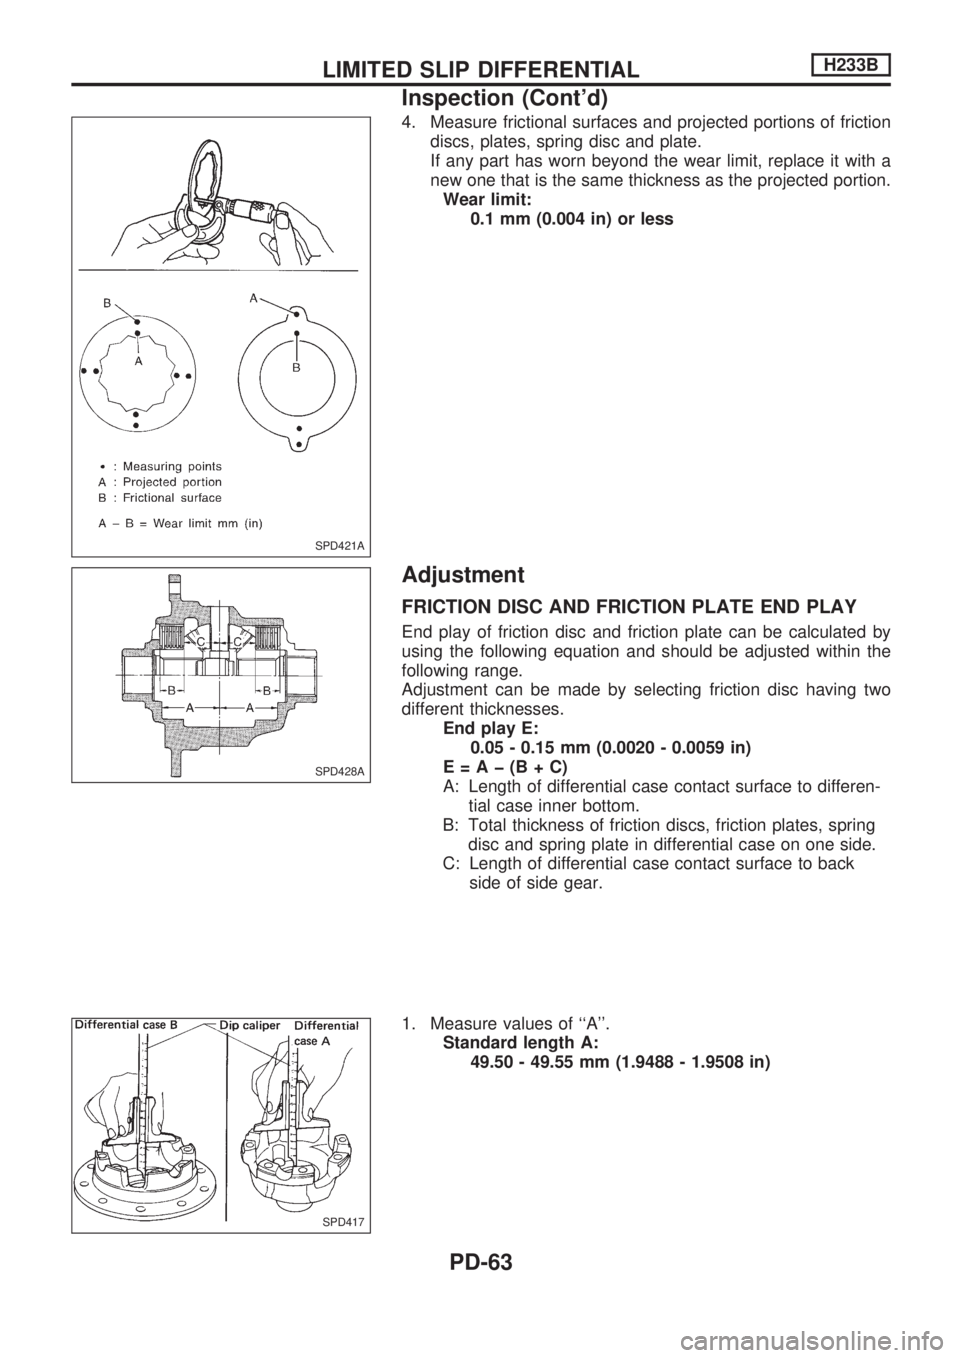
4. Measure frictional surfaces and projected portions of friction
discs, plates, spring disc and plate.
If any part has worn beyond the wear limit, replace it with a
new one that is the same thickness as the projected portion.
Wear limit:
0.1 mm (0.004 in) or less
Adjustment
FRICTION DISC AND FRICTION PLATE END PLAY
End play of friction disc and friction plate can be calculated by
using the following equation and should be adjusted within the
following range.
Adjustment can be made by selecting friction disc having two
different thicknesses.
End play E:
0.05 - 0.15 mm (0.0020 - 0.0059 in)
E=Aþ(B+C)
A: Length of differential case contact surface to differen-
tial case inner bottom.
B: Total thickness of friction discs, friction plates, spring
disc and spring plate in differential case on one side.
C: Length of differential case contact surface to back
side of side gear.
1. Measure values of ``A''.
Standard length A:
49.50 - 49.55 mm (1.9488 - 1.9508 in)
SPD421A
SPD428A
SPD417
LIMITED SLIP DIFFERENTIALH233B
Inspection (Cont'd)
PD-63
Page 1145 of 1659
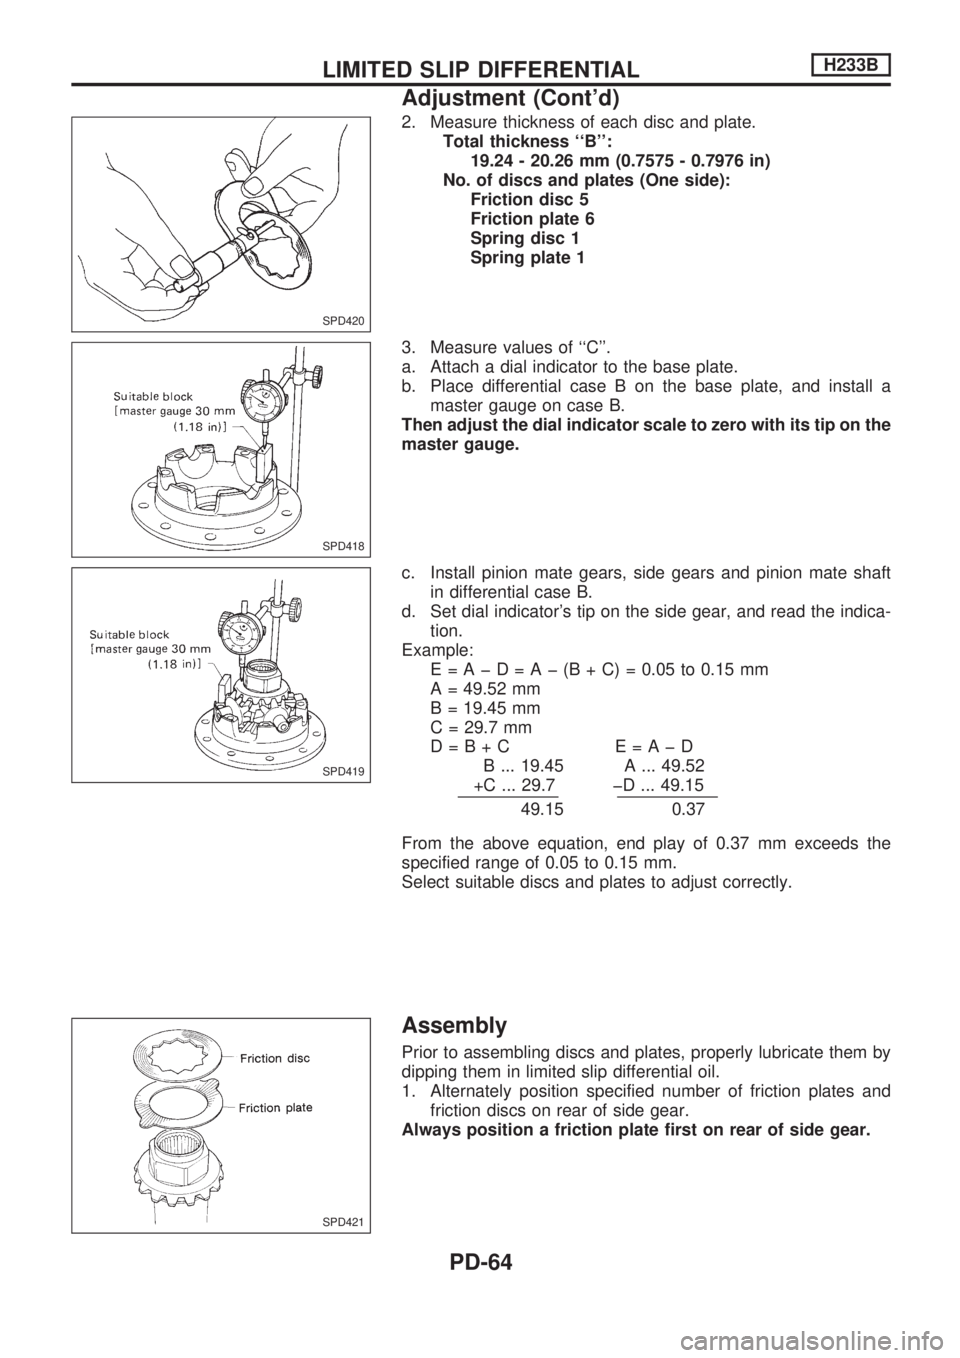
2. Measure thickness of each disc and plate.
Total thickness ``B'':
19.24 - 20.26 mm (0.7575 - 0.7976 in)
No. of discs and plates (One side):
Friction disc 5
Friction plate 6
Spring disc 1
Spring plate 1
3. Measure values of ``C''.
a. Attach a dial indicator to the base plate.
b. Place differential case B on the base plate, and install a
master gauge on case B.
Then adjust the dial indicator scale to zero with its tip on the
master gauge.
c. Install pinion mate gears, side gears and pinion mate shaft
in differential case B.
d. Set dial indicator's tip on the side gear, and read the indica-
tion.
Example:
E=AþD=Aþ(B+C)=0.05 to 0.15 mm
A = 49.52 mm
B = 19.45 mm
C = 29.7 mm
D=B+C E=AþD
B ... 19.45 A ... 49.52
+C ... 29.7 þD ... 49.15
49.15 0.37
From the above equation, end play of 0.37 mm exceeds the
specified range of 0.05 to 0.15 mm.
Select suitable discs and plates to adjust correctly.
Assembly
Prior to assembling discs and plates, properly lubricate them by
dipping them in limited slip differential oil.
1. Alternately position specified number of friction plates and
friction discs on rear of side gear.
Always position a friction plate first on rear of side gear.
SPD420
SPD418
SPD419
SPD421
LIMITED SLIP DIFFERENTIALH233B
Adjustment (Cont'd)
PD-64
Page 1146 of 1659
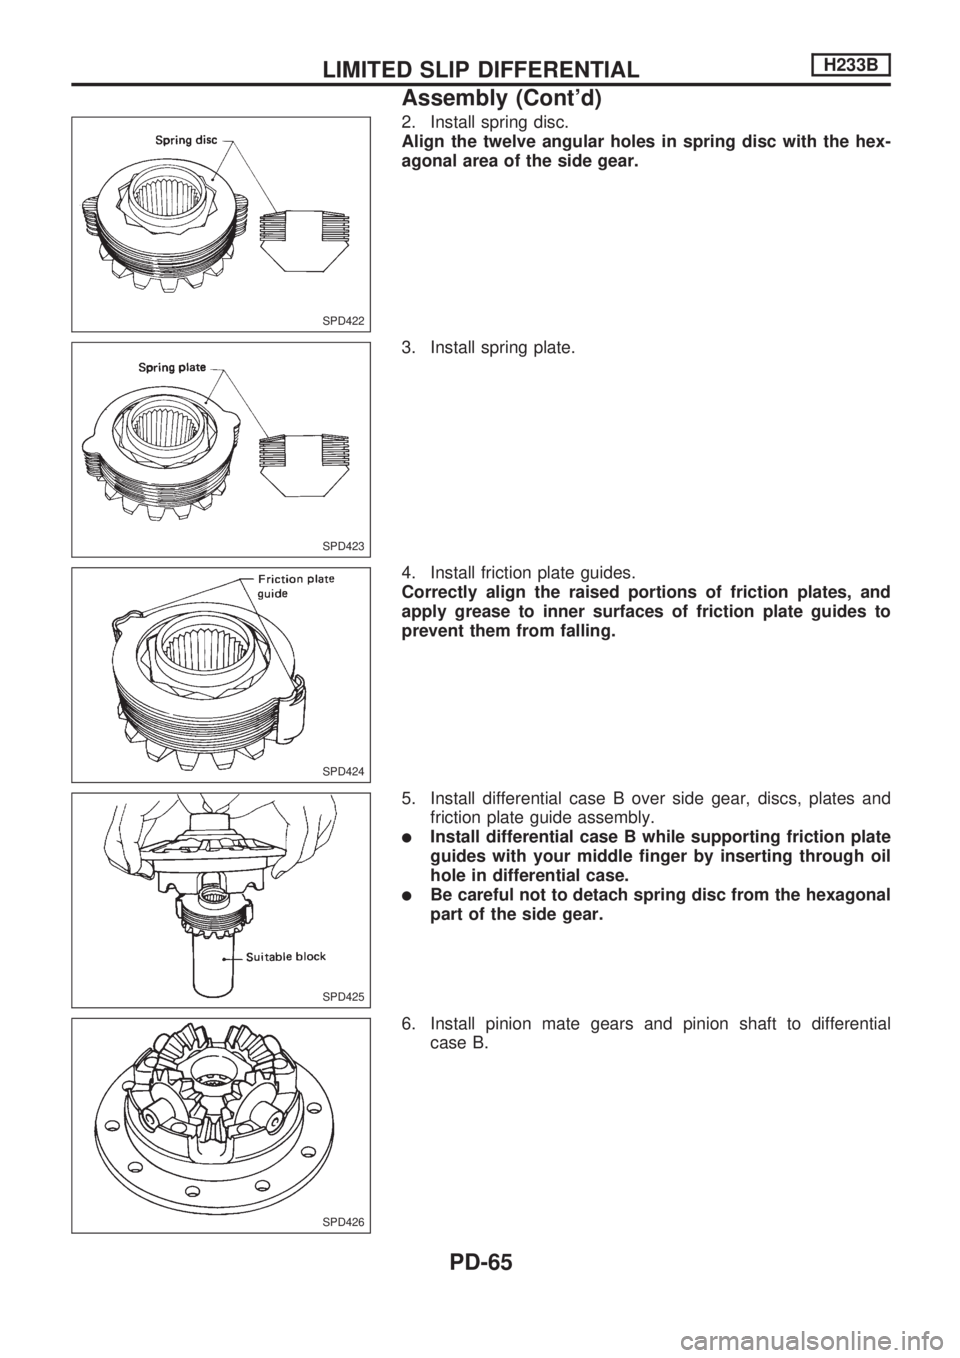
2. Install spring disc.
Align the twelve angular holes in spring disc with the hex-
agonal area of the side gear.
3. Install spring plate.
4. Install friction plate guides.
Correctly align the raised portions of friction plates, and
apply grease to inner surfaces of friction plate guides to
prevent them from falling.
5. Install differential case B over side gear, discs, plates and
friction plate guide assembly.
lInstall differential case B while supporting friction plate
guides with your middle finger by inserting through oil
hole in differential case.
lBe careful not to detach spring disc from the hexagonal
part of the side gear.
6. Install pinion mate gears and pinion shaft to differential
case B.
SPD422
SPD423
SPD424
SPD425
SPD426
LIMITED SLIP DIFFERENTIALH233B
Assembly (Cont'd)
PD-65
Page 1147 of 1659
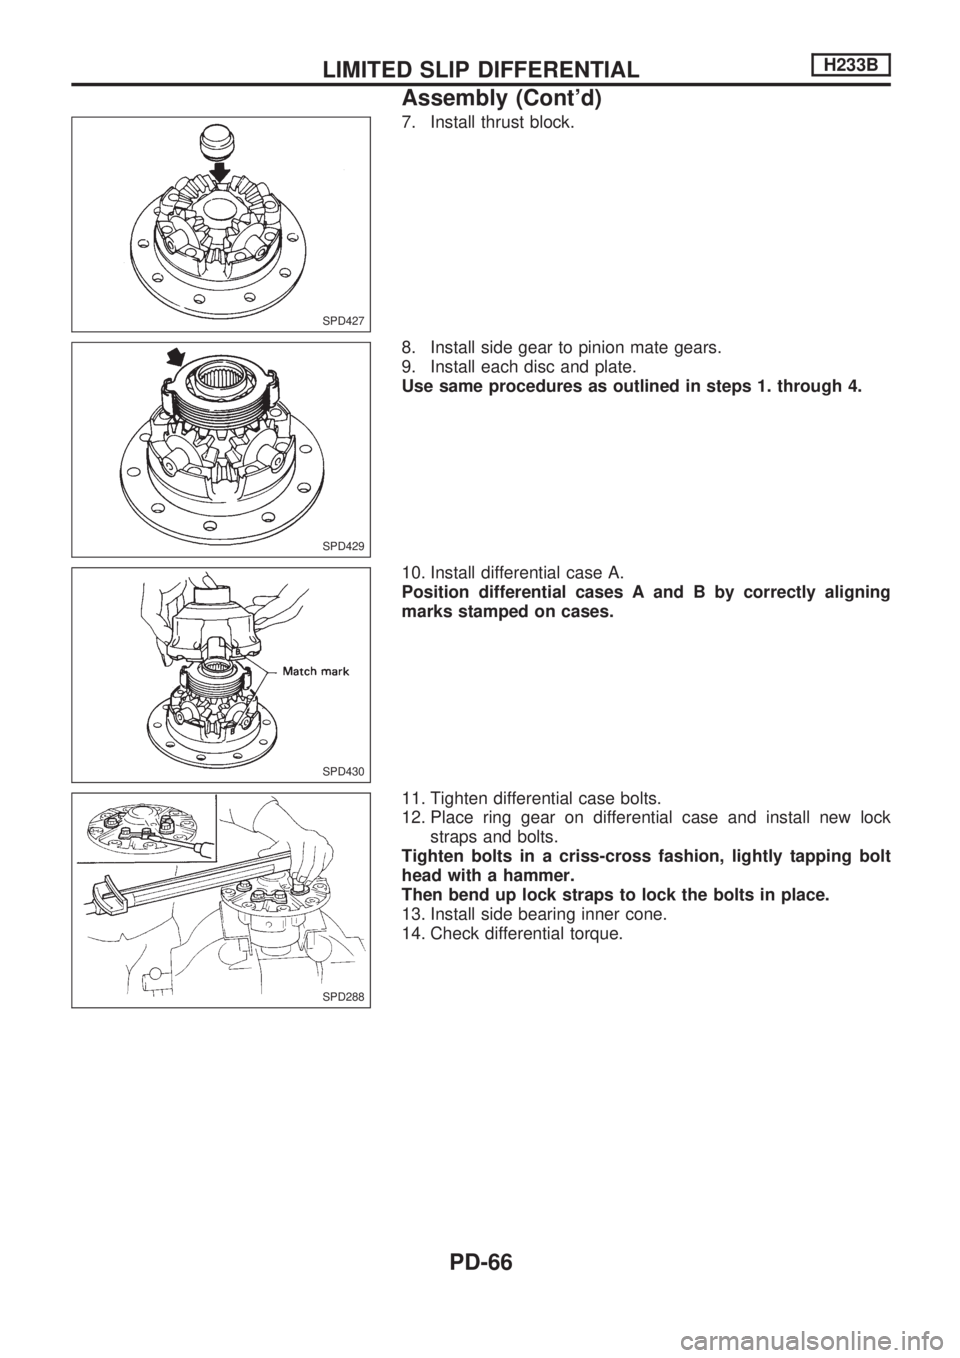
7. Install thrust block.
8. Install side gear to pinion mate gears.
9. Install each disc and plate.
Use same procedures as outlined in steps 1. through 4.
10. Install differential case A.
Position differential cases A and B by correctly aligning
marks stamped on cases.
11. Tighten differential case bolts.
12. Place ring gear on differential case and install new lock
straps and bolts.
Tighten bolts in a criss-cross fashion, lightly tapping bolt
head with a hammer.
Then bend up lock straps to lock the bolts in place.
13. Install side bearing inner cone.
14. Check differential torque.
SPD427
SPD429
SPD430
SPD288
LIMITED SLIP DIFFERENTIALH233B
Assembly (Cont'd)
PD-66
Page 1148 of 1659
For quiet and reliable final drive operation, the following five
adjustments must be made correctly:
1. Side bearing preload
2. Pinion gear height
3. Pinion bearing preload. Refer to ``ASSEMBLY'', PD-73.
4. Ring gear-to-pinion backlash. Refer to ``ASSEMBLY'',PD-74.
5. Ring and pinion gear tooth contact pattern
Drive Pinion Height
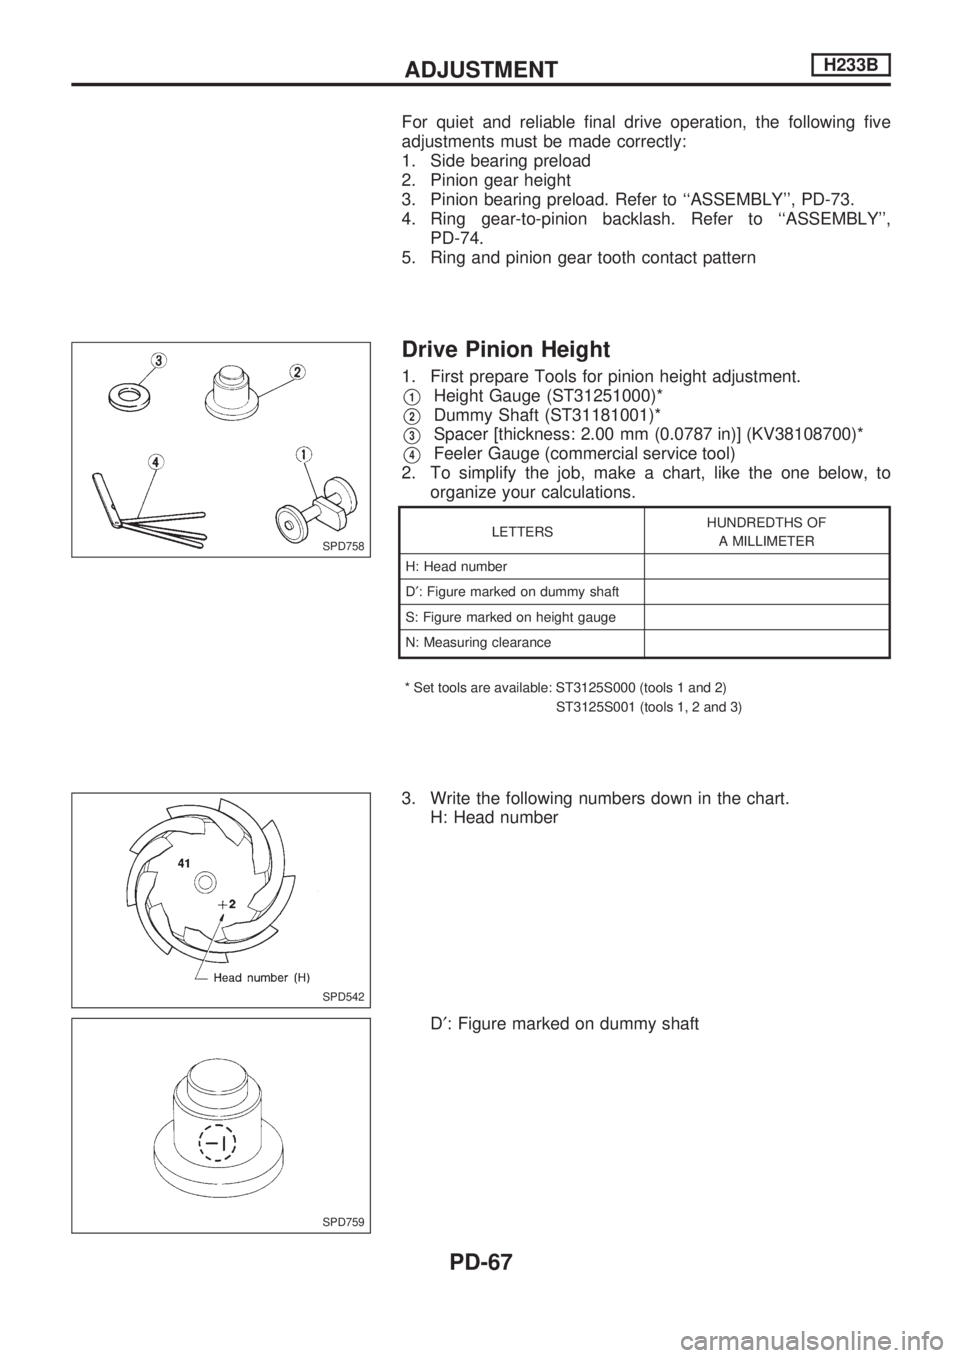
1.FirstprepareToolsforpinionheightadjustment.
V1HeightGauge(ST31251000)*
V2DummyShaft(ST31181001)*
V3Spacer[thickness:2.00mm(0.0787 in)] (KV38108700)*
V4FeelerGauge (commercial service tool)
2. To simplify the job, make a chart, like the one below, to organize your calculations.
LETTERS HUNDREDTHS OF
A MILLIMETER
H: Head number
D ¢: Figure marked on dummy shaft
S: Figure marked on height gauge
N:Measuringclearance
* Set tools are available: ST3125S000 (tools 1 and 2) ST3125S001 (tools 1, 2 and 3)
3. Write the following numbers down in the chart.H: Head number
D¢: Figure marked on dummy shaft
SPD758
SPD542
SPD759
ADJUSTMENTH233B
PD-67
Page 1149 of 1659
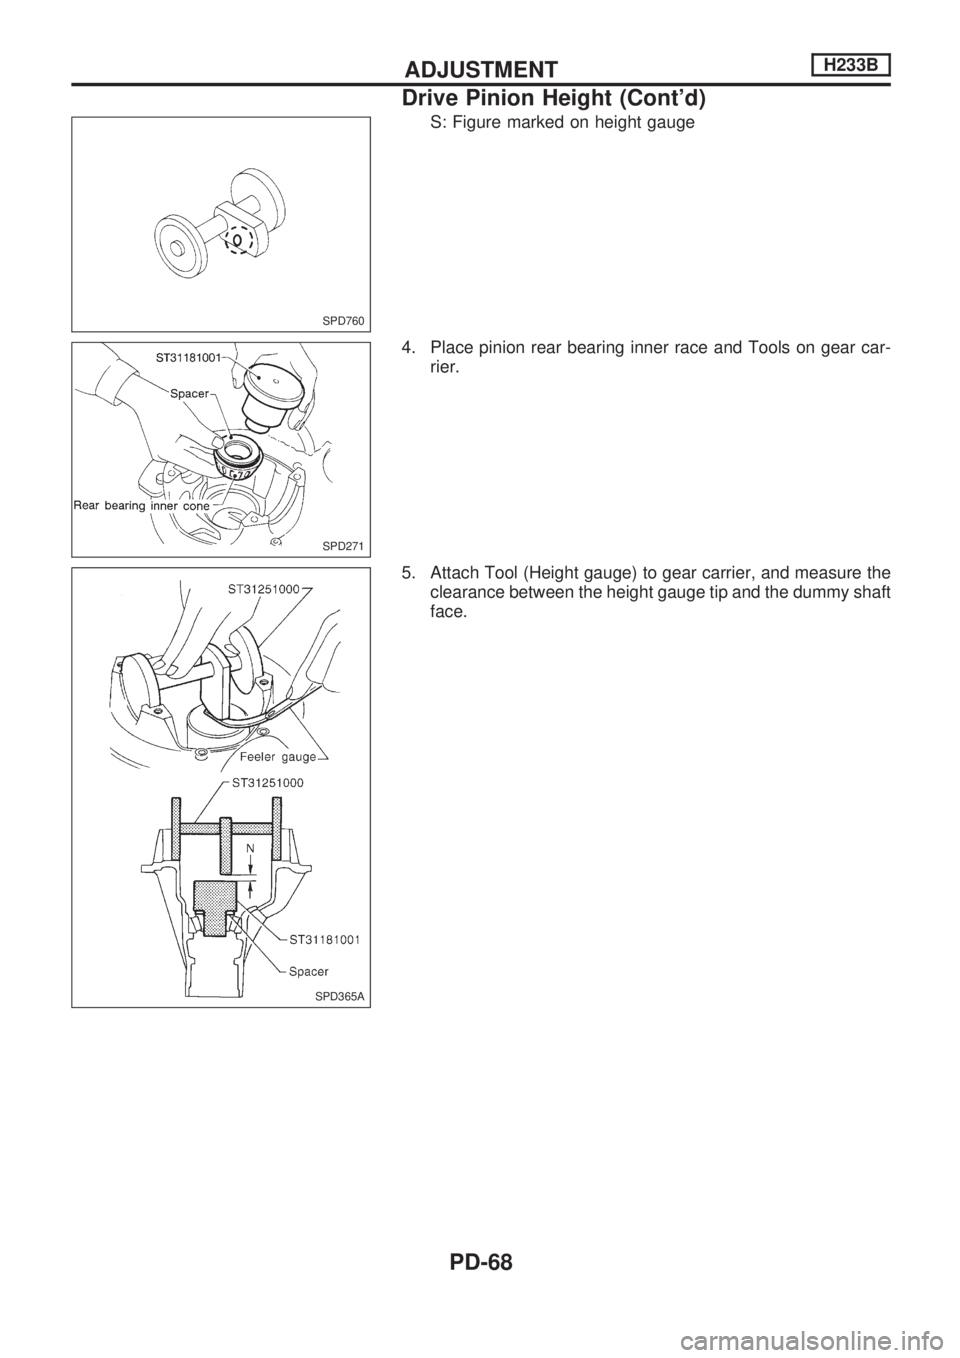
S: Figure marked on height gauge
4. Place pinion rear bearing inner race and Tools on gear car-
rier.
5. Attach Tool (Height gauge) to gear carrier, and measure the
clearance between the height gauge tip and the dummy shaft
face.
SPD760
SPD271
SPD365A
ADJUSTMENTH233B
Drive Pinion Height (Cont'd)
PD-68
Page 1150 of 1659
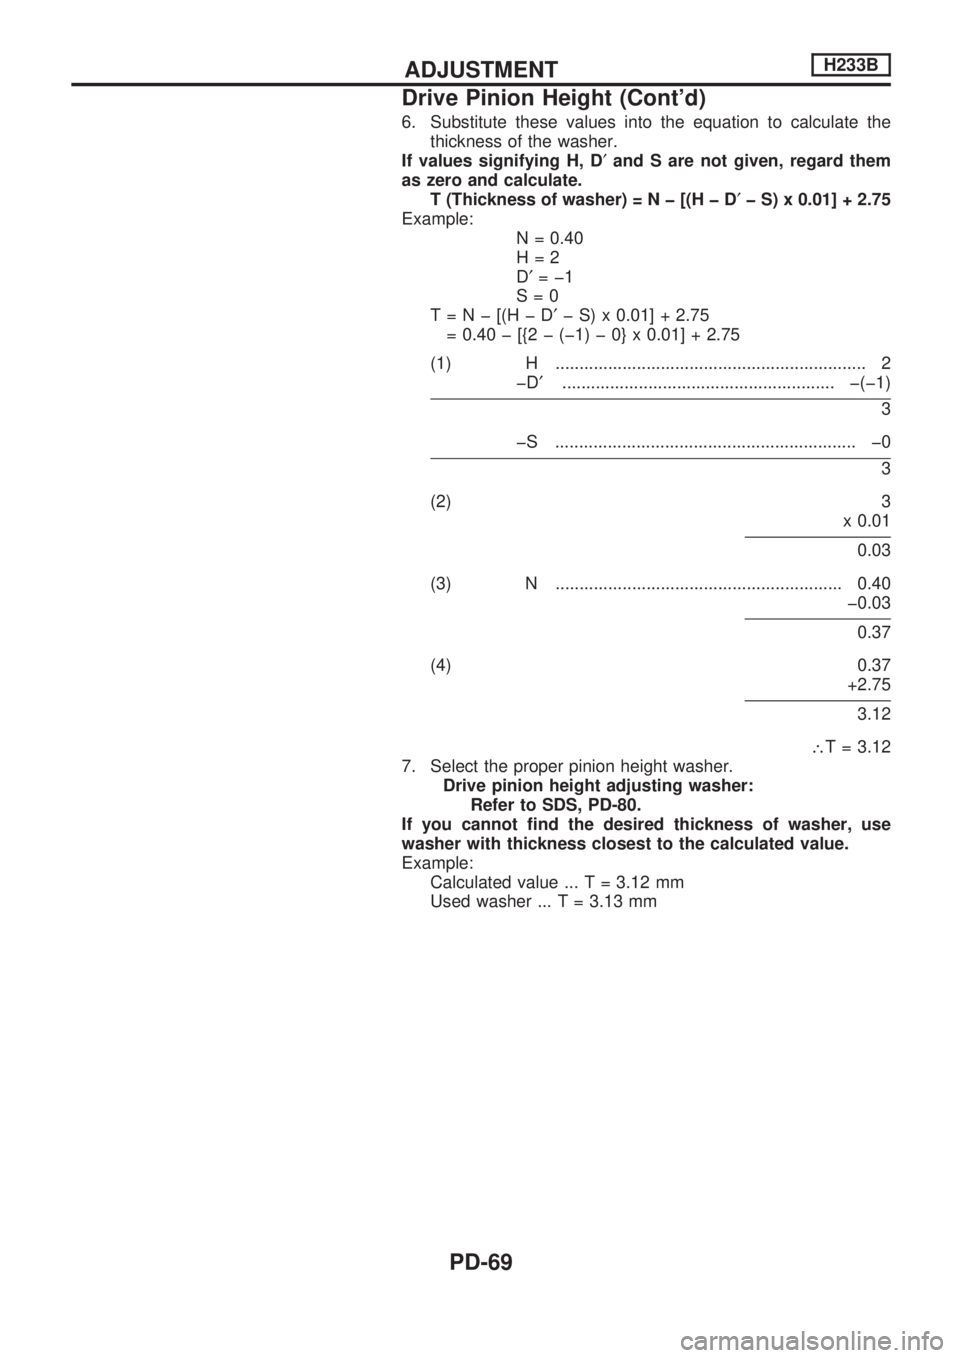
6. Substitute these values into the equation to calculate thethickness of the washer.
If values signifying H, D ¢and S are not given, regard them
as zero and calculate. T(Thicknessofwasher )=Nþ[(HþD¢þS)x0.01]+2.75
Example: N=0.40
H=2
D¢=þ1
S=0
T=Nþ[(HþD ¢þS)x0.01]+2.75
=0.40þ[{2þ(þ1)þ0}x0.01]+2.75
(1) H ................................................................. 2 þD¢ ......................................................... þ(þ1)
3
þS ............................................................... þ0
3
(2) 3 x 0.01
0.03
(3)N............................................................0.40 þ0.03
0.37
(4)0.37 +2.75
3.12
\ T=3.12
7. Select the proper pinion height washer. Drive pinion height adjusting washer:Refer to SDS, PD-80.
If you cannot find the desired thickness of washer, use
washer with thickness closest to the calculated value.
Example: Calculatedvalue.. .T=3.12mm
Usedwasher.. .T=3.13mm
ADJUSTMENTH233B
Drive Pinion Height (Cont'd)
PD-69