NISSAN PICK-UP 1998 Repair Manual
Manufacturer: NISSAN, Model Year: 1998, Model line: PICK-UP, Model: NISSAN PICK-UP 1998Pages: 1659, PDF Size: 53.39 MB
Page 1651 of 1659
General Specifications
Engine model TD25
Cylinder arrangementIn-line
Number of cylinders 4
Valve arrangement OHV
Bore x stroke mm (in)92.9 x 92.0
(3.657 x 3.622)
Displacement cm
3(cu in) 2,494 (152.18)
Firing order 1-3-4-2
Number of
piston ringsCompression 2
Oil 1
Number of main bearings 5
Inspection and Adjustment
COMPRESSION PRESSURE
Unit: kPa (bar, kg/cm2, psi)/rpm
Standard 2,942 (29.4, 30, 427)/200
Minimum 2,452 (24.5, 25, 356)/200
Differential limit between cylinders 294 (2.9, 3, 43)/200
CYLINDER HEAD
Unit: mm (in)
Standard Limit
Head surface distortionLess than
0.07 (0.0028)0.2 (0.008)
Nominal cylinder head height 89.9 - 90.1 (3.539 - 3.547)
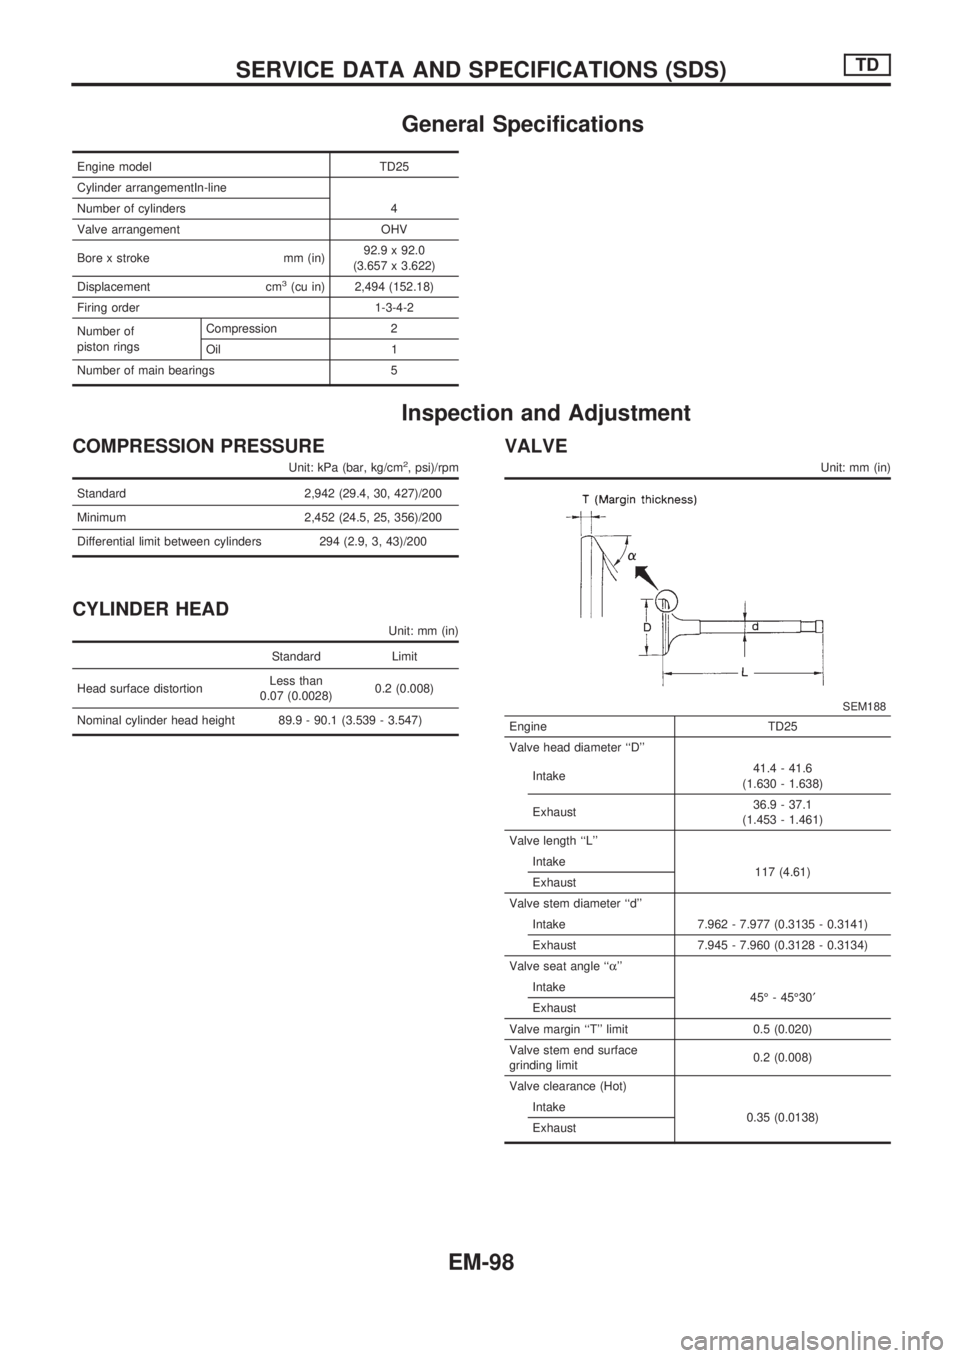
VALVE
Unit: mm (in)
SEM188
Engine TD25
Valve head diameter ``D''
Intake41.4 - 41.6
(1.630 - 1.638)
Exhaust36.9 - 37.1
(1.453 - 1.461)
Valve length ``L''
Intake
117 (4.61)
Exhaust
Valve stem diameter ``d''
Intake 7.962 - 7.977 (0.3135 - 0.3141)
Exhaust 7.945 - 7.960 (0.3128 - 0.3134)
Valve seat angle ``a''
Intake
45É - 45É30¢
Exhaust
Valve margin ``T'' limit 0.5 (0.020)
Valve stem end surface
grinding limit0.2 (0.008)
Valve clearance (Hot)
Intake
0.35 (0.0138)
Exhaust
SERVICE DATA AND SPECIFICATIONS (SDS)TD
EM-98
Page 1652 of 1659
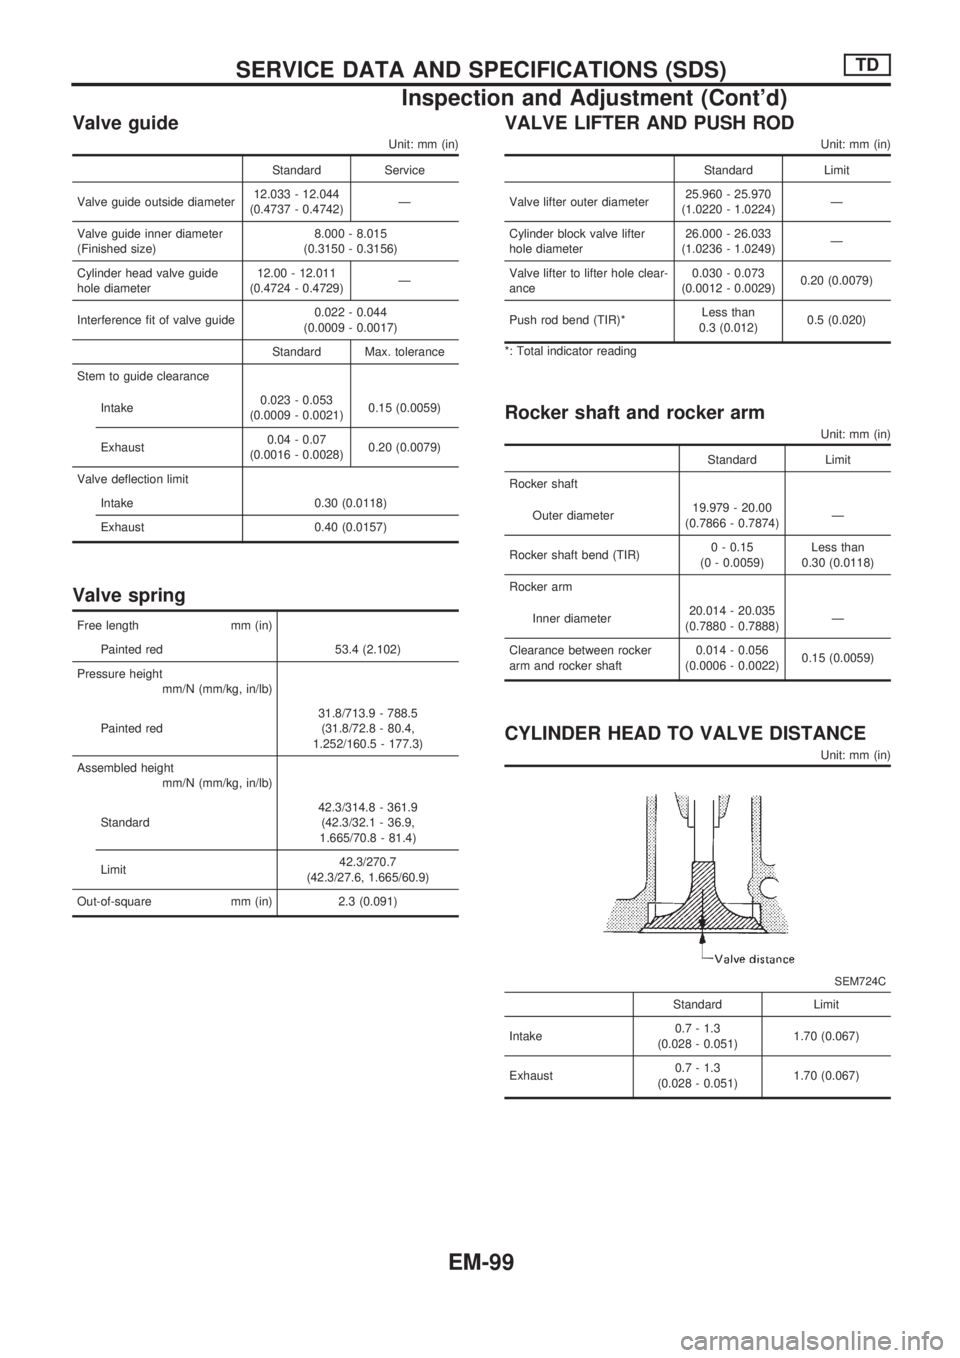
Valve guide
Unit: mm (in)
Standard Service
Valve guide outside diameter12.033 - 12.044
(0.4737 - 0.4742)Ð
Valve guide inner diameter
(Finished size)8.000 - 8.015
(0.3150 - 0.3156)
Cylinder head valve guide
hole diameter12.00 - 12.011
(0.4724 - 0.4729)Ð
Interference fit of valve guide0.022 - 0.044
(0.0009 - 0.0017)
Standard Max. tolerance
Stem to guide clearance
Intake0.023 - 0.053
(0.0009 - 0.0021)0.15 (0.0059)
Exhaust0.04 - 0.07
(0.0016 - 0.0028)0.20 (0.0079)
Valve deflection limit
Intake 0.30 (0.0118)
Exhaust 0.40 (0.0157)
Valve spring
Free length mm (in)
Painted red 53.4 (2.102)
Pressure height
mm/N (mm/kg, in/lb)
Painted red31.8/713.9 - 788.5
(31.8/72.8 - 80.4,
1.252/160.5 - 177.3)
Assembled height
mm/N (mm/kg, in/lb)
Standard42.3/314.8 - 361.9
(42.3/32.1 - 36.9,
1.665/70.8 - 81.4)
Limit42.3/270.7
(42.3/27.6, 1.665/60.9)
Out-of-square mm (in) 2.3 (0.091)
VALVE LIFTER AND PUSH ROD
Unit: mm (in)
Standard Limit
Valve lifter outer diameter25.960 - 25.970
(1.0220 - 1.0224)Ð
Cylinder block valve lifter
hole diameter26.000 - 26.033
(1.0236 - 1.0249)Ð
Valve lifter to lifter hole clear-
ance0.030 - 0.073
(0.0012 - 0.0029)0.20 (0.0079)
Push rod bend (TIR)*Less than
0.3 (0.012)0.5 (0.020)
*: Total indicator reading
Rocker shaft and rocker arm
Unit: mm (in)
Standard Limit
Rocker shaft
Outer diameter19.979 - 20.00
(0.7866 - 0.7874)Ð
Rocker shaft bend (TIR)0 - 0.15
(0 - 0.0059)Less than
0.30 (0.0118)
Rocker arm
Inner diameter20.014 - 20.035
(0.7880 - 0.7888)Ð
Clearance between rocker
arm and rocker shaft0.014 - 0.056
(0.0006 - 0.0022)0.15 (0.0059)
CYLINDER HEAD TO VALVE DISTANCE
Unit: mm (in)
SEM724C
Standard Limit
Intake0.7 - 1.3
(0.028 - 0.051)1.70 (0.067)
Exhaust0.7 - 1.3
(0.028 - 0.051)1.70 (0.067)
SERVICE DATA AND SPECIFICATIONS (SDS)TD
Inspection and Adjustment (Cont'd)
EM-99
Page 1653 of 1659
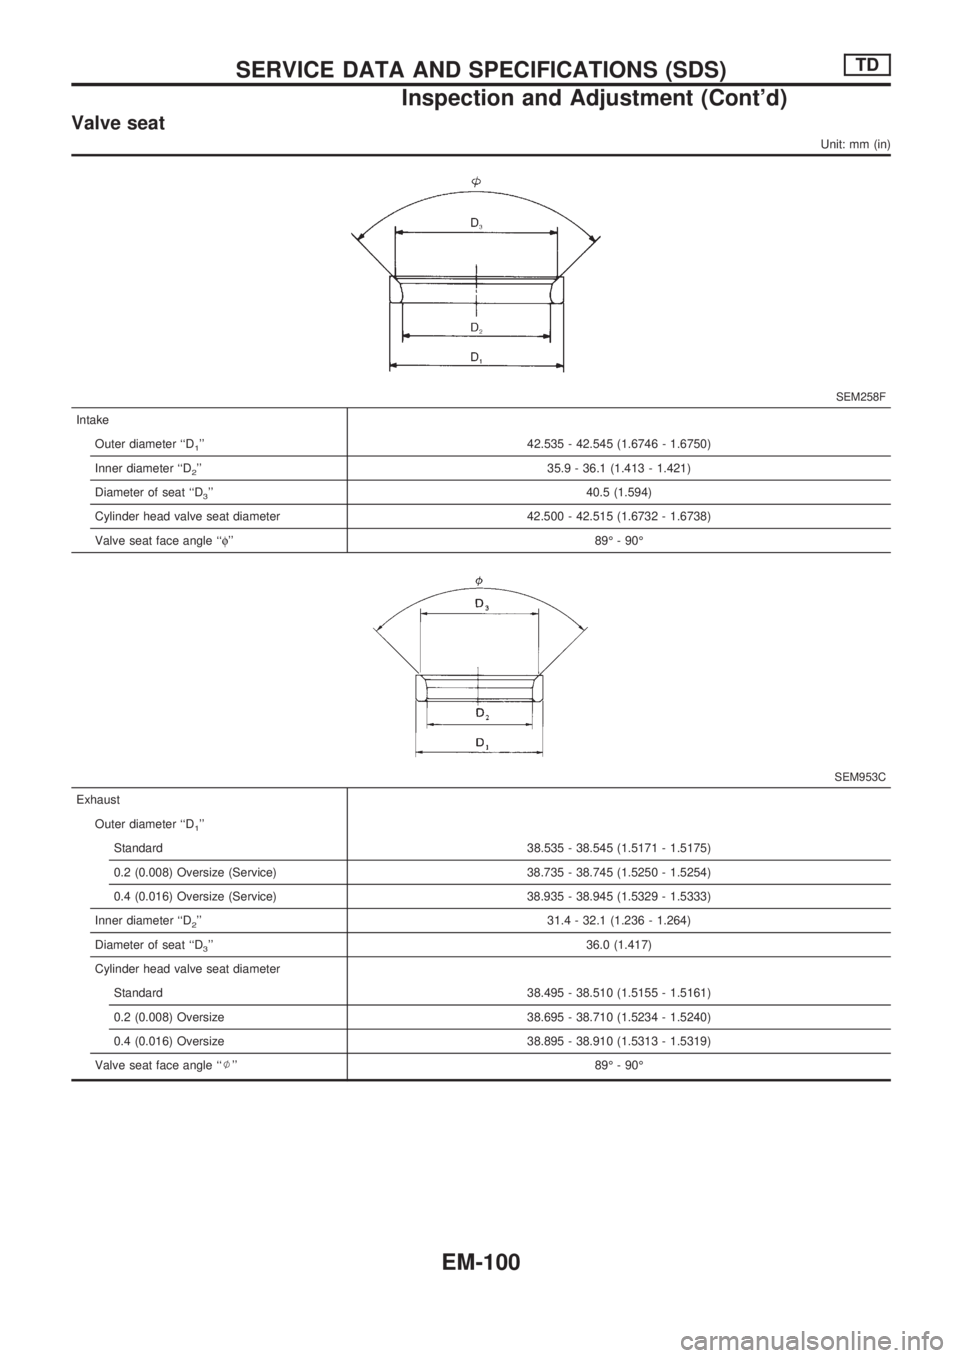
Valve seat
Unit: mm (in)
SEM258F
Intake
Outer diameter ``D
1'' 42.535 - 42.545 (1.6746 - 1.6750)
Inner diameter ``D
2'' 35.9 - 36.1 (1.413 - 1.421)
Diameter of seat ``D
3'' 40.5 (1.594)
Cylinder head valve seat diameter 42.500 - 42.515 (1.6732 - 1.6738)
Valve seat face angle ``f'' 89É - 90É
SEM953C
Exhaust
Outer diameter ``D
1''
Standard 38.535 - 38.545 (1.5171 - 1.5175)
0.2 (0.008) Oversize (Service) 38.735 - 38.745 (1.5250 - 1.5254)
0.4 (0.016) Oversize (Service) 38.935 - 38.945 (1.5329 - 1.5333)
Inner diameter ``D
2'' 31.4 - 32.1 (1.236 - 1.264)
Diameter of seat ``D
3'' 36.0 (1.417)
Cylinder head valve seat diameter
Standard 38.495 - 38.510 (1.5155 - 1.5161)
0.2 (0.008) Oversize 38.695 - 38.710 (1.5234 - 1.5240)
0.4 (0.016) Oversize 38.895 - 38.910 (1.5313 - 1.5319)
Valve seat face angle ``J'' 89É - 90É
SERVICE DATA AND SPECIFICATIONS (SDS)TD
Inspection and Adjustment (Cont'd)
EM-100
Page 1654 of 1659
![NISSAN PICK-UP 1998 Repair Manual CAMSHAFT AND CAMSHAFT BEARING
Unit: mm (in)
Standard Limit
Camshaft journal to bush-
ing clearance
[Oil clearance]0.020 - 0.109
(0.0008 - 0.0043)0.15 (0.0059)
Camshaft journal diam-
eter
Front50.721 - NISSAN PICK-UP 1998 Repair Manual CAMSHAFT AND CAMSHAFT BEARING
Unit: mm (in)
Standard Limit
Camshaft journal to bush-
ing clearance
[Oil clearance]0.020 - 0.109
(0.0008 - 0.0043)0.15 (0.0059)
Camshaft journal diam-
eter
Front50.721 -](/img/5/57374/w960_57374-1653.png)
CAMSHAFT AND CAMSHAFT BEARING
Unit: mm (in)
Standard Limit
Camshaft journal to bush-
ing clearance
[Oil clearance]0.020 - 0.109
(0.0008 - 0.0043)0.15 (0.0059)
Camshaft journal diam-
eter
Front50.721 - 50.740
(1.9969 - 1.9976)Ð
2nd50.521 - 50.540
(1.9890 - 1.9898)Ð
3rd50.321 - 50.340
(1.9811 - 1.9819)Ð
4th50.121 - 50.140
(1.9733 - 1.9740)Ð
Rear49.921 - 49.940
(1.9654 - 1.9661)Ð
Camshaft bend (Total
indicator reading)Less than
0.02 (0.0008)0.06 (0.0024)
Camshaft end play0.08 - 0.28
(0.0031 - 0.0110)0.50 (0.0197)
EM671
Standard Limit
Cam height ``A''
Intake & Exhaust41.88 - 41.92
(1.6488 - 1.6504)41.40 (1.6299)
SERVICE DATA AND SPECIFICATIONS (SDS)TD
Inspection and Adjustment (Cont'd)
EM-101
Page 1655 of 1659
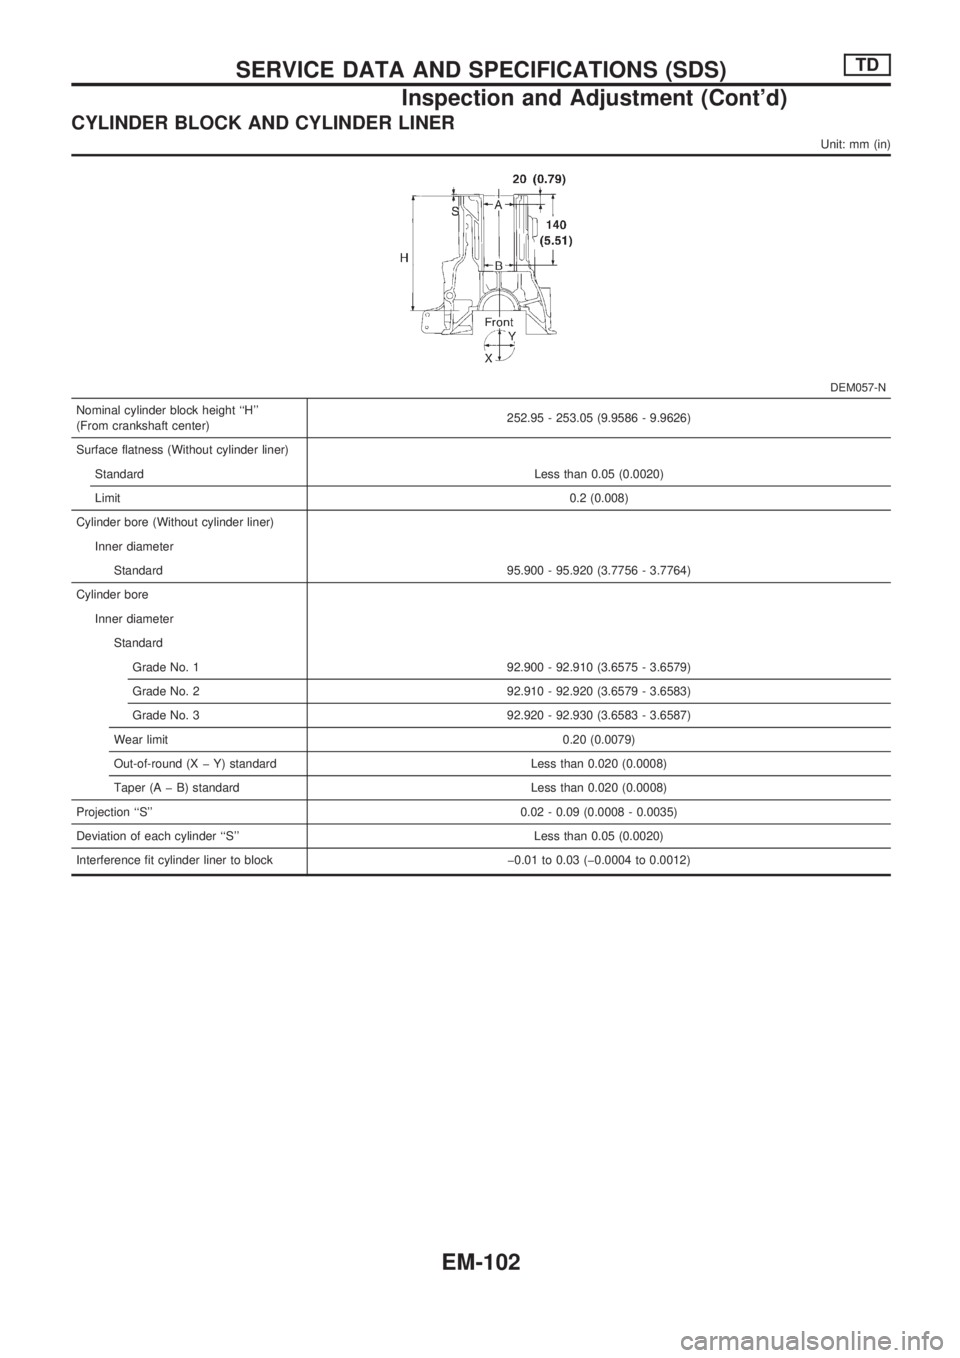
CYLINDER BLOCK AND CYLINDER LINER
Unit: mm (in)
DEM057-N
Nominal cylinder block height ``H''
(From crankshaft center)252.95 - 253.05 (9.9586 - 9.9626)
Surface flatness (Without cylinder liner)
StandardLess than 0.05 (0.0020)
Limit0.2 (0.008)
Cylinder bore (Without cylinder liner)
Inner diameter
Standard 95.900 - 95.920 (3.7756 - 3.7764)
Cylinder bore
Inner diameter
Standard
Grade No. 1 92.900 - 92.910 (3.6575 - 3.6579)
Grade No. 2 92.910 - 92.920 (3.6579 - 3.6583)
Grade No. 3 92.920 - 92.930 (3.6583 - 3.6587)
Wear limit0.20 (0.0079)
Out-of-round (X þ Y) standard Less than 0.020 (0.0008)
Taper (A þ B) standard Less than 0.020 (0.0008)
Projection ``S'' 0.02 - 0.09 (0.0008 - 0.0035)
Deviation of each cylinder ``S'' Less than 0.05 (0.0020)
Interference fit cylinder liner to block þ0.01 to 0.03 (þ0.0004 to 0.0012)
SERVICE DATA AND SPECIFICATIONS (SDS)TD
Inspection and Adjustment (Cont'd)
EM-102
Page 1656 of 1659
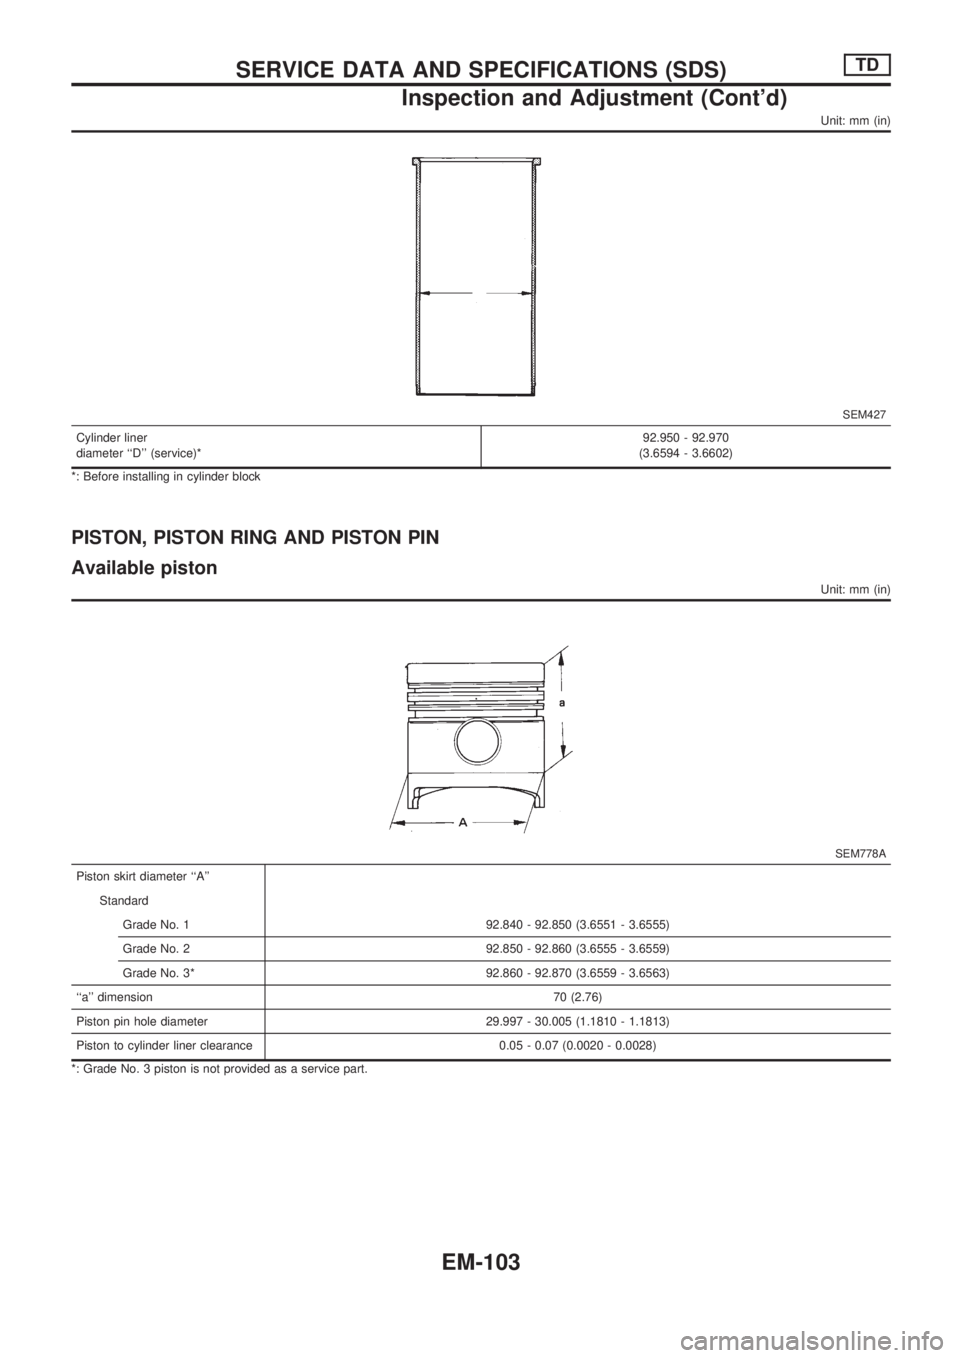
Unit: mm (in)
SEM427
Cylinder liner
diameter ``D'' (service)*92.950 - 92.970
(3.6594 - 3.6602)
*: Before installing in cylinder block
PISTON, PISTON RING AND PISTON PIN
Available piston
Unit: mm (in)
SEM778A
Piston skirt diameter ``A''
Standard
Grade No. 1 92.840 - 92.850 (3.6551 - 3.6555)
Grade No. 2 92.850 - 92.860 (3.6555 - 3.6559)
Grade No. 3* 92.860 - 92.870 (3.6559 - 3.6563)
``a'' dimension70 (2.76)
Piston pin hole diameter 29.997 - 30.005 (1.1810 - 1.1813)
Piston to cylinder liner clearance 0.05 - 0.07 (0.0020 - 0.0028)
*: Grade No. 3 piston is not provided as a service part.
SERVICE DATA AND SPECIFICATIONS (SDS)TD
Inspection and Adjustment (Cont'd)
EM-103
Page 1657 of 1659
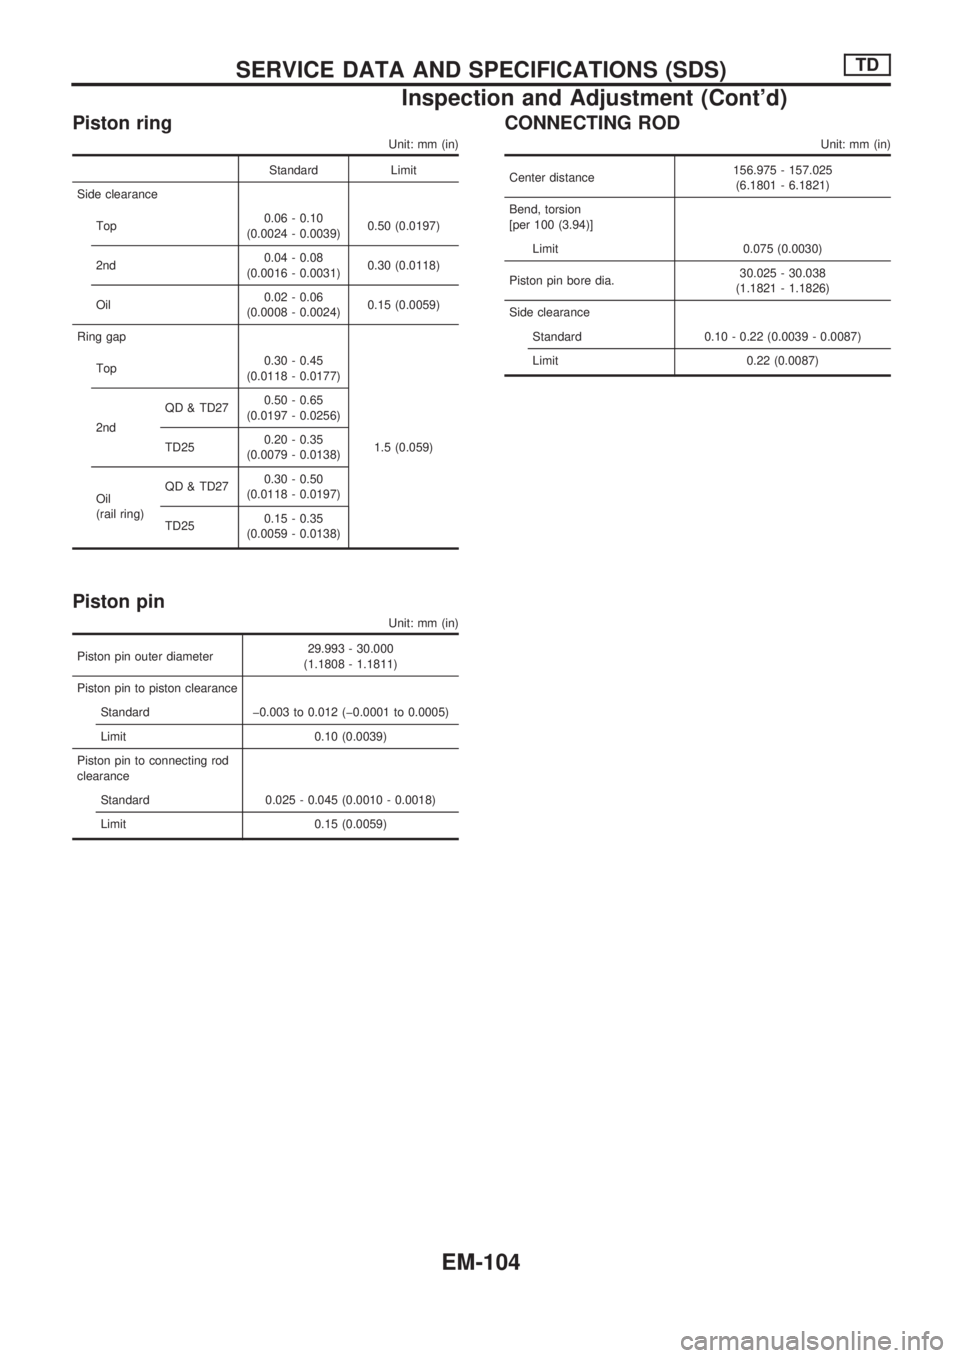
Piston ring
Unit: mm (in)
Standard Limit
Side clearance
Top0.06 - 0.10
(0.0024 - 0.0039)0.50 (0.0197)
2nd0.04 - 0.08
(0.0016 - 0.0031)0.30 (0.0118)
Oil0.02 - 0.06
(0.0008 - 0.0024)0.15 (0.0059)
Ring gap
Top0.30 - 0.45
(0.0118 - 0.0177)
1.5 (0.059) 2ndQD & TD270.50 - 0.65
(0.0197 - 0.0256)
TD250.20 - 0.35
(0.0079 - 0.0138)
Oil
(rail ring)QD & TD270.30 - 0.50
(0.0118 - 0.0197)
TD250.15 - 0.35
(0.0059 - 0.0138)
Piston pin
Unit: mm (in)
Piston pin outer diameter29.993 - 30.000
(1.1808 - 1.1811)
Piston pin to piston clearance
Standard þ0.003 to 0.012 (þ0.0001 to 0.0005)
Limit 0.10 (0.0039)
Piston pin to connecting rod
clearance
Standard 0.025 - 0.045 (0.0010 - 0.0018)
Limit 0.15 (0.0059)
CONNECTING ROD
Unit: mm (in)
Center distance156.975 - 157.025
(6.1801 - 6.1821)
Bend, torsion
[per 100 (3.94)]
Limit 0.075 (0.0030)
Piston pin bore dia.30.025 - 30.038
(1.1821 - 1.1826)
Side clearance
Standard 0.10 - 0.22 (0.0039 - 0.0087)
Limit 0.22 (0.0087)
SERVICE DATA AND SPECIFICATIONS (SDS)TD
Inspection and Adjustment (Cont'd)
EM-104
Page 1658 of 1659
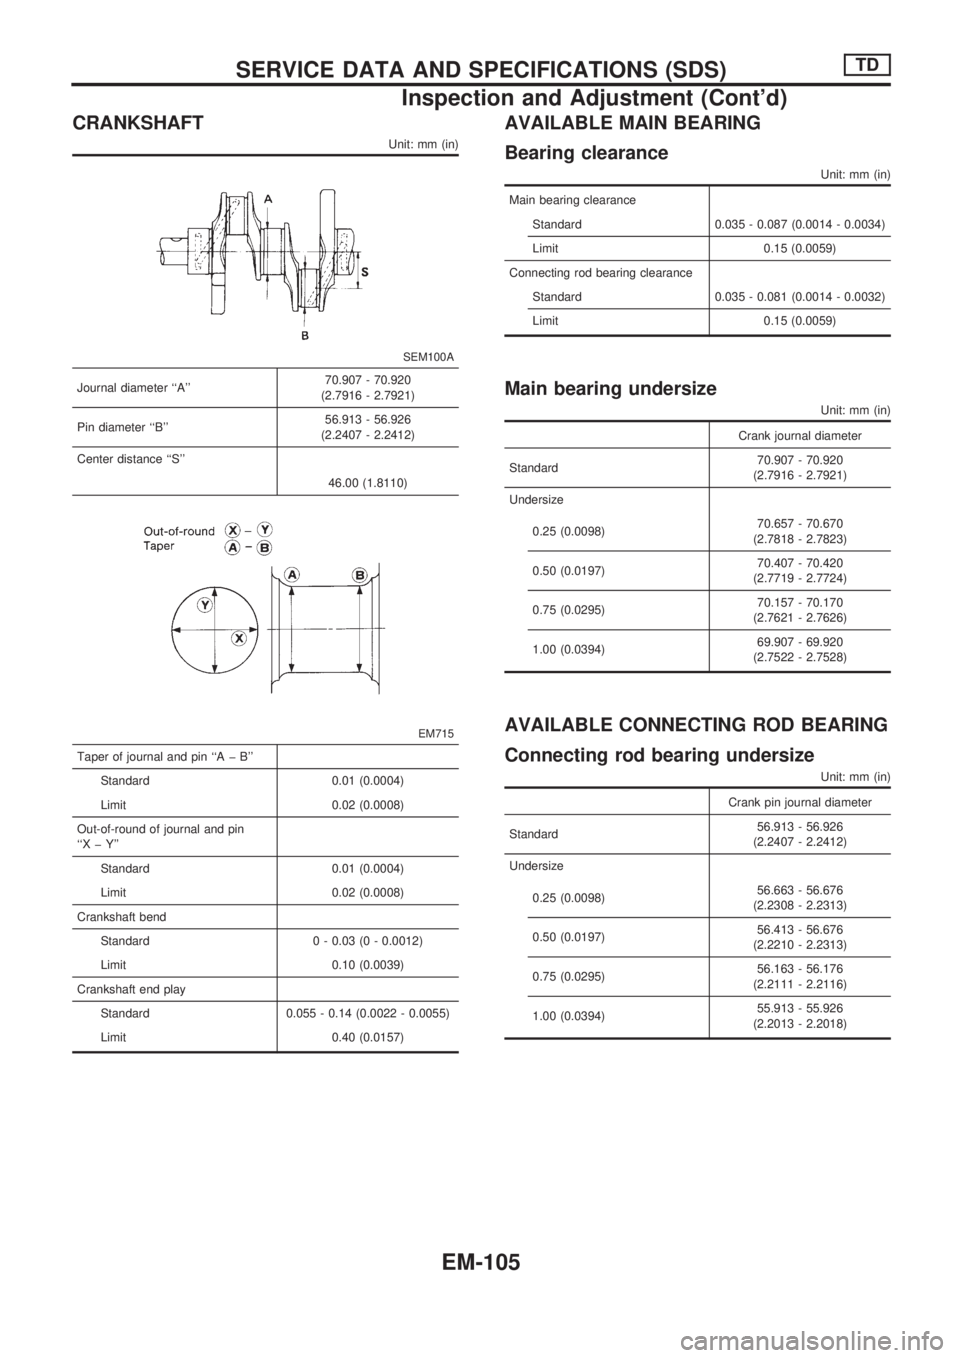
CRANKSHAFT
Unit: mm (in)
SEM100A
Journal diameter ``A''70.907 - 70.920
(2.7916 - 2.7921)
Pin diameter ``B''56.913 - 56.926
(2.2407 - 2.2412)
Center distance ``S''
46.00 (1.8110)
EM715
Taper of journal and pin ``A þ B''
Standard 0.01 (0.0004)
Limit 0.02 (0.0008)
Out-of-round of journal and pin
``X þ Y''
Standard 0.01 (0.0004)
Limit 0.02 (0.0008)
Crankshaft bend
Standard 0 - 0.03 (0 - 0.0012)
Limit 0.10 (0.0039)
Crankshaft end play
Standard 0.055 - 0.14 (0.0022 - 0.0055)
Limit 0.40 (0.0157)
AVAILABLE MAIN BEARING
Bearing clearance
Unit: mm (in)
Main bearing clearance
Standard 0.035 - 0.087 (0.0014 - 0.0034)
Limit 0.15 (0.0059)
Connecting rod bearing clearance
Standard 0.035 - 0.081 (0.0014 - 0.0032)
Limit 0.15 (0.0059)
Main bearing undersize
Unit: mm (in)
Crank journal diameter
Standard70.907 - 70.920
(2.7916 - 2.7921)
Undersize
0.25 (0.0098)70.657 - 70.670
(2.7818 - 2.7823)
0.50 (0.0197)70.407 - 70.420
(2.7719 - 2.7724)
0.75 (0.0295)70.157 - 70.170
(2.7621 - 2.7626)
1.00 (0.0394)69.907 - 69.920
(2.7522 - 2.7528)
AVAILABLE CONNECTING ROD BEARING
Connecting rod bearing undersize
Unit: mm (in)
Crank pin journal diameter
Standard56.913 - 56.926
(2.2407 - 2.2412)
Undersize
0.25 (0.0098)56.663 - 56.676
(2.2308 - 2.2313)
0.50 (0.0197)56.413 - 56.676
(2.2210 - 2.2313)
0.75 (0.0295)56.163 - 56.176
(2.2111 - 2.2116)
1.00 (0.0394)55.913 - 55.926
(2.2013 - 2.2018)
SERVICE DATA AND SPECIFICATIONS (SDS)TD
Inspection and Adjustment (Cont'd)
EM-105
Page 1659 of 1659
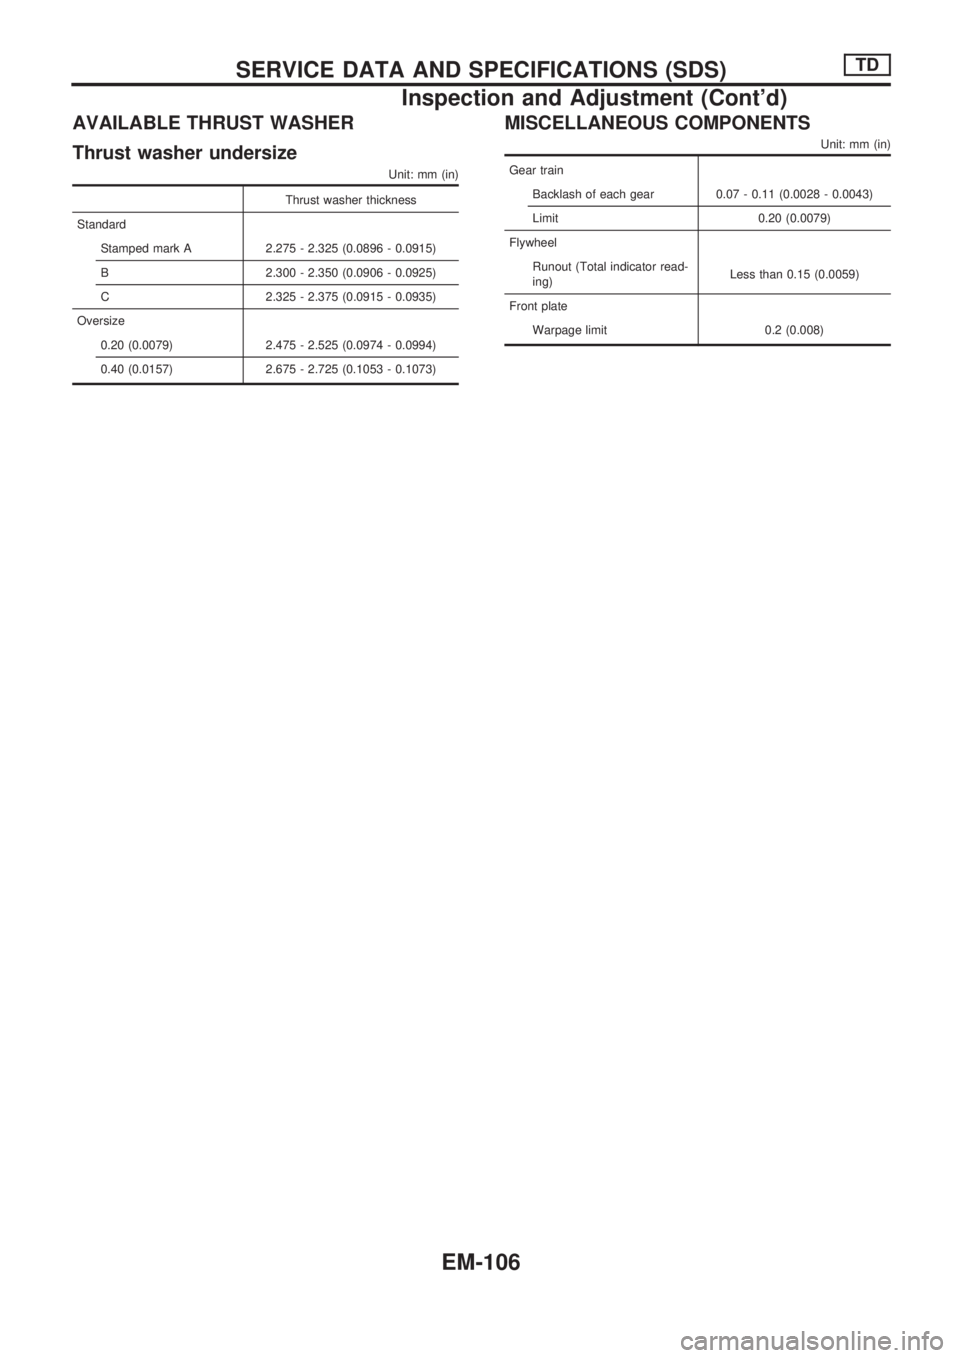
AVAILABLE THRUST WASHER
Thrust washer undersize
Unit: mm (in)
Thrust washer thickness
Standard
Stamped mark A 2.275 - 2.325 (0.0896 - 0.0915)
B 2.300 - 2.350 (0.0906 - 0.0925)
C 2.325 - 2.375 (0.0915 - 0.0935)
Oversize
0.20 (0.0079) 2.475 - 2.525 (0.0974 - 0.0994)
0.40 (0.0157) 2.675 - 2.725 (0.1053 - 0.1073)
MISCELLANEOUS COMPONENTS
Unit: mm (in)
Gear train
Backlash of each gear 0.07 - 0.11 (0.0028 - 0.0043)
Limit 0.20 (0.0079)
Flywheel
Runout (Total indicator read-
ing)Less than 0.15 (0.0059)
Front plate
Warpage limit 0.2 (0.008)
SERVICE DATA AND SPECIFICATIONS (SDS)TD
Inspection and Adjustment (Cont'd)
EM-106